Mission Control Version 1.60 Release Notification
18 February 2022
A new version of Mission Control (version 1.60) will be released on the AppExchange on Friday 18th February 2022. This notification has been issued to existing Mission Control users. It contains an overview of the new features available with this release, along with instructions on how to upgrade to the new version.
This release includes a number of new features, along with some enhancements to existing functionality, including:
Let’s get stuck into the detail…
NOTE: Role Forecasting is being released as a beta feature. We welcome your feedback on this feature and will be working to finalise the functionality as part of the next release. It will be GA in the Q2 ’22. During the beta period, you may experience known limitations or identify bugs. Please submit these to [email protected].
The Resource Forecasting beta comprises of 3 main features:
Role Forecasting
The Role Forecasting feature provides the ability to soft-book resources at an Opportunity and/or Project level.
Role Availability
The Role Availability feature provides the ability to track how many days per week, hours per day, and billable target % values each Role will be available for during specific periods of time.
Hours Distributor
The Hours Distributor previously available on the Resource Assignment Wizard for individual Actions has been extended to work across Projects, Milestones, Actions, Roles and Holidays.
A list of the known issues will be available here: https://aprika.secure.force.com/missioncontrol?pid=0GiOWeXutVGdTJYd2squMA
Role Forecasting encompasses a range of features that provide the ability to soft book resources based on potential Opportunities and/or live Projects without knowing the granular detail of all the individual Actions that will be needed.
There are 3 Custom Objects that are core to using the Role Forecasting features, these include:
From either an Opportunity or a Project, a User will be able to access the Role Forecast Component. This page enables Users to create Role Forecast requirements, specifying the hours being booked, as well as distributing those hours via the Role Allocation records throughout the duration of the Role Forecast period.
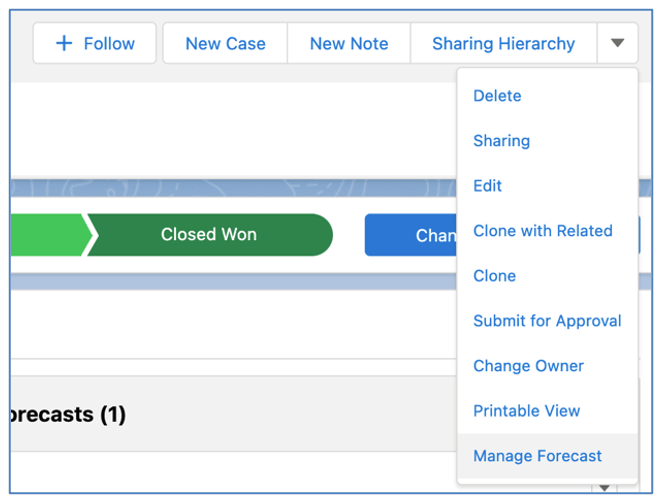
The ‘Role Forecast’ component enables you to create Role Forecast and related Role Allocation records. The component is accessible from the Opportunity and Project Objects. It can be added as a component on a Lightning Page Layout or accessed via the ‘Manage Forecast’ button as shown below.
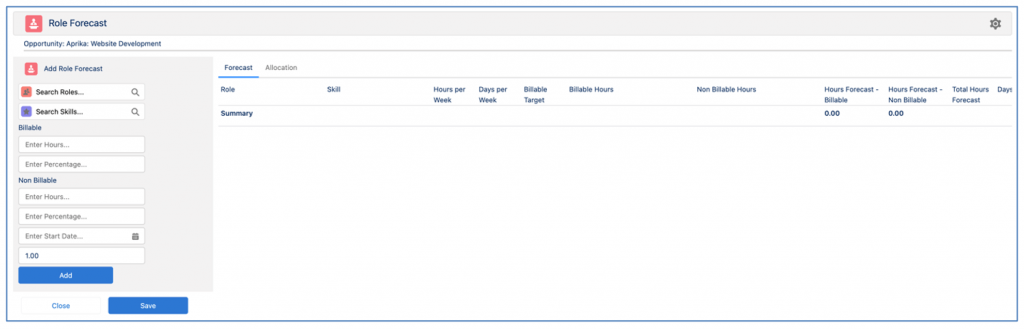
If you have not yet created any Role Forecast records, the Role Forecast component will be as shown below.
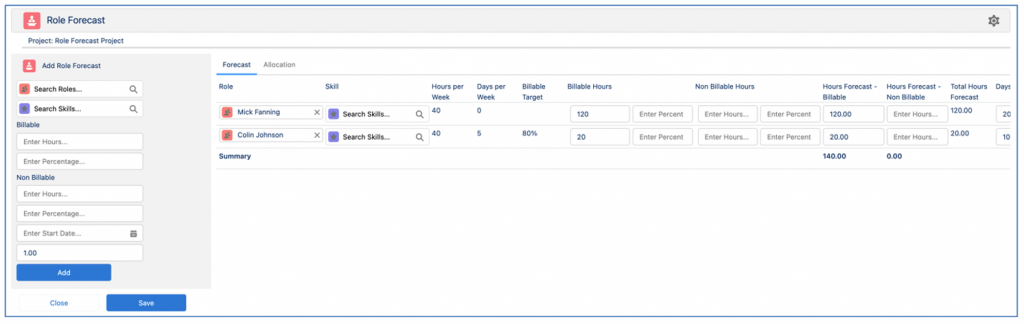
If you have created Role Forecast records, they will be visible in the Forecast Tab, as shown below.
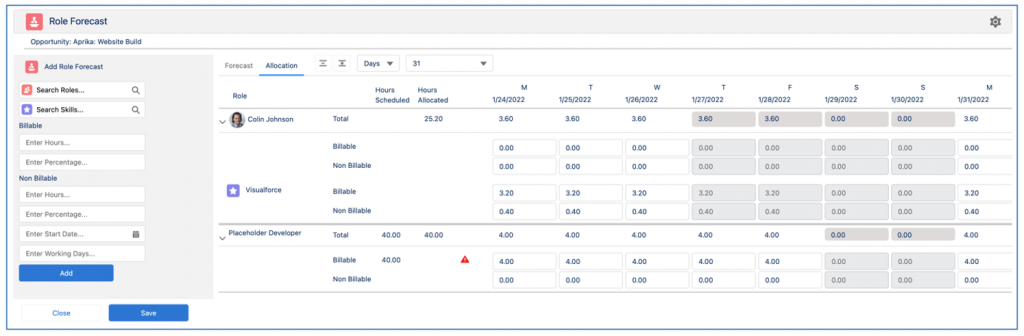
Related Role Allocation records will be visible in the Allocation Tab, as shown below.
When adding a new Role Forecast, you need to select the Role and optionally select a Skill. Note, if you select a Role, the Skill field will be filtered to show the Skills that are assigned to that Role. If you select a Skill first, the Role field will be filtered show Roles with that Skill.
When entering Billable and Non Billable hours, you can choose to enter a specific number of hours or you can enter a percentage. The percentage will be used to calculate the number that will be added to the ‘Hours Forecast – Billable’ and ‘Hours Forecast – Non Billable’ fields on the Role Forecast record.
For example, if Mick Fanning has an Hours per Week value of 40 and a Billable Target value of 80% he is expected to do 32 hours of billable work and 8 hours of non billable work per week. Therefore, if I create a Role Forecast for Mick for 7 days using the percentage values rather than entering a specific number of hours, I would get the following results.
| Percentage | Hours | Explanation of result |
| Billable: 50% | 22.40 | Mick is expected to do 32 hours of billable work per week. This Role Forecast is requesting 50% of Mick’s billable time, therefore (32 / 5 * 7) * 50% = 22.40 |
| Non Billable: 25% | 2.8 | Mick is expected to do 8 hours of non billable work per week. This Role Forecast is requesting 25% of Mick’s non billable time, therefore (8 / 5 * 7) * 25% = 2.8 |
You will also be required to enter a Start Date and a number of Working Days. For example, if I set the Start Date to be Monday 24th January and Working Days to be 7, the End Date of the Role Forecast will automatically be calculated based on the Working Days, so would be Tuesday 1st February. Holidays will also be taken into consideration when calculating the End Date, so if the Role was on Holiday on Thursday 27th and Friday 28th January, the End Date would be set to Thursday 3rd February.
Below is an example of adding a Role Forecast based on the above scenario.

When the Role Forecast is added, the following fields are automatically populated:
| Field | Population Criteria |
| Hours Forecast – Billable | Either Billable Hours or calculated using Billable Percentage |
| Hours Forecast – Non Billable | Either Non Billable Hours or calculated using Non Billable Percentage |
| End Date | Start Date + Working Days (factoring in Holidays & Non Working Days) |
| Billable Hourly Rate | Based on Billable Hourly Rate from Skill Assignment or Role, Rate Adjustments will take priority if available |
| Cost Hourly Rate | Based on Cost Hourly Rate from Skill Assignment or Role, Rate Adjustments will take priority if available |
The Billable Hourly Rate and Cost Hourly Rate fields can be adjusted if they need to be modified from the source rates for this specific Role Forecast. The following fields will all automatically calculate to provide you with a summary of all Role Forecast records:

Once the Role Forecast record has been added to the Forecast Tab, the Role Allocation records will be available on the Allocation Tab. By default, the hours from the Role Forecast will be evenly distributed across each of the working days between the Start Date and End Date of the Role Forecast.

You will be able to expand / collapse all of the records by using the + / – buttons. You can also choose to view the Role Allocation records as individual Days or grouped by Weeks.
You can modify the distribution of the hours across the Role Allocation records, for example if you need to front load the effort or back load the effort. Note: when modifying the hours on the Weeks view, the hours will be evenly distributed between each working day within that week.
If you have manually distributed the hours you will see the ![]() icon. This indicates the hours have been manually distributed. If you click on this icon, it will reset the hours to be evenly distributed between the Role Allocation records.
icon. This indicates the hours have been manually distributed. If you click on this icon, it will reset the hours to be evenly distributed between the Role Allocation records.
If the total hours across all Role Allocation records does not equal the value of the hours field on the Role Forecast record, you will see the ![]() icon. This serves as a warning notification so you can review the hours on the Role Allocation records and adjust them accordingly.
icon. This serves as a warning notification so you can review the hours on the Role Allocation records and adjust them accordingly.
The Settings icon on the Role Forecast component provides access to the following settings:
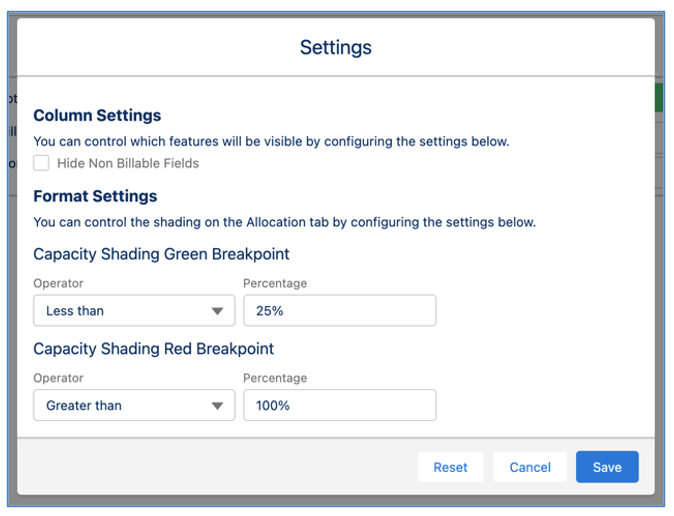
You are able to:
These settings are controlled by individual Users.
The ‘Resource Planner’ component will be accessible from the Management Pad of the Mission Control Console and directly from a Tab in the navigation menu. It will provide a summary of the hours booked against each Role across:
This will provide insight into the full capacity of all resources within the business. The Resource Planner includes 2 Tabs:
When using the Resource Planner, the Overview Tab will load by default. It comprises of 3 main sections:
Below is an example of the Overview Tab.

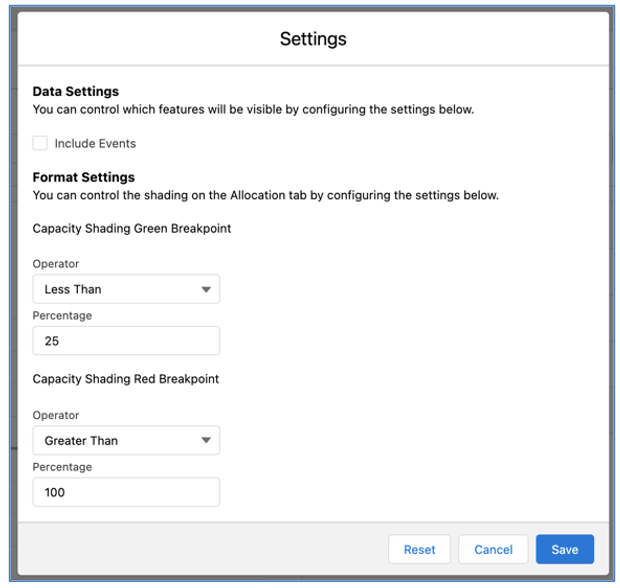
Data Settings
This section lets you specify what data will be displayed on the Overview Tab, covering:

The Display setting provides you with the option of choosing whether you view Role Allocation records related to Forecasts, Actions or both. This Display setting will be persistently remembered between visits to the Resource Planner. The options are:
The Start Date will default to today and the End Date will default to Today +3 months.
The Group By buttons provide you with the ability to toggle the view of the data within the Capacity Table. Role will display each Role alphabetically. Master Team will group the Roles by Master Team. This toggle option will be persistently remembered between visits to the Resource Planner.
Capacity Overview Chart
The Capacity Overview Chart provides a stacked capacity from all Role Allocations included in the date / filter range and will split it between:
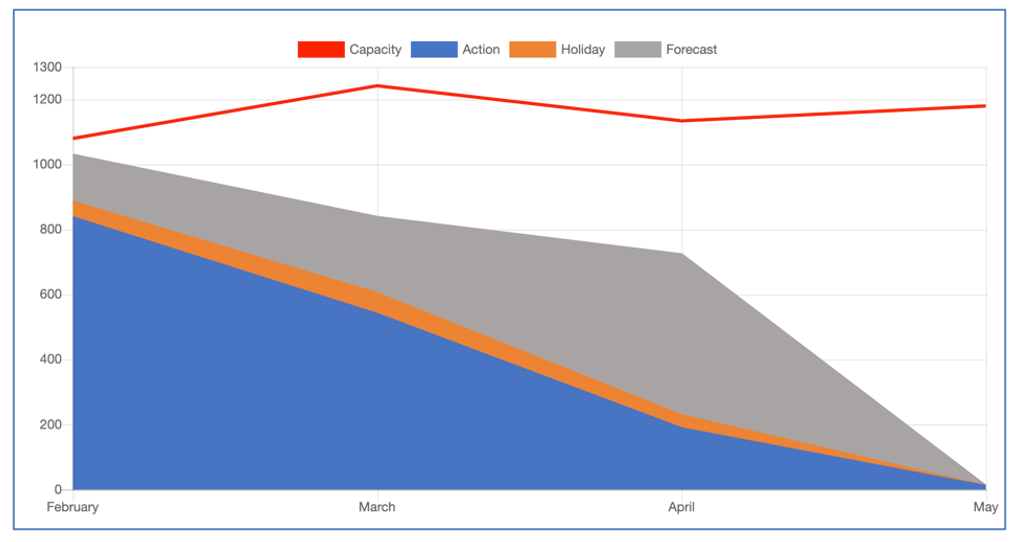
The red line represents the overall capacity of the team for each period. Combining the capacity and the total Role Allocations, you can view a high-level summary of where you may have too few or too many resources to match the expected workload.
Capacity Table
The Capacity Table provides insight into the capacity of each individual Role. The table can display each individual Role sorted alphabetically or grouped into Master Team. This is controlled by toggling the Role and Master Team buttons within the Data Settings section.
The information displayed within the Capacity Table is as follows:
When using the Master Team Group By option, the Capacity Table will show the Team Names, and you’re able to expand / collapse the Role information within each Master Team for individual Role figures.
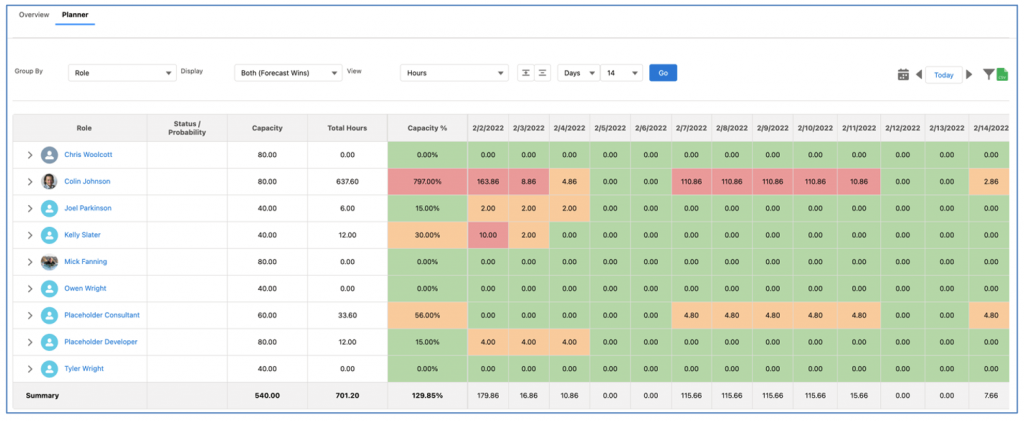
The Planner Tab of the Resource Planner comprises of 2 main sections:
Below is an example of the Planner Tab.
Data Settings
This section lets you specify what data will be displayed on the Planner Tab, covering:
![]()
The Group By setting enables you to choose whether you group the data within the Capacity Table by Role or Project/Opportunity.
When grouping by Role, you will see a high-level summary of capacity by Role sorted alphabetically. You can expand / collapse into the detail within each Role by clicking on the + / – buttons in the Data Settings section. This will show a breakdown of hours for the Role by each Project/Opportunity.

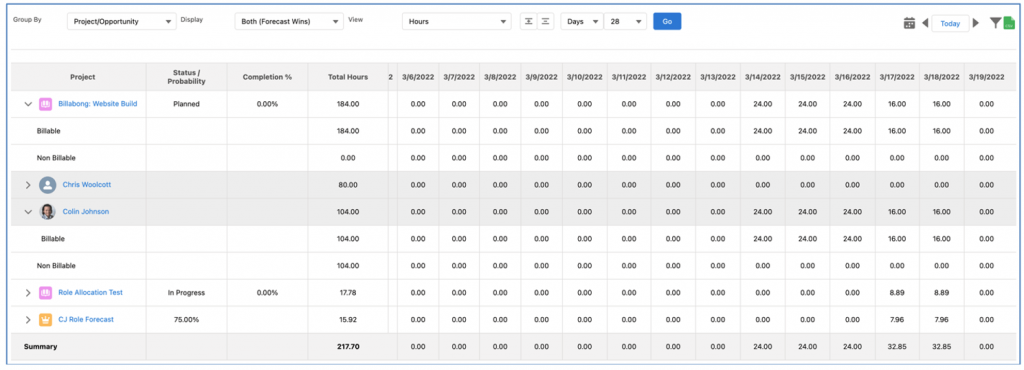
When grouping by Project/Opportunity, you will see a high-level summary of capacity by Project / Opportunity sorted alphabetically. You can expand / collapse into the detail by clicking on the + / – buttons in the Data Settings section. This will show a breakdown of the hours for the Project/Opportunity by each Role.
The Display setting provides you with the option of choosing whether you view Role Allocation records related to Forecasts, Actions or both. This Display setting will be persistently remembered between visits to the Resource Planner. The options are:
Role Allocation records relating to Holiday records will always be included.
The View (Source) setting enables you to choose what data is summarised within the Capacity Table, the options include:
These values will only be accessible if the User has Field Level Security access to the underlying fields.
The View (Timeline) setting enables you to choose the date timeline within the Capacity Table, the options include:
You are also able to specify how many columns are display (e.g. you may choose to view 14 days, 8 weeks, etc.).
The various date navigation buttons enable you to select and move between date ranges. The options include:
The CSV Export icon enables you to export the contents of the Capacity Table as a CSV file. It will be exported with a file name of MC_Resource_Planner_YYYY_MM_DD.csv.
The Resource Planner provides the ability to apply a combination of filters as required. These filters can also be saved and persistently applied. Preset Filters are created and accessed by individual Users and cannot be shared with other Users.
To access the Filter modal, you need to click the Filter icon which is accessible from the Data Settings section of either the Overview or Planner Tabs.
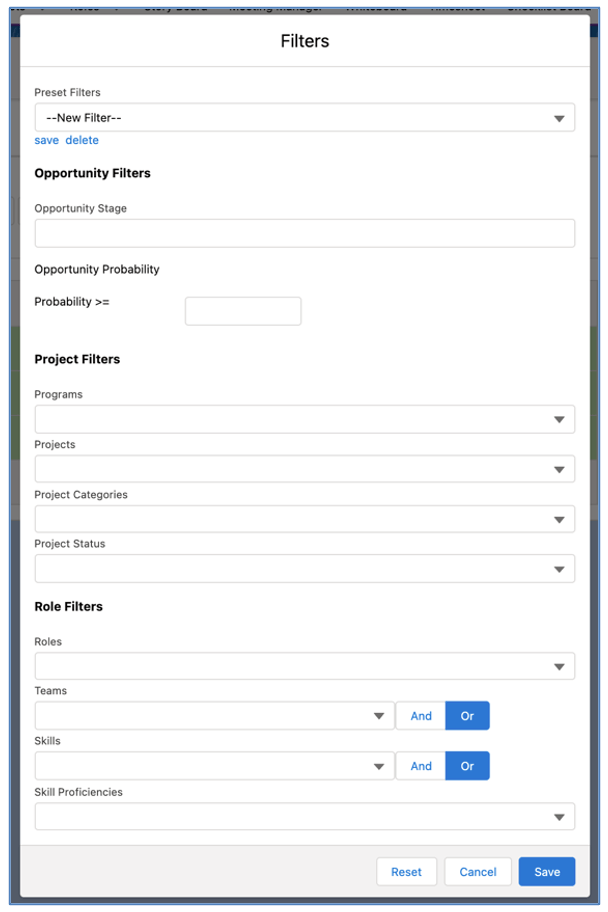
The filters allow you to determine which Role Allocations are included within the dataset, as well as filtering the Roles. The filter options for controlling Role Allocations include the ability to apply filters based on Opportunities and Projects.
Opportunity Filters
You can choose to filter Opportunities based on the Opportunity Stage value(s) and/or the Probability % being greater or equal to a particular percentage value.
Project Filters
You can choose to filter Projects based on the following options:
The Opportunity and Project filters will be used to determine the Role Allocations that will be displayed.
Role Filters
You can choose to filter the results to only show particular Roles, the options include:
The Settings icon on the Role Forecast component provides access to the following settings:
You are able to:
These settings are controlled by individual Users.
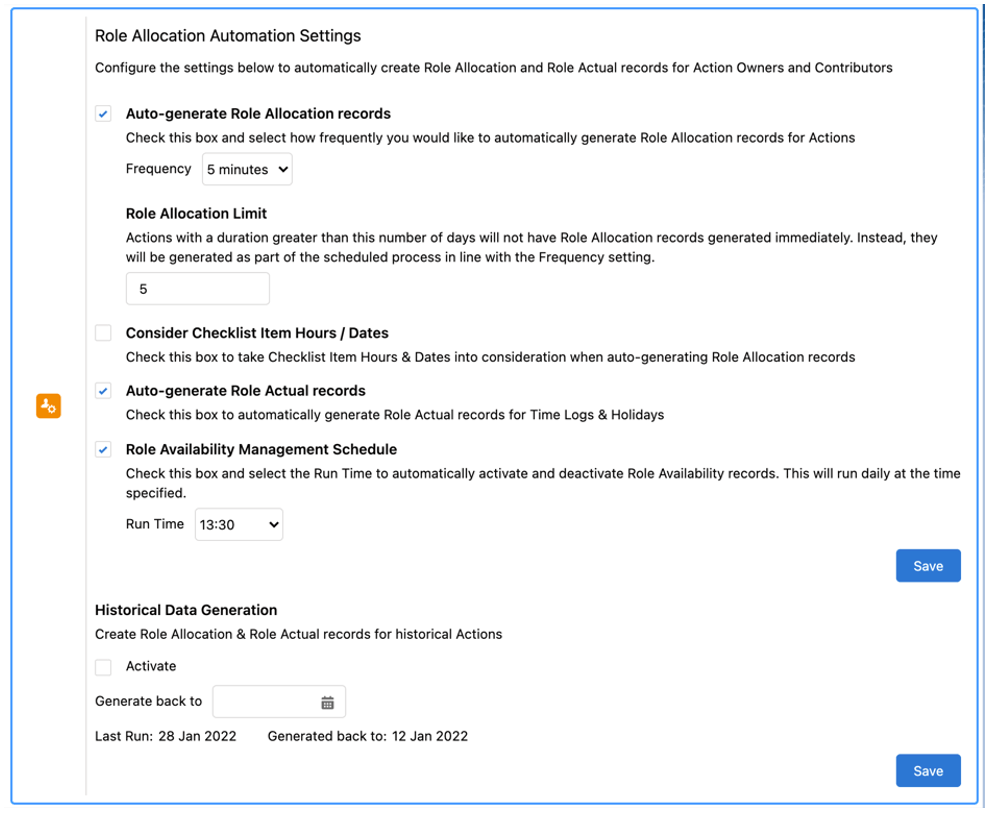
To fully leverage the Role Forecasting functionality, a number of automated settings need to be enabled. These can all be controlled via the ‘Role Allocation Automation Settings’ section on the Control Pad of the Mission Control Console.
In order to enable these Role Allocation Automation Settings, the Field History Tracking needs to be enabled for the following Objects/Fields.
| Role Forecast | Action | Contributor |
| Start Date
End Date Hours Forecast – Billable Hours Forecast – Non Billable Role |
Start Date
End Date Hours Scheduled – Billable Hours Scheduled – Non Billable Action Owner |
Contribution Billable
Contribution Non Billable Role |
For Role Forecast and Action records that have a shorter duration, the Role Allocation records will be created immediately via Apex Triggers. However, to accommodate Salesforce governor limits when generating Role Allocation records for Role Forecasts and Actions that have a longer duration, these records will be created via Apex Batch Classes.
To activate this Apex Trigger Batch Class logic, set the Checkbox field to TRUE, select a Frequency and click the Save button.
Note: if this setting is inactive, Role Allocation records will need to be created manually.
The default limit for transferring the creation of Role Allocation records from the Apex Trigger to the Apex Batch Class is set to 100. Depending on other customisation customers have in their Salesforce Org, they may need to reduce this limit to avoid Salesforce governor limits.
To set a custom limit, enter a value in the Role Allocation Limit field and click the Save button.
By default, Role Allocation records for Action Owners and Contributors will be created based on the hours and date fields on the Action.
To take the hours and date fields from the Checklist Items into consideration, this setting will need to be activated. To activate, set the Checkbox field to TRUE and click the Save button.
To have Role Actual records automatically created for Time Logs and Holidays, this setting will need to be activated. To activate, set the Checkbox field to TRUE and click the Save button.
To avoid having to manually adjust the Active field on Role Availability records, this Apex Batch Class will automatically activate and deactivate Role Availability records.
To activate, set the Checkbox field to TRUE and select the ‘Run Time’ that you would like this process to run each day and click the Save button.
This feature enables you to create Role Allocation and Role Actual records for existing Actions. For example, if you have been using Mission Control without enabling the Role Forecasting functionality and decide to begin using it, you will want to have Role Allocation records and Role Actual records creating for historical Actions so you have the required data.
To generate Role Allocation and Role Actual records for historical Actions, you will need to set the Activate Checkbox field to TRUE and select a Date and click the Save button. This date will be used to determine how far back in time Role Allocation and Role Actual records should be generated.
Once the records have been generated, there will be a notification beneath the Date field confirming the date the process last run and the date data was generated back to.
When modifying Role Forecast records, a User may amend key fields that will require related Role Allocation records to be modified. The table below summarises the distribution rules that will be applied to each scenario based on whether the Role Allocation records are evenly distributed or manually distributed.
| Modification Scenario | Even Distribution | Manual Distribution |
| Start Date is brought forward to start earlier | Create additional Role Allocation records for working days being added to the duration and evenly distribute the hours across all of the Role Allocation records | Create additional Role Allocation records for the working days being added to the duration and set them to 0 hours, the User will then manually distribute as required |
| Start Date is moved back to start later | Delete the Role Allocation records for the outgoing days.
Redistribute the hours across the Role Allocation records for the days between the new Start Date and End Date. |
Delete the Role Allocation records for the outgoing days.
The User will manually distribute the hours across the remaining Role Allocation records. |
| End Date is brought forward to start earlier | Delete the Role Allocation records for the outgoing days.
Redistribute the hours from the Role Allocation records between Today and the original End Date across the Role Allocation records for the days between Today and the new End Date. |
Delete the Role Allocation records for the outgoing days.
The User will manually distribute the hours across the remaining Role Allocation records. |
| End Date is moved back to start later | Create additional Role Allocation records for working days being added to the duration and evenly distribute the hours from the Role Allocation records between Today and the original End Date across all of the Role Allocation records from Today through to the new End Date | Create additional Role Allocation records for the working days being added to the duration and set them to 0, the User will manually distribute as required. |
| Start Date and End Date both moved by the same number of working days but Start Date still occurs before the original End Date | Delete he Role Allocation records for the outgoing days.
Create additional Role Allocation records for working days between the new Start Date and End Date that don’t already have an existing Role Allocation and evenly distribute the hours across all of the Role Allocation records between the Start Date and End Date. |
Delete the Role Allocation records for the outgoing dates.
Create new Role Allocation records as needed. Mirror the original Role Allocation Hours across all current Role Allocation records (for example the hours scheduled for Day 1 of the original date range will be scheduled to Day 1 of the new date range). |
| Start Date and End Date both brought forwards (e.g. to start early) in time by the same number of days but End Date still occurs later than the original Start Date | Delete the Role Allocation records for the outgoing days.
Create additional Role Allocation records for working days between the new Start Date and End Date that don’t already have an existing Role Allocation and evenly distribute the hours across all of the Role Allocation records between the new Start Date and End Date. |
Delete the Role Allocation records for the outgoing dates.
Create new Role Allocation records as needed. Mirror the original Role Allocation Hours across all current Role Allocation records (for example the hours scheduled for Day 1 of the original date range will be scheduled to Day 1 of the new date range). |
| Start Date and End Date both moved by the same number of days and no overlap exists with the existing date range | Delete the Role Allocation records for the outgoing days.
Create additional Role Allocation records for working days between the new Start Date and End Date that don’t already have an existing Role Allocation and evenly distribute the hours across all of the Role Allocation records between the new Start Date and End Date. |
Delete the Role Allocation records for the outgoing dates.
Create new Role Allocation records as needed. Mirror the original Role Allocation Hours across all current Role Allocation records (for example the hours scheduled for Day 1 of the original date range will be scheduled to Day 1 of the new date range). |
| Hours Forecast – Billable or Hours Forecast – Non Billable is increased | Additional hours are split evenly across Role Allocation records for the Action Owner from Today through to the End Date. | No changes will be made, the User will manually distribute the change |
| Hours Forecast – Billable or Hours Forecast – Non Billable is increased after the Start Date has passed | Additional Hours are plight evenly across Role Allocation records for the Action Owner from Today through to the End Date. | No changes will be made, the User will manually distribute the change |
| Hours Forecast – Billable or Hours Forecast – Non Billable is decreased | The reduction in hours is evenly removed from each Role Allocation record from the Start Date or Today (whichever is greater) through to the End Date. The hours will only reduce down to 0, they will not be put into a negative. | No changes will be made, the User will manually distribute the change |
| Hours Forecast – Billable or Hours Forecast – Non Billable is decreased after the Start Date has passed | The reduction in hours is evenly removed from each Role Allocation record from Today through to the End Date. The hours will only reduce down to 0, they will not be put into a negative. | No changes will be made, the User will manually distribute the change |
| Role is changed | Delete the Role Allocation records for the outgoing Role.
Create Role Allocation records for the new Role. |
For all Role Allocation records from Today through to the End Date, reassign to the new Role. |
The Role record provides customers with the ability to specify values for ‘Hours per Week’ and ‘Billable Target’. However, these are static values and if changed, would be applied to all legacy periods as well. For example, if a new person joins the business during their ramp-up period they may be expected to achieve a lower Billable Target than once they are fully operational. Another example could be where someone previously worked part-time and has transitioned to work full time. Using these fields on the Role record alone do not provide this level of flexibility.
The Role Availability Custom Object provides customers with the ability to record availability information for different time periods.
A Role Availability record contains key information about when a Role will be working, including:
A Role can have multiple Role Availability records, but only one record can be active at a time. The values from the active Role Availability record will be populated on the Role record. To avoid customers from having to manually activate and deactivate Role Availability records once the date ranges are no longer valid, a schedule can be enabled on the Control Pad to have this operation carried out automatically.
To activate the schedule, you will need to set the following setting to TRUE within the Role Allocation Automation Settings section of the Control Pad on the Mission Control Console.
Role Availability Management Schedule
You will need to set the checkbox to TRUE and select the time of day that you want this process to run. This process will run every day at the time specified and will automatically activate and deactivate Role Availability records.
To enable you to create and manage Role Availability records for a specific Role, you can access the ‘Role Availability’ component from the Role record by clicking the ‘Manage Availability’ button as shown below.

If a Role does not have any related Role Availability records, you will see a draft record ready to be completed, as shown below.

If a Role does have existing Role Availability records, they will be displayed in descending order based on Start Date and End Date.

Note: If you have not enabled the automated management of Role Availability activation/deactivation, you will need to manually adjust the records as required.
To leverage the new Role Allocation functionality, the existing ‘Hours Distributor’ component within the Resource Assignment Wizard has been updated. It has also been enhanced to be accessible in the following locations:
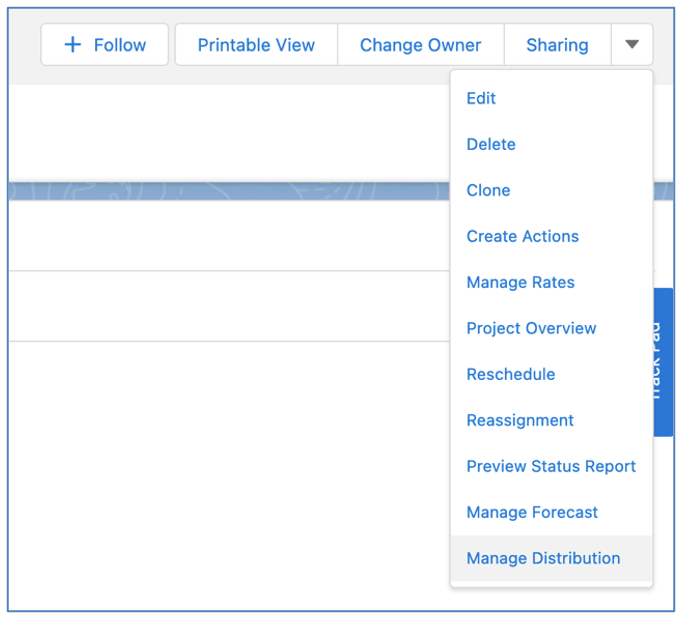
For each Object, it will be accessible via the ‘Manage Distribution’ button. For the Resource Assignment Wizard it is accessible from the ‘Hours Distributor’ Tab.
When accessing the Hours Distributor from the Project record, it will display Role Allocations relating to each Role / Action contained within the Project Plan.
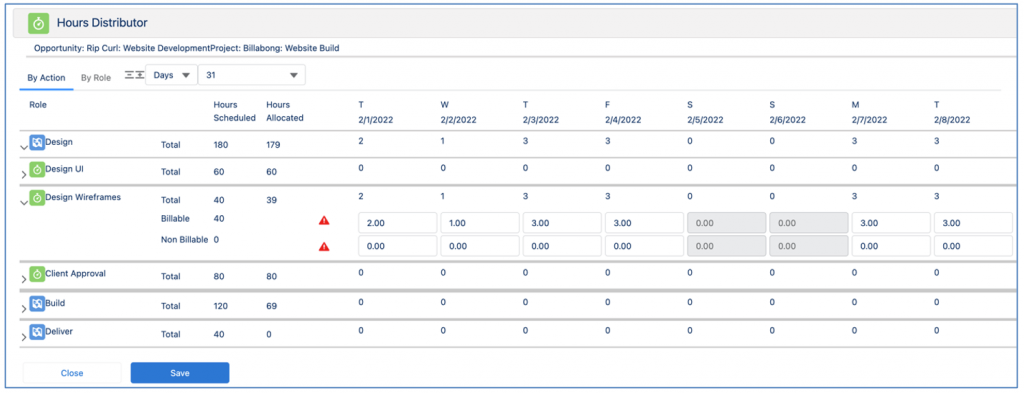
You are able to choose whether to view the data grouped by Action or by Role. When viewing the data by Action, you will see a data row for each Role that is assigned to the Action as either the Action Owner or Contributor. The Actions will be grouped by Milestone.
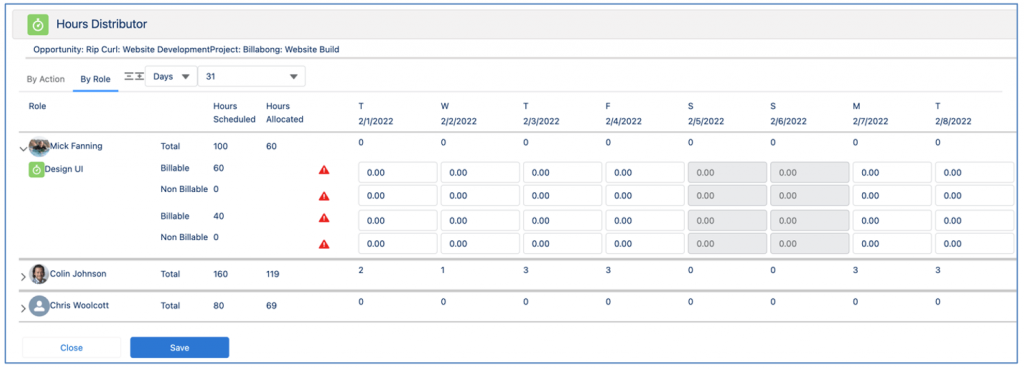
When viewing the data by Role, you will see a data row for each Action the Role is assigned to as either the Action Owner or Contributor.
When accessing the Hours Distributor from the Milestone record, it will display Role Allocation records relating to each Role / Action relating to the Milestone.
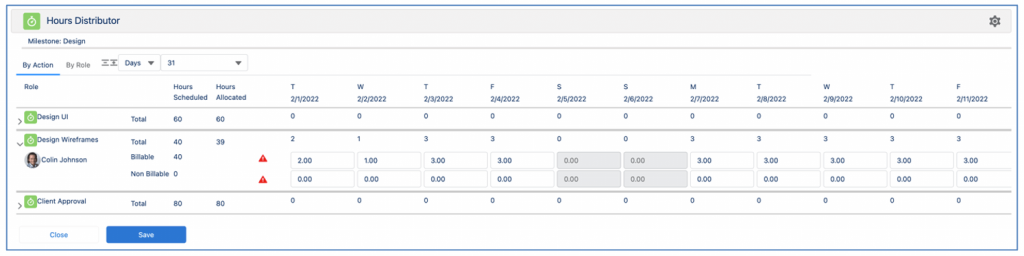
You are able to choose whether to view the data grouped by Action or by Role. When viewing the data by Action, you will see a data row for each Role that is assigned to the Action as either the Action Owner or Contributor.
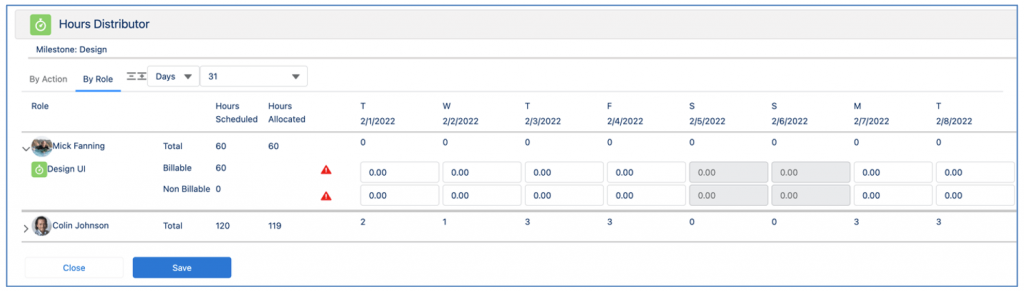
When viewing the data by Role, you will see a data row for each Action the Role is assigned to as either the Action Owner or Contributor.
When accessing the Hours Distributor from the Action record, it will display Role Allocation records relating to each Role assigned to the Action.
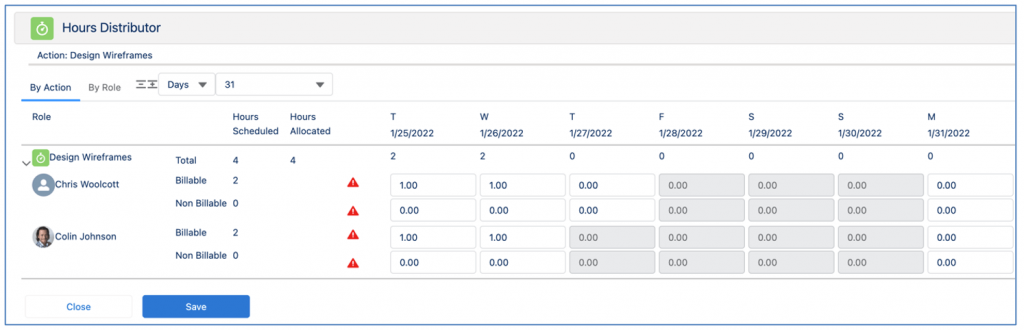
You are able to access the Hours Distributor from within the Resource Assignment Wizard. This provides the same functionality that is available when accessing it from an individual Action record.
You can utilise the Hours Distributor on a Holiday record to create Role Allocation records. This enables you to distribute the hours across the days. For example, a person may be taking 12 hours of PTO across a 2 day period. Rather than it being evenly distributed with 6 hours per day, it may be that 4 hours are for day 1 and 8 hours for day 2. Another example may be where a person is taking PTO from Friday through to Tuesday, but it only requires 2 days (e.g. Friday and Tuesday, as Monday is a Public Holiday). In this scenario, you are able to distribute the 16 hours on Friday (8 hours) and Tuesday (8 hours).
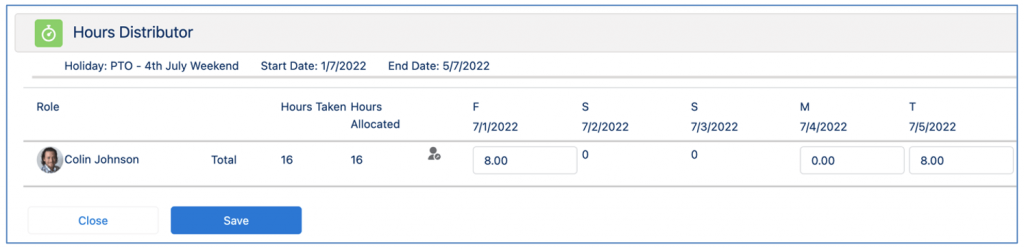
Note: The Hours Distributor should only be used for Holidays that relate to an individual Role.
When accessing the Hours Distributor from a Role record, it will display Role Allocation records assigned to the Role across multiple Projects and Opportunities. As such, it the Role Allocation records may be related to an Action or a Role Forecast. You will be able to select a specific date range (e.g. view all Role Allocations assigned to Mick Fanning for the next two weeks).
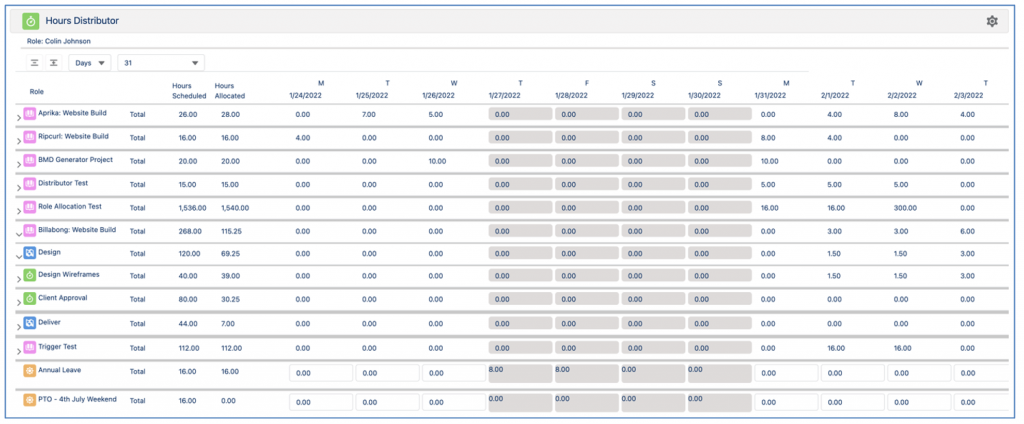
In addition to Role Allocation records relating to Actions and Role Forecasts, this view will also show Role Allocations assigned to Holidays and provide a capacity summary at the bottom to easily identify any potential bottlenecks.
When modifying Action records, a User may amend key fields that will require related Role Allocation records to be modified. The table below summarises the distribution rules that will be applied to each scenario based on whether the Role Allocation records are evenly distributed or manually distributed.
| Modification Scenario | Even Distribution | Manual Distribution |
| Start Date is brought forward to start earlier | Create additional Role Allocation records for working days being added to the duration and evenly redistribute the hours across all of the Role Allocation records | Create additional Role Allocation records for the working days being added to the duration and set them to 0 hours, the User will manually distribute as required |
| Start Date is moved back to start later | Delete the Role Allocation records for the outgoing days, if they have no related Role Actual records.
If they do have related Role Actuals, set Hours Scheduled to 0.
Redistribute the hours across the Role Allocation records for the days between the new Start Date and End Date |
Delete the Role Allocation records for the outgoing days if they have no related Role Actual records.
If they do have related Role Actuals, set the Hours Scheduled to 0.
The User will then manually distribute the hours across the remaining Role Allocation records. |
| End Date is brought forward to start earlier | Delete the Role Allocation records for the outgoing days, if they have no related Role Actual records.
If they do have related Role Actuals, set the Hours Scheduled to 0.
Redistribute the hours from the Role Allocation records between Today and the original End Date across the Role Allocation records for the days between Today and the new End Date |
Delete the Role Allocation records for the outgoing days, if they have no related Role Actual records.
If they do have related Role Actuals, set the Hours Scheduled to 0.
The User will then manually distribute the hours across the remaining Role Allocation records. |
| End Date is moved back to start later | Create additional Role Allocation records for working days being added to the duration and evenly redistribute the hours from the Role Allocation records between Today and the original End Date across all of the Role Allocation records from Today through to the new End Date | Create additional Role Allocation records for the working days being added to the duration and set them to 0 hours.
The User will then manually distribute as required. |
| Start Date and End Date both moved by the same number of working days but Start Date still occurs before the original End Date | Delete the Role Allocation records for the outgoing days, if they have no related Role Actual records.
If they do have related Role Actuals, set the Hours Scheduled to 0.
Create additional Role Allocation records for working days between the new Start Date and End Date that don’t already have an existing Role Allocation and evenly redistribute the hours across all of the Role Allocation records between the new Start Date and End Date. |
Delete the Role Allocation records for the outgoing days, if they have no related Role Actual records.
If they do have related Role Actuals, set the Hours Scheduled to 0.
Create new Role Allocation records as needed. Mirror the original Role Allocation hours across all current Role Allocation records (for example the hours scheduled for Day 1 of the original date range will be scheduled to Day 1 of the new date range). |
| Start Date and End Date both brought forwards (e.g. to start early) in time by the same number of days but End Date still occurs later than the original Start Date | Delete the Role Allocation records for outgoing days, if they have no related Role Actual records.
If they do have related Role Actuals, set the Hours Scheduled to 0.
Create additional Role Allocation records for working days between the new Start Date and End Date that don’t already have an existing Role Allocation and evenly redistribute the hours across all of the Role Allocation records between the new Start Date and End Date. |
Delete the Role Allocation records for the outgoing days, if they have no related Role Actual records.
If they do have related Role Actuals, set the Hours Scheduled to 0.
Create new Role Allocation records as needed. Mirror the original Role Allocation hours across all current Role Allocation records (for example the hours scheduled for Day 1 of the original date range will be scheduled to Day 1 of the new date range). |
| Start Date and End Date both moved by the same number of days and no overlap exists with the existing date range | Delete the Role Allocation records for the outgoing days, if they have no related Role Actuals.
If they do have related Role Actuals, set the Hours Scheduled to 0.
Create additional Role Allocation records for working days between the new Start Date and End Date that don’t already have an existing Role Allocation and evenly redistribute the hours across all of the Role Allocation records between the new Start Date and End Date |
Delete the Role Allocation records for the outgoing days, if they have no related Role Actual records.
If they do have related Role Actuals, set the Hours Scheduled to 0.
Create new Role Allocation records as needed. Mirror the original Role Allocation hours across all current Role Allocation records (for example the hours scheduled for Day 1 of the original date range will be scheduled to Day 1 of the new date range). |
| Hours Scheduled – Billable or Hours Scheduled – Non Billable is increased | Additional hours are split evenly across Role Allocation records for the Action Owner from Start Date or Today (whichever is later) through to End Date | No changes will be made, the User will manually distribute the change |
| Hours Scheduled – Billable or Hours Scheduled – Non Billable is increased after the Start Date has passed | Additional hours are split evenly across Role Allocation records for the Action Owner from Today through to End Date | No changes will be made, the User will manually distribute the change |
| Hours Scheduled – Billable or Hours Scheduled – Non Billable is decreased | The reduction in hours is evenly removed from each Role Allocation record from the Start Date or Today (whichever is greater) through to the End Date. The hours will only reduce down to 0, they will not be put into a negative. | No changes will be made, the User will manually distribute the change |
| Hours Scheduled – Billable or Hours Scheduled – Non Billable is decreased after the Start Date has passed | The reduction in hours is evenly removed from each Role Allocation record from the Today through to the End Date. The hours will only reduce down to 0, they will not be put into a negative. | No changes will be made, the User will manually distribute the change |
| Action Owner is changed | Delete the Role Allocation records for the outgoing Action Owner, if they have no related Role Actual records.
If they do have related Role Actuals, set the Hours Scheduled to 0.
Create Role Allocation records for the new Action Owner, calculated by the different between Hours Scheduled on the Action and the sum of hours already allocated to existing Contributor records. |
For any Role Allocation records from Today through to the End Date, if there are no related Role Actual records, reassign the Role Allocation record to the new Action Owner.
If there are related Role Actuals, set the Hours Scheduled to 0 and create new Role Allocation records for the new Action Owner with the Hours Scheduled that were assigned to the original Action Owner. |
| Contributor is added | Create Role Allocation records for the Contributor, splitting the hours evenly across each remaining day from Today through to the End Date.
Update Role Allocation records for the Action Owner, calculated by the difference between Hours Scheduled on the Action and the sum of hours already allocated to the Contributor records. |
If existing Role Allocation records exist for any Role relating to the Action have been manually overridden, create Role Allocation records for the Contributor, splitting the hours evenly across each remaining day from Today or Start Date (whichever is later) through to End Date.
The User will need to manually adjust the Role Allocation records as required. |
| Contributor is deleted | Delete the Role Allocation records for the Contributor, if they have no related Role Actual records.
If they do have related Role Actuals, set the Hours Scheduled to 0.
Update the Role Allocation records for the Action Owner, calculated by the different between Hours Scheduled on the Action and the sum of hours already allocated to the remaining Contributor records. |
Delete the Role Allocation records for the Contributor, if they have no related Role Actual records.
If they do have related Role Actuals, set the Hours Scheduled to 0.
The User will need to manually adjust the Role Allocation records as required. |
| Contributor is changed from one Role to another Role | Delete the Role Allocation records for the outgoing Contributor, if they have no related Role Actual records.
If they do have related Role Actuals, set the Hours Scheduled to 0.
Create Role Allocation records for the new Contributor, evenly distributing the hours from Today through to End Date. |
For any Role Allocation records from Today through to the End Date, if there are no related Role Actual records, reassign the Role Allocation record to the new Contributor.
If there are related Role Actuals, set the Hours Scheduled to 0 and create a new Role Allocation record for the new Contributor with the Hours Scheduled that were assigned to the original Contributor. |
| Contributor hours within Contribution Billable or Contribution Non Billable are increased | Additional hours split evenly across Role Allocation records for the Contributor from Today through to End Date. | No changes will be made, the User will manually distribute the change |
| Contributor hours within Contribution Billable or Contribution Non Billable are decreased | Reduction in hours will be evenly removed from each Role Allocation record for the Contributor from Today through to End Date. The hours will only reduce down to 0, they will not be put into a negative. | No changes will be made, the User will manually distribute the change |
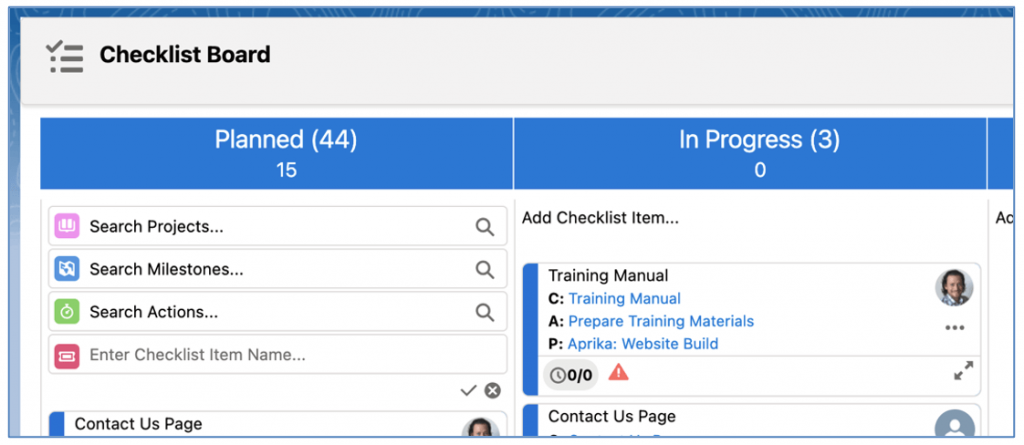
The Checklist Item Kanban Board enables you to visualise all of your Checklist Items based on their current ‘Status’. You can access the Checklist Kanban via the main navigation menu as a sub-tab on the Project Overview Component, which will pre-filter the board to show Checklist Items that relate to Actions on that specific Project.
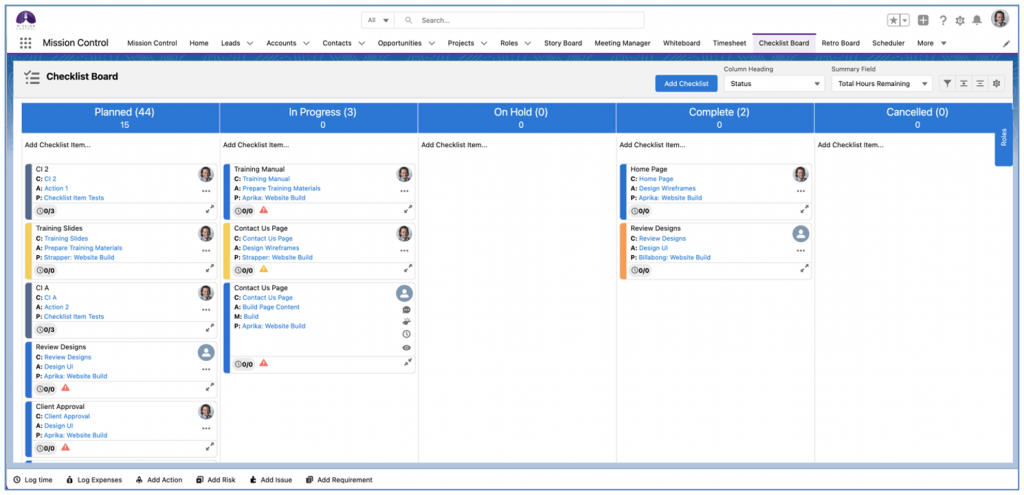
Each Checklist Item is displayed as a ‘Sticky Note’ (also referred to as a ‘Card’) on the Kanban, showing details such as:
You can drag and drop the Checklist Item cards from one column to another. For example, if you have a Checklist Item that has progressed from ‘Planned’ to ‘In Progress’, you can simply drag it from the Planned column and drop it into the In Progress column.
Note: When you drag a card into the Complete column, the Status field of the Checklist Item will be updated to ‘Complete’ and the Complete (Checkbox Field) will also be set to TRUE. Similarly, if you set the Complete field to TRUE, the Status will automatically be updated to Complete.
You can add a new Checklist Item record by clicking the blue ‘Add Checklist’ button located in the header of the Board.
![]()
This will open up the ‘New Checklist’ modal, where you are able to enter the full details for a new Checklist Item and then click Save.
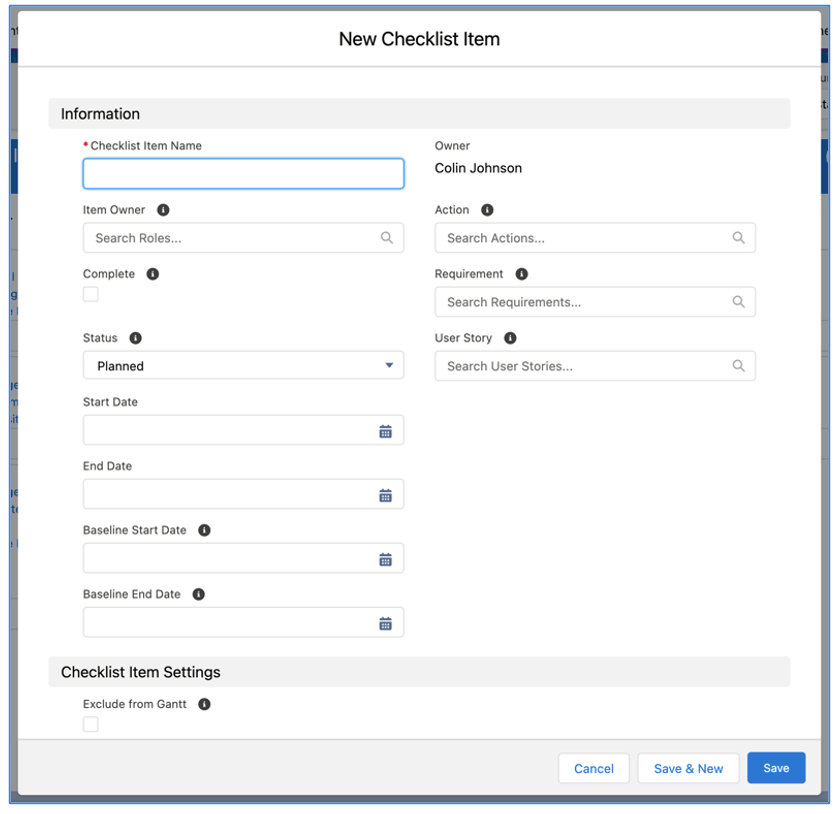
You can quickly add a new Checklist Item by clicking the ‘Add Checklist Item…’ just below the column header. This will open up the Quick Add section, as shown below:
Simply select the Project, Milestone and Action, type in the Checklist Item Name, then click the tick icon or hit enter. The Checklist Item will be created and the fields will reset to enable you to add another Checklist Item.
Note: If you have a Validation Rule or field requirement that prevents the Checklist Item from being created, a New Checklist Item page will open up where you can complete the required fields and save the record.
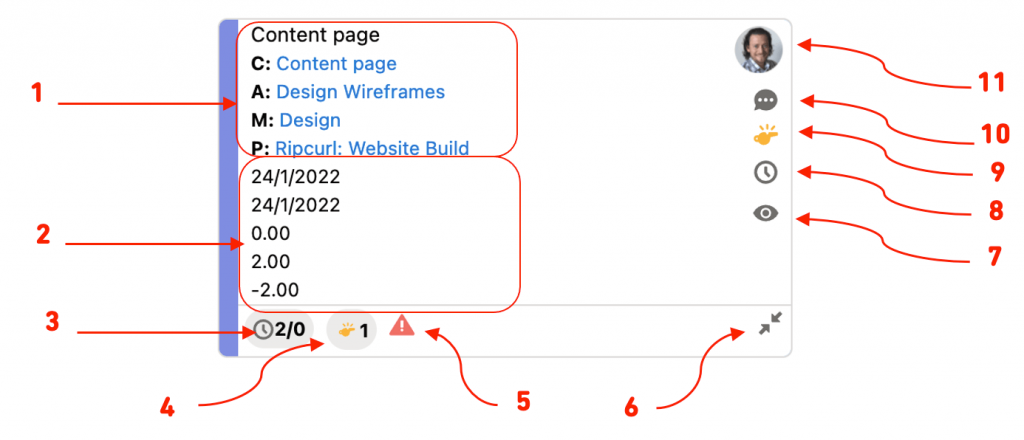
Below is an example of a Checklist Item Card on the Kanban Board.
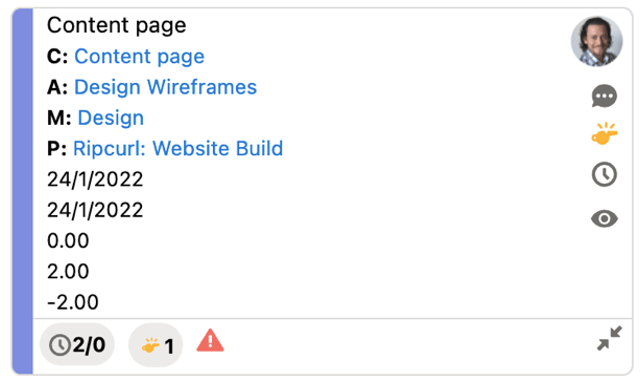
The card offers you a lot of functionality, each feature of the card is explained below.
The Checklist Cards can show a lot of information, and as such, can take up a fair amount of space, and you may wish to have a more compact view. The Cards can be collapsed or expanded as required between the ‘Detail’ and ‘Compact’ views, based on how much information you with to view. Below are examples of the expanded and collapsed Cards.
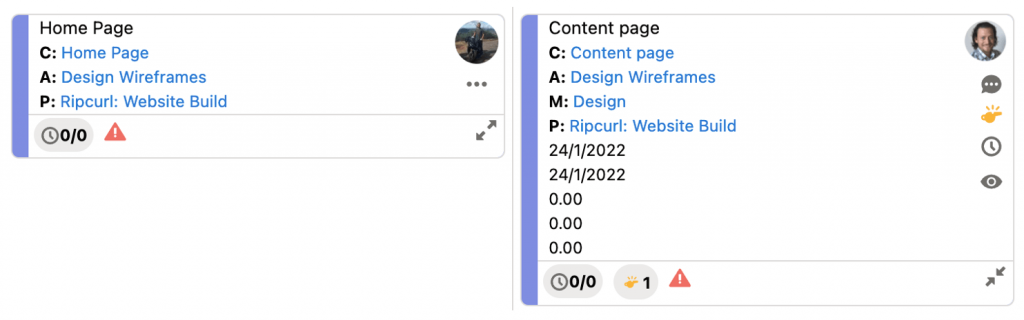
Within the Board Settings, you can specify the default view for any new Checklist Items. You are able to collapse / expand individual cards by clicking the icon in the footer of the Card. You are also able to collapse / expand all Checklist Cards at once by clicking the Expand All or Collapse All button within the Board Header, as shown below.

By default, the Checklist Cards will be displayed based on the following values:
If you need to reorganize the priority of the Checklist Items within a specific column, you are able to drag and drop them up or down within the column and that adjustment will be persistently remembered.
The ‘Board Priority Order’ field value is adjusted by dragging a Checklist Item up / down within a column, but if the Checklist Item is dragged left / right into another column, the values will not be adjusted.
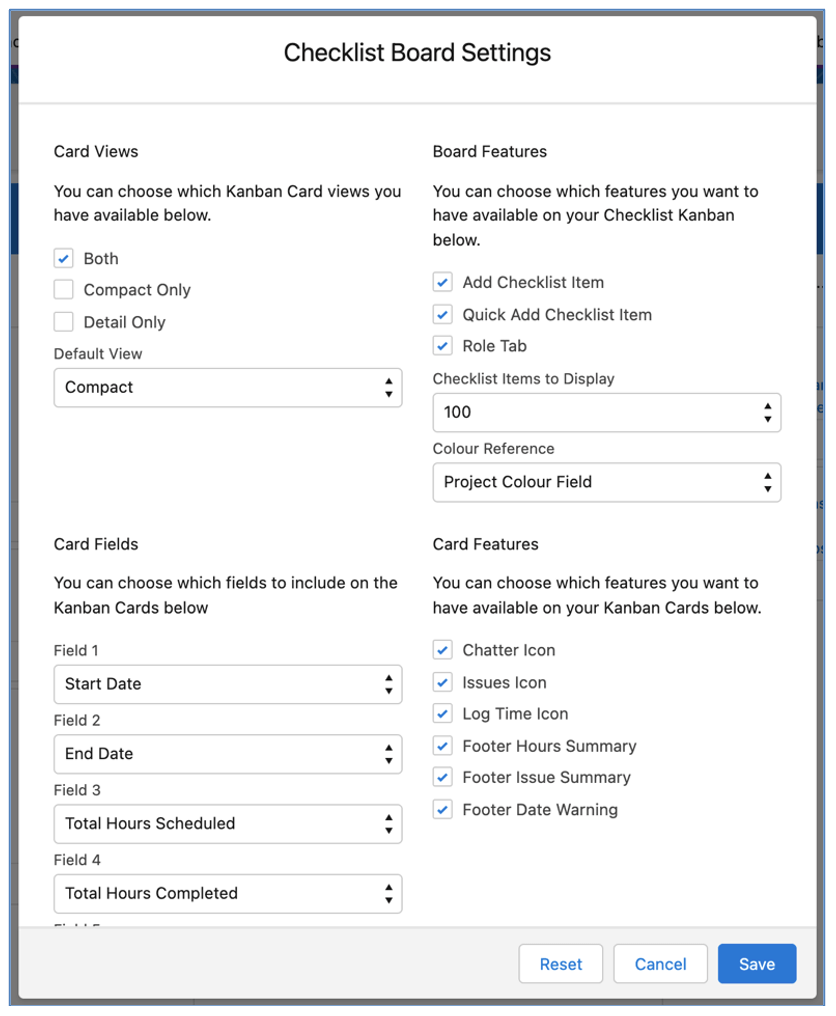
Users have the ability to control the Sort Order of Cards should they not wish to use the default sort order. This can be controlled within the Board Settings modal, as shown below:
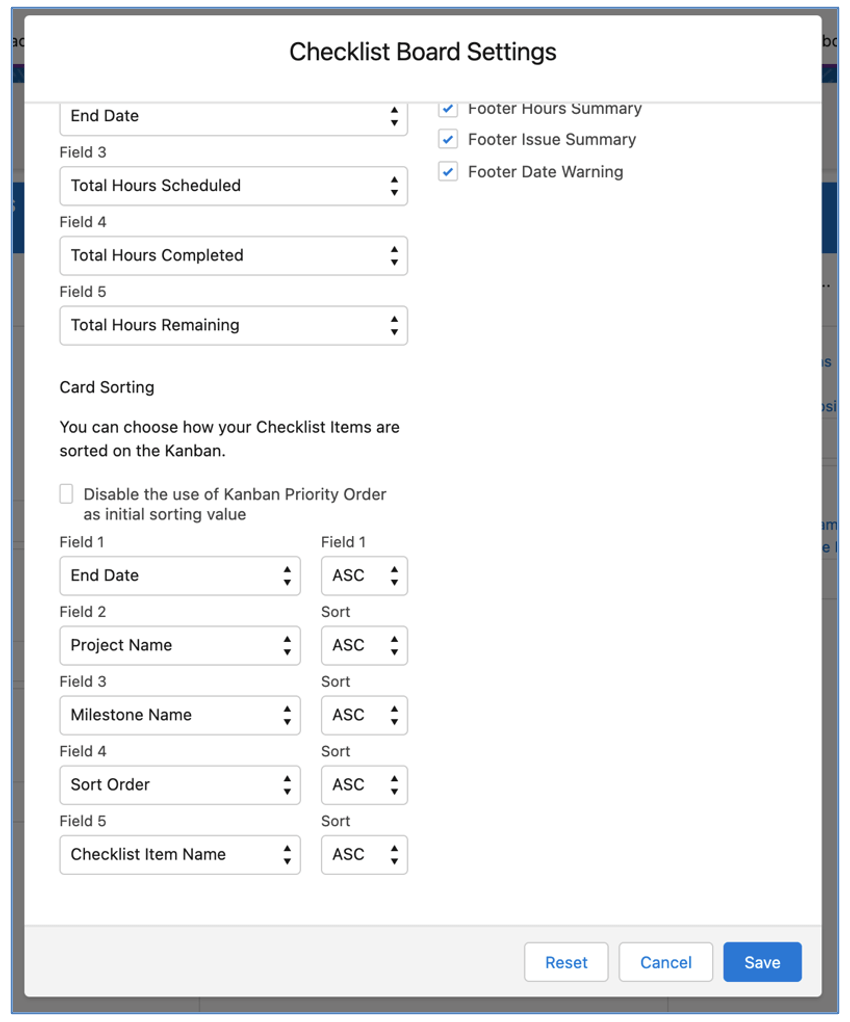
Users can disable the Board Priority Order field from being used as the initial sorting value. In addition, they can specify up to 5 fields to sort by, and the direction (e.g. ASC / DESC).
You’re able to dynamically adjust the Column Headings. By default, Status columns will be displayed. However, if you want to switch from viewing columns for Status to Item Owner, you just need to select the Picklist in the ‘Column Heading’ field as below.
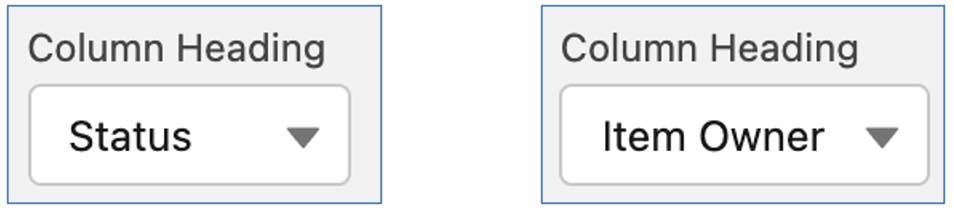
This will dynamically switch the column headings on the Kanban Board and rearrange all of the Checklist Items based on their ‘Item Owner’ value.
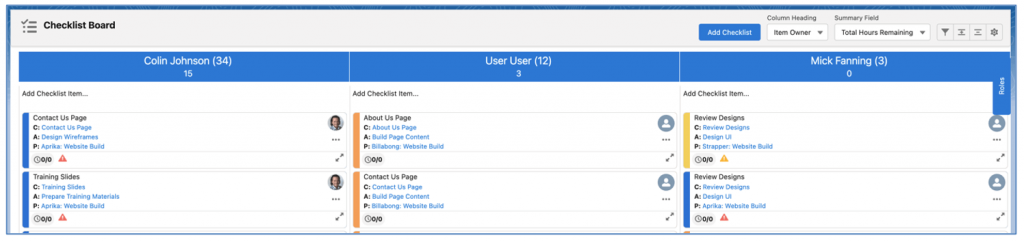
You’re able to dynamically adjust the Summary Field. By default, the Summary Field will be set to Total Hours Remaining. You have the option to change this to a range of other Number or Percent fields on the Checklist Item Object.
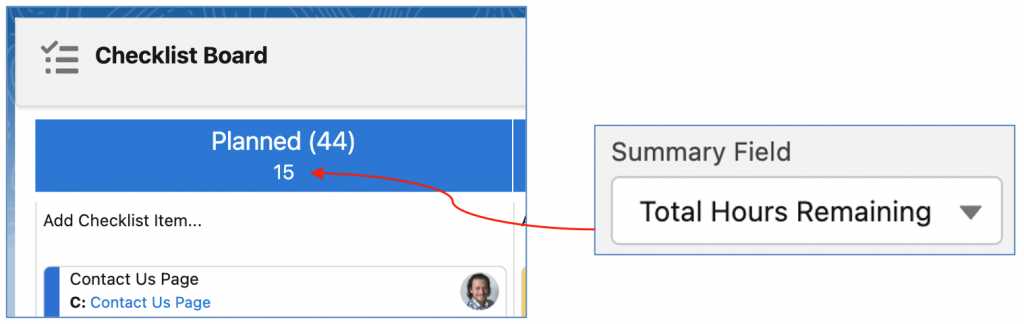
The Summary Field will be persistently remembered for each User.
You can apply any combination of filters to make sure you’re viewing the Checklist Items that are most important to you. Simply click on the Filter icon to open up the Filters modal and apply the filters as required.

The filters can be applied as required, alternatively, you can save any Filter selection, and that will be persistently applied each time you visit the Checklist Board.
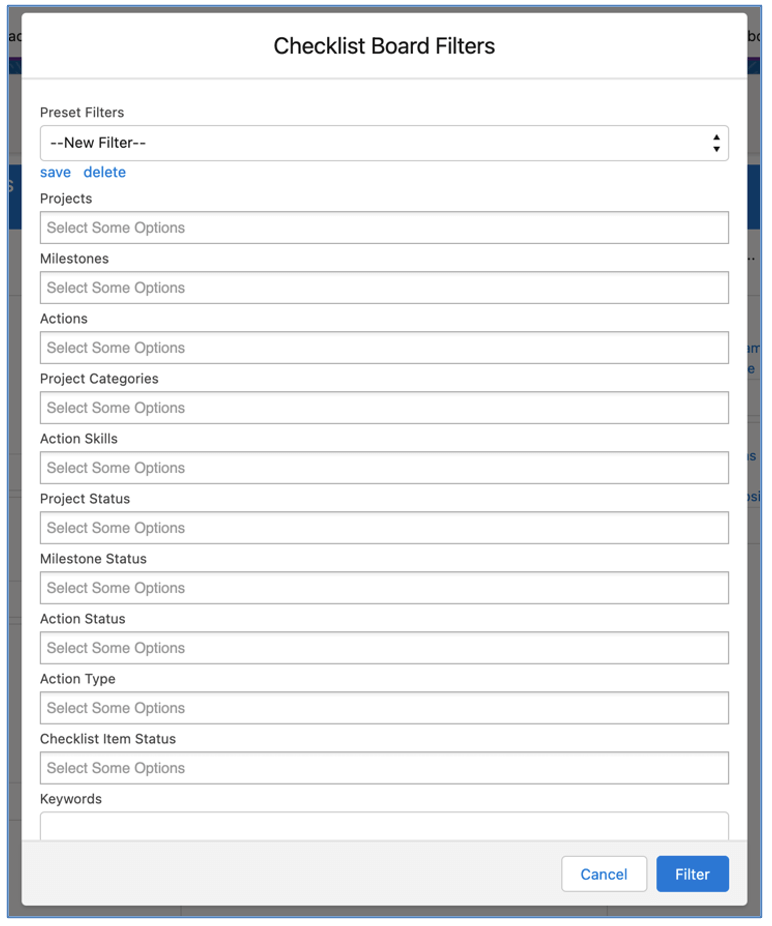
Preset Filters are created and accessed by individual Users and cannot be shared with other Users.
The Board Settings modal enables you to customise various settings to control which features are accessible on the Board.
These Board Settings can be controlled by each individual User by clicking on the Settings icon on the Board.

Alternatively, you can choose to override these settings at an organisation-wide level from the Control Pad of the Console. If you override from the Control Pad, Users will no longer have access to the Settings icon on the Board.
Roles Tab
The ‘Roles’ Tab located on the right-hand-side of the Board allows you to view all of the active Roles within Mission Control.
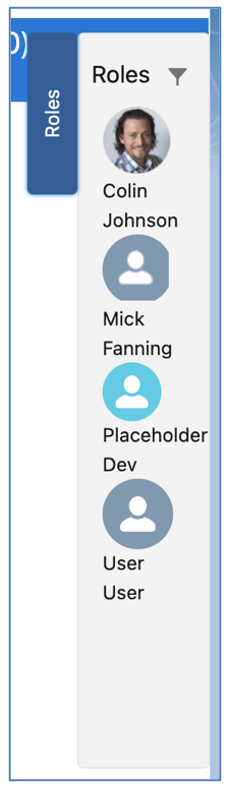
You can expand / collapse the Tab, which will be persistently remembered between visits to the Board. Therefore, if you don’t wish to use the Role Tab, you can keep it collapsed.
The primary purpose of the Roles Tab is to enable you to re-assign a Checklist Item from one owner to another. You can do this by dragging and dropping the right person on top of the image of the existing Item Owner, which will transfer ownership.
You can filter to find Roles that match the criteria you require. For example, you may be looking for Roles that have a specific Skill or are a member of a particular Team. To access the Role Filters, click the Filter icon at the top of the Role Tab, which will open the Role Filters modal as shown below.
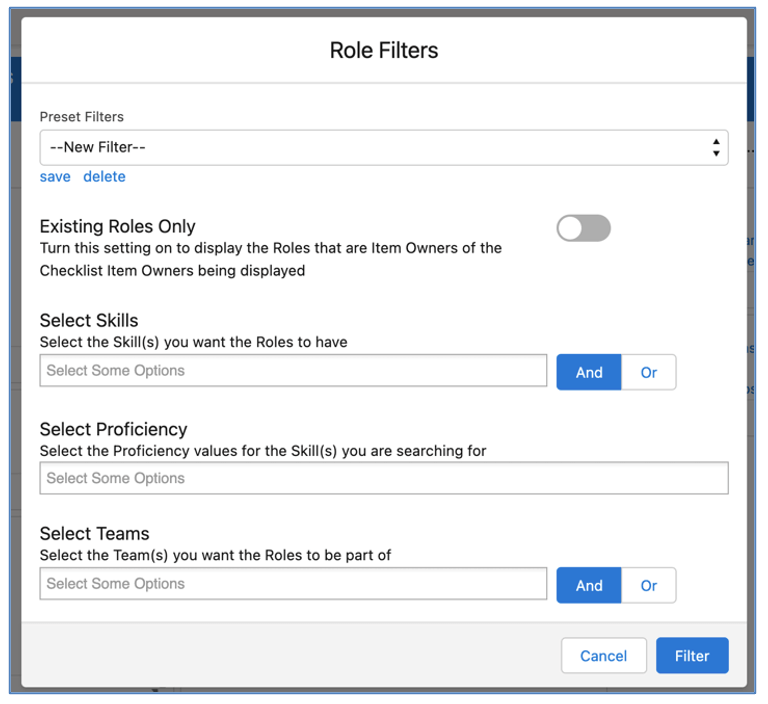
Within the Role Filters, you can:
The filters can be applied as required, alternatively, you can save any Filter selection, and that will be persistently applied each time you visit the Checklist Board.
You are now able to control the Billing Type for individual Milestones within a Project. This means you will be able to set each Milestone within a Project to one of the following ‘Milestone Billing Type’ options:
This also requires the Project ‘Billing Type’ field to be set to ‘Controlled on Milestones’, which is a new picklist value that you will need to manually add to the field.
When using the ‘Controlled on Milestones’ Project Billing Type, the Project Billing Cycle will need to be set to ‘Manual’ and the Billing Event will need to be generated manually using the Billing Event Generator component.
The Billing Event ‘Generator’ is a component that enables you to generate a Billing Event and multiple Billing Event Items, for each Milestone that is eligible to be billed.
When the Project Billing Type is set to ‘Controlled on Milestones’, you will have access to the ‘Generate’ button on the Billing Tab of the Project Overview, as shown below.

When you click the Generate button, the Billing Event Generator component will load up a draft Billing Event and Billing Event Items based on which Milestones have been configured for billing. Below is an example of the Billing Event Generator with multiple Billing Event Items for various Milestones related to the Project.
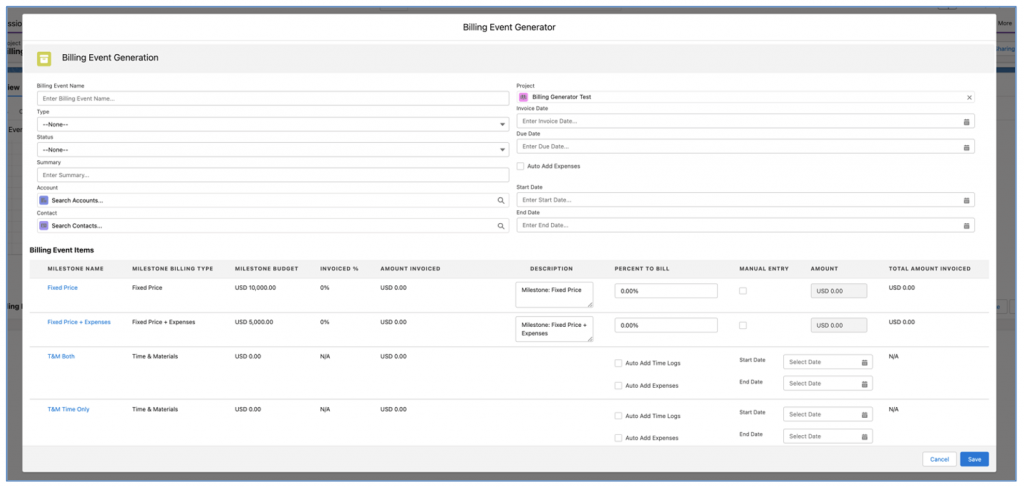
Draft Billing Event Item records will be displayed for each Milestone based on the ‘Milestone Billing Type’ as outlined in the table below.
| Milestone Billing Type | Criteria |
| Fixed Price | Milestone Budget > 0 |
| Fixed Price + Expenses | Milestone Budget > 0 |
| Time & Materials | Related Time Logs where Invoiced is not equal to TRUE and Approval Status = Approved
OR
Related Expenses where Invoiced is not equal to TRUE and Approval Status = Approved |
Depending on the Milestone Billing Type, the Billing Event Item record(s) will be created based on the following scenarios.
Amount specified on the page, by either entering the ‘Percent to Bill’ or by using the ‘Manual Entry’ checkbox to enter the ‘Amount’ value manually. There will be 1 Billing Event Item record created for Fixed Price Milestones.
Amount specified on the page, by either entering the ‘Percent to Bill’ or by using the ‘Manual Entry’ checkbox to enter the ‘Amount’ value manually. There will be 1 Billing Event Item record created for Fixed Price + Expenses Milestones progress payment and potentially another Billing Event Item will be created for any approved, but not yet invoiced Expenses that relate to the Milestone.
There will be 2 Billing Event Item records created for Time & Materials Milestones, based on whether the User selects the ‘Auto Add Time Logs’ and ‘Auto Add Expenses’ checkboxes for the Billing Event Item. One Billing Event Item record will be for the Time Logs that are approved, but not yet invoiced that relate to Actions related to this Milestone, and the other Billing Event Item record will be for the Expenses that are approved, but not yet invoiced that relate to this Milestone.
The User can optionally choose to apply a date range filter to specify a Start Date and End Date that will be factored in when identifying the Time Logs and Expenses that should be invoiced.
The User has the option to add an additional Billing Event Item record for any Expenses that relate to the Project, but are not related to a specific Milestone. This is done by setting the ‘Auto Add Expenses’ checkbox within the Billing Event section of the page. The User can optionally choose to apply a date range filter to specify a Start Date and End Date that will be factored in when identifying the Expenses that should be invoiced.
To enable customers to add additional fields to the Billing Event section of the Generator page, a Field Set called ‘Billing Event Generator Fields’ is available on the Billing Event Object.
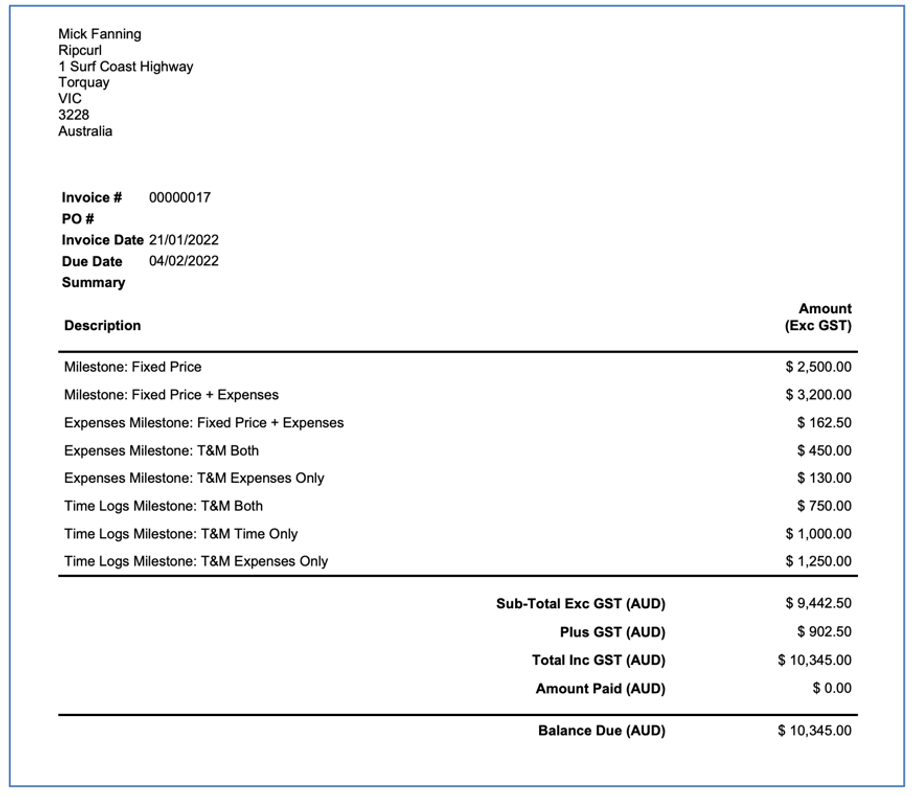
When using the ‘Controlled on Milestones’ Billing Type, Users will be able to choose between the ‘Summary’ or the ‘Detail’ Invoice PDF. This is controlled by the ‘Invoice Template’ on the Billing Event record. By default, it will be set to Summary.
The Summary PDF is shown below.
The Detail PDF is shown below.
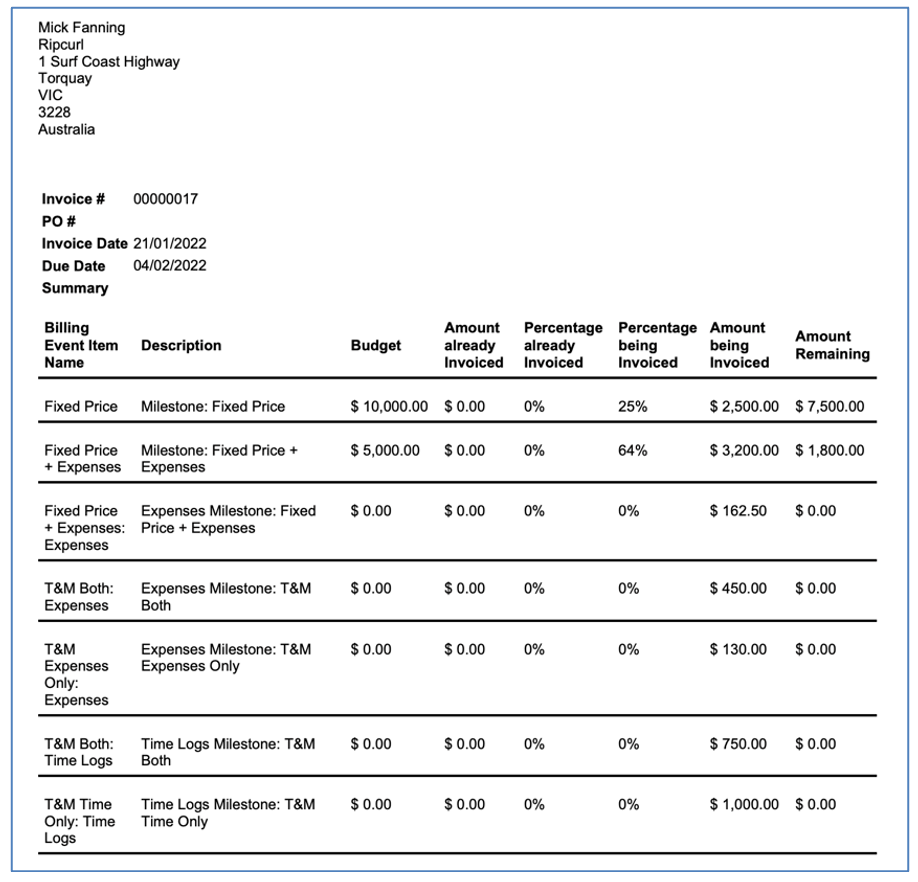
The Time Log and Expense Appendices can be added to both the Summary and Detail PDFs.
The ‘Status Path’ component provides a snapshot of the current Status of all related records at the level below the record you are viewing within the Project Plan. For example, if I’m looking at the Component on the Milestone Page, it will display all of the related Actions. It can be added to the Project, Milestone or Action Lightning Page Layouts using the Lightning App Builder. The Component will dynamically display records as follows:
This Component is read-only, to have it reflect changes, they will need to be applied directly on the individual records.
Each section of the Path will be populated with the Name field from the record. The sections are coloured based on the Status of the record, as outlined below.
The records will be displayed based on the following sort order.
| Milestone | Action | Checklist Item |
| Milestone Sort Order
End Date Start Date Name |
Gantt Sort Order
End Date Start Date Action Name |
Sort Order
End Date Start Date Item Name |
A number of new features have been added to the Opportunity Auto-Generation functionality. Each new feature is detailed below.
A new Custom Object called ‘Product Milestone’ has been added to the solution to provide customers with the ability to associate multiple Milestones to a Product.
The ‘Product Milestone’ Object enables you to associate multiple Milestones to an individual Product. This provides the ability to have multiple Milestones added to the Project Plan when a particular Product is added as an Opportunity Line Item.
For example, if a Product called ‘Website Page’ is sold, it may require 3 different Milestones to be added to the Project Plan (e.g. Design, Build, Content).
For all of the Product-based Generation Method options, Milestones referenced in the ‘Product Milestone’ Object will be added to the Project Plan. If the ‘Milestone Template’ field on the Product record contains a value, this will be used. If this field is empty, Milestones referenced in the ‘Product Milestone’ Object related to the Product will be used.
Across all Generation Methods, any Budget Items related to the Project Template specified on the Opportunity will be created as part of the auto-generation process.
Additional Generation Methods have been added, which provide greater flexibility around generating Projects to meet your requirements. The new Generation Method values are:
These new methods will add the Milestone to the Project Plan multiple times based on the Opportunity Line Item ‘Quantity’ field. For example, if the Opportunity Line Item Quantity field is 3, then the Milestone associated to the Product would be added to the Project 3 times.
The ‘Product Quantity’ Generation Method provides you with the ability to build up a Project Plan based on the Products associated to the Opportunity.
The Project record will be cloned based on the ‘Project Template’ specified on the Opportunity. However, the rest of the project plan (e.g. Milestones, Actions, Checklist Items, Contributors and Dependencies) will be added only if the Product has been associated to a ‘Milestone Template’ If a Product is associated to the Opportunity, the associated Milestone Template will be added to the project potentially multiple times based on the Opportunity Line Item ‘Quantity’ field.
The ‘Base Template + Product Quantity’ Generation Method provides you with the ability to clone a generic Project Plan from one Project Template, as well as building up the Project Plan based on the Products associated to the Opportunity
This Generation Method lets you included standardised Milestones on your Project, as well as including additional Milestones based on the Products sold. For example, you may want to include standard Milestones into every Project Plan, such as ‘Kick-off’, ‘Go Live’ and ‘Customer Success Handover’, but they’re not include as Products that will be added to the Opportunity.
To use this Generation Method, you’ll need your standard Milestones to be on one Project Template, and your Product related Milestones on a different Project. The Project Template containing your standard Milestones will be considered your Base Template, and all of the Milestones within this Project will be added to the Project when it is auto-generated from the Opportunity. Any Milestones related to the Products will also be added, potentially multiple times based on the Opportunity Line Item ‘Quantity’ field.
When specifying the ‘Project Template’ on the Opportunity, you would enter the Project that is your Base Template.
Note: You will need to manually add these new options to the ‘Generation Method’ picklist field on the Opportunity Object. Full details are included in the ‘New Field Overview’ section of this document.
Depending on which Generation Method has been used to auto-generate the Project Plan, the ‘Milestone Budget’ field will be populated. The table below summarises when and how the Milestone Budget field will be populated.
| Generation Method | Population Definition |
| Opportunity | Not populated |
| Products | Opportunity Product Total Sale Price |
| Products – No Duplicates | Sum of the Opportunity Product Total Sale Price for all Opportunity Products that have the same Milestone Template |
| Product Quantity | Value of the Opportunity Product Total Sale Price divided by the Quantity |
| Base Template + Products | Base Template Milestones copied from Template
Product Milestones from the Opportunity Total Sale Price |
| Base Template + Products – No Duplicates | Base Template Milestones copied from Template
Product Milestones from the sum of the Opportunity Product Total Sale Price for all Opportunity Products that have the same Milestone Template |
| Base Template + Product Quantity | Base Template Milestones copied from Template
Product Milestones from the value of the Opportunity Product Total Sale Price divided by the Quantity |
| Any option with multiple ‘Product Milestone’ records | Not populated |
A new field has been added to the Milestone Object called ‘Opportunity Product’. This will be populated with the Opportunity Product (e.g. Opportunity Line Item) that resulted in the Milestone being added to the Project Plan as part of the auto-generation functionality.
A number of new features have been added to Checklist Items. Each new feature is detailed below.
Baseline Dates are now available on the Checklist Item Object and will operate in the same manner as the Baseline Dates of the Project, Milestone and Action Objects.
They will be populated automatically when the Start Date / End Date fields are populated and you will be able to reset the Baseline Dates of the Checklist Items using the Project ‘Set Baseline Dates’ feature.
Checklist Item Baseline Dates will be visible on the Gantt Chart, along with Project, Milestone and Action Baseline Dates using the ‘Toggle Baseline’ button.
In Version 1.56 Checklist Item Hours were introduced, enabling customers to track Scheduled, Completed and Remaining Hours on individual Checklist Items. When using the Hours fields on the Checklist Item records, the Hours fields on the Action would be overridden to be a sum of the Hours on the related Checklist Items.
Whilst some customers want the Action Hours to be overridden in this manner, other customers have requested the ability to enter the hours at the Action level manually and not have them overridden by the Checklist Item hours.
As such, the logic to override the Action Hours when the Checklist Item Hours fields are populated will be controlled by a new Custom Setting that is accessible within the Project Automation Settings section of the Control Pad on the Mission Control Console. The setting is called:
Disable Action Hours Override from Checklist Item Hours
Note: An Install Script will update this setting to TRUE. Therefore if you do wish to have the Action Hours overridden you will need to manually set it back to FALSE.
An enhancement has been made to the logic that automatically creates Contributors for any Role that is assigned as a Checklist Item Owner, which is controlled by the ‘Disable Automated Management of Contributors’ setting within the Project Automation Settings section of the Control Pad on the Mission Control Console.
Previously, a Contributor would only be created for an Item Owner if the Checklist Item had a positive value in either the ‘Hours Scheduled – Billable’ or ‘Hours Scheduled – Non Billable’ field. This logic has been adjusted so that the Contributor record will be created for a Checklist Item Owner even if the hours fields are null or 0 if the Custom Setting is FALSE.
A number of new features have been added in relation to logging time. Each new feature is detailed below.
You are able to prevent Roles from logging time against Actions if they are not assigned to that Action as either the Action Owner, a Contributor or the Item Owner of a Checklist Item related to the Action.
To enable this feature, you need to set the following setting to TRUE within the Project Automation Settings section of the Control Pad on the Mission Control Console.
Disable Unassigned Roles from Logging Time to Action
If this setting is FALSE, any Role will be able to log time against the Action. If it is TRUE, a Role will only be able to log time against the Action if they are assigned as outlined above. If a Role not assigned to the Action attempts to log time against the Action, they will receive a notification as outlined below.
‘Unable to Log Time. You are not assigned to the Action. Please speak to the Project Owner’
You are able to choose whether Time Log hours and associated financials roll up to the Action whether or not the Time Log has been approved.
By default, the hours and associated financials of a Time Log will only be rolled up to the Action once the Approval Status is set to Approved.
If you wish to have the hours and associated financials roll up to the Action immediately regardless of whether or not the Time Log has been approved, you can set the following setting to TRUE within the Project Automation Settings section of the Control Pad on the Mission Control Console.
Disable Time Log Rollup on Approval Status
If this setting is FALSE, the Time Log will need to be approved in order for the hours and associated financials to roll up to the Action. If this setting is TRUE, the hours and associated financials of the Time Log will roll up to the Action immediately, regardless of the Approval Status.
If you enable this feature after you have created Time Logs, you will need to click the ‘Run Script’ button below the setting (see image below).

This script will update any existing Time Logs to set the ‘Roll Up To Action’ checkbox field to TRUE if the Approval Status is ‘Approved’. Once the script has completed, you will receive an email notification if the process was unable to update the Time Logs. If successful, you will see a Success confirmation next to the Run Script button.
If you have Actions that you want to restrict Roles from logging time against, you are able to set the ‘Prevent Time Logs’ field to TRUE. This field is available to be applied at the Project, Milestone and individual Action levels. If you apply it at the Project, all Actions on that Project will be unable to have time logged against them. If you apply it at the Milestone, all Actions relating to that Milestone will be unable to have time logged against them.
Any Action that has the ‘Prevent Time Logs Indicator’ field set to TRUE will be excluded from the Timesheet and logging time will be prohibited from any other pages such as the Whiteboard, Action Pad, etc.
If a User attempts to log time against an Action manually, they will receive the following notification.
‘This Action has been configured to not allow Time Logs. Please speak to the Project Manager’
A number of enhancements have been made to the Create Actions page. Each enhancement is detailed below.
When editing existing records from the ‘Create Actions’ page via the Project record, there is a limit of 100 records being displayed. The Create Actions page is now also accessible from the Milestone record, allowing you to edit existing Actions relating to a particular Milestone within a Project.
To access the Create Actions page from a Milestone record, click the ‘Create Actions’ button as shown below.
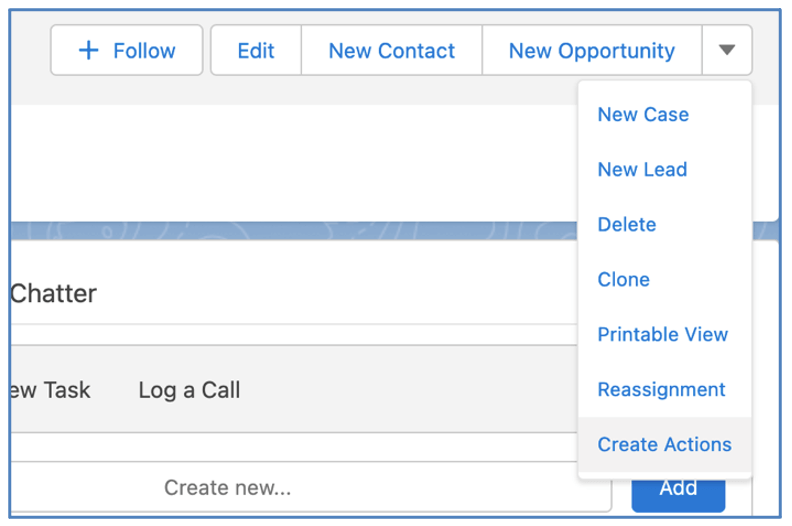
Note: If you do not have access to this button on the Milestone record, please speak with your System Administrator to add it to the Milestone Page Layout.
You are able to add up to 5 x Custom Fields on the Create Actions page. To add Custom Fields to the page, you will need to select the fields within the ‘Create Actions Page Settings’ Tile on the Control Pad of the Mission Control Console, as shown below.

These fields will appear between the ‘Action Notes’ and ‘Non Billable’ fields.
A number of enhancements have been added to the Gantt Chart. Each enhancement is detailed below.
The existing + / – buttons on the Gantt Chart that allow you to collapse and expand record sets (e.g. Actions, Milestones) so you can quickly drill in or out of the level of detail you want to look at have been updated to accommodate Checklist Items.
Previously, when you clicked the button to collapse records when you are viewing Projects, Milestones, Actions & Checklist Items, it would collapse the Actions and the Checklist Items.
These buttons have now been enhanced to treat the Checklist Items as their own record set. Therefore now, when you are viewing Projects, Milestones, Actions & Checklist Items and you click the button to collapse records, only the Checklist Items will be collapsed. An additional click would collapse the Actions and then a subsequent click would collapse the Milestones.
You are able to specify a meaningful description that can be associated to a Milestone Deadline. This description can be entered in the ‘Milestone Deadline Name’ field on the Milestone.
If this field is populated, this description will be displayed on the Milestone Deadline row of the Gantt Chart as shown above.
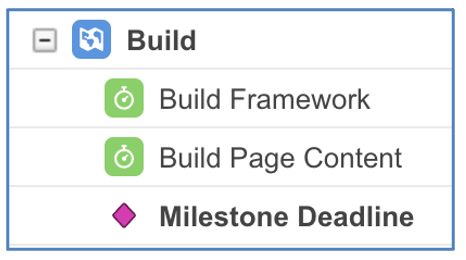
If this field is empty, a generic ‘Milestone Deadline’ description will be displayed on the Milestone Deadline row of the Gantt Chart as shown above.
For each row of the Gantt Chart (e.g. Project, Milestone, Action, Checklist Item) there is a Progress value displayed to the right of bar within the Chart.

This progress information can be turned on / off within the Gantt Chart settings as shown below.
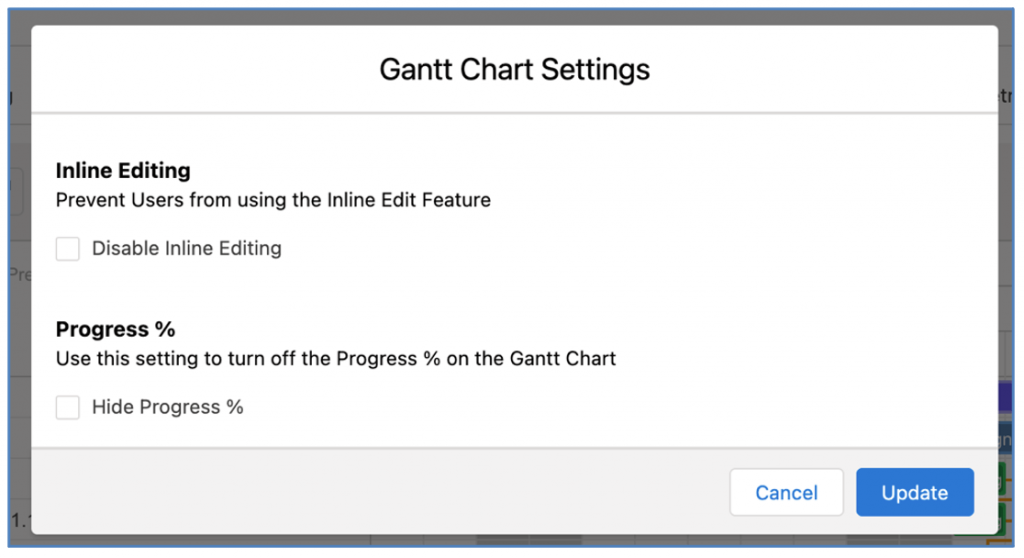
This setting can be controlled by individual Users within their own Gantt Chart Settings or centrally for all Users via the Gantt Chart Settings on the Control Pad of the Mission Control Console.
The Time Logs Tab on both the Project Overview and Client Read Only pages has been adjusted to display the Time Logs in a Data Table instead of a Timeline view. Below is an illustration of the new Data Table.
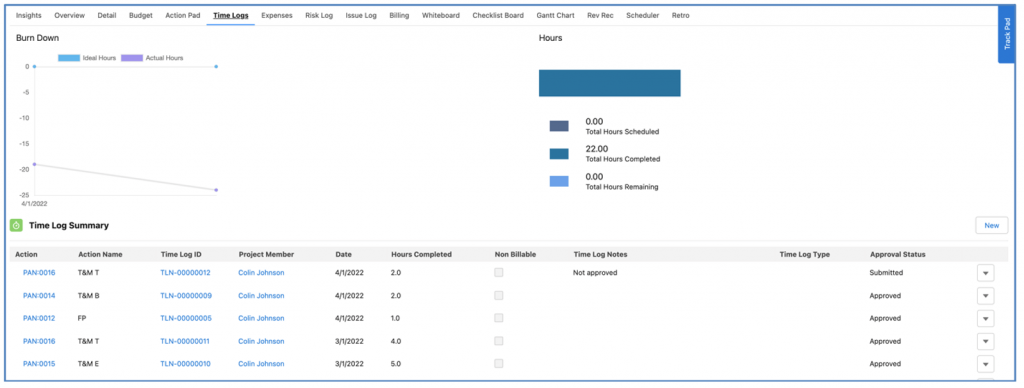
The columns within the Data Table are controlled by a Field Set on the Time Log Object. By default, the following fields are included:
There are separate Field Sets that control the columns for the Project Overview page an the Client Read Only page, these Field Sets are:
Using separate Field Sets enables customers to display different fields internally to what they display externally if required.
A number of minor enhancements have been made to various features. Each enhancement is detailed below.
Previously when a Holiday was added to the system, existing Actions that were scheduled during that same period would not automatically be rescheduled. Logic has been added that will now automatically adjust the Start Date / End Date of Actions that are scheduled on the same dates as a Holiday.
This logic can be turned on / off via a setting within the Project Automation Settings section of the Control Pad on the Mission Control Console. The setting is:
Disable Action Rescheduling around Holidays
In addition to this setting being FALSE, the ‘Auto-generate Role Allocation records’ feature within the Role Allocation Automation Settings needs to be enabled in order for the Actions to be rescheduled.
Note: An Install Script will update this setting to TRUE. Therefore, if you do wish to have the Actions automatically rescheduled when Holidays are created, you will need to manually set it back to FALSE.
Previously Global Holidays were identified by having no value in the ‘Role’ field and no related Holiday Assignment records. To improve the identification of Global Holiday records, a new field has been added to the Holiday Object. The Checkbox field called ‘Global Holiday’ needs to be set to TRUE for a Holiday to now be considered a Global Holiday.
Note: An Install Script will update legacy Global Holiday records setting this field to TRUE.
There are numerous Tiles on the Control Pad of the Mission Control Console that enable you to schedule Apex jobs. These jobs are set to run in the background in context of the User that enabled the job.
If that User becomes inactive (e.g. they leave the business), the job will fail to run and whilst there are notifications available within Salesforce Setup, there was previously no way of identifying this via the Control Pad of the Console.
Therefore, for each Tile on the Control Pad that enables you to schedule an Apex job a warning icon will be displayed to alert customers that action is required in order to reschedule the Apex job via an active User.
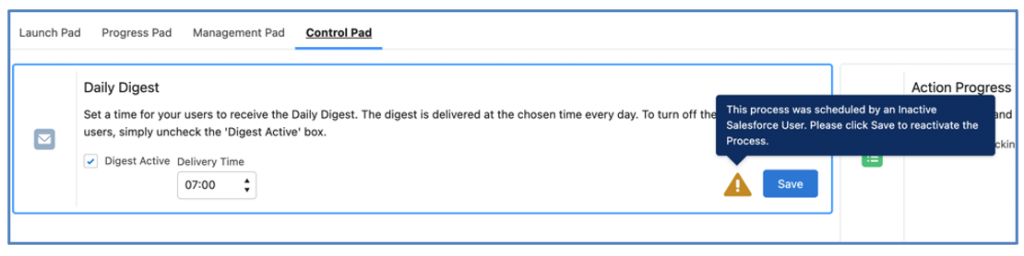
The image above shows the notification where an Apex job was scheduled by an inactive User.
The ‘Project Detail’ page(s) of the Project Status Report have been updated to ensure the Custom Field columns are hidden if they are not being used. This will allow the Standard Field columns to the left of the Custom Field columns to span more of the table.
A number of enhancements have been applied to the Project Clone page, each enhancement is detailed below.
The Project Clone page has been updated to provide customers with the ability to select which fields are visible in the Project field sections of the page. Each section is controlled by a Field Set as outlined below.
| Field Set Name | Default Fields |
| Project Details Clone Fields | Project Name
Project Owner Status Account Project Reference # Contact Category Opportunity Sub Category Program Description |
| Project Settings Clone Fields | Billing Type
Project Budget Billing Rate Cost Rate Billable Day Rate Cost Day Rate Overtime Allowed (Billable) Overtime Allowed (Cost) Non Billable Colour Exclude from Scheduler Colour Hex Exclude from Timesheet Anticipated Project Expenses Exclude from Program Planner Exclude from Daily Digest Display on PMO Dashboard Enforce Dependency Validation Project Owner Timesheet Approval Reqd Project Owner Expense Approval Reqd Role Manager Timesheet Approval Reqd Role Manager Expense Approval Reqd |
| Billing Information Clone Fields | Purchase Order #
Tax Label Billing Cycle Include Time Log Appendix Periodic Billing Frequency Include Expense Appendix Payment Terms Include Non Billable Time in Appendix Retainer Amount Periodic Billing Last Date Periodic Billing Next Date |
This provides customers with the ability to add and remove fields to suit their specific requirements.
A new section has been added to the Project Clone page, located between ‘Clone Settings’ and ‘Milestones & Actions’ that will display ‘Budget Items’. If the Project has related Budget Items, this section will be displayed and will enable the user to clone Budget Items. If the Budget Items are not required, they can be deleted prior to clicking the ‘Clone Project’ button.
The Milestone Clone page has been updated to provide customers with the ability to select which fields are visible in the Milestone field sections of the page. Each section is controlled by a Field Set as outlined below.
| Field Set Name | Default Fields |
| Milestone Details Clone Fields | Milestone Name
Project Milestone Owner Status Exclude from Scheduler Exclude from Timesheet Invoice on Completion Invoice Amount Non Billable Exclude from Billable Capacity Exclude from Gantt Exclude from Status Report Exclude from Client Page |
This provides customers with the ability to add and remove fields to suit their specific requirements.
A number of new fields have been added to the Project & Milestone Objects to summarise fields from the Action Object. These fields are:
The ‘Hours Summary’ Chart on the Insights Tab and Time Logs Tab of the Project Overview has been updated to use the ‘Total Projected Hours Remaining’ field instead of the ‘Total Hours Remaining’ field.
In addition to the new fields above, the formulae of some existing fields have also been modified. These fields are:
For full details of all these new and existing fields, please refer to the ‘New Field Overview’ section of this document.
There is automated logic that updates the Action Status if a User changes the Status of the Milestone. For example, if you determine all Actions within a Milestone have been completed, rather than changing each individual Action, you’re able to change the Milestone Status to ‘Complete’ and that will automatically update all related Actions, setting the Status to ‘Complete’ as well.
However, if for example, you place a Milestone Status ‘On Hold’, all related Actions will have their Status set to ‘On Hold’. When you then take the Milestone off hold (e.g. move it back to Planned or In Progress) none of the related Actions are updated. The User would need to manually adjust each Action individually.
Additional logic has been added to reset the Action Status fields to their prior value before they were placed on hold. When a Milestone is changed from On Hold to either Planned or In Progress, Action Status fields will be updated by reviewing Field History Tracking of the Action Status field to determine the prior value. If Field History Tracking is not configured for the Status field, it will be updated based on the following logic:
In the last release we introduced the ability to associate Time Logs to Issues, adding the following fields to the Issue Object:
These 3 fields have been added to the Issue Log and Issue Manager components.
For your convenience, an Install Script will execute as part of the upgrade process. This will populate various fields on the Role record as outlined below.
| Field / Setting | Value |
| Role Object
View Checklist Board Tab |
TRUE |
| Custom Setting:
Disable Action Hours Override from Checklist Item Hours |
TRUE |
| Time Log Object
Roll Up to Action |
TRUE
If Approval Status = Approved |
| Custom Setting:
Disable Action Rescheduling around Holidays |
TRUE |
| Holiday Object
Global Holiday |
TRUE |
| Checklist Item
Status |
If Project Status is not Complete or Archived = FALSE, the following updates will happen:
If Complete = TRUE, set to Complete If Complete = FALSE & Total Hours Completed > 0, set to In Progress Everything else set to Planned |
A number of new fields have been added to the solution as part of this release. We recommend you add these fields to your Page Layouts. If you are not using the Permission Sets included with Mission Control, we recommend you check the Field Level Security for all of these fields to ensure all appropriate Profiles have the required access.
| Field | Field Type | Comments |
| Forecast ID | Auto-number | Identifies the unique number for the Role Forecast record |
| Role | Lookup (Role) | Links to the Role record this Role Forecast relates to |
| Opportunity | Lookup (Opportunity) | Links to the Opportunity record this Role Forecast relates to |
| Project | Lookup (Project) | Links to the Project record this Role Forecast relates to |
| Billable Hourly Rate | Currency (14, 4) | Identifies the Billable Hourly Rate used for this Role Forecast |
| Cost Hourly Rate | Currency (14, 4) | Identifies the Cost Hourly Rate used for this Role Forecast |
| Billable Hours | Number (16, 2) | Identifies the number of Billable Hours requested for this Role Forecast. Used to determine ‘Hours Forecast – Billable’ |
| Billable Percentage | Percent (16, 2) | Identifies the percentage of Billable Hours requested for this Role Forecast. Used to determine ‘Hours Forecast – Billable’ |
| Hours Forecast – Billable | Number (16, 2) | Identifies the number of Billable Hours assigned to this Role on this Role Forecast |
| Non Billable Hours | Number (16, 2) | Identifies the number of Non Billable Hours requested for this Role Forecast. Used to determine ‘Hours Forecast – Non Billable’ |
| Non Billable Percentage | Percent (16, 2) | Identifies the percentage of Non Billable Hours requested for this Role Forecast. Used to determine ‘Hours Forecast – Non Billable’ |
| Hours Forecast – Non Billable | Number (16, 2) | Identifies the number of Non Billable Hours assigned to this Role on this Role Forecast |
| Total Hours Forecast | Formula (Number 16, 2) | Formula: Calculates the Total Hours Forecast based on ‘Hours Forecast – Billable’ + ‘Hours Forecast – Non Billable’ |
| Start Date | Date | Identifies the Forecasted Start Date |
| Working Days | Number (16, 2) | Identifies the number of Working Days expected as part of this Role Forecast |
| End Date | Date | Identifies the Forecasted End Date |
| Skill | Lookup (Skill) | Links to the Skill record this Role Forecast relates to |
| Hours Forecast Value (Billable) | Formula (Currency 16, 2) | Formula: Calculates the Hours Forecast Value (Billable) based on ‘Hours Forecast – Billable’ x ‘Billable Hourly Rate’ |
| Hours Forecast Value (Cost) | Formula (Currency 16, 2) | Formula: Calculates the Hours Forecast Value (Cost) based on ‘Total Hours Forecast’ x ‘Cost Hourly Rate’ |
| Forecast P&L | Formula (Currency 16, 2) | Formula: Calculates the Forecast P&L based on ‘Hours Forecast Value (Billable)’ – ‘Hours Forecast Value (Cost)’ |
| Forecast GM% | Formula (Percent 16, 2) | Formula: Calculates the Forecast GM% based on ‘Forecast P&L’ / ‘Hours Forecast Value (Billable)’ |
| Manual Allocation | Checkbox | When checked, denotes child Role Allocation records are manually allocated |
| Field | Field Type | Comments |
| Allocation ID | Auto-number | Identifies the unique number for the Role Allocation record |
| Role | Lookup (Role) | Links to the Role record this Role Allocation relates to |
| Role Forecast | Lookup (Role Forecast) | Links to the Role Forecast record this Role Allocation relates to |
| Action | Lookup (Action) | Links to the Action this Role Allocation relates to |
| Contributor | Lookup (Contributor) | Links to the Contributor record this Role Allocation relates to |
| Skill | Formula (Text) | Formula: Identifies the Skill Name referenced on the Action or Role Forecast this Role Allocation relates to |
| Date | Date | Identifies the Date this Role Allocation relates to |
| Hours Scheduled – Billable | Number (16, 2) | Identifies the number of Billable Hours assigned to this Role Allocation from the Role Forecast or Action it relates to |
| Hours Scheduled – Non Billable | Number (16, 2) | Identifies the number of Non Billable Hours assigned to this Role Allocation from the Role Forecast or Action it relates to |
| Total Hours Scheduled | Formula (Number 16, 2) | Formula: Calculates the Total Hours Scheduled based on ‘Hours Scheduled – Billable’ + ‘Hours Scheduled – Non Billable’ |
| Hours Scheduled Value (Billable) | Currency (16, 2) | Identifies the scheduled billable value of this Role Allocation by multiply the Hours Scheduled – Billable with the appropriate Billable Hourly Rate |
| Hours Scheduled Value (Cost) | Currency (16, 2) | Identifies the scheduled cost value of this Role Allocation by multiply the Total Hours Scheduled with the appropriate Cost Hourly Rate |
| Hours Completed – Billable | Roll Up Summary | Roll up summary of the Hours Completed – Billable field on related Role Actual records |
| Hours Completed – Non Billable | Roll Up Summary | Roll up summary of the Hours Completed – Non Billable field on the related Role Actual records |
| Total Hours Completed | Formula (Number 16, 2) | Formula: Calculates the Total Hours Completed based on ‘Hours Completed – Billable’ + ‘Hours Completed – Non Billable’ |
| Hours Completed Value (Billable) | Roll Up Summary | Roll Up summary of the Hours Completed Value (Billable) field on related Role Actual records |
| Hours Completed Value (Cost) | Roll Up Summary | Roll Up summary of the Hours Completed Value (Cost) field on related Role Actual records |
| Allocation Type | Formula (Text) | Formula: Identifies whether this Role Allocation relates to a Role Forecast, Action or Holiday |
| Manual Allocation | Formula (Checkbox) | Displays the Manual Allocation value of the parent Action, Role Forecast or Holiday record |
| Field | Field Type | Comments |
| Role Actual ID | Auto-number | Identifies the unique number for the Role Actual record |
| Role | Lookup (Role) | Links to the Role record this Role Actual relates to |
| Time Log | Lookup (Time Log) | Links to the Time Log record this Role Actual relates to |
| Holiday | Lookup (Holiday) | Links to the Holiday record this Role Actual relates to |
| Role Allocation | Master-Detail (Role Allocation) | Links to the Role Allocation record this Role Actual relates to |
| Date | Date | Identifies the Date this Role Actual relates to |
| Hours Completed – Billable | Number (16, 2) | Identifies the number of Billable Hours completed from the record this Role Actual relates to (e.g. Time Log or Holiday) |
| Hours Completed – Non Billable | Number (16, 2) | Identifies the number of Non Billable Hours completed from the record this Role Actual relates to (e.g. Time Log or Holiday) |
| Total Hours Completed | Formula (16, 2) | Formula: Calculates the Total Hours Completed based on ‘Hours Completed – Billable’ + ‘Hours Completed – Non Billable’ |
| Hours Completed Value (Billable) | Currency (16, 2) | Identifies the completed billable value of this Role Actual by multiplying the Hours Completed – Billable with the appropriate Billable Hourly Rate |
| Hours Completed Value (Cost) | Currency (16, 2) | Identifies the completed cost value of this Role Actual by multiplying the Total Hours Completed with the appropriate Cost Hourly Rate |
| Non Billable | Formula (Checkbox) | Formula: Identifies if the Time Log this Role Actual record relates to was marked as Non Billable |
| Exclude from Billable Capacity | Formula (Checkbox) | Formula: Identifies if the Time Log this Role Actual record relates to was marked as Exclude from Billable Capacity |
| Field | Field Type | Comments |
| Role Availability ID | Auto-Number | Identifies the unique number for the Role Availability record |
| Role | Lookup (Role) | Links to the Role record this Role Availability relates to |
| Start Date | Date | Identifies the Start Date the Role Availability applies from |
| End Date | Date | Identifies the End Date the Role Availability applies to |
| Active | Checkbox | Identifies if the Role Availability record is set as the active record related to this Role |
| Monday | Number (16, 2) | Identifies how many hours the Role is set to work on this day of the week |
| Tuesday | Number (16, 2) | Identifies how many hours the Role is set to work on this day of the week |
| Wednesday | Number (16, 2) | Identifies how many hours the Role is set to work on this day of the week |
| Thursday | Number (16, 2) | Identifies how many hours the Role is set to work on this day of the week |
| Friday | Number (16, 2) | Identifies how many hours the Role is set to work on this day of the week |
| Saturday | Number (16, 2) | Identifies how many hours the Role is set to work on this day of the week |
| Sunday | Number (16, 2) | Identifies how many hours the Role is set to work on this day of the week |
| Hours per Week | Formula (Number 16, 2) | Formula: Calculates the total hours the Role will work during the week based on the sum of all individual Day values |
| Billable Target | Percent (16, 2) | Identifies the percentage of billable work per week the Role should achieve |
| Days per Week | Formula (Number 16, 2) | Formula: Identifies how many days contain a value greater than 0 to calculate the number of days per week the Role works |
| Field | Field Type | Comments |
| View Checklist Board Tab | Checkbox | Identifies if the User linked to this Role has the ability to view the Project Overview Checklist Board Tab |
| Project Overview Default Tab | Picklist | Existing Field
The following value needs to be manually added to this Picklist.
Checklist Board |
| Monday | Number (16, 2) | Identifies how many hours the Role is set to work on this day of the week. Updated automatically to match the Active Role Availability record if this feature is being utilised and activated from the Control Pad of the Console |
| Tuesday | Number (16, 2) | Identifies how many hours the Role is set to work on this day of the week. Updated automatically to match the Active Role Availability record if this feature is being utilised and activated from the Control Pad of the Console |
| Wednesday | Number (16, 2) | Identifies how many hours the Role is set to work on this day of the week. Updated automatically to match the Active Role Availability record if this feature is being utilised and activated from the Control Pad of the Console |
| Thursday | Number (16, 2) | Identifies how many hours the Role is set to work on this day of the week. Updated automatically to match the Active Role Availability record if this feature is being utilised and activated from the Control Pad of the Console |
| Friday | Number (16, 2) | Identifies how many hours the Role is set to work on this day of the week. Updated automatically to match the Active Role Availability record if this feature is being utilised and activated from the Control Pad of the Console |
| Saturday | Number (16, 2) | Identifies how many hours the Role is set to work on this day of the week. Updated automatically to match the Active Role Availability record if this feature is being utilised and activated from the Control Pad of the Console |
| Sunday | Number (16, 2) | Identifies how many hours the Role is set to work on this day of the week. Updated automatically to match the Active Role Availability record if this feature is being utilised and activated from the Control Pad of the Console |
| Days per Week | Formula (Number 16, 2) | Formula: Identifies how many days contain a value greater than 0 to calculate the number of days per week the Role works |
| Field | Field Type | Comments |
| Hours Completed – Billable | Roll Up Summary | Existing Field Change
The Filter Logic on this field has been changed as outlined below.
Old Logic Non Billable Tracker = FALSE Approval Status = Approved
New Logic Non Billable Tracker = FALSE Roll Up to Action = TRUE |
| Hours Completed – Non Billable | Roll Up Summary | Existing Field Change
The Filter Logic on this field has been changed as outlined below.
Old Logic Non Billable Tracker = TRUE Approval Status = Approved
New Logic Non Billable Tracker = TRUE Roll Up to Action = TRUE |
| Gantt Collapsed | Checkbox | When checked, indicates the Action is collapsed on the Gantt |
| Prevent Time Logs | Checkbox | Identifies if Time Logs should be prevented from being created for this Action |
| Prevent Time Logs Indicator | Formula (Checkbox) | Formula: Identifies if Time Logs should be prevented from being created for this Action. Will be TRUE if either the Action or parent Milestone field is set to TRUE |
| Hours Allocated – Billable | Number (16, 2) | Identifies the sum of billable hours from related Role Allocation records |
| Hours Allocated – Non Billable | Number (16, 2) | Identifies the sum of non billable hours from related Role Allocation records |
| Total Hours Allocated | Formula (Number 16, 2) | Formula: Calculate ‘Hours Allocated – Billable’ + ‘Hours Allocated Non Billable’ |
| Allocation Variance – Billable | Formula (Number 16, 2) | Formula: Calculates the difference between ‘Hours Scheduled – Billable’ and ‘Hours Allocated – Billable’ |
| Allocation Variance – Non Billable | Formula (Number 16, 2) | Formula: Calculates the difference between ‘Hours Scheduled – Non Billable’ and ‘Hours Allocated – Non Billable’ |
| Allocation Variance – Total | Formula (Number 16, 2) | Formula: Calculates the difference between ‘Total Hours Scheduled’ and ‘Total Hours Allocated’ |
| Manual Allocation | Checkbox | When checked, denotes child Role Allocation records are manually allocated |
| Field | Field Type | Comments |
| Status | Picklist | Identifies the status of the Checklist Item. Picklist values: Planned; In Progress; On Hold; Complete; Cancelled |
| Card Size | Text (40) | Used for persistent size on the Checklist Board |
| Board Priority Order | Number (16, 2) | Identifies the vertical position of the Checklist Item on the Checklist Board |
| Baseline Start Date | Date | Tracks the original Start Date for this Checklist Item |
| Baseline End Date | Date | Tracks the original End Date for th is Checklist Item |
| Field | Field Type | Comments |
| Roll Up to Action | Checkbox | Identifies whether the Hours Completed and associated financial information should be rolled up to the Action fields |
| Field | Field Type | Comments |
| Global Holiday | Checkbox | Identifies if this Holiday is a Global Holiday that should be allocated to all Roles |
| Field | Field Type | Comments |
| Total Remaining | Formula (Currency 16, 2) | Existing Field
The Formula has been changed as outlined below.
Old Formula IF(amc__Non_Billable__c = TRUE , 0, IF(ISPICKVAL( amc__Billing_Type__c , “Fixed Price”), amc__Cost_Budget__c – (amc__Amount_Invoiced__c – amc__Total_Credited__c), IF(ISPICKVAL( amc__Billing_Type__c, “Fixed Price + Expenses”), amc__Cost_Budget__c – (amc__Amount_Invoiced__c – (amc__Expenses_Invoiced__c + amc__Total_Credited__c)) ,(amc__Hours_Scheduled_Cost__c + IF(amc__Anticipated_Project_Expenses__c > amc__Actual_Project_Expenses__c, amc__Anticipated_Project_Expenses__c, amc__Actual_Project_Expenses__c – amc__Expenses_Invoiced__c)) – (amc__Amount_Invoiced__c – amc__Total_Credited__c))))
New Formula IF(amc__Non_Billable__c = TRUE , 0, IF(ISPICKVAL( amc__Billing_Type__c , “Fixed Price”), amc__Cost_Budget__c – (amc__Amount_Invoiced__c – amc__Total_Credited__c), IF(ISPICKVAL( amc__Billing_Type__c, “Fixed Price + Expenses”), amc__Cost_Budget__c – (amc__Amount_Invoiced__c – (amc__Expenses_Invoiced__c + amc__Total_Credited__c)) ,(amc__Hours_Scheduled_Cost__c + IF(amc__Anticipated_Project_Expenses__c > amc__Actual_Project_Expenses__c, amc__Anticipated_Project_Expenses__c, amc__Actual_Project_Expenses__c – amc__Expenses_Invoiced__c)) – (amc__Amount_Invoiced__c – amc__Total_Credited__c)))) |
| Billing Type | Picklist | Existing Field
The following value needs to be manually added to this Picklist
Controlled on Milestones |
| Projected Hours Remaining – Billable | Roll Up Summary | Identifies the projected number of billable hours remaining on all Actions within this Project |
| Projected Hours Remaining – Non Billable | Roll Up Summary | Identifies the projected number of non billable hours remaining on all Actions within this Project |
| Total Projected Hours Remaining | Formula (Number 16, 2) | Identifies the total projected number of hours remaining on all Actions within this Project |
| Projected Total Hours – Billable | Formula (Number 16, 2) | Identifies the total projected number of billable hours on all Actions within this Project. Formula: ‘Hours Completed – Billable’ + ‘Projected Horus Remaining – Billable’ |
| Projected Total Hours – Non Billable | Formula (Number 16, 2) | Identifies the total projected number of non billable hours on all Actions within this Project. Formula: ‘Hours Completed – Non Billable’ + ‘Projected Hours Remaining – Non Billable’ |
| Projected Total Hours | Formula (Number 16, 2) | Identifies the total projected hours on all Actions within this Project. Formula: ‘Total Hours Completed’ + ‘Total Projected Hours Remaining’ |
| Project Completion Status | Formula (Percent) | Existing Field
The formula field has been changed as follows.
Old Formula If(ISPICKVAL(amc__Status__c, “Complete”) , 1 ,If(amc__Hours_Completed__c = 0, If(amc__Total_Actions__c > 0, amc__Complete_Actions__c / amc__Total_Actions__c, 0), amc__Hours_Completed__c / ( amc__Hours_Completed__c + amc__Hours_Remaining__c )))
New Formula If(ISPICKVAL(amc__Status__c, “Complete”) , 1 ,If(OR(amc__Total_Hours_Scheduled__c = 0, amc__Total_Hours_Completed__c = 0), If(amc__Total_Actions__c > 0, amc__Complete_Actions__c / amc__Total_Actions__c, 0), amc__Total_Hours_Completed__c / ( amc__Total_Hours_Completed__c + amc__Total_Projected_Hours_Remaining__c ))) |
| Prevent Time Logs | Checkbox | Identifies if Time Logs should be prevented from being created for Actions within this Project |
| Field | Field Type | Comments |
| Milestone Billing Type | Picklist | Identifies the Billing Type used for this Milestone. Picklist values: Fixed Price; Fixed Price + Expenses; Time & Materials |
| Amount Invoiced | Currency (16, 2) | Identifies the Total Invoiced value based on the ‘Amount’ field of all related Billing Events where Type = Invoice and Status = Issued |
| Invoiced % | Formula (Percent 16, 2) | Formula calculates Amount Invoiced / Milestone Budget |
| Amount Remaining | Formula (Currency 16, 2) | Formula calculates Milestone Budget – Amount Invoiced |
| Opportunity Product | Lookup (Opportunity Product) | Identifies the Opportunity Product relating to the Opportunity that this Milestone was auto-generated from |
| Milestone Deadline Name | Text (255) | Identifies the description of the Milestone Deadline |
| Projected Hours Remaining – Billable | Roll Up Summary | Identifies the projected number of billable hours remaining on all Actions within this Milestone |
| Projected Hours Remaining – Non Billable | Roll Up Summary | Identifies the projected number of non billable hours remaining on all Actions within this Milestone |
| Total Projected Hours Remaining | Formula (Number 16, 2) | Identifies the total projected number of hours remaining on all Actions within this Milestone |
| Projected Total Hours – Billable | Formula (Number 16, 2) | Identifies the total projected number of billable hours on all Actions within this Milestone. Formula: ‘Hours Completed – Billable’ + ‘Projected Hours Remaining – Billable’ |
| Projected Total Hours – Non Billable | Formula (Number 16, 2) | Identifies the total projected number of non billable hours on all Actions within this Milestone. Formula: ‘Hours Completed – Non Billable’ + ‘Projected Hours Remaining – Non Billable’ |
| Projected Total Hours | Formula (Number 16, 2) | Identifies the total projected hours on all Actions within this Milestone. Formula: ‘Total Hours Completed’ + ‘Total Projected Hours Remaining’ |
| Milestone Completion Status | Formula (Percent) | Existing Field
The formula has been changed as follows.
Old Formula If(ISPICKVAL(amc__Status__c, “Complete”) , 1 ,If(amc__Hours_Completed__c = 0, If(amc__Total_Actions__c > 0, amc__Complete_Actions__c / amc__Total_Actions__c, 0), amc__Hours_Completed__c / ( amc__Hours_Completed__c + amc__Hours_Remaining__c )))
New Formula If(ISPICKVAL(amc__Status__c, “Complete”) , 1 ,If(OR(amc__Total_Hours_Scheduled__c = 0, amc__Total_Hours_Completed__c = 0), If(amc__Total_Actions__c > 0, amc__Complete_Actions__c / amc__Total_Actions__c, 0), amc__Total_Hours_Completed__c / ( amc__Total_Hours_Completed__c + amc__Total_Projected_Hours_Remaining__c ))) |
| Prevent Time Logs | Checkbox | Identifies if Time Logs should be prevented from being created for Actions within this Milestone |
| Prevent Time Logs Indicator | Formula (Checkbox) | Formula: Identifies if Time Logs should be prevented from being created for Actions within this Milestone. Will be TRUE if either the Milestone or the parent Project field is set to TRUE |
| Field | Field Type | Comments |
| Milestone | Lookup (Milestone) | Existing Field
A Lookup Filter has been applied to this field to only show Milestones that relate to the Project this Billing Event relates to |
| Invoice Template | Picklist | Identifies whether the Summary or Detail Template is used when generating the Invoice PDF. Picklist values: Summary; Detail. Default value is Summary |
| Field | Field Type | Comments |
| Milestone | Lookup (Milestone) | Identifies the Milestone this Billing Event Item relates to |
| Field | Field Type | Comments |
| Generation Method | Picklist | Existing Field
The following values need to be manually added to this field.
Product Quantity Base Template + Product Quantity |
| Field | Field Type | Comments |
| PMID | Auto-number | Identifies the unique number for this Product Milestone record |
| Product | Lookup (Product) | Links to the Product that will require this Milestone as part of the work required to be delivered on the Project when this Product is associated to an Opportunity |
| Milestone | Lookup (Milestone) | Links to the Milestone that will be added as part of the work required to deliver this Product when auto-generating a new Project from the Opportunity |
| Project Unit | Picklist | Identifies the unit of measure for calculating the total hours required on the Actions required for this Product & Milestone. Picklist values: Day; Hour; Source |
Mission Control will be made available based on the following release schedule.
18th February 2022 – Available for manual upgrade from the AppExchange
26th February 2022 – Automatic upgrade to all Sandbox Orgs
5th March 2022 – Automatic upgrade to all Production Orgs
To manually upgrade to the new version of Mission Control in your organisation, please follow the steps below:
We have pre-recorded the ‘What’s New’ webinar to provide further information on how to get the best out of the new features. To access this webinar, please view the ‘Release Notes’ section of the Mission Control Support Centre – www.aprika.com/mc-support
Some of the new features included in this release of Mission Control have come from ideas submitted from existing clients. If you have an idea for enhancing Mission Control, you can submit it via email to [email protected].
If you have any questions regarding this release notification, please do not hesitate to contact us at [email protected].