Mission Control – Version 1.54 Release Notification
15 May 2020
A new version of Mission Control (version 1.54) will be released on the AppExchange on Friday 15th May 2020. This notification has been issued to existing Mission Control users. It contains an overview of the new features available with this release, along with instructions on how to upgrade to the new version.
What’s New?
This release includes a number of new features, along with some enhancements to existing functionality, including:
Let’s get stuck in to the detail…
Project Request Object
The Auto-Generation feature on the Opportunity has been well received by customers, and several requests were submitted to have similar functionality available to use with other Standard / Custom Objects.
The ‘Project Request’ Object enables you to create a request for a new Project from any Standard or Custom Object. The Project Request record can be created, then reviewed prior to creating the Project, or it can automatically create the Project.
The Project Request Object has Lookup fields to the following Standard Objects:
If you wish to leverage this feature from any other Standard or Custom Object, you will need to add a Lookup field to that Object on the Project Request Object.
The Project Request record can be created manually, or automatically via a Process Builder. The key fields required for the Project Request record are outlined below:
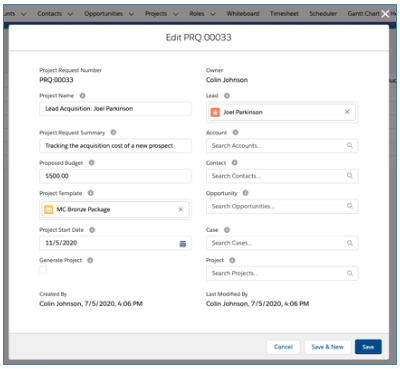
The Project specified as the ‘Project Template’ will be cloned in its entirety, including all related Milestones, Actions, Checklist Items, Contributors and Dependencies, with the first Action being scheduled on the ‘Project Start Date’.
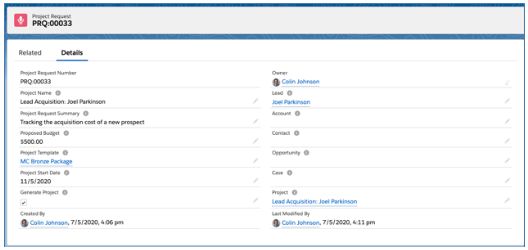
To create the Project automatically from the Project Request record, you must set the ‘Generate Project’ field to TRUE. Once saved, the newly created Project will be populated in the ‘Project’ field, as shown below:
The Project Request Related List will need to be manually added to any of the Objects you wish to be able to have access to it from.
Project Request Field Mapping
When auto-generating a Project, the following fields will be set by default:
| Project Field | Default Value |
| Project Name | Project Request: Project Name |
| Project Budget | Project Request: Proposed Budget |
| Archived | FALSE |
| Template | FALSE |
| Status | Planned |
Should you wish to override any of these default mappings, or if you would like to map additional fields from Custom Objects you add to the Project Request Object, you can manage your own custom field mapping using the ‘Auto-Generation Field Mapping’ Tile on the Control Pad of the Mission Control Console, as shown below:
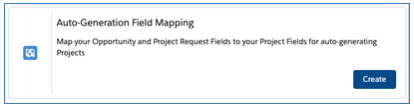
Clicking the ‘Create’ button will open up the Field Mapping component, as shown below:
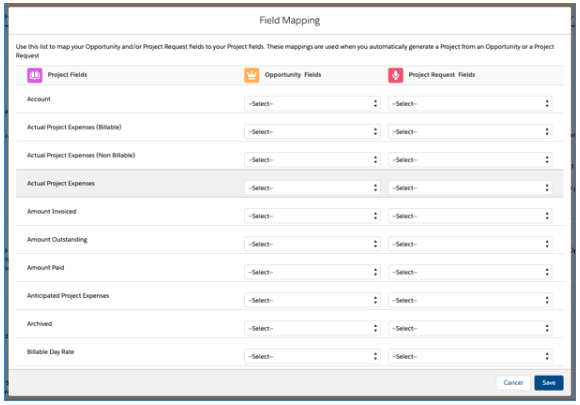
From here, you are able to map a Project field to a Project Request field. This mapping will then ensure that the Project Request field gets populated into the Project field as part of the auto-generation process.
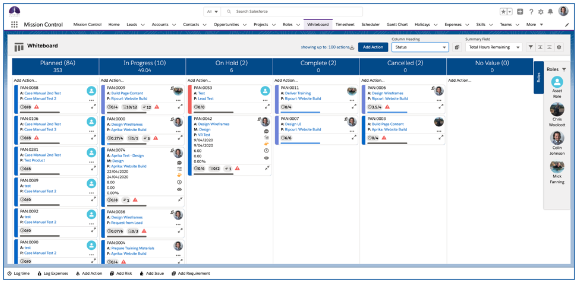
New Kanban Whiteboard
The Whiteboard has had a major overhaul, taking into account feedback from a variety of customers. Whilst the overall layout of the Whiteboard won’t appear to have changed much, it’s now packed with a lot more power.
The Whiteboard is a ‘Kanban’ board that enables you to visualise all of your Actions based on their current Status.
Each Action is displayed as a ‘Sticky Note’, or ‘Card’ on the Whiteboard, showing details such as:
You can drag and drop the Action cards from one column to another. For example, if you have an Action that has progressed from ‘Planned’ to ‘In Progress’, you can simply drag it from the Planned column and drop it into the In Progress column.
Note: When you log time against a ‘Planned’ Action, it will automatically get updated to ‘In Progress’.
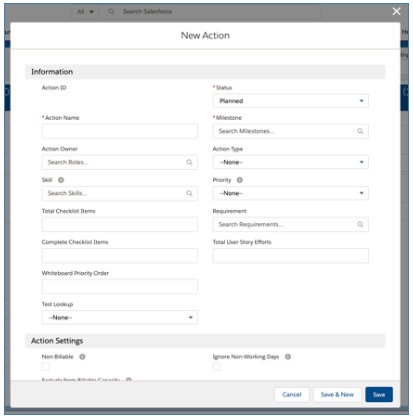
Add Action
You can add a new Action by clicking the blue ‘Add Action’ button located in the header of the Whiteboard.

This will open up the New Action modal, where you are able to enter full details for a new Action and then click Save.
Quick Add Action
You can quickly add a new Action by clicking the ‘Add Action’ just below the column header. This will open up the Quick Add section, as shown below:
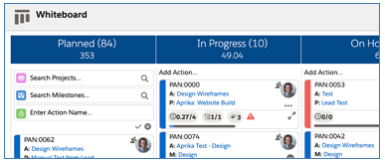
Simply select the Project and Milestone, type in the Action Name, and hit enter. The Action will be created and the fields reset to enable you to add another Action if required.
If you have a Validation Rule or field requirement that prevents the Action from being created, a New Action page will open up where you can complete the required fields and save the record.
Action Card
Below is an example of an Action Card on the Whiteboard.
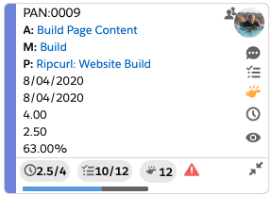
The Action Card offers you a lot of functionality, each feature of the card is explained below.
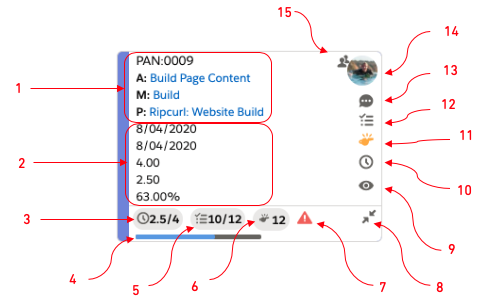
Collapse / Expand All
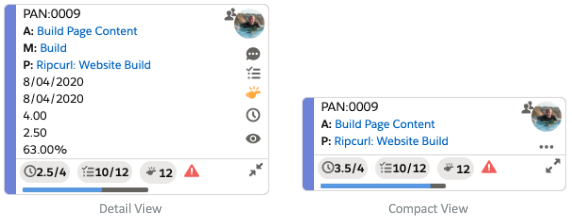
The Action Cards can show a lot of information, and as such, can take up a fair amount of space, and you may wish to have a more compact view. The Cards can be collapsed or expanded as required between the ‘Detail’ and ‘Compact’ views, based on how much information you wish to view. Below are examples of the expanded and collapsed Cards.
Within the Whiteboard Settings, you can specify the default view for any new Actions. You are able to collapse / expand individual Actions by clicking the ![]() or
or ![]() icon in the bottom right of the Card. You are also able to collapse / expand all Actions at once by clicking the Expand All or Collapse All button within the Whiteboard Header, as shown below.
icon in the bottom right of the Card. You are also able to collapse / expand all Actions at once by clicking the Expand All or Collapse All button within the Whiteboard Header, as shown below.

Action Sort Order
By default, the Action Cards will be displayed based on the following values:
If you need to reorganize the priority of Actions within a specific column, you are able to drag and drop them up or down within the column and that adjustment will be persistently remembered.
Column Heading
You’re able to dynamically adjust the Column Headings. By default, Status columns will be displayed. However, if you want to switch from viewing columns for Status to Priority, you just need to select the Picklist in the ‘Column Heading’ field as below.

This will dynamically switch the column headings on the Whiteboard and rearrange all of the Actions based on their ‘Priority’ value.

The Column Heading options include all Picklist fields on the Action, plus the ability to select ‘Milestone’ if the Whiteboard is filtered to just display Actions relating to one Action.
You are also able to select which values within the selected Column Heading field are displayed as columns. For example, if Status is selected, by default, all values will have a column displayed, as shown below.

However, you can choose which options you wish to be displayed by clicking the ![]() icon.
icon.
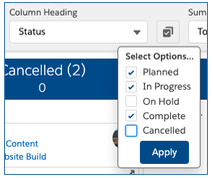
Once you make the selection and click Apply, only the selected values will have a column displayed. This will be persistently remembered until the Column Heading field is changed.

Summary Field
You’re able to dynamically adjust the Summary Field. By default, the ‘Summary Field’ will be set to Total Hours Remaining. You have the option to change this to a range of other Number or Percent fields on the Action Object.
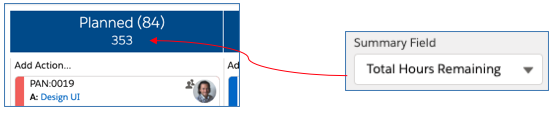
The Summary Field will be persistently remembered for each User.
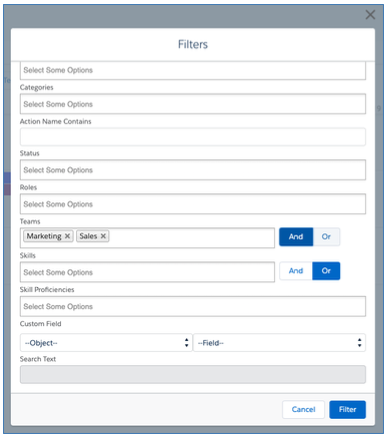
Action Filters
You can apply any combination of filters to make sure you’re viewing the Actions that are most important to you. Simply click on the Filter icon to open up the Filters modal and apply the filters as required.

The filters can be applied as required, alternatively, you can save any Filter selection, and that will be persistently applied each time you visit the Whiteboard.
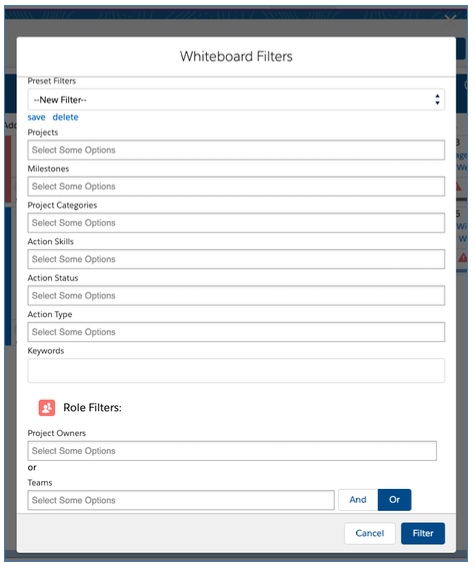
Preset Filters are created and accessed by individual Users and cannot be shared with other Users.
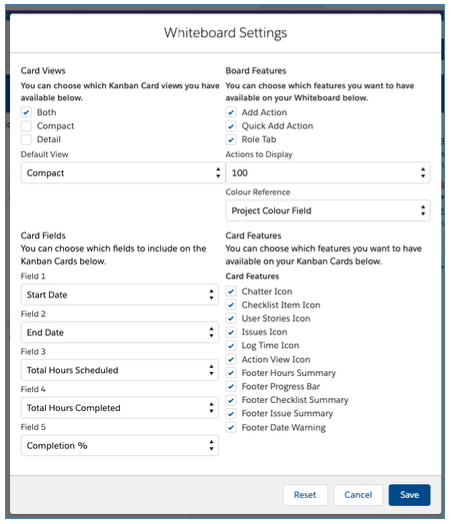
Whiteboard Settings
The Whiteboard Settings modal enables you to customise various settings to control which features are accessible on the Whiteboard.
These Whiteboard Settings can be controlled by each individual User by clicking on the ![]() icon on the Whiteboard. Alternatively, you can choose to override these settings at an organisation-wide level from the Control Pad of the Console. If you override from the Control Pad, Users will no longer have access to the Settings icon on the Whiteboard.
icon on the Whiteboard. Alternatively, you can choose to override these settings at an organisation-wide level from the Control Pad of the Console. If you override from the Control Pad, Users will no longer have access to the Settings icon on the Whiteboard.
Roles Tab
The ‘Roles’ Tab located on the right-hand-side of the Whiteboard allows you to view all of the active Roles within Mission Control.
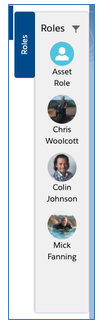
You can expand / collapse the Tab, which will be persistently remembered between visits to the Whiteboard. Therefore, if you don’t wish to use the Role Tab, you can keep it collapsed.
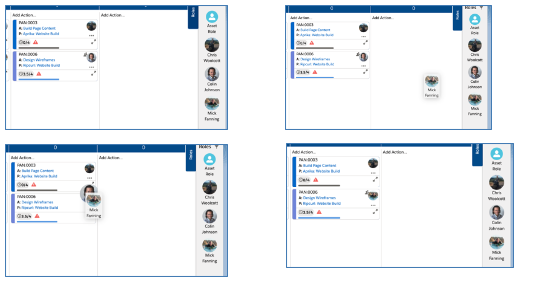
The primary purpose of the Roles Tab is to enable you to re-assign an Action from one owner to another. You can do this by dragging and dropping the right person on top of the image of the existing Action Owner, which will transfer ownership, as shown below.
You can filter to find Roles that match the criteria you require. For example, you may be looking for Roles that have a specific Skill or are a member of a particular Team. To access the Role Filters, click the Filter icon at the top of the Role Tab, which will open the Role Filters modal as shown below.
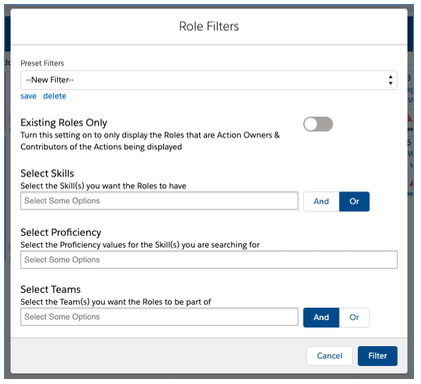
Within the Role Filters, you can:
The filters can be applied as required, alternatively, you can save any Filter selection, and that will be persistently applied each time you visit the Whiteboard.
Case Integration
You are now able to log time directly from a Case record! A new field has been added to the Case Object which allows a Case to be related to an Action within a Project. The ‘Add Action’ and ‘Log Time’ components have been enhanced to enable you to add them to your Lightning Experience Page Layout via the Lightning App Builder.
To log time from a Case, you need to ensure the ‘Action’ field is added to the Case Page Layout. You will also need to edit the Case Page within the Lightning App Builder and add the ‘Add Action’ and ‘Log Time’ Tabs to the page, as shown below.
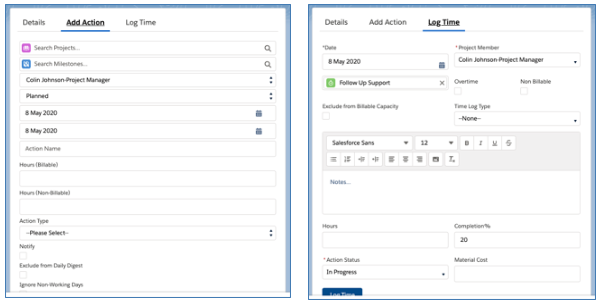
Once you have associated the Case to an Action, the Log Time component will automatically identify the correct Action to associate the Time Log to. The Time Log will then be created and relate to both the Action and the Case.
A Permission Set is available within Mission Control that can be assigned to Users that require to log time from the Case Object. This Permission Set is called ‘Mission Control Case Fields’.
Note: This functionality is only available within Lightning Experience.
New Create Actions Page
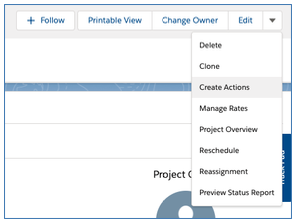
The existing ‘Create Actions’ page has been enhanced to provide additional functionality, including the ability to edit existing Actions.
The ‘Create Actions’ page is accessible from the Project Page Layout. You access it by clicking the ‘Create Actions’ button, as highlighted below.
This page enables you to quickly create multiple Actions for one Project, including adding Contributors and Checklist Items. You are also able to edit existing Actions if you need to make changes in bulk.
When you initially load the Create Actions page, you’ll have one draft record ready to complete, as illustrated below.
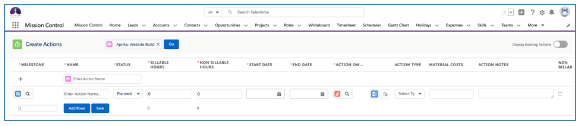
You can add multiple draft rows by entering the number of rows you wish to add and click the ‘Add Row(s)’ button.
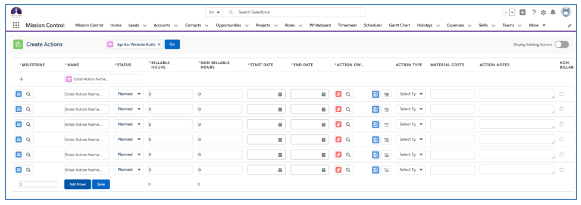
Alternatively, you can use the ‘Quick Add’ feature at the top of the page, which will add the new Action to the bottom of the list.

Once you have completed the required information for all of the Actions, click the Save button at the bottom of the page.
Page Features
Display Existing Actions
In the top right corner of the page, you can toggle on / off the ability to view and edit Existing Actions. If this is toggled on, all existing Actions will be displayed to enable you to make changes as required.
![]()
Note: If the Project has too many Actions, the Display Existing Actions feature will be disabled.
Resource Assignment Wizard
You can access the Resource Assignment Wizard by clicking the ![]() icon. This will allow you to search for available Roles, and assign the Action Owner and Contributors.
icon. This will allow you to search for available Roles, and assign the Action Owner and Contributors.
Checklist Item Manager
You can access the Checklist Item Manager to add new, or edit existing Checklist Items by clicking the ![]() icon.
icon.
Time Log Enhancements
Customers have requested the ability to prevent Users from deleting Time Log records if they have been approved and/or invoiced. To provide flexibility, these settings can be turned on / off based on your own requirements.
Two new settings have been added to the Project Automation Settings section of the Control Pad on the Mission Control Console, as outlined below:

Note: These settings will be false by default.
If you would like to prevent Users from deleting Time Logs where the ‘Approval Status’ field = Approved, you will need to set the ‘Disable Deletion of Approved Time Logs’ setting to true.
If you would like to prevent Users from deleting Time Logs where the ‘Invoiced’ field = true, you will need to set the ‘Disable Deletion of Invoiced Time Logs’ setting to true.
Expense Enhancements
Deletion Settings
Customers have requested the ability to prevent Users from deleting Expense records if they have been approved and/or invoiced. To provide flexibility, these settings can be turned on / off based on your own requirements.
Two new settings have been added to the Project Automation Settings section of the Control Pad on the Mission Control Console, as outlined below:

Note: These settings will be false by default.
If you would like to prevent Users from deleting Expenses where the ‘Approval Status’ field = Approved, you will need to set the ‘Disable Deletion of Approved Expenses’ setting to true.
If you would like to prevent Users from deleting Expenses where the ‘Invoiced’ field = true, you will need to set the ‘Disable Deletion of Invoiced Expenses’ setting to true.
Expense Approvals
Customers have requested greater flexibility around who may need to approve Expenses. Previously Expenses could only be approved by the ‘Expense Approver’ specified on the Role Object. This enhancement enables you to specify whether the Project Manager and/or the Expense Approver from the Role are required to approve Expenses.
If you require Expenses to be approved, you have two options as to who needs to approve the Expense, as outlined below:
There are two fields on the Project record called ‘Project Owner Expense Approval Reqd’ and ‘Role Manager Expense Approval Reqd’, as illustrated below:

Project Related Expenses
If you require the Project Owner to approve Expenses related to the Project, you will need to set the ‘Project Owner Expense Approval Reqd’ to true.
If you require the Role Manager to approve Expenses related to the Project, you will need to set the ‘Role Manager Expense Approval Reqd’ to true.
If you do not require approvals for Expenses related to a Project, both fields should be left false.
Non Project Expenses
Expenses that are not related to a Project will require approval, if the ‘Expense Approver’ field is populated.
Submitting Expenses for Approval
When you create an Expense, you will have the option to click the ‘Save Expense’ button or the ‘Save & Submit Expense’ button.
The Save Expense button will save the Expense and set the Approval Status to Pending if approval is required, and Approved if approval is not required.
The Save & Submit Expense button will save the Expense and set the Approval Status to Submitted if approval is required, and Approved if approval is not required.
Approving Expenses
To approve Expenses, go to the Expense Object Tab and select the ‘Expenses Requiring My Approval’ List View. This will display all Expenses that require your approval, either as the Project Owner or the Role Manager. Using the inline edit functionality of the List View, you’ll be able to update the Project Manager Approval Status and / or Role Manager Approval Status to Approved.
Minor Enhancements
A number of minor enhancements have been applied to various features within the solution as part of this release. Details of each minor enhancement are included below.
Team & Skill AND/OR Filters
Previously when you were filtering for Teams / Skills on pages like the Scheduler, Whiteboard and Action Pad, the filter logic was OR – so if you searched for two Teams of Sales and Marketing, the results would include Roles that were in Sales OR Marketing.
A toggle button has been included to enable you to choose between AND or OR filter logic. So if you’re wanting Roles that are in both the Sales and the Marketing teams, you would set the button to AND.
Below is an illustration of the AND filter being used for Teams.
Your preference will be persistently remembered. If you used the OR option the last time you visited a page, the OR option will be selected by default.
Role Enhancements
Some customers requested the ability to exclude certain Roles from the Scheduler (e.g. clients, placeholders, etc.). To accommodate this request, a new field has been added to the Role Object called ‘Exclude from Scheduler’.
Any Role that has this field set to TRUE will not be displayed on the Scheduler.
Note: This field will need to be added to the Role Page Layout.
Project Status Report Generation Button
In order to be able to generate the Project Status Report PDF at any time, a button has been added to the Project Object called ‘Project Status Report’. Clicking this button will generate a PDF of the Project Status Report.
This button does not impact the weekly schedule of the Project Status Report that is used to distribute the PDF to Project Stakeholders.
New Field Overview
A number of new fields have been added to the solution as part of this release. We recommend you add these fields to your Page Layouts. If you are not using the Permission Sets included with Mission Control, we recommend you check the Field Level Security for all of these fields to ensure all appropriate Profiles have the required access.
Project Request
| Field | Field Type | Comments |
| Project Request Number | Auto-number | Unique number identifying the Project Request (format: PRG:00001) |
| Project Name | Text (80) | Identifies the string to use for the Name when creating the Project |
| Lead | Lookup (Lead) | Links to the Lead this Project Request was generated from |
| Account | Lookup (Account) | Links to the Account this Project Request was generated from |
| Contact | Lookup (Contact) | Links to the Contact this Project Request was generated from |
| Opportunity | Lookup (Opportunity) | Links to the Opportunity this Project Request was generated from |
| Case | Lookup (Case) | Links to the Case this Project Request was generated from |
| Project Request Summary | Text Area (255) | Identifies the summary information relating to this Project Request |
| Proposed Budget | Currency (16, 2) | Identifies the anticipated budget required to deliver this Project |
| Generate Project | Checkbox | Set this field to TRUE to auto-generate the Project |
| Project Template | Lookup (Project) | Links to the Project that will be used as a Template when auto-generating a new Project from this Project Request. This field is filtered to only show Projects where Template = TRUE |
| Project Start Date | Date | Identifies the date that will be used for scheduling the Project |
| Project | Lookup (Project) | Links to the Project created from this Project Request |
Action
| Field | Field Type | Comments |
| Whiteboard Priority Order | Number (16, 2) | Identifies the vertical position of the Action on the Whiteboard |
Case
| Field | Field Type | Comments |
| Action | Lookup (Action) | Links to the Action this Case relates to |
Time Log
| Field | Field Type | Comments |
| Case | Lookup (Case) | Links to the Case this Time Log relates to |
Expense
| Field | Field Type | Comments |
| Project Owner Approval Required | Formula (Checkbox) | Used by Expense Trigger. Identifies if Project Owner Approval is required for this Expense |
| Role Manager Approval Required | Formula (Checkbox) | Used by Expense Trigger. Identifies if Role Manager Approval is required for this Expense |
| Project Owner Approver | Lookup (Role) | Identifies the Role record for the person that is the Project Owner response for approving this Expense |
| Role Manager Approver | Lookup (Role) | Identifies the Role record for the person that is the Role Manager responsible for approving this Expense |
| Project Owner Approval Status | Picklist | Identifies the Approval Status of the Project Owner for this Expense.
Values: Pending; Submitted; Approved; Rejected |
| Role Manager Approval Status | Picklist | Identifies the Approval Status of the Role Manager for this Expense
Values: Pending; Submitted; Approved; Rejected |
| Project Owner Rejection Comments | Text Area (255) | Identifies the reason the Project Owner rejected the Expense |
| Role Manager Rejection Comments | Text Area (255) | Identifies the reason the Role Manager rejected the Expense |
| Project Owner Current User | Formula (Checkbox) | Identifies if the Current User is the User required to approve this Expense as the Project Owner |
| Role Manager Current User | Formula (Checkbox) | Identifies if the Current User is the User required to approve this Expense as the Role Manager |
| Approver | This field has been retired | |
| Approver Current User | This field has been retired |
Role
| Field | Field Type | Comments |
| Exclude from Scheduler | Checkbox | Identifies whether this Role should be excluded from the Scheduler |
Project
| Field | Field Type | Comments |
| Project Owner Expense Approval Reqd | Checkbox | Identifies whether the Role specified as the Project Owner on this Project needs to approve Expenses |
| Role Manager Expense Approval Reqd | Checkbox | Identifies whether the Role specified as the Expense Approver on the ‘Incurred By’ Role record needs to approve Expenses |
How do I upgrade?
Mission Control will be made available based on the following release schedule.
15th May 2020 – Available for manual upgrade from the AppExchange
23rd May 2020 – Automatic upgrade to all Sandbox Orgs
30th May 2020 – Automatic upgrade to all Production Orgs
To manually upgrade to the new version of Mission Control in your organisation, please follow the steps below:
What’s New Webinar
We have pre-recorded the ‘What’s New’ webinar to provide further information on how to get the best out of the new features. To access this webinar, please view the ‘Release Notes’ section of the Mission Control Support Centre – www.aprika.com/mc-support
Feedback
Some of the new features included in this release of Mission Control have come from ideas submitted from existing clients. If you have an idea for enhancing Mission Control, you can submit it via email to [email protected].
Questions?
If you have any questions regarding this release notification, please do not hesitate to contact us at [email protected].