Mission Control Version 1.59 Release Notification
10 September 2021
A new version of Mission Control (version 1.59) will be released on the AppExchange on Friday 10th September 2021. This notification has been issued to existing Mission Control users. It contains an overview of the new features available with this release, along with instructions on how to upgrade to the new version.
This release includes a number of new features, along with some enhancements to existing functionality, including:
Let’s get stuck into the detail…
An important part of any Project is reviewing how it went, and identifying learnings that can be taken into future Projects. The Retrospective Board enables you to carry out a ‘lessons learned’ assessment of a Project, or even a Phase / Sprint within a Project.
When conducting a ‘Retrospective’ you can identify ‘Learnings’. For each Learning, you can indicate your opinion as to whether it was something that worked well that you can take into future projects, or perhaps it didn’t go so well and you may choose to try something else next time round. You’re also able to tag each Learning against a number of Categories. These parameters will enable you to search the Retrospective Board in advance of kicking off a new Project to identify Learnings from previous Projects. For example, you may want to search for all Learnings that ‘Worked Well’ with a Category of ‘Documentation’ prior to commencing a business requirements gathering exercise.
When creating a Learning, you can allocate one of the following ‘Opinion’ values:
When identifying the Categories a Learning relates to, you can allocated it to as many of the following values:
The Retrospective identifies a specific review / lessons learned ceremony that has been conducted. The Retrospective relates to a particular Project, and a Project can have multiple Retrospectives related to it. For example, you may choose to conduct one Retrospective ceremony at the end of the Project. Alternatively, you may choose to conduct a Retrospective each time you complete a Milestone / Sprint during the Project.
Within a Retrospective, you will create Learning records. These Learnings identify the individual items the team has reviewed. Each Learning will relate to a specific Retrospective, and a Retrospective can have multiple Learnings related to it.
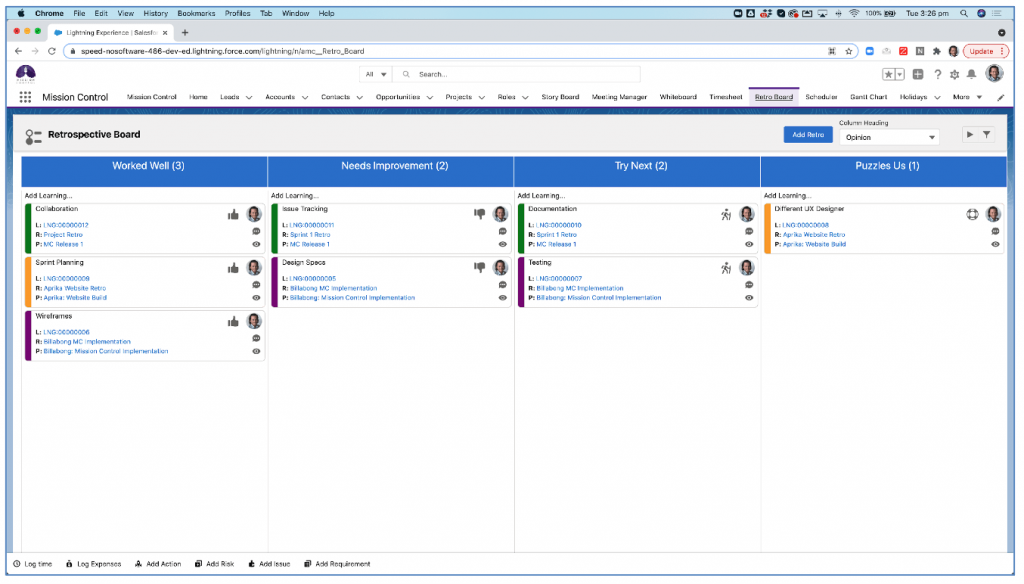
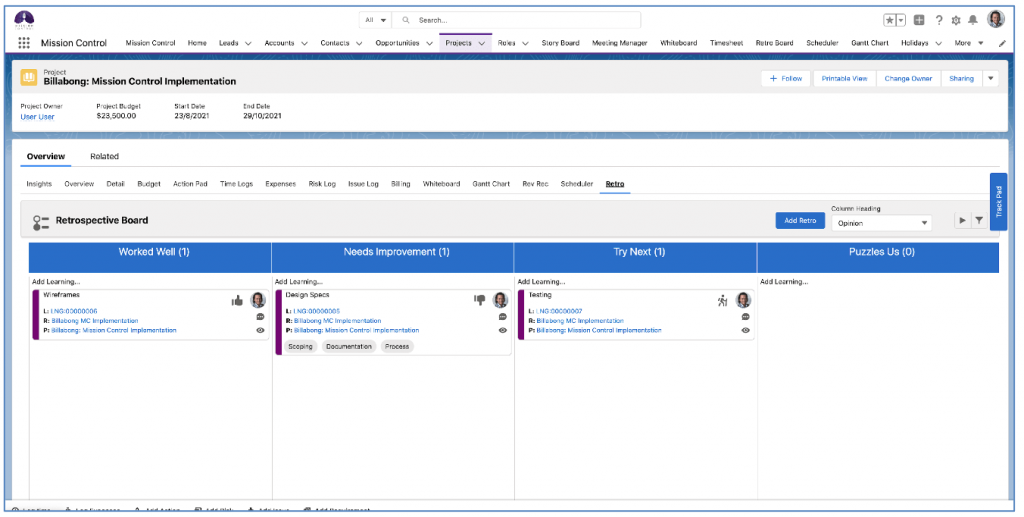
The Retrospective ceremony will be carried out using the Retrospective Board. This is a Kanban Board that displays Learnings. Below is an illustration of what the Retrospective Board looks like.
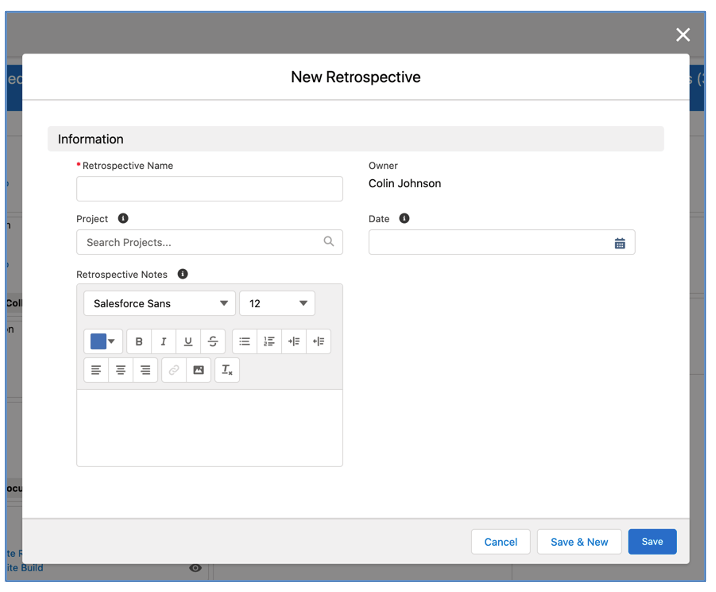
To create a new Retrospective from the Retro Board, you need to click the ‘Add Retro’ button, which can be found located in the top-right section of the board near the ‘Column Heading’ picklist field.

When you click the button, that will open the ‘New Retrospective’ Modal. From here, you will be able to enter the appropriate fields and click Save.
Once you’ve done this, the Retrospective will be available to associate Learnings when you are creating them from the individual Kanban Columns.
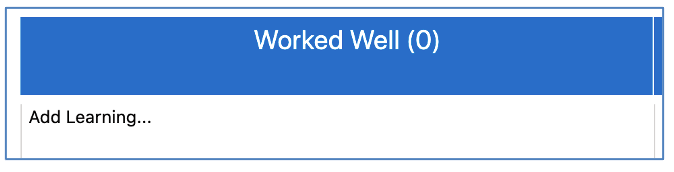
To create a Learning, you can expand the ‘Quick Create’ section within a Kanban Column by clicking on the ‘Add Learning…’ text.
This will open up the Quick Create section where you can specify the Project and Retrospective the Learning will relate to, as well as entering the Learning name.
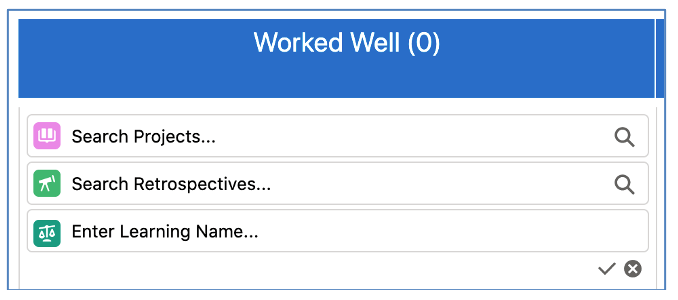
When you select a Project, the Retrospectives search box will be filtered to only show Retrospectives that relate to the selected Project. Once you enter the Learning Name, hit Enter to create the Learning. You will then see the Learning Card appear on the Kanban.
After the Learning has been created, you can click on the eye icon to open the Learning Summary Modal. From here, you can:
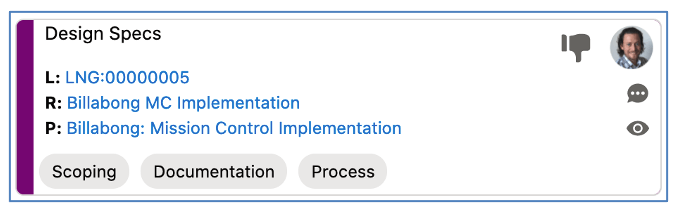
When you edit the Learning, you can select the Categories that it relates to. Each of these Categories will then appear on the Learning Card as shown below.
If you want to change the Opinion for a particular Learning, you can drag the Learning Card between the Kanban columns.
By default, the columns on the board will be based on the ‘Opinion’ field of the Learning record. This will show you columns for:
You can change the columns by selecting a different option in the ‘Column Heading’ picklist, which is located in the top-right section of the board near the Add Retro button.

The options available for the Column Heading setting are:
This setting is persistent, so if you choose to change from Opinion to another option, such as Project, the next time you load the Retro Board the columns will be based on the Project setting.
One of the main things that drives the success of a Retrospective ceremony is that it is an interactive, collaborative session involving multiple project team members.
One of the really cool features of the Retro Board is the ability to turn on the ‘Auto Refresh’ setting. When turned on, you will automatically see new Learnings appear on your Retro Board as your colleagues are creating or updating them. You can turn on the Auto Refresh feature by clicking the ‘Play’ button, which is located in the top-right section of the board near the Column Heading picklist field.

By default, this setting is turned off – indicated by the ‘Play’ button. If it’s turned on, you will see a ‘Pause’ button. This setting is persistent, so if you switch it on, the next time you load the Retro Board it will still be switched on.
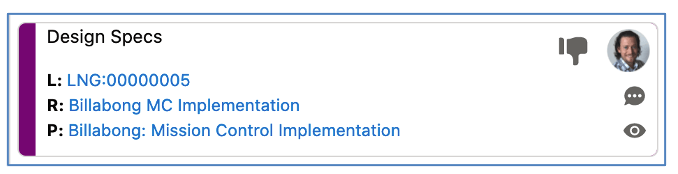
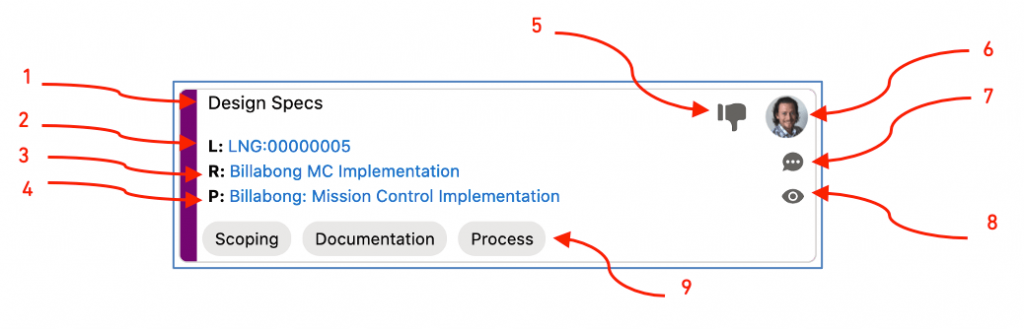
Below is an example of the Learning Card on the Retro Board.
The Learning Card offers you a lot of functionality, each component of the card is explained below.
You can apply filters to the Retro Board to find the Learnings you require. For example, you may want to view all of the Learnings with an Opinion of ‘Worked Well’ that relate to Projects of a certain Category.
You can access the Filters Modal by clicking the Filter icon, which is located in the top-right section of the board near the ‘Column Heading’ picklist field.
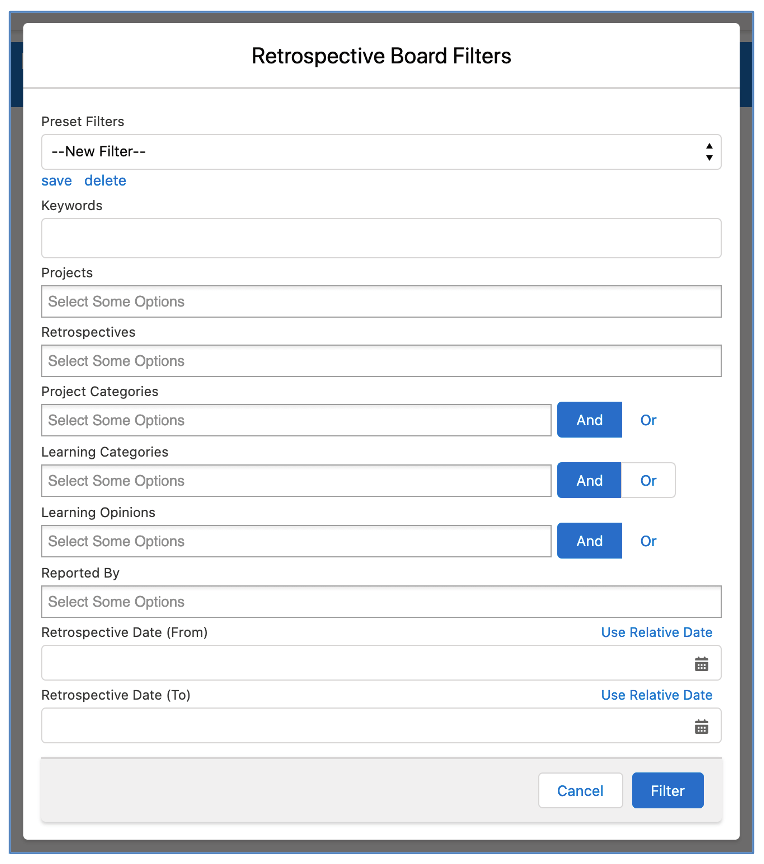
Within the Modal, you can apply the required filters. You can choose to save your filter selections as a ‘Preset Filter’ that can be applied persistently each time you visit the Retro Board.
Note: Preset Filters are created and accessed by individual Users and cannot be shared with other Users.
There are a number of ways to access the Retro Board, as outlined below:
The primary way to use the Retrospective Board is via the ‘Retro Board’ Tab, which gives you access to the standalone board – this means you’ll be able to view Learnings from multiple Projects / Retrospectives. The Retro Tab is included within the Mission Control ‘App’ so will be available on the Navigation Menu as shown below.

You can also add the Retro Board Tab to your own custom App menus.
The ‘Retro’ Tab on the Project Overview provides access to the Retro Board, filtered to show Learnings specifically related to Retrospectives that are related to the Project.
Access to the Retro Tab on the Project Overview can be controlled for each individual User on their Role record. To provide a User access to the Retro Tab, ensure the ‘View Retro Tab’ field on their Role record is set to TRUE.
You can add the ‘RestrospectiveBoard’ Component to the page within Lightning Experience for the following Objects:
You will need to edit the Lightning Page within the Lightning App Builder and follow the steps below:
You will then be able to access the Retro Board in context of that particular record.
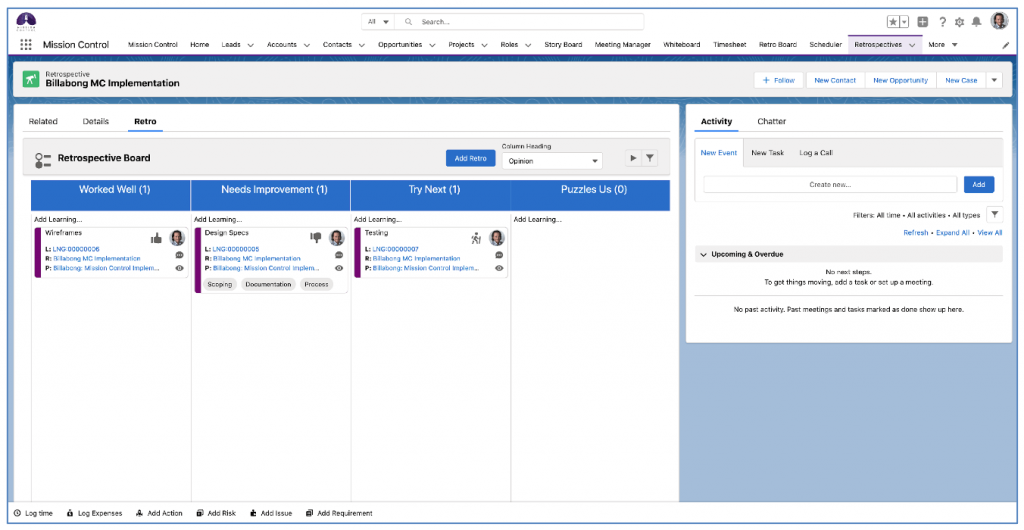
Note: When this component is added to the Milestone page, it will be filtered by default to display Learnings relating to the Project that the Milestone relates to. You can then further refine the results by filtering for a particular Retrospective.
The Holiday Allowance Object allows you to define how many days are allocated to each Role over a period. When creating a Holiday record, if applicable, it can be related to a Holiday Allowance record.
Each Role can have multiple Holiday Allowances, each defined for a period of time and for a certain type of Holiday.
For example, you can create Holiday Allowance record for Mick Fanning as follows:
Type: Annual Leave
Days: 20
Start Date: 1/Jan/2021
End Date: 31/Dec/2021
Type: VTO
Days: 4
Start Date: 1/Jan/2021
End Date: 31/Dec/2021
When a Holiday is related to a Holiday Allowance record, the ‘Days Taken’ value from the Holiday record will be added to the ‘Used’ field on the Holiday Allowance.
Each Holiday Allowance record can be set to accrue or expire at the end of the period. If it can accrue, you can specify what percentage can be accrued. You may for example provide 20 days PTO per year and agree employees can accrue 25%. If the employee uses 10 days, even though the ‘Remaining’ would be 10, once the End Date has passed it would reduce to 5 as that’s the maximum that can be accrued.
You can specify a default setting for the Accrual % for Holiday Allowance records. This can be done via the ‘Holiday Allowance Accrual Percentage’ setting with the ‘Custom Settings’ Tile on the Control Pad of the Mission Control Console.
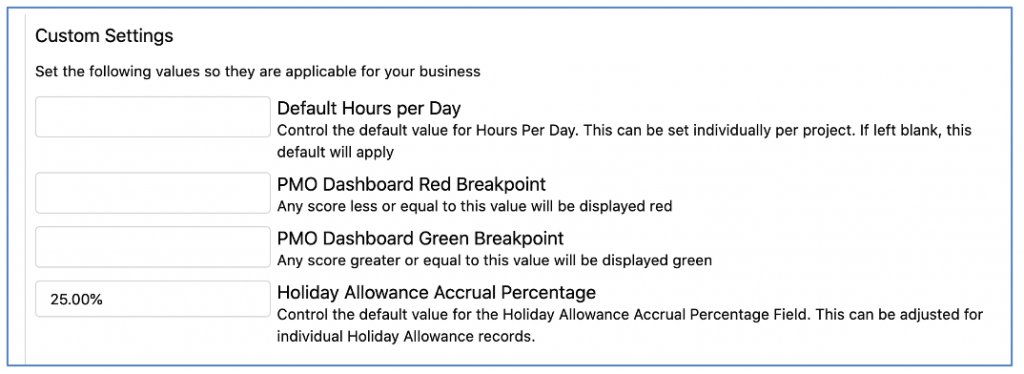
If this Setting contains a value, it will be displayed by default in the ‘Accrual %’ field when creating a new Holiday Allowance record. It can also be overridden for individual Holiday Allowance records. For example, you may set your default to 100% and that is applicable to PTO and VTO, but you may not let Sick Leave accrue, so you can override the Accrual % value for that individual Holiday Allowance record.
The Apex Trigger on the Holiday Object will automatically update the Holiday Allowance record based on the following scenarios:
Two Validation Rules are included to support the Holiday Allowance feature. By default, one is active and the other is inactive, but can be activated if required.
Validation Rule: Ensure_HA_Remaining_Sufficient (Active)
This rule ensures the Remaining value on the Holiday Allowance is not less than the number of days being taken on the Holiday record.
Validation Rule: Ensure_Holiday_Specified (Inactive)
This rule ensures a Holiday Allowance record is specified on the Holiday record if the ‘Type’ field is set to Annual Leave, Sick Leave or Study Leave.
Two reports are included that will provide details of the current number of days used and remaining across each Role, across the various Holiday Allowance records.
Holiday Allowance Remaining Summary
This report provides a summary of all Holiday Allowance records grouped by Role and Holiday Allowance ‘Type’.
Holiday Allowance Remaining Role
This report provides a summary of all Holiday Allowance records grouped by Holiday Allowance ‘Type’. You are able to add a ‘Report Chart’ component to the Role Lightning Page that will summarise the number of days ‘Remaining’ for each Holiday Allowance ‘Type’ for a particular Role.
For example, Mick Fanning may have 4 days of VTO for 2021, 20 days of PTO for 2021 and 5 days of PTO accrued from 2020.
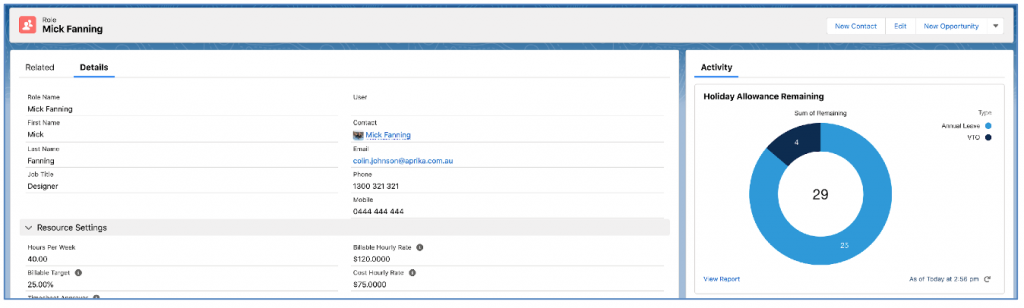
By adding the Report Chart component to the page, you will get a real-time view of the Role’s Holiday Allowance.
A number of new features and user experience enhancements have been added to the Meeting Manager, as outlined below.
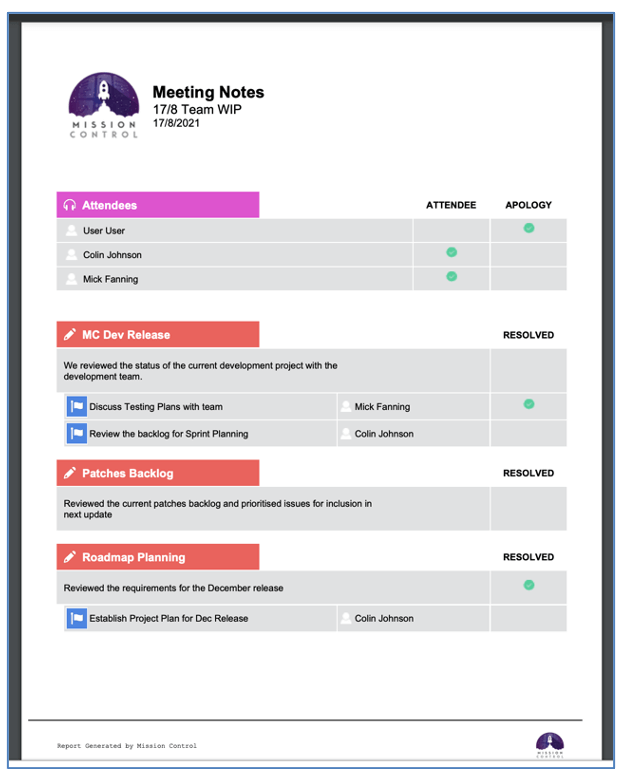
You can generate a ‘Meeting Notes’ PDF that can be downloaded and circulated. This PDF contains the following details:
To generate the Meeting Notes PDF, click on the PDF icon which is located in the top-right section of the Meeting Manager.
![]()
When you click the icon, it will open up the Meeting Notes PDF allowing you to download and circulate as required. Below is an example of the Meeting Notes PDF.
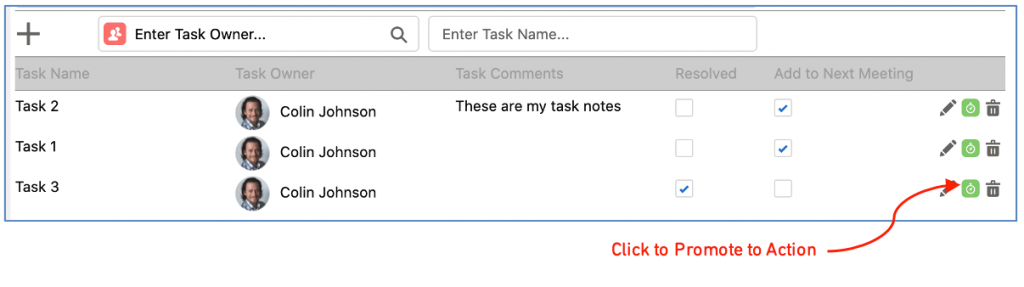
You are able to ‘promote’ an Agenda Task to an Action. This may be required when an Agenda Task has been reviewed and determined to need work on a specific Project to be carried out.
To promote an Agenda Task to an Action, you can click on the green Action icon, located to the right of the Edit icon for the Agenda Task on the Meeting Manager.
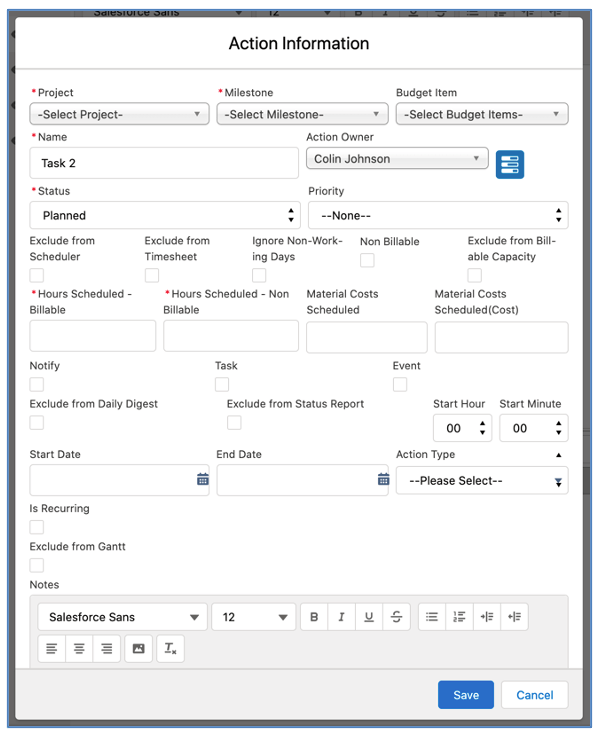
When you click the icon, it will open up the Action Modal allowing you to create a new Action. From here, you will be able to select which Project and Milestone the Action will relate to, as well as accessing the Resource Assignment Wizard.
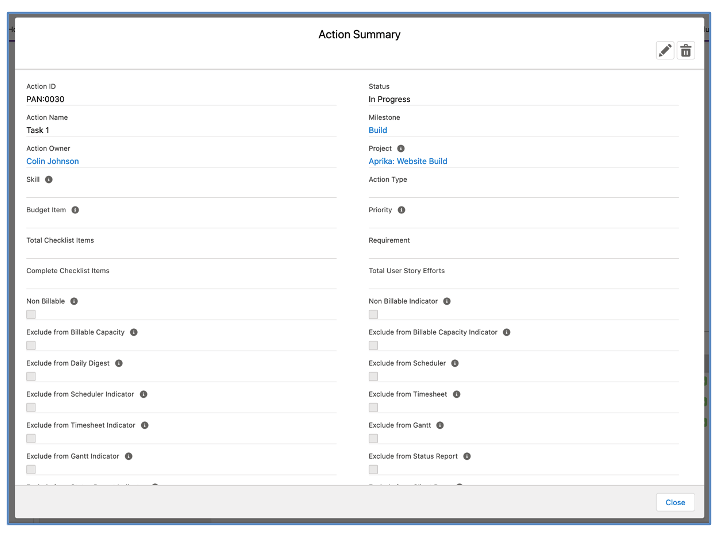
Once an Agenda Task has been promoted to an Action, if you click the green Action icon, it will open the Action Summary modal, as shown below.
Two new Auto-generation ‘Generation Method’ options have been included in this release. In order to use these methods, you will need to manually add the following values to the ‘Generation Method’ picklist field on the Opportunity Object:
Each of these new methods are explained below.
The Base Template + Products ‘Generation Method’ provides you with the ability to clone a generic Project Plan from one Project Template, as well as building up the Project Plan based on the Products associated to the Opportunity.
This Generation Method lets you include standardised Milestones on your Project, as well as including additional Milestones based on the Products sold. For example, you may want to include standard Milestones into every Project Plan, such as ‘Kick-off’, ‘Go Live’ and ‘Customer Success Handover’, but they’re not included as Products that will be added to the Opportunity.
To use this Generation Method, you’ll need your standard Milestones to be on one Project Template, and your Product related Milestones on a different Project. The Project Template containing your standard Milestones will be considered your Base Template, and all of the Milestones within this Project will be added to the Project when it is auto-generated from the Opportunity. Any Milestones related to the Products will also be added.
When specifying the ‘Project Template’ on the Opportunity, you would enter the Project that is your Base Template.
This Generation Method will add a Product Milestone to the Project for each instance of where an Opportunity Line Item references the same Product.
The Base Template + Products – No Duplicates ‘Generation Method’ provides you with the ability to clone a generic Project Plan from one Project Template, as well as building up the Project Plan based on the Products associated to the Opportunity. This method differs from the Base Template + Products method in that regardless of how many Opportunity Line Items reference the same Product, the Milestone will only be added once.
This Generation Method lets you include standardised Milestones on your Project, as well as including additional Milestones based on the Products sold. For example, you may want to include standard Milestones into every Project Plan, such as ‘Kick-off’, ‘Go Live’ and ‘Customer Success Handover’, but they’re not included as Products that will be added to the Opportunity.
To use this Generation Method, you’ll need your standard Milestones to be on one Project Template, and your Product related Milestones on a different Project. The Project Template containing your standard Milestones will be considered your Base Template, and all of the Milestones within this Project will be added to the Project when it is auto-generated from the Opportunity. Any Milestones related to the Products will also be added.
When specifying the ‘Project Template’ on the Opportunity, you would enter the Project that is your Base Template.
Previously the Project Builder enabled you to convert a Requirement from a Program to an Action on a Project. This conversion process would relate any User Stories from the Requirement to the Action. Additional conversion options have been enhanced to now provide flexibility in how you convert Requirements and User Stories to a Project.
You have 3 options to convert Requirements and User Stories into a Project Plan:
You can choose which conversion method you want to use using the ‘Convert’ Setting within the Requirements Tab.
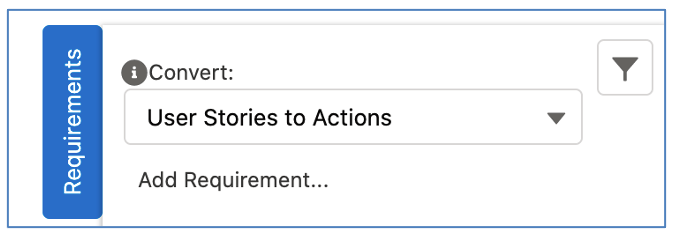
This is a persistent setting, and will be remembered between visits to the Project Builder.
This conversion method will convert the Requirement into an Action within an existing Milestone. Any User Stories and Checklist Items that relate to the Requirement will be updated to the Action that is created.
When using this conversion method, you will see the Requirement cards within the Requirements Tab, as illustrated below.
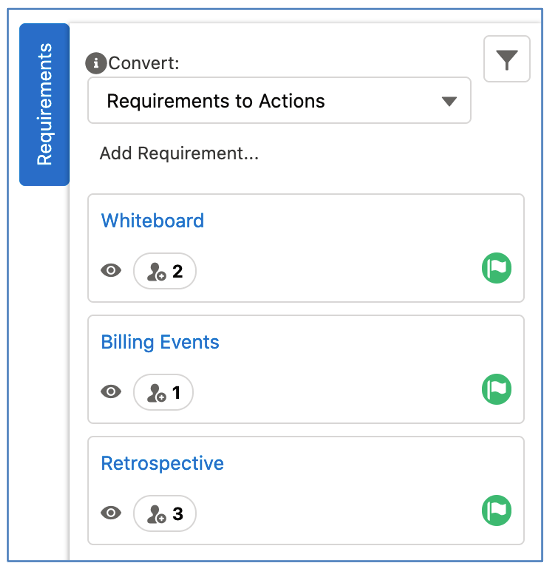
To convert a Requirement to an Action, ensure the ‘Convert’ setting is set to Requirements to Actions and then simply drag and drop the Requirement into a Milestone Column and it will create the Action.
This conversion method will convert the Requirement into a Milestone, and each individual User Story will be converted into an Action within the new Milestone.
When using this conversion method, you will see the Requirement cards within the Requirements Tab, as illustrated below.
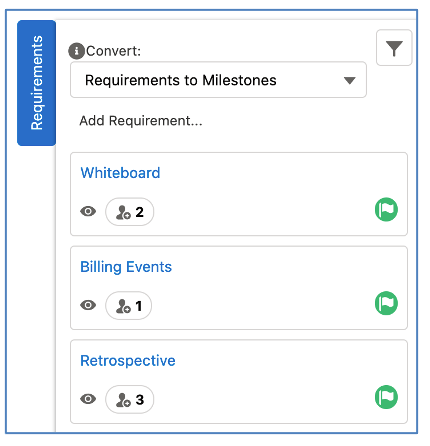
To convert a Requirement to a Milestone, ensure the ‘Convert’ setting is set to Requirements to Milestones and then simply drag and drop the Requirement onto the Project Builder.
This conversion method will convert User Stories into Actions. Using this method enables you to convert User Stories relating to the same Requirement into different Milestones. Any Checklist Items that relate to the User Story will be related to the Action.
When using this conversion method, you will see the Requirement and User Story cards within the Requirements Tab, as illustrated below.
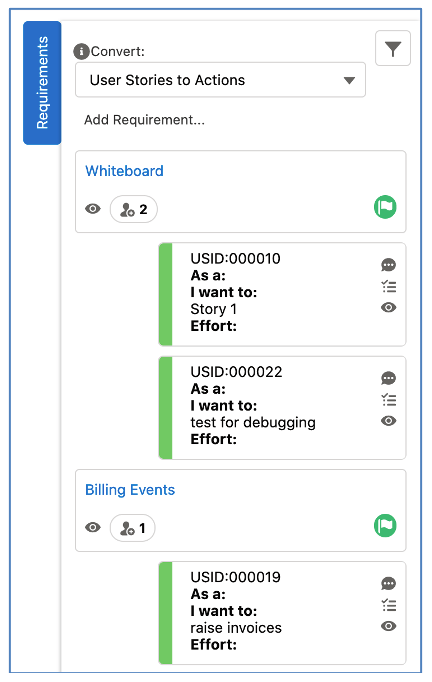
To convert an individual User Story to an Action, ensure the ‘Convert’ setting is set to User Stories to Actions and then simply drag the User Story card into a Milestone Column and it will create the Action. If you want to convert all User Stories relating to a particular Requirement to the same Milestone, you can drag the Requirement card into a Milestone Column and it will create an Action for each User Story.
A number of enhancements have been made to the Timesheet to incorporate various customer requests. Each enhancement is detailed below.
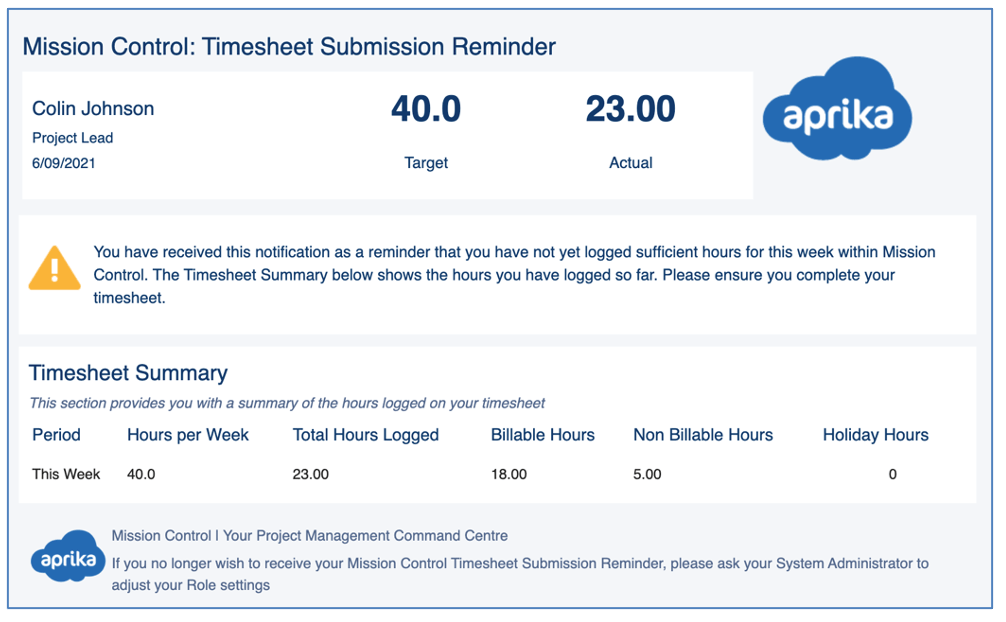
Love it or hate it? No matter the answer, we’ve now got you covered! When using the ‘Save & Submit’ button on the Timesheet, you can receive a warning notification pop-up if the total hours you’re submitting are less than your ‘Hours per Week’ value, as shown below.
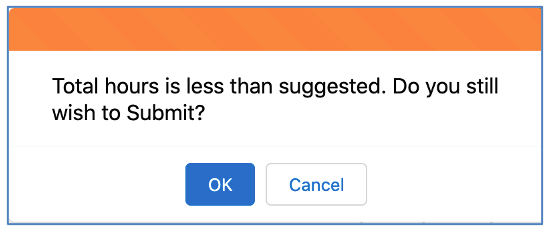
We’ve found some customers want this warning, others aren’t so keen. So in an attempt to keep everyone happy, we’ve added in a new setting within the Timesheet Settings that lets you control whether it’s enabled or not.
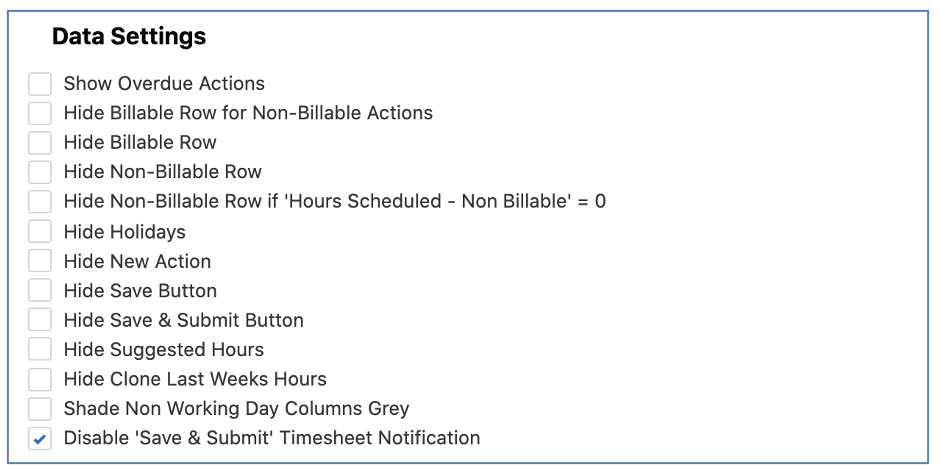
If this setting is TRUE, you will not receive the pop-up notification.
When logging time from the Timesheet, you can access the ‘Time Log Information’ modal to enter further information relating to the hours, such as Notes, relating the Time Log to a Checklist Item, setting it as Overtime, etc.
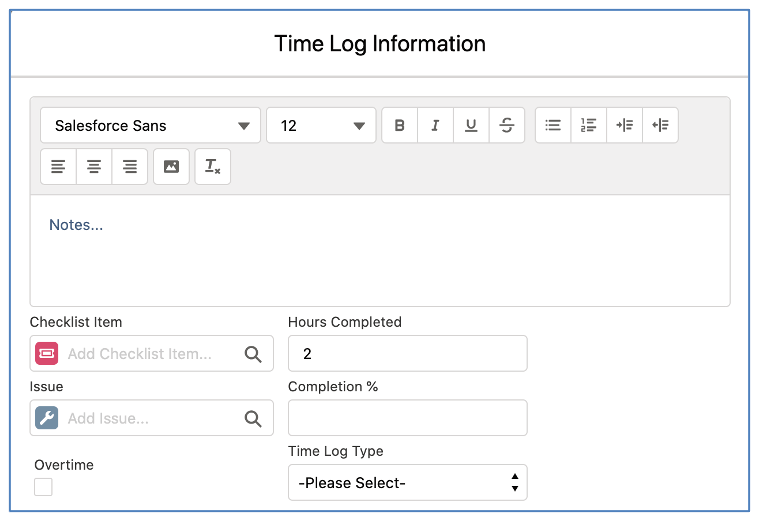
You can specify up to 5 additional fields from the Time Log Object to be accessible from this modal. Users can set the fields they would like to be included in this modal from within the Timesheet Settings, as shown below.
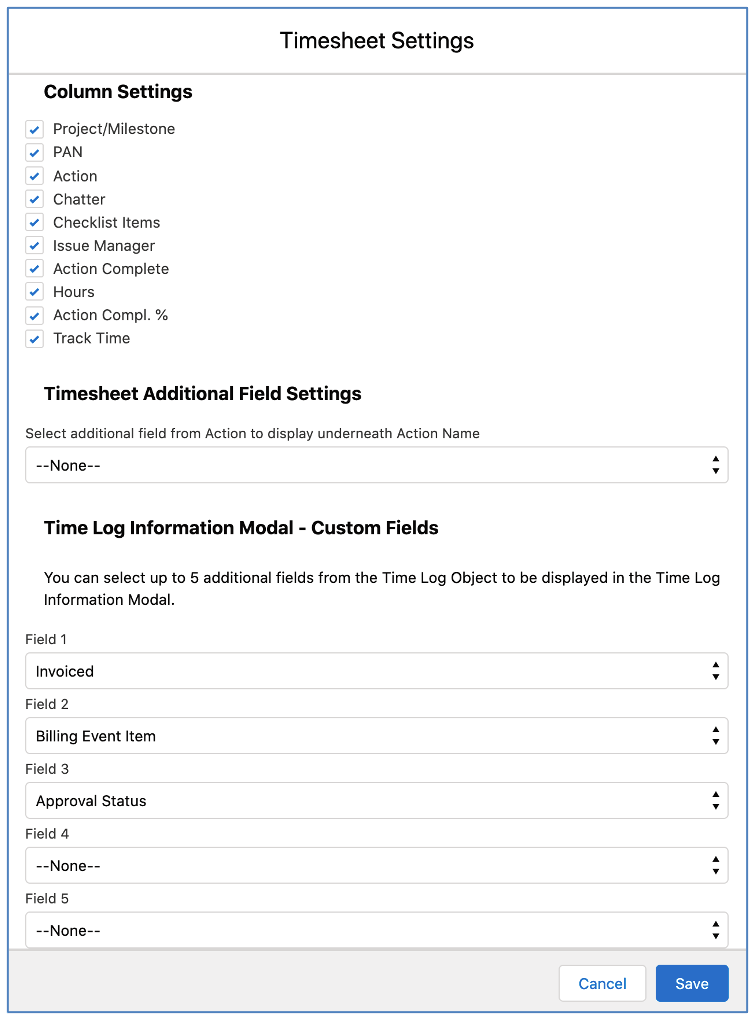
You can also control these fields centrally from the Timesheet Settings on the Control Pad of the Mission Control Console if you’re overriding individual User settings.
The Timesheet includes a summary of the Approval Status of all Time Logs on the Timesheet as shown below.

In order to be able to easily identify which Actions the Time Logs relate to, you can view an Approvals breakdown to the right of each Action row on the Timesheet.
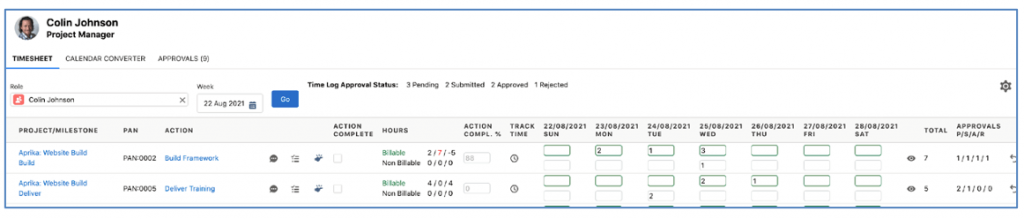
This row-level insight allows you to quickly identify which Action the Time Log relates to in order to review and amend where required.
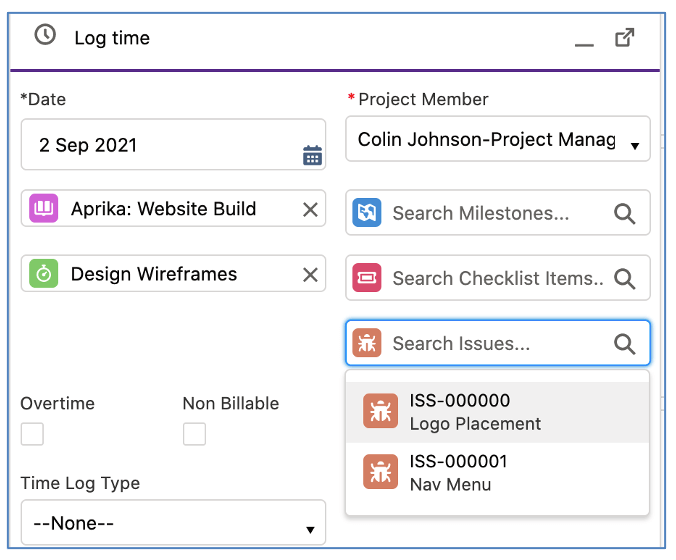
You can associate a Time Log to a specific Issue that relates to the Action. A Time Log must always relate to an Action, but you can optionally choose to relate it to one of the Issues under the Action and it will reflect in the Issue ‘Hours Completed – Billable’ or ‘Hours Completed – Non Billable’ field. This enables you to identify how much time has been spent working on the individual Issue.
When using the Log Time Component, you will be able to select the Action the Time Log relates to and then further select the specific Issue.
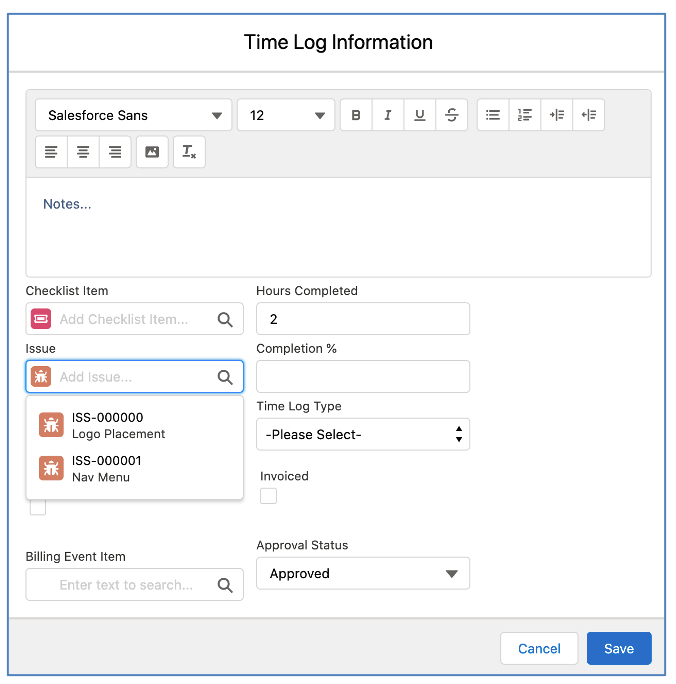
When using the Timesheet, you can select the specific Issue by double-clicking into the hours cell to open the Time Log Summary modal.
The Time Log Related List can be included on both the Action Page Layout and the Issue Page Layout.
The sort order of Actions listed in the search results when manually adding an Action to the Timesheet has been updated to match the same order that is used on the Gantt Chart and Project Overview.
You are able to issue out Timesheet Submission reminder emails and Timesheet Exception notification emails when people have not submitted sufficient time on their Timesheet.
The Timesheet Submission Reminder is an email template that will be sent to individual Role records on a specified day of the week if they have not logged the required percentage of hours for the current week. For example, you may choose to schedule this reminder to go out on a Friday afternoon if people have not logged more than 90% of their time for the week.
Each individual Role can be opted in to receive this email notification by setting the ‘Receive Timesheet Reminder’ field to TRUE on their Role record.
The settings on the Control Pad allow you to enable this email notification. You can specify the date, time and percentage. Any Role that has not logged enough hours on their Timesheet for the current week to meet the percentage specified, will receive the Timesheet Submission Reminder. The percentage is based on the ‘Hours per Week’ field on their Role record. The email will be issued at the time specified based on the individual User’s Time Zone setting.
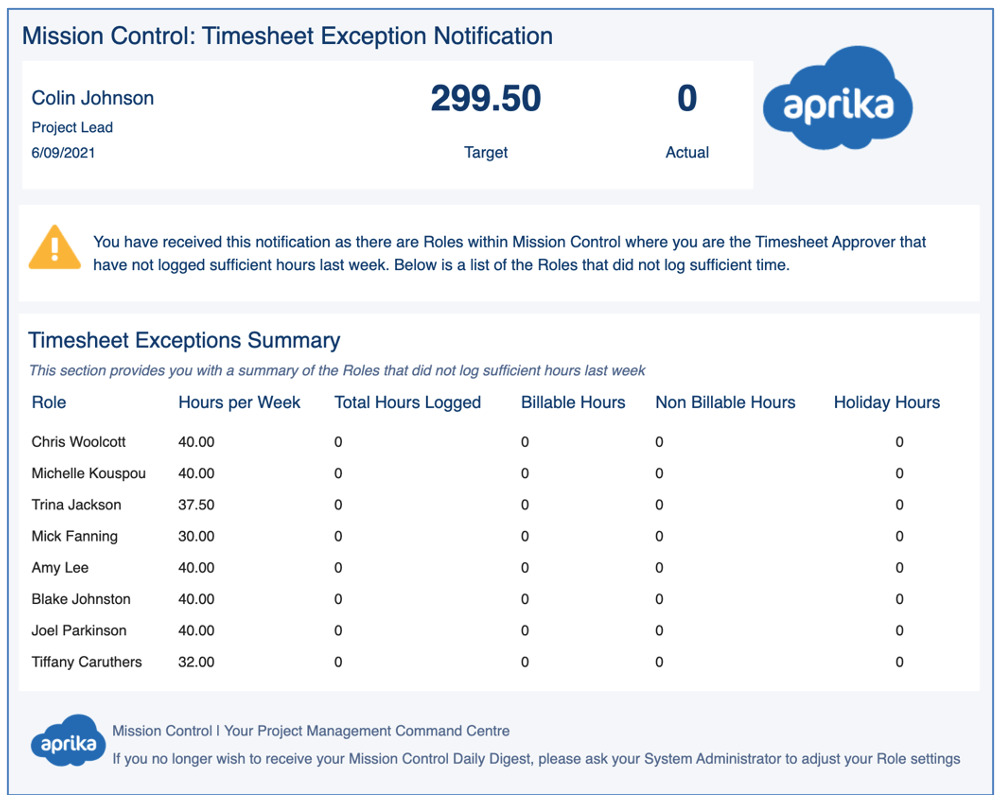
The Timesheet Exception Notification is an email template that will be sent to the Role that is the ‘Timesheet Approver’ for other Roles on a specified day of the week. The person will receive this email if any Role that they are the Timesheet Approver for has not logged the required percentage of hours for last week. For example, you may choose to schedule this notification to go out on Monday morning if people have not logged more than 90% of their time for last week.
Each individual Role can be opted in to receive this email notification by setting the ‘Receive Exception Notification’ field to TRUE on their Role record.
The settings on the Control Pad allow you to enable this email notification. You can specify the date, time and percentage. Any Role that the person is the Timesheet Approver for will be included in this exception notification if they have not logged enough hours on their Timesheet for last week to meet the percentage specified. The percentage is based on the ‘Hours per Week’ field on the individual Role records. The email will be issued at the time specified based on the individual User’s Time Zone setting.
You can enable the distribution schedule for the Timesheet Submission Reminder and Timesheet Exception Notification emails from the ‘Timesheet Notifications’ section on the Control Pad of the Mission Control Console.
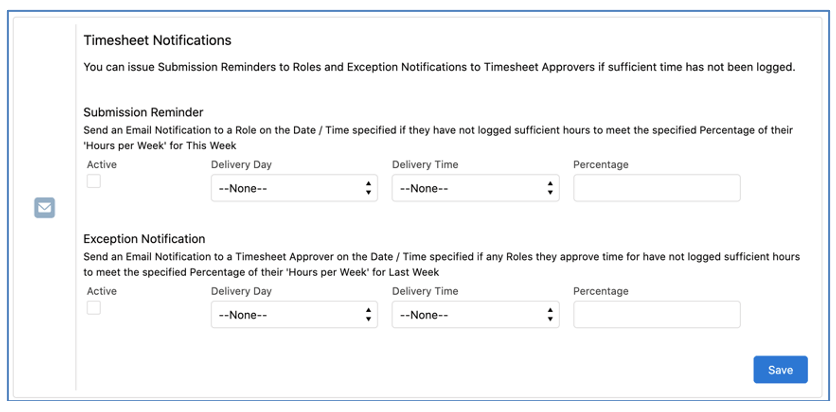
Set the Active field to TRUE, specify the Delivery Date, Delivery Time and Percentage and click Save. This will be scheduled to distribute the emails to any Role that has the appropriate field on their Role record set to TRUE. The emails will be distributed on the date/time specified based on the individual User’s Time Zone settings.
A number of enhancements have been made to the Action Pad to incorporate various customer requests. Each enhancement is detailed below.
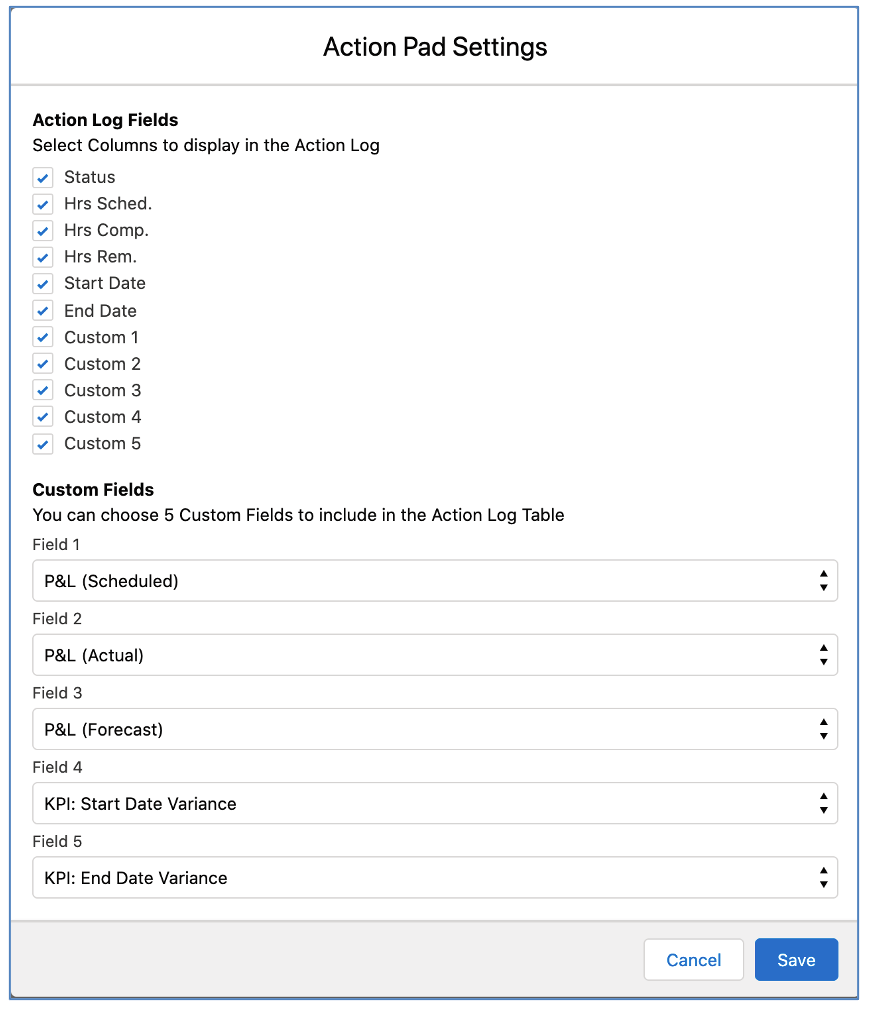
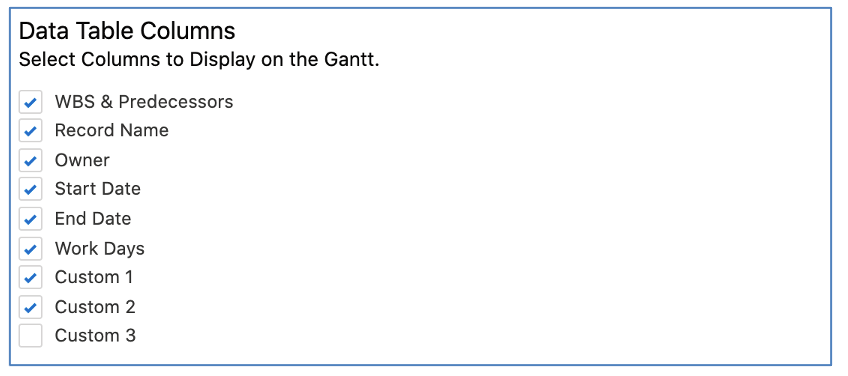
The fields within the Action Log section of the Action Pad can be customized to the User’s personal preferences. Alternatively, you may choose to control these settings for all Users leveraging the Override settings on the Control Pad of the Mission Control Console.
The Settings can be accessed by clicking the settings icon located on the right-hand side of the Action Log section of the Action Pad near the Keyword Search and Filter button, as shown below.

Within the Settings, you’re able to select which standard columns you have displayed as well as specifying up to 5 custom fields to be included.
If you wish to ensure all Users have the same settings, you can use the Action Pad Override Settings feature on the Control Pad of the Mission Control Console.
You can use the Keyword Search feature to quickly search and filter the Actions within the Action Log of the Action Pad. Simply enter the text you wish to search for, press return and any Action not matching the search string will be removed from the list of records.
The search string is applied to all fields that are displayed within the Action Log. For example, if you search for ‘Data’ it would display Actions if the Project, Milestone or Action contains the word Data.
You are able to apply the Custom Filters from within the Project Overview Action Pad Tab. The Custom Filter modal can be accessed by clicking the Filter icon located on the right-hand side of the Action Log section of the Action Pad near the Keyword Search and Settings button, as shown below.
By default the Action Pad will display all Actions relating to the Project. You can use the Filter Modal to further reduce the Actions displayed. For example, you may wish to only include Actions where the Status is Planned or In Progress.
A number of additional Filter options have been added to the Custom Filters modal.
You are able to use the AND / OR Toggle at the top of the Role Filters section to determine whether multiple filters are queried as AND or as OR.
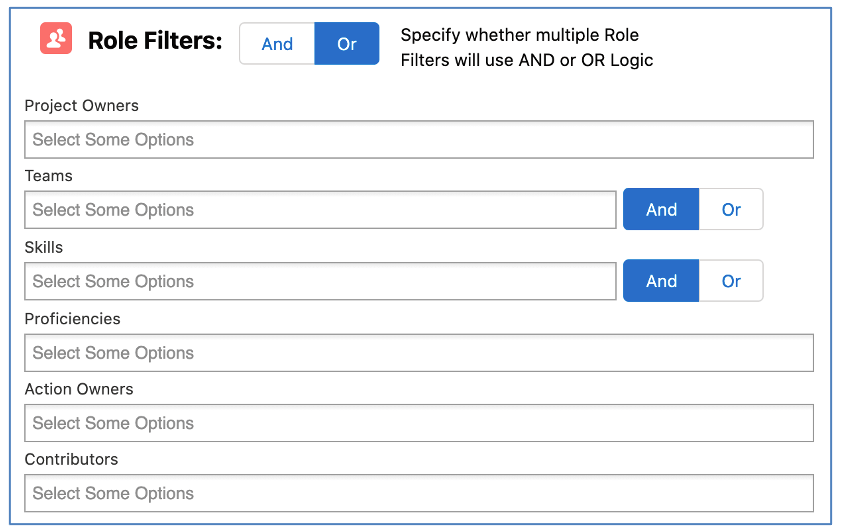
For example, if Mick Fanning is looking to see Actions where he is the Project Owner as well as any Actions where he is the Action Owner, he would have the Toggle set to OR. The results shown would be all Actions where Project Owner = Mick Fanning as well as all Actions where Action Owner = Mick Fanning. Whereas, if he was only looking for Actions that he is responsible for within Projects that he manages, he would have the Toggle set to AND. The results in this instance would only include Actions where the Project Owner = Mick Fanning AND the Action Owner = Mick Fanning.
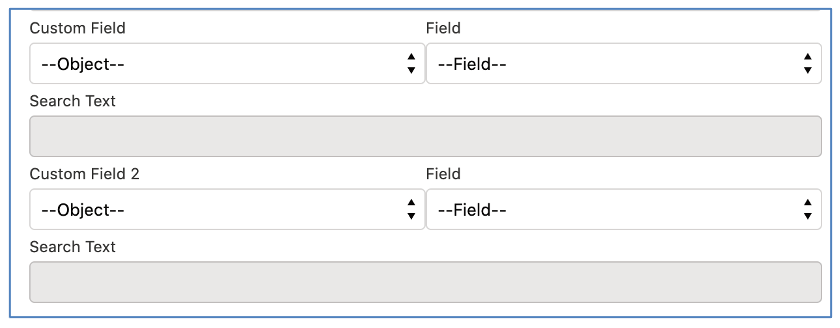
You can use the Custom Field filters to apply filters to the Action Pad based on any field from the Project, Milestone or Action Object.
A number of enhancements have been made to the Gantt Chart to incorporate various customer requests. Each enhancement is detailed below.
For each record displayed on the Gantt Chart (e.g. Project, Milestone, Action or Checklist Item), you can access the Modal window for that record by clicking the pencil icon, or by double-clicking on the bar for that record on the chart timeline.
Within the Modal for each record you have access to the following Tabs.
| Project | Milestone | Action | Checklist Item |
| Project Summary
Record Detail Chatter |
Milestone Summary
Record Detail Chatter |
Action Summary
Log Time Record Detail Chatter |
Checklist Summary
Record Detail Chatter |
For each Role record you have the ability to specify which of these Tabs they have access to, and which will load by default. This is controlled via fields within the ‘Gantt Chart Settings’ section of the Role Page Layout.
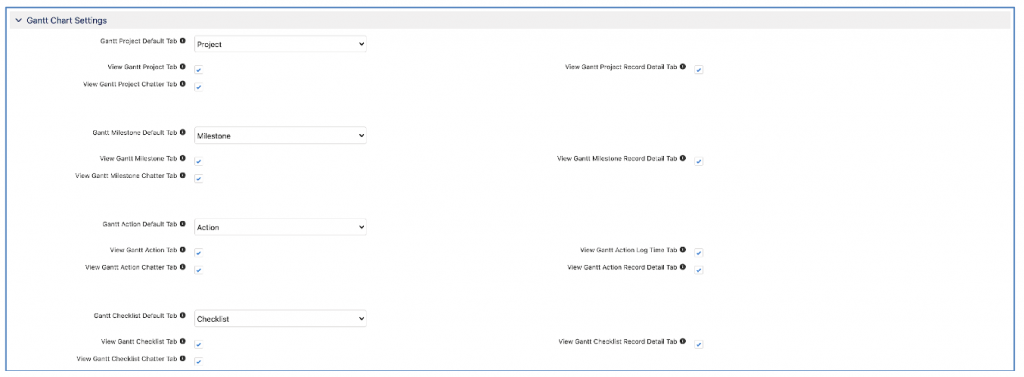
For your convenience, these fields will be pre-populated as part of an Install Script. Full details of the Install Script can be found later in these release notes.
The ‘Add Week to Start’ and ‘Add Week to End’ buttons have been removed from the Gantt Chart. Instead, now when rescheduling Actions on the Gantt Chart the Timeline will automatically adjust to reflect the new dates. If you drag and drop the Action to the end of the existing Timeline, an additional week will automatically appear at the end. If you edit the dates within the Data Table to outside of the existing Timeline that is displayed, it will automatically adjust to reflect the change. Previously, the Action would disappear from the Gantt Chart until you manually clicked the ‘Add Week to End’ button to extend the Timeline beyond the new dates assigned to the Action.
The Filters on the Standalone Gantt Chart have had the following fields added as filter options:
You will now be able to apply Filters to the Gantt Chart based on these fields.
To enable you to centrally configure the Gantt Chart settings for all Users, the Gantt Chart Settings on the Control Pad of the Console have been updated to include a Gantt Chart Settings Override feature.

If this is TRUE, the Settings icon on the Gantt Chart will not be visible and the column selections in the Gantt Data Table will be controlled based on the Control Pad Gantt Chart Settings.
Currency and Number fields that are displayed in the Data Table of the Gantt Chart will now display currency symbols and decimal separators.
We have migrated the Gantt and Scheduler Export features to Heroku, which is part of the Salesforce Platform. The only action you will be required to undertake is outlined below, which is required if you use the ‘PNG Export’ feature on the Gantt Chart.
Update CSP Trusted Site Settings
Update Remote Site Settings
You are able to track the ‘Delivery Status’ of Requirements and User Stories once they have been converted to Actions on Projects.
There is a Picklist field on the Requirement Object and the User Story Object called ‘Delivery Status’, which contains the same values as the Action Status field, as follows:
This field will be automatically updated based on the Status value of the Action in the following situations:
Requirement Converted to Action: the Requirement Delivery Status field is updated to match the Action Status. User Story Delivery Status field needs to be updated manually
Requirement Converted to Milestone: – the User Story Delivery Status field is updated to match the Action Status. The Requirement Delivery Status is updated to match the Milestone Status
User Story Converted to Action: the User Story Delivery Status field is updated to match the Action Status. The Requirement Delivery Status is updated to match the Milestone Status
You are able to Filter the Program Planner and Story Board based on the Delivery Status of the Requirement and/or User Story.
The Reassignment Wizard has been enhanced to enable it to be used in context of an individual Milestone or Action.
You will need to add the ‘Reassignment’ Button to your Milestone and Action Page Layouts in order to utilise this feature.
When being used in context of a Milestone, it will enable you to do a mass transfer of the Milestone Owner and the Owner of records relating to the Milestone, including Actions, Checklist Items and Contributors.
When being used in context of an Action, it will enable you to do a mass transfer of the Action Owner and the Owner of records relating to the Action, including Checklist Items and Contributors.
A number of minor enhancements have been made to various features. Each enhancement is detailed below.
The Project Trigger has had additional logic added that will ensure Dependency records are deleted when the Project is deleted. This will ensure there are no orphaned Dependency records left in the system.
The Resource Assignment Wizard Scale Setting (e.g. Days / Weeks) will now be persistently remembered.
In Mission Control ‘ownership’ of records such as Projects, Milestones, Actions, etc. is determined based on the Role record, rather than the User record. This means that when creating List Views or Reports, you are unable to create dynamic filters using the ‘My Records’ feature. As such, ‘Current User’ Formula Fields have been added to the following Objects:
The formula within these fields will return a 1 if the User viewing the record is the User associated with the Role that is assigned as the owner of the record. Otherwise, it will display a 0.
You can use these ‘Current User’ fields to create dynamic List Views / Report filters that all Users can leverage. By applying a filter where Current User = 1, each User viewing the List View or Report will only see records assigned to them.
A number of new KPI Tracking fields have been added to the Project, Milestone, Action and Checklist Item Objects. These fields will enable you to run exception reports for various scenarios, including:
Each Formula Field will display 0 if the field values match. You will therefore be able to create exception reports where the field does not equal zero. For example, if I want to run a report that shows all Projects where the Start Date is greater than the Baseline Start Date (e.g. the Project started later than when we expected it to) I could create a filter on a report where ‘KPI: Start Date Variance’ is less than zero.
The table below outlines the fields available on each Object.
| Field | Project | Milestone | Action | Checklist |
| KPI: Start Date Variance
Calculates ‘Baseline Start Date’ – ‘Start Date’ |
X | X | X | |
| KPI: End Date Variance
Calculates ‘Baseline End Date’ – ‘End Date’ |
X | X | X | |
| KPI: Total Hours Variance
Calculates ‘Total Hours Scheduled’ – (‘Total Hours Completed’ + ‘Total Hours Remaining’) |
X | X | X | X |
| KPI: P&L Variance
Calculates ‘P&L Scheduled’ – ‘P&L Forecast’ |
X | X | X |
A number of enhancements have been made to the Project Overview page, as outlined below.
You are now able to hide the ‘Detail’ Tab of the Project Overview in the same way that you can all other Project Overview Tabs. This is controlled by the ‘View Detail Tab’ on the Role record.
This field will be set to TRUE automatically for all existing Role records as part of the Install Script. Full details of the Install Script can be found later in these release notes.
You are now able to set the Detail Tab to be the default tab that is loaded when first loading the Project Overview. This is controlled by setting the ‘Project Overview Default Tab’ field on the Role record to ‘Detail’.
Note: You will need to manually add the Detail value to the Picklist Options for this field.
The following changes have been applied to the Overview Tab within the Project Overview Component.
A number of enhancements have been made to the Project Status Report, as outlined below.
Customers have requested the ability to choose whether or not specific Milestones, Actions or Checklists should be excluded from the Project Status Report.
To support this request, a number of new fields have been added to the following Objects:
| Milestone | Action | Checklist Item |
| Exclude from Status Report | Exclude from Status Report
Exclude from Status Report Indicator |
Exclude from Status Report
Exclude from Status Report Indicator |
If you wish to exclude a particular Milestone from the Project Status Report, you will need to set the Milestone ‘Exclude from Status Report’ field to TRUE. This will flow down to all related Actions and Checklist Items, setting their ‘Exclude from Status Report Indicator’ field to TRUE.
If you wish to exclude a particular Action from the Project Status Report, you will need to set the Action ‘Exclude from Status Report’ field to TRUE. This will set the Action ‘Exclude from Status Report Indicator’ field to TRUE and flow down to all related Checklist Items, setting their ‘Exclude from Status Report Indicator’ field to TRUE.
If you wish to exclude a particular Checklist Item from the Project Status Report, you will need to set the Checklist Item ‘Exclude from Status Report’ field to TRUE. This will set the Checklist Item ‘Exclude from Status Report Indicator’ field to TRUE.
Records will be excluded from the Project Status Report based on the following field criteria:
Milestone: ‘Exclude from Status Report’ = TRUE
Action: ‘Exclude from Status Report Indicator’ = TRUE
Checklist Item: ‘Exclude from Status Report Indicator’ = TRUE
To enable you to add different Project fields to the ‘Project Summary’ and ‘Project Detail’ pages, an additional Field Set has been included on the Project Object. The existing ‘Project: Status Report Fields’ Field Set will now apply to the ‘Project Summary’ section of the Project Status Report.
You can include up to 5 x Custom Fields from the Project record on the ‘Project Detail’ page of the Project Status Report.
These fields need to be added to a Field Set on the Project Object called ‘Project: Status Report Detail Fields’. Whilst you can add more than 5 Fields to the Field Set, only the Top 5 Fields will be displayed within the Status Report.
You can access the Field Set by going to Setup > Object Manager > Project > Field Sets > Project: Status Report Detail Fields.
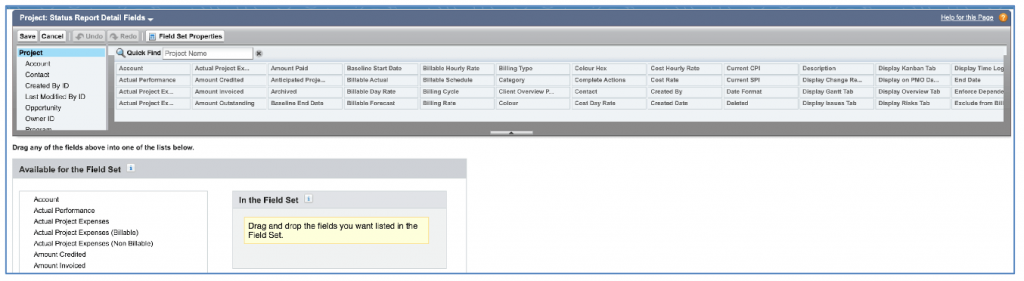
Once you have added your Fields, click Save.
For your convenience, an Install Script will execute as part of the upgrade process. This will populate various fields on the Role record as outlined below.
| Field | Value |
| View Detail Tab | TRUE |
| View Retro Tab | TRUE |
| Gantt Project Default Tab | Project |
| View Gantt Project Tab | TRUE |
| View Gantt Project Chatter Tab | TRUE |
| View Gantt Project Record Detail Tab | TRUE |
| Gantt Milestone Default Tab | Milestone |
| View Gantt Milestone Tab | TRUE |
| View Gantt Milestone Chatter Tab | TRUE |
| View Gantt Milestone Record Detail Tab | TRUE |
| Gantt Action Default Tab | Action |
| View Gantt Action Tab | TRUE |
| View Gantt Action Chatter Tab | TRUE |
| View Gantt Action Log Time Tab | TRUE |
| View Gantt Action Record Detail Tab | TRUE |
| Gantt Checklist Default Tab | Checklist |
| View Gantt Checklist Tab | TRUE |
| View Gantt Checklist Chatter Tab | TRUE |
| View Gantt Checklist Record Detail Tab | TRUE |
A number of new fields have been added to the solution as part of this release. We recommend you add these fields to your Page Layouts. If you are not using the Permission Sets included with Mission Control, we recommend you check the Field Level Security for all of these fields to ensure all appropriate Profiles have the required access.
| Field | Field Type | Comments |
| Name | Text (80) | Identifies the Name of the Retrospective |
| Project | Lookup (Project) | Identifies the Project this Retrospective relates to |
| Date | Date | Identifies the date this Retrospective was held |
| Retrospective Notes | Rich Text | Detailed notes relating to the Retrospective |
| Field | Field Type | Comments |
| Learning ID | Auto Number | Identifies the Unique Reference for this Learning. Format – LNG:{000000} |
| Retrospective | Lookup (Retrospective) | Identifies the Retrospective this Learning relates to |
| Reported By | Lookup (Role) | Identifies the Role record of the person that identified this Learning |
| Opinion | Picklist | Identifies the Opinion of this Learning
Values: Worked Well; Needs Improvement; Try Next; Puzzles Us |
| Category | Multi Picklist | Identifies the Categories this Learning relates to
Values: Process; Resource; Schedule; Collaboration; Scoping; Testing; Documentation |
| Learning Notes | Rich Text | Detailed notes relating to the Learning |
| Field | Field Type | Comments |
| Project Overview Default Tab | Picklist | Existing Field – you will need to add the following values as a new option:
Detail Retro |
| View Retro Tab | Checkbox | Identifies whether the User linked to this Role has the ability to view the Project Overview Retrospective Tab |
| Gantt Project Default Tab | Picklist | Identifies which Tab on the Gantt Project Modal is displayed by default.
Values: Project; Record Detail; Chatter |
| View Gantt Project Tab | Checkbox | Identifies whether the User linked to this Role has the ability to view this Tab on the Gantt Modal |
| View Gantt Project Chatter Tab | Checkbox | Identifies whether the User linked to this Role has the ability to view this Tab on the Gantt Modal |
| View Gantt Project Record Detail Tab | Checkbox | Identifies whether the User linked to this Role has the ability to view this Tab on the Gantt Modal |
| Gantt Milestone Default Tab | Picklist | Identifies which Tab on the Gantt Project Modal is displayed by default.
Values: Milestone; Record Detail; Chatter |
| View Gantt Milestone Tab | Checkbox | Identifies whether the User linked to this Role has the ability to view this Tab on the Gantt Modal |
| View Gantt Milestone Chatter Tab | Checkbox | Identifies whether the User linked to this Role has the ability to view this Tab on the Gantt Modal |
| View Gantt Milestone Record Detail Tab | Checkbox | Identifies whether the User linked to this Role has the ability to view this Tab on the Gantt Modal |
| Gantt Action Default Tab | Picklist | Identifies which Tab on the Gantt Project Modal is displayed by default.
Values: Action; Log Time; Record Detail; Chatter |
| View Gantt Action Tab | Checkbox | Identifies whether the User linked to this Role has the ability to view this Tab on the Gantt Modal |
| View Gantt Action Chatter Tab | Checkbox | Identifies whether the User linked to this Role has the ability to view this Tab on the Gantt Modal |
| View Gantt Action Log Time Tab | Checkbox | Identifies whether the User linked to this Role has the ability to view this Tab on the Gantt Modal |
| View Gantt Action Detail Record Detail Tab | Checkbox | Identifies whether the User linked to this Role has the ability to view this Tab on the Gantt Modal |
| Gantt Checklist Default Tab | Picklist | Identifies which Tab on the Gantt Project Modal is displayed by default.
Values: Checklist; Record Detail; Chatter |
| View Gantt Checklist Tab | Checkbox | Identifies whether the User linked to this Role has the ability to view this Tab on the Gantt Modal |
| View Gantt Checklist Chatter Tab | Checkbox | Identifies whether the User linked to this Role has the ability to view this Tab on the Gantt Modal |
| View Gantt Checklist Record Detail Tab | Checkbox | Identifies whether the User linked to this Role has the ability to view this Tab on the Gantt Modal |
| View Detail Tab | Checkbox | Identifies whether the User linked to this Role has the ability to view the Project Overview Detail Tab |
| Receive Timesheet Reminder | Checkbox | Check this to ensure this person receives the Mission Control Timesheet Submission Reminder |
| Receive Exception Notification | Checkbox | Check this to ensure this person receives the Mission Control Timesheet Exception Notification Email |
| Field | Field Type | Comments |
| Name | Text (80) | Identifies the name of the record |
| Start Date | Date | Identifies the Start Date for this Holiday Allowance |
| End Date | Date | Identifies the End Date for this Holiday Allowance |
| Allowance | Number (16,2) | Identifies the number of days allocated to this Holiday Allowance |
| Accrues | Checkbox | Identifies whether the Holiday Allowance can be accrued to a future period |
| Accrual % | Percent (16,2) | Identifies the percentage of the Holiday Allowance that can be accrued |
| Used | Number (16,2) | Identifies the number of days used from this Holiday Allowance |
| Remaining | Formula (Number 16,2) | Identifies how many days are remaining from this Holiday Allowance |
| Type | Picklist | Identifies the Type of Holiday Allowance
Values: Annual Leave; VTO; Sick Leave |
| Role | Lookup (Role) | Identifies the Role this Holiday Allowance relates to |
| Field | Field Type | Comments |
| Holiday Allowance | Lookup (Holiday Allowance) | Identifies the Holiday Allowance record this Holiday relates to |
| Field | Field Type | Comments |
| Generation Method | Picklist | Existing Field – you will need to add the following values as new options:
Base Template + Products Base Template + Products – No Duplicates |
| Field | Field Type | Comments |
| KPI: Start Date Variance | Formula (Number 18,0) | Formula: Calculates Baseline Start Date – Start Date |
| KPI: End Date Variance | Formula (Number 18,0) | Formula: Calculates Baseline End Date – End Date |
| KPI: Total Hours Variance | Formula (Number 16,2) | Formula: Total Hours Scheduled – (Total Hours Completed + Total Hours Remaining) |
| KPI: P&L Variance | Formula (Currency 16,2) | Formula: P&L Scheduled – P&L Forecast |
| Project Owner Current User | Formula (Number 1,0) | Identifies if the User viewing this record is the User linked to the Role that is the Project Owner. If true, 1 is displayed, if false, 0 is displayed. This field can be used to create Dynamic List View / Report Filters |
| Field | Field Type | Comments |
| Requirement | Lookup (Requirement) | Links to the Requirement record that this Milestone was created from |
| KPI: Start Date Variance | Formula (Number 18,0) | Formula: Calculates Baseline Start Date – Start Date |
| KPI: End Date Variance | Formula (Number 18,0) | Formula: Calculates Baseline End Date – End Date |
| KPI: Total Hours Variance | Formula (Number 16,2) | Formula: Total Hours Scheduled – (Total Hours Completed + Total Hours Remaining) |
| KPI: P&L Variance | Formula (Currency 16,2) | Formula: P&L Scheduled – P&L Forecast |
| Milestone Owner Current User | Formula (Number 1,0) | Identifies if the User viewing this record is the User linked to the Role that is the Milestone Owner. If true, 1 is displayed, if false, 0 is displayed. This field can be used to create Dynamic List View / Report Filters |
| Exclude from Status Report | Checkbox | Identifies if this Milestone should be excluded from the Project Status Report |
| Field | Field Type | Comments |
| As a | Lookup (Persona) | Links to the Persona record that the User Story relates to |
| I want to | Rich Text | A description of what the Persona would like to be able to do |
| So that I can | Rich Text | A description of what the Persona is trying to achieve |
| Acceptance Criteria | Rich Text | Detailed notes on how this User Story will be evaluated |
| User Story | Lookup (User Story) | Links to the User Story record that this Action was created from |
| KPI: Start Date Variance | Formula (Number 18,0) | Formula: Calculates Baseline Start Date – Start Date |
| KPI: End Date Variance | Formula (Number 18,0) | Formula: Calculates Baseline End Date – End Date |
| KPI: Total Hours Variance | Formula (Number 16,2) | Formula: Total Hours Scheduled – (Total Hours Completed + Total Hours Remaining) |
| KPI: P&L Variance | Formula (Currency 16,2) | Formula: P&L Scheduled – P&L Forecast |
| Action Owner Current User | Formula (Number 1,0) | Identifies if the User viewing this record is the User linked to the Role that is the Action Owner. If true, 1 is displayed, if false, 0 is displayed. This field can be used to create Dynamic List View / Report Filters |
| Exclude from Status Report | Checkbox | Identifies if this Action should be excluded from the Project Status Report |
| Exclude from Status Report Indicator | Formula (Checkbox) | Identifies if this Action should be excluded from the Project Status Report. Will be TRUE if either Action or parent Milestone is set to TRUE |
| Field | Field Type | Comments |
| KPI: Total Hours Variance | Formula (Number 16,2) | Formula: Total Hours Scheduled – (Total Hours Completed + Total Hours Remaining) |
| Action Name | Formula (Text) | Formula: References the Action Name from the Action this Checklist Item relates to |
| Milestone Name | Formula (Text) | Formula: References the Milestone Name that the Action this Checklist Item relates to |
| Project Name | Formula (Text) | Formula: References the Project Name that the Action this Checklist Item relates to |
| Exclude from Status Report | Checkbox | Identifies if this Checklist Item should be excluded from the Project Status Report |
| Exclude from Status Report Indicator | Formula (Checkbox) | Identifies if this Checklist Item should be excluded from the Project Status Report. Will be TRUE if either Checklist Item or parent Action is set to TRUE |
| Field | Field Type | Comments |
| Action Name | Formula (Text) | Formula: References the Action Name from the Action this Time Log relates to |
| Milestone Name | Formula (Text) | Formula: References the Milestone Name that the Action this Time Log relates to |
| Project Name | Formula (Text) | Formula: References the Project Name that the Action this Time Log relates to |
| Project Member Current User | Formula (Number 1,0) | Identifies if the User viewing this record is the User linked to the Role that is the Project Member. If true, 1 is displayed, if false, 0 is displayed. This field can be used to create Dynamic List View / Report Filters |
| Issue | Lookup (Issue) | Links to the Issue this Time Log relates to |
| Field | Field Type | Comments |
| Action Name | Formula (Text) | Formula: References the Action Name from the Action this Issue relates to |
| Milestone Name | Formula (Text) | Formula: References the Milestone Name that the Action this Issue relates to |
| Issue Owner Current User | Formula (Number 1,0) | Identifies if the User viewing this record is the User linked to the Role that is the Issue Owner. If true, 1 is displayed, if false, 0 is displayed. This field can be used to create Dynamic List View / Report Filters |
| Hours Completed – Billable | Number (16,2) | Identifies the billable hours that have been associated to this Issue from Time Logs |
| Hours Completed – Non Billable | Number (16,2) | Identifies the non billable hours that have been associated to this Issue from Time Logs |
| Total Hours Completed | Formula (Number 16,2) | Formula: ‘Hours Completed – Billable’ + ‘Hours Completed – Non Billable’ |
| Field | Field Type | Comments |
| Contributor Current User | Formula (Number 1,0) | Identifies if the User viewing this record is the User linked to the Role that is the Contributor. If true, 1 is displayed, if false, 0 is displayed. This field can be used to create Dynamic List View / Report Filters |
| Field | Field Type | Comments |
| Risk Owner | Lookup (Role) | Identifies the Role that is responsible for this Risk |
| Risk Owner Current User | Formula (Number 1,0) | Identifies if the User viewing this record is the User linked to the Role that is the Risk Owner. If true, 1 is displayed, if false, 0 is displayed. This field can be used to create Dynamic List View / Report Filters |
| Field | Field Type | Comments |
| Delivery Status | Picklist | Identifies the delivery status of the Requirement based on the status of the Action related to this record
Values: Planned, In Progress; On Hold; Complete; Cancelled |
| Field | Field Type | Comments |
| Delivery Status | Picklist | Identifies the delivery status of the User Story based on the status of the Action related to this record
Values: Planned, In Progress; On Hold; Complete; Cancelled |
| Field | Field Type | Comments |
| Added to Next Meeting | Checkbox | Identifies that this Agenda Item has been added to the Next Meeting |
| Field | Field Type | Comments |
| Added to Next Meeting | Checkbox | Identifies that this Agenda Task has been added to the Next Meeting |
Mission Control will be made available based on the following release schedule.
10th September 2021 – Available for manual upgrade from the AppExchange
18th September 2021 – Automatic upgrade to all Sandbox Orgs
25th September 2021 – Automatic upgrade to all Production Orgs
To manually upgrade to the new version of Mission Control in your organisation, please follow the steps below:
We have pre-recorded the ‘What’s New’ webinar to provide further information on how to get the best out of the new features. To access this webinar, please view the ‘Release Notes’ section of the Mission Control Support Centre – www.aprika.com/mc-support
Some of the new features included in this release of Mission Control have come from ideas submitted from existing clients. If you have an idea for enhancing Mission Control, you can submit it via email to [email protected].
If you have any questions regarding this release notification, please do not hesitate to contact us at [email protected].
