Salesforce Project Management Software by Aprika

Mission Control is a native application that runs on the Force.com platform. It is a project management system that integrates with the cloud-based CRM system, Salesforce.com. It enables you to manage all of your projects from the cloud, integrated with your existing Salesforce.com system.
Mission Control is available for the following editions of Salesforce.com:
If you are using any other edition, please speak to your Salesforce.com Account Executive about upgrading.
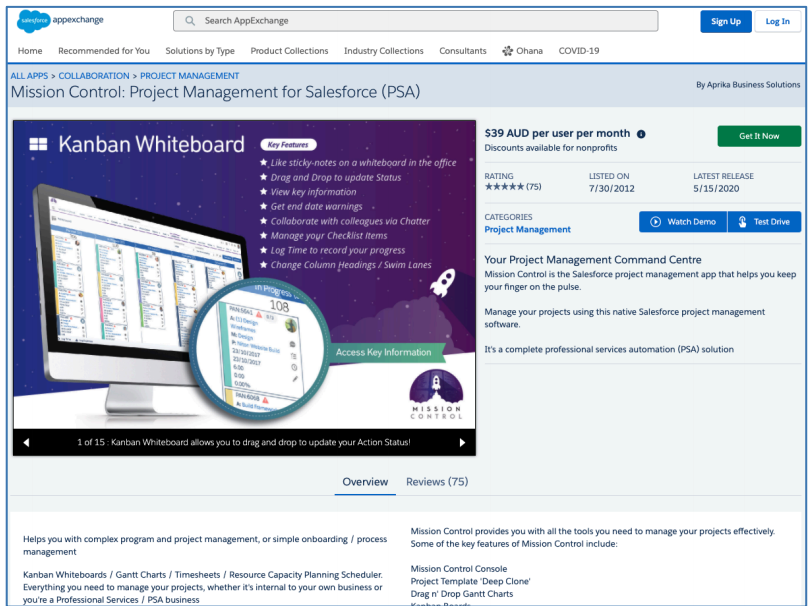
To install Mission Control, click the Get It Now link on the AppExchange.
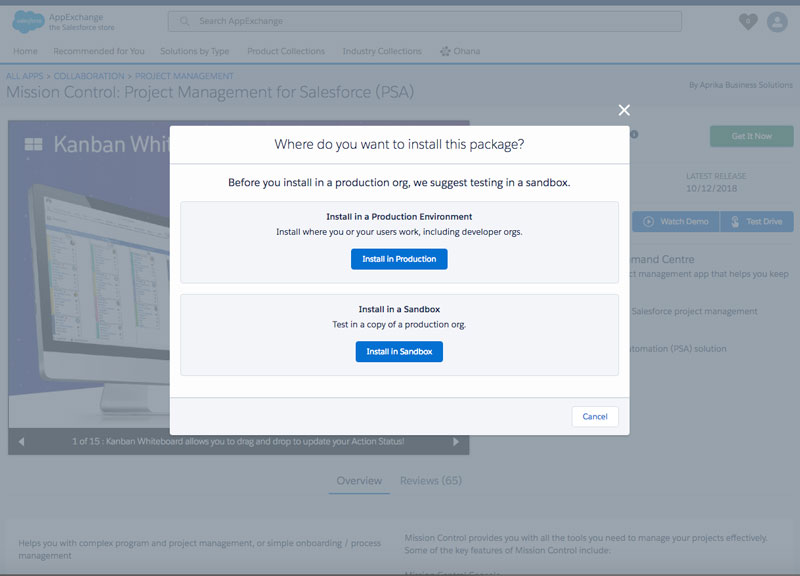
Choose the appropriate settings to install Mission Control in your Salesforce.com org.
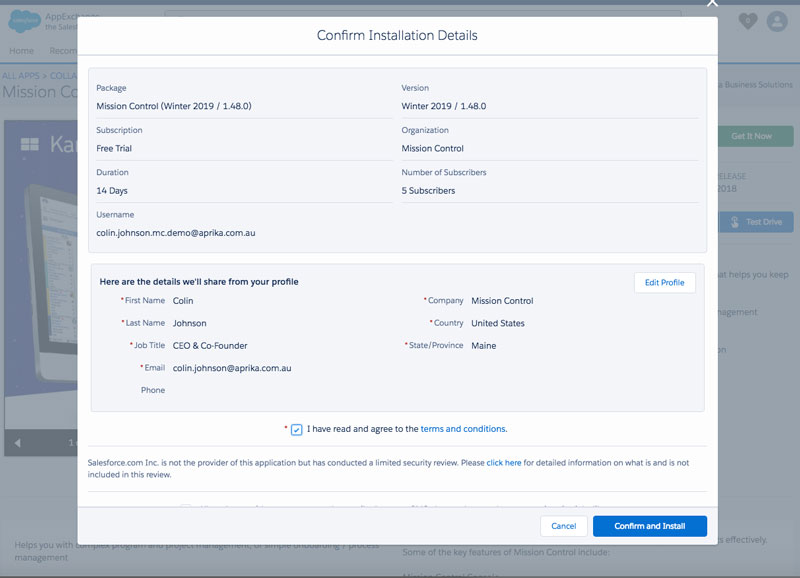
Confirm you agree to the terms and conditions and install the application
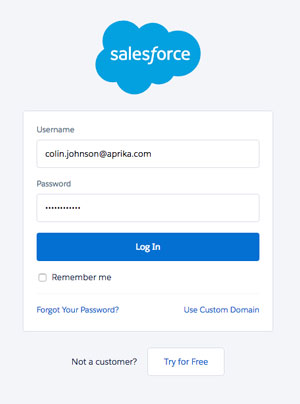
Enter your Salesforce.com User Name and Password and click Log in to Salesforce
Choose which Users you wish to assign permissions to and click Install.
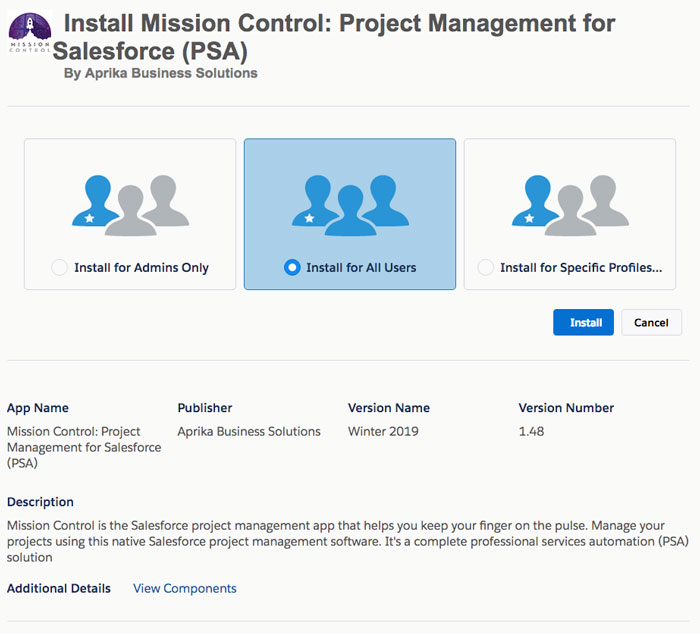
You will now get a message that states your installation is complete and Mission Control will show on your application list.
Congratulations! Your Mission Control application has been installed correctly. You are now ready to move on to Configuration.
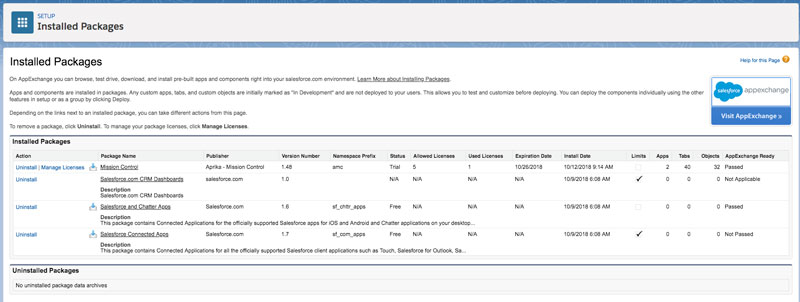
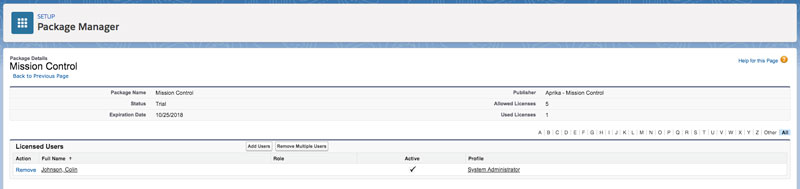
Mission Control is licensed on a per user basis. When you install Mission Control into your Salesforce.com org, you will need to assign your Mission Control licenses to your Salesforce.com users. To do this, follow the steps below:
PLEASE NOTE: You do not need to assign Mission Control licences if you are installing in a Sandbox environment.
Should you need to increase the number of Mission Control user licenses, please email [email protected].
The Daily Digest provides detailed insight into what’s going on in Mission Control from the individual Role’s perspective. It includes the following sections:
Timesheet Summary

The Timesheet Summary section provides insight into the hours you’ve logged for This Week and Last Week.
Today’s Assignments
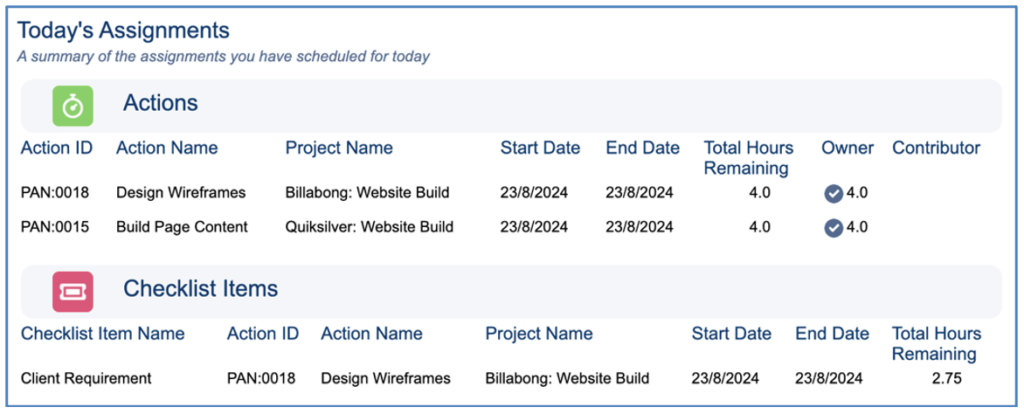
This section includes a list of Actions and Checklist Items. The records will be included if they meet the following criteria:
Actions
Checklist Items
New Assignments
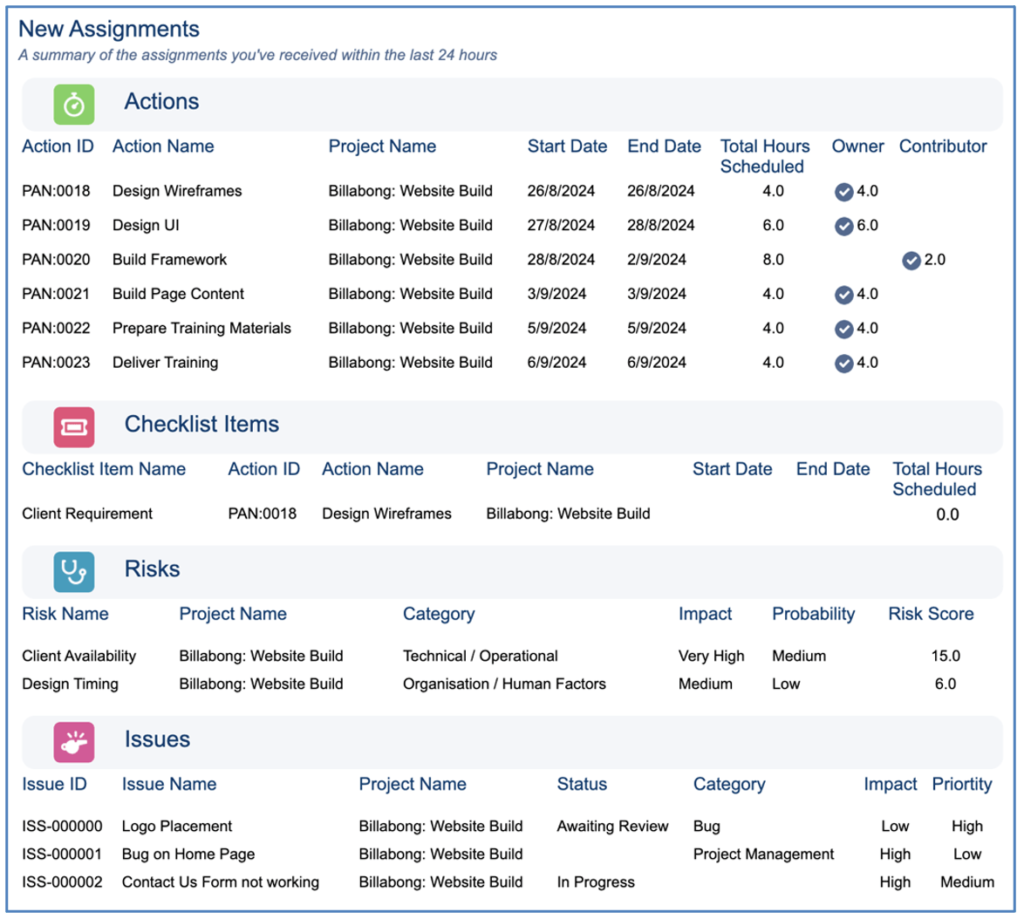
The New Assignments section includes lists of Actions, Checklist Items, Risks and Issues that have been assigned to the Role in the last 24 hours.
Upcoming Deadlines
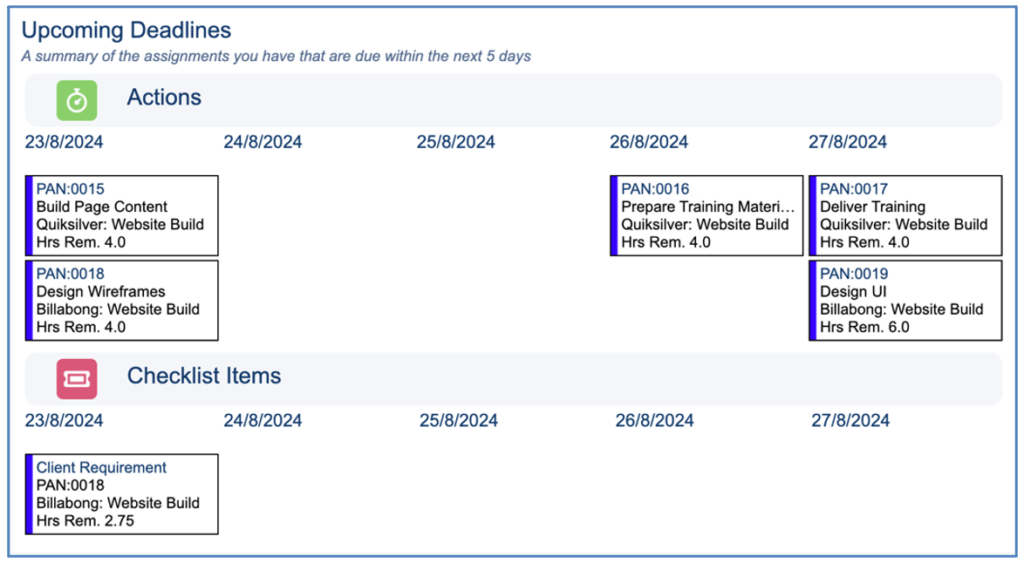
This section includes lists of Actions and Checklist Items that have an End Date in the next 5 days.
Outstanding Assignments
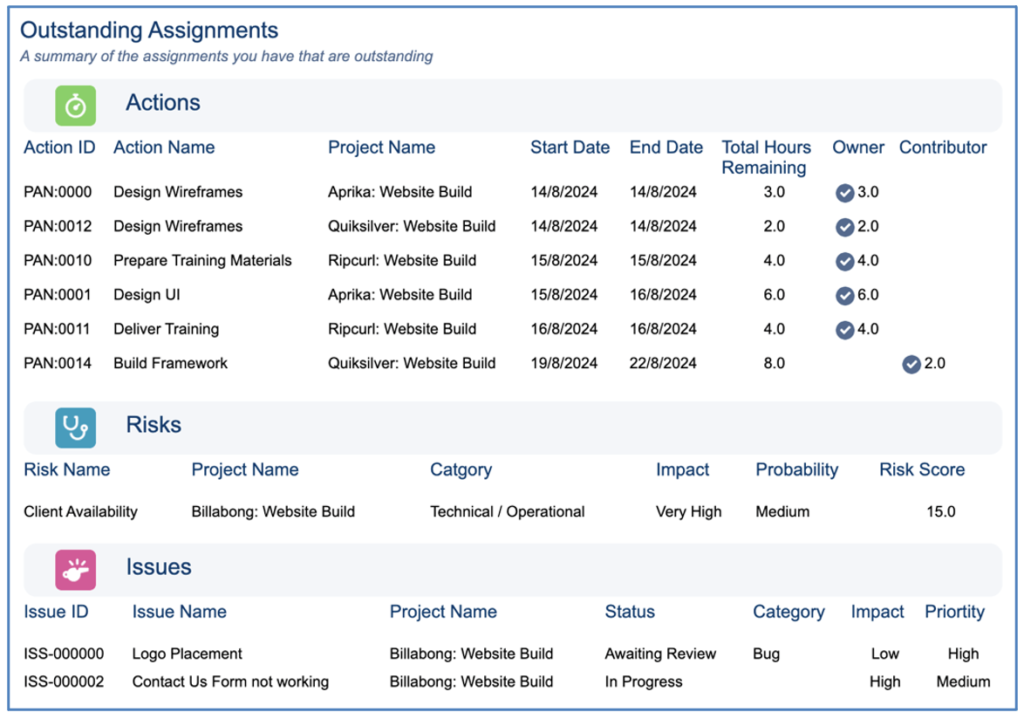
This section includes lists of Actions, Checklist Items, Risks and Issues that are outstanding. The records will be included if they meet the following criteria:
Actions
Checklist Items
Risks
Issues
Estimates Summary

The Estimates Summary section provides a record count of Estimates the User needs to do that are overdue, in their To Do list or assigned to them to review.
Approvals Summary

The Approvals Summary section provides a record count of Time Logs, Expenses and Holidays that are currently awaiting your approval.
Rejections Summary
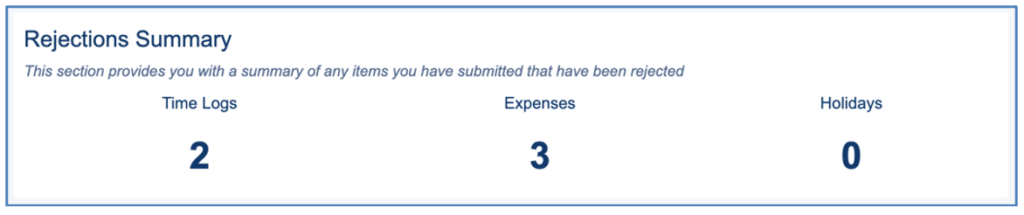
The Rejections Summary section provides a record count of Time Logs, Expenses and Holidays you have submitted that have been rejected.
Each section of the digest will only appear if there are records to display. For example, if you have not been assigned any new records within the last 24 hours, the ‘New Assignments’ section will not be visible.
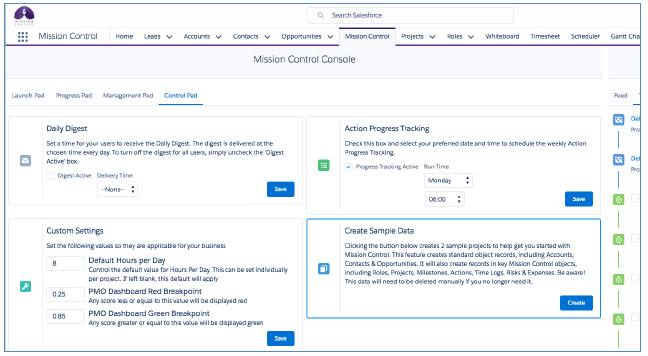
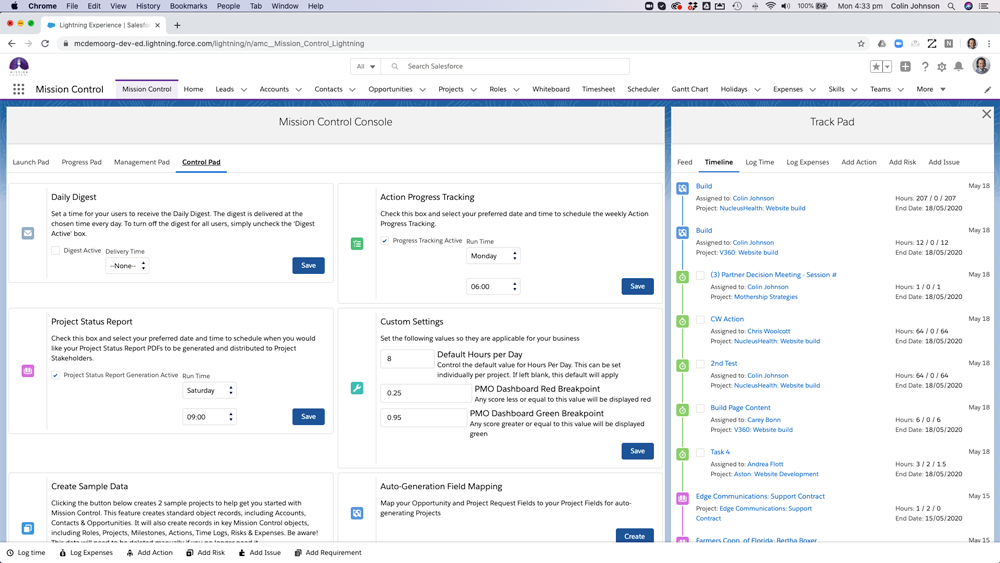
The Daily Digest can be activated from the Daily Digest panel in the ‘Control Pad’ section of the Mission Control Console by following the configuration process below:
Your daily digests are now active and will be generated daily at the start time you specified.
In addition, you can further customise the content of the email by selecting to exclude certain content. This is controlled via settings within the Daily Digest Tile on the Control Pad of the Mission Control Console.
Note: Each individual Action Owner can subscribe / unsubscribe to the digest email by adjusting the ‘Receive Digest’ setting on their ‘Role’ record. The default is subscribed.
You specify the time of day that you would like the Daily Digest to be sent out from the ‘Daily Digest’ Tile on the Control Pad of the Mission Control Console. The Daily Digest will be distributed at the specified time, but it will be based on the Timezone of the individual digest recipients.
For example, we have two employees called Mick and Kelly. Mick is based in Melbourne, Australia and Kelly is based in San Francisco, USA. We have scheduled our Daily Digest to be distributed at 5am. Mick will receive his email at 5am AEST and Kelly will receive his email at 5am PST.
To accommodate Users that do not work every day, a number of fields are available on the Role Object that allow you to specify at an individual Role level, which days of the week they will receive the Daily Digest. The fields are as follows:
· Daily Digest – Monday
· Daily Digest – Tuesday
· Daily Digest – Wednesday
· Daily Digest – Thursday
· Daily Digest – Friday
· Daily Digest – Saturday
· Daily Digest – Sunday
To ensure each Role receives the Daily Digest on the days they wish to receive it, each field must be set to TRUE on their Role record.
The Daily Digest will not be distributed to any Role that is on Holiday that day, based on any of the following Holiday types:
· Individual Holiday
· Team Assigned Holiday
· Global Holiday
Mission Control allows you to generate sample data so that you can evaluate and get up and running quickly. If you would like to take advantage of this feature, navigate to the ‘Control Pad’ on the Mission Control Console and click the “Create Sample Data” button. This will populate sample records in all of the key objects required for Mission Control. Please note that once this sample data is created, you will need to manually delete each record that is no longer required.
That’s it! That is all the configuration you need to do. You are now ready to start using Mission Control. Continue reading to find out how to launch your first mission!
Mission Control consists of 62 objects that hold the data relating to various aspects of your projects. These objects are:
You can access each object in the usual manner via their own individual tabs. However, you can launch straight into most of these areas directly from the Mission Control Console.
The Mission Control Console has been designed to work as your ‘command centre’, providing quick launch access to any aspect of your project data. From the Mission Control Console, you can quickly perform the following actions:
The Console is broken up into four separate Tabs. Each of which can be restricted to individual users if required. Four Tabs available on the Console include:
Let’s take a look at each Tab in a bit more detail.
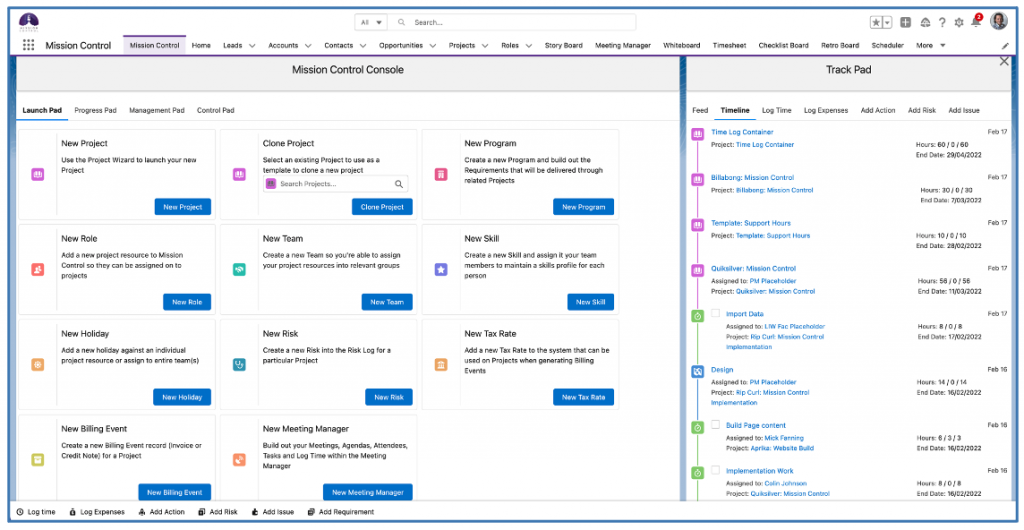
Launch Pad
The Launch Pad is where you need to go if you’re looking to create a new record within Mission Control, such as a Role, Holiday, Skill, Risk, etc. It also provides you with the ability to launch a new Project, whether that’s through the Project Clone feature, or via the new ‘Project Launcher’, which we’ll cover off later in the release notes. It provides you with the ability to create any of the following records:

The Profile Permissions associated to the User will be applied. For example, if the User does not have the permission to create a Skill record, the Skill ‘Tile’ will not be visible on the Launch Pad.
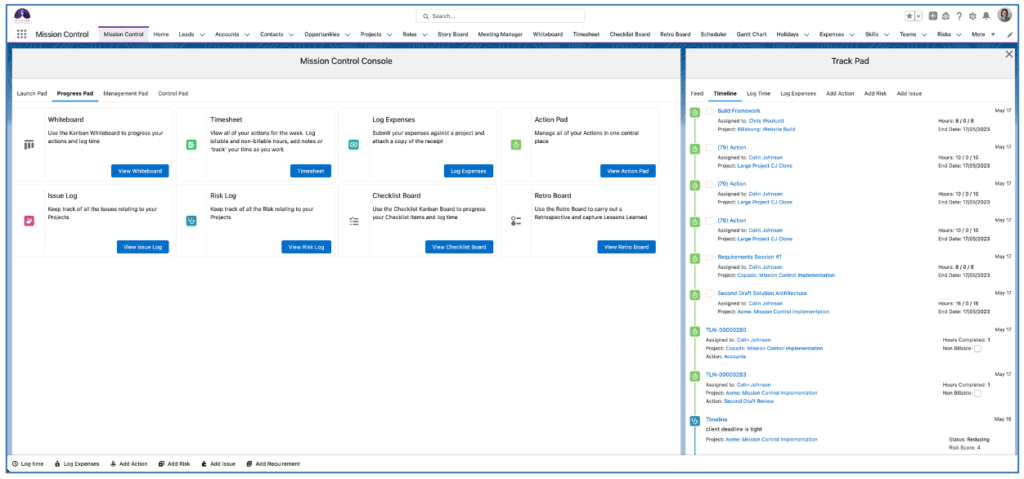
Progress Pad
The Progress Pad is where you’d go if you’re looking to log progress against a Project you’re working on. From here, you’ll be able to access the following tools within Mission Control:
Management Pad
The Management Pad provides you with access to all of the tools within Mission Control that help you keep on top of the management of your projects, including:
Control Pad
The Control Pad provides you with access to all of the administration settings within Mission Control. We expect you’ll want to restrict access to this Tab to your System Administrators and potentially your Project Managers.
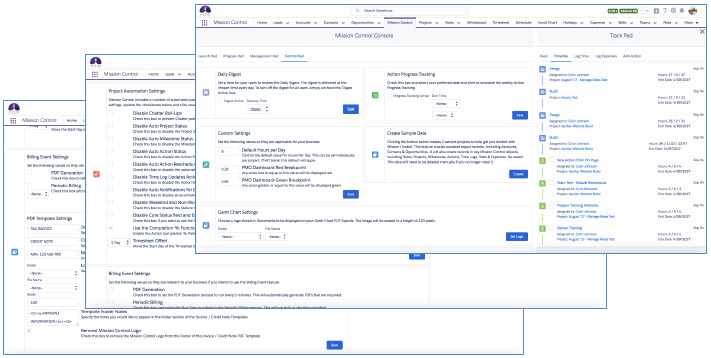
From the Control Pad, you’ll be able to complete the following administrative functions:
There are numerous Tiles on the Control Pad of the Mission Control Console that enable you to schedule Apex jobs. These jobs are set to run in the background in context of the User that enabled the job.
If that User becomes inactive (e.g. they leave the business), the job will fail to run and whilst there are notifications available within Salesforce Setup, there was previously no way of identifying this via the Control Pad of the Console.
Therefore, for each Tile on the Control Pad that enables you to schedule an Apex job a warning icon will be displayed to alert customers that action is required in order to reschedule the Apex job via an active User.
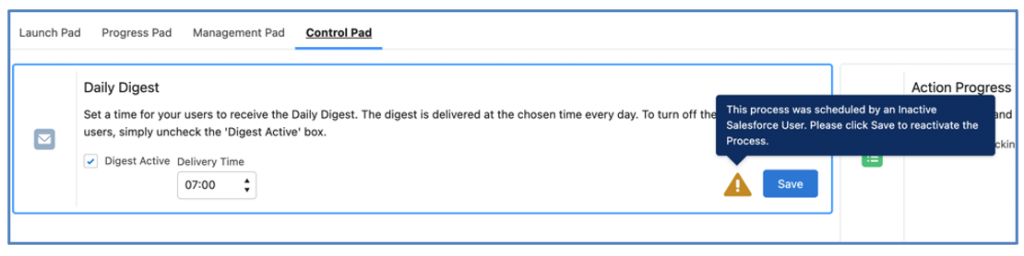
The image above shows the notification where an Apex job was scheduled by an inactive User.
Tab Access
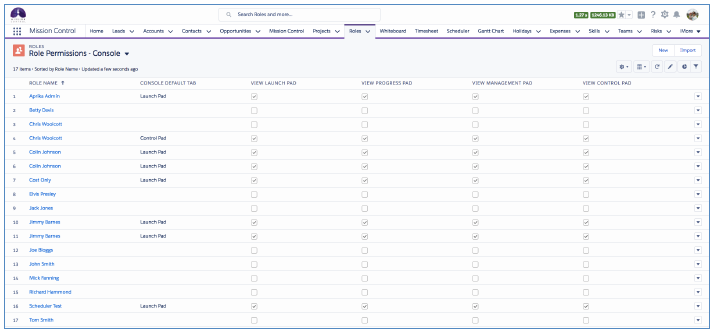
We’ve focused on providing you as much flexibility as possible with regards to how much access you provide each User with on the Console. You can control access to each Tab for each individual Role record within Mission Control. The fields that control User access to the Console include:
Field | Field Type | Comments |
Console Default Tab | Picklist | Allows you to specify which Tab you would like to appear when initially loading the Console |
View Launch Pad | Checkbox | Identifies whether the Role can view the Launch Pad Tab |
View Progress Pad | Checkbox | Identifies whether the Role can view the Progress Pad Tab |
View Management Pad | Checkbox | Identifies whether the Role can view the Management Pad Tab |
View Control Pad | Checkbox | Identifies whether the Role can view the Control Pad Tab |
You can set these field values for an individual Role record by editing the record and updating the fields in the ‘Console Settings’ section.

You can also manage these settings for all of your Role records from a new List View that has been included called ‘Role Permissions – Console’.
To create the framework of a new project quickly, directly from your Mission Control Console, follow the steps below:
From the Console, navigate to the ‘Launch Pad’ and then click on the ‘New Project’ button as shown below. This will open the ‘Project Launcher’.
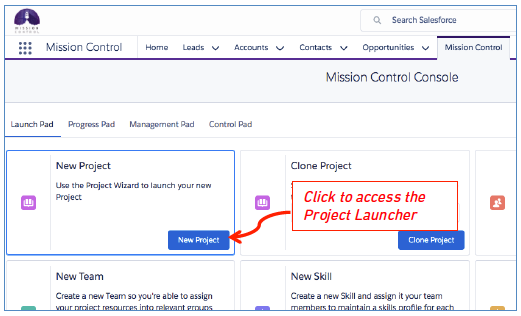
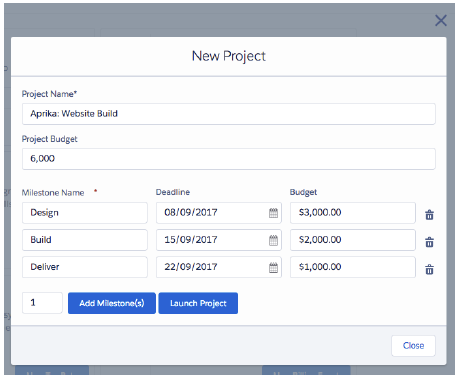
The Project Launcher allows you to build out the framework for a new Project by entering high-level details for the Project and Milestones.
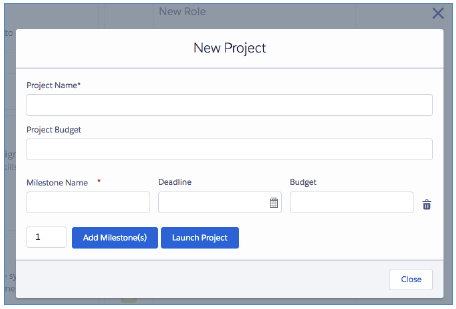
From the Project Launcher, you’re able to specify the Project Name and Project Budget for the Project record, as well as adding the number of Milestones you require. For each Milestone, you’re able to enter the Milestone Name, Deadline and Budget (if applicable). Once you’ve entered the required information as per the below example, you’re able to click the ‘Launch Project’ button, which will generate the records for you.
You are able to add additional fields relating to the Project record and/or the Milestone record(s) via Field Sets on the respective Objects. The Field Set names are:
Fields added to the Project Field Set will be added below the Opportunity field. Fields added to the Milestone Field Set will be added to the right of the Budget field.
In addition to adding fields to the Field Sets, if a Customer adds a Custom Field to either the Project or Milestone Object and sets the ‘Required’ field to TRUE, these fields will automatically be included on the Project Launch Wizard.
In addition, if a Customer has Multi Currency enabled in their Salesforce Org, the Currency field on the Project will automatically appear below the Project Name field.
Global Action
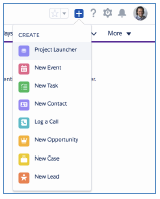
You can also access the Project Launcher from the Global Action feature within Lightning Experience. Simply click on the Global Action + sign in the top right corner of your screen and select the ‘Project Launcher.
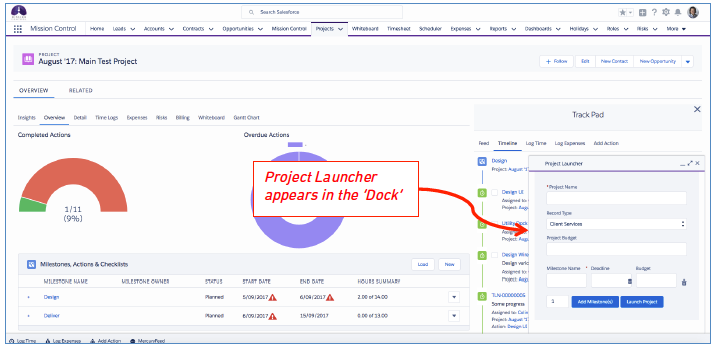
This will open up the Project Launcher component in a ‘Dock’ at the bottom right hand side of the window, as shown below.
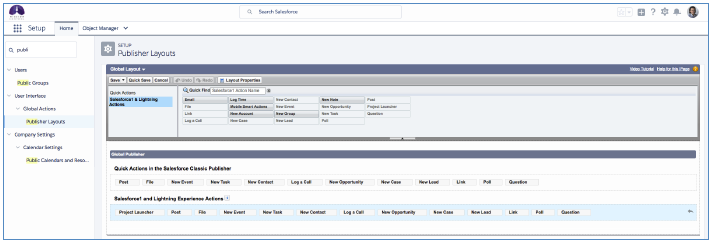
Note: you will need to add the Project Launcher to your ‘Publisher Layout’ for it to appear in your Global Actions list. To do this, click Setup, search for Publisher Layouts in the quick find search box, click ‘Edit’ for the ‘Global Layout’ and add Project Launcher to the Salesforce1 & Lightning Experience Actions section, as illustrated below.
Once your project is saved you can quickly create the project actions using the Create Actions button. (See more detail on creating actions later in this document)
Projects can also be created using the standard ‘Create New’ options within Salesforce for the Project, Milestones and Actions.
Mission Control allows you to track the revenue and costs of a Project. This enables you to track the Profit & Loss for individual Actions, Milestones and Projects.
You’re able to specify the Billing Rate and Cost Rate for each Project – the options are ‘Standard’ and ‘Role-based’.
Standard – This option will use the ‘Billable Hourly Rate’ and ‘Cost Hourly Rate’ on the Project. These are calculated based on the ‘Billable Day Rate’ and ‘Cost Day Rate’ values that you specify on the Project, which are divided by the ‘Hours per Day’ value.
Role-based – This option will use the ‘Billable Hourly Rate’ and ‘Cost Hourly Rate’ specified on the individual Role records, or the project specific role rates specified using the Manage Rates button on the individual project.
Skill-based – This option will use the ‘Billable Hourly Rate’ and ‘Cost Hourly Rate’ specified on the skill assignments for each individual role involved in the project based on the skill required to complete the action. In the event that Skill-based is selected for the billing type and there is no skill-based rate for the specific skill, the project specific role rates will first be used. If there are no project specific role rates in place (manage rates), then the roles standard rates will be used.
Rate Card – This option will use the ‘Billable Hourly Rate’ and ‘Cost Hourly Rate’ specified on the Rate Card Entry for the Function that matches the Role’s Function. When using the Rate Card method for either the Billing Rate or the Cost Rate, the financials relating to the hours will be calculated based on the following priority:
Action ‘Skill’ field is populated:
Action ‘Skill’ field is not populated:
When logging hours against a Project, the ‘Hours Completed – Billable’ will accrue when the ‘Non Billable Indicator’ on the Time Log is FALSE. Where it is TRUE, the time will be attributed to the ‘Hours Completed – Non Billable’.
There are currency fields that track the ‘Billable’ and ‘Cost’ values for the Project. Hours will be taken into account for the ‘Cost’ calculation regardless of whether they are billable or non-billable. Only hours that are considered billable will be calculated into the ‘Billable’ value. The example below aims to illustrate how this new functionality will work.
Scenario: Mick Fanning works for Rip Curl and has been assigned as the Action Owner of an Action on a Project to build a new website. The Action will require Mick to carry out both billable and non-billable work to deliver the Action. The following parameters will be used for the Project.
Hours Per Day: 8
Billing Rate: Standard Cost Rate: Standard
Billing Day Rate: $1,200 Cost Day Rate: $800
Billing Hourly Rate: $150 Cost Hourly Rate: $100
These parameters illustrate that Rip Curl will earn $150 revenue for every billable hour that Mick works on this Project. For every hour he works on the Project, Rip Curl will incur $100 cost (e.g. salary, overheads, etc).
Mick logs 2 hours of billable time and 1 hour of non-billable time on the Action. The net result is as follows:
Hours Completed – Billable: 3
Hours Completed – Non Billable: 1
Total Hours Completed: 4
Hours Completed Value (Billable): $450 (3 hours (billable) x $150 (the Billable Hourly Rate))
Hours Completed Value (Cost): $400 (4 hours (billable & non billable) x $100 (the Cost Hourly Rate))
P&L (Actual): $50
These calculations are available for the Scheduled Hours, Completed Hours and Remaining Hours.
A Validation Rule has been included that will prevent users from entering a number greater than 0 in the Hours Scheduled – Billable field if the Non Billable Indicator = TRUE.
Out of the box, this Validation Rule is inactive. If you would like to activate the rule, please carry out the following steps:
Click Setup > Object Manager > Action > Validation Rules > Edit ‘Billable hours Cannot Be Entered’ > Set Active to TRUE > Click Save
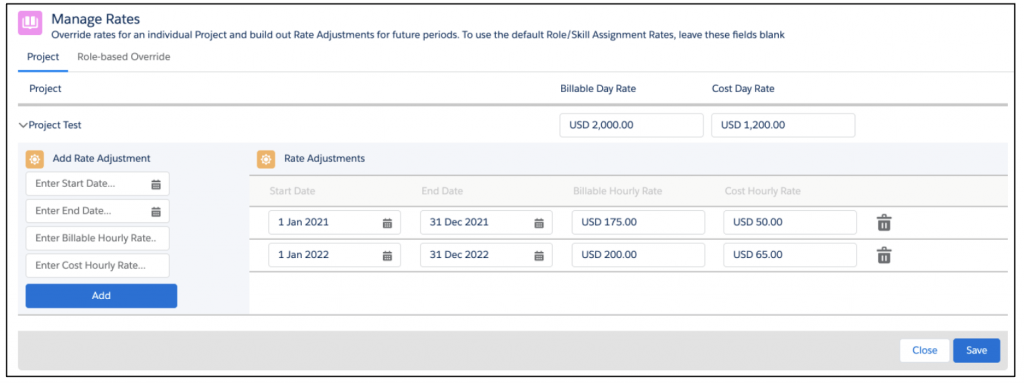
The Rate Adjustment feature allows you to create a set of rates (e.g. Billable and Cost Rates) for a specified time period. These Rate Adjustment records are created via the ‘Manage Rates’ page, which is accessible from either the Project or Role record. There are 5 types of Rate Adjustment scenarios, as outlined in the table below:
| Rate Adjustment Type | Accessed From | Scenario |
| Project | Project | When using the ‘Standard’ Billing Rate or Cost Rate, this would allow you to adjust the rates used on a specific Project. For example, you may have a Billing Rate of $2,000 per day during 2021 and that might increase to $2,200 in 2022 and further increase to $2,500 in 2023 |
| Role-based | Role | When using the ‘Role-based’ Billing Rate or Cost Rate, this would allow you to adjust the rates for an individual Role. For example, Mick Fanning may have a Cost Rate of $150 per hour in 2021 and that might increase to $175 in 2022 |
| Role-based Override | Project | When using the ‘Role-based’ Billing Rate or Cost Rate, this would allow you to override the rates for an individual Role on a specific Project. For example, Mick Fanning’s Role-based Cost Hourly Rate may be $150 but for one particular Project, you may need to reduce this to $125. You can also use this to account for changes in the overridden rates during different periods of time |
| Skill-based | Role | When using the ‘Skill-based’ Billing Rate or Cost Rate, this would allow you to adjust the rates for an Individual Role when using a specific Skill. For example, Mick Fanning using the Skill of HTML Coding may have a Billing Hourly Rate of $175 in 2021 and that might increase to $200 in 2022 |
| Skill-based Override | Project | When using the ‘Skill-based’ Billing Rate or Cost Rate, this would allow you to override the rates for an individual Role for a specific Skill being used on a specific Project. For example, Mick Fanning’s Skill Assignment Billable Hourly Rate for HTML Coding may be $175, but for one particular Project, you may need to adjust it to $200. You can also use this to account for changes in the overridden rates during different time periods |
| Rate Card | Rate Card | When using the ‘Rate Card’ Billing Rate or Cost Rate, this would allow you to override the rates for an individual Rate Card Entry. For example, The ‘Project Manager’ Function may have a Rate Card Entry with a Billable Hourly Rate of $150, but for a specific period of time, this needs to be changed to $125 |
The Manage Rates page comprises of 5 x Tabs, for each of the Rate Adjustment Types outlined in the Table above. Depending on where you access the Manage Rates page from will determine which Tabs you see on the page. The Table below defines which Tabs you’ll see when you view the Manage Rates page from the Project record or from the Role record.
| Project | Role | Rate Card |
Project Role-based Override Skill-based Override | Role-based Skill-based | Rate Card |
When viewing the Manage Rates page from the Project record, you will only see the Tabs that apply to the Billing Rate and Cost Rate values selected on the Project. For example, if my Project has a Billing Rate of Standard and a Cost Rate of Role-based, the Skill-based Override Tab will not be visible.
Project: Project Tab
Below is an example of the Manage Rates page being used to create Rate Adjustment record for a Project using the Project Tab.
Project: Role-based Override Tab
Below is an example of the Manage Rates page being used to create Rate Adjustment records for a Project using the Role-based Override Tab.
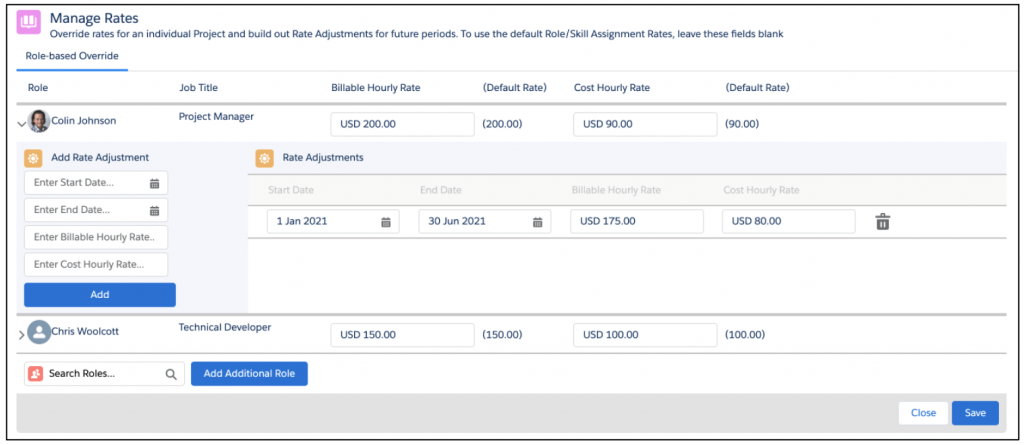
The Role-based Override Tab will automatically load any Role that is assigned to the Project as an Action Owner, Contributor and Checklist Item Owner. You will also be able to add additional Roles manually as required.
Project: Skill-based Override Tab
Below is an example of the Manage Rates page being used to create Rate Adjustment records for a Project using the Skill-based Override Tab.
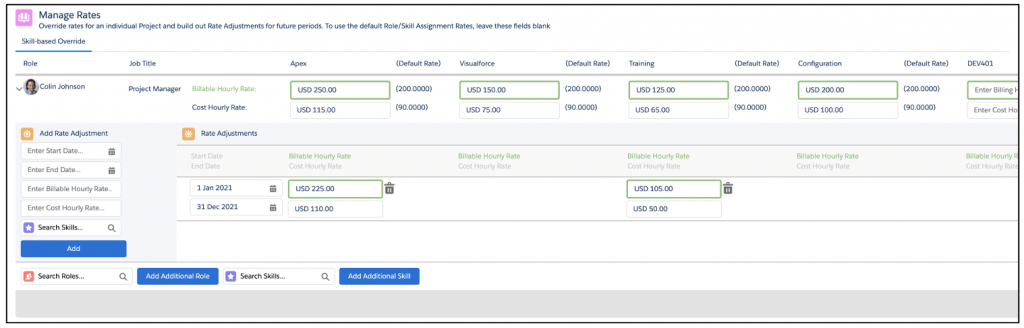
The Skill-based Override Tab will automatically load any Role that is assigned to the Project as an Action Owner, Contributor or Checklist Item Owner. You will also be able to add additional Roles manually as required.
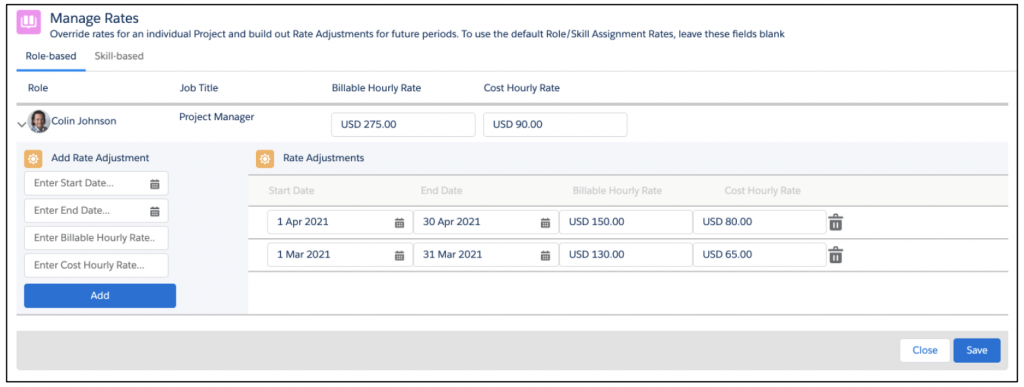
Role: Role-based Tab
Below is an example of the Manage Rates page being used to create Rate Adjustment records for an individual Role using the Role-based Tab.
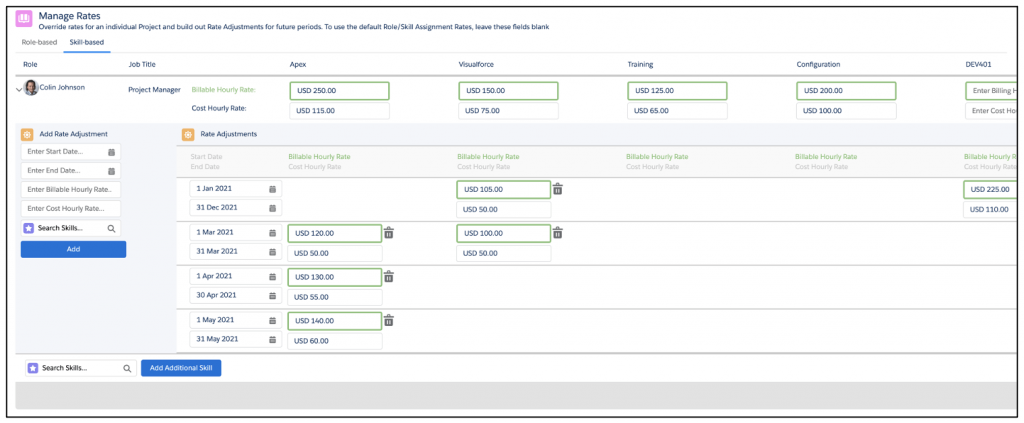
Role: Skill-based Tab
Below is an example of the Manage Rates page being used to create Rate Adjustment records for an individual Role’s Skill Assignment records using the Skill-based Tab.
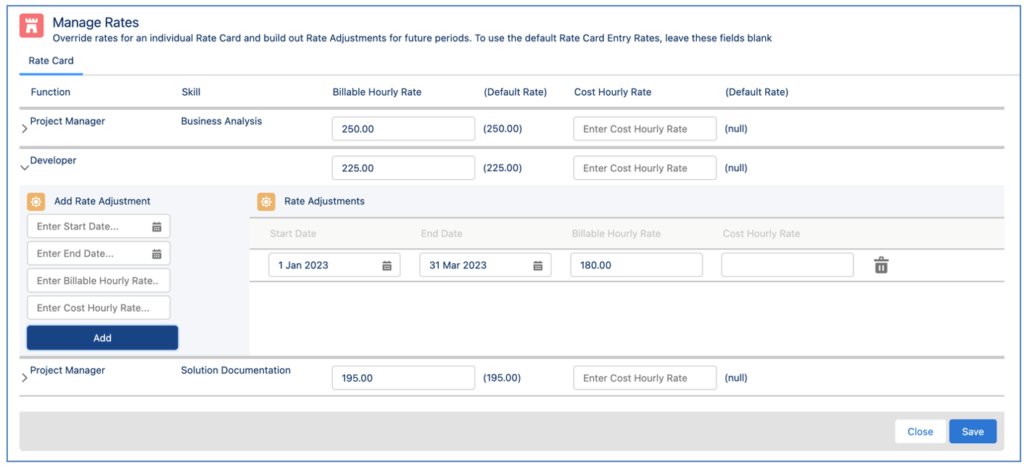
Rate Card: Rate Card Tab
Below is an example of the Manage Rates page being used to create Rate Adjustment records for a Rate Card Entry within a particular Rate Card.
The Manage Rates page will prevent you from creating two Rate Adjustment records that cover an overlapping time period. For example, you will not be able to have one Rate Adjustment covering 1st March 21 to 10th April 21 and another Rate Adjustment covering 1st April to 30th April.
The Manage Rates page will support Multi Currency if you have that feature enabled within Salesforce. When creating Rate Adjustments, they will automatically assume the same Currency as the parent record they apply to (e.g. Project, Role or Skill Assignment).
Note: If you override the rates after the Actions have been created, you will need to use the ‘Force Financials Recalculation’ feature to apply the new rates.
The ‘Rate Card’ method provides a way of applying specific rates to all Projects associated with a particular customer. To use the Rate Card values on a Project, you will need to set the Billing Rate and/or Cost Rate to ‘Rate Card’. In addition, you will need to select the Rate Card that you want to use. Only Rate Cards that relate to the Account specified on the Project can be selected.
A Rate Card is a container for a group of ‘Rate Card Entry’ records that contain Billing and/or Cost Rates for a particular Function. The Rate Card is related to an Account record, enabling you to create a set of rates for one Account that vary from the rates used for a different Account.
In order to create Rate Cards and Rate Card Entries, you must ensure the ‘Function’ field on each Role record has been populated. This Function field is used on the individual Rate Card Entries to identify the rates that should be used, based on the Function field value of the Role completing the work on the Project.
The Function field contains the following values by default, but you are able to add / remove by modifying the values in the ‘Function’ Picklist Value Set. By modifying these values, the Function field on both the Role and the Rate Card Entry will be updated. The default values include:
By using the Function, rather than the name of the person, you do not need to maintain Rate Card Entries for each individual Role that will be working on the Project. For example, if Mick Fanning and Kelly Slater both have a Function of ‘Project Manager’, you will only need to create a Rate Card Entry for Project Manager and that will be applied to both of these Roles if they are working on the Project.
Create a Rate Card
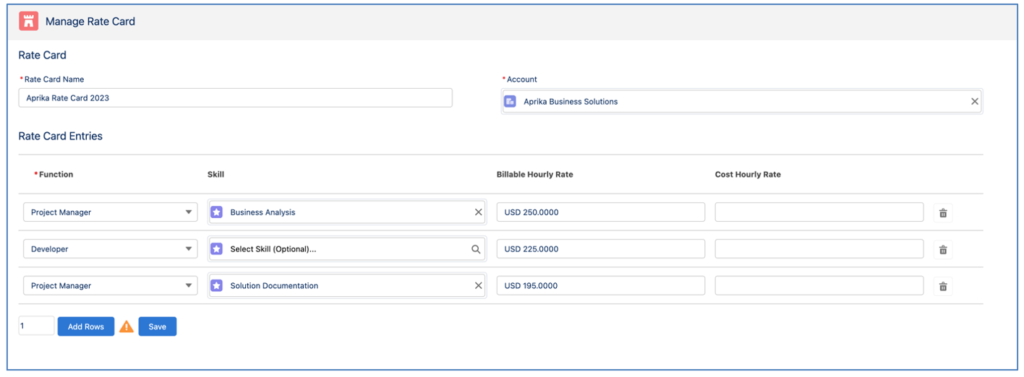
To create a Rate Card, you need to click on the ‘New’ button on the Rate Card Object Tab or from the Related List on the Account Page. This will open up the ‘Manage Rate Card’ page, which enables you to create the Rate Card and related Rate Card Entry records.

You will need to enter the Rate Card Name and ensure the Account field is populated with the name of the customer that this Rate Card will be used for.
Within the Rate Card Entries section, you can create Rate Card Entry records for each Function as required. You can optionally choose to associate a Skill to the Rate Card Entry. For example, you may charge different rates if your Project Managers are performing different activities on the Project, such as Business Analysis and Solution Documentation. For this scenario, you would need 2 Rate Card Entries for the Project Manager Function, one with the Skill of Business Analysis and the other with the skill of Solution Documentation.

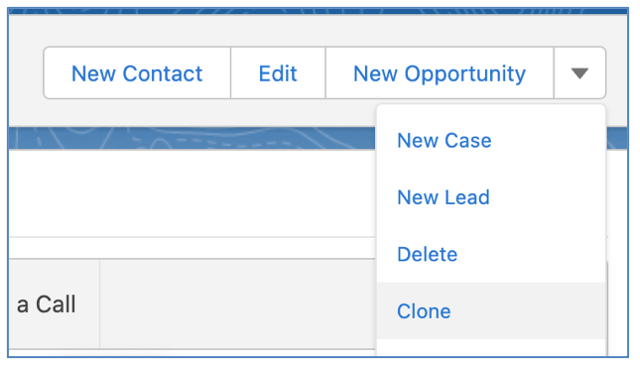
Clone a Rate Card
You can clone an existing Rate Card and related Rate Card Entries by using the ‘Clone’ button the Rate Card record.
This deep clone process enables you to provide a new Rate Card Name, change the Account it will relate to and save all related Rate Card Entry records.
If required, you are also able to delete any unwanted Rate Card Entries as well as creating additional Rate Card Entries.
You have the ability to specify whether a Project is being measured on a ‘Fixed Price’, ‘Fixed Price + Expenses’ or ‘Time & Materials’ basis. There is no fundamental difference to the way the calculations will work. However, on a Fixed Price project, you may want to restrict the number of ‘Billable’ hours completed to ensure it does not exceed the scheduled billable hours. In addition, periodic billing can only be applied to Time & Materials based projects. Manual and Milestone Billing can be applied to either type.
To assist with management of scheduled and completed hours on fixed price projects, Mission Control includes a Validation Rule that will prevent the User from logging time if it will push the completed billable hours over the scheduled billable hours.
Out of the box, this Validation Rule is inactive. If you would like to activate the rule, please carry out the following steps:
You can specify on an individual Project basis whether overtime can be calculated into the billable and cost values using the following fields:
When logging time, the User will be able to specify whether or not the time they’re logging is ‘Overtime’. If the above fields have been set, the billable and cost values for the Project will calculate the Hours x Overtime Ratio x Hourly Rate (whether this is standard, role based or skills based).
Multiple Overtime Rates
For Customers who need to apply more than one Overtime Rate to a Project, there are the ‘Overtime Card’ and ‘Overtime Rate’ Objects. For example, you may apply an Overtime Ratio of 1.5 for overtime carried out through the working week and a higher ratio of 2.0 for overtime carried out on the weekend.
To use multiple Overtime Rates on a Project, you need to set the following fields on the Project record:
A Validation Rule on the Project Object will prevent Users from setting the ‘Use Multiple Overtime Rates’ field to TRUE without specifying a value in the ‘Overtime Card’ field.
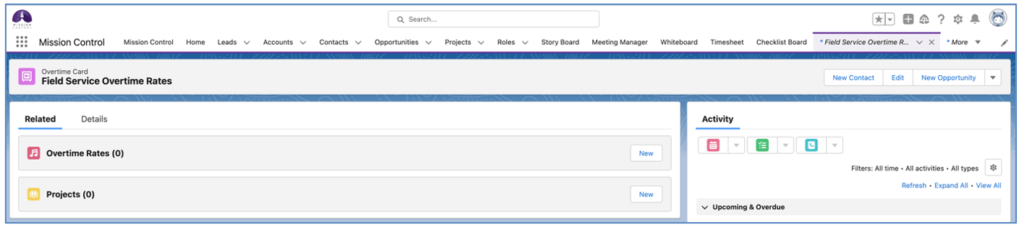
To create a set of Overtime Rates, you first need to create an Overtime Card. This will be the parent record that contains the various Overtime Rates. To create a new Overtime Card, click the New button from the Overtime Card Tab, as shown below.

Once you have completed all of the relevant fields, save the record. From there, you’ll be able to click the Related Tab to create the individual Overtime Rate records.
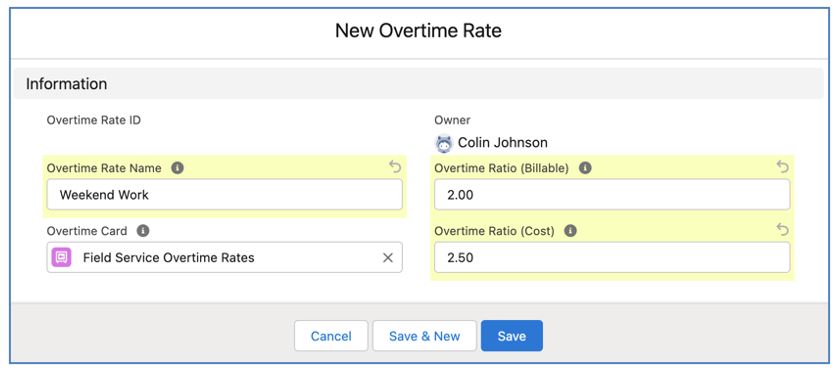
The Overtime Rate records contain the ratio values that will be used to calculate the Billable and Cost values. For example, a company may charge their customers 2.0 x the standard billable hourly rate for weekend work, but they pay their staff 2.5 x the standard cost hourly rate. In this example, they would need to create an Overtime Rate record as shown below.
When logging time against a Project that has the ‘Use Multiple Overtime Rates’ field set to TRUE, the User will need to specify which Overtime Rate needs to be applied to the Time Log, if they have set the Time Log ‘Overtime’ field to TRUE. The ‘Time Log Information’ Modal of the Timesheet and the Log Time Component available on pages such as the Whiteboard, Action Pad, etc. will display a Lookup Field in this situation to enable the User to select from the available Overtime Rate records.
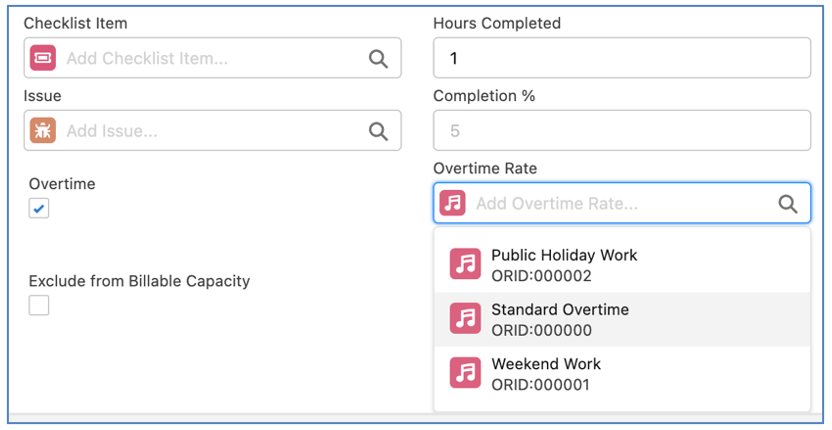
The Overtime Rates available in this Lookup Field are filtered to only those records that relate to the Overtime Card that has been specified on the Project.
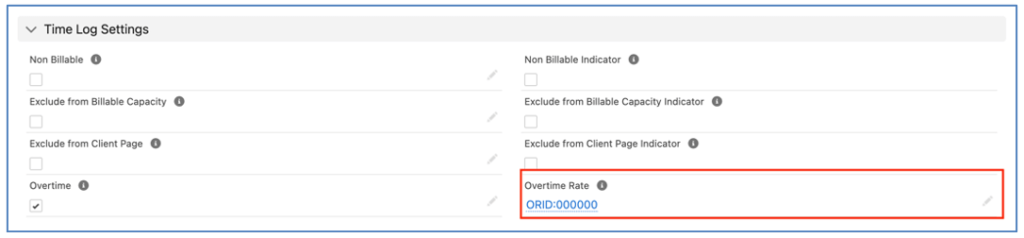
Time Logs relating to Projects using multiple overtime rates will have the Overtime Rate record specified on the Detail Page of the record to enable you to identify which Overtime Rate was used when calculating the financials of the Time Log.
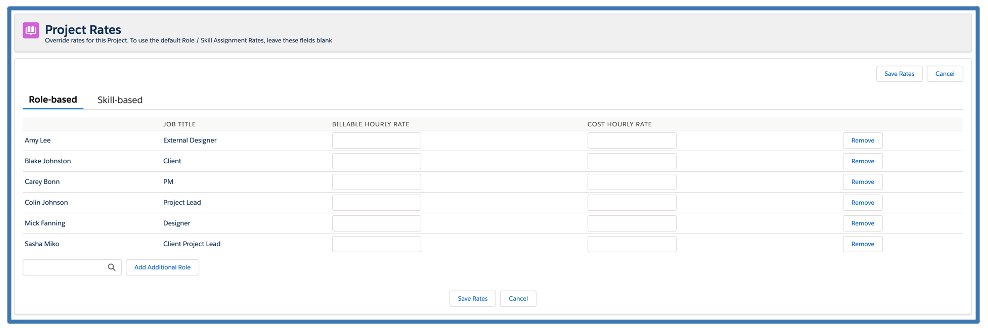
You are able to specify hourly rates per Role, per Project using the Manage Rates feature. This means you can specify different hourly rates (billable and cost) for Roles that may be working across different Projects.
For Example, when working on the project to develop a website for Billabong, the Hourly Rates for Mick Fanning may be $150 (billable) and $100 (cost). However, for a similar project to develop a website for Quiksilver, we may have needed to offer a discount in order to secure the deal, which means Mick Fanning’s billable rate may only be $120 for this project.
To use this feature, you need to set the rates prior to creating any Actions. After creating the Project & Milestones, navigate to the Project Detail page and click the ‘Manage Rates’ button. This will take you to the following page, where you’ll be able to add the required Roles and specify the Billable and Cost Hourly Rates where applicable.
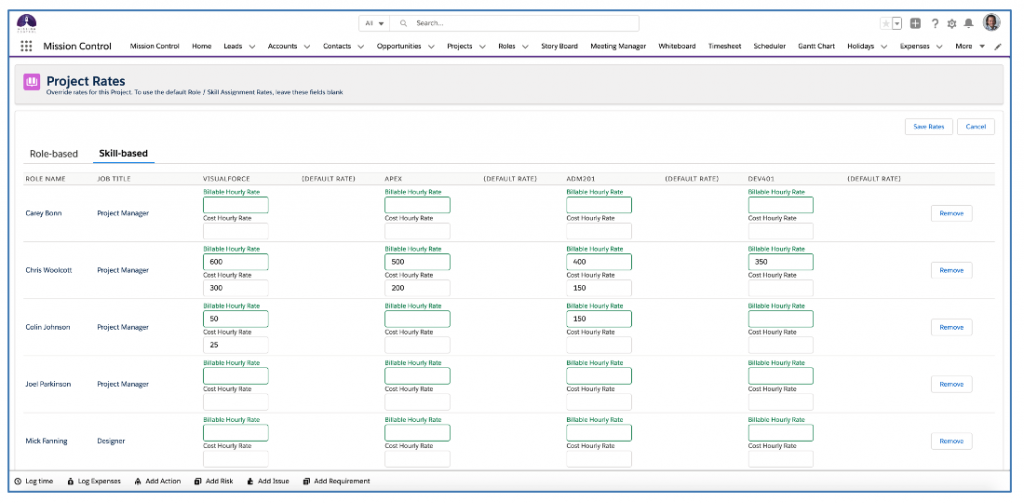
You are able to specify hourly rates per Role, per Skill, per Project using the Manage Rates feature. This means you can specify different hourly rates (Billable and Cost) for Roles, using different Skills, that may be working across different Projects.
For example, when working on the project to develop a website for Billabong, when doing the UX Design, the Hourly Rates for Mick Fanning may be $150 (billable) and $100 (cost). However, for a similar project to develop a website for Quiksilver, we may have needed to offer a discount in order to secure the deal, which means when doing the UX Design on this Project, Mick Fanning’s Skill-based rate may only be $120.
After creating the Project & Milestones, navigate to the Project Detail page and click the ‘Manage Rates’ button. This will take you to the following page, where you’ll be able to add the Billable and Cost Hourly Rates for each Role / Skill as required.
Note: If you override the rates after the Actions have been created, you will need to use the ‘Force Financials Recalculation’ feature to apply the new rates.
You can flag a Project as a Template by setting the ‘Template’ Checkbox field to TRUE on the Project record. A Project Template is the same as any other Project, in that it will comprise of records in the Project, Milestone, Action, Contributor, Checklist Item and Dependency Objects. The ‘Template’ Checkbox field is the only differentiator.
Project Templates are excluded from the following pages:
Mission Control Console. Cloning a Project will copy across all Milestones and Actions for the Project. You can keep these details as they are or edit them before saving, as well as choosing to clone the Checklist Items, Contributors and Project Rates.
To clone a Project, simply follow the steps below:
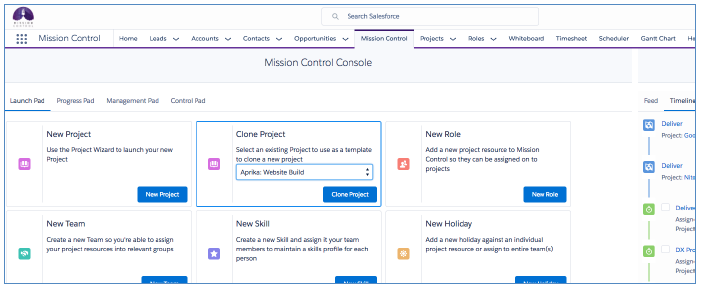
This will take to you the Clone Project page where you can enter information relating to your project. Under the Project Settings section you can change the Start Date of the Project, simply by selecting the correct date and clicking ‘Update’. These settings will be applied across the whole Project.
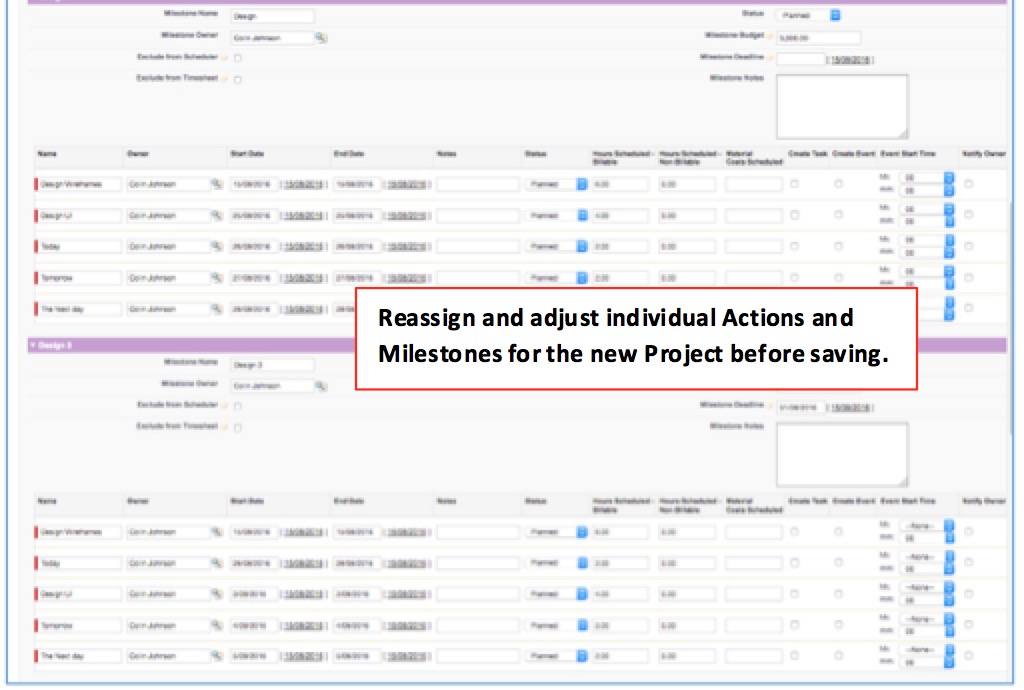
This is the clone edit page. You can edit the project details, milestones and actions before saving your clone.
The ‘Clone Project’ Tile on the Launch Pad of the Mission Control Console will only display Project Templates. If you wish to clone a Project that is not specified as a Template, you will need to navigate to the Project page and click the ‘Clone’ button.
The Project Clone page provides customers with the ability to select which fields are visible in the Project field sections of the page. Each section is controlled by a Field Set as outlined below.
Field Set Name | Default Fields |
Project Details Clone Fields | Project Name Project Owner Status Account Project Reference # Contact Category Opportunity Sub Category Program Description |
Project Settings Clone Fields | Billing Type Project Budget Billing Rate Cost Rate Billable Day Rate Cost Day Rate Overtime Allowed (Billable) Overtime Allowed (Cost) Non Billable Colour Exclude from Scheduler Colour Hex Exclude from Timesheet Anticipated Project Expenses Exclude from Program Planner Exclude from Daily Digest Display on PMO Dashboard Enforce Dependency Validation Project Owner Timesheet Approval Reqd Project Owner Expense Approval Reqd Role Manager Timesheet Approval Reqd Role Manager Expense Approval Reqd |
Billing Information Clone Fields | Purchase Order # Tax Label Billing Cycle Include Time Log Appendix Periodic Billing Frequency Include Expense Appendix Payment Terms Include Non Billable Time in Appendix Retainer Amount Periodic Billing Last Date Periodic Billing Next Date |
There are Field Sets on the Milestone and Action Objects that enable you to add additional fields to the Project Clone page:
By adding Fields to either of these Field Sets, these Fields will be included in the Milestone / Action sections of the Project Clone page.
This provides customers with the ability to add and remove fields to suit their specific requirements.
There is a lot of information and records that can be copied over when cloning a Project in Mission Control. Here is a list of these items:
Keep in mind that you don’t have to keep all of the above from the original project; you have the option to pick and choose.
The following records are NOT copied over as it is expected that this is a new Project that you will be working on:
The following fields are reset when cloning a Project:
Project | Milestone | Action | Checklist Items |
Status | Hours Completed Non Billable | Baseline Start Date | Complete |
Archived | Hours Remaining Non Billable | Baseline End Date | Status |
Template | Hours Completed Value Cost | Hours Completed Cost | |
Amount Invoiced | Hours Remaining Value Cost | Hours Remaining Cost | |
Total Paid | Status | Hours Completed Value Cost | |
Total Credited | Hours Remaining Value Cost | ||
Total Outstanding | Completion Percent | ||
Amount Invoiced | Complete Checklist Items | ||
Tax Amount Invoiced | Completion Overridden | ||
Amount Paid | Dependant Action | ||
Amount Outstanding | Gap From Parent | ||
Total Credited | Budget Item | ||
Periodic Billing Last Date | Status | ||
Periodic Billing Next Date | |||
Total Outstanding | |||
Hours Completed Non Billable | |||
Actual Project Expenses | |||
Hours Completed Value Cost | |||
Hours Remaining Value Cost | |||
External Project Id |
To track whether your Users are creating new Projects from scratch manually or if they are creating the Project via the cloning or auto-generation process, there is a field on the Project Object.
The ‘Source Project’ field on the Project will be populated with the Project that was used as the source Project in the following scenarios:
When a Milestone is being created as part of any of the cloning or auto-generation functions, the ‘Source Milestone’ field will be populated to identify which Milestone this new Milestone was generated from. This field will be automatically populated when a Milestone is created using any of the following functions:
To prevent Users from manually adding Milestones to their Projects, rather than adding via the above functions, the ‘Prevent New Milestone If Source Empty’ Validation Rule can be activated. This will prevent Users other than System Administrators from adding a new Milestone to a Project if the ‘Source Milestone’ field is empty.
You are able to automatically generate a Project Plan (Project, Phases, Milestones, Actions, Checklist Items, Contributors and Dependencies) from an Opportunity. There are seven methods for auto-generation of Projects, including:
A number of Custom Fields are included on the Opportunity and Product Objects, as outlined below:
| Opportunity | Product |
Generation Method (Picklist) Project Template (Lookup) Project Start Date (Date) Generate Project (Checkbox) Rate Card (Lookup) | Milestone Template (Lookup) Project Unit (Picklist) |
Note: A Permission Set called ‘Mission Control Opportunity & Product Fields’ is available so you can quickly provide Users with permission to access those fields.
Opportunity Method
The Opportunity ‘Generation Method’ provides you with the ability to clone and entire Project Plan based on the Project that is specified in the ‘Project Template’ field on the Opportunity.
This will clone the entire project plan exactly as it exists on the template, with the first Action in the Project being scheduled to occur on the ‘Project Start Date’, specified on the Opportunity.
Products Method
The Products ‘Generation Method’ provides you with the ability to build up a Project Plan based on the Products associated to the Opportunity.
The Project record will be cloned based on the ‘Project Template’ specified on the Opportunity. However, the rest of the project plan (e.g. Milestones, Actions, Checklist Items, Contributors and Dependencies) will be added only if the Product has been associated to a ‘Milestone Template’. If a Product is associated to the Opportunity multiple times, then a Milestone will be added to the Project for each Opportunity Line Item referencing the same Product.
Products – No Duplicates Method
The Products – No Duplicates ‘Generation Method’ provides you with the ability to build up a Project Plan based on the Products associated to the Opportunity.
The Project record will be cloned based on the ‘Project Template’ specified on the Opportunity. However, the rest of the project plan (e.g. Milestones, Actions, Checklist Items, Contributors and Dependencies) will be added only if the Product has been associated to a ‘Milestone Template’. No matter how many times a Product is associated to the Opportunity, only one instance of the Milestone will be added to the Project.
Product Quantity
The ‘Product Quantity’ Generation Method provides you with the ability to build up a Project Plan based on the Products associated to the Opportunity.
The Project record will be cloned based on the ‘Project Template’ specified on the Opportunity. However, the rest of the project plan (e.g. Milestones, Actions, Checklist Items, Contributors and Dependencies) will be added only if the Product has been associated to a ‘Milestone Template’ If a Product is associated to the Opportunity, the associated Milestone Template will be added to the project potentially multiple times based on the Opportunity Line Item ‘Quantity’ field.
Product Quantity x Hours
The Product Quantity x Hours ‘Generation Method’ provides you with the ability to build up a Project Plan based on the Products associated to the Opportunity.
The Project record will be cloned based on the ‘Project Template’ specified on the Opportunity. The remainder of the Project Plan (e.g. Phases, Milestones, Actions, Checklist Items, Contributors & Dependencies) will be added only if the Product has been associated to a ‘Milestone Template’ or has related ‘Product Milestones’. If a Product is associated to the Opportunity, the associated Milestone(s) will be added to the Project. The ‘Hours Scheduled – Billable’ and ‘Hours Scheduled – Non Billable’ of all Actions, Checklist Items and Contributors will be multiplied by the Opportunity Line Item ‘Quantity’ field.
Base Template + Products
The Base Template + Products ‘Generation Method’ provides you with the ability to clone a generic Project Plan from one Project Template, as well as building up the Project Plan based on the Products associated to the Opportunity.
This Generation Method lets you include standardised Milestones on your Project, as well as including additional Milestones based on the Products sold. For example, you may want to include standard Milestones into every Project Plan, such as ‘Kick-off’, ‘Go Live’ and ‘Customer Success Handover’, but they’re not included as Products that will be added to the Opportunity.
To use this Generation Method, you’ll need your standard Milestones to be on one Project Template, and your Product related Milestones on a different Project. The Project Template containing your standard Milestones will be considered your Base Template, and all of the Milestones within this Project will be added to the Project when it is auto-generated from the Opportunity. Any Milestones related to the Products will also be added.
When specifying the ‘Project Template’ on the Opportunity, you would enter the Project that is your Base Template.
This Generation Method will add a Product Milestone to the Project for each instance of where an Opportunity Line Item references the same Product.
Base Template + Products – No Duplicates
The Base Template + Products – No Duplicates ‘Generation Method’ provides you with the ability to clone a generic Project Plan from one Project Template, as well as building up the Project Plan based on the Products associated to the Opportunity. This method differs from the Base Template + Products method in that regardless of how many Opportunity Line Items reference the same Product, the Milestone will only be added once.
This Generation Method lets you include standardised Milestones on your Project, as well as including additional Milestones based on the Products sold. For example, you may want to include standard Milestones into every Project Plan, such as ‘Kick-off’, ‘Go Live’ and ‘Customer Success Handover’, but they’re not included as Products that will be added to the Opportunity.
To use this Generation Method, you’ll need your standard Milestones to be on one Project Template, and your Product related Milestones on a different Project. The Project Template containing your standard Milestones will be considered your Base Template, and all of the Milestones within this Project will be added to the Project when it is auto-generated from the Opportunity. Any Milestones related to the Products will also be added.
When specifying the ‘Project Template’ on the Opportunity, you would enter the Project that is your Base Template.
Base Template + Product Quantity
The ‘Base Template + Product Quantity’ Generation Method provides you with the ability to clone a generic Project Plan from one Project Template, as well as building up the Project Plan based on the Products associated to the Opportunity
This Generation Method lets you include standardised Milestones on your Project, as well as including additional Milestones based on the Products sold. For example, you may want to include standard Milestones into every Project Plan, such as ‘Kick-off’, ‘Go Live’ and ‘Customer Success Handover’, but they’re not include as Products that will be added to the Opportunity.
To use this Generation Method, you’ll need your standard Milestones to be on one Project Template, and your Product related Milestones on a different Project. The Project Template containing your standard Milestones will be considered your Base Template, and all of the Milestones within this Project will be added to the Project when it is auto-generated from the Opportunity. Any Milestones related to the Products will also be added, potentially multiple times based on the Opportunity Line Item ‘Quantity’ field.
When specifying the ‘Project Template’ on the Opportunity, you would enter the Project that is your Base Template.
The Product ‘Generation Method’ options will be useful for customers who sell their professional services as part of a larger sale. For example, imagine a software company is selling licenses and implementation support, they can have an Opportunity with multiple Opportunity Product lines. Only those that have a ‘Milestone Template’ specified on the parent Product record will be generated into the project plan.
The fields on the Product record allow you to specify whether or not a Product will require a Milestone, along with related Actions, Checklist Items, Contributors and Dependencies to be created.
You identify this by completing the following two fields on the Product record:
Milestone Template
The ‘Milestone Template’ field on the Product lets you reference a Milestone you’ve created on a Project Template. This is a filtered field that will only return Milestones associated to Projects where the ‘Template’ field is set to true.
Project Unit
The ‘Project Unit’ field on the Product lets you specify the unit of measure for calculating the total hours required on the Actions related to the Milestone. This is a Picklist field with values for ‘Day’ ‘Hour’ and ‘Source’.
When using the Products or Products – No Duplicates ‘Generation Method’, the Project will be cloned from the Project specified as the ‘Project Template’ on the Opportunity. Each Opportunity Product that relates to a Product with a value in the ‘Milestone Template’ field will be cloned from that Milestone and the first Action within each cloned Milestone will be scheduled on the ‘Project Start Date’, specified on the Opportunity.
Using either of these Generation Method, the ‘Hours Scheduled – Billable’ and ‘Hours Scheduled – Non Billable’ fields on the Actions within the Milestone will be calculated as follows:
The Opportunity Product ‘Quantity’ and Product ‘Project Unit’ will be used to determine the number of ‘Hours Scheduled – Billable’ and ‘Hours Scheduled – Non Billable’ on each Action. For the Day and Hour options within the Project Unit field, the calculation will identify the total number of hours required for the Milestone by multiplying the Opportunity ‘Quantity’ by 1 if the Product ‘Project Unit’ is set to Hour or by the Custom Setting ‘Hours per Day’ (accessible from the Control Pad of the Mission Control Console), if the Product ‘Project Unit’ is set to Day.
The total hours for the Milestone will be divided across related Actions, retaining the percentage split between the Actions from the Milestone Template.
For the Source option within the Project Unit field, the total number of hours are cloned exactly as they are the template records.
The Table below illustrates an example of how these calculations work:
Project Unit | Quantity | Total Hours | Template Milestone | New Milestone |
Day | 3 | 24 (e.g. 3 * 8) | Action A: 4 hours (50% of total) Action B: 2 hours (25% of total) Action C: 1 hour (12.5% of total) Action D: 1 hour (12.5% of total) | Action A: 12 hours Action B: 6 hours Action C: 3 hours Action D: 3 hours |
Hour | 4 | 4 (e.g. 4 * 1) | Action A: 6 hours (50% of total) Action B: 3 hours (25% of total) Action C: 3 hours (25% of total) | Action A: 2 hours Action B: 1 hour Action C: 1 hour |
Source | N/A | N/A | Action A: 4 hours Action B: 4 hours Action C: 2 hours | Action A: 4 hours Action B: 4 hours Action C: 2 hours |
Base Template + Product Quantity x Hours
The Base Template + Product Quantity x Hours ‘Generation Method’ provides you with the ability to clone a generic Project Plan from one Project Template, as well as building up the Project Plan based on the Products associated to the Opportunity.
This Generation Method lets you include standardized Milestones on your Project, as well as including additional Milestones based on the Products sold. For example, you may want to include standard Milestones into every Project Plan, such as ‘Kick-off’, ‘Go Live’, and ‘Customer Success Handover’, but they’re not included as Products that will be added to the Opportunity.
To use this Generation Method, you’ll need your standard Milestones to be on one Project Template, and your Product related Milestones on a different Project. The Project Template containing your standard Milestones will be considered your Base Template, and all of the Milestones within this Project will be added to the Project when it is auto-generated from the Opportunity. Any Milestones related to the Products will also be added to the Project. The ‘Hours Scheduled – Billable’ and ‘Hours Scheduled – Non Billable’ of all Actions, Checklist Items and Contributors will be multiplied by the Opportunity Line Item ‘Quantity’ field.
When specifying the ‘Project Template’ on the Opportunity, you would enter the Project that is your Base Template.
Multiple Milestones per Product
The ‘Product Milestone’ Object enables you to associate multiple Milestones to an individual Product. This provides the ability to have multiple Milestones added to the Project Plan when a particular Product is added as an Opportunity Line Item.
For example, if a Product called ‘Website Page’ is sold, it may require 3 different Milestones to be added to the Project Plan (e.g. Design, Build, Content).
For all of the Product-based Generation Method options, Milestones referenced in the ‘Product Milestone’ Object will be added to the Project Plan. If the ‘Milestone Template’ field on the Product record contains a value, this will be used. If this field is empty, Milestones referenced in the ‘Product Milestone’ Object related to the Product will be used.
Auto-Generation
To auto-generate a Project from the Opportunity, you need to set the ‘Generate Project’ field to true. This can be done manually, or via a Workflow Rule / Process Builder based on your own criteria, such as when the Stage is set to ‘Closed Won’.
Only Projects with the Template field set to true will be able to be referenced in the ‘Project Template’ field on the Opportunity.
Opportunity Field Mapping
When auto-generating a Project, the following fields will be set by default:
Project Field | Default Value |
Project Name | Opportunity Name |
Opportunity | Opportunity Id |
Account | Opportunity > Account Id |
Project Budget | Opportunity Amount |
Archived | FALSE |
Template | FALSE |
Status | Planned |
Should you wish to override any of these default mappings, or if you would like to map additional fields from the Opportunity to fields on the Project, you can manage your own custom field mapping using the ‘Auto-Generation Field Mapping’ Tile on the Control Pad of the Mission Control Console, as shown below:
Clicking the ‘Create’ button will open up the Field Mapping component, as shown below:
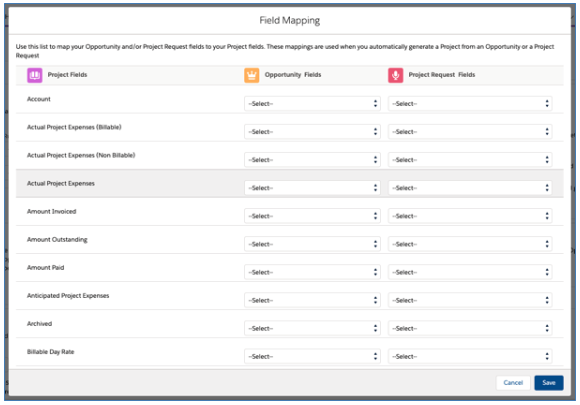
From here, you are able to map a Project field to an Opportunity field. This mapping will then ensure that the Opportunity field gets populated into the Project field as part of the auto-generation project.
For Customers using the Auto Generation Field Mapping, if you have configured Record Types on the Opportunity or Project Request Object, you are able to configure Field Mapping specific to each Record Type.
When Record Types exist on the Object, ‘Configure’ buttons will be displayed above the standard Field Mapping table on the Field Mapping Modal, as shown below.

To create a Field Map for a specific Record Type, click the Configure button. This will open up a Modal that allows you to select the Record Type and create the Field Mapping rules that will be applied for that Record Type.
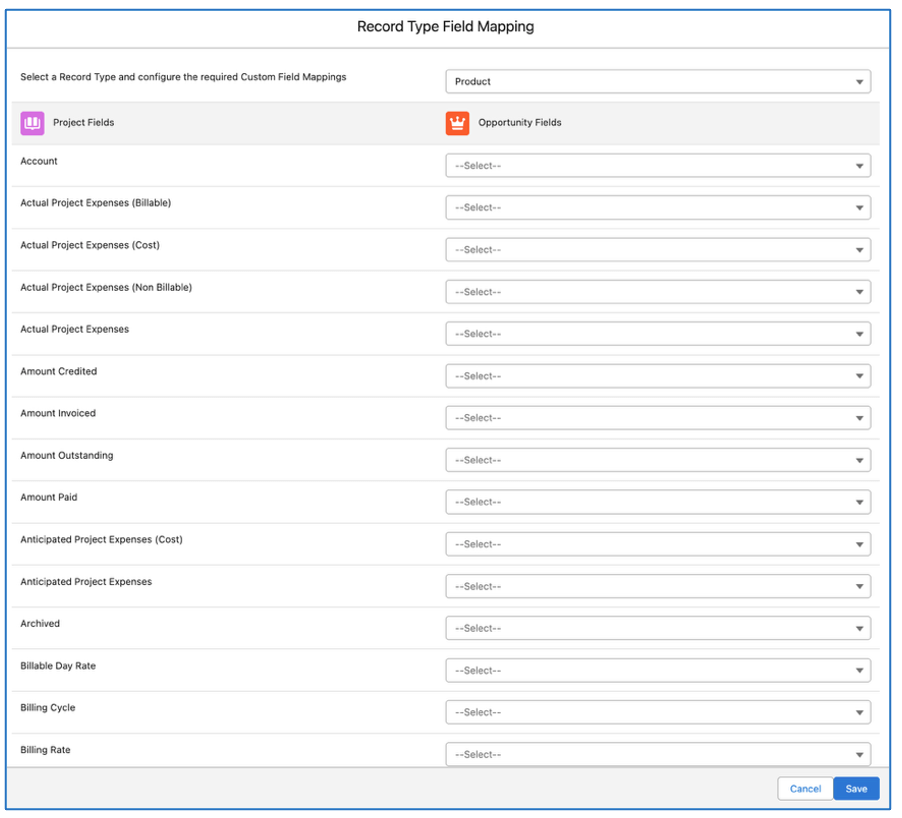
Note: If Record Types are configured on the Object, but no Record Type specific Field Mapping has been created, the standard Field Mapping will be used by default.
Record Ownership Setting
A Custom Setting within the ‘Project Automation Settings’ section of the Control Pad on the Mission Control Console allows you to control the Owner of the Project when it’s being auto-generated. This ‘Transfer Cloned Records to Running User’ setting will set the Running User as the record Owner of the Project when it is being automatically generated from an Opportunity or a Project Request record.

If this Setting is FALSE, the Owner will be set as the same value that is on the Template that is being used in the auto-generation process.
Clone Budget Items
Across all Generation Methods, any Budget Items related to the Project Template specified on the Opportunity will be created as part of the auto-generation process.
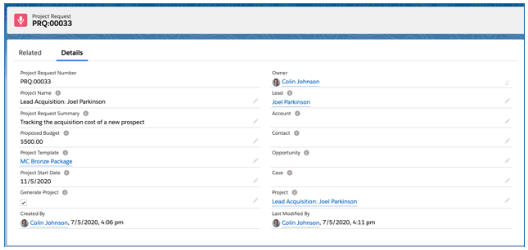
The ‘Project Request’ Object enables you to create a request for a new Project from any Standard or Custom Object. The Project Request record can be created, then reviewed prior to creating the Project, or it can automatically create the Project.
The Project Request Object has Lookup fields to the following Standard Objects:
If you wish to leverage this feature from any other Standard or Custom Object, you will need to add a Lookup field to that Object on the Project Request Object.
The Project Request record can be created manually, or automatically via a Process Builder. The key fields required for the Project Request record are outlined below:
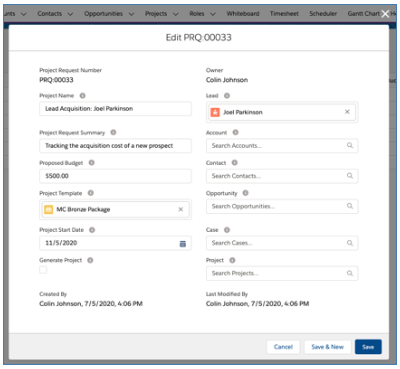
The Project specified as the ‘Project Template’ will be cloned in its entirety, including all related Milestones, Actions, Checklist Items, Contributors and Dependencies, with the first Action being scheduled on the ‘Project Start Date’.
To create the Project automatically from the Project Request record, you must set the ‘Generate Project’ field to TRUE. Once saved, the newly created Project will be populated in the ‘Project’ field, as shown below:
The Project Request Related List will need to be manually added to any of the Objects you wish to be able to have access to it from.
Project Request Field Mapping
When auto-generating a Project, the following fields will be set by default:
| Project Field | Default Value |
| Project Name | Project Request: Project Name |
| Project Budget | Project Request: Proposed Budget |
| Archived | FALSE |
| Template | FALSE |
| Status | Planned |
Should you wish to override any of these default mappings, or if you would like to map additional fields from Custom Objects you add to the Project Request Object, you can manage your own custom field mapping using the ‘Auto-Generation Field Mapping’ Tile on the Control Pad of the Mission Control Console, as shown below:
Clicking the ‘Create’ button will open up the Field Mapping component, as shown below:
From here, you are able to map a Project field to a Project Request field. This mapping will then ensure that the Project Request field gets populated into the Project field as part of the auto-generation process.
For Customers using the Auto Generation Field Mapping, if you have configured Record Types on the Opportunity or Project Request Object, you are able to configure Field Mapping specific to each Record Type.
When Record Types exist on the Object, ‘Configure’ buttons will be displayed above the standard Field Mapping table on the Field Mapping Modal, as shown below.
To create a Field Map for a specific Record Type, click the Configure button. This will open up a Modal that allows you to select the Record Type and create the Field Mapping rules that will be applied for that Record Type.
Note: If Record Types are configured on the Object, but no Record Type specific Field Mapping has been created, the standard Field Mapping will be used by default.
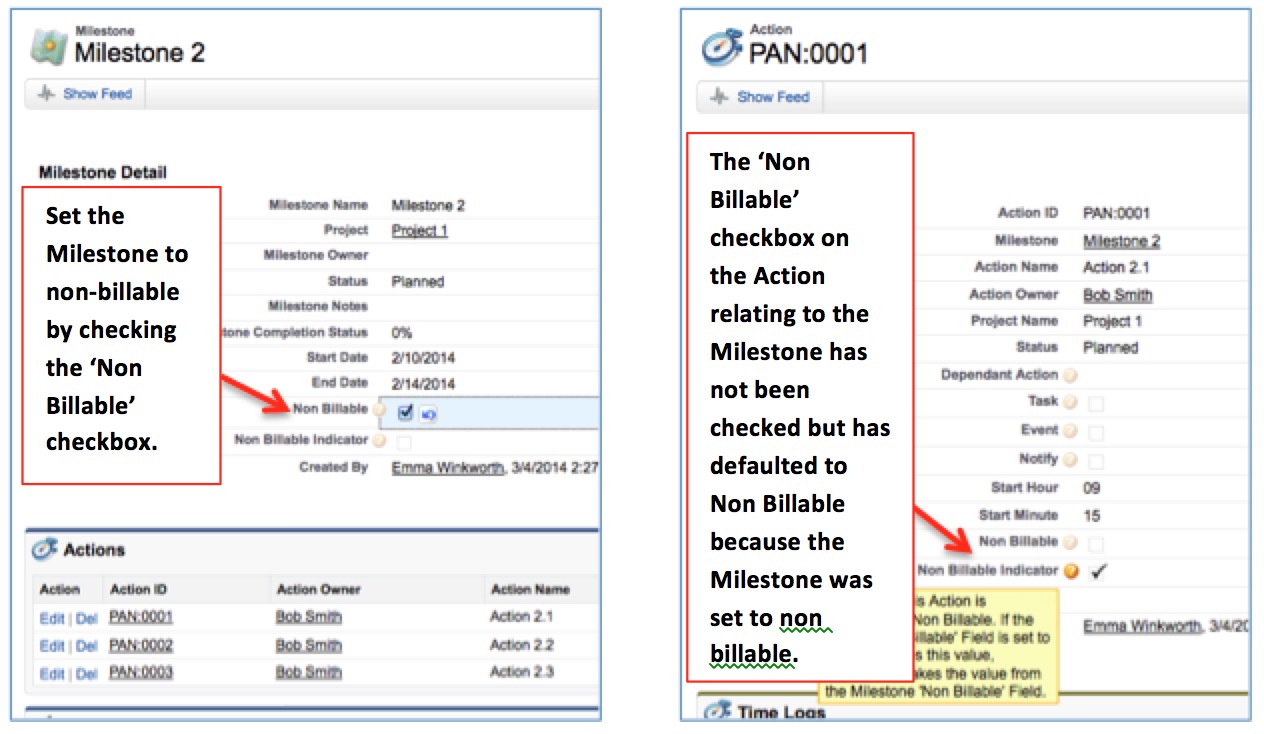
If you track billable and non-billable hours, you can identify whether a Project, Milestone, Action or Time Log is ‘Non Billable’. If a record is flagged as Non Billable, all child records will automatically default to Non Billable too. For example, if you set a Milestone to Non Billable, then all Actions and Time logs beneath that Milestone will default to Non Billable as per below example.
To create a new Program, you can quickly access the relevant page from the Mission Control Console.

To create a new Project Role, you can quickly access the relevant page from the Mission Control Console.
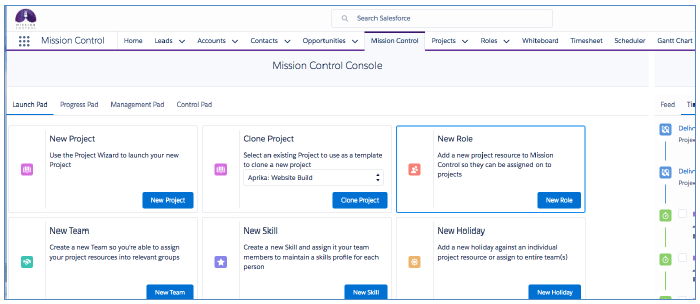
The Create New Role page will appear as follows:
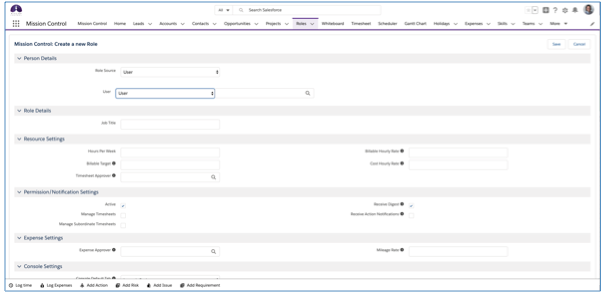
A Role is linked to either a Contact or a User within your system. Alternatively, you can create an ‘Asset’ Role, which can be used to identify a project resource such as a machine, truck or a ‘placeholder’ (e.g. Junior Developer, Copywriter, Designer, etc.). To create a new Role, follow the steps below:
You will be directed to the Detail page for this record, where you will see all of the contact details have been linked through to the Role record (see example below). This Role will now be available to assign actions to from within your Projects.
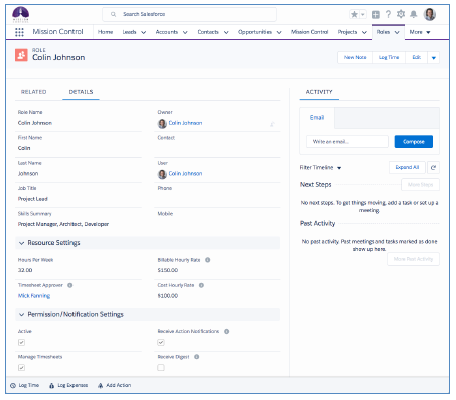
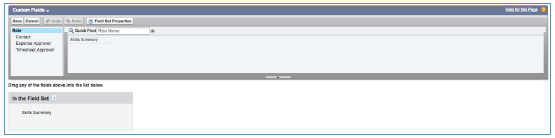
The Role ‘Edit’ Page has been overridden to provide you with an efficient way of managing the Role record as well as their skills and team assignments. If you add Custom Fields to the Role Object, you will need to add them to the ‘Custom Field Set’ to make them visible on the edit page.
To add your own Custom Fields to the Field Set, navigate to Setup > Create > Objects > Roles > Field Sets and click Edit.

Drag the fields you require into the Field Set and click Save.
The ‘Active’ checkbox on a role record makes the role available to use in pick lists. If this field is unchecked, then the role will be filtered out of pages such as Create Actions, Time Logs, Whiteboard and the Scheduler.
The skills object allows you to maintain a list of skills (e.g. Experience, Certifications, Languages), which you can assign to roles using Skills Assignments.
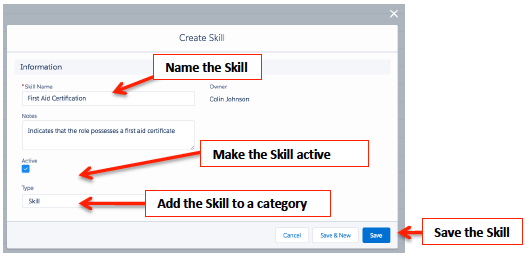
To create a skill, go to the Skills tab and then click on the New Button.
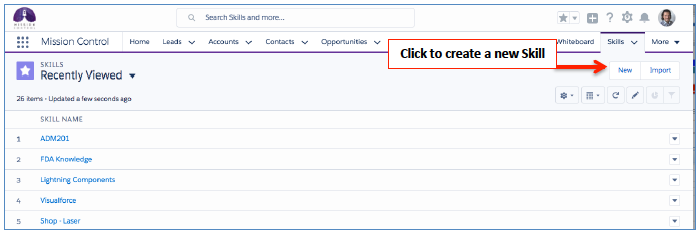
You can then enter a name for the skill, notes, make the skill active and select a type to categorise the skill by. Note: You can adjust the Type values in the object setup area.
You can then assign the skill to roles, using the Skills Assignment button.
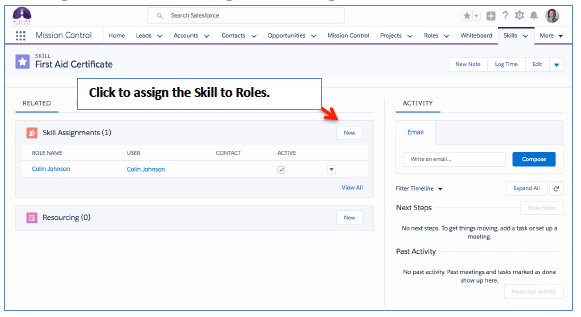
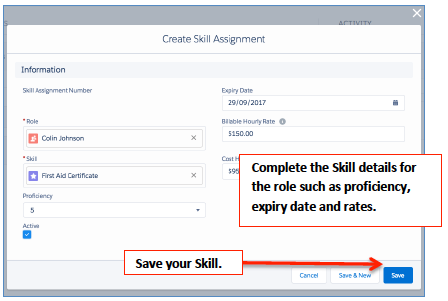
This allows you to specify a proficiency and expiry date for each individual role that has the skill as well as skill based billable and cost rates. You can also make the skill record active/inactive for the role.
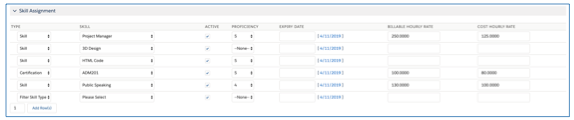
Multiple Skills can easily be managed for individual Roles via the Skill Assignment section of the Role edit page as follows. When adding Skills you can also filter by Skill type to search for a specific group of Skills.
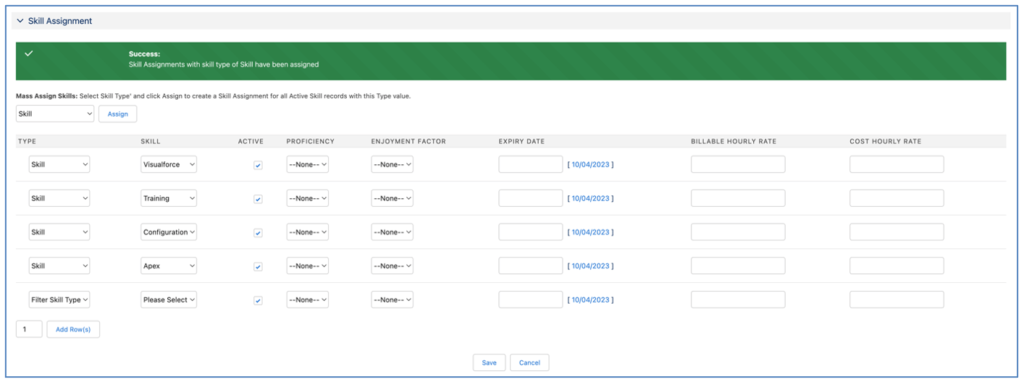
Mass Assign Skills
When managing the Skills an individual Role is assigned to, you are able to mass assign a group of Skills to the Role from their Role Edit Page. Within the Skill Assignment section of the Role Edit page, you can select a Skill ‘Type’ from the picklist and click the Assign button.

This will create a Skill Assignment record for each Active Skill that has the Type value selected.
When creating a new Skill from the Skills Tab, you can mass assign to all Active Roles by setting the ‘Mass Assign to Roles’ field to TRUE.
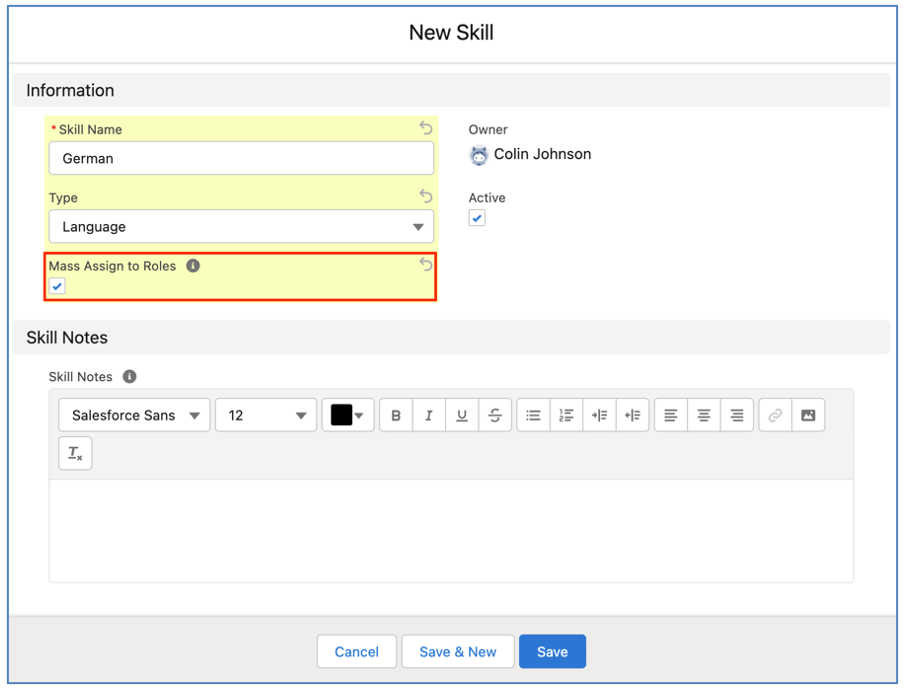
Setting this field to TRUE will create a Skill Assignment record for any Active Role where they already have a Skill Assignment for another Skill with the same Type value. For example, Mick Fanning and Kelly Slater both have a Skill Assignment for the Skill ‘English’, which has a Type value of Language. When creating a new Skill record for ‘French’, the User sets the ‘Mass Assign to Roles’ field to TRUE. When the record is saved, a Skill Assignment record will be automatically created for both Mick and Kelly.
You are also able to set this field to TRUE on existing Skills and it will perform the same function. For example, Mick Fanning has Skill Assignment records for ‘English’ and ‘French’. Kelly Slater has a Skill Assignment for ‘English’. The User edits the ‘French’ Skill record, sets the ‘Mass Assign to Roles’ field to TRUE and saves the record. A new Skill Assignment record will be automatically created for Kelly.
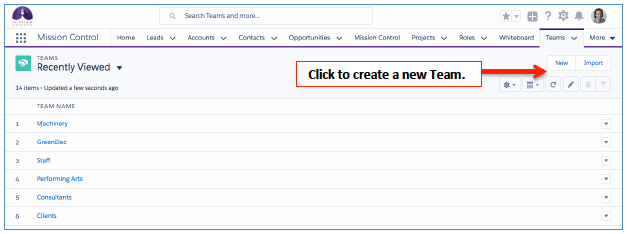
The Teams object allows you to create teams of roles for example Marketing, Directors etc. which you can then use to easily apply holidays and skills to. Teams can also be filtered on scheduler and whiteboard so that you can see manage teams easily. Roles can be members of multiple teams.
To create a new Team, go to the Teams tab and then click on the ‘New’ Button.
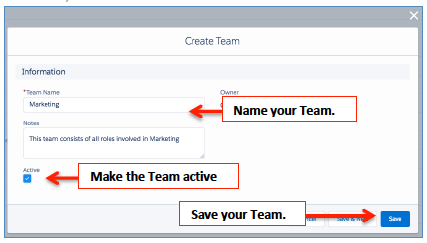
Next, give your team a name, record notes about it and mark it as active before saving.
Once you save your team you can then add roles to the team using Team Assignments.
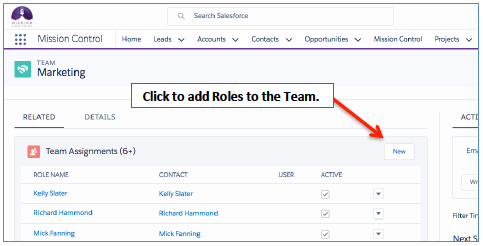
This allows you to select and add individual roles to the team.
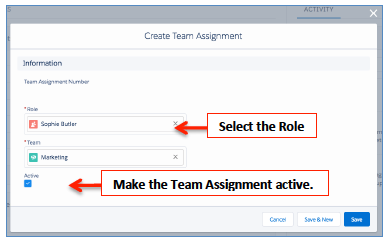
You can also add a Role to multiple teams and manage these using the Team Assignments section of the Role edit page as follows:

The active checkbox on the Team Assignment records allows you to specify if the Role is currently a member of the Team. This means that when you filter the Scheduler or Whiteboard by Teams, only roles that have an active Team Assignment will show.
Project resources can move between Master Teams and change Function as they get promoted, etc. To ensure Rate Card financials and Role Utilisation reporting remains accurate, you are able to create ‘Role History’ records.
The Role History feature handles scenarios where someone may have been in one Function for a period of time and then moved into a new Function. For example, during 2025 Mick Fanning may have been a Consultant. In 2026, he became a Project Manager. Without using Role History, on a Project with Rate Card financials, that spans 2025 and 2026 would not accurately track Mick’s differing rates between the time he was a Consultant and the time he was a Project Manager.
Changes to a Role’s ‘Master Team’ could also impact a Role’s figures on the Role Utilisation Report. For example, Kelly Slater may have been in the Sales Master Team between January and December 2025, and then moved into the Consultants Master Team on the 1st January 2026. When viewing the Role Utilisation Report for Nov 25, Dec 25 and Jan 26, it would inaccurately report that the Consultants Team didn’t hit their target because Kelly’s numbers would be included for November and December before he became part of the team.
By leveraging the Role History feature, these same scenarios can be handled accurately.
For Mick Fanning, we would create a Role History record as outlined in the table below.
Role History ID | Effective Until Date | Role | Master Team | Function |
RHID:00001 | 12/31/2025 | Mick Fanning | Consultant |
With these records in place, when calculating financials for the Rate Card Project, the following logic will be applied:
Time Logs prior up to 31st December 2025: Use the Consultant Rate Card Entry
Time Logs from 1st January 2026: Use the Project Manager Rate Card Entry
For Kelly switching from Sales to Consultants, we would create a Role History record as outlined below.
Role History ID | Effective Until Date | Role | Master Team | Function |
RHID:00001 | 12/31/2025 | Kelly Slater | Sales |
When viewing the Role Utilisation Report, looking at both Sales and Consultants, Kelly’s time would be allocated to each Master Team as outlined in the table below (note the green cells indicate where Kelly’s utilisation figures would be factored in).
Master Team | Nov 25 | Dec 25 | Jan 26 | Feb 26 |
Sales | X | X | ||
Consultants | X | X |
Role History records can be created manually via the ‘Role History’ Related List, which is accessible from the Related Tab of the Role record.

Role History records will be automatically created in the following scenarios:
You can create Development Plans in relation to an individual Role within Mission Control. Within a Development Plan, you’re able to create Assessments against each Skill that is assigned to them.
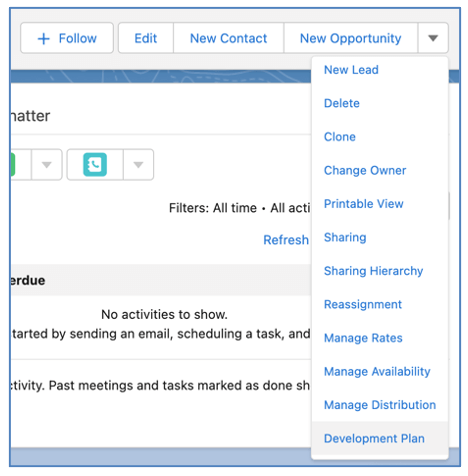
The ‘Role Development Plan’ page is accessed by clicking the ‘Development Plan’ button on the Role record.
The Role Development Plan has two Tabs:
The Assessment Tab provides you with the ability to carry out an assessment of each Skill that is assigned to the Role.
The Insights Tab provides you with the ability to compare results from up to 5 Development Plans to see how a person’s results have changed between reviews.
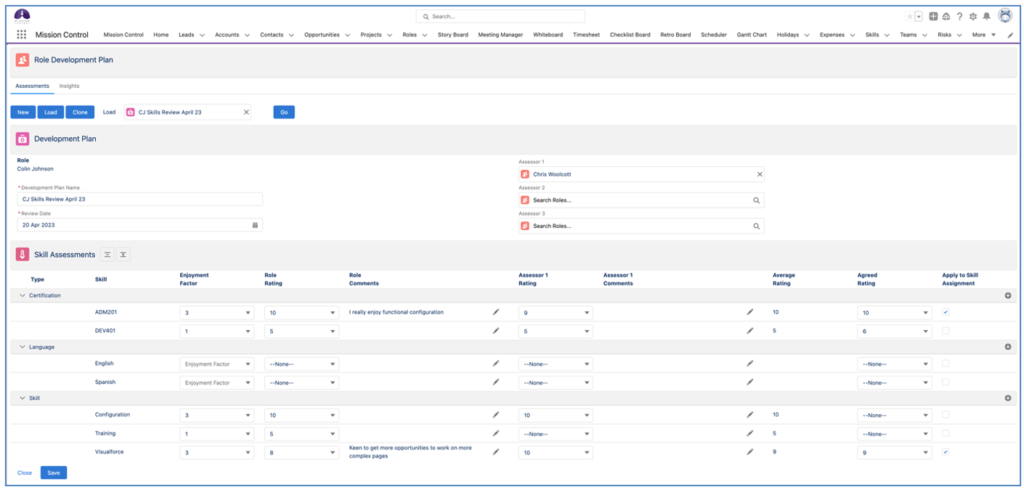
Assessments Tab
When you initially load the Role Development Plan page, the Assessments Tab will load by default and you will have the option to:

Create New Development Plan
To create a new Development Plan record, click the New button. This will load a draft Development Plan record enabling you to complete the various fields, along with draft Assessment records for each Skill that the Role has an active Skill Assignment for.

The assessment can be carried out by up to 4 people, including the person that the Role record relates to and 3 additional assessors.
The Role will have the ability to complete the following fields within each Assessment:
Each of the Assessors will have the ability to complete the following fields within each Assessment:
When reviewing all feedback, you have the ability to view the Average Rating across all assessors, specify an Agreed Rating and choose to have the Enjoyment Factor and Agreed Rating update the Skill Assignment record values.
If during the assessment it is agreed that the Role is interested in developing a new Skill that they’re not currently assigned to, you are able to click the + icon located on the right-hand side of the Skill Assessment section of the page.
This will open up the ‘New Skill Assignment’ Modal where you can specify the Skill, Billable Hourly Rate, Cost Hourly Rate, etc.
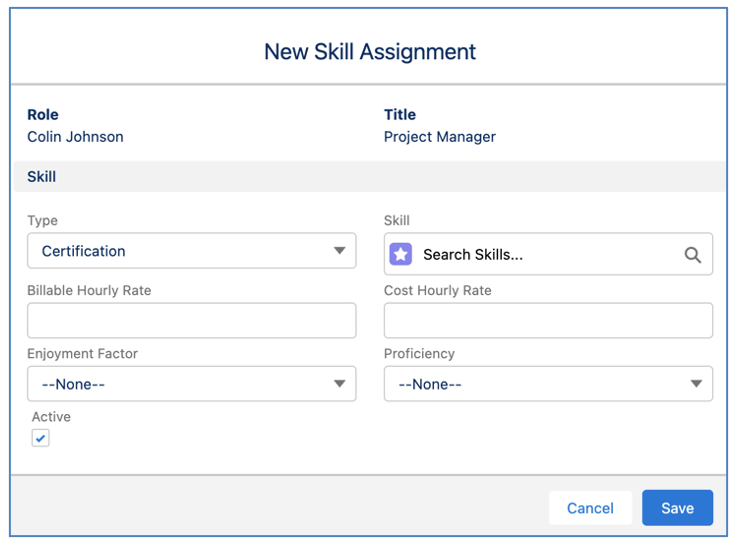
Once you click Save, the new Skill Assignment record will be related to the Role and added to the appropriate section of the Assessments.
Load Existing Development Plan
To load an existing Development Plan, you will need to click the Load button. This will display a search field where you can select from the Development Plans related to the Role that you are viewing the page in context of.
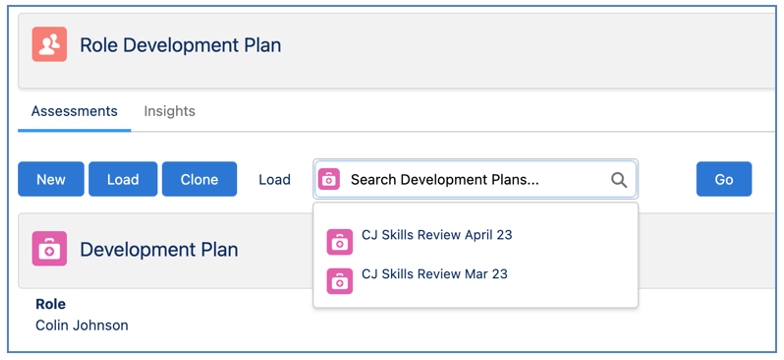
Once you have selected the required Development Plan, click the Go button and the Development Plan and Assessment records will be loaded.
Clone Existing Development Plan
To create a new Development Plan based on an existing Development Plan, you’re able to perform a ‘deep clone’ by clicking the Clone button. This will display a search field where you can select from the Development Plans related to the Role record that you are viewing the page in context of.
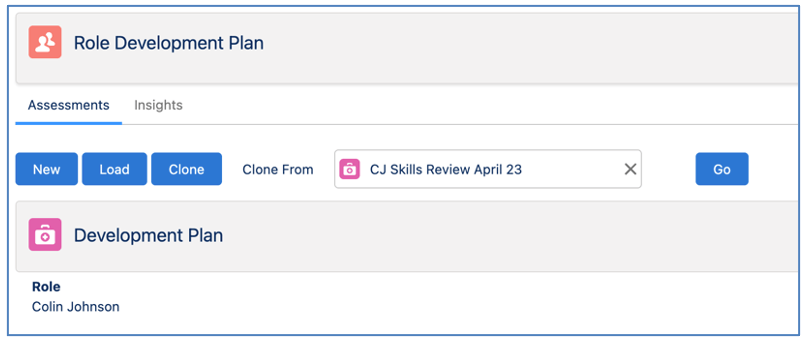
Once you have selected the required Development Plan, click the Go button and the deep clone process will create draft records for the Development Plan and Assessment records.
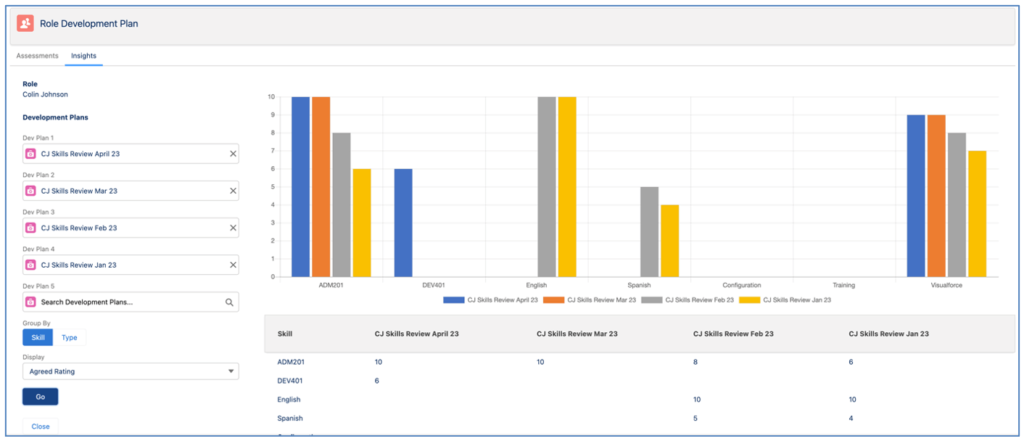
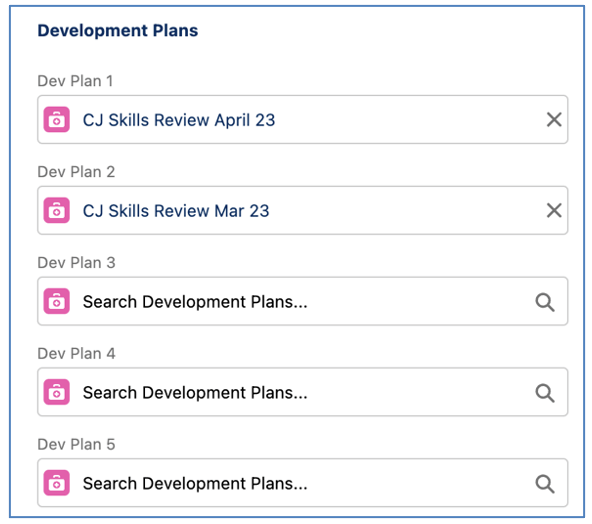
Insights Tab
The Insights Tab provides you with the ability to view a variety of metrics from up to 5 Development Plans for an individual Role. This can help identify whether a person’s ability is improving or declining for particular Skills.
The 5 most recent Development Plans will automatically be loaded. This is based on the ‘Review Date’ on the Development Plan records. However, you are able to select the 5 Development Plans manually.
The settings enable you to choose whether to group the data by Skill or by Type. You can also choose what value from the Assessment records you view on the Insights Chart. The options are:
When grouping by Skill, the values from each Assessment will be displayed. When grouping by Type, the average values from all Assessments for Skills that have the same Type (e.g. Certification, Skill, Language, etc.) will be displayed.
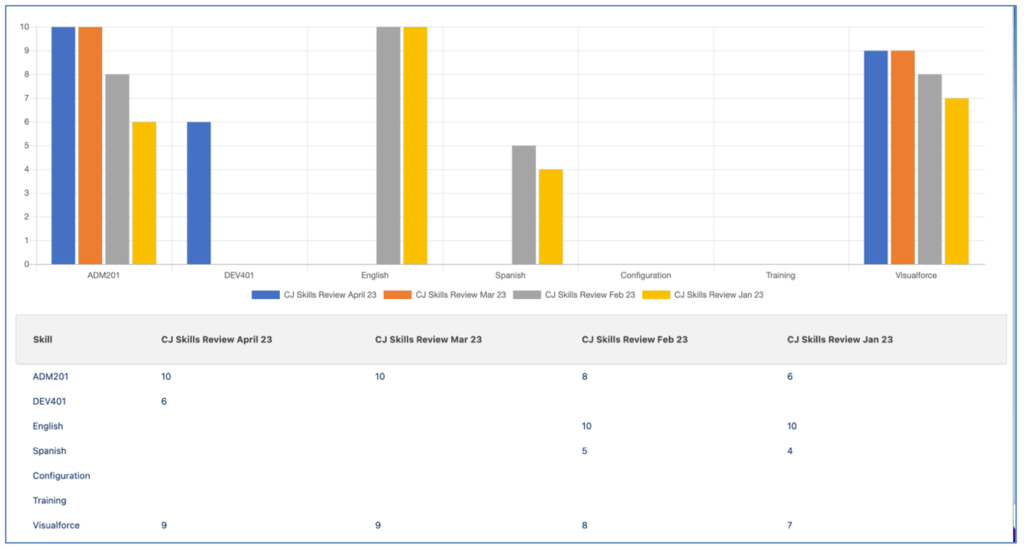
The Chart and Table provide the progressive insight into the movement in the metrics between each Development Plan being analysed.
The ‘Skills Matrix’ Report can be found within the ‘Mission Control Reports’ Folder in the Reports Tab. This report enables Customers to view a matrix of Skills assigned to Active Roles.
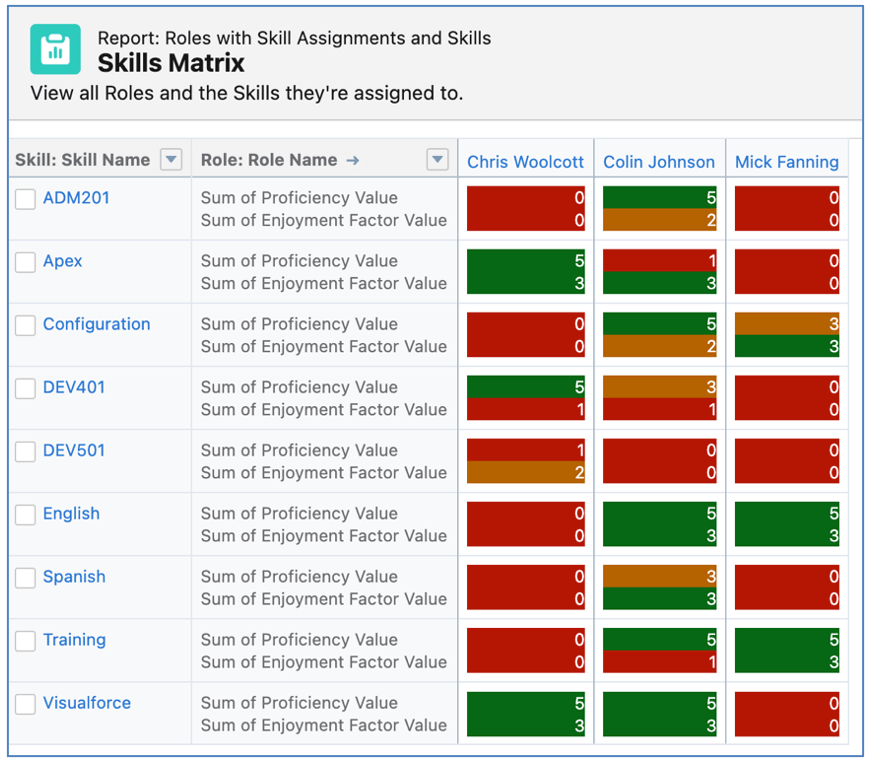
The report provides insight into the Proficiency and Enjoyment Factor of each Role for the Skills assigned to them.
The Proficiency value is conditionally highlighted based on the following scale:
The Enjoyment Factor value is conditionally highlighted based on the following scale:
Any Role that has not been assigned the Skill or has not been provided a value in the Proficiency or Enjoyment Factor fields of their Skill Assignment records will be displayed as 0 (Red).
The Role record provides customers with the ability to specify values for ‘Hours per Week’ and ‘Billable Target’. However, these are static values and if changed, would be applied to all legacy periods as well. For example, if a new person joins the business during their ramp-up period they may be expected to achieve a lower Billable Target than once they are fully operational. Another example could be where someone previously worked part-time and has transitioned to work full time. Using these fields on the Role record alone do not provide this level of flexibility.
The Role Availability Custom Object provides customers with the ability to record availability information for different time periods.
A Role Availability record contains key information about when a Role will be working, including:
A Role can have multiple Role Availability records.
Role Availability Manager
To enable you to create and manage Role Availability records for a specific Role, you can access the ‘Role Availability’ component from the Role record by clicking the ‘Manage Availability’ button as shown below.

If a Role does not have any related Role Availability records, you will see a draft record ready to be completed, as shown below.

If a Role does have existing Role Availability records, they will be displayed in descending order based on Start Date and End Date.

Note: If you have not enabled the automated management of Role Availability activation/deactivation, you will need to manually adjust the records as required.
The Holiday Allowance Object allows you to define how many days are allocated to each Role over a period. When creating a Holiday record, if applicable, it can be related to a Holiday Allowance record.
Each Role can have multiple Holiday Allowances, each defined for a period of time and for a certain type of Holiday.
For example, you can create Holiday Allowance record for Mick Fanning as follows:
Type: Annual Leave
Days: 20
Start Date: 1/Jan/2021
End Date: 31/Dec/2021
Type: VTO
Days: 4
Start Date: 1/Jan/2021
End Date: 31/Dec/2021
When a Holiday is related to a Holiday Allowance record, the ‘Days Taken’ value from the Holiday record will be added to the ‘Used’ field on the Holiday Allowance.
Each Holiday Allowance record can be set to rollover or expire at the end of the period. If it can rollover, you can specify what percentage can be rolled over. You may for example provide 20 days PTO per year and agree employees can rollover 25%. If the employee uses 10 days, even though the ‘Remaining’ would be 10, once the End Date has passed it would reduce to 5 as that’s the maximum that can be rolled over.
You can specify a default setting for the Rollover % for Holiday Allowance records. This can be done via the ‘Holiday Allowance Rollover Percentage’ setting within the Custom Settings Tile on the Control Pad of the Mission Control Console.
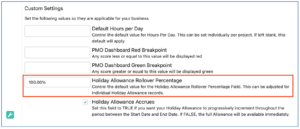
If this Setting contains a value, it will be displayed by default in the ‘Accrual %’ field when creating a new Holiday Allowance record. It can also be overridden for individual Holiday Allowance records. For example, you may set your default to 100% and that is applicable to PTO and VTO, but you may not let Sick Leave accrue, so you can override the Accrual % value for that individual Holiday Allowance record.
When using Holiday Allowance feature, you can choose whether the full allowance is available immediately or if it accrues throughout the period it applies to.
This is controlled via the ‘Holiday Allowance Accrues’ setting within the Custom Settings Tile on the Control Pad of the Mission Control Console.
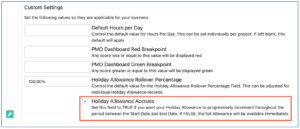
If this Setting is FALSE, the full allowance will be available immediately. However, if this Setting is TRUE, the ‘Available Allowance’ field will progressively increment throughout the period between the Start Date and End Date.
Holiday Trigger
The Apex Trigger on the Holiday Object will automatically update the Holiday Allowance record based on the following scenarios:
Validation Rules
Two Validation Rules are included to support the Holiday Allowance feature. By default, one is active and the other is inactive, but can be activated if required.
Validation Rule: Ensure_HA_Remaining_Sufficient (Active)
This rule ensures the Remaining value on the Holiday Allowance is not less than the number of days being taken on the Holiday record.
Validation Rule: Ensure_Holiday_Specified (Inactive)
This rule ensures a Holiday Allowance record is specified on the Holiday record if the ‘Type’ field is set to Annual Leave, Sick Leave or Study Leave.
Holiday Allowance Reports
Two reports are included that will provide details of the current number of days used and remaining across each Role, across the various Holiday Allowance records.
Holiday Allowance Remaining Summary
This report provides a summary of all Holiday Allowance records grouped by Role and Holiday Allowance ‘Type’.
Holiday Allowance Remaining Role
This report provides a summary of all Holiday Allowance records grouped by Holiday Allowance ‘Type’. You are able to add a ‘Report Chart’ component to the Role Lightning Page that will summarise the number of days ‘Remaining’ for each Holiday Allowance ‘Type’ for a particular Role.
For example, Mick Fanning may have 4 days of VTO for 2021, 20 days of PTO for 2021 and 5 days of PTO accrued from 2020.
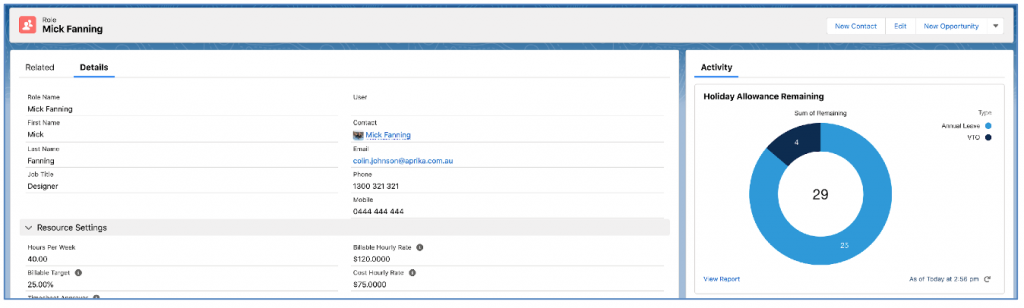
By adding the Report Chart component to the page, you will get a real-time view of the Role’s Holiday Allowance.
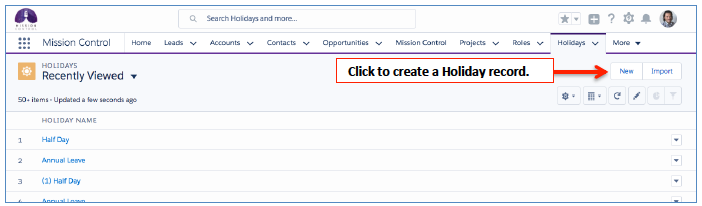
Holidays allow you to record annual leave, public holidays and other unavailable time for individual Roles or entire Teams, which can then be easily seen on the Scheduler for consideration when planning. You can create a holiday record directly from the Holidays tab or from the Holidays related list of a Role record.
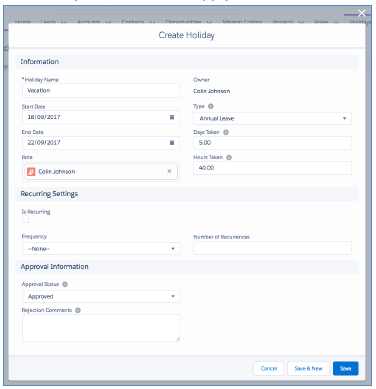
To complete the Holiday record, give it a Name, Select the Type and enter the Start Date and End Date of the Holiday, along with number of Hours Taken. From here you can assign the Holiday to an individual Role or leave it blank if you would like to apply it to a Team. Holidays that are not related to a Role or assigned to Team(s) via Holiday Assignments will be considered ‘Global Holidays’, they will need to have the ‘Global Holiday’ Checkbox set to TRUE and they will be assigned to all Roles.
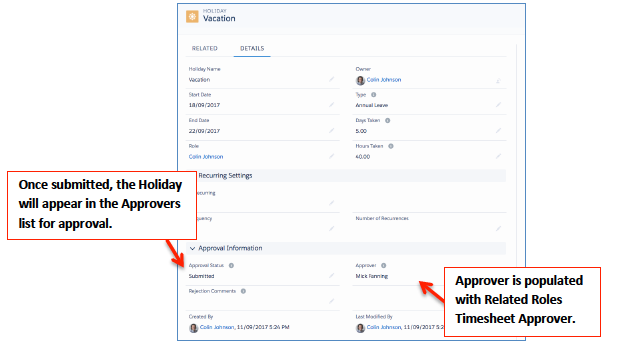
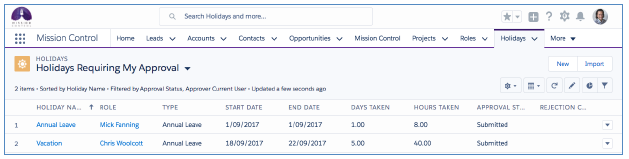
For individual Holiday records, you can use the approval process whereby once a Holiday is submitted, it can be reviewed and approved or rejected by the Roles Timesheet Approver. The approval status field reflects the current status of the holiday record and should be set to Submitted once the user would like it to be approved.
A validation rule on the approval status field prevents the user that the holiday record is for from approving their own holiday records. (Note this rule is inactive by default and can be switched on by going to Setup > Create > Objects > Holidays > Validation Rules > Cannot Approve Own Holidays.)
All Holidays with a status of “Submitted” will then appear in a list view for the relevant approver called “Holidays Requiring My Approval”.
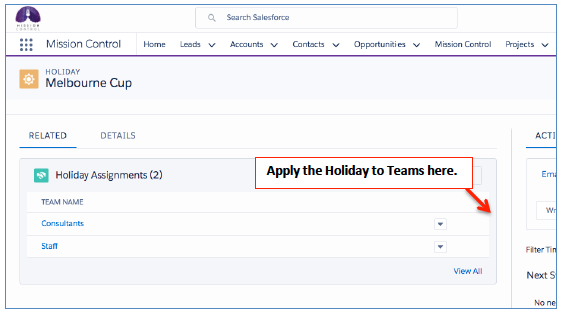
After you have saved your Holiday record you can use the Team assignment option to assign the Holiday to Teams.
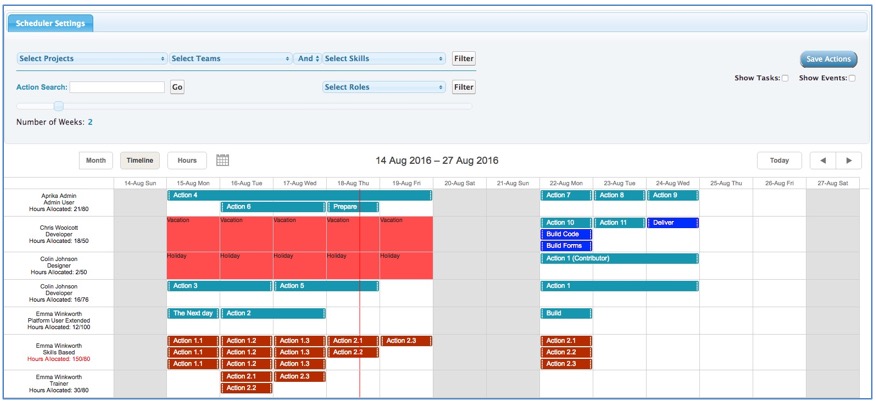
Holidays appear in red on the scheduler to help you plan around these periods.
Holiday Exclusions
The Holiday Exclusion enables you to specify that individual Roles that are part of a Team should not be allocated to a Holiday that has been associated to the Team via a Holiday Assignment.
You can choose to exclude someone manually for a specific Holiday record. Alternatively, you can specify on their Team Assignment record that they should be excluded from Holidays assigned to the Team.
Excluding manually for a specific Holiday
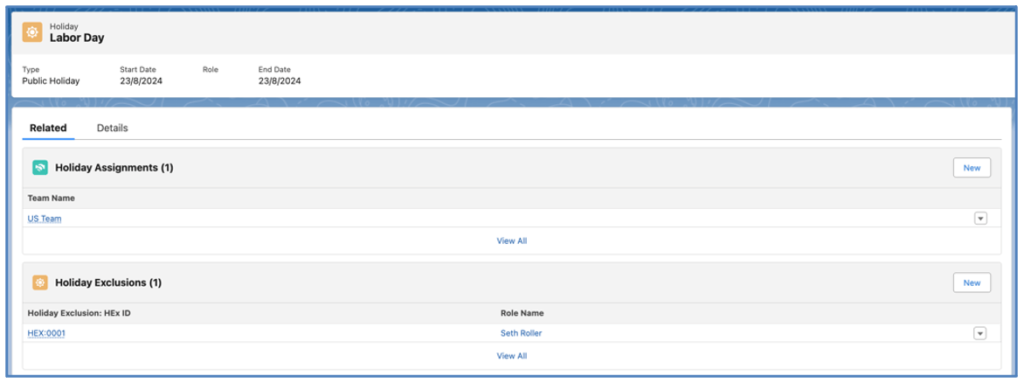
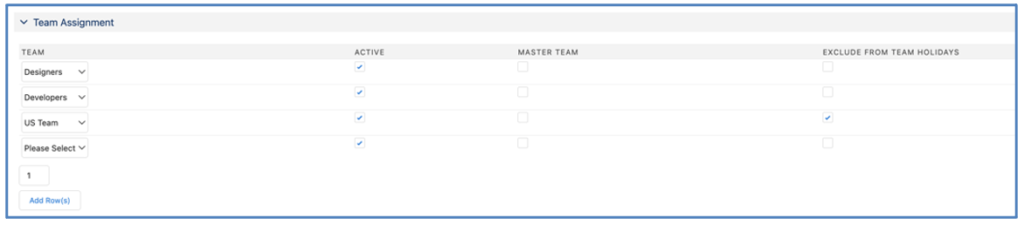
You may find you need to exclude an individual Role that is part of a Team from a specific Holiday. For example, Seth is part of the ‘US Team’ and is entitled to the Holidays that get assigned to this Team. The Labor Day public holiday is coming up next week, so a Holiday is created and a Holiday Assignment is created for the US Team. This will allocate the Holiday to all of the Roles associated to the US Team.
However, Seth has chosen not to take the day off due to work commitments and instead aims to take a TOIL day next month instead. To exclude Seth from this Holiday, a Holiday Exclusion record must be created, as shown below.
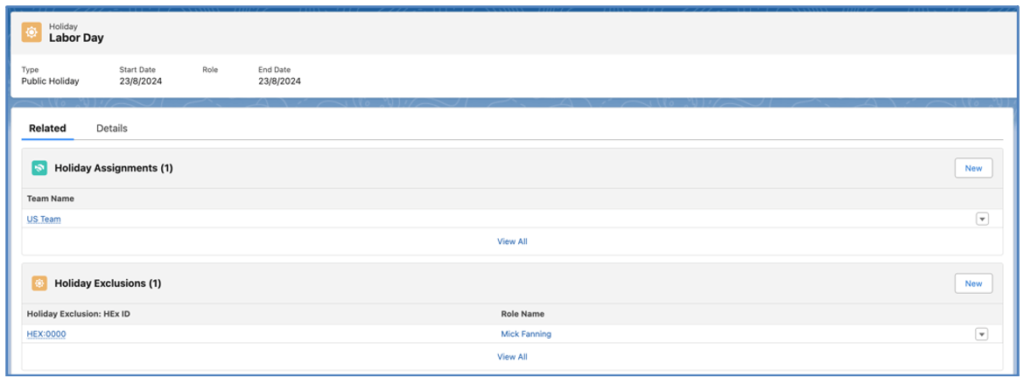
Once the Holiday Exclusion record has been created, Seth will not be included in the Holiday and will continue to be available to work that day.
The above shows Seth as still available on the day of the Public Holiday even though other Roles that are members of the US Team are unavailable due to the Holiday.
Excluding automatically for all Holidays assigned to the Team
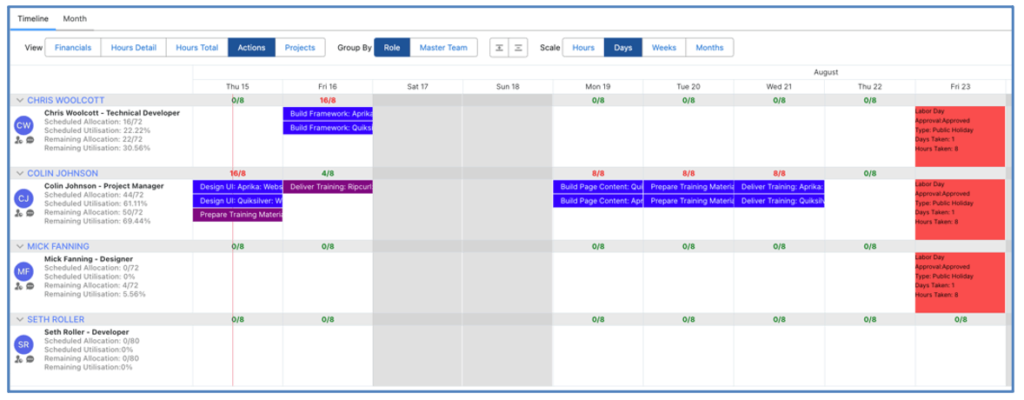
You may find you need to have a Role included in a Team, but they are not eligible for any of the Holidays that get assigned to the Team. For example, let’s say we have a ‘US Team’ and this includes Colin, Chris, Seth and Mick. However, Mick is a Contractor and is not eligible for Public Holidays.
To avoid having to manually create a Holiday Exclusion record for Mick every time a Holiday is assigned to the US Team, you can specify on Mick’s Team Assignment record, that he should be excluded from team holidays.
The above image shows that the ‘Exclude from Team Holidays’ field has been set to TRUE for the ‘US Team’ Team Assignment for Mick.
This ensures that a Holiday Exclusion record is automatically created for Mick whenever a Holiday Assignment is created for the ‘US Team’.
This means Mick will not be allocated to the Public Holiday and will remain available for work.
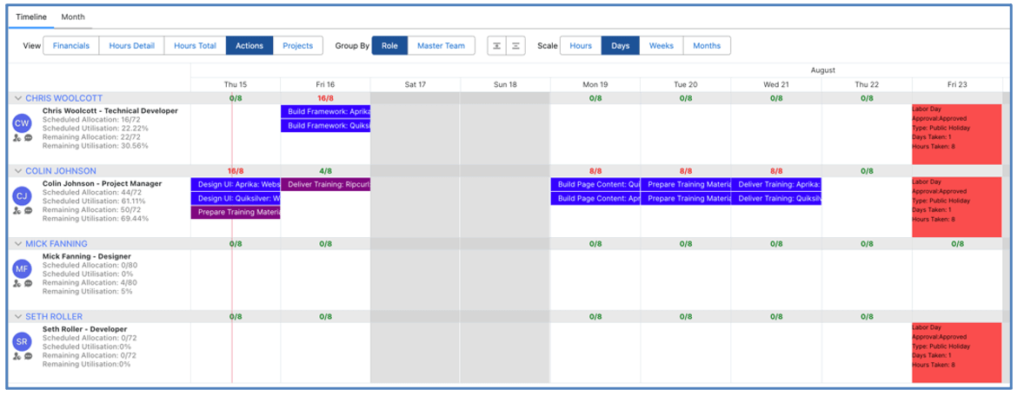
The above shows Mick as still available on the day of the Public Holiday even though other Roles that are members of the US Team are unavailable due to the Holiday.
To enable customers to group Milestones of a Project together, you can choose to create ‘Phase’ records under your Project record. Unlike Milestones and Actions, which are mandatory requirements for a Project Plan, the Phase record is optional.
Some of your Projects may not be large enough to warrant having Phases, therefore you do not need to create them for every Project.
For larger Projects, you may wish to group your Milestones into layers beneath the Project. For example, we may have the following Milestones on a Project:
Below is an example of how these Milestones, and related Actions are shown on the Gantt Chart.
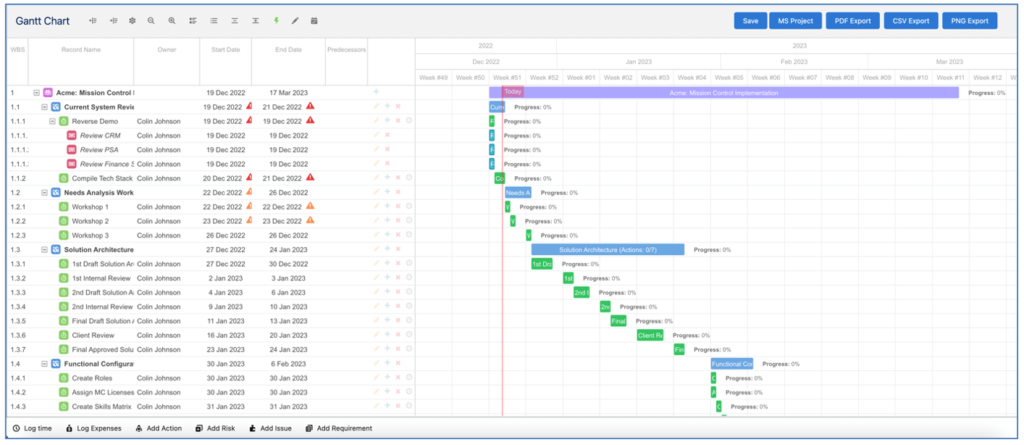
We may choose to group these Milestones into the three separate Phases, as detailed below:
Once the Milestones have been related to a Phase, the Phases will be displayed on the Gantt Chart as shown below.
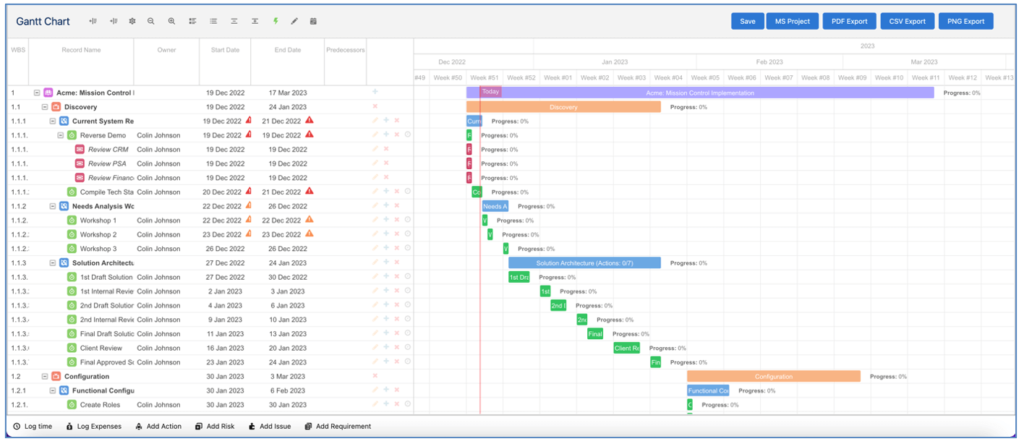
Creating Phases
To create a Phase, click the New button on the Phase Related List on the Project record you want the Phase to relate to. Enter the applicable fields and click Save.
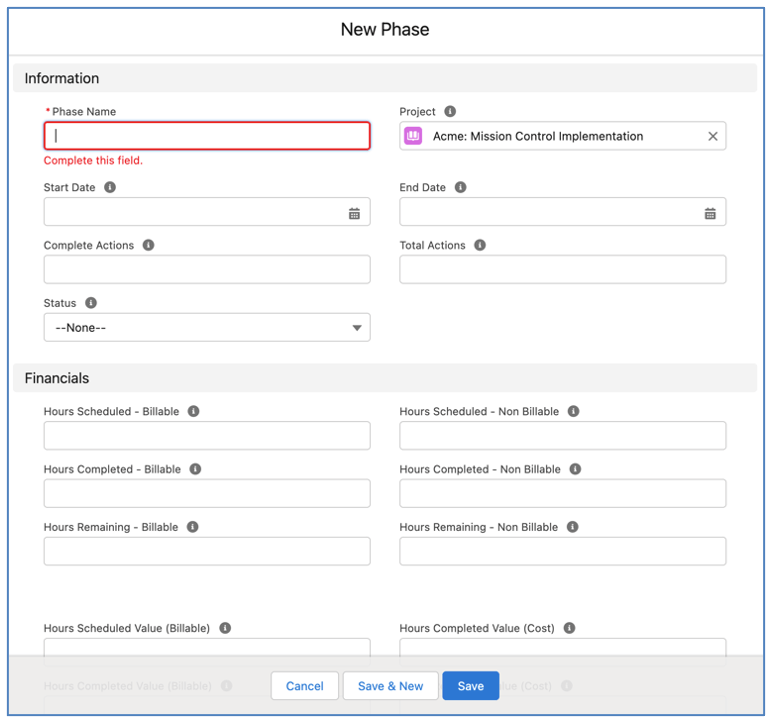
The only standard Fields that need to be populated manually are the Phase Name and the Project. All other fields will be updated automatically once the Phase has related Milestones.
Creating Multiple Phases
The ‘Create Phases’ page enables you to create multiple Phases for one Project. You are also able to edit existing Phases if you need to make changes in bulk.
The page is accessible from the Project Page Layout. You access it by clicking the ‘Create Phases’ button, as highlighted below.
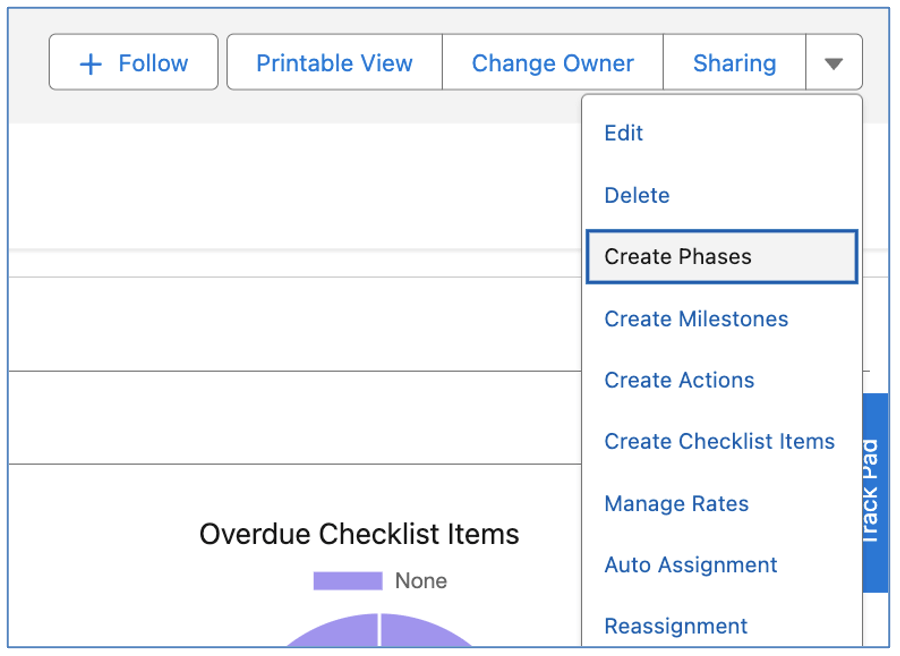
When you initially load the Create Phases page, you’ll have one draft record ready to complete, as illustrated below.

You can add multiple draft rows by entering the number of rows you wish to add and click the ‘Add Row(s)’ button.
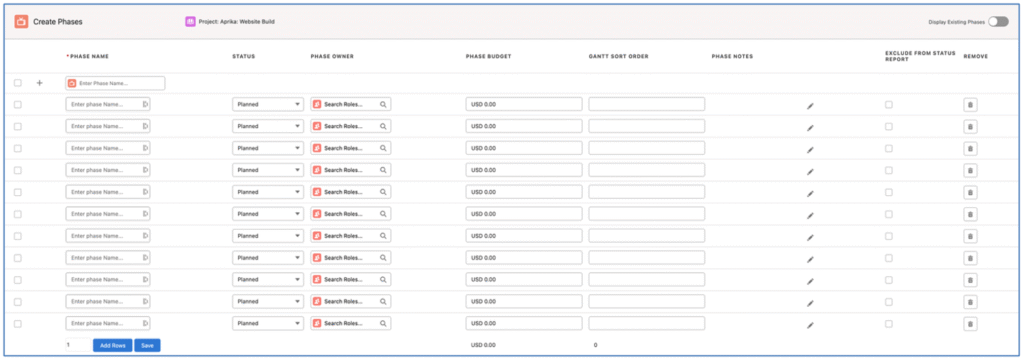
Alternatively, you can use the ‘Quick Add’ feature at the top of the page, which will add the new Phase to the bottom of the list.

Once you have completed the required information for all of the Phases, click the Save button at the bottom of the page.
Page Features
Display Existing Phases
In the top right corner of the page, you can toggle on/off the ability to view and edit Existing Phases. If this is toggled on, all existing Phases will be displayed to enable you to make changes as required.

Note: The maximum number of Phases supported is 200.
Multi Line Editing
You are able to apply edits to multiple lines on the Create Phases page at the same time. Click the checkbox at the top of the page, or selecting the checkbox for the individual rows you wish to edit, as shown below.

Applying an edit to one of the selected rows will apply the same change to all of the selected rows. For example, in the image below, the User has selected all 3 rows.

The User adjusted the Exclude from Status Report field value on row 1, and the same change is automatically applied to rows 2 and 3.
Copy Phase Owner
The copy icon located to the right of the Phase Owner field on the Create Phases page enables you to copy the Phase Owner from the row above to the selected row.
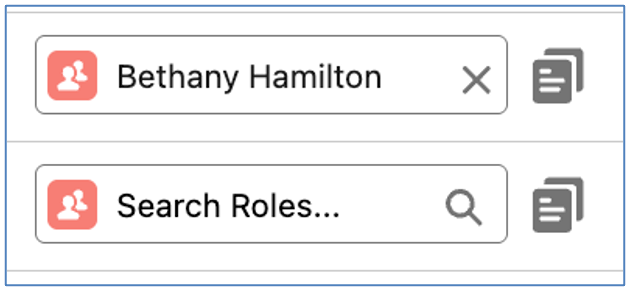
For example, in the image below, row 1 has Bethany Hamilton as the Phase Owner. If Bethany is also required to be the Phase Owner of the Phase on row 2, the User can click the icon to copy the value from row 1, rather than having to use the lookup functionality.
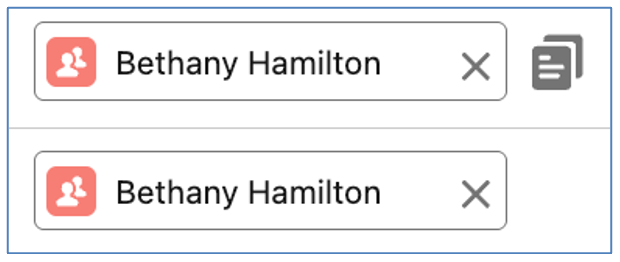
Note: clicking this icon will not work in conjunction with the multi-line edit functionality. However, manually populating one Phase Owner field would automatically populate the same value in the Phase Owner of other rows selected.
Display Custom Fields
To provide customers with the ability to choose which fields are displayed on the page, there is a Field Set on the Phase Object called ‘Create Phase Fields’. All existing fields on the Phase Object are available for selection, excluding the following:
These fields are excluded from the Field Set as they will always appear on the Create Phases page by default.
The following fields are pre-selected within the Field Set and will be accessible from the Create Phases page.
If you wish to add Custom Fields or remove any of the above pre-selected fields, you can do so by editing the fields included in the Field Set.
Relating Milestones to Phases
To relate a Milestone to a Phase, you need to populate the Phase field on the Milestone record. This can be done by editing the Milestones individually, entering the appropriate Phase and clicking Save.
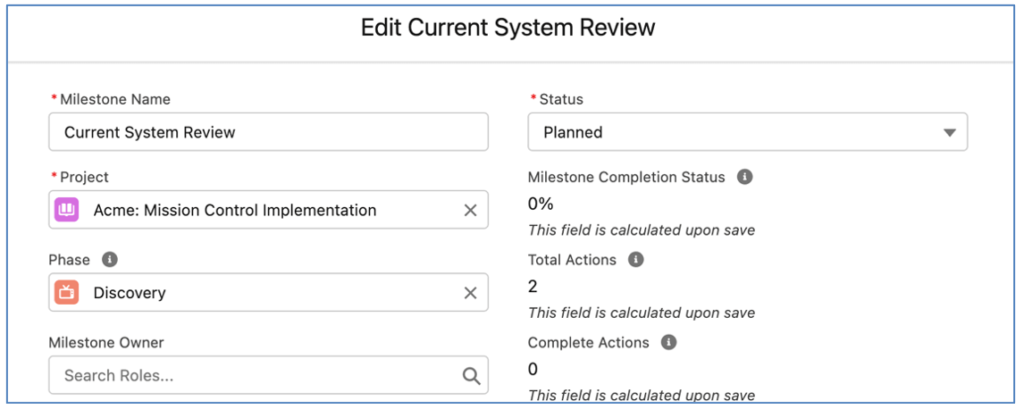
Alternatively, you can add the Phase field to the ‘Create Milestones Fields’ Field Set. This will enable you to populate the Phase field for all Milestones.
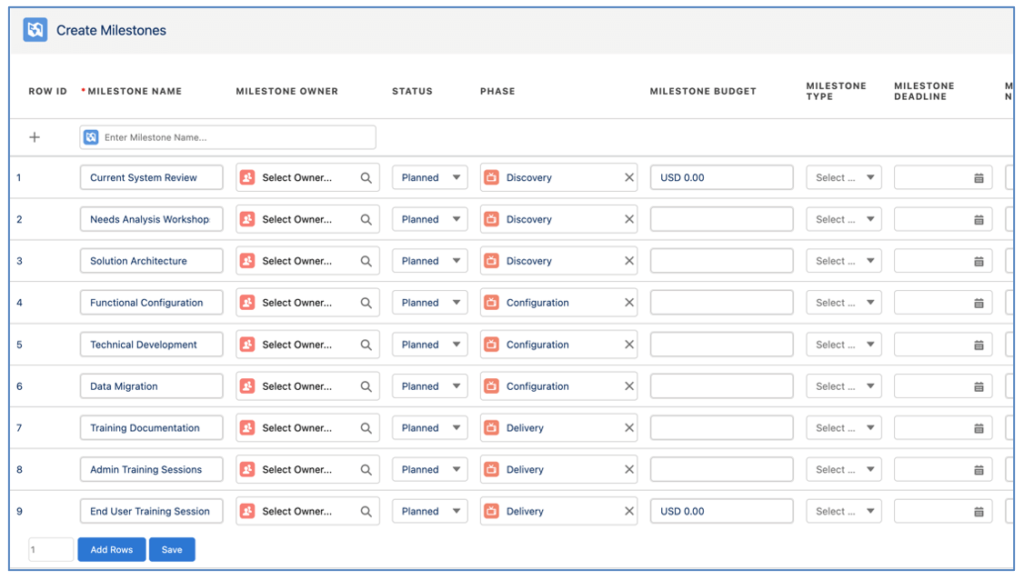
The Milestone Object allows you to set the Key Milestones for your Project. You can have multiple Milestones per Project, each with multiple Actions. The Milestone object allows you to capture the top-level information for the milestone such as status, budget, deadline and invoicing detail. Milestones can be created as part of the new Project creation on the Mission Control Console, or directly using the New Milestone button of the Project related list.
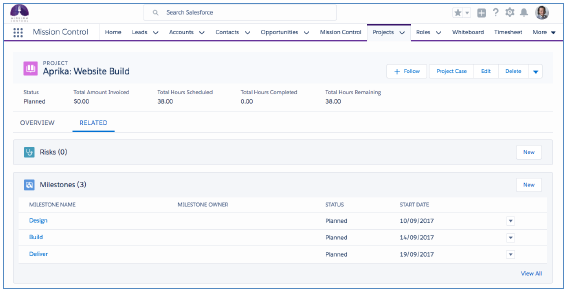
After clicking on the new milestone button you can enter the Milestone details and then save. Note: You only need to enter details in the information section of the Milestone page; the other fields will be updated by a trigger based on the Actions and Time Logs that get recorded under the Milestone.
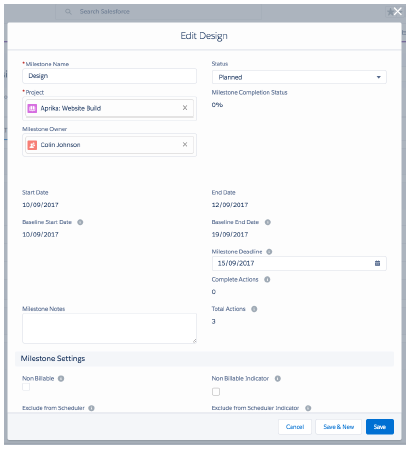
The ‘Create Milestones’ page is accessible from the Project Page Layout. You access it by clicking the ‘Create Milestones’ button, as highlighted below.
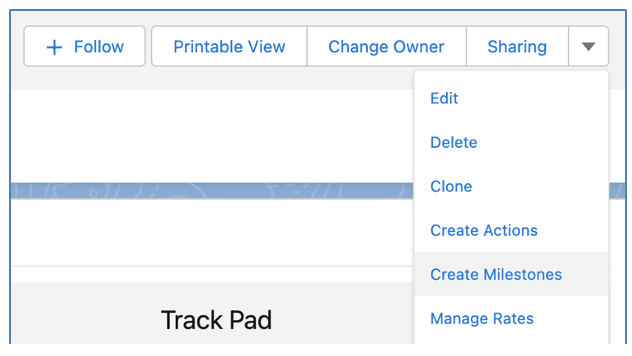
This page enables you to quickly create multiple Milestones for one Project. You are able to edit existing Milestones if you need to make changes in bulk.
When you initially load the Create Milestones page, you’ll have one draft record ready to complete, as illustrated below.
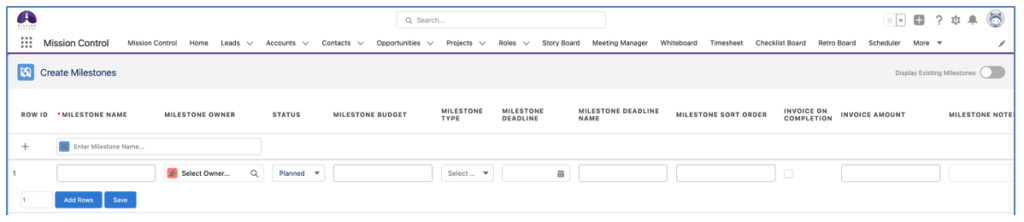
You can add multiple draft rows by entering the number of rows you wish to add and click the ‘Add Row(s)’ button.
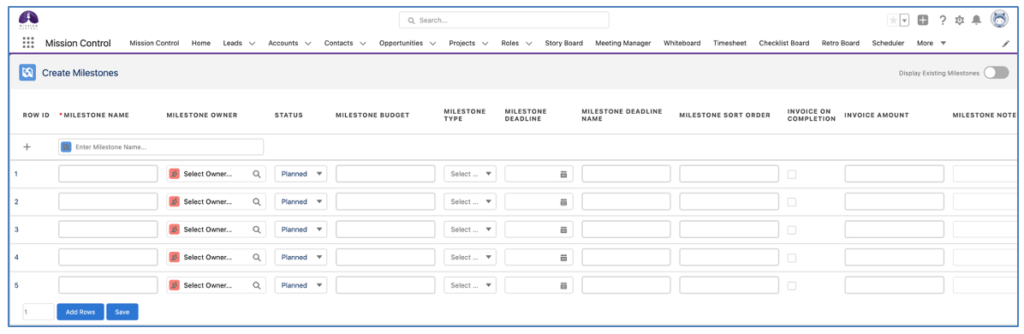
Alternatively, you can use the ‘Quick Add’ feature at the top of the page, which will add the new Milestone to the bottom of the list.
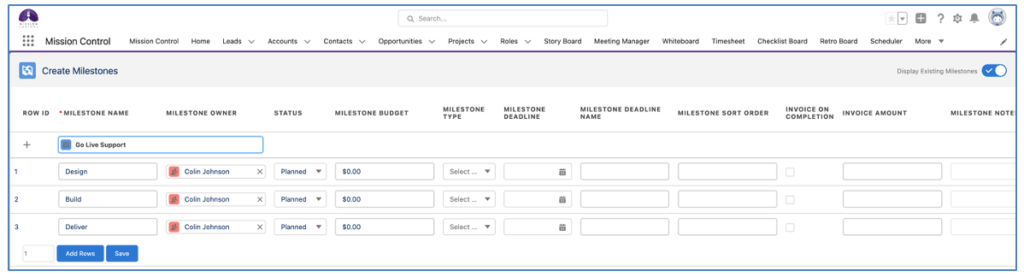
Once you have completed the required information for all of the Milestones, click the Save button at the bottom of the page.
In the top right corner of the page, you can toggle on/off the ability to view and edit Existing Milestones. Is this is toggled on, all existing Milestones related to the Project will be displayed to enable you to make changes as required.

Note: The maximum number of Milestones supported is 100. When editing existing records from the ‘Create Milestones’ page if there are too many Milestones that causes this limit to be exceeded, you will need to edit the Milestones individually.
Multi Line Editing
You are able to apply edits to multiple lines on the Create Milestones page at the same time. Click the checkbox at the top of the page, or selecting the checkbox for the individual rows you wish to edit, as shown below.

Applying an edit to one of the selected rows will apply the same change to all of the selected rows. For example, in the image below, the User has selected rows 1, 5 and 9.

The User adjusts the ‘Invoice on Completion’ field for row 1 and the same change is automatically applied to rows 5 and 9.
Copy Milestone Owner
The copy icon located to the right of the Milestone Owner field on the Create Milestones page enables you to copy the Milestone Owner from the row above to the selected row.
![]()
For example, in the image below, row 1 has Colin Johnson specified as the Milestone Owner. If Colin is also required to be the Milestone Owner of the Milestone on row 2, the User can click the icon to copy the value from row 1, rather than having to use the lookup functionality.

Note: clicking this icon will not work in conjunction with the multi-line edit functionality.
Display Custom Fields
To provide customers with the ability to choose which fields are displayed on the page, there is a Field Set on the Milestone Object called ‘Create Milestone Fields’. All existing fields on the Milestone Object are available for selection, excluding the following:
These fields are excluded from the Field Set as they will always appear on the Create Milestones page by default.
The following fields are pre-selected within the Field Set and will be accessible from the Create Milestones page.
If you wish to add Custom Fields or remove any of the above pre-selected fields, you can do so by editing the fields included within the Field Set.
Milestone Budget:
This enables you to specify the dollar value (billable revenue) that will be generated as a result of delivering this Milestone. Note: The milestone budget amount will be used for Fixed Price Milestone billing projects in the event that an invoice amount has not been specified.
Unallocated Milestone Budget:
This is a formula field that calculates ‘Milestone Budget’ – ‘Hours Scheduled Value (Billable)
A Validation Rule is available on the Action Object that will prevent an Action from being saved if the Project’s Billing Type is ‘Fixed Price’ and the Action’s ‘Hours Scheduled Value (Billable)’ exceed the ‘Unallocated Milestone Budget’.
Note, this Validation Rule is set to Disabled by default. If you want to utilise this feature, you will need to edit the Validation Rule ‘Exceed_Milestone_Budget’ and set the Active Checkbox to TRUE.
Milestone Deadline
A Date field allows clients to specify the date that the Milestone must be delivered by. The current ‘Start Date’ and ‘End Date’ values on the Milestone are driven by the earliest Start Date and latest End Date of all child Action records.
This Milestone Deadline field can be set and used in conjunction with a Validation Rule to prevent users from setting the End Date on an Action record beyond the Milestone Deadline.
Note, this Validation Rule is set to Disabled by default. If you want to utilise this feature, you will need to edit the Validation Rule ‘End_Date_Exceeds_Milestone_Deadline’ and set the Active Checkbox to TRUE.
The Milestone Deadline can be plotted onto the Gantt Chart as a pink diamond as shown below.

Milestone Deadline Name
You are able to specify a meaningful description that can be associated to a Milestone Deadline. This description can be entered in the ‘Milestone Deadline Name’ field on the Milestone.
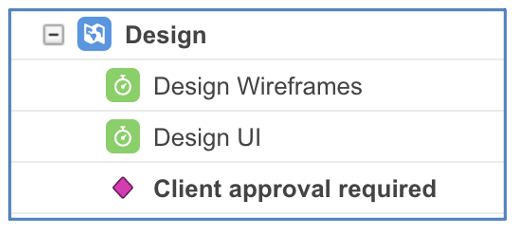
If this field is populated, this description will be displayed on the Milestone Deadline row of the Gantt Chart as shown above.
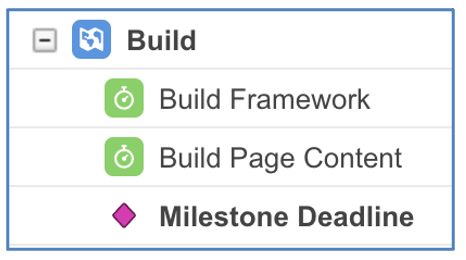
If this field is empty, a generic ‘Milestone Deadline’ description will be displayed on the Milestone Deadline row of the Gantt Chart as shown above.
When creating an Action, you need to associate it to a Milestone and fill in the relevant details, including:
Note: When creating Actions, you are able to specify the Start Date and End Date manually. Alternatively, you can specify the Start Date and the Working Days. When specifying the Working Days, the End Date will be calculated automatically taking into account Business Hours Settings, Holidays (Individual, Team and Global) as well as non-working days specified on the Role’s ‘Role Hours’ records.
The ‘Create Actions’ page is accessible from the Project & Milestone Page Layouts. You access it by clicking the ‘Create Actions’ button, as highlighted below.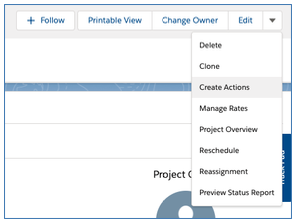
This page enables you to quickly create multiple Actions for one Project, including adding Contributors and Checklist Items. You are also able to edit existing Actions if you need to make changes in bulk.
When you initially load the Create Actions page, you’ll have one draft record ready to complete, as illustrated below.
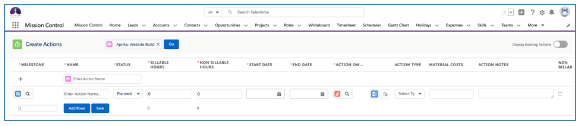
You can add multiple draft rows by entering the number of rows you wish to add and click the ‘Add Row(s)’ button.
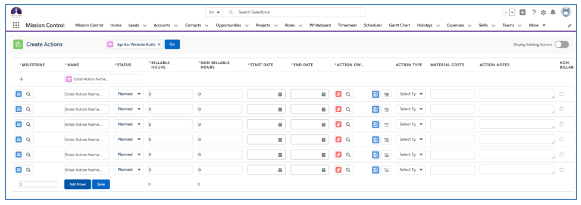
Alternatively, you can use the ‘Quick Add’ feature at the top of the page, which will add the new Action to the bottom of the list.

Once you have completed the required information for all of the Actions, click the Save button at the bottom of the page.
Page Features
Display Existing Actions
In the top right corner of the page, you can toggle on / off the ability to view and edit Existing Actions. If this is toggled on, all existing Actions will be displayed to enable you to make changes as required.
![]()
Note: The maximum number of Actions supported is 200. When editing existing records from the ‘Create Actions’ page if there are too many Actions that causes this limit to be exceeded, you can access it from the Milestone record, allowing you to edit existing Actions relating to a particular Milestone within a Project.
Resource Assignment Wizard
You can access the Resource Assignment Wizard by clicking the ![]() icon. This will allow you to search for available Roles, and assign the Action Owner and Contributors.
icon. This will allow you to search for available Roles, and assign the Action Owner and Contributors.
Checklist Item Manager
You can access the Checklist Item Manager to add new, or edit existing Checklist Items by clicking the ![]() icon.
icon.
Multi Line Editing
You are able to apply edits to multiple lines on the Create Actions page at the same time. Click the checkbox at the top of the page, or selecting the checkbox for the individual rows you wish to edit, as shown below.
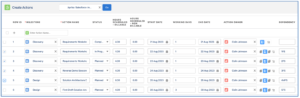
Applying an edit to one of the selected rows will apply the same change to all of the selected rows. For example, in the image below the User has selected rows 2, 3, 4 and 5.
![]()
The User adjusts the Action Owner of row 2, and the same change is automatically applied to rows 3, 4 and 5.
Copy Action Owner
The copy icon located to the right of the Action Owner field on the Create Actions page enables you to copy the Action Owner from the row above to the selected row.
For example, in the image below, row 1 has Mick Fanning specified as the Action Owner. If Mick is also required to be the Action Owner of the Action on row 2, the User can click the icon to copy the value from row 1, rather than having to use the lookup functionality.
Note: clicking this icon will not work in conjunction with the multi-line edit functionality.
Copy Contributors
The copy icon located to the right of the Resource Assignment Wizard icon on the Create Actions page enables you to copy the Contributors from the row above to the selected row.
For example, in the image below, row 11 has Contributors assigned to support the Action Owner. If the same Roles are required as Contributors for the Action on row 12, the User can click the icon to copy the Contributors and their hours contribution from row 11, rather than having to use the Resource Assignment Wizard.
![]()
Note: clicking this icon will not work in conjunction with the multi-line edit functionality. It will only be displayed if the Action above has contributors.
Custom Fields
You are able to add up to 5 x Custom Fields on the Create Actions page. To add Custom Fields to the page, you will need to select the fields within the ‘Create Actions Page Settings’ Tile on the Control Pad of the Mission Control Console, as shown below.

These fields will appear between the ‘Action Notes’ and ‘Non Billable’ fields.
By default, the following fields are available on the Create Actions page:
Custom Override of Fields
The ‘Create Actions Page Settings’ Tile on the Control Pad of the Mission Control Console enables you to specify up to 5 x Custom Fields to be included on the Create Actions page.
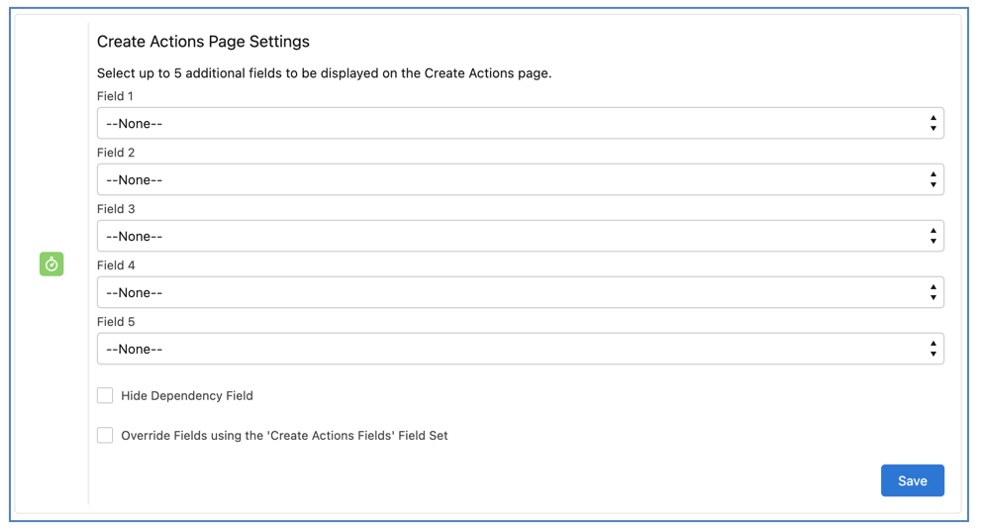
However, for Customers that want to add more Custom Fields and/or remove any of the default standard Fields, a Field Set is available on the Action Object called ‘Create Actions Fields’. When using this Field Set to control the page layout, you will need to add all of the required Fields to the Field Set.
Note, Milestone, Action Name and Action Owner are not available within the Field Set, as they will always be included on the page by default.
In addition to adding the Fields to the Field Set, you will need to set the ‘Override Fields using the ‘Create Actions Fields’ Field Set’ setting to TRUE within the ‘Create Actions Page Settings’ Tile on the Control Pad of the Mission Control Console.
The Dependency field visibility is not able to be controlled via the Field Set as it is not an actual field on the Object. As such, if you do not want this field to be included on the page layout, you will need to set the ‘Hide Dependency Field’ setting to TRUE within the ‘Create Actions Page Settings’ Tile on the Control Pad of the Mission Control Console.
The Action Contributors feature allows you to record multiple Roles against the one Action and to specify how many Billable and Non-Billable hours each of these Roles will contribute to the Action. Each action can have one Action Owner, multiple Action Contributors. Action Contributors can be added to an action using the Contributors related list of the action, or with the Resource Assignment Wizard. We will look at the Resource Assignment Wizard in the next section. To add Contributors to existing actions, go to the Action detail page and click the “New Contributor” button in the Contributors related list.
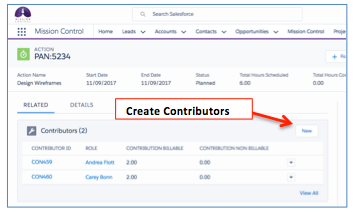
Select the Role for the Contributor and enter the Billable and Non Billable hours this Role will be contributing to the Actions completion and then Save.
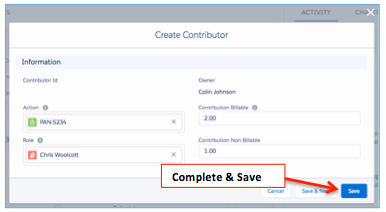
Any hours on the Action that are not assigned to Contributors will be assigned to the Action Owner.
Actions assigned to contributors will appear on the Timesheet and Scheduler for the Contributor.
On the Scheduler, the action will appear as separate actions for each Contributor, however only the master Action can be rescheduled and all Contributor Actions will be rescheduled accordingly.
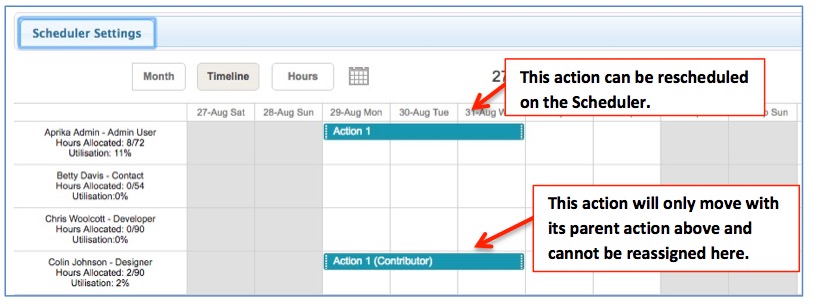
The Resource Assignment Wizard is a unique feature of Mission Control that not only allows you to easily add Action Contributors when creating your Actions, but also gives you insight into the availability and Skill sets of your Roles so that you can best decide which Roles to utilise as Contributors and as the Action Owner. You can also unevenly distribute the hours across various days. The Wizard comprises of two tabs:
To use the Resource Assignment Wizard, go to your Project and click the “Create Actions” button. From here select the Milestone you are creating Actions for, enter the Action Name, Status and Billable and Non Billable Hours as well as Start and End Date and then click on the Resource Assignment Wizard Icon.
![]()
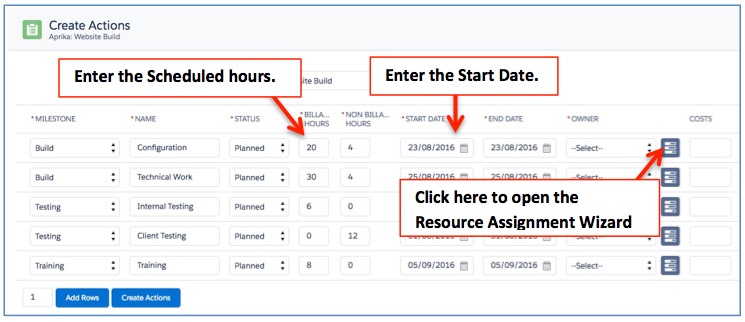
Note: You must at least enter the Start Date and Billable or Non Billable Hours before you can access the Resource Assignment Wizard.
Assignment Wizard
The Resource Assignment Wizard provides you with the ability to search for the most appropriate resources that can be assigned to an Action on a Project based on various parameters, including:
You can access the Resource Assignment Wizard from a number of pages, including:
To launch the Resource Assignment Wizard, click the ![]() icon.
icon.
Below is an illustration of the Resource Assignment Wizard:
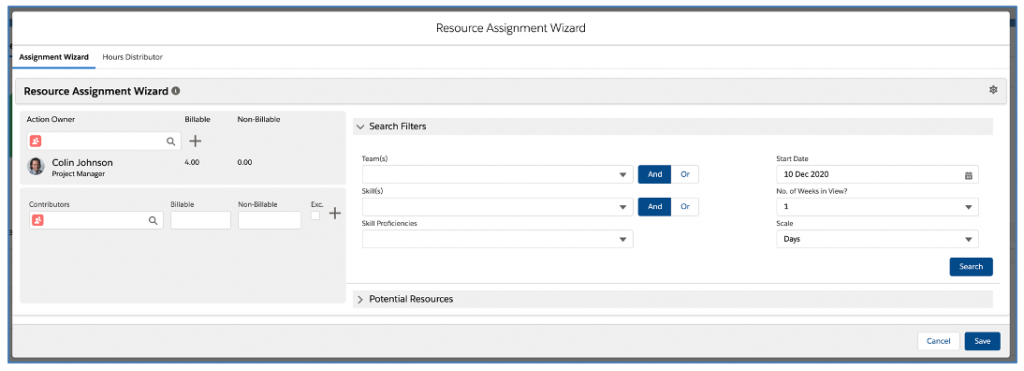
The sections on the left show the Action Owner and any Contributors, along with their hours allocation. The section on the right defaults to the ‘Search Filters’ feature that allows you to apply filters for the type of resource you require.
You can assign the Action Owner and / or Contributors by manually searching for them in the left sections, as shown below, or by dragging and dropping the appropriate resource from the list of Potential Resources into either the Action Owner zone or the Contributors zone.
Manually assigning an Action Owner
If you wish to quickly assign a Role as the Action Owner and you know who that will be, you can simply type their name in the lookup field within the Action Owner zone and click the + icon. In the example below, Chris Woolcott is the existing Action Owner and will be replaced with Colin Johnson.
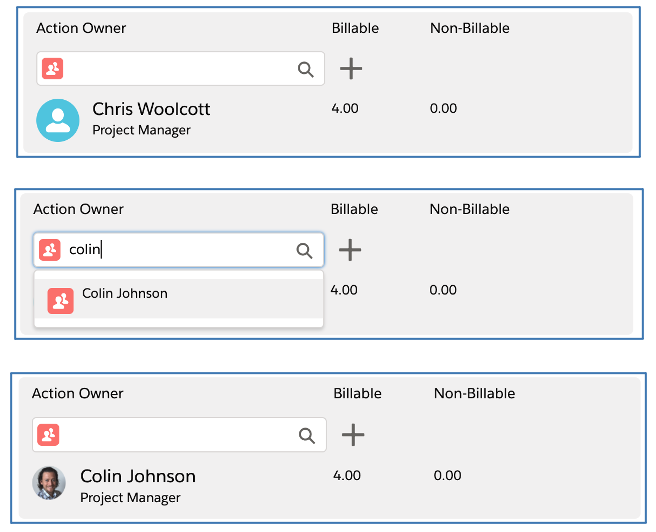
Once the new Action Owner has been assigned, click the Save button.
Manually assigning a Contributor
If you wish to quickly assign a Role as a Contributor and you know who that will be, you can simply type their name in the lookup field within the Contributors zone, enter their Billable / Non Billable contributions and indicate whether their contribution should be ‘Excluded from Billable Capacity, then click the + icon. Each Contributor will appear below the search fields and can be edited / deleted as required.
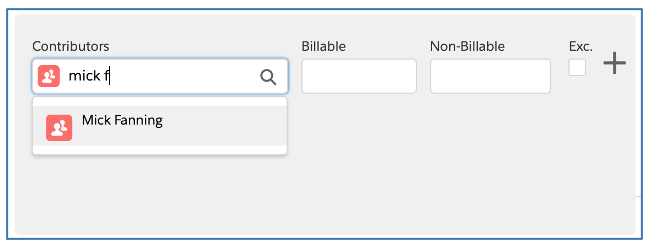
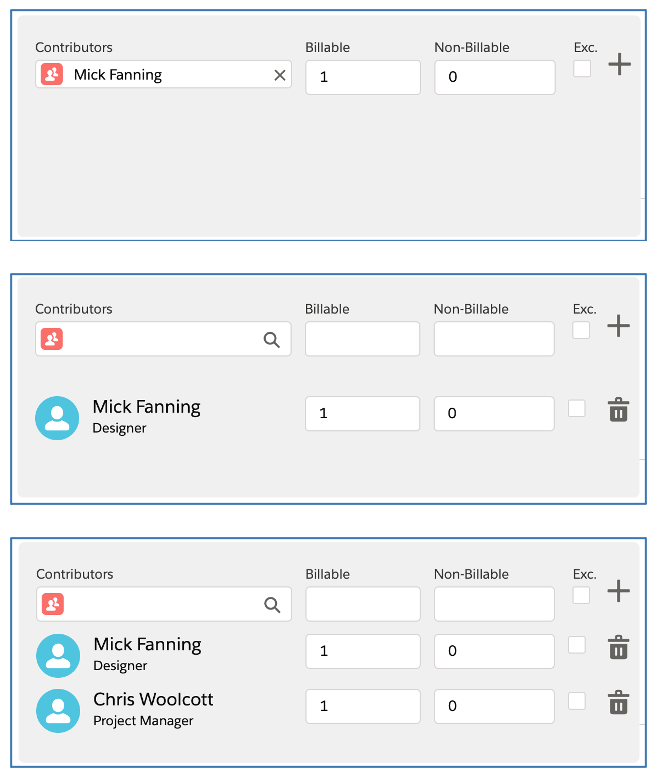
Once the new Contributors have been assigned, click the Save button.
Searching for Resources
If you do not know which resources you will be assigning to the Action, you can use the ‘Search Filters’ section to help apply filters to find a list of Potential Resources. Note, you can click Search without applying any filters and it will return the full list of active Roles.
Within the Search Filters, you can apply filters for Teams, Skills and Skill Proficiency levels. You’re also able to specify the number of weeks in view and what scale you would like to view.
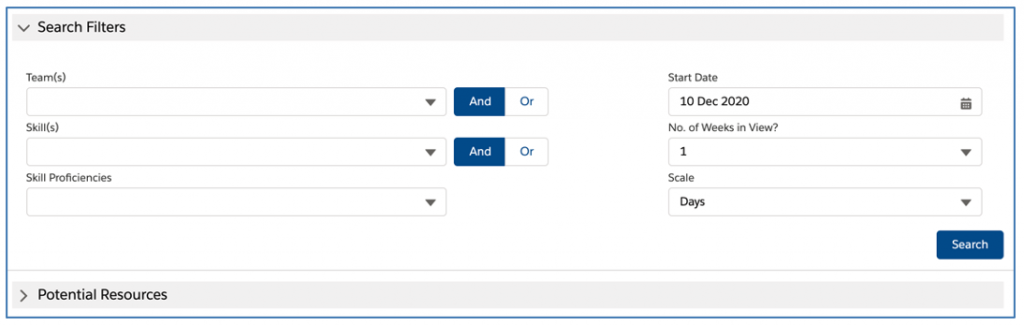
Once you’ve applied the required filters, click Search. At this point, the Search Filters section will collapse and you will see the Potential Resources section. If you need to adjust your filters, simply click on the Search Filters header and the Potential Resources will collapse, allowing you to make your changes and search again.
Potential Resources
Once you have clicked Search, you will see a list of ‘Potential Resources’ (matching your filter criteria if applied). For each Role, you will be able to see their real-time capacity based on existing allocation of work across other Projects.
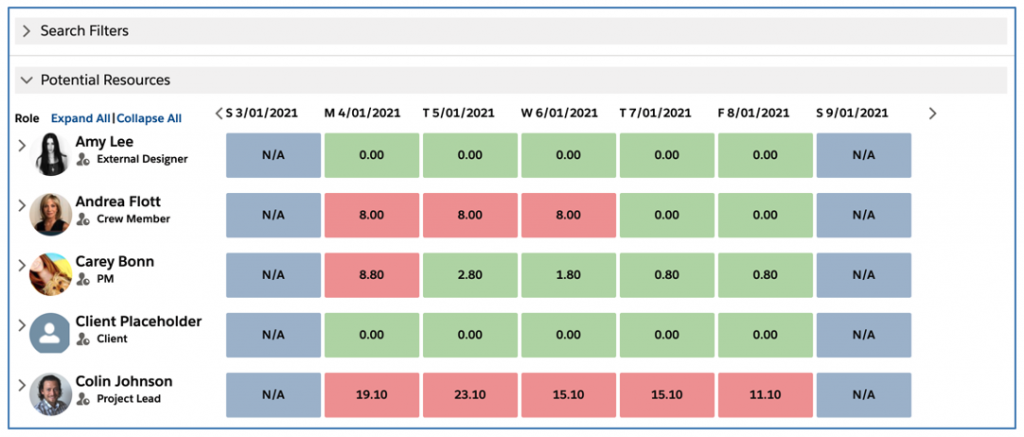
You can also drill down into a particular Role to view the breakdown of their hours to see whether they are Billable, Non Billable or Holiday hours.
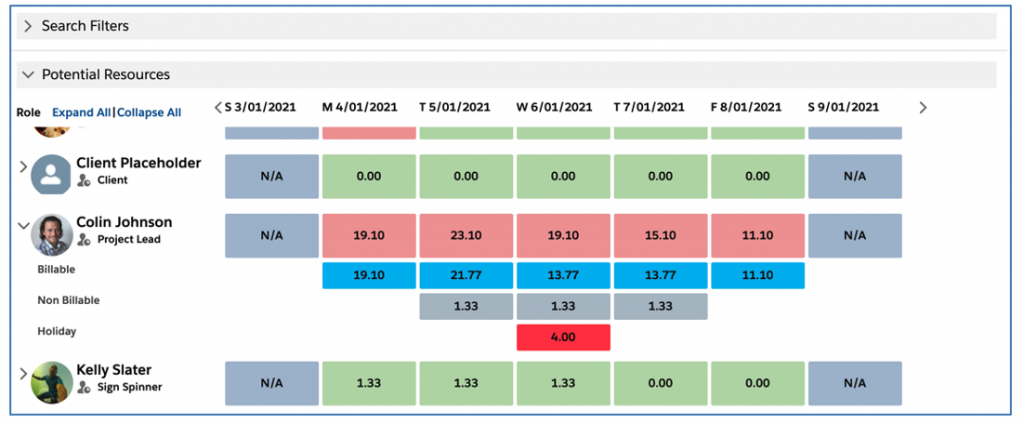
To find out which Projects the breakdown hours relate to, you can click onto the hours and a tooltip will display the Projects and Hours, as shown below.
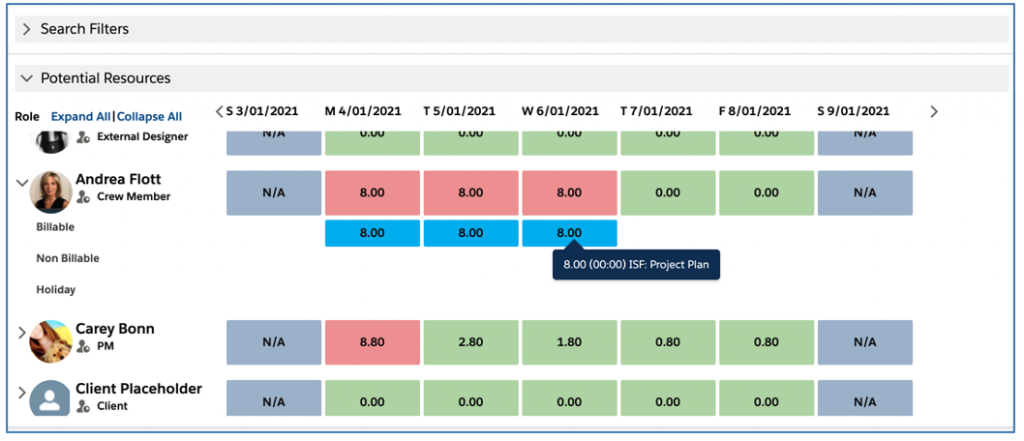
Once you’ve identified the Role that you wish to assign to the Action, you can drag them to either the Action Owner zone or the Contributors zone, as shown below.
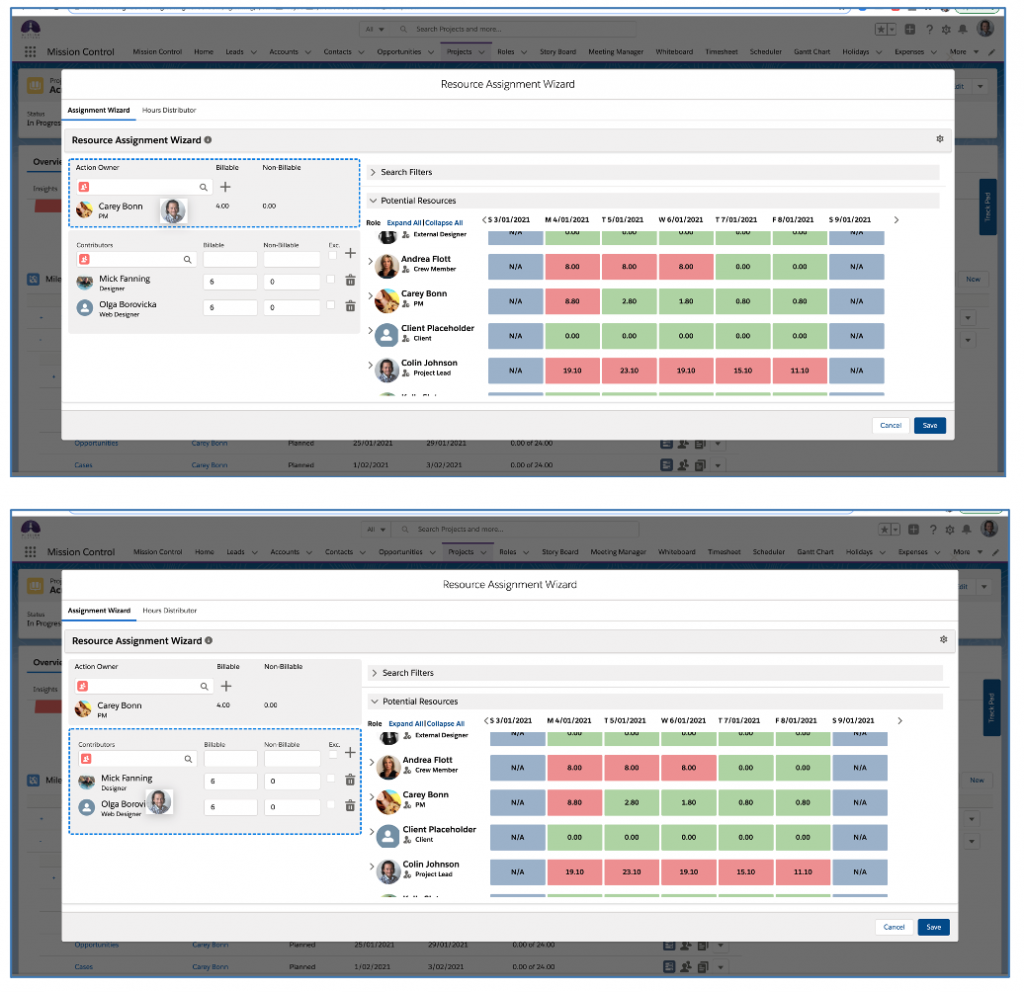
Mass assign Roles as Contributors
You can assign multiple Roles as Contributors via the Resource Assignment Wizard by using the select checkbox field next to each person’s Role record, as shown below.
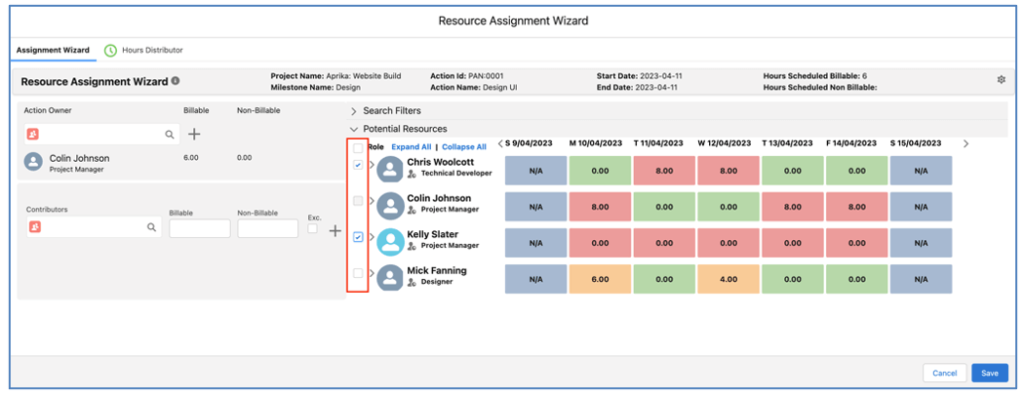
For example, if I want to assign both Chris and Kelly as Contributors on an Action, I don’t need to drag them both individually to the Contributors section. I can set their select checkbox field to TRUE and drag one of their Roles to the Contributors section.
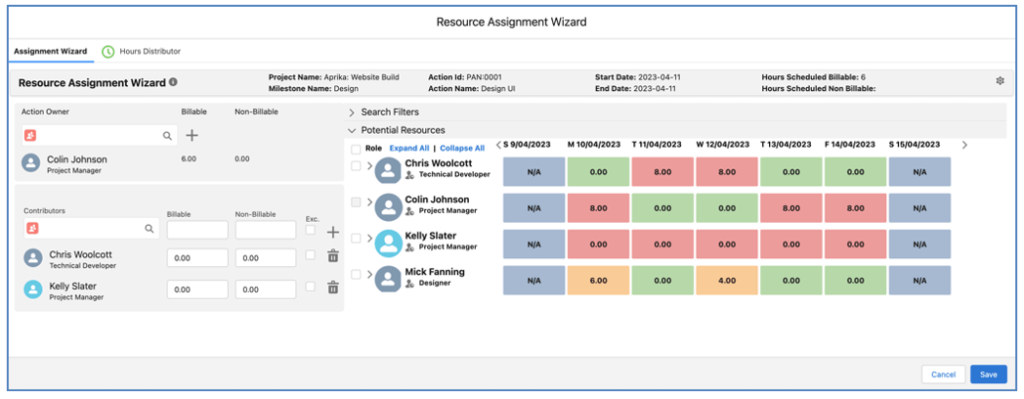
This will create Contributor records for each of the selected Roles, reducing the effort required to assign multiple Roles as Contributors.
Settings
You can use the Settings to customize the results of your searches, and how the data is displayed in the Potential Resources section. You access the Settings by clicking the ![]() icon in the top right of the Resource Assignment Wizard.
icon in the top right of the Resource Assignment Wizard.
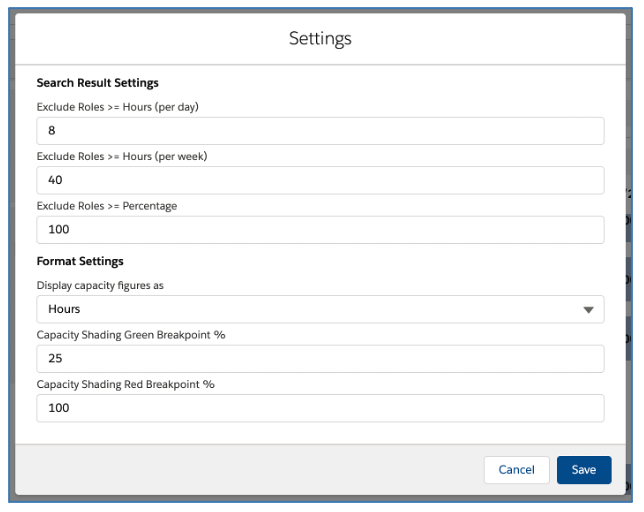
Exclude Roles >= Hours (per day)
This setting will be used to filter Roles from the Potential Resources list when the ‘Display capacity figures as’ setting is set to Hours and the Search Filters ‘Scale’ is set to Days.
Exclude Roles >= Hours (per week)
This setting will be used to filter Roles from the Potential Resources list when the ‘Display capacity figures as’ setting is set to Hours and the Search Filters ‘Scale’ is set to Weeks.
Exclude Roles >= Percentage
This setting will be used to filter Roles from the Potential Resources list when the ‘Display capacity figures as’ setting is set to Percentage.
Display capacity figures as
This setting lets you define whether you view the capacity of the Potential Resources as Hours or Percentage, below are illustrations of both views.
Hours (Day Scale)
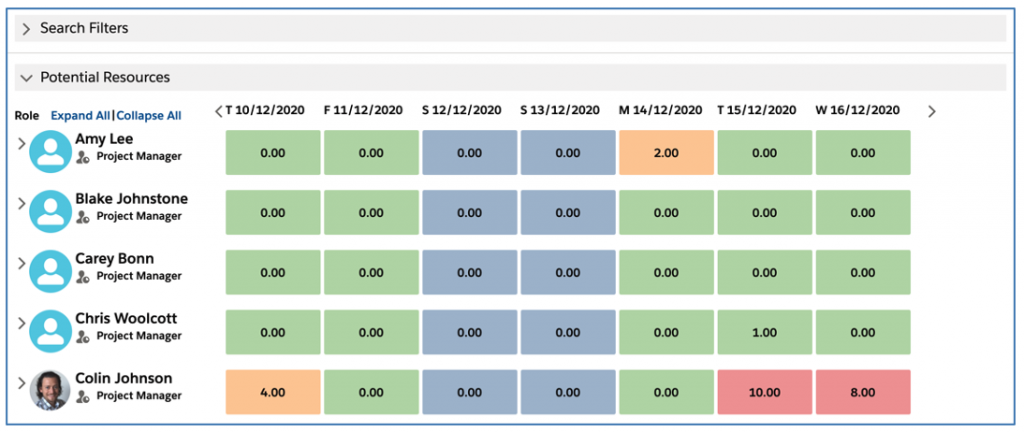
Hours (Week Scale)
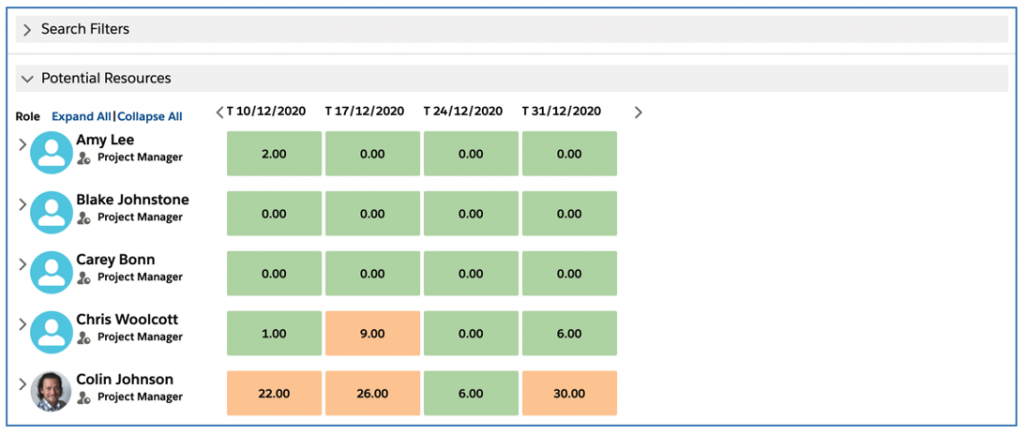
Percentage (Day Scale)
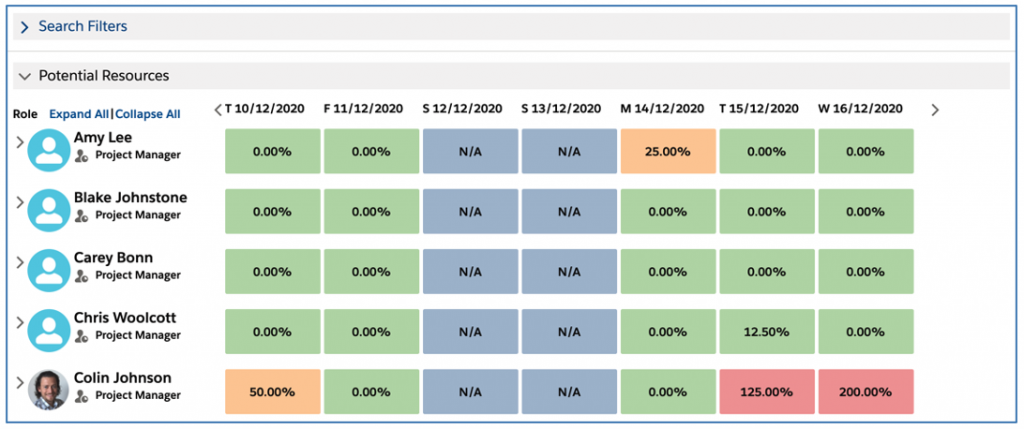
Percentage (Week Scale)
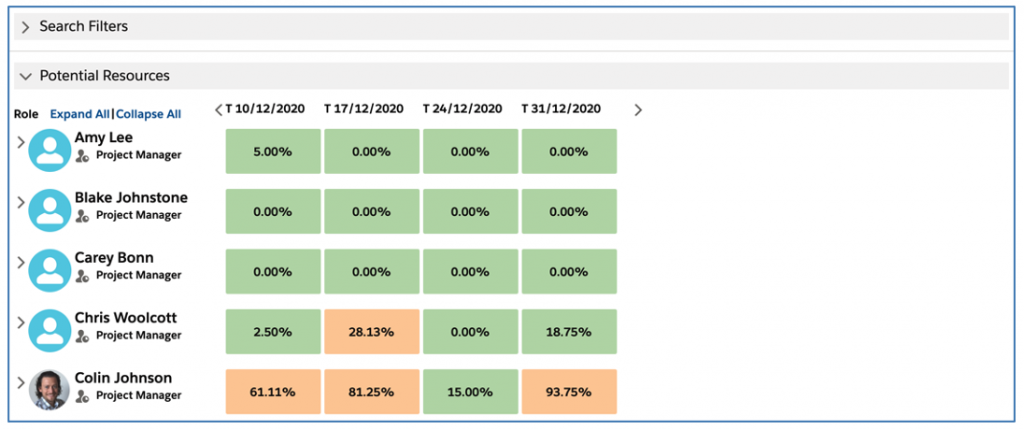
Capacity Shading Green Breakpoint %
This setting will define the breakpoint of the Hours / Percentage data that will result in the cell being shaded Green.
Capacity Shading Red Breakpoint %
This setting will define the breakpoint of the Hours / Percentage data that will result in the cell being shaded Red.
Include Events
This setting enables you to factor in Salesforce Events within the figures that show a Role’s availability.
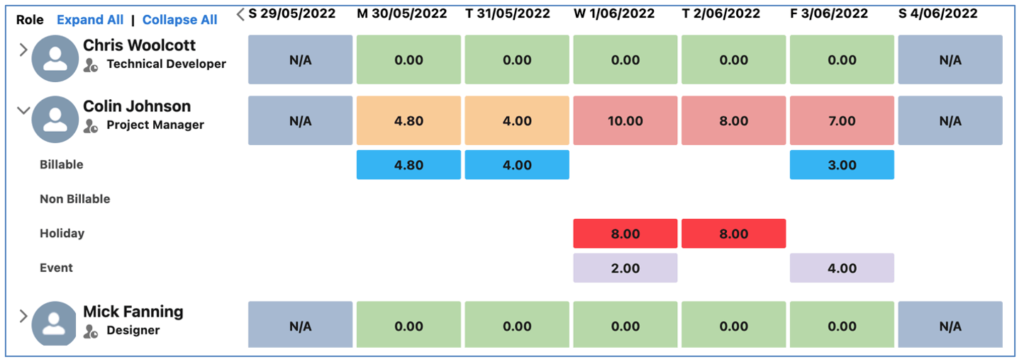
Include Role Forecast Hours
This setting enables you to include hours from Role Forecast records within the figures that show a Role’s availability.
When this setting is TRUE, the calculations for the hours / percentage figures within the ‘Potential Resources’ section of the Resource Assignment Wizard will include the hours from Role Allocation records related to Role Forecast records. These hours will be included in the Hours Summary and incorporated within the Billable and Non Billable values on the Hours Breakdown.
When the Include Forecast Hours setting is TRUE, the User will need to specify the source of hours in the ‘Action / Role Forecast Hours Source’ setting, selecting from the following options:
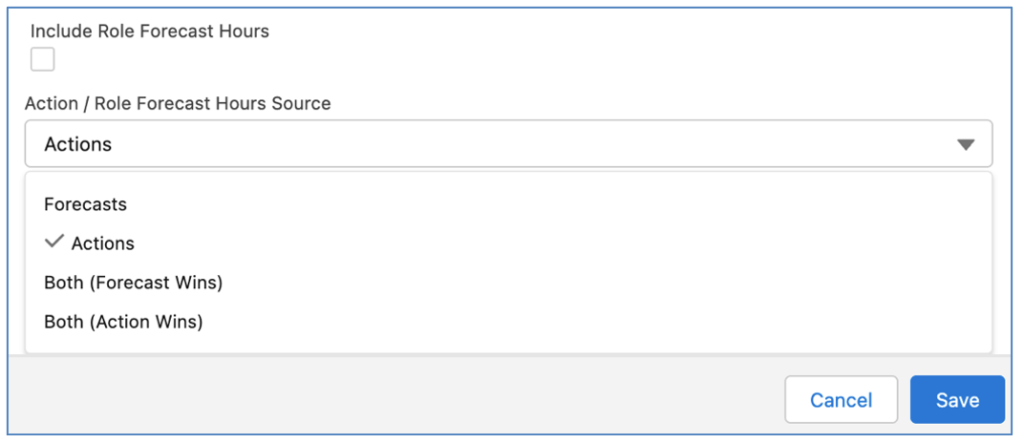
When the Include Forecast Hours setting is FALSE, the Role Forecast hours won’t be included (e.g. it will be considered the same as Actions only).
Include Contributor Dates
If you have a need to assign a Contributor to a specific date range within the Action’s Start Date and End Date period, you can set the Start Date and End Date on individual Contributor records.
By default, if you leave the Contributor Start Date and End Date fields empty, the system will assume the Contributor is being assigned to the Action for the entire duration based on the Action’s Start Date and End Date. In the example below, Colin is the Action Owner and Chris is a Contributor. The Action spans 5 days, and Chris’ Contributor record has no values in the Start Date and End Date fields. Therefore, he is assigned to the entire duration of the Action.

In the example below, whilst Colin as the Action Owner, will be working on the Design UI Action for the entire week, Mick is only required as a Contributor for 2 days. Therefore, the Start Date and End Date on Mick’s Contributor record have been set.
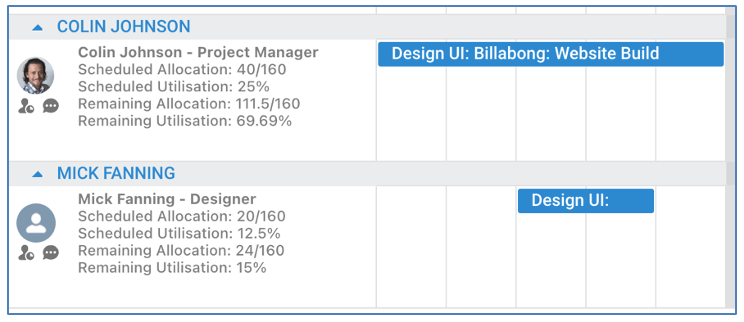
To set the Start Date and End Date of individual Contributor records, you will need to set the ‘Include Contributor Dates’ setting to TRUE within the Resource Assignment Wizard (RAW) Settings, as shown below.
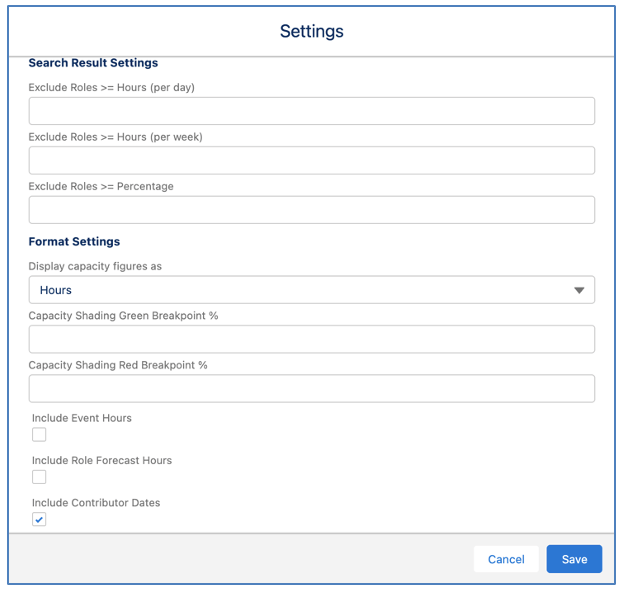
With this setting TRUE, the Start Date and End Date fields for each individual Contributor will be available within the RAW for you to specify manually as required.
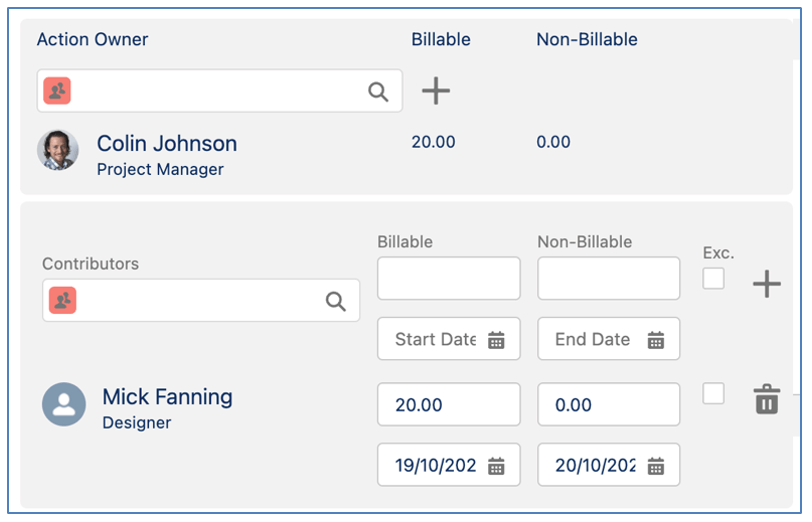
Dates are only required if you wish to control when a Contributor is assigned to an Action. If they are being assigned to the Action for the entire duration, the Contributor Start Date and End Date fields can be left empty.
A Validation Rule is included on the Contributor Object to ensure the Start Date and End Date of the Contributor fall within the Start Date and End Date range of the Action.
Pre-set Team / Skill Filters
There is a custom setting available within the Resource Assignment Wizard Settings that enables the Team and Skill filter parameters to be automatically populated.
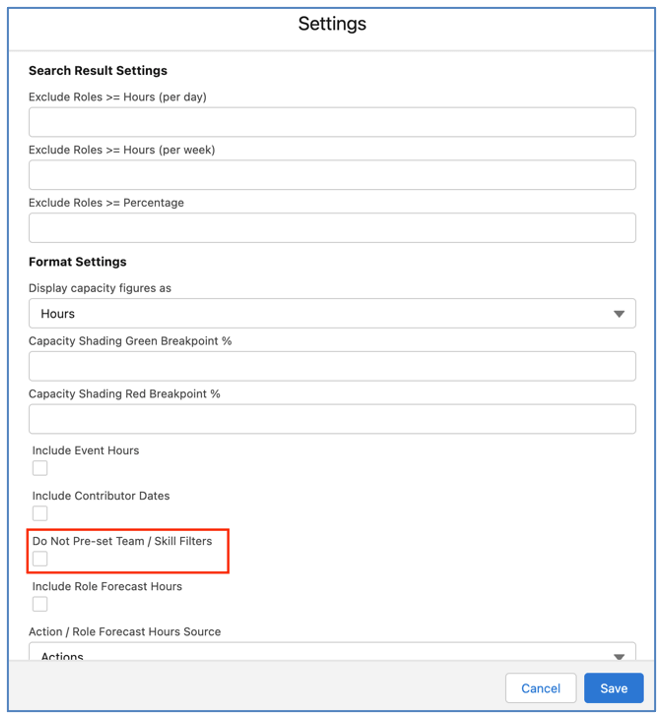
If this setting is FALSE, the Team and Skill filter parameters will be pre-populated with the following values:
Pre-populating these filter parameters enables Users to more rapidly search for Roles that have the attributes required to be assigned to the Action.
If this setting is TRUE, the Team and Skill search parameters will be left blank for the User to manually apply filters as required.
The ‘Hours Distributor’ feature enables you to manually control how the hours in the ‘Hours Scheduled – Billable’ and ‘Hours Scheduled – Non Billable’ fields are distributed between the working days of an Action or Holiday. By default, these hours fields are distributed evenly between the Start Date and End Date. For example, if an Action has a Start Date of Monday 3rd June and an End Date of Wednesday 5th June, and there are 12 hours scheduled to be done on the Action, then it will be assumed that 4 hours of work will be done on Monday, Tuesday and Wednesday. It is accessible in the following locations:
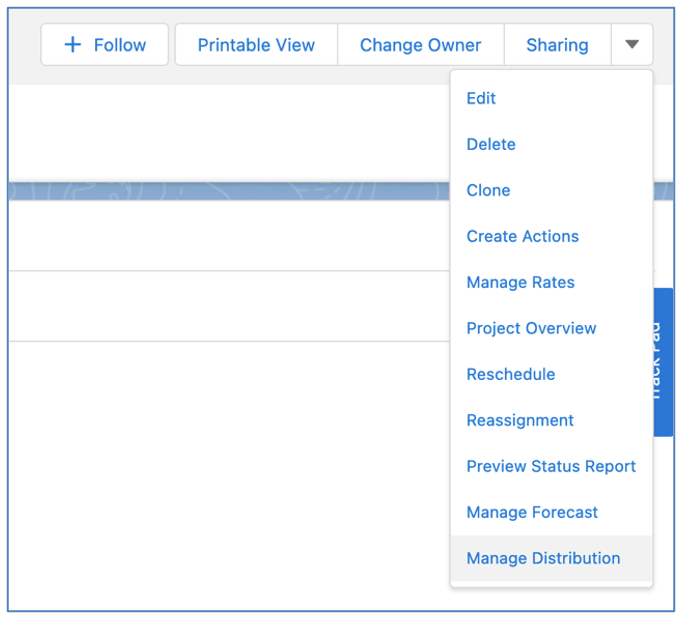
For each Object, it will be accessible via the ‘Manage Distribution’ button. For the Resource Assignment Wizard it is accessible from the ‘Hours Distributor’ Tab.
Projects
When accessing the Hours Distributor from the Project record, it will display Role Allocations relating to each Role / Action contained within the Project Plan.
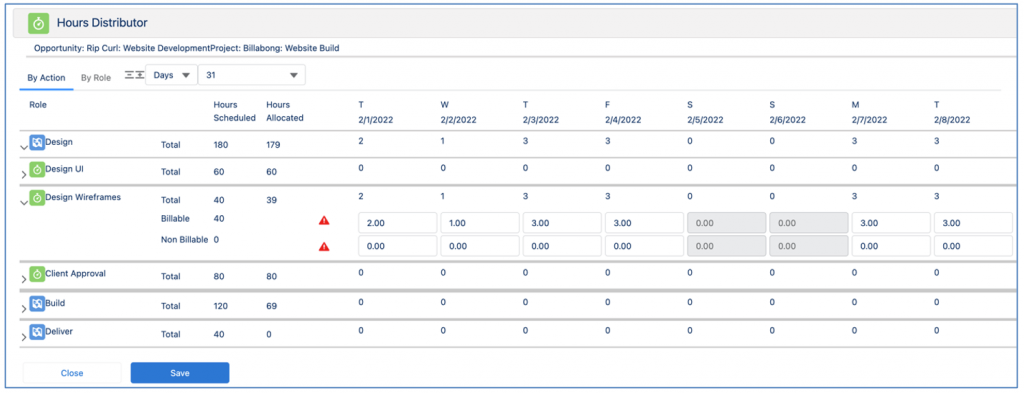
You are able to choose whether to view the data grouped by Action or by Role. When viewing the data by Action, you will see a data row for each Role that is assigned to the Action as either the Action Owner or Contributor. The Actions will be grouped by Milestone.
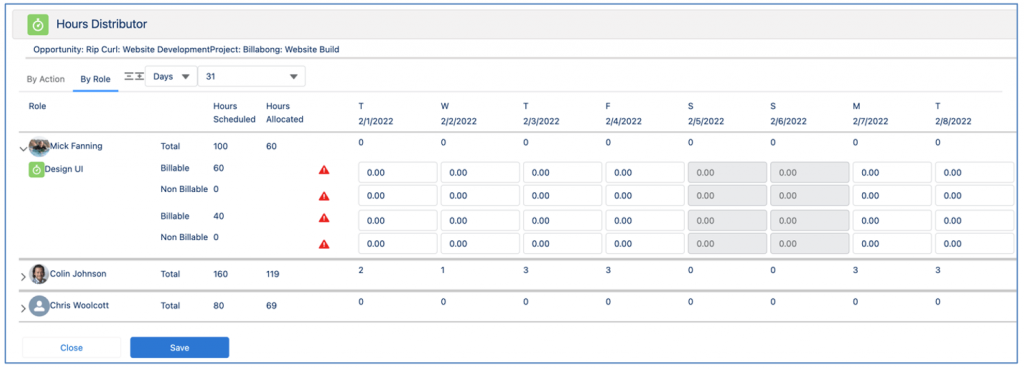
When viewing the data by Role, you will see a data row for each Action the Role is assigned to as either the Action Owner or Contributor.
Milestones
When accessing the Hours Distributor from the Milestone record, it will display Role Allocation records relating to each Role / Action relating to the Milestone.
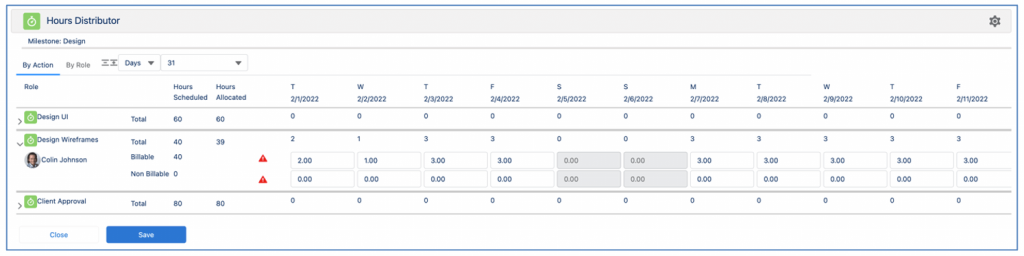
You are able to choose whether to view the data grouped by Action or by Role. When viewing the data by Action, you will see a data row for each Role that is assigned to the Action as either the Action Owner or Contributor.
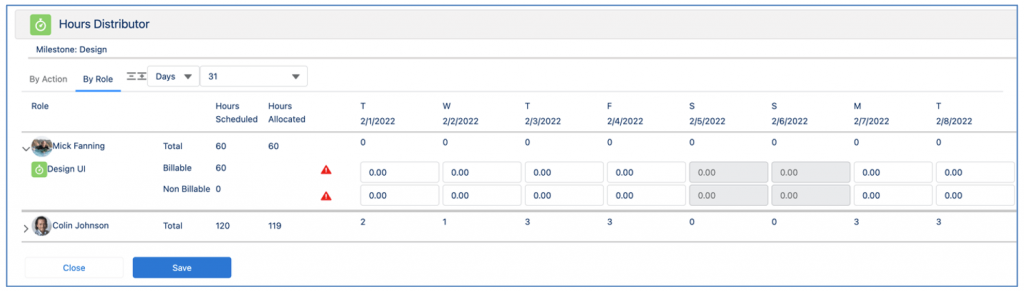
When viewing the data by Role, you will see a data row for each Action the Role is assigned to as either the Action Owner or Contributor.
Actions
When accessing the Hours Distributor from the Action record, it will display Role Allocation records relating to each Role assigned to the Action.
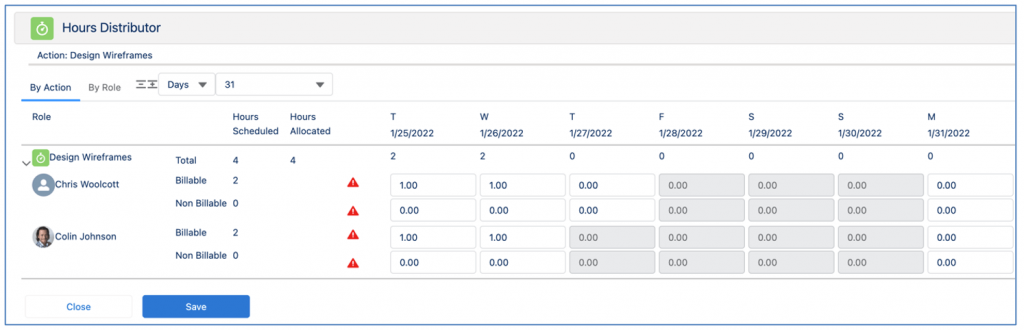
Resource Assignment Wizard
You are able to access the Hours Distributor from within the Resource Assignment Wizard. This provides the same functionality that is available when accessing it from an individual Action record.
Holidays
You can utilise the Hours Distributor on a Holiday record to create Role Allocation records. This enables you to distribute the hours across the days. For example, a person may be taking 12 hours of PTO across a 2 day period. Rather than it being evenly distributed with 6 hours per day, it may be that 4 hours are for day 1 and 8 hours for day 2. Another example may be where a person is taking PTO from Friday through to Tuesday, but it only requires 2 days (e.g. Friday and Tuesday, as Monday is a Public Holiday). In this scenario, you are able to distribute the 16 hours on Friday (8 hours) and Tuesday (8 hours).
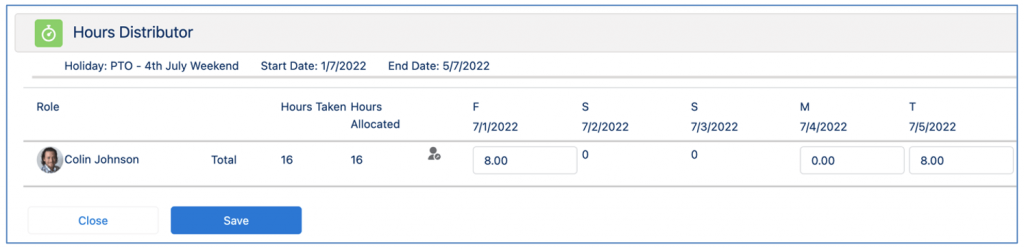
Note: The Hours Distributor should only be used for Holidays that relate to an individual Role.
Roles
When accessing the Hours Distributor from a Role record, it will display Role Allocation records assigned to the Role across multiple Projects and Opportunities. As such, it the Role Allocation records may be related to an Action or a Role Forecast. You will be able to select a specific date range (e.g. view all Role Allocations assigned to Mick Fanning for the next two weeks).
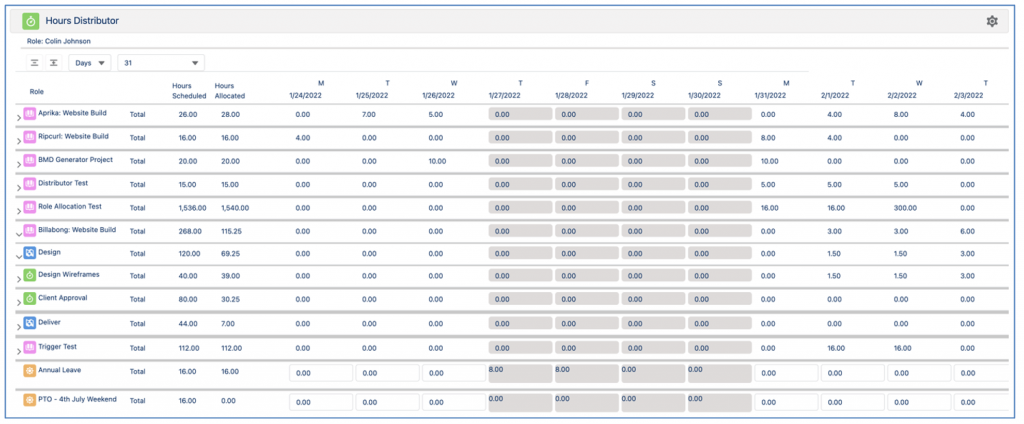
In addition to Role Allocation records relating to Actions and Role Forecasts, this view will also show Role Allocations assigned to Holidays and provide a capacity summary at the bottom to easily identify any potential bottlenecks.
Adjust Start Date & End Date
When a Role Allocation record is created or edited with Total Hours Scheduled greater than zero, and it is before the existing Start Date of the Action, Contributor or Role Forecast that it relates to, the Start Date and Working Days fields of the parent record (e.g. Action, Contributor or Role Forecast) will be adjusted to be based on the date from the Role Allocation record.
When a Role Allocation record is created or edited with Total Hours Scheduled greater than zero, and it is after the existing End Date of the Action, Contributor or Role Forecast that it relates to, the End Date and Working Days fields of the parent record (e.g. Action, Contributor or Role Forecast) will be adjusted to be based on the date from the Role Allocation record.
Clear All Values
When distributing hours on the ‘Manage Forecast’ or ‘Manage Distribution’ Component, you can use the ![]() icon to clear all existing Role Allocation field entries.
icon to clear all existing Role Allocation field entries.
![]()
When you click this icon, it will reset all fields to 0 if they are currently greater than 0. This enables Users to restart the manual distribution and gradually build up the allocation as they enter values into the individual Role Allocation fields.
Redistribute Remaining Hours
When distributing hours on the ‘Manage Distribution’ Component in relation to Actions, you can use the ![]() icon to redistribute hours from historical dates where the Role Actual does not match the Role Allocation.
icon to redistribute hours from historical dates where the Role Actual does not match the Role Allocation.
![]()
This function can be carried out for an individual row of data being displayed on the ‘Manage Distribution’ Component by clicking the icon within that row. Alternatively, if you wish to carry this function out for all rows being displayed, you can click the master icon located in the top right.
When you click the icon, the sum of hours remaining for any Role Allocation with a Date less than Today will be redistributed across the remaining Role Allocations between Today and the End Date. Specifically, the following functions will be carried out:
Redistribute Remaining Hours Automatically
On the Hours Distributor, you are able to manually reschedule remaining hours. This is achieved by clicking the icon below, either for individual rows or for all rows of data being displayed.
![]()
To remove the need to manually carry out this task for each of your active projects, you are able to schedule this process to occur automatically on a daily basis. This is scheduled by enabling the below feature within the ‘Role Allocation Automation Settings’ Tile on the Control Pad of the Mission Control Console.

To enable the feature, set the Checkbox to TRUE, select a Run Time and click the Save button within the ‘Role Allocation Automation Settings’.
This process will then run daily at the time specified and will carry out the updates for all Projects that meet the following criteria:
The automated process will carry out the same updates that take place when the icon is clicked manually, which include:
The sum of hours remaining for any Role Allocation with a Date less than Today will be redistributed across the remaining Role Allocations between Today and the End Date. Specifically, the following functions will be carried out:
When Role Allocations are adjusted via the redistribution process, the ‘Manually Allocated’ field on the parent Action record will be set to TRUE.
Hours Distributor Distribution Rules
When modifying Action records, a User may amend key fields that will require related Role Allocation records to be modified. The table below summarises the distribution rules that will be applied to each scenario based on whether the Role Allocation records are evenly distributed or manually distributed.
Modification Scenario | Even Distribution | Manual Distribution |
Start Date is brought forward to start earlier | Create additional Role Allocation records for working days being added to the duration and evenly redistribute the hours across all of the Role Allocation records | Create additional Role Allocation records for the working days being added to the duration and set them to 0 hours, the User will manually distribute as required |
Start Date is moved back to start later | Delete the Role Allocation records for the outgoing days, if they have no related Role Actual records. If they do have related Role Actuals, set Hours Scheduled to 0. Redistribute the hours across the Role Allocation records for the days between the new Start Date and End Date | Delete the Role Allocation records for the outgoing days if they have no related Role Actual records. If they do have related Role Actuals, set the Hours Scheduled to 0. The User will then manually distribute the hours across the remaining Role Allocation records. |
End Date is brought forward to start earlier | Delete the Role Allocation records for the outgoing days, if they have no related Role Actual records. If they do have related Role Actuals, set the Hours Scheduled to 0. Redistribute the hours from the Role Allocation records between Today and the original End Date across the Role Allocation records for the days between Today and the new End Date | Delete the Role Allocation records for the outgoing days, if they have no related Role Actual records. If they do have related Role Actuals, set the Hours Scheduled to 0. The User will then manually distribute the hours across the remaining Role Allocation records. |
End Date is moved back to start later | Create additional Role Allocation records for working days being added to the duration and evenly redistribute the hours from the Role Allocation records between Today and the original End Date across all of the Role Allocation records from Today through to the new End Date | Create additional Role Allocation records for the working days being added to the duration and set them to 0 hours. The User will then manually distribute as required. |
Start Date and End Date both moved by the same number of working days but Start Date still occurs before the original End Date | Delete the Role Allocation records for the outgoing days, if they have no related Role Actual records. If they do have related Role Actuals, set the Hours Scheduled to 0. Create additional Role Allocation records for working days between the new Start Date and End Date that don’t already have an existing Role Allocation and evenly redistribute the hours across all of the Role Allocation records between the new Start Date and End Date. | Delete the Role Allocation records for the outgoing days, if they have no related Role Actual records. If they do have related Role Actuals, set the Hours Scheduled to 0. Create new Role Allocation records as needed. Mirror the original Role Allocation hours across all current Role Allocation records (for example the hours scheduled for Day 1 of the original date range will be scheduled to Day 1 of the new date range). |
Start Date and End Date both brought forwards (e.g. to start early) in time by the same number of days but End Date still occurs later than the original Start Date | Delete the Role Allocation records for outgoing days, if they have no related Role Actual records. If they do have related Role Actuals, set the Hours Scheduled to 0. Create additional Role Allocation records for working days between the new Start Date and End Date that don’t already have an existing Role Allocation and evenly redistribute the hours across all of the Role Allocation records between the new Start Date and End Date. | Delete the Role Allocation records for the outgoing days, if they have no related Role Actual records. If they do have related Role Actuals, set the Hours Scheduled to 0. Create new Role Allocation records as needed. Mirror the original Role Allocation hours across all current Role Allocation records (for example the hours scheduled for Day 1 of the original date range will be scheduled to Day 1 of the new date range). |
Start Date and End Date both moved by the same number of days and no overlap exists with the existing date range | Delete the Role Allocation records for the outgoing days, if they have no related Role Actuals. If they do have related Role Actuals, set the Hours Scheduled to 0. Create additional Role Allocation records for working days between the new Start Date and End Date that don’t already have an existing Role Allocation and evenly redistribute the hours across all of the Role Allocation records between the new Start Date and End Date | Delete the Role Allocation records for the outgoing days, if they have no related Role Actual records. If they do have related Role Actuals, set the Hours Scheduled to 0. Create new Role Allocation records as needed. Mirror the original Role Allocation hours across all current Role Allocation records (for example the hours scheduled for Day 1 of the original date range will be scheduled to Day 1 of the new date range). |
Hours Scheduled – Billable or Hours Scheduled – Non Billable is increased | Additional hours are split evenly across Role Allocation records for the Action Owner from Start Date or Today (whichever is later) through to End Date | No changes will be made, the User will manually distribute the change |
Hours Scheduled – Billable or Hours Scheduled – Non Billable is increased after the Start Date has passed | Additional hours are split evenly across Role Allocation records for the Action Owner from Today through to End Date | No changes will be made, the User will manually distribute the change |
Hours Scheduled – Billable or Hours Scheduled – Non Billable is decreased | The reduction in hours is evenly removed from each Role Allocation record from the Start Date or Today (whichever is greater) through to the End Date. The hours will only reduce down to 0, they will not be put into a negative. | No changes will be made, the User will manually distribute the change |
Hours Scheduled – Billable or Hours Scheduled – Non Billable is decreased after the Start Date has passed | The reduction in hours is evenly removed from each Role Allocation record from the Today through to the End Date. The hours will only reduce down to 0, they will not be put into a negative. | No changes will be made, the User will manually distribute the change |
Action Owner is changed | Delete the Role Allocation records for the outgoing Action Owner, if they have no related Role Actual records. If they do have related Role Actuals, set the Hours Scheduled to 0. Create Role Allocation records for the new Action Owner, calculated by the different between Hours Scheduled on the Action and the sum of hours already allocated to existing Contributor records. | For any Role Allocation records from Today through to the End Date, if there are no related Role Actual records, reassign the Role Allocation record to the new Action Owner. If there are related Role Actuals, set the Hours Scheduled to 0 and create new Role Allocation records for the new Action Owner with the Hours Scheduled that were assigned to the original Action Owner. |
Contributor is added | Create Role Allocation records for the Contributor, splitting the hours evenly across each remaining day from Today through to the End Date. Update Role Allocation records for the Action Owner, calculated by the difference between Hours Scheduled on the Action and the sum of hours already allocated to the Contributor records. | If existing Role Allocation records exist for any Role relating to the Action have been manually overridden, create Role Allocation records for the Contributor, splitting the hours evenly across each remaining day from Today or Start Date (whichever is later) through to End Date. The User will need to manually adjust the Role Allocation records as required. |
Contributor is deleted | Delete the Role Allocation records for the Contributor, if they have no related Role Actual records. If they do have related Role Actuals, set the Hours Scheduled to 0. Update the Role Allocation records for the Action Owner, calculated by the different between Hours Scheduled on the Action and the sum of hours already allocated to the remaining Contributor records. | Delete the Role Allocation records for the Contributor, if they have no related Role Actual records. If they do have related Role Actuals, set the Hours Scheduled to 0. The User will need to manually adjust the Role Allocation records as required. |
Contributor is changed from one Role to another Role | Delete the Role Allocation records for the outgoing Contributor, if they have no related Role Actual records. If they do have related Role Actuals, set the Hours Scheduled to 0. Create Role Allocation records for the new Contributor, evenly distributing the hours from Today through to End Date. | For any Role Allocation records from Today through to the End Date, if there are no related Role Actual records, reassign the Role Allocation record to the new Contributor. If there are related Role Actuals, set the Hours Scheduled to 0 and create a new Role Allocation record for the new Contributor with the Hours Scheduled that were assigned to the original Contributor. |
Contributor hours within Contribution Billable or Contribution Non Billable are increased | Additional hours split evenly across Role Allocation records for the Contributor from Today through to End Date. | No changes will be made, the User will manually distribute the change |
Contributor hours within Contribution Billable or Contribution Non Billable are decreased | Reduction in hours will be evenly removed from each Role Allocation record for the Contributor from Today through to End Date. The hours will only reduce down to 0, they will not be put into a negative. | No changes will be made, the User will manually distribute the change |
Checklist Items are individual items that need to be ‘ticked off’ as part of delivering an Action. The Checklist will serve as a simple ‘To Do’ list of items that you can mark as complete. For example, if you have an Action to deliver training for a client, your Checklist Items might include:
You can add notes to any Checklist Item as well as identify the person that will be responsible for it, and whether it has been completed for not. You can create Checklist Items directly from the Action Detail Page using the ‘Related List’.
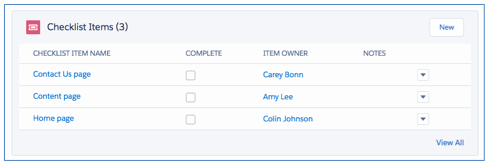
You can also create Checklist Items when using the ‘Create Actions’ page and on the Whiteboard. To create Checklist Items you need to click the Checklist Item icon as per the below illustrations.
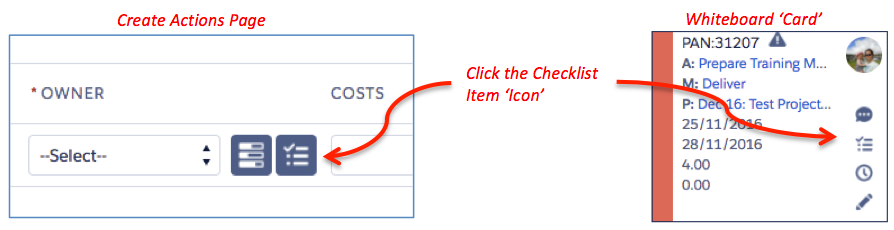
You will then be presented with the ability to add a new Checklist Item as per the screenshot below. You can fill in the Name, Owner and Notes and click the tick sign to confirm.
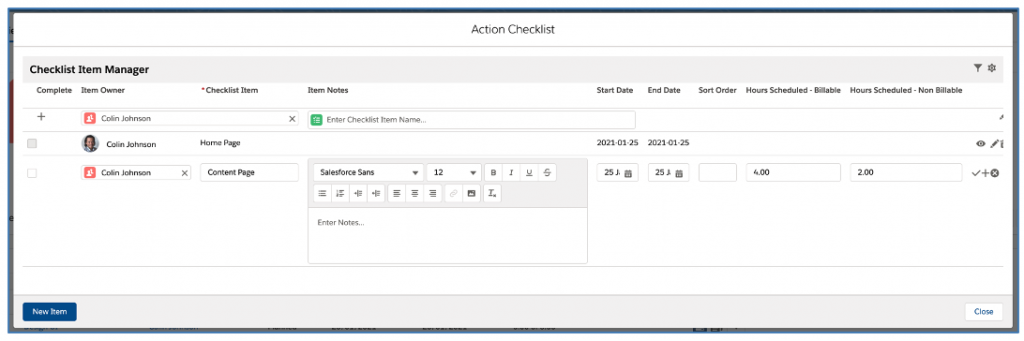
You are also able to add the ‘Checklist Item’ Tab to your menu navigation to access the Object’s home page. This will enable you to access List Views of your Checklist Items and manage them all from one place.
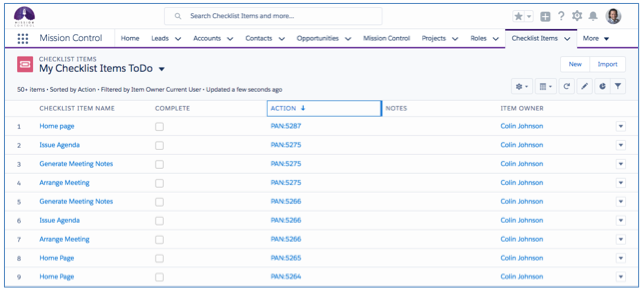
Create Multiple Checklist Items
The ‘Create Checklist Items’ page enables you to create multiple Checklist Items for one Project. You are also able to edit existing Checklist Items if you need to make changes in bulk.
The page is accessible from the Project, Milestone & Action Page Layouts. You access it by clicking the ‘Create Checklist Items’ button, as highlighted below.

When you initially load the Create Checklist Items page, you’ll have one draft record ready to complete, as illustrated below.

You can add multiple draft rows by entering the number of rows you wish to add and click the ‘Add Row(s)’ button.
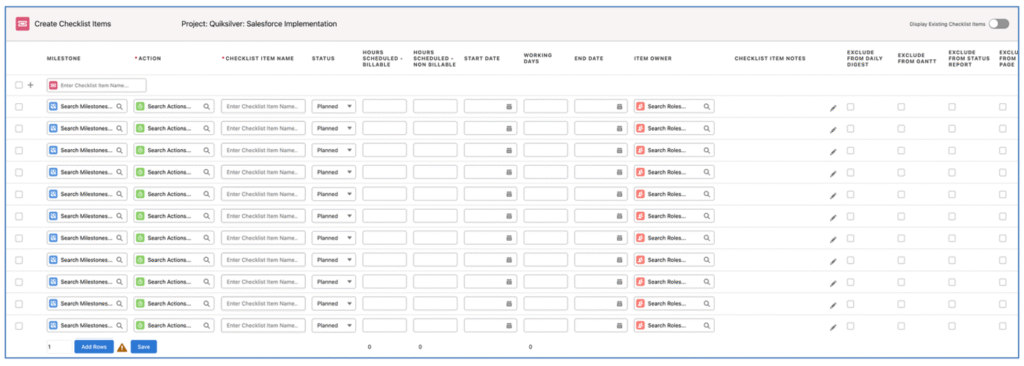
Alternatively, you can use the ‘Quick Add’ feature at the top of the page, which will add the new Checklist Item to the bottom of the list.

Once you have completed the required information for all of the Checklist Items, click the Save button at the bottom of the page.
Page Features
Display Existing Checklist Items
In the top right corner of the page, you can toggle on/off the ability to view and edit Existing Checklist Items. If this is toggled on, all existing Checklist Items will be displayed to enable you to make changes as required.

Note: The maximum number of Checklist Items supported is 200. When editing existing records from the ‘Create Checklist Items’ page, if there are too many Checklist Items that causes this limit to be exceeded, you can access it from the Milestone or individual Action record.
Multi Line Editing
You are able to apply edits to multiple lines on the Create Checklist Items page at the same time. Click the checkbox at the top of the page, or selecting the checkbox for the individual rows you wish to edit, as shown below.
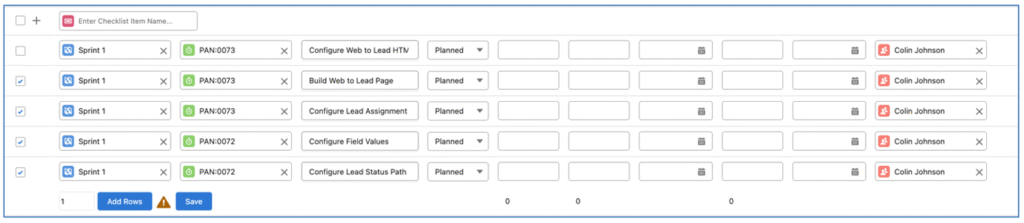
Applying an edit to one of the selected rows will apply the same change to all of the selected rows. For example, in the image below, the User has selected rows 2, 3, 4 and 5.

The User adjusted the Item Owner of row 2, and the same change is automatically applied to rows 3, 4 and 5.
Copy Item Owner
The copy icon located to the right of the Item Owner field on the Create Checklist Items page enables you to copy the Item Owner from the row above to the selected row.

For example, in the image below, row 1 has Bethany Hamilton as the Item Owner. If Bethany is also required to be the Item Owner of the Checklist Item on row 2, the User can click the icon to copy the value from row 1, rather than having to use the lookup functionality.

Note: clicking this icon will not work in conjunction with the multi-line edit functionality. However, manually populating one Item Owner field would automatically populate the same value in the Item Owner of other rows selected.
Display Custom Fields
To provide customers with the ability to choose which fields are displayed on the page, there is a Field Set on the Checklist Item Object called ‘Create Checklist Item Fields’. All existing fields on the Checklist Item Object are available for selection, excluding the following:
These fields are excluded from the Field Set as they will always appear on the Create Checklist Items page by default.
The following fields are pre-selected within the Field Set and will be accessible from the Create Checklist Items page.
If you wish to add Custom Fields or remove any of the above pre-selected fields, you can do so by editing the fields included in the Field Set.
Checklist Item Hours
When applying hours at the individual Checklist Item level, this will override the ability to enter values in the Hours Scheduled – Billable and Hours Scheduled – Non Billable fields directly on the Action record the Checklist Item relates to.
For example, if I create an Action and enter 10 in the Hours Scheduled – Billable field and 4 in the Hours Scheduled – Non Billable field, and then proceed to create some Checklist Items that contain values in the Hours Scheduled – Billable and Hours Scheduled – Non Billable fields, the values I entered in the Action will be overwritten with the sum of hours from the related Checklist Items. To revert to entering values manually in the Action, I would need to remove all values in the fields from all related Checklist Items.
If you try to modify the Action fields, you will be presented with a notification as illustrated below.
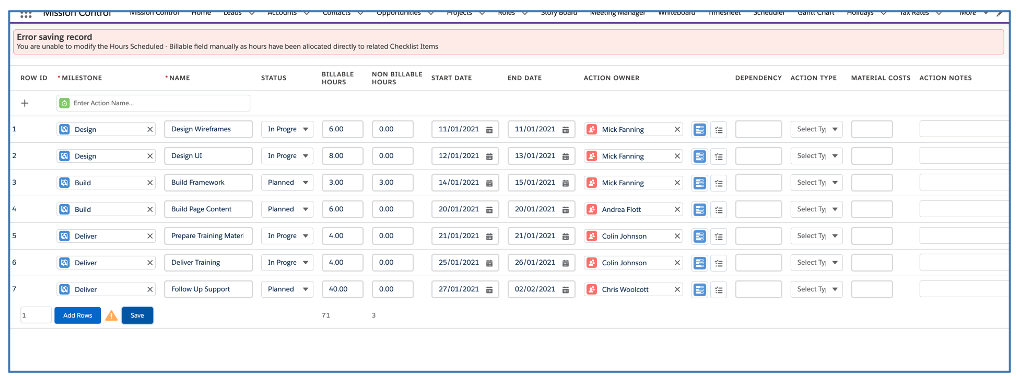
However, this fuctionality can be turned off to allow you to enter Checklist Item hours without them overriding the Action hours. This is controlled by a Custom Setting that is accessible within the Project Automation Settings section of the Control Pad on the Mission Control Console. The setting is called:
Disable Action Hours Override from Checklist Item Hours
This setting will need to be set to TRUE if you do not want Checklist Item hours overriding the Action hours.
Automated Management of Contributor Records
You can choose to have Contributor records automatically created / updated / deleted based on the Role being assigned as the Item Owner of Checklist Items.
This feature is controlled by a setting in the ‘Project Automation Settings’ section of the Control Pad on the Mission Control Console.

If this setting is TRUE, the feature will be disabled and Contributors will need to be managed manually. If this setting is FALSE, the feature will be enabled and Contributors will be managed automatically.
When Contributors are being managed automatically, you will not need to create / edit / delete Contributor records manually. In addition, the ‘Contribution Billable’ and ‘Contribution Non Billable’ fields will be calculated automatically. If you try and edit these fields manually, you will be presented with a notification as illustrated below.
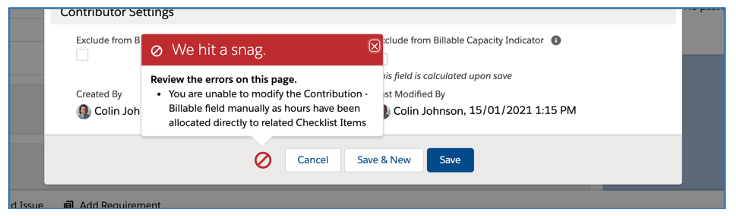
Contributor records will be created, updated and deleted automatically based on the Role’s assignment to the Action / Checklist Items.
For example, prior to creating Checklist Items, I assign Mick Fanning as the Action Owner and create Contributor records for Kelly Slater and Joel Parkinson. I then create a Checklist Item with values entered in the ‘Hours Scheduled – Billable’ or ‘Hours Scheduled – Non Billable’ fields and assign the Item Owner as Kelly Slater, the automated management of Contributors will be invoked. The result will be that Kelly Slater’s Contributor record will be updated to ensure the ‘Contribution – Billable’ and ‘Contribution – Non Billable’ fields reflect the hours on the Checklist Items. Joel Parkinson’s Contributor record will automatically be deleted, as he doesn’t yet own any Checklist Items. If a new Checklist Item with hours is created and assigned to Joel Parkinson, then a new Contributor record will be created for him.
In a scenario where the Action Owner also owns Checklist Items, they will not have a Contributor record created. However, if the Action is reassigned to a different Role and the outgoing Action Owner remains the Item Owner of Checklist Items, a Contributor record will automatically be created for them.
Log time to Checklist Items
You can associate a Time Log to a specific Checklist Item relating to the Action. A Time Log must always relate to an Action, but you can optionally choose to relate it to one of the Checklist Items under the Action and it will reflect in the Checklist Items ‘Hours Completed – Billable’ or ‘Hours Completed – Non Billable’ field. This enables you to identify how much time has been spent working on the individual Checklist Items.
When using the Log Time Component, you will be able to select the Action the Time Log relates to and then further select the specific Checklist Item.
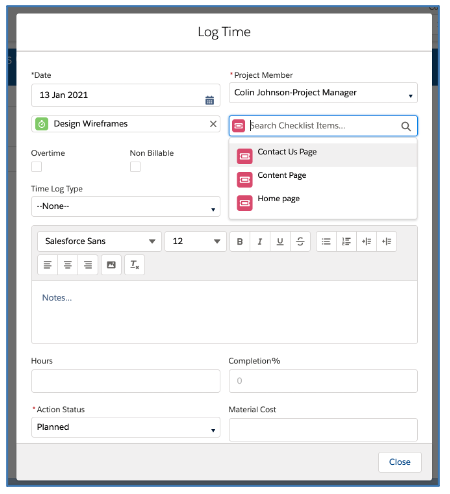
When using the Timesheet, you can select the specific Checklist Item by double-clicking into the hours cell to open the Time Log Summary field.
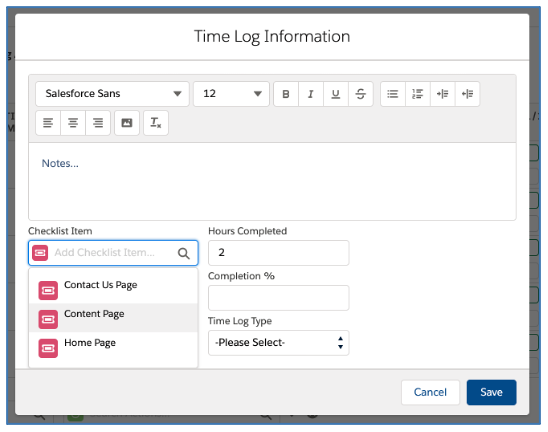
The Time Log Related List can be included on both the Action Page Layout and the Checklist Item Page Layout.
Checklist Item Manager
The Checklist Item Manager lets you easily manage all of your Checklist Items relating to a particular Action or User Story.
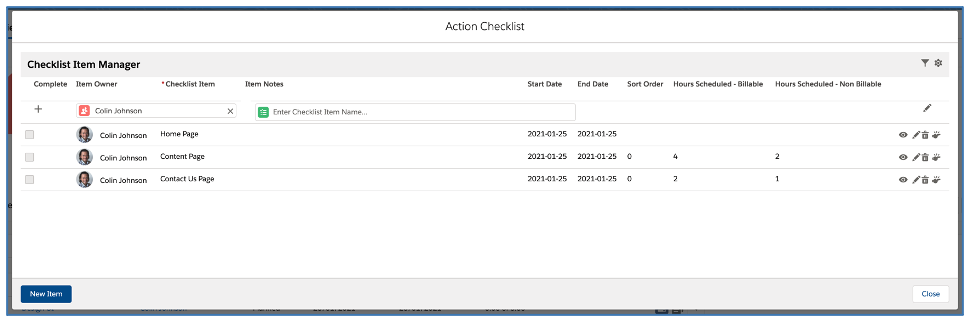
Quick Create Items
The Quick Create section at the top of the Checklist Item Manager provides you with the ability to quickly create multiple Checklist Items.
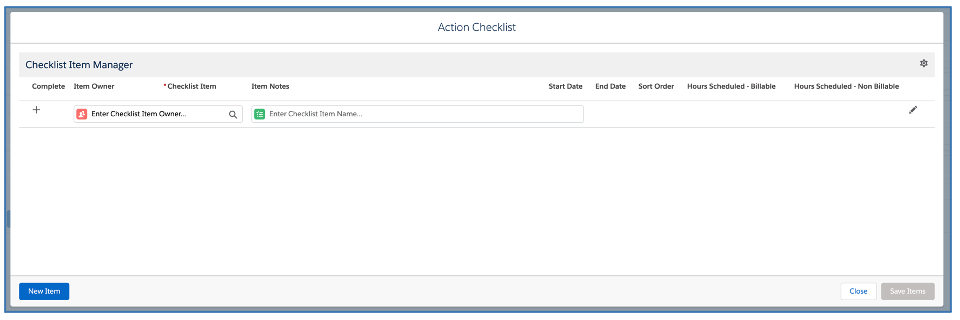
Optionally select the Checklist Item Owner and then enter the Checklist Item Name. Once this has been done, you can either click the + icon, or press the Enter key.
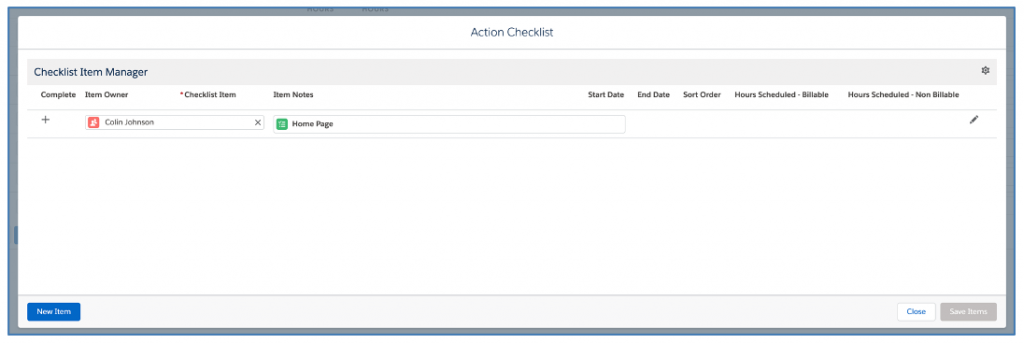
The Checklist Item will appear in the Checklist Item Manager and focus will be retained on the Quick Create Checklist Item Name text box so you can create another record.
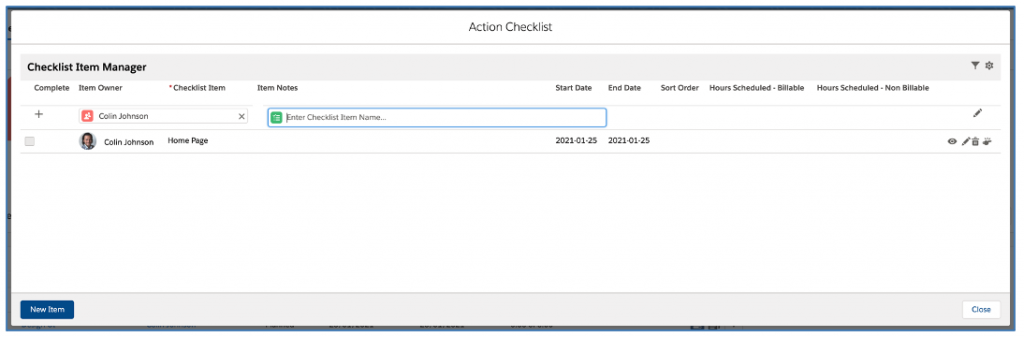
To add further information to the Checklist Item record, you can click the pencil icon to open it in Edit mode.
Add New Items
You can click the ‘New Item’ button in the bottom left of the Checklist Item Manager to open a draft record in Edit mode, allowing you to fill in all of the key fields.
When the new record is ready to be saved, you can click the tick icon and then the Save Items button. Alternatively, if you want to save the record and then immediately add another new record, click the + icon.
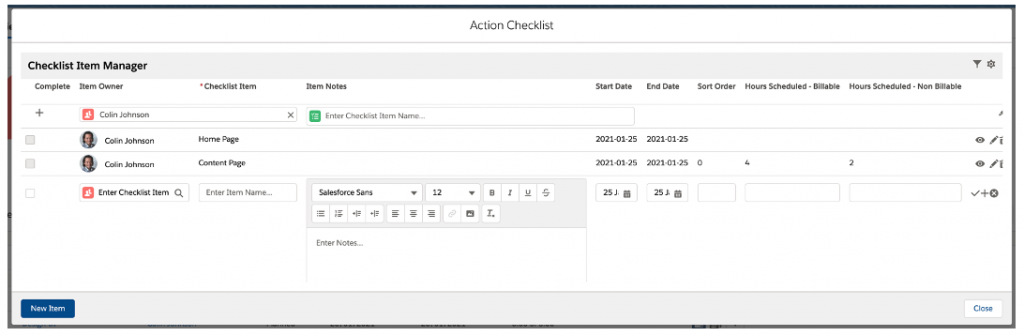
This will enable you to create another new Checklist Item. Once you’ve created all the required records, click the Save Items button.
Edit Individual Items
If you need to make changes to an existing Checklist Item, you can click the pencil icon for the required record. This will open up the record in Edit mode.
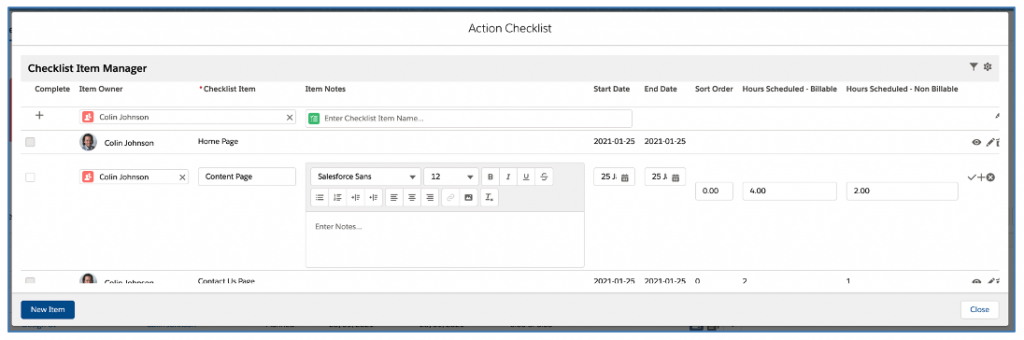
Once you have made your changes, click the tick icon to commit your save.
Edit All Items
If you wish to edit all Checklist Items at once, you can click the pencil icon located on the right-hand side of the Quick Create row of the Checklist Item Manager.

This will open up all Checklist Item records in Edit mode, allowing you to make changes across multiple records.
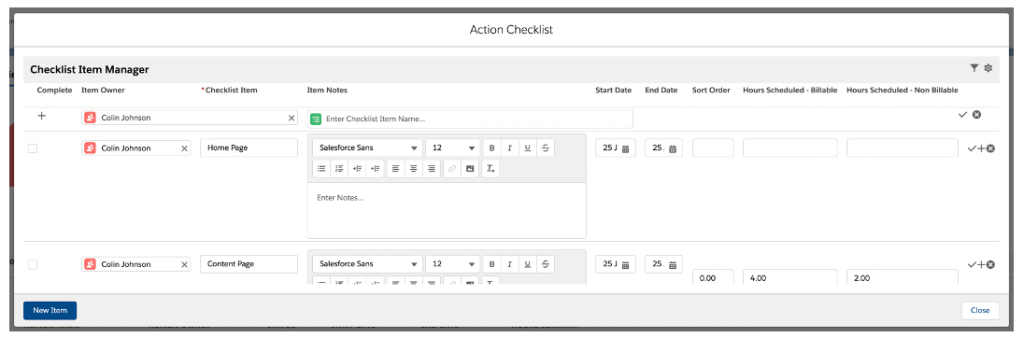
Once you have made all of your required changes, click the tick icon located on the right-hand side of the Quick Create row of the Checklist Item Manager.

This will commit the changes across all Checklist Items.
View Full Record
To access the full record detail of an individual Checklist Item, click the eye icon for the required record.
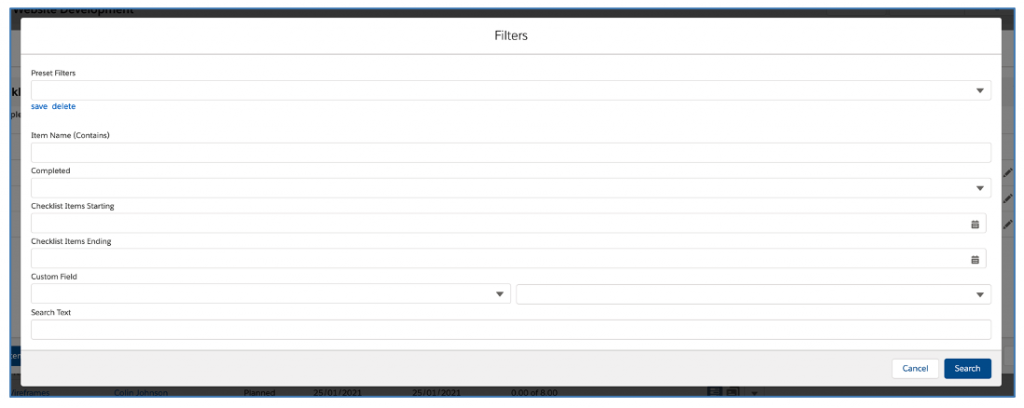
This will open up the full Page Layout view for the Checklist Item record. From here you can edit or delete the record.
Filters
You can apply filters within the Checklist Item Manager by clicking the Filter icon located in the top right.

This will open up the Filter modal as illustrated below.
From the Filter modal, you are able to apply various filters. In addition, you can save filters into the ‘Preset Filters’ list at the top of the modal. These preset filters will be stored for ongoing use.
Settings
By default, the Checklist Item Manager will show the following fields:
By default, the Checklist Items will be sorted using the following logic:
The first four fields are static, but the remaining five fields can be customized to your own preference as well as modifying the Sort Logic. This is controlled within the Settings modal, which is accessed by clicking the Setup icon located in the top right of the Checklist Item Manager.
When you access the Settings modal, you can specify the Fields you wish to display on the Checklist Item record rows. You can also adjust the fields and direction preferences for how your Checklist Items will be sorted.
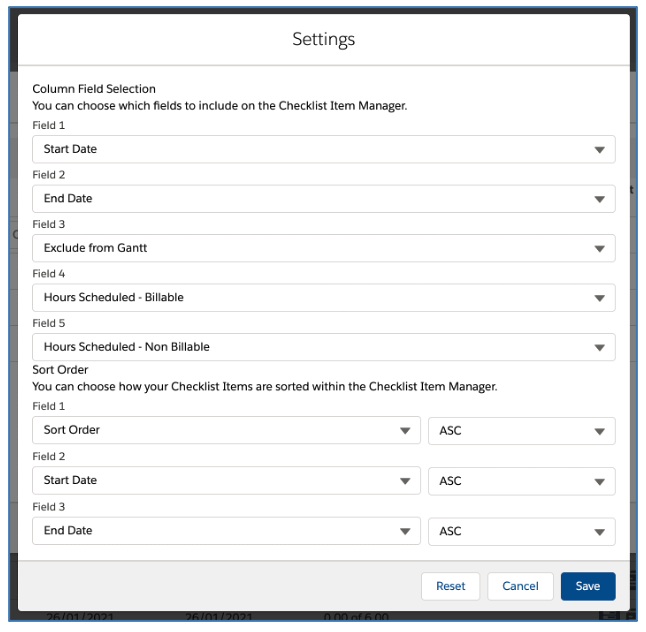
When you make changes to the Settings, you will need to click the Save button. To reset the default settings, click the Reset button.
When creating Checklist Items, you can set the ‘Notify’ checkbox field to TRUE. This will send an immediate email to the Item Owner.
An example of the email notification is as follows:
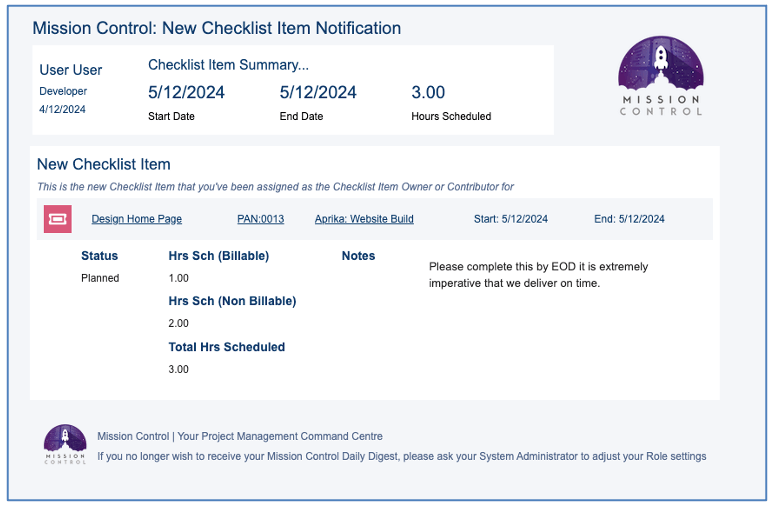
Please note: In order to utilise this feature, the Role record’s ‘Receive New Checklist Item Notification’ checkbox must be set to TRUE.
The Checklist Item Kanban Board enables you to visualise all of your Checklist Items based on their current ‘Status’. You can access the Checklist Kanban via the main navigation menu as a sub-tab on the Project Overview Component, which will pre-filter the board to show Checklist Items that relate to Actions on that specific Project.
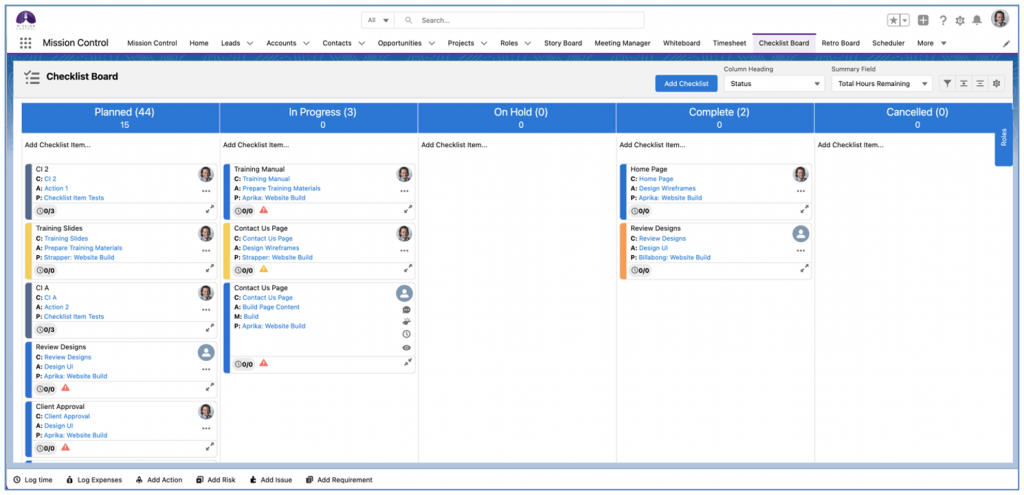
Each Checklist Item is displayed as a ‘Sticky Note’ (also referred to as a ‘Card’) on the Kanban, showing details such as:
You can drag and drop the Checklist Item cards from one column to another. For example, if you have a Checklist Item that has progressed from ‘Planned’ to ‘In Progress’, you can simply drag it from the Planned column and drop it into the In Progress column.
Note: When you drag a card into the Complete column, the Status field of the Checklist Item will be updated to ‘Complete’ and the Complete (Checkbox Field) will also be set to TRUE. Similarly, if you set the Complete field to TRUE, the Status will automatically be updated to Complete.
Add Checklist
You can add a new Checklist Item record by clicking the blue ‘Add Checklist’ button located in the header of the Board.
![]()
This will open up the ‘New Checklist’ modal, where you are able to enter the full details for a new Checklist Item and then click Save.
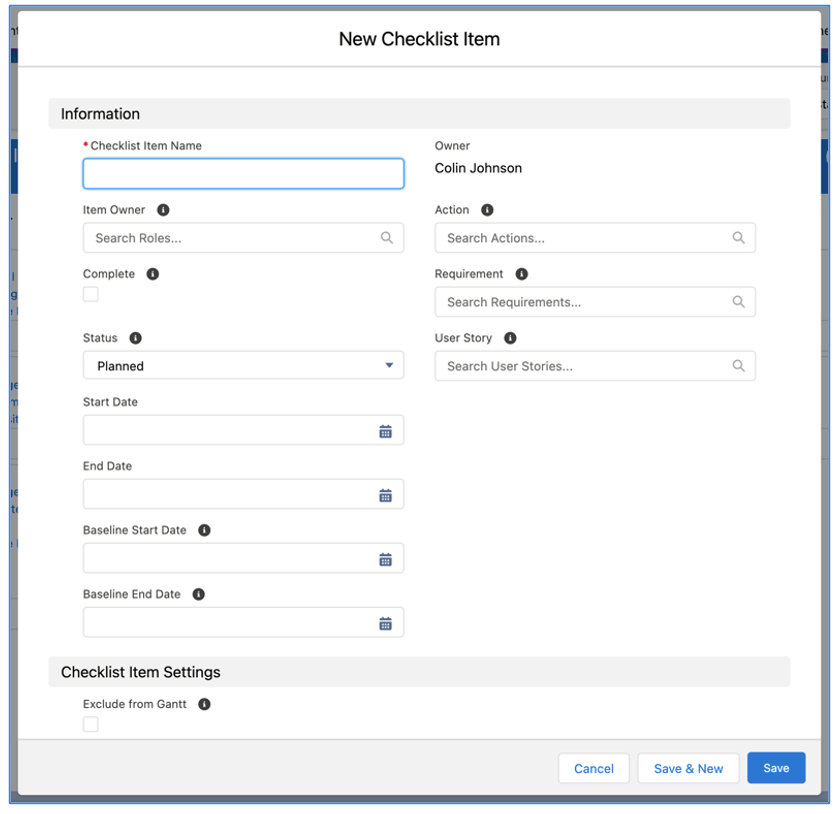
Quick Add Checklist
You can quickly add a new Checklist Item by clicking the ‘Add Checklist Item…’ just below the column header. This will open up the Quick Add section, as shown below:
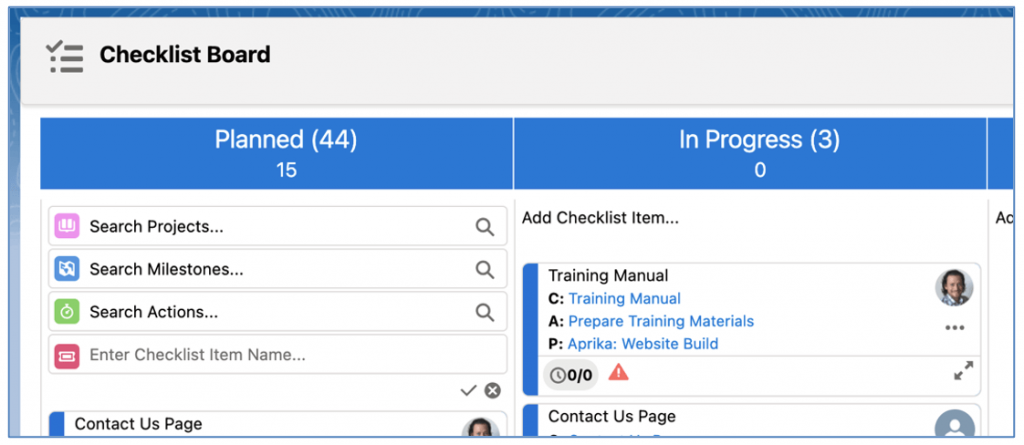
Simply select the Project, Milestone and Action, type in the Checklist Item Name, then click the tick icon or hit enter. The Checklist Item will be created and the fields will reset to enable you to add another Checklist Item.
Note: If you have a Validation Rule or field requirement that prevents the Checklist Item from being created, a New Checklist Item page will open up where you can complete the required fields and save the record.
Checklist Card
Below is an example of a Checklist Item Card on the Kanban Board.
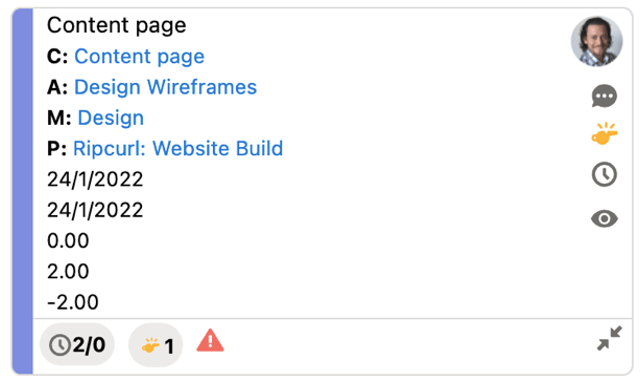
The card offers you a lot of functionality, each feature of the card is explained below.
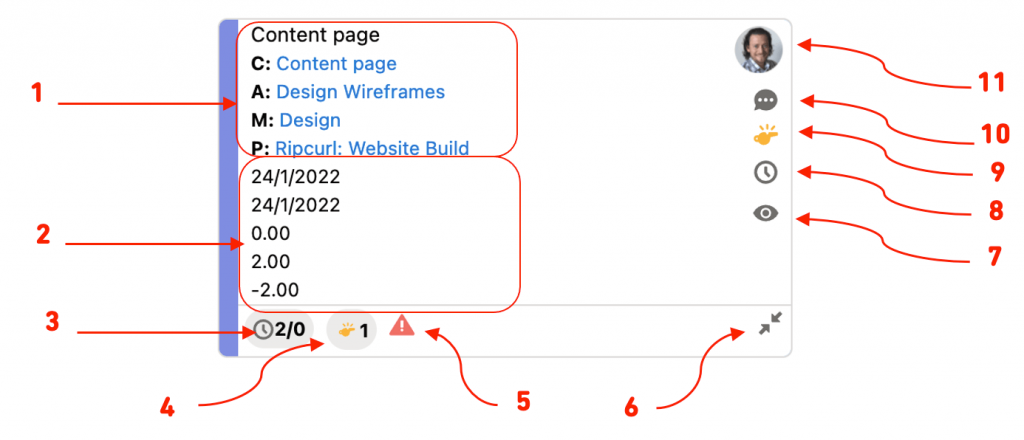
Collapse / Expand All
The Checklist Cards can show a lot of information, and as such, can take up a fair amount of space, and you may wish to have a more compact view. The Cards can be collapsed or expanded as required between the ‘Detail’ and ‘Compact’ views, based on how much information you with to view. Below are examples of the expanded and collapsed Cards.
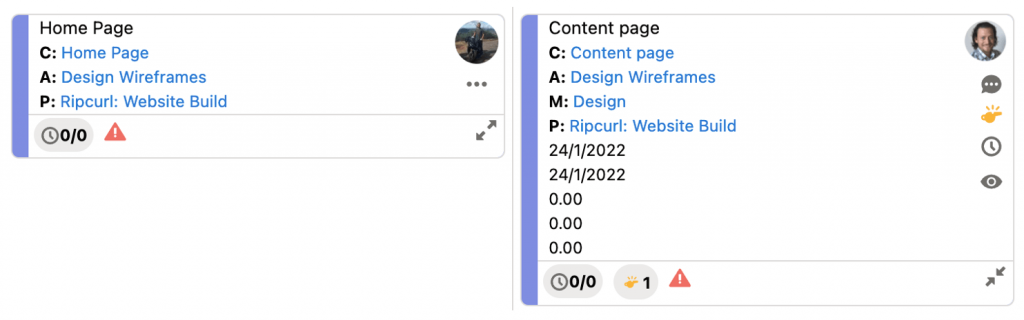
Within the Board Settings, you can specify the default view for any new Checklist Items. You are able to collapse / expand individual cards by clicking the icon in the footer of the Card. You are also able to collapse / expand all Checklist Cards at once by clicking the Expand All or Collapse All button within the Board Header, as shown below.

Checklist Sort Order
By default, the Checklist Cards will be displayed based on the following values:
If you need to reorganize the priority of the Checklist Items within a specific column, you are able to drag and drop them up or down within the column and that adjustment will be persistently remembered.
The ‘Board Priority Order’ field value is adjusted by dragging a Checklist Item up / down within a column, but if the Checklist Item is dragged left / right into another column, the values will not be adjusted.
Users have the ability to control the Sort Order of Cards should they not wish to use the default sort order. This can be controlled within the Board Settings modal, as shown below:
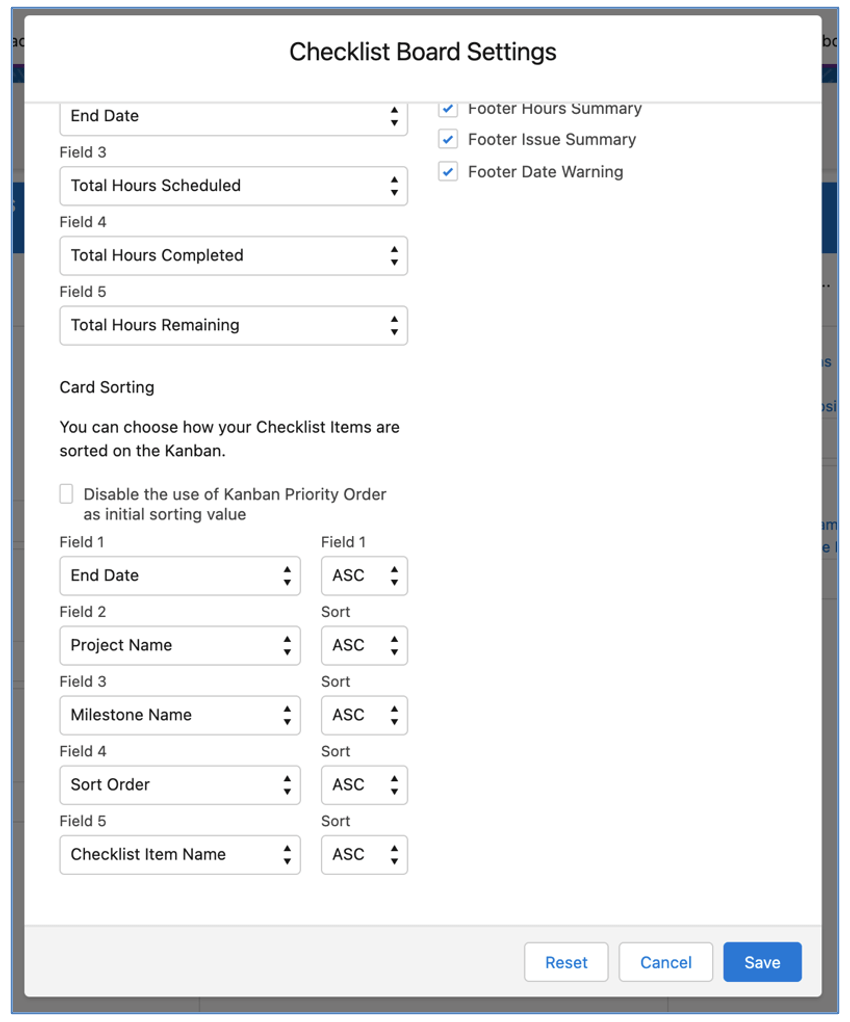
Users can disable the Board Priority Order field from being used as the initial sorting value. In addition, they can specify up to 5 fields to sort by, and the direction (e.g. ASC / DESC).
Column Heading
You’re able to dynamically adjust the Column Headings. By default, Status columns will be displayed. However, if you want to switch from viewing columns for Status to Item Owner, you just need to select the Picklist in the ‘Column Heading’ field as below.
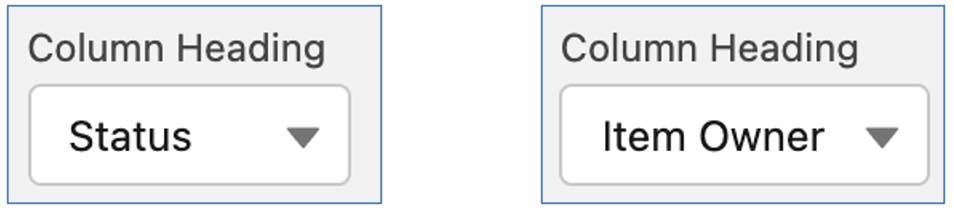
This will dynamically switch the column headings on the Kanban Board and rearrange all of the Checklist Items based on their ‘Item Owner’ value.
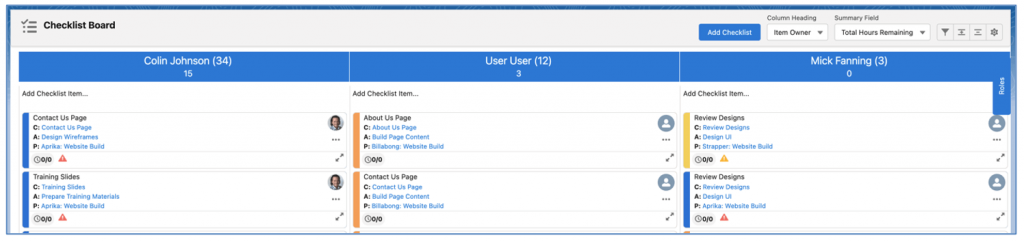
Summary Field
You’re able to dynamically adjust the Summary Field. By default, the Summary Field will be set to Total Hours Remaining. You have the option to change this to a range of other Number or Percent fields on the Checklist Item Object.
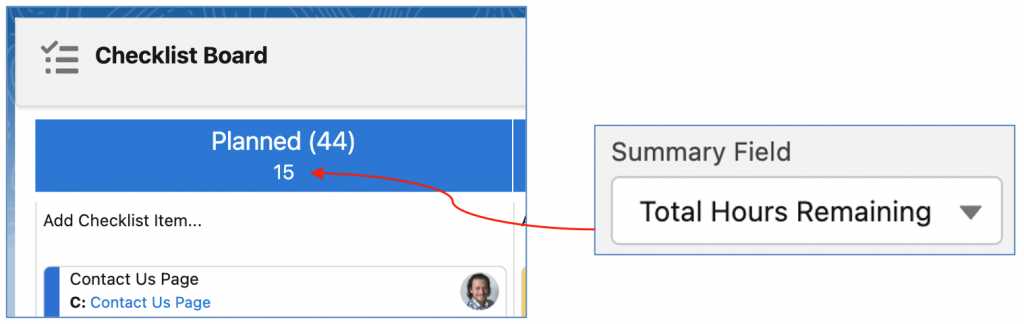
The Summary Field will be persistently remembered for each User.
Checklist Filters
You can apply any combination of filters to make sure you’re viewing the Checklist Items that are most important to you. Simply click on the Filter icon to open up the Filters modal and apply the filters as required.

The filters can be applied as required, alternatively, you can save any Filter selection, and that will be persistently applied each time you visit the Checklist Board.
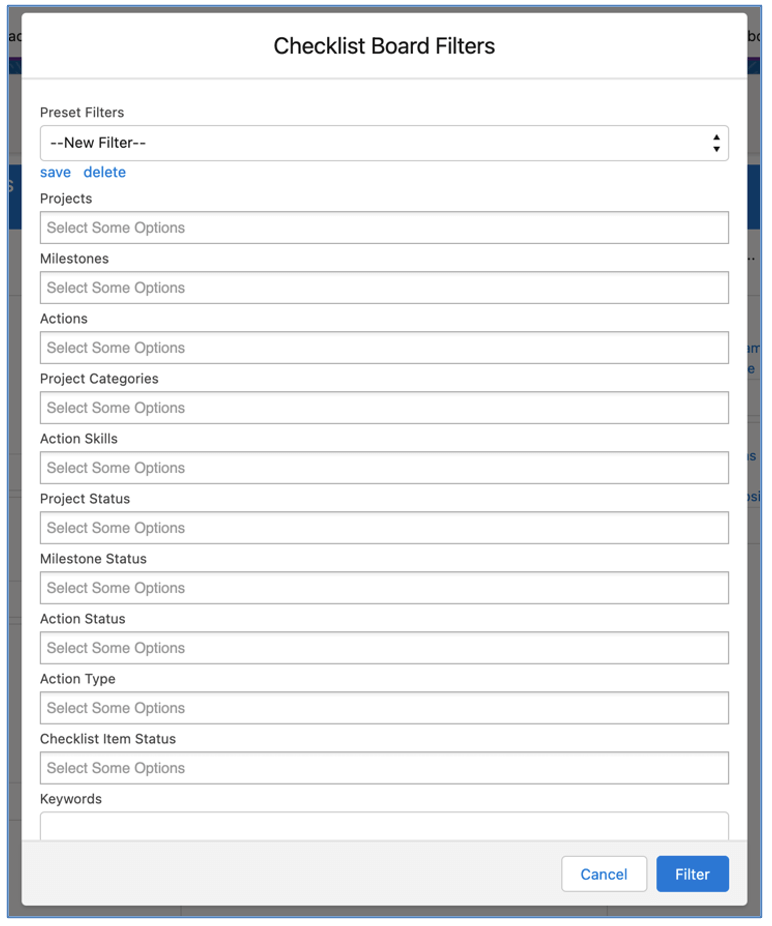
Preset Filters are created and accessed by individual Users and cannot be shared with other Users.
Board Settings
The Board Settings modal enables you to customise various settings to control which features are accessible on the Board.
These Board Settings can be controlled by each individual User by clicking on the Settings icon on the Board.

Alternatively, you can choose to override these settings at an organisation-wide level from the Control Pad of the Console. If you override from the Control Pad, Users will no longer have access to the Settings icon on the Board.
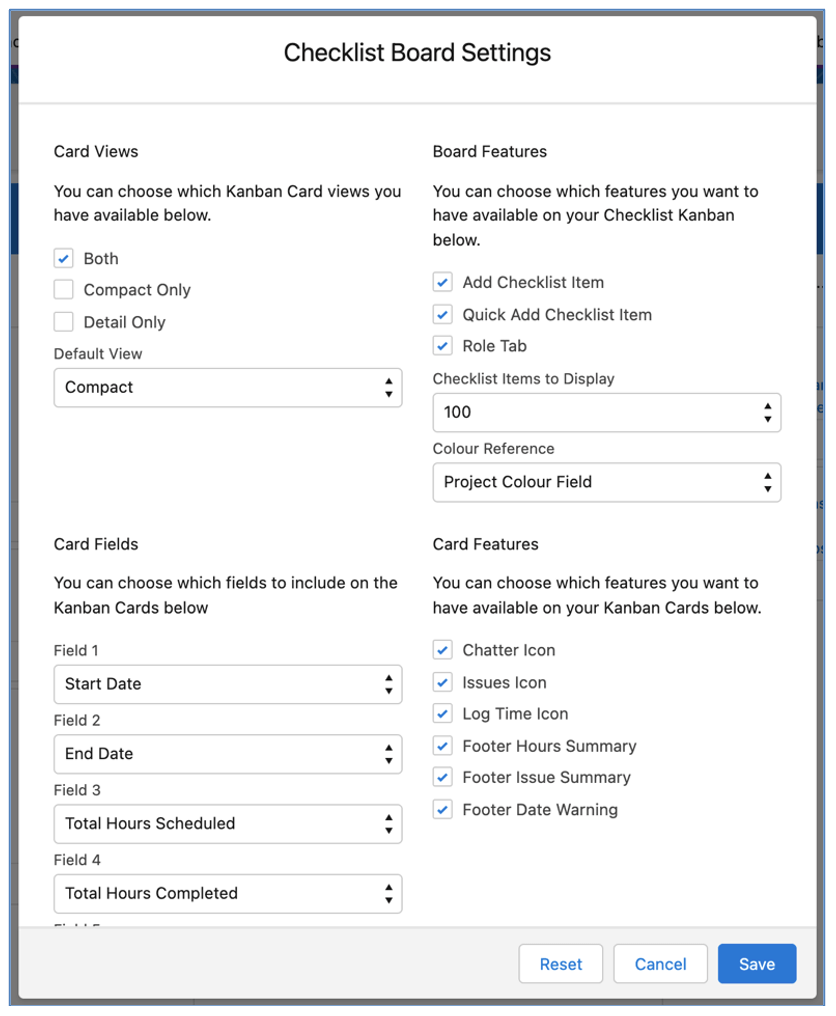
Roles Tab
The ‘Roles’ Tab located on the right-hand-side of the Board allows you to view all of the active Roles within Mission Control.
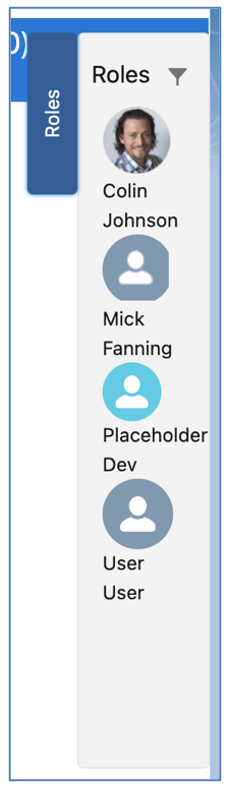
You can expand / collapse the Tab, which will be persistently remembered between visits to the Board. Therefore, if you don’t wish to use the Role Tab, you can keep it collapsed.
The primary purpose of the Roles Tab is to enable you to re-assign a Checklist Item from one owner to another. You can do this by dragging and dropping the right person on top of the image of the existing Item Owner, which will transfer ownership.
You can filter to find Roles that match the criteria you require. For example, you may be looking for Roles that have a specific Skill or are a member of a particular Team. To access the Role Filters, click the Filter icon at the top of the Role Tab, which will open the Role Filters modal as shown below.
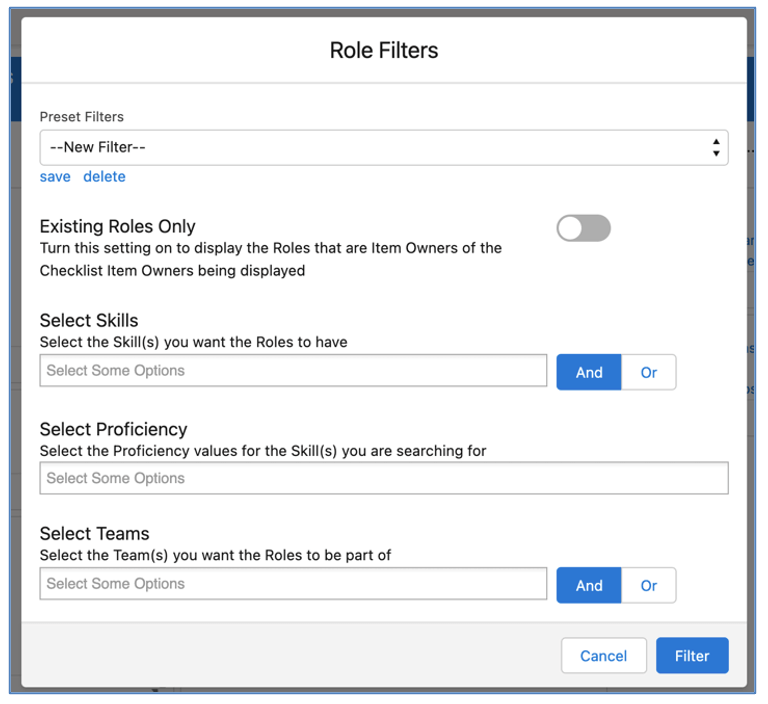
Within the Role Filters, you can:
The filters can be applied as required, alternatively, you can save any Filter selection, and that will be persistently applied each time you visit the Checklist Board.
Task/Event Synchronization allows you to create a standard Salesforce.com Task or Event record that relates to a Mission Control Action and have it update the actions date and time values based on the event. Note: Where a User has changed the Subject of the Event, when being updated, the Action will no longer overwrite this value.
When creating an Action, if you set the ‘Task’ Checkbox field to TRUE, a Salesforce Task record will be created and associated to the Action in the Activity History related list.
When creating an Action, if you set the ‘Event’ Checkbox field to TRUE, a Salesforce Event record will be created and associated to the Action in the Activity History related list. It will be assigned to Action Owner and Contributors, providing their Role records relate to Salesforce User records.
Note: Events will only be created if the Action Owner’s Role record relates to a Salesforce User. If Multi-Day setting is disabled and the Event checkbox is set at the action level, users will have to schedule actions for a single day to have them populate as events in the calendars.
By default when the ‘Task’ or ‘Event’ fields on the Action are set to TRUE, the Task or Event record is created with ‘Mission Control: ‘ set as a Prefix followed by the Action Name with the Project Name in brackets within the Name field. For example, for the ‘Rip Curl: Website’ Project, if you set the Task field to TRUE on the ‘Design Wireframes’ Action, the Name of the Task will be as follows:
Mission Control: Design Wireframes (Rip Curl: Website)
To provide Customers with flexibility on the Prefix, there is a Setting within the ‘Project Automation Settings’ Tile on the Control Pad of the Mission Control Console called ‘Enable Task/Event Prefix Override’.

This Setting enables Customers to choose to override the Prefix with a Custom Prefix value or to remove the Prefix altogether.
To override with a Custom Prefix, set the Setting Checkbox to TRUE, select ‘Custom Prefix’ in the Override Option and specify a value in the Custom Prefix field, as shown below.

In this example, the Task Name would be:
Project Task: Design Wireframes (Rip Curl: Website)
To remove the Prefix, set the Setting Checkbox to TRUE and select ‘No Prefix’ in the Override Option, as shown below.

Leaving this Setting FALSE will mean Task and Event Names use the out of the box format.
The Clone button on a Milestone allows you to clone (make a copy of) a Milestone and all child Actions, saving them to the existing Project or to a new Project. Before the records are cloned, you are able to make changes to the Milestone and Actions so they are relevant to the new Project or requirements.
To Clone a Milestone, go to the Milestone page and click the ‘Clone’ button.
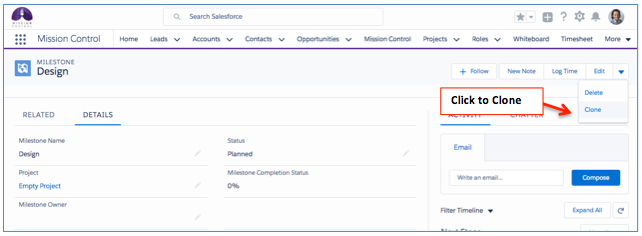
Make the desired changes for the new Milestone and Actions and click the Clone Milestone button.
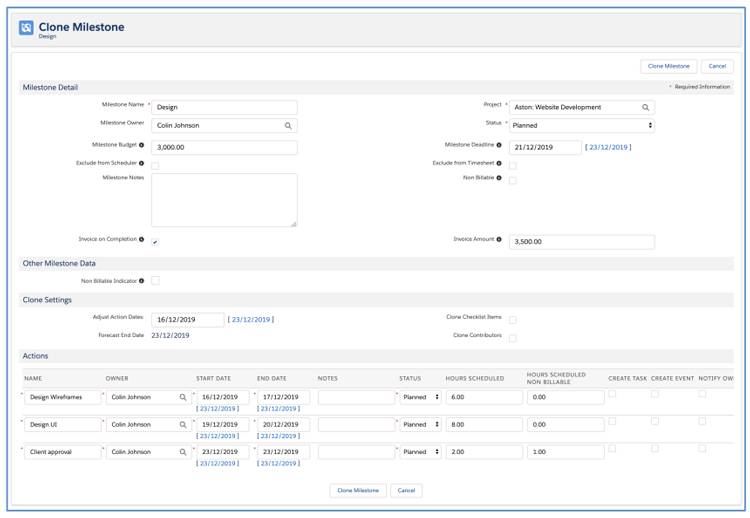
Note: If the Milestone you are cloning relates to a skills based project, you will also be able to edit the view and edit the skills for the actions.
The Milestone Clone page provides customers with the ability to select which fields are visible in the Milestone field sections of the page. Each section is controlled by a Field Set as outlined below.
Field Set Name | Default Fields |
Milestone Details Clone Fields | Milestone Name Project Milestone Owner Status Exclude from Scheduler Exclude from Timesheet Invoice on Completion Invoice Amount Non Billable Exclude from Billable Capacity Exclude from Gantt Exclude from Status Report Exclude from Client Page |
There is also a Field Set on the Action Object to enable Custom Fields to be added to the Action section of the page:
By adding Fields to this Field Set, these Fields will be included in the Action section of the Milestone Clone page.
This provides customers with the ability to add and remove fields to suit their specific requirements.
The Milestone Loader is a tool that takes the existing Milestone Clone feature to a new level. You’re able to select and load in multiple Milestones in one go, including all of their Actions, Contributors and Checklist Items.
So for example, I may have created a Project record, but not yet created any Milestones, Actions, etc. I may have two other Projects that between them already contain the detail of what is required on this new Project. Therefore, I can use the Milestone Loader to go and grab a copy of the relevant records from each of the other two Projects.
You access the Milestone Loader from the Overview Tab on the Project Overview page, as shown in the screenshot below.
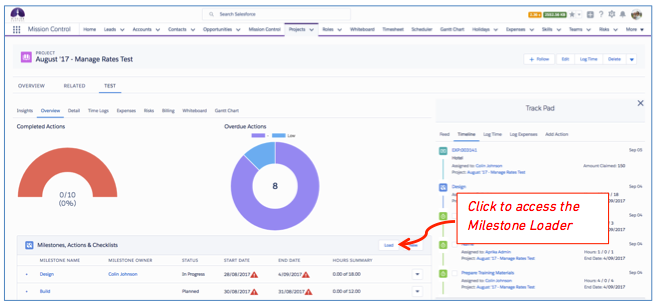
The Milestone Loader will initially load as shown below:
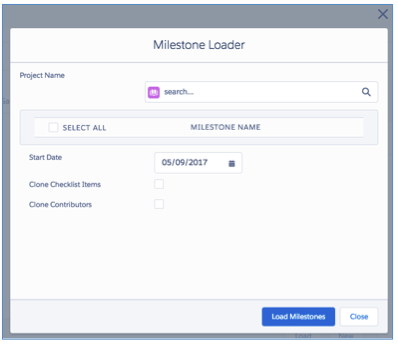
You’re able to search for the Project that you want to load the Milestones from. As you start typing the Project Name, the search list will automatically begin to filter the list of Projects you can choose from.
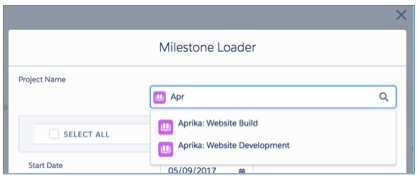
Once you have selected the Project you’re looking for, a list of Milestones will appear. You can then choose the Milestones you’re looking to load in to your new Project.
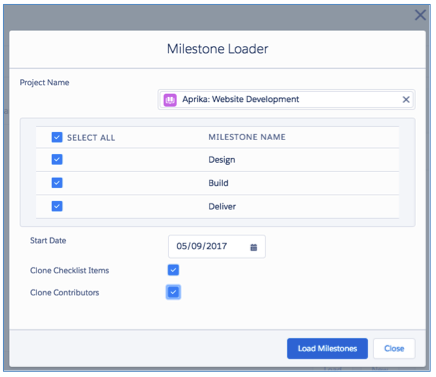
You’re able to select all, or as many of the Milestones as you require. You can also choose to specify the Start Date for the first most Action being loaded in to the new Project, along with whether you want to clone the Checklist Items and Contributors.
The Milestone Loader lets you load in multiple Milestones from one Project at a time, if you require Milestones from more than one Project, you’ll need to perform this process for each Project.
The Action Clone Page provides you with the ability to perform a ‘Deep Clone’ of the Action and any related Checklist Items and Contributors.
When you click the ‘Clone’ button the Action Page Layout, the custom clone page will load as shown below.
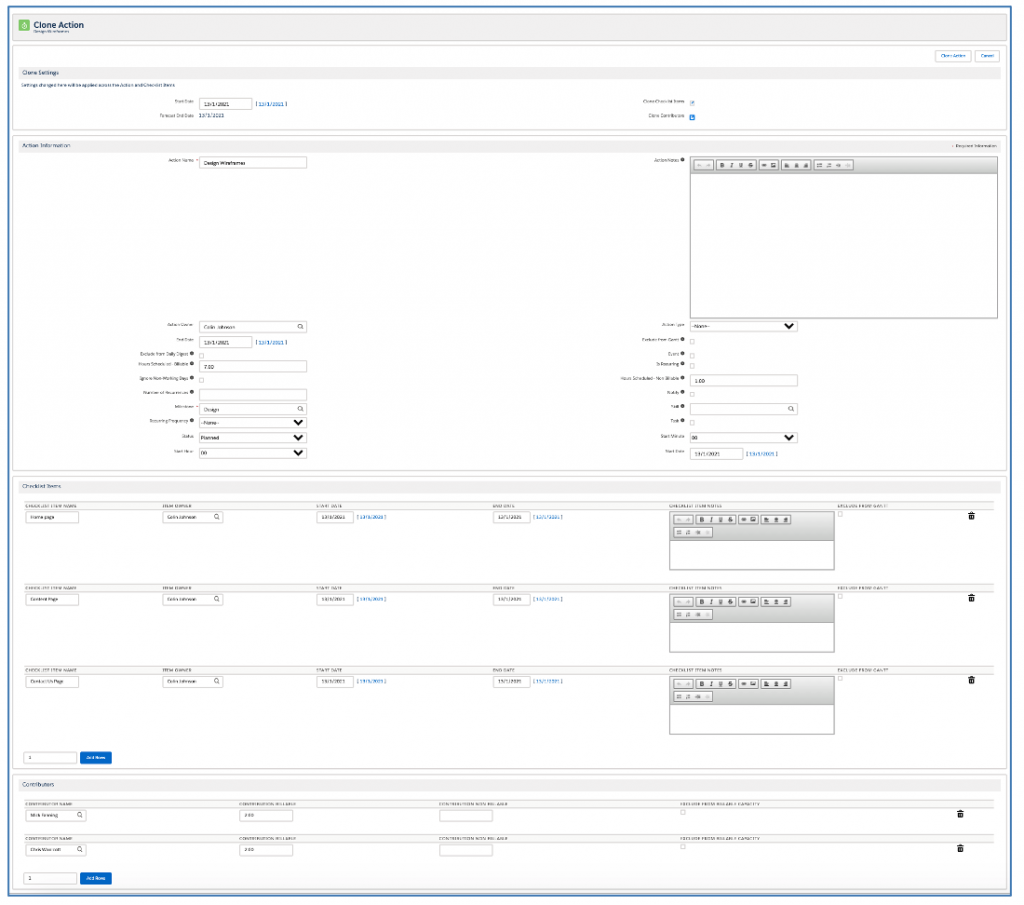
The page will show the Action record, and any related Checklist Items and Contributors. Within the Clone Settings section at the top, you are able to:
You can also modify any field values manually as required, as well as adding / deleting Checklist Items and Contributors.
Custom Field Sets
The fields displayed on the Action record section of the custom clone page are controlled by two Field Sets:
If you have your own custom fields that you would like to be included on the custom clone page, you can add them to the Action Clone Custom Field Set. You can also adjust the order of the fields within the Action Clone Standard Field Set.
You’re able to set Milestones and their Actions, or just individual Actions to be recurring. The process is slightly different for each option.
Recurring Milestones & Actions
A Milestone can be set to be recurring. This will recur the Milestones and its Actions and their Checklist Items & Contributors. To set a Milestone as recurring, you need to specify the following field values on the Milestone record:
When the Milestone Status is set to Complete, the next instance of the Milestone (and Actions & Checklist Items) will be created with the Milestone Deadline and the Action Start Date, End Date, Baseline Start Date and Baseline End Date all adjusted based on the ‘Recurring Frequency’ using the following adjustment rules.

The Milestone created as part of the recurring process will have the same field values as the original Milestone. The Milestone Name will have a number in brackets at the start of the string, indicating which recurrence it is. For example, a Milestone that has been configured to recur 3 times will result in the following:

Note: Where the Milestone’s Name is using all 80 characters of the field string, the final four characters will be dropped from the string for the subsequent recurrences to make room for the number.
Each Action created as part of the recurring process will have the same field values as the original Action, except for the Status field, which will be set to ‘Planned’.
Each new recurrence of the Milestone is used to recur the subsequent Milestone. Therefore, any new Actions added to the current Milestone will be created as part of the next recurrence. To support the recurring process, each recurrence of the Milestone will have a ‘Recurrences Remaining’ field identifying how many more recurrences are required. Once the final Milestone has been recurred, it will have a ‘Recurrences Remaining’ value of 0 and therefore, when the Status is set to Complete, no further recurrences will be created. The below table illustrates how this will function.

Note: If you want to continue recurring the Milestone, you’ll need to adjust the ‘Remaining Recurrences’ value of the last Milestone.
Recurring Actions
An Action can be set to be recurring. This will recur the Action and its Checklist Items & Contributors and parent the new Actions to the same Milestone. To set an Action as recurring, you need to specify the following field values on the Action record:
When the Action is created, or updated and has been set to ‘Is Recurring’, the relevant number of additional Actions will immediately be created, changing the Start Date, End Date, Baseline Start Date and Baseline End Date based on the ‘Recurring Frequency’ using the following adjustment rules.

Each Action created as part of the recurring process will have the same field values as the original Action, except for the Name and the Status. The Status will default to ‘Planned’ for all recurrences. The Name will have a number in brackets at the start of the string indicating which recurrence it is. For example, an Action that has been configured to recur 3 times, will result in the following:

Where the original Action Name is using all 255 characters of the field string, the final four characters will be dropped from the string for subsequent recurrences to make room for the number.
Validation Rules are included on the Milestone and Action Objects to ensure the ‘Number of Recurrences’ and ‘Recurring Frequency’ fields contain a value if ‘Is Recurring’ is set to TRUE.
Note: An Action that was set to be recurring within a recurring Milestone will not be recurred when the Milestone is recurred to prevent doubling up the required Actions within the new Milestone.
Budget Items allow you to breakdown and track the Project Budget at a granular level across multiple budget line items. For example, if you have a Project that is developing a new software application you may choose to break your budget into three areas:
Whilst you have an overall ‘Project Budget’ field on the Project, the Budget Items will allow you to track the budget allocation and performance for each of these individual areas of the Project.
From the Project Overview page, you can access the ‘Budget’ Tab. This comprises of summary charts with a Data Table below where you can view the Budget Items. Within the Budget Tab, there are a series of Tabs that allow you to get to key information relating to your Budget Items, including:
Below is an illustration of the Budget Tab with the Summary Data Table being displayed.
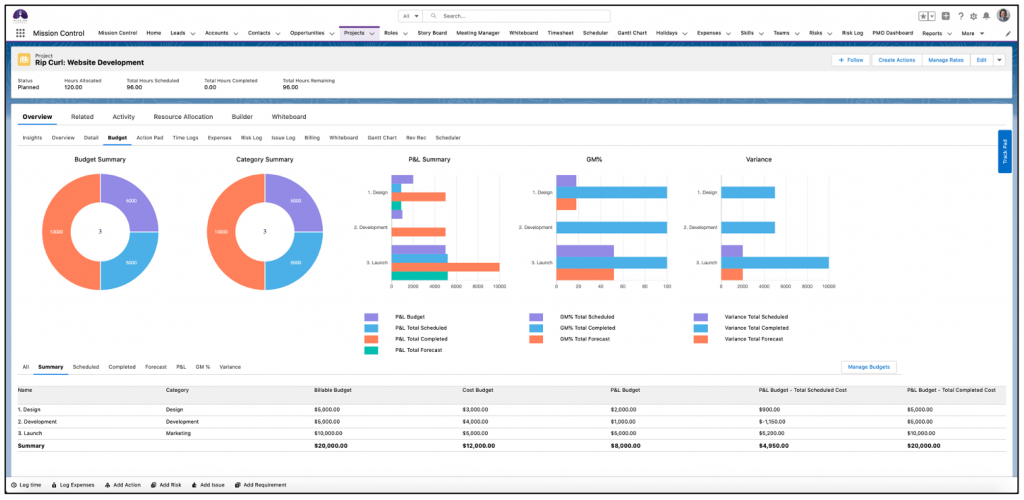
You can create new, and edit existing Budget Item records using the ‘Manage Budgets’ page. This is accessible from the Budget Tab on the Project Overview page by clicking the ‘Manage Budgets’ button.
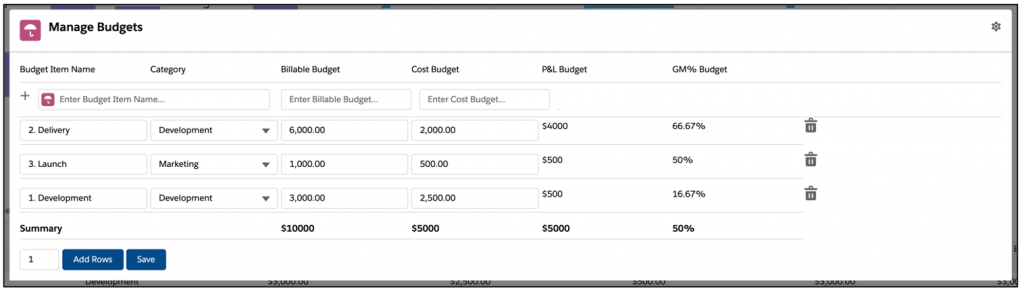
To track the performance of your Budget Items, you will need to relate your Actions and Expenses to Budget Items. The Hours and Material Cost financials from the Action, along with Expenses will be summarized on the Budget Item record they relate to. It’s easiest to relate the Budget Items to the Actions from the Create Actions Page. It’s also recommended to set up the Budget Item to Action relationship on the Project Template which will carry over into new Projects.
Note: Budget Items do not update the ‘Project Budget’ field on the Project.
When creating a Risk you need to associate it to a Project and fill in the relevant details, as per the example below:
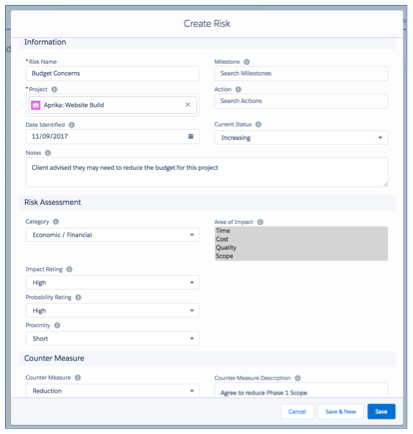
You are able to create Risks from the Project Overview page, the Risk Object home page, the ‘Add Risk’ component on the Track Pad or Utility and directly from the Risk Log.
Risk Log
The Risk Log is accessible as a stand-alone page, which you can access via the ‘Progress Pad’ on the Mission Control Console.

You can also access it on the Project Overview from the Risks sub-tab. Access via the Project Overview page can be controlled via the Project Overview permissions on the Role record, like all other Project Overview Tabs.
Below is an example of the Risk Log being viewed as a stand-alone page.
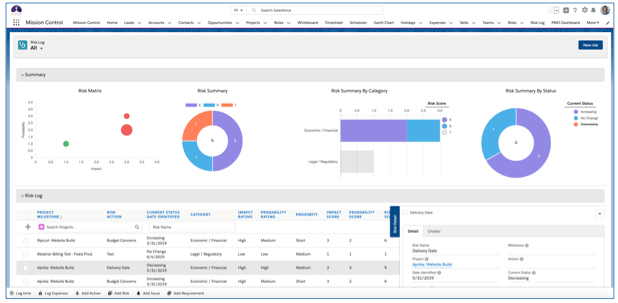
It comprises of two main sections – Summary and Risk Log. Each can be collapsed to allow you to focus on the area of interest.
When using the Risk Log on the Project Overview page, it’s filtered to show all of the Actions related to that Project. On the stand-alone page, you will be able to determine which Risks are displayed, by selecting a ‘List View’ filter on the Risk Object.
Summary Section
The Summary Section includes 4 charts, providing you with a high level overview of the following:
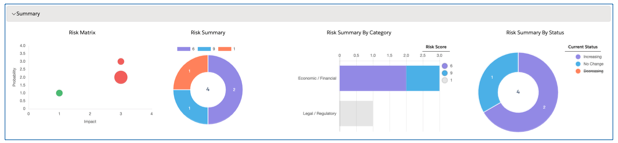
Risk Log Section
The Risk Log section provides you with a working ‘pad’ where you can do numerous tasks, including:

Quick Create Risks
You’re able to quickly create new Risks using the quick create feature located at the top of the Risk Log – see below.
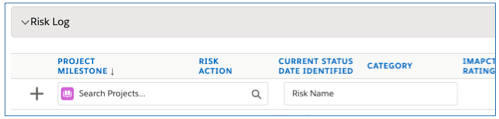
Providing you don’t have any Validation Rules or mandatory field requirements preventing a Risk from being created with just the Risk Name, you’ll be able to rapidly create new Risks using the feature.
If a Validation Rule or mandatory field requirement does prevent the Risk from being created, a new Risk page will open up where you can complete the required fields and save the record.
Using the quick create feature, new Risks will appear at the top of the list in your Risk Log and you can then click on any of them to view them in the Risk Detail on the right-hand side, or double click to edit further information.
Sort by any Column
Within the Risk Log, you’re able to sort the data by any of the columns. Just click on the column you would like to sort by and the data will be re-organised accordingly. You can identify which column is being used for sorting by the directional arrow – in the example below, the Category is being used.
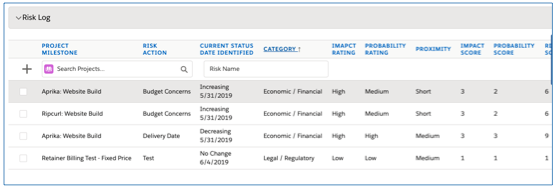
Close Risks
You can quickly mark a Risk’s Status as Closed by ticking the box on the left-hand side of the table, or at the top of the Risk Detail Tab.
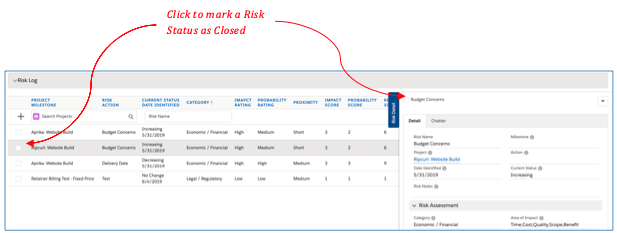
View / Edit Risks
If you need to view further information relating to an individual Risk, you can click on to the Risk within the Risk Log table, and that will populate the ‘Risk Detail’ Tab on the right-hand side.
If you need to edit the record, you can select the drop-down arrow and click Edit, or you can double-click on the record within the table and the Risk Edit page will open, where you’ll be able to make changes and click Save.

Collaborate via Chatter
If you need to collaborate with colleagues on a Risk, you can click on the ‘Chatter’ tab within the Risk Detail section to access the Chatter Feed for the individual Risk.
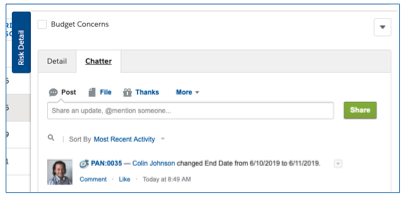
Promote a Risk to an Issue
In order to be able to ‘promote’ a Risk into an Issue, customers can use the ‘Promote Risk to Issue’ Quick Action on the Risk record. This is accessible from the Chatter Feed on the Risk Log, or from the Buttons on the Risk Detail Page. When you click the ‘Promote Risk to Issue’ button/link, it will open up a draft Issue record with Risk field information merged in to the appropriate Issue fields, as illustrated below:
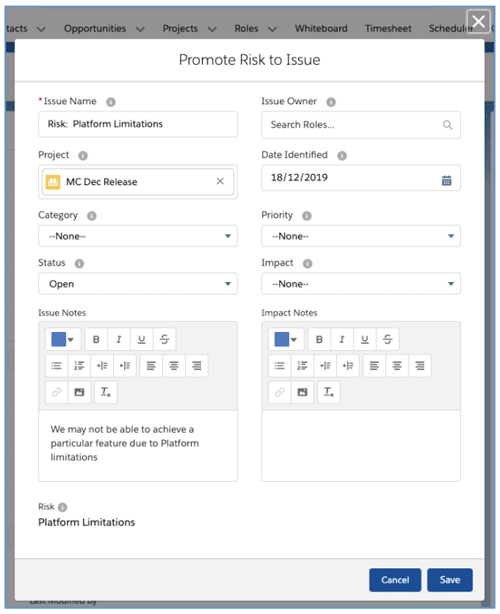
To add this button to the Chatter Feed inside the Risk Log, you’ll want to update the Risk page layout to include this button in the ‘Quick Actions in the Salesforce Classic Publisher’ section. You will also need to ensure the ‘Enable Actions in the Publisher’ option in Chatter Settings is checked.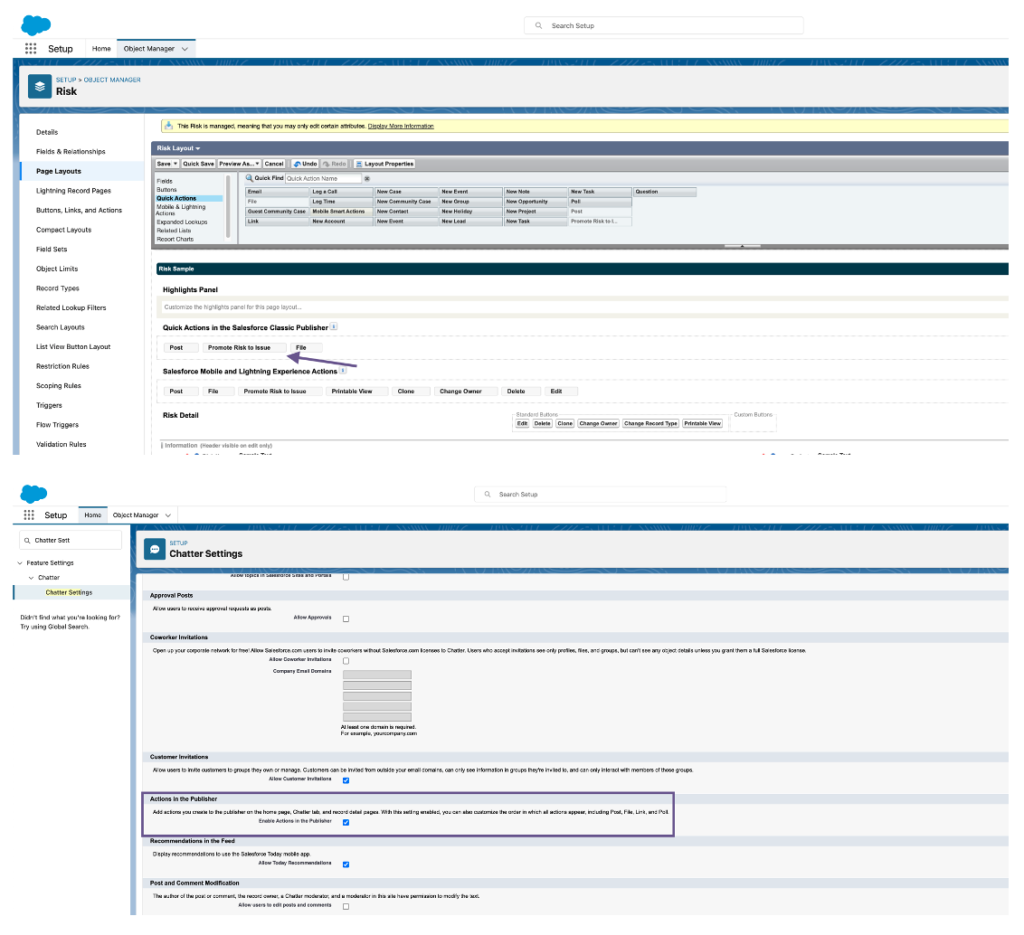
To add this button to the Risk record page, you’ll want to update the Risk page layout to include this button in the ‘Salesforce Mobile & Lightning Experience Actions’ section.
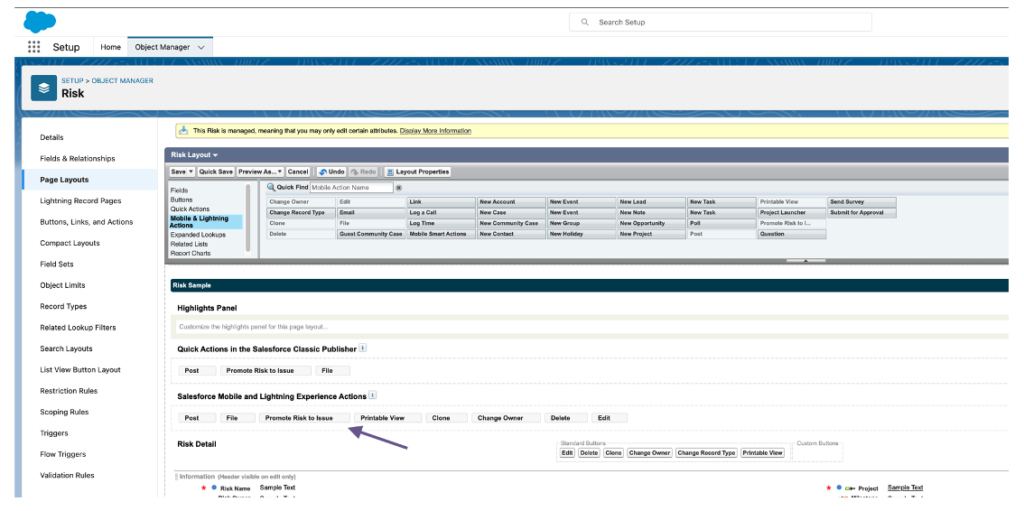
From Mission Control, you can quickly launch into a Project Overview for a specific Project. This Project Overview provides a complete overview of the project, including:
To launch into a Project Overview from the Mission Control Console, follow the steps below:
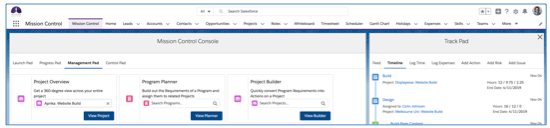
You can also access the Project Overview by clicking the “Project Overview” button on a Projects detail page.
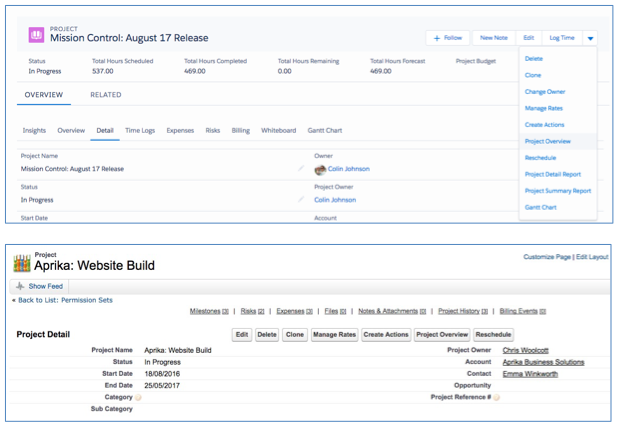
The project Overview provides information via various ‘Tabs’. Each tab provides you with detailed information relating to a specific area of the Project. Each tab is explained below.
Insights
This tab provides various charted information showing the current state of play for the project.
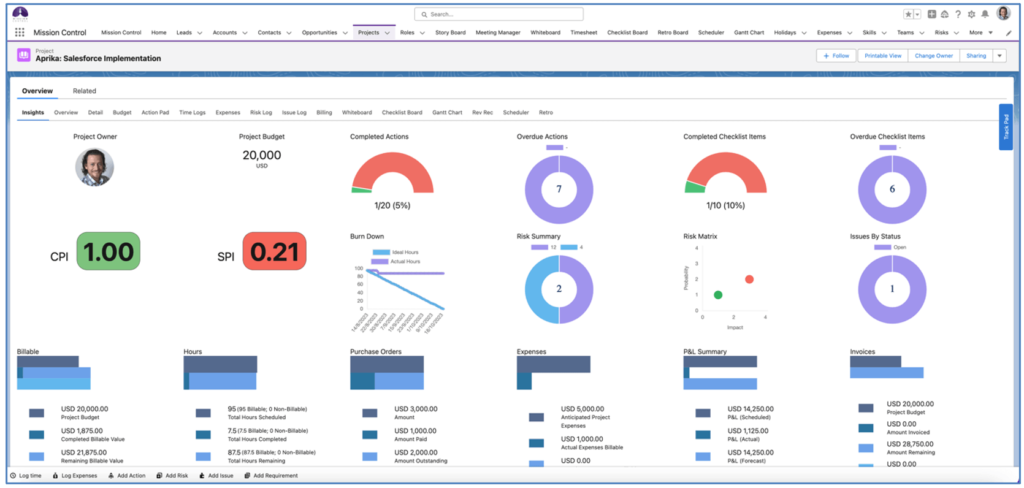
The aim of the Insights Tab is to provide you with a high level, graphical view of how the project is performing. The key information represented on the Insights Tab includes:
The entire Insights Tab can be hidden by setting the ‘View Insights Tab’ to FALSE on individual Role records. However, you may want to provide access to the Insights Tab, but restrict visibility to certain Charts.
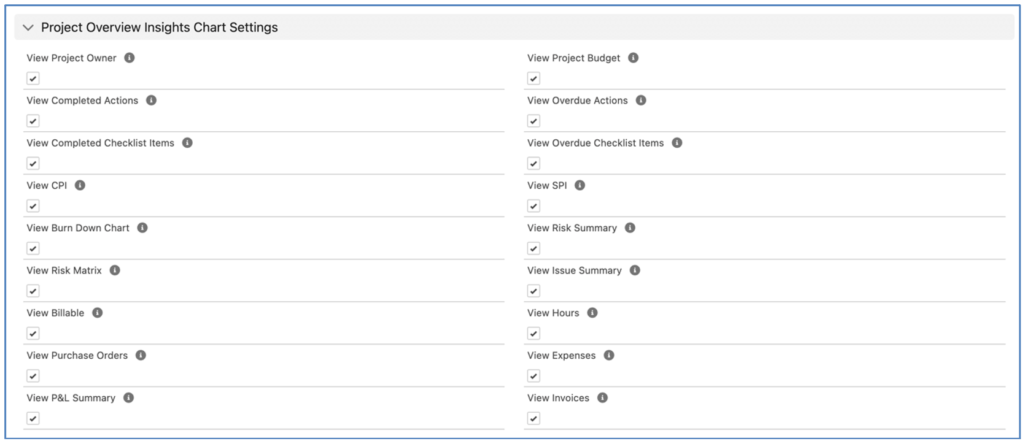
You are able to control the display settings for each individual Chart, to determine whether or not they are displayed for each individual User. These settings are controlled via Checkbox Fields on the Role record.
Overview
The Overview Tab provides a number of Charts relating to the status of Actions and Checklist Items along with a expandable tree grid of the Work Breakdown Structure of a Project, including Phases, Milestones, Actions and Checklist Items.

Overview Charts
Within the Overview Tab, you have a number of Charts providing insight into specific metrics.
Completed Actions Chart
The Completed Actions gauge chart provides you with an overview of how many Actions have been completed on the Project.
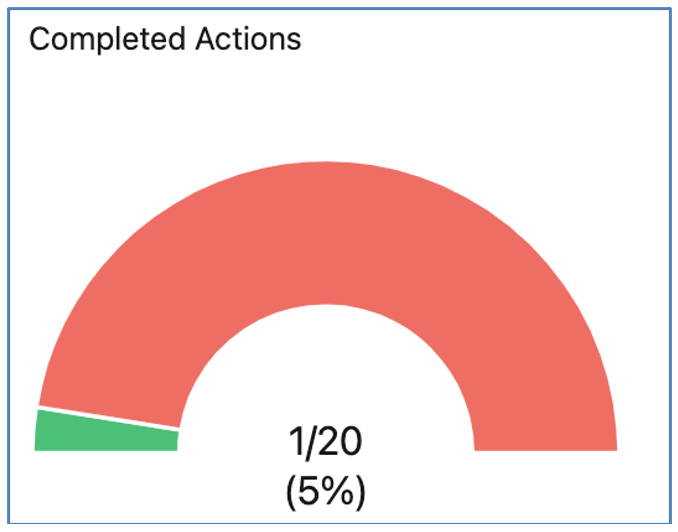
Overdue Actions Chart
The Overdue Actions donut chart provides you with insight into any Actions that are overdue and groups them based on their ‘Priority’ value. When you hover over this chart, you’ll see a list of the Actions that are overdue, so you can quickly jump to the detail if required.
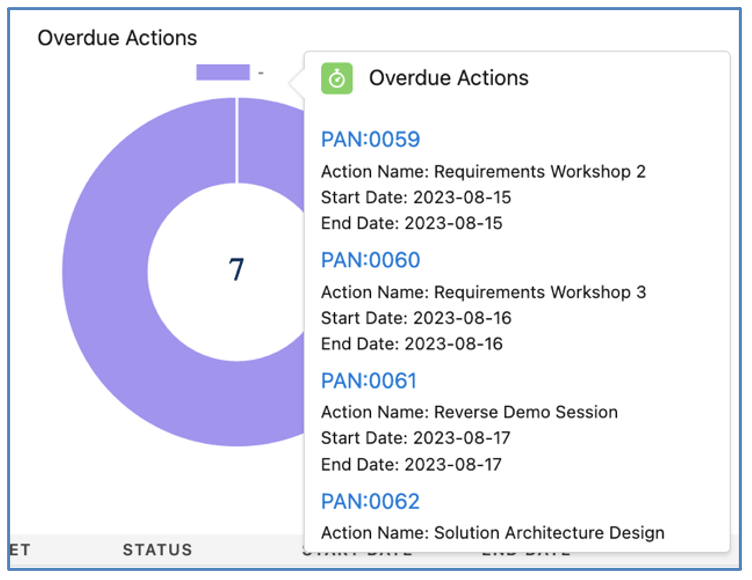
Completed Checklist Items Chart
The Completed Checklist Items gauge chart provides you with an overview of how many Checklist Items have been completed on the Project.
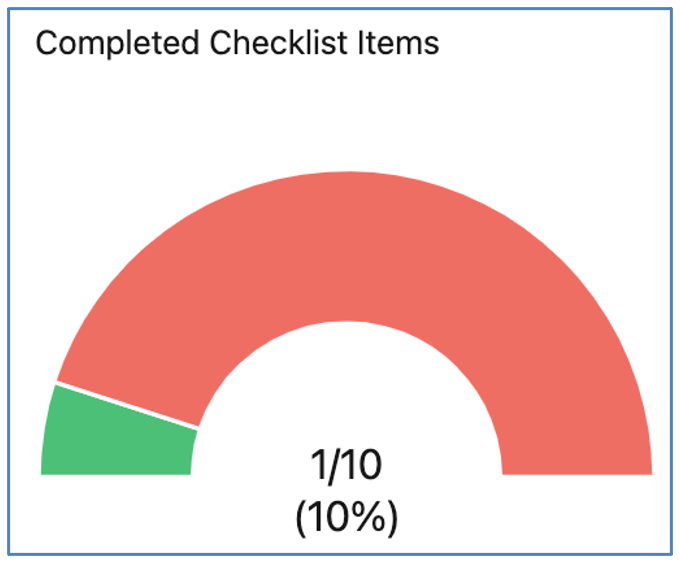
Overdue Checklist Items Chart
The Overdue Checklist Items donut chart provides you with insight into any Checklist Items that are overdue and groups them based on the ‘Priority’ value of the Action they relate to. When you hover over this chart, you’ll see a list of the Checklist Items that are overdue, so you can quickly jump to the detail if required.
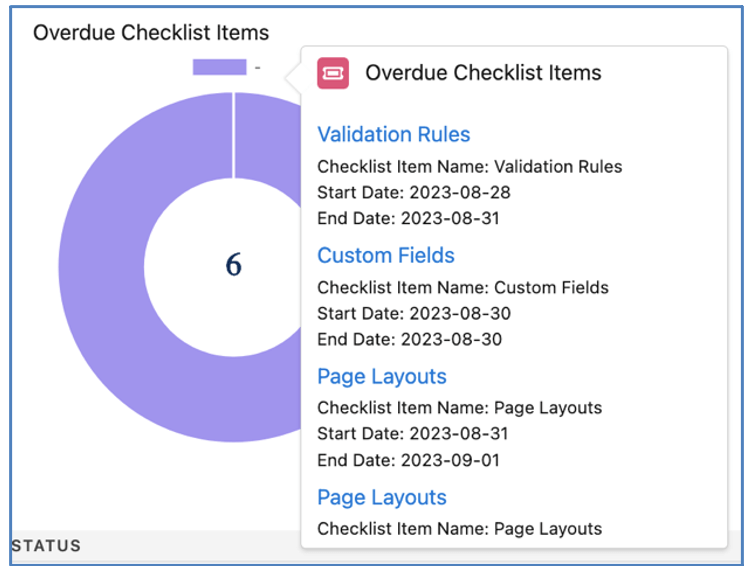
Velocity Chart
The Velocity Chart provides insight into the velocity performance of each Milestone on the Project.
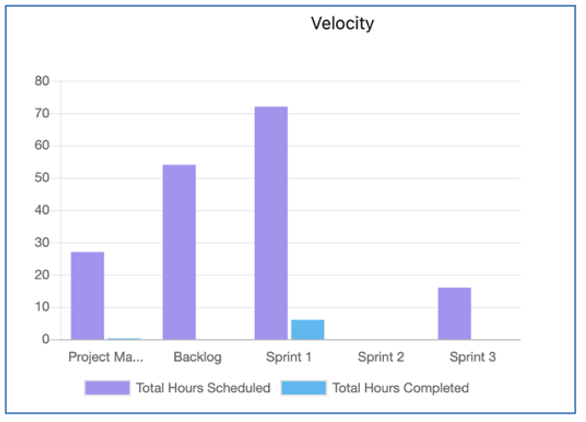
The Velocity measures the Total Hours Scheduled and Total Hours Completed for each Milestone.
These Charts can be hidden for individual Users by setting the ‘View Overview Tab Charts’ field to FALSE on their Role record.
Work Breakdown Structure
The Work Breakdown Structure section of the Overview Tab provides details of the full project plan, including:

Each layer can be collapsed / expanded by clicking the +/- buttons. This will be persistently remembered for each User each time they view a Project Overview. For example, if Mick collapsed Actions and Checklists, so was only looking at Phases and Milestones, he would only see Phases and Milestones the next time he loaded the Project Overview page.
Warning Icons
Where Start Date and End Date values are either overdue or approaching, a Red or Yellow warning icon will be displayed, as illustrated below.
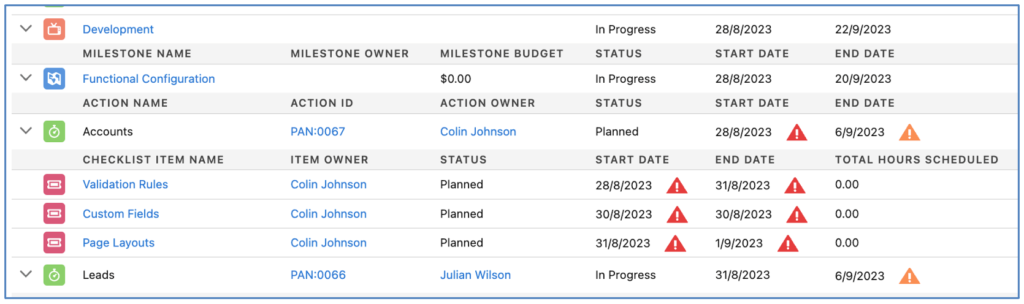
The table below outlines the rules that control which warning icon is displayed.
| Date Field | Status Value | Date | Warning Icon |
| Start Date | Planned | <= Today | |
| Start Date | Planned | Today +1 OR Today +2 | |
| End Date | Planned OR In Progress | <= Today | |
| End Date | Planned OR In Progress | Today +1 OR Today +2 |
Sort Order
By default, the Sort Order of each layer is set to the values specified in the table below.
| Phase | Milestone | Action | Checklist Item |
Gantt Sort Order ASC Start Date ASC End Date ASC Name ASC | Milestone Sort Order ASC Start Date ASC End Date ASC Name ASC | Gantt Sort Oder ASC Start Date ASC End Date ASC Action Name ASC | Sort Order ASC Start Date ASC End Date ASC Created Date ASC Name ASC |
Project Overview Filters
Filters can be applied to the Work Breakdown Structure (WBS) table on the Overview Tab of the Project Overview. This enables you to remove records that you may not wish to currently view. For example, you may wish to filter the records to only show you those where you are the owner, or remove any that have already been completed.
To access the Filters Modal, you will need to click the filter icon located on the right-hand side of the Overview WBS table, as shown below.

You can apply Filters at each of the following layers:
Filters applied at the Action layer can comprise of Filters on the Action, Checklist Item and Contributor Objects. For example, you may want to filter Actions based on you being the Action Owner, or a Contributor, or an Item Owner of a related Checklist Item.
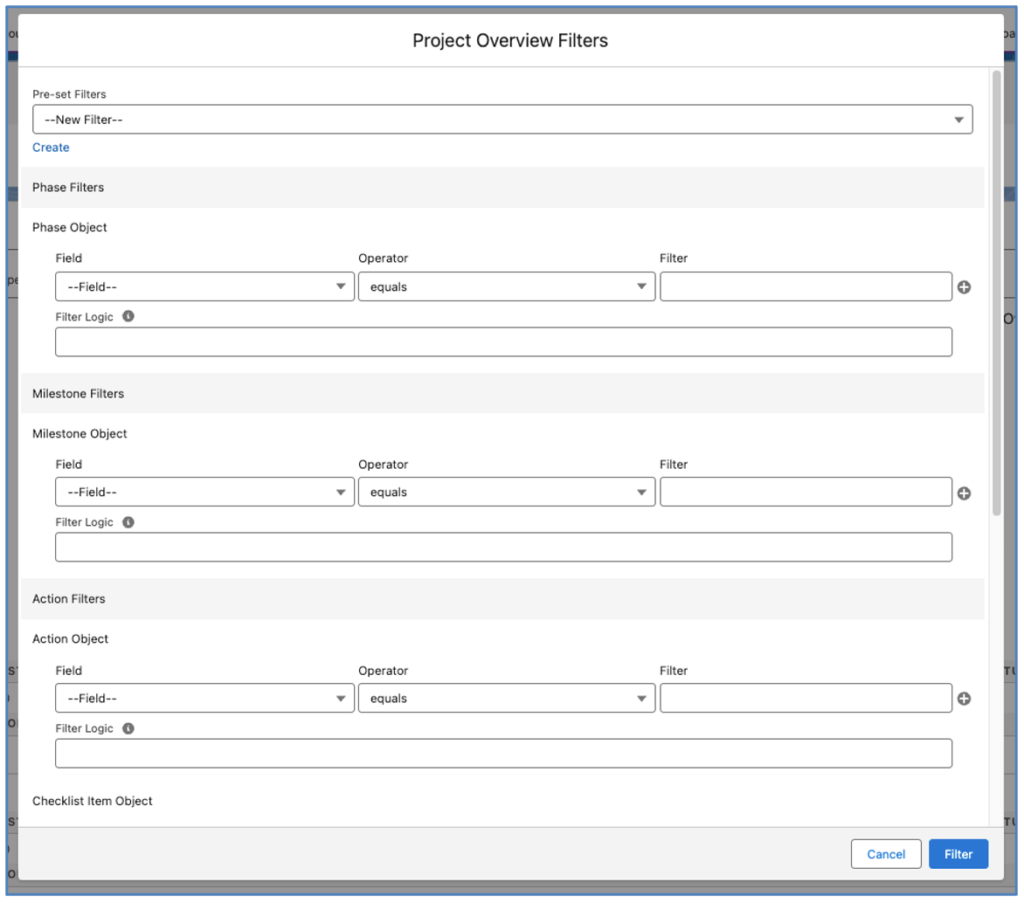
You are able to adjust the Filter Logic for each layer. Filters can be saved using the Pre-set Filter feature and shared with other Users.
Project Overview Settings
Each User can set their own preferences by clicking on the ![]() icon and adjusting the sort settings for each layer.
icon and adjusting the sort settings for each layer.
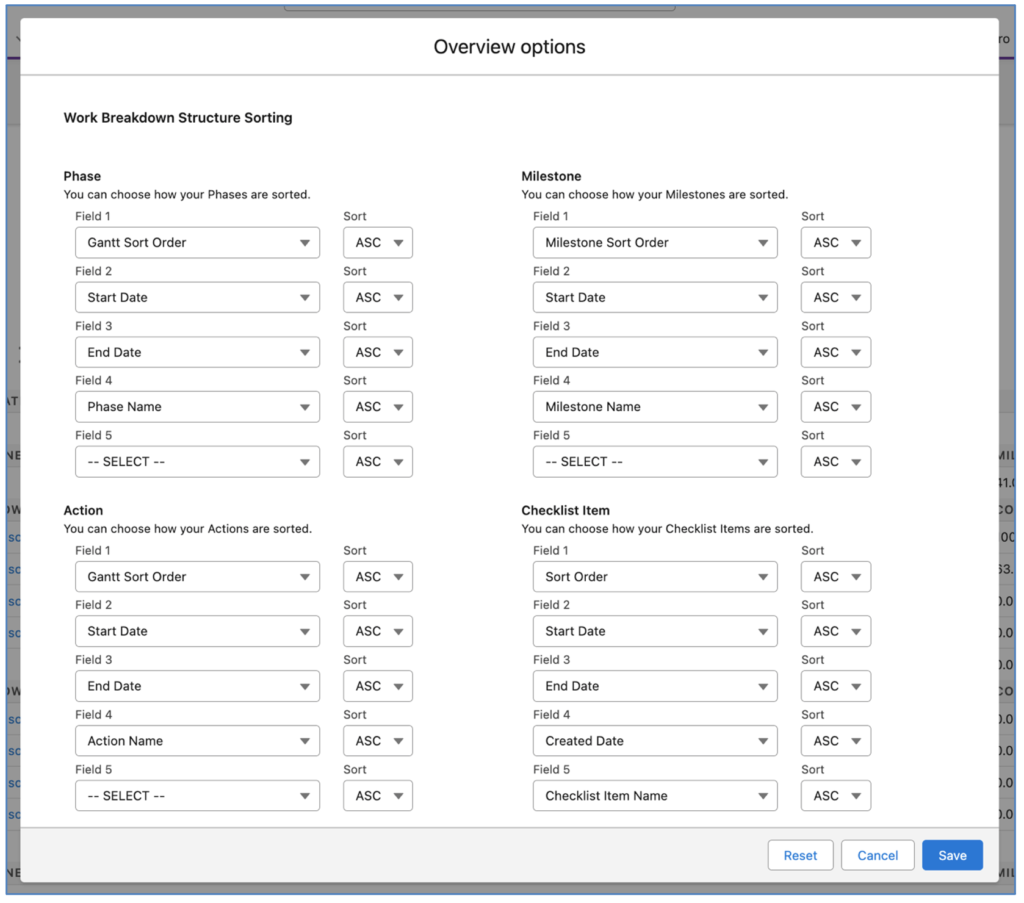
Users can specify up to 5 fields per Object to determine the sorting of records, along with whether the field should be sorted in ascending (ASC) or descending (DESC) order. To reset to the default settings, click the Reset button.
Customising the fields displayed
By default, the fields included for each layer of the Work Breakdown Structure are as specified in the table below.
| Phase | Milestone | Action | Checklist Item |
Name Phase Owner Phase Budget Status Start Date End Date Total Hours Scheduled Total Hours Completed Phase Completion Status | Name Milestone Owner Milestone Budget Status Start Date End Date Total Hours Scheduled Total Hours Completed Milestone Completion Status Milestone Type | Action Name Action ID Action Owner Status Start Date End Date Total Hours Scheduled Total Hours Completed Completion % Action Type | Name Item Owner Status Start Date End Date Total Hours Scheduled Total Hours Completed |
You are able to adjust the fields displayed using the following Field Sets:
Page Functions
There are a variety of buttons/icons that provide you with access to key features, each button/icon is explained below.
| Button/Icon | Function |
 | Click to create a new Milestone |
 | Click to open the Milestone Loader |
| Click to open the Edit Modal for the record | |
| Click to delete the record | |
| Click to open the Resource Assignment Wizard | |
| Click to open the Log Time component | |
| Click to open the Checklist Item Manager | |
| Click to open the Issue Manager | |
| Click to open the Action Splitter | |
| Click to add a new Action relating to the Milestone |
Detail
This tab gives you access to the standard detail page layout based on the Project record’s record type / user’s page layout assignment
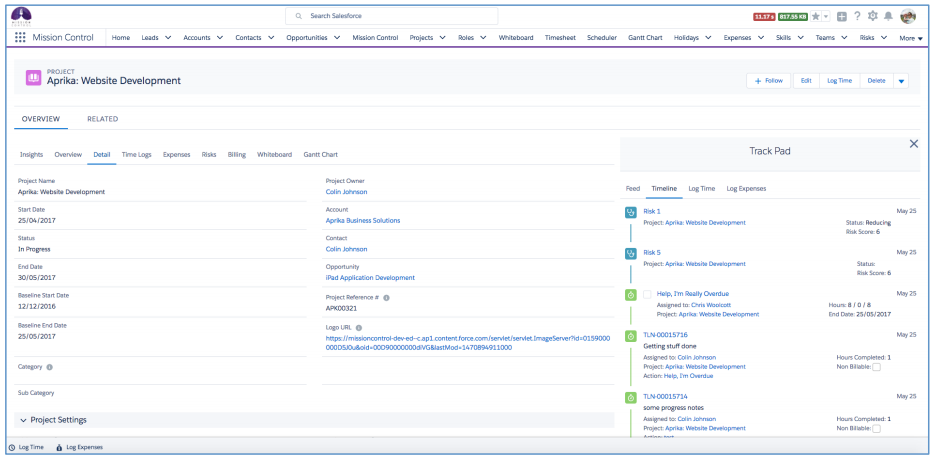
The benefit of this page is that you can control which fields you present to individual Users/Profiles, which is something the previous Project Overview page didn’t offer.
Budget Tab
This tab gives you access to the Budget Items related to the Project. From here, you can also access the ‘Manage Budgets’ page, which allows you to create and edit Budget Items.
Action Pad
This tab gives you access to the Action Pad, filtered for the specific Project.

Project Grid
The Project ‘Grid’ is a Tab accessible from the Project Overview Component. To access the Grid Tab, a User’s Role record must have the ‘View Grid Tab’ field set to TRUE.

The Grid provides a dynamic view to interact with the key activity layers within your Project Work Breakdown Structure (WBS). Within the Grid, you can view:
This is controlled by selecting the ‘Data Source’, which will be persistently remembered per User.
The Grid provides a variety of features to interact with the data, including:
Each of these features are explained in further detail below.
Group By
The Grid contains a ‘Group By’ section, located at the top of the Grid.

By dragging Fields from the Grid to the Group By section, the content of the Grid will be grouped by that field.

In the example above, the Grid has been grouped by Milestone, then by Action Owner. To remove the Group By selections you’ve made, simply click the x in the field ‘Pill’ within the Group By section.
Note: The Group By selections will be persistently remembered on a per User basis.
Quick Filter
Each column displayed within the Grid features a ‘Quick Filter’ under the Column Header, as shown below.

These Quick Filters can be used to apply a temporary filter to view key datasets. For example, in the image below, the Project Manager wants to view all Actions that have a Priority value of ‘High’. They enter High into the Quick Filter for Priority and the Grid returns the records matching the filter.

To return to the full dataset, simply remove the text string entered into the Quick Filter.
Inline Edit
The Grid enables you to make inline edits to the records displayed. Simply double-click into the cell you wish to edit and make the change.

Once you remove focus from that cell, you can click the ‘Save’ button to commit the changes you’ve made.

Note: The warning icon will display next to the Save button when there are unsaved changes on the Grid.
Auto Save
By default, changes you apply to the Grid are not saved until you click the main Save button at the top of the Grid.
However, if you would prefer each change to be saved immediately, you are able to turn on a setting that will automatically save each change. To enable this feature, you will need to set the ‘Enable Auto Save’ setting to TRUE.

This is accessed by clicking the settings icon in the top-right corner of the Grid. With this setting enabled, each time you make an update to any record on the Grid, it will be saved immediately.

When the setting is enabled, the status of Auto Save is displayed as ‘On’ next to the Save button.
Functions
There are a variety of icons that provide you with access to key features, each icon is explained below.
Icon | Function |
Provides access to the Resource Assignment Wizard. Will display Green if the Action has Contributors | |
Provides access to the Log Time component | |
Provides access to the Checklist Item Manager. Will display Green if the Action has related Checklist Items | |
Provides access to the Issue Manager. Will display Yellow if there are unresolved Issues | |
Provides access to the Action Splitter component | |
Provides access to the Edit Modal for the record | |
Click to delete the record |
Sorting
By default, the Grid will be sorted using the following fields:
Actions
Checklist Items
You can apply custom sorting, using up to 3 columns, for both the Action and Checklist Item layers of the Grid. This is achieved by clicking the Column Header for the column you wish to sort by. In the example below, the User has clicked on the Milestone column to sort by the Milestone Name.

To apply custom sorting to a second or third column, you will need to hold down the Shift key whilst clicking on the column you wish to sort by. In the example below, the User has selected Action Owner as the second column to sort by.

Custom Sorting will be remembered persistently on a per User basis. To clear any Custom Sorting that has been applied, click the ‘Clear Sort’ button as shown in the image below.

When Custom Sorting is cleared, the Grid will revert to the default sorting behaviour.
Filters
Filters can be applied to the WBS dataset on the Grid. This enables you to remove records that you may not wish to currently view. For example, you may wish to filter the records to only show those where you are the Action Owner, or remove any that have already been Completed or Cancelled.
To access the Filters Modal, you will need to click the filter icon located on the right-hand side of the Grid, as shown below.

You can apply Filters at each of the following layers:
Filters applied at the Action layer can comprise of Filters on the Action, Checklist Item and Contributor Objects. For example, you may want to filter Actions based on you being the Action Owner, or a Contributor, or an Item Owner of a related Checklist Item.

You are able to adjust the Filter Logic for each layer. Filters can be saved using the Pre-set Filter feature and shared with other Users.
Column Control: Field Sets
By default, the following fields are displayed for Action and Checklist Items on the Grid:
Action
You can add/remove fields from this view through the ‘Action Grid Fields’ Field Set on the Action Object.
You can access the Field Set by going to Setup > Object Manager > Action > Field Sets > Action Grid Fields.
Checklist Item
You can add/remove fields from this view through the ‘Checklist Item Grid Fields’ Field Set on the Checklist Item Object.
You can access the Field Set by going to Setup > Object Manager > Checklist Item > Field Sets > Checklist Item Grid Fields.
Time Logs
This tab includes the burn down chart, hours summary chart and ‘Timeline’ of all time Logs
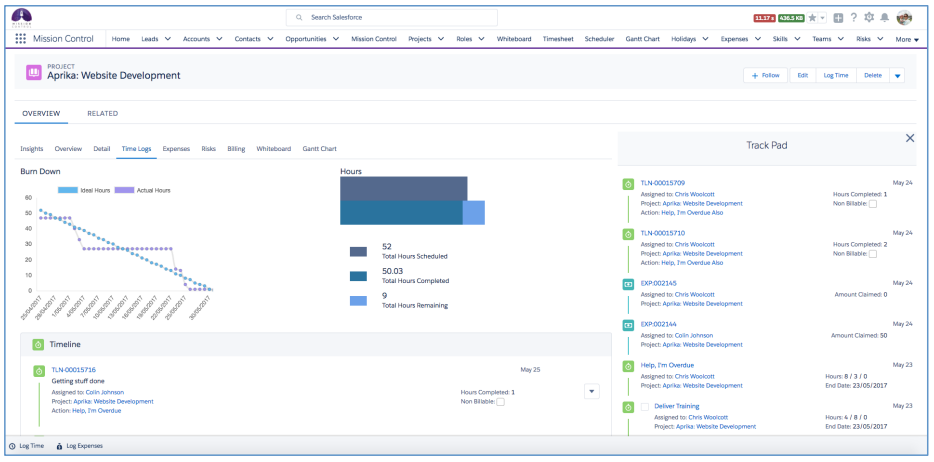
Burn Down Chart
The Burn Down Chart illustrates the ‘ideal’ and ‘actual’ delivery of hours throughout the project.
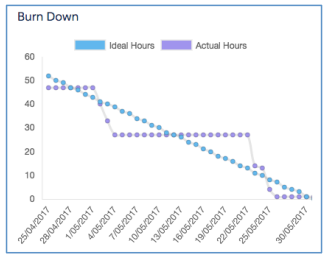
Hours Summary
The Hours Summary chart provides you with an overview of the ‘Total Hours Scheduled’ in comparison to the ‘Total Hours Completed’ + ‘Total Hours Remaining’, giving insight to whether the project is likely to be delivered in less or more hours than were scheduled.
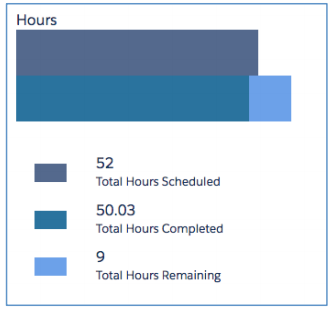
Time Log Table
The table shows a list of all Time Logs in descending order as they’ve logged against the Project’s Actions.
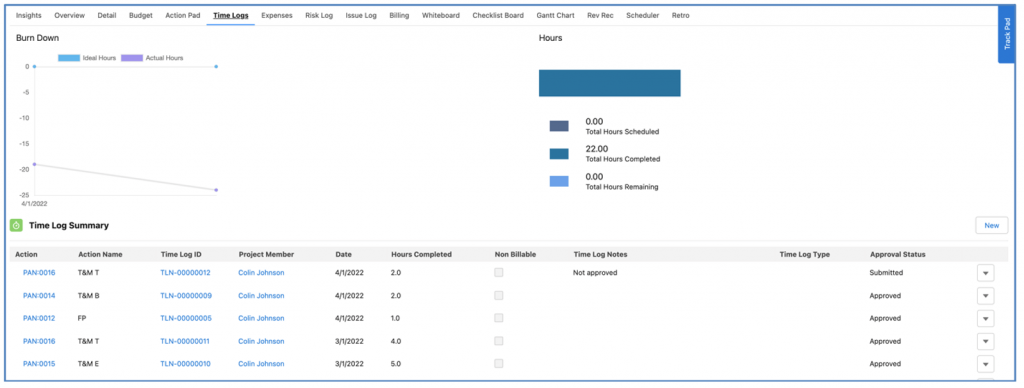
Project Time Logs PDF
The ‘Time Logs PDF’ can be generated from the Time Logs Tab on the Project Overview. This provides you with the ability to generate a PDF containing the Time Logs related to the Project, which can be downloaded and shared, for example, with your customer, to provide insight into the time spent on the project.
To generate the PDF, navigate to the Time Logs Tab on the Project Overview and click the ‘Generate PDF’ button, located on the right-hand side above the Time Log Summary table.
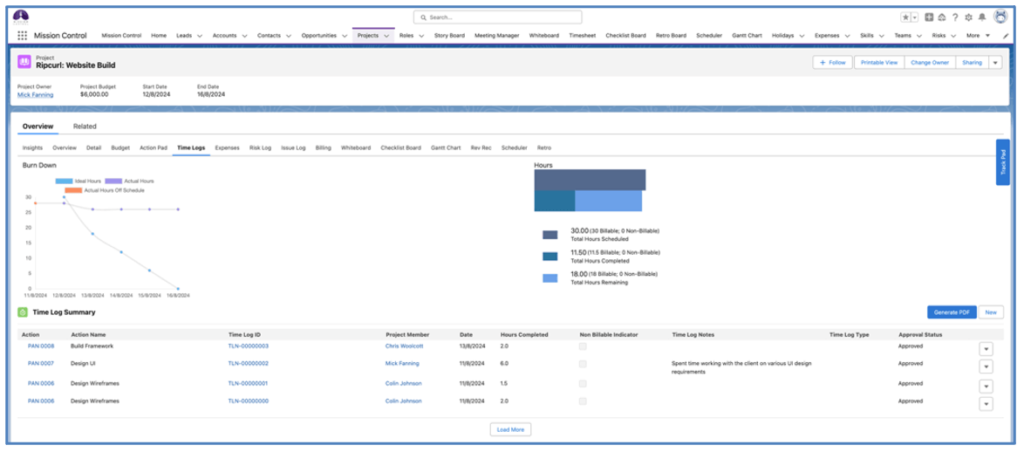
When you click the button, a modal will appear allowing you to specify a date range.
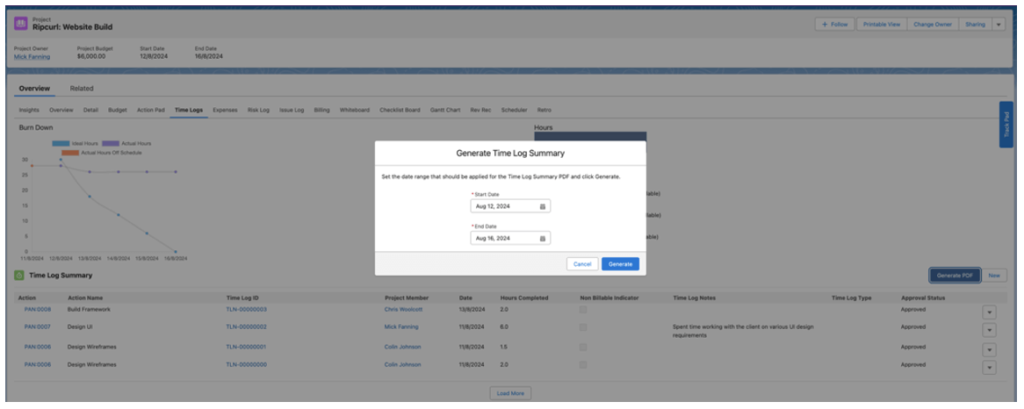
By default, these field values are set based on the following rules:
Start Date: Set to the Project Start Date or the Date of the earliest Time Log, whichever is earlier
End Date: Set to the Project End Date or the Date of the latest Time Log, whichever is later
You are able to run the report using these default dates, or select the required date range you want to apply. Time Logs will be included in the report if the ‘Date’ is greater or equal to the specified Start Date and less or equal to the specified End Date.
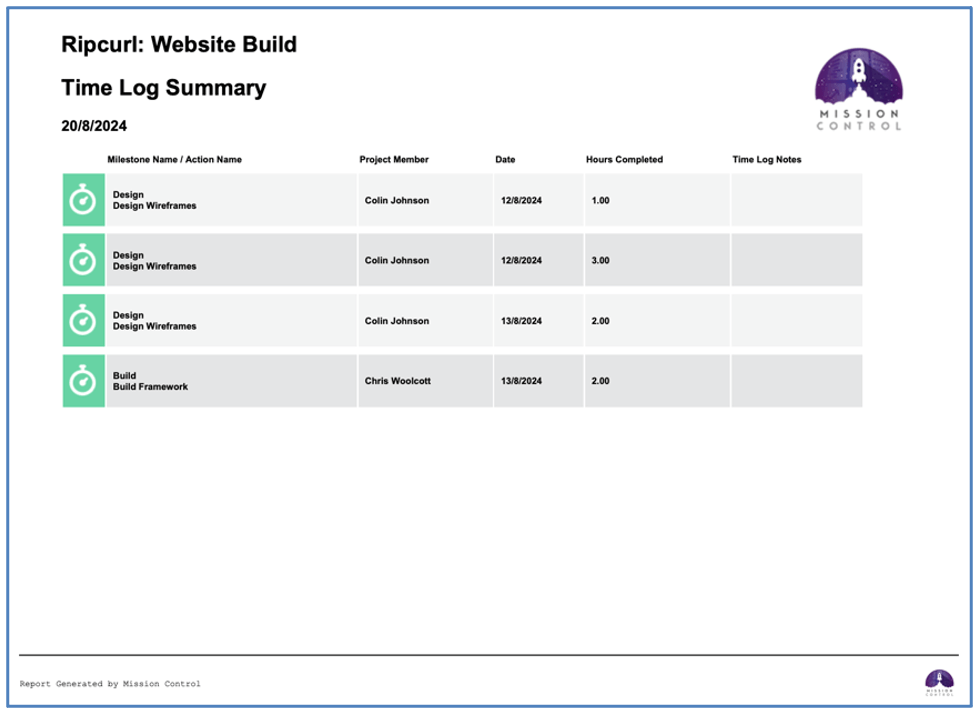
When you download the PDF, the default format for the File Name will be:
YYMMDD – Project Name – Time Log Summary.pdf
For example, if you generate the PDF on the 14th August 2024 for the Rip Curl: Website Build Project, the file name will be:
240814 – Rip Curl Website Build – Time Log Summary.pdf
Sort Order
The Sort Order used within the PDF is:
Custom Fields
The Milestone Name / Action Name column will always appear as the first column within the table. The other columns included by default are:
You can add additional fields into the table by using the ‘Time Log Summary PDF’ Field Set on the Time Log Object. You can include a total of 10 columns into the table, therefore, the first 9 fields included within the Field Set will be included in the PDF.
Branding
The logo located in the top right will display the file set as the ‘Gantt Chart Logo’ on the Control Pad within Mission Control. If there is no logo specified within this setting, the Mission Control logo will display by default.
The footer can be turned off by setting the ‘Report Generated by Mission Control Footer’ Setting to TRUE within the ‘Project Status Report Settings tile on the Control Pad of the Mission Control Console.
Expenses
The Expenses Tab provides access to key Purchase Order / Expense summary charts along with lists of Purchase Orders and Expenses.
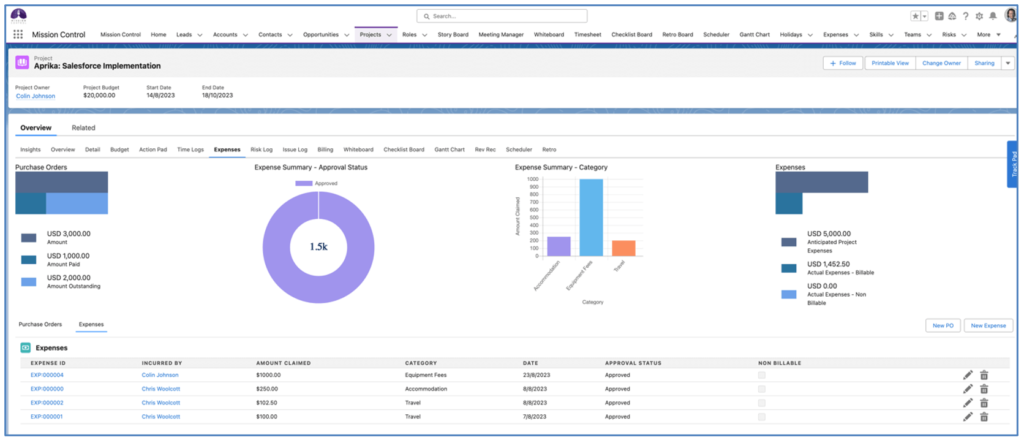
Expense Charts
Within the Expense Tab, you have a number of Charts providing insight into specific metrics.
Purchase Order Summary
This bar chart provides a summary of all Purchase Orders related to the Project.
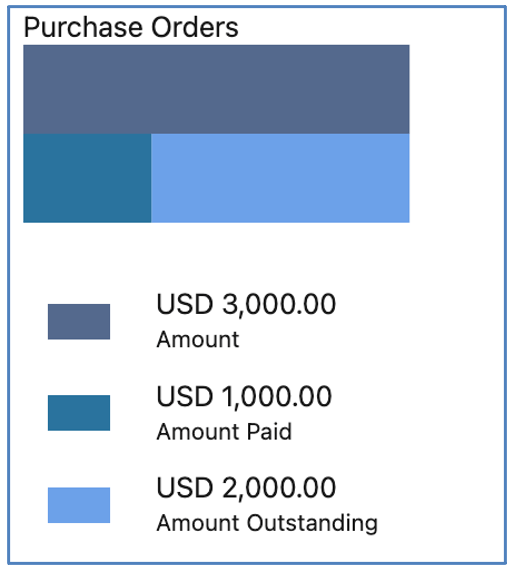
Expense Summary – Approval Status
This donut chart provides a summary of all Expenses grouped by the Approval Status.
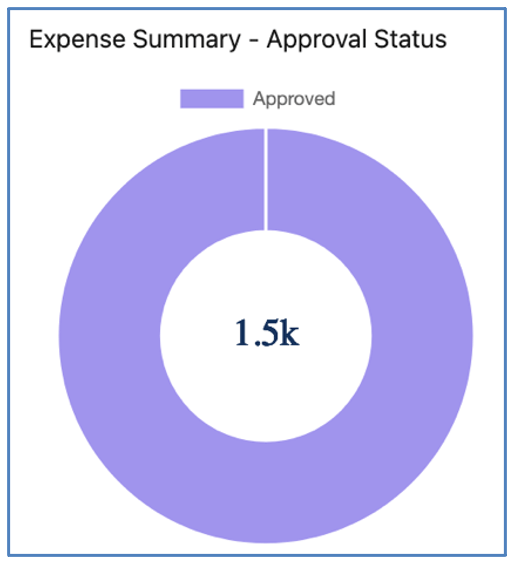
Expense Summary – Category
This bar chart provides a summary of all Expenses grouped by Category.
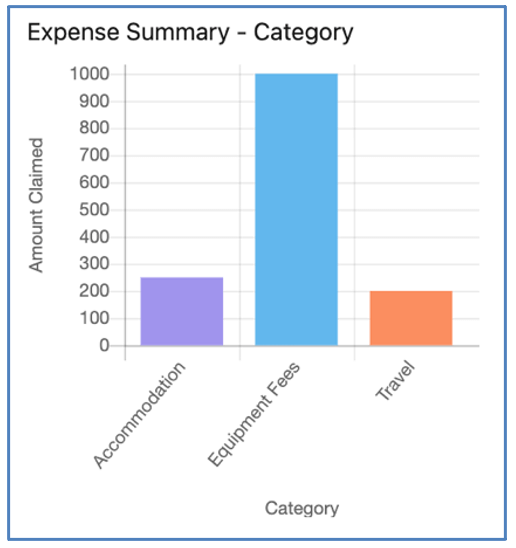
Expense Summary
This bar chart provides a summary of Anticipated Expenses versus Actual Expenses.
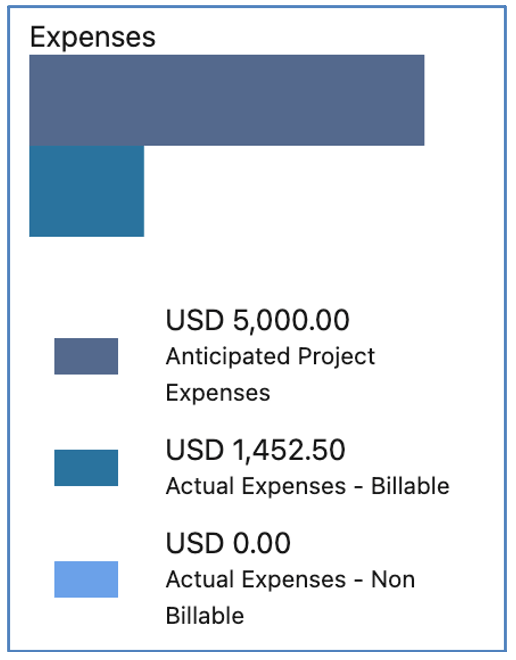
These Charts can be hidden for individual Users by setting the ‘View Expense Tab Charts’ field to FALSE on their Role record.
Purchase Orders & Expenses Tabs
Below the charts, there are Tabs that provide access to Purchase Orders and Expenses. You also have the ability to create new Purchase Orders and Expenses.
Purchase Orders
The Purchase Orders Tab provides visibility of all Purchase Orders logged against the Project, along with related Purchase Order Items and Expenses.

Expenses
The Expenses Tab provides visibility of all Expenses logged against the Project, including key fields such as Category, Amount Claimed and Approval Status.

Customising the fields displayed
By default, the fields included for the Purchase Orders and Expenses Tabs are as specified in the table below.
| Purchase Order | Purchase Order Item | Expense |
Purchase Order Number Account Summary Status Amount Amount Paid Amount Outstanding | Purchase Order Item Number Description Quantity Unit Price Amount | Expense ID Incurred By Amount Claimed Category Date Status Non Billable |
You are able to adjust the fields displayed using the following Field Sets:
Risks
This tab includes the Risk Matrix and a Risk Summary chart as well as a list view of all Risks.
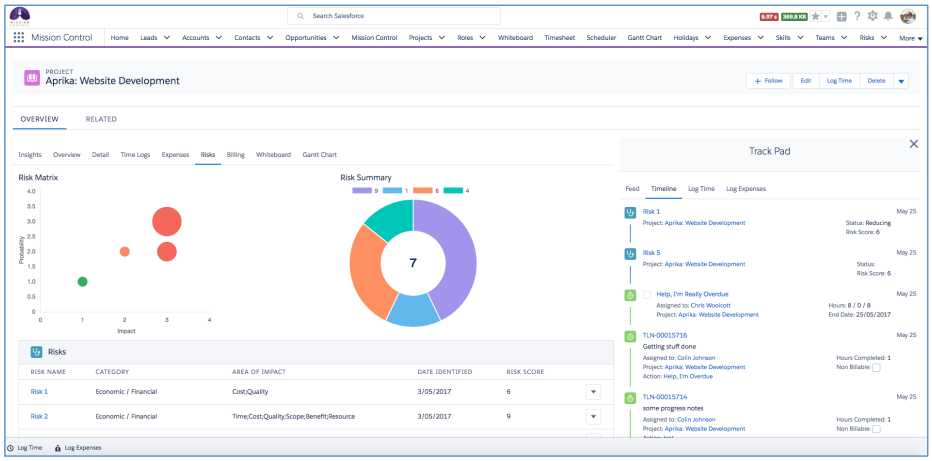
Risk Matrix
The Risk Matrix is a bubble chart representing all of the Risks based on their probability and impact rating. The bubbles increase in size based on the number of Risks with that rating.
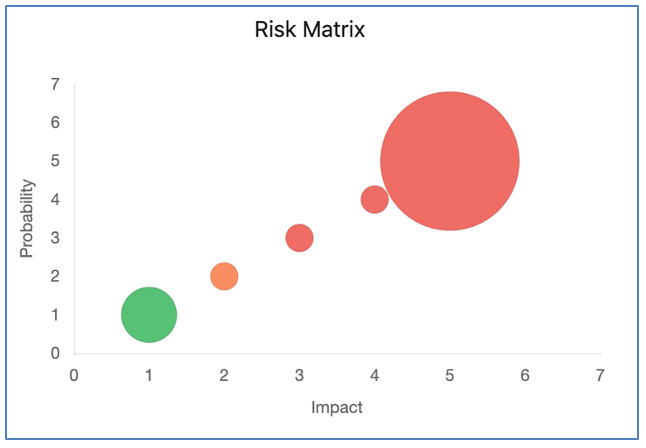
Risk Summary
The Risk Summary donut chart provides insight into the Risk Score of each Risk related to the Project.
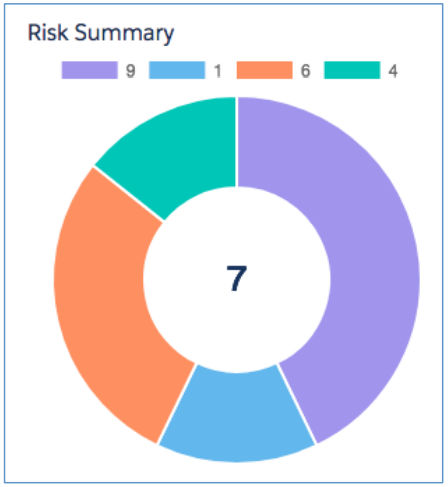
Risks List
You’re able to view all Risks logged against the project including key fields such as Category, Area of Impact and Risk Score.
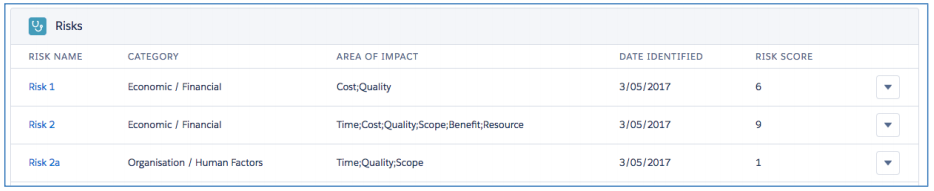
You’re able to Edit or Delete any Risk directly from the list by clicking the arrow on the right-hand side and selecting ‘Edit’ or ‘Delete’.

Billing
This tab includes some financial charts and a tree-structure of Billing Events > Billing Event Items and Billing Payments
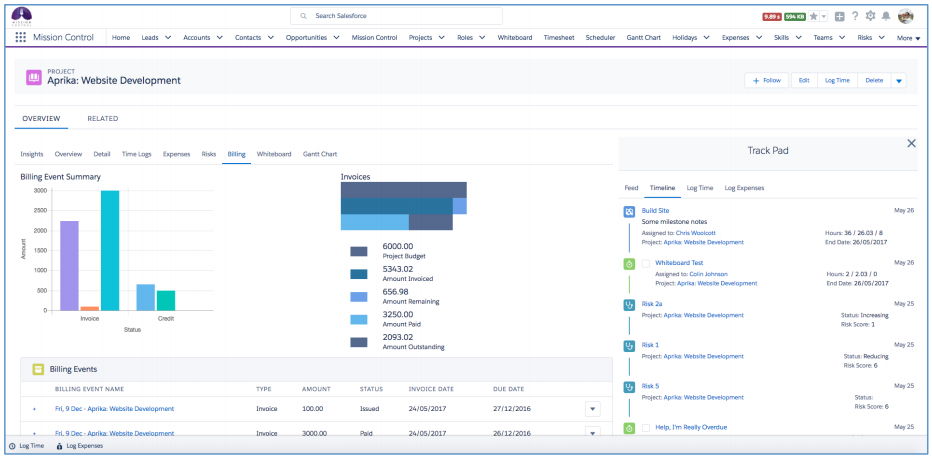
Billing Event Summary
This bar chart provides a summary of all Invoices and Credits that have been raised against the Project and summarised based on the ‘Status’.

Invoices Summary
This bar chart provides a summary of the project budget and the amounts invoiced, remaining, paid and outstanding.
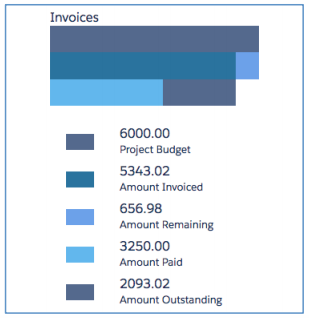
Billing Events List
This tab provides you with visibility of all Billing Events, Billing Event Items and Billing Payments logged against the project. The Billing Events are displayed in descending ‘Invoice Date’ order.
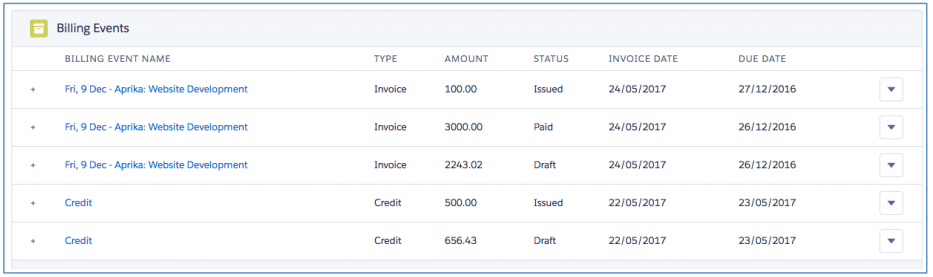
The list displays the Billing Events by default and can be expanded to display any related Billing Event Items and Billing Payments. To expand any individual Billing Event, simply click the + sign next to the Billing Event Name.
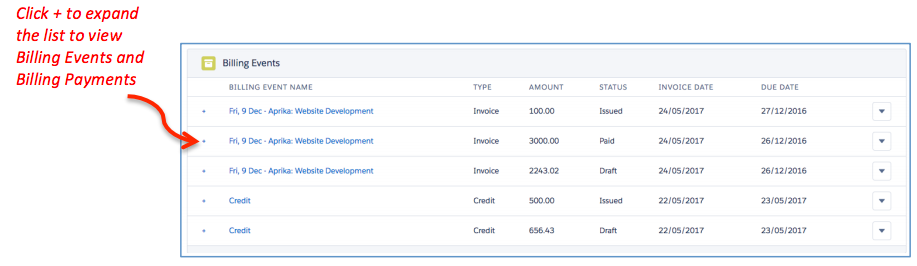
To collapse any of the Billing Event records, click the – button and the Billing Event Items and Billing Payments will be hidden again.
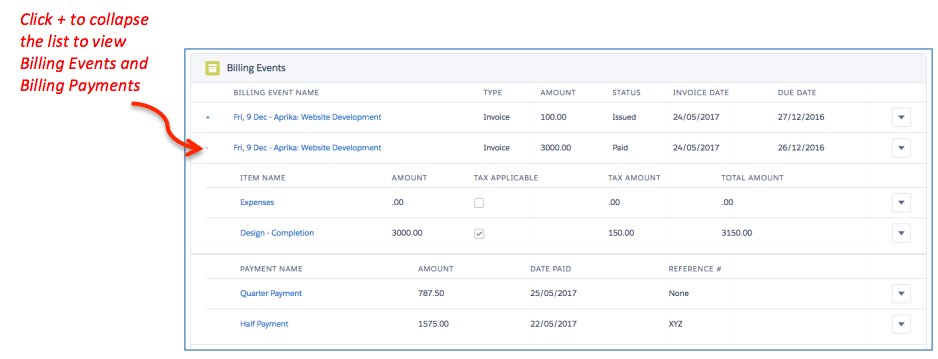
You’re able to Edit or Delete any Billing Event, Billing Event Item or Billing Payment directly from the list by clicking the arrow on the right-hand side and selecting ‘Edit’ or ‘Delete’.
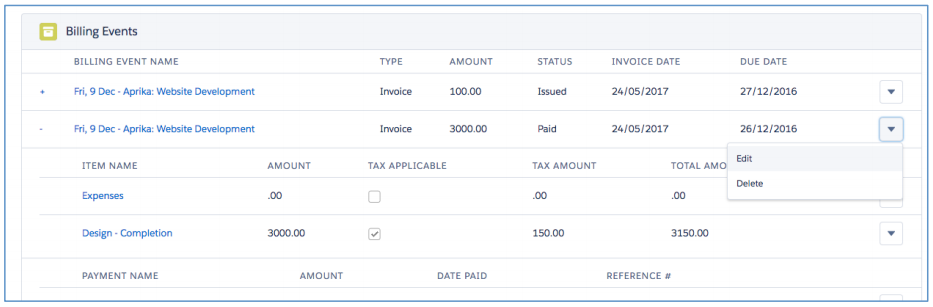
Whiteboard
This tab provides you with access to the Whiteboard, filtered for the single Project. All of the main Whiteboard functionality is available here.
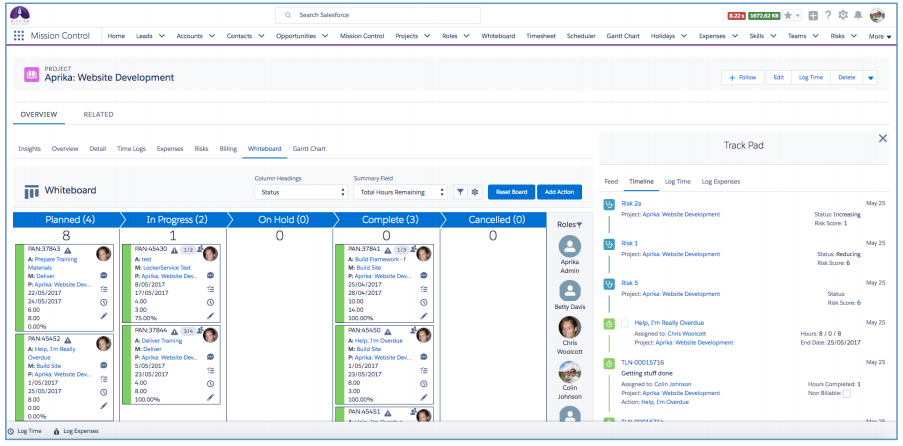
Checklist Board
This tab provides you with access to the Checklist Board, filtered for the single Project. All of the main Checklist Board functionality is available here.
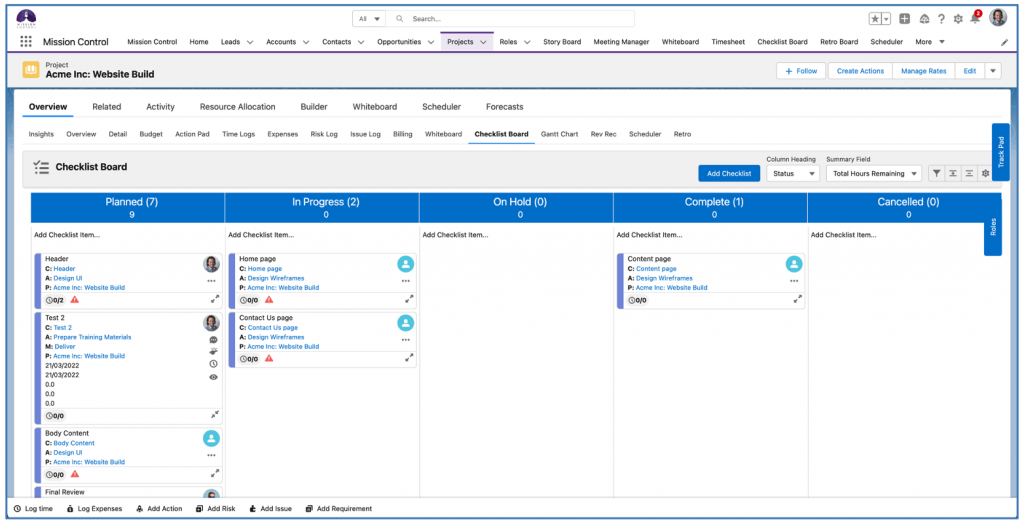
Gantt Chart
This provides you with access to standard Gantt Chart, filtered for the single Project. All of the main Gantt Chart functionality is available here.
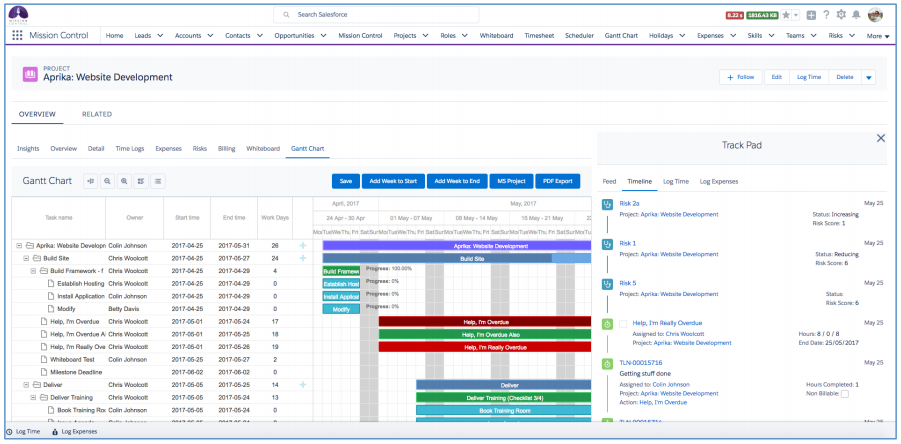
Revenue Recognition (Rev Rec)
The Rev Rec Tab gives you access to the Revenue Recognition page of the PMO Dashboard, filtered to the individual Project.
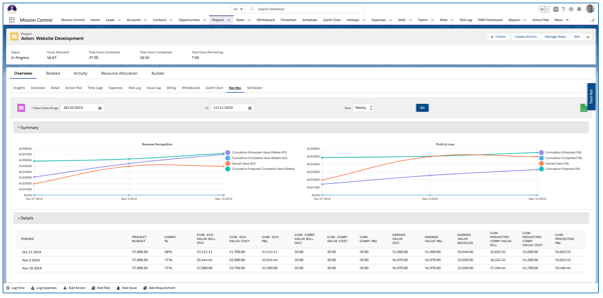
Scheduler
The Scheduler Tab gives you access to the capacity planning resource scheduler page, filtered to the individual Project.
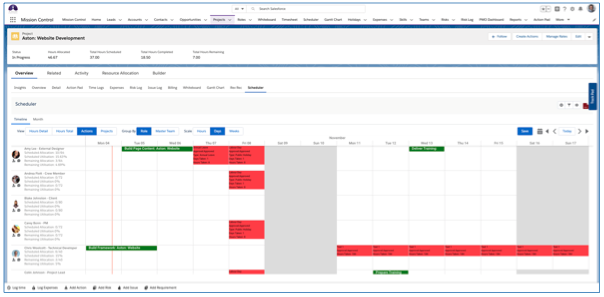
Retro
The Retro Tab gives you access to the Retrospective Kanban Board, filtered to the individual Project. It will display Learnings related to Retrospectives that are related to the Project.
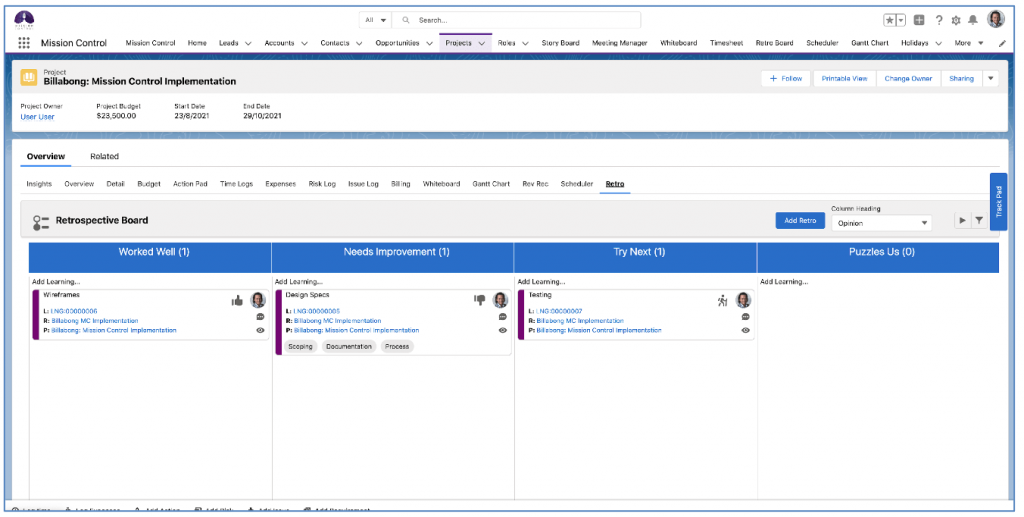
Epic Board
The Epic Board is a Tab on the Project Overview that enables Users to manage Epics, User Stories & Actions for Agile Projects. The Requirement Object is used as an Epic. An Epic allows you to group Actions together, even if they are allocated to separate Milestones on a Project.
For example, you may be running a Project, where you have captured a number of different scenarios from your customer, across various departments. These Actions will be delivered across a number of Sprint-based Milestones. However, you want to be able to retain insight as to which department each of the Actions relates to.
In the table below, we have captured the various use cases for each department within the customer’s business.
| Sales | Marketing | Customer Success | Finance |
· Track key stages of Opportunity Pipeline · Track Lead Status · Receive Leads from Website | · Track Lead Source · Send Mass Emails to Leads | · Receive support requests from customers via email · Track escalation rules | · Have insight into Sales Pipeline |
As the Project is planned out, these individual use cases will become Actions on your Project, which get assigned to individual Sprint Milestones. In the table below, we see how these Actions have been assigned to various Milestones.
| Sprint 1 | Sprint 2 | Sprint 3 |
· Track Lead Status · Receive Leads from Website · Track Lead Source | · Track key stages of Opportunity Pipeline · Send Mass Emails to Leads · Have insight into Sales Pipeline | · Receive support requests from customers via email · Track escalation rules |
By just looking at the Milestones and Actions, you lose the visibility of which ‘Epic’ the Actions relate to. With the Epic Board, you are able to view the Actions in context of both Epic (Requirement) and Sprint (Milestone). The table below illustrates the view of the Actions in context of both Epic and Sprint.
| Epic (Requirement) | Sprint (Milestone) | ||
| Sprint 1 | Sprint 2 | Sprint 3 | |
| Sales | · Track Lead Status · Receive Leads from Website | · Track key stages of Opportunity Pipeline | |
| Marketing | · Track Lead Source | · Send Mass Emails to Leads | |
| Customer Success | · Receive support requests from customers via email · Track escalation rules | ||
| Finance | · Have insight into Sales Pipeline | ||
Leveraging the Epic Board functionality, you will be able to maintain this view across both Epics and Sprints, as show in the Timeline view below.
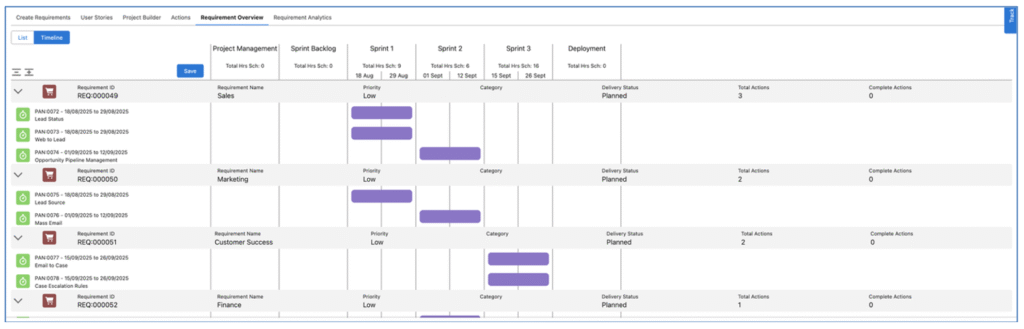
On a larger Project, you may choose to initially create User Stories, which you then convert to Actions once they are finalised and approved by the customer. However, User Stories are not mandatory. You can choose to create Actions, directly related to the Epic. The Epic Board provides the flexibility for you to choose either option.
The Epic Board comprises of various Sub Tabs, including:
You can control whether a User has access to the Epic Board and each individual Sub Tab based on various fields on their Role record.
To provide access to the Epic Board, a User’s Role record will need to have the ‘View Epic Board Tab’ field set to TRUE. You can also control which Sub Tab is loaded by default by setting the ‘Epic Board Default Tab’ field. You can also control visibility of each of the Sub Tabs through the following fields on the Role record:
Create Requirements Tab
The ‘Create Requirements’ Tab enables you to create the Epics for your Project. Note, we are using Epics and Requirements interchangeably here. The Epic will be a record that is inserted in the ‘Requirement’ Object.
Requirements can relate to a Project. However, due to the Master-Detail relationship, they must also relate to a Program. Therefore, to use the Epic Board, your Project will need to relate to a Program. This will allow you to relate your Requirements to a Program.
If your Project does not relate to a Program, you will see the following screen when you click on the Create Requirements Tab.
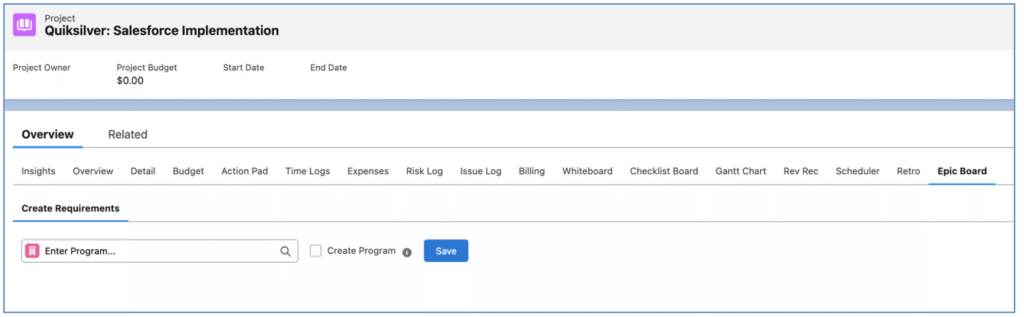
From here, you can relate the Project to a Program if one already exists by entering the Program name in the Program lookup field. Alternatively, if a Program has not already been created, you can tick the ‘Create Program’ field to generate a Program with the same Name as the Project.
When you click save, you will then be presented with the ‘Create Requirements’ page, as shown below.
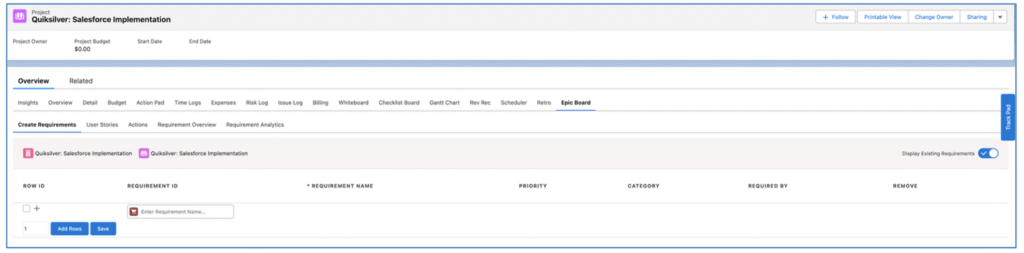
You will now be able to create the Epics for your Project. You can do this by using the quick create feature at the top of the page, or by clicking the ‘Add Rows’ button to add extra rows to your page.
The image below shows the 4 Epics we require on the Quiksilver: Salesforce Implementation Project, in line with the example from above.
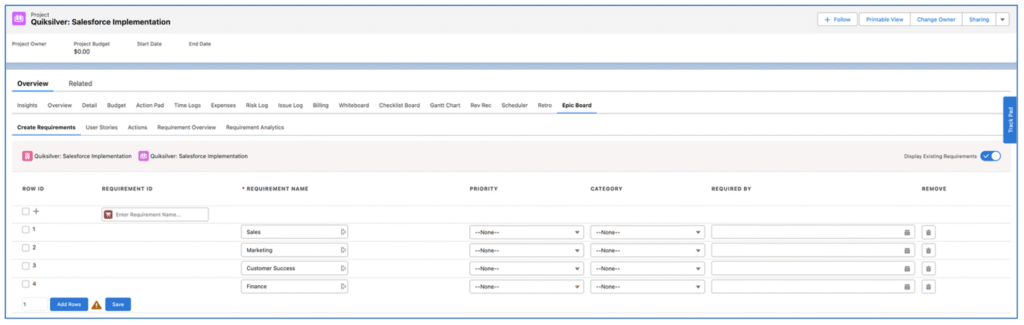
Once you have created the Epics, you can click Save.
User Stories Tab
The User Story Tab enables you to create User Stories, which can be directly related to an individual Epic. You may choose to create User Stories initially, so they can be refined, scoped and agreed with the client before converting them to Actions.
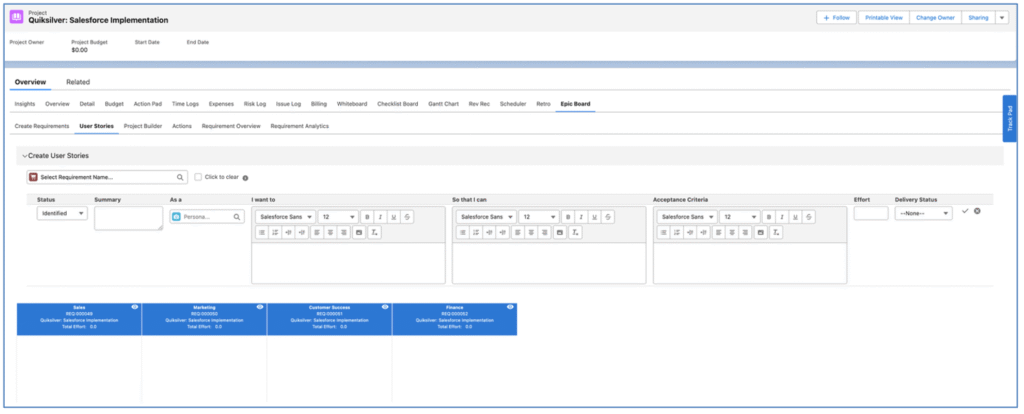
To create User Stories, you will need to first select the Requirement (Epic) they will relate to. If you intend to create multiple User Stories related to the same Requirement, you can choose to leave the ‘Click to clear’ FALSE and the Requirement will remain populated. If you set this field to TRUE, you will need to populate the Requirement field each time you create a new User Story.
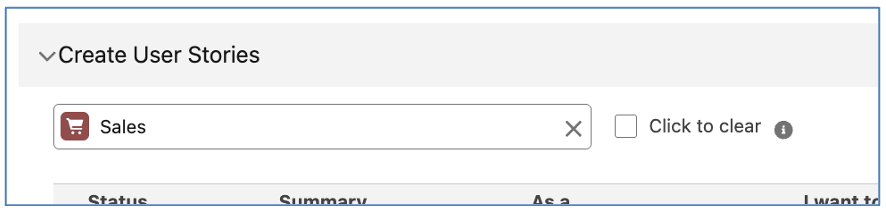
Once the Requirement field is populated, you can enter the required information for the individual User Story.

To create the User Story and have it appear on the Story Board, click the tick icon. This will add the User Story card to the board and clear the new User Story fields ready for you to create another User Story if required.

You will be able to continue creating User Stories, relating them to the appropriate Requirement.
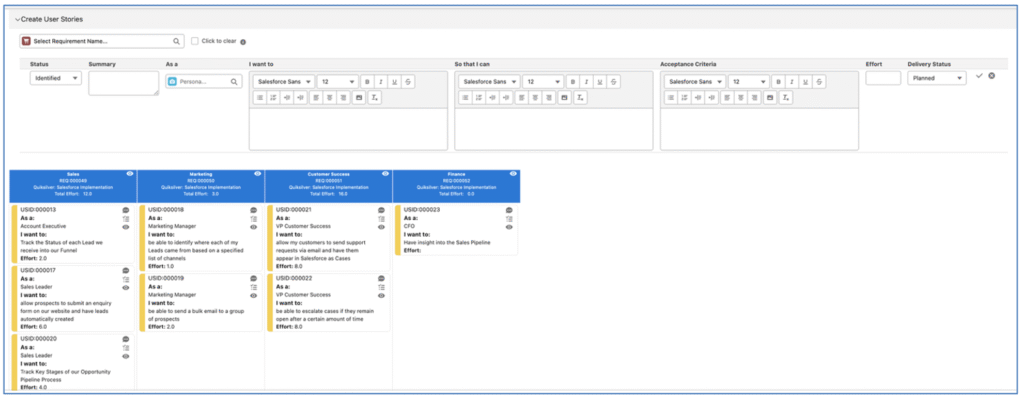
Once you have created all of your User Stories, you can use the Project Builder Tab to convert them to Actions and allocate them to the appropriate Sprints/Milestones.
Project Builder Tab
The Project Builder Tab provides access to the Project Builder component, which enables Users to convert User Stories into Actions. Whilst the standalone Project Builder provides various conversion methods, being used in context of the Epic Board, it is restricted to the ‘User Stories to Actions’ conversion method.

Users are able to drag and drop User Stories into Milestones on the Project Builder. The Actions will then be available on the Project’s work breakdown structure to be assigned to the appropriate resources and scheduled for delivery.
Actions Tab
The Actions Tab provides access to the ‘Create Actions’ component, enabling Users to view existing Actions and create new Actions.
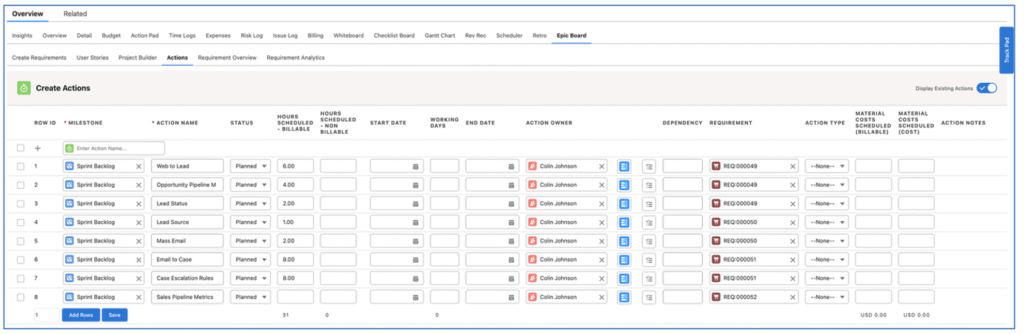
The functionality of the Actions Tab on the Epic Board is the same as the standalone Create Actions component.
Requirement Overview Tab
The Requirement Overview Tab provides the detailed insight of the Actions, in context of both the Epic (Requirement) and the Sprint (Milestone) they relate to. The Tab provides access to two features:
These views will only show Actions that are related to Requirements, not all Actions. For example, if you have a ‘Project Admin’ Milestone where you are tracking various PM Actions, such as weekly progress meetings, etc., they are unlikely to be related to a Requirement. Therefore, they will not be visible from this Tab, but they will remain visible on other key feature tabs such as the Overview, Whiteboard, Action Pad and Gantt Chart.
Requirement List
The Requirement List view provides a nested view of the Actions, grouped by the Requirement they are related to.
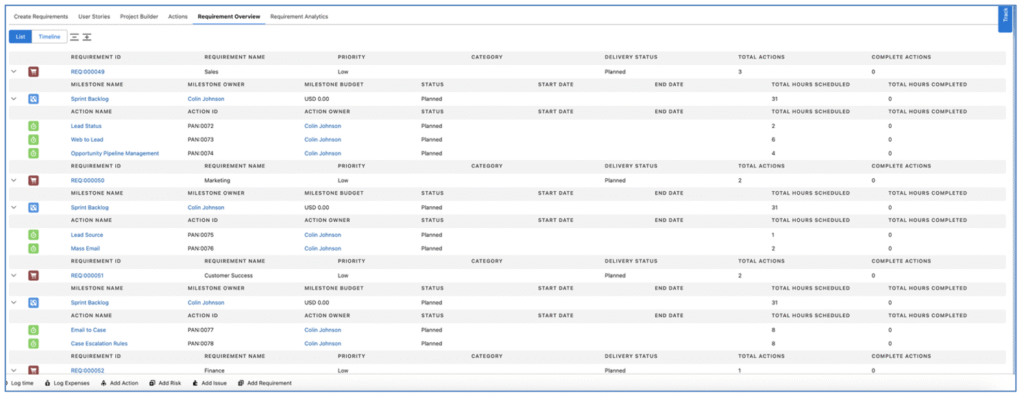
Each Requirement and Action will only appear in the List once. However, the Milestone can appear multiple times if Actions within different Requirements are related to the same Milestone.
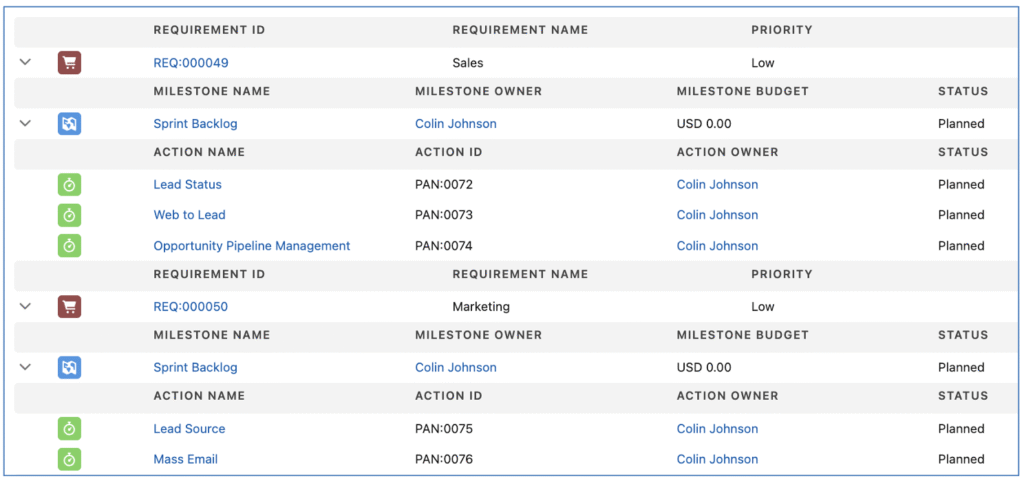
For example, in the example above, the Actions related to the ‘Sales’ Requirement and the Actions related to the ‘Marketing’ Requirement are allocated to the ‘Sprint Backlog’ Milestone. Therefore, the ‘Sprint Backlog’ Milestones appears under both the ‘Sales’ and ‘Marketing’ Requirements.
The Requirement List is a read-only visualisation of the data. If you wish to edit any of the underlying records, you can click the hyperlinks to navigate to the individual records.
Requirement Timeline
The Requirement Timeline view provides a gantt-style view of the Actions, grouping and visualising their relationship to both the Epic (Requirement) and Sprint (Milestone).
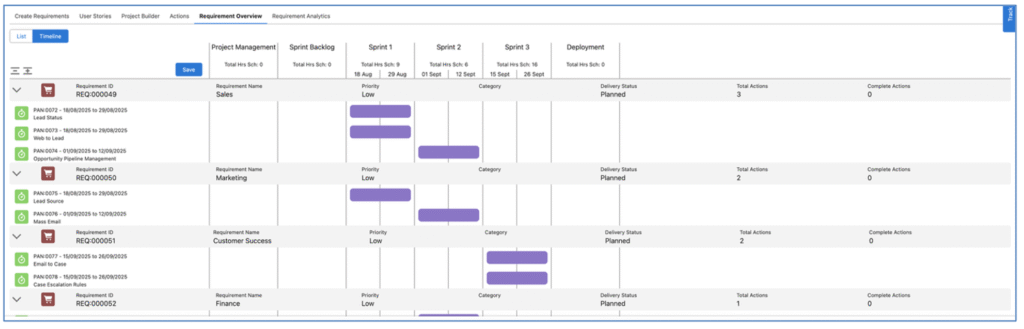
Vertically, the Actions are grouped by the Requirement they relate to. Horizontally, the Actions are grouped by the Milestone they relate to.
Milestones will only be visible on the Timeline view if they contain no Actions or Actions that relate to a Requirement.
To view additional information relating to any individual Action, you are able to click onto the timeline bar of the Action to display a Hover modal, as shown below.
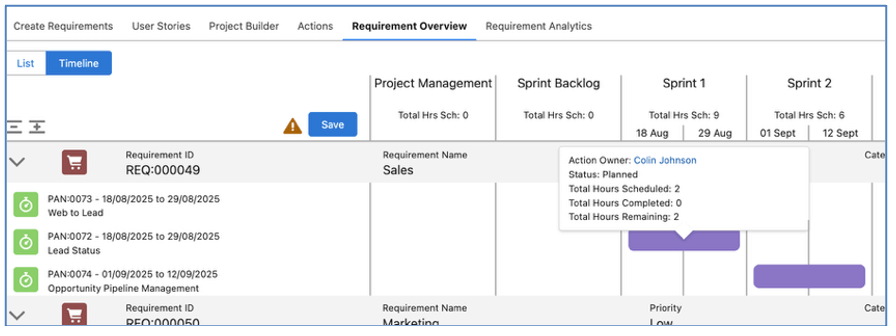
By default, the fields included in this hover include the Action Owner, Status, Total Hours Scheduled, Total Hours Completed and Total Hours Remaining. The content of the hover modal is controlled by a Field Set. Please refer to the ‘Epic Board Configuration Settings’ section for more information.
Unsaved Changes
When you make changes to any of the Actions on the Requirements Timeline view, you will need to confirm you wish to save the changes by clicking the ‘Save’ button.
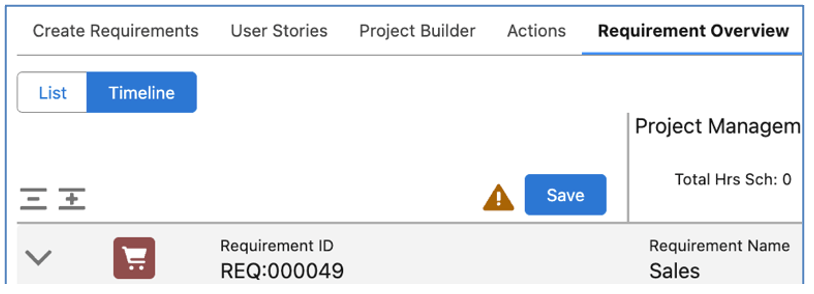
A warning icon will appear next to the Save button to notify you there are unsaved changes that could be lost if you navigate away from the page.
Adjust the Order of Actions
You are able to adjust the order in which Actions are displayed within their respective Requirement by dragging and dropping the Action up or down within the list of Actions.

In the example above, I would like the ‘Web to Lead’ Action to appear at the top of the list. Therefore, I drag it up above the ‘Lead Status’ Action. This adjusts the ‘Requirement Priority Order’ field on the Action record.
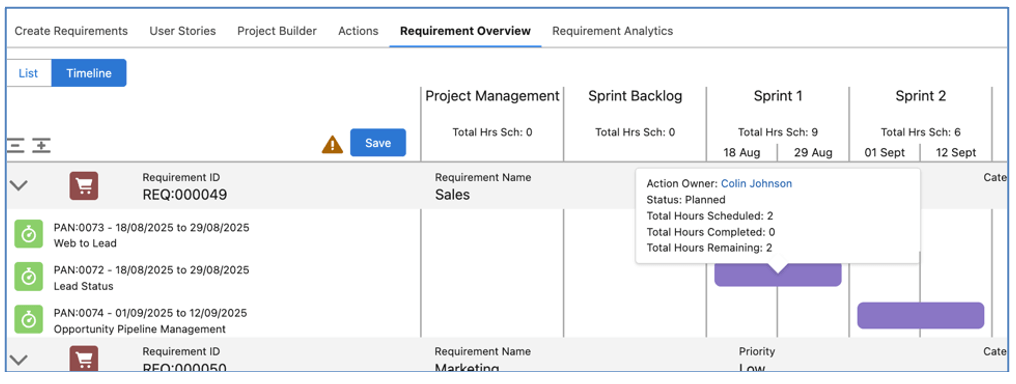
The unsaved changes warning icon will appear, reminding me to click the Save button to commit the change.
Reparent an Action between Requirements
You are able to reparent an Action from one Requirement to another by dragging and dropping the Action between Requirements.
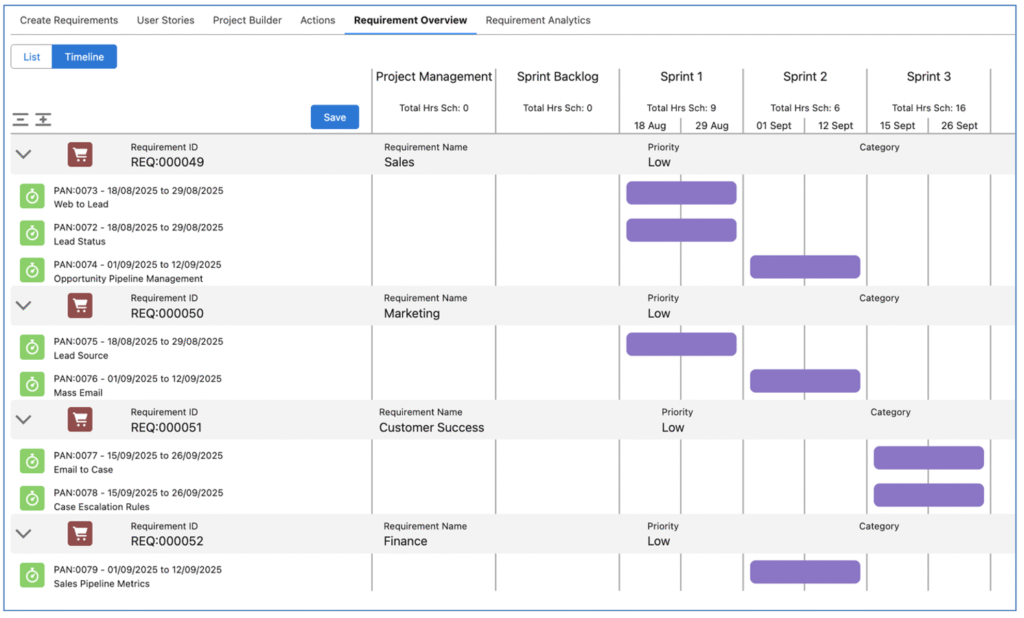
In the example above, the ‘Opportunity Pipeline Management’ Action is currently related to the ‘Sales’ Requirement. However, we need to relate it to the ‘Finance’ Requirement instead. Therefore, we are able to drag and drop this into the list of Actions for the ‘Finance’ Requirement, as shown below.

The unsaved changes warning icon will appear, reminding me to click the Save button to commit the change.
Reparent an Action between Milestones
You are able to reparent an Action from one Milestone to another by dragging and dropping the Action between Milestone.
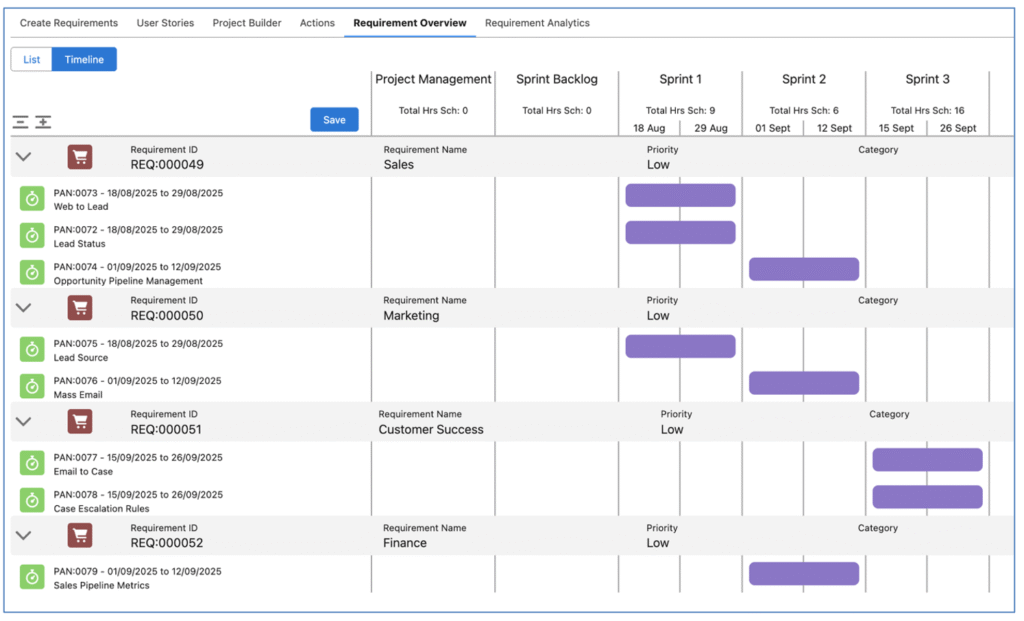
In the example above, the ‘Web to Lead’ Action is currently related to the ‘Sprint 1’ Milestone. However, we need to reschedule this into the ‘Sprint 2’ Milestone instead. Therefore, we are able to drag and drop this into the column for the ‘Sprint 2’ Milestone, as shown below.
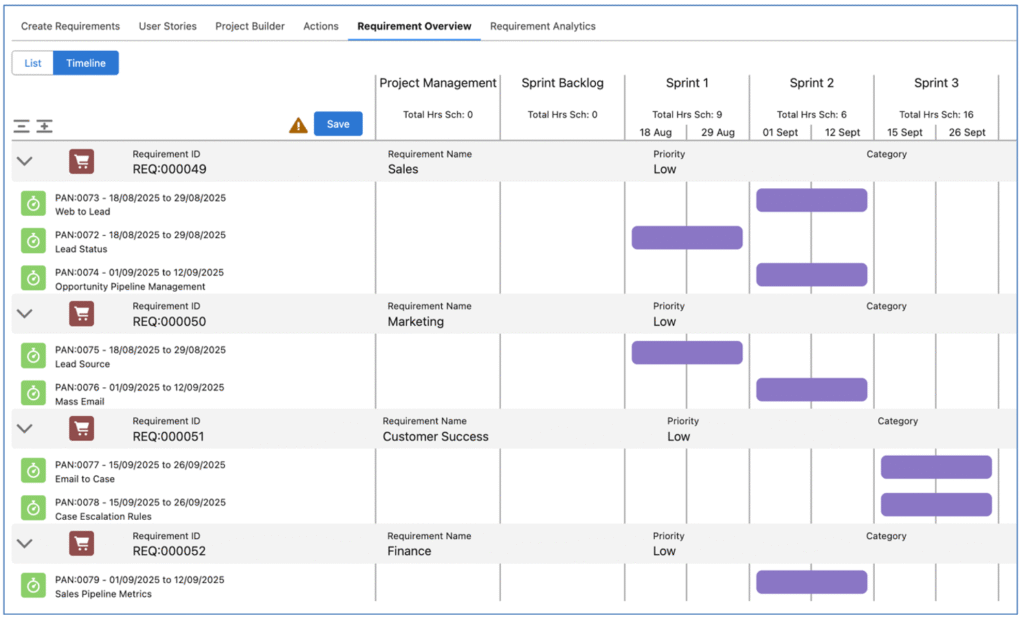
The unsaved changes warning icon will appear, reminding me to click the Save button to commit the change.
Note: When an Action is rescheduled to a new Milestone, if the Action Owner is unavailable during that timeframe, a notification will be displayed advising of their availability restrictions.
Edit Action Details
You are able to edit the details of an Action by double-clicking on the Timeline bar for the Action. This will open up the ‘Edit Action’ Modal, as shown below.

By default, the fields included in this Modal include the Start Date, End Date and Working Days. The content of the modal is controlled by a Field Set. Please refer to the ‘Epic Board Configuration Settings’ section for more information.
Requirement Analytics Tab
The Requirement Analytics Tab provides access to various charts providing insight into the performance of the Epics, including:

Below is an overview of the information each chart provides.
Burn Down
The Burn Down Chart illustrates the ‘ideal’ and ‘actual’ delivery of hours throughout the Sprints.
Velocity: Completed Actions
This gauge shows the total number of Actions assigned to the Sprints and how many of those Actions were Completed.
Hours by Time Log Type
This donut chart provides insight into the number of hours logged to the Sprints, categorised by Time Log Type.
Velocity: Total Hours
This bar chart provides insight into the velocity of total hours, illustrating the number of hours scheduled and the number of hours completed during the Sprints.
Velocity: Hours by Function
This bar chart provides insight into the velocity of hours by Function, illustrating the number of hours scheduled and the number of hours completed during the Sprints, grouped by the Role ‘Function’ field.
Velocity: Hours by Role
This bar chart provides insight into the velocity of hours by Role (person), illustrating the number of hours scheduled and the number of hours completed during the Sprints, grouped by Role.
Epic Board Configuration Settings
There are a number of Field Sets that enable you to customise the fields displayed on specific sections across the Epic Board. A list of all applicable Field Sets is included below.
Requirements
Create Requirements Fields – controls the fields displayed on the ‘Create Requirements’ Tab
Requirement Overview Requirement Fields – controls the fields displayed on the List and Timeline views on the ‘Requirement Overview’ Tab
Milestone
Requirement Overview Milestone Fields – controls the fields displayed on the List and Timeline views on the ‘Requirement Overview’ Tab
Action
Requirement Overview Action Fields – controls the fields displayed on the List and Timeline views on the ‘Requirement Overview’ Tab
Requirement Overview Action Hover – controls the fields displayed on the Hover Modal on the Timeline view of the ‘Requirements Overview’ Tab
Requirement Overview Action Modal – controls the fields displayed on the ‘Edit Action’ Modal on the Timeline view of the ‘Requirements Overview Tab
Checklist Item
Requirement Overview Checklist Fields – controls the fields displayed on the List and Timeline views on the ‘Requirement Overview’ Tab
Field Level Security / Object Access
Please note that all records displayed on the Project Overview Page have Field Level Security, Object Access and Sharing Rules enforced. However, whilst the Charts enforce Object Access and Sharing Rules, the Field Level Security is not enforced. For example, if a User does not have the permission to view the Expense Field ‘Amount Claimed’ they would still see the figures in the Expense Charts. Therefore, we recommend you review the contents of each chart to ensure you set User visibility accordingly.
Tab / Chart Access
We’ve focused on providing you as much flexibility as possible with regards to how you use the Project Overview. You can control access to each Tab, and the Charts on the Tab for each Individual Role. A number of new fields have been added to the Role Object to enable you to set the access to each Tab. The new fields are summarised below.
| Field | Field Type | Comments |
| Project Overview Default Tab | Picklist | Allows you to specify which Tab you would like to appear when initially loading the Project Overview page |
| View Insights Tab | Checkbox | Identifies whether the Role can view the Insights Tab |
| View Overview Tab | Checkbox | Identifies whether the Role can view the Overview Tab |
| View Detail Tab | Checkbox | Identifies whether the Role can view the Detail Tab |
| View Overview Tab Charts | Checkbox | Identifies whether the Role can view the charts on the Overview Tab |
| View Budget Tab | Checkbox | Identifies whether the Role can view the Budget Tab |
| View Action Pad Tab | Checkbox | Identifies whether the Role can view the Action Pad Tab |
| View Time Logs Tab | Checkbox | Identifies whether the Role can view the Time Logs Tab |
| View Time Logs Tab Charts | Checkbox | Identifies whether the Role can view the charts on the Time Logs Tab |
| View Expenses Tab | Checkbox | Identifies whether the Role can view the Expense Tab |
| View Expenses Tab Charts | Checkbox | Identifies whether the Role can view the charts on the Expense Tab |
| View Risks Tab | Checkbox | Identifies whether the Role can view the Risks Tab |
| View Risks Tab Charts | Checkbox | Identifies whether the Role can view the charts on the Risks Tab |
| View Issue Log Tab | Checkbox | Identifies whether the Role can view the Issue Log Tab |
| View Billing Tab | Checkbox | Identifies whether the Role can view the Billing Tab |
| View Billing Tab Charts | Checkbox | Identifies whether the Role can view the charts on the Billing Tab |
| View Whiteboard Tab | Checkbox | Identifies whether the Role can view the Whiteboard Tab |
| View Checklist Board Tab | Checkbox | Identifies whether the Role can view the Checklist Board Tab |
| View Gantt Chart Tab | Checkbox | Identifies whether the Role can view the Gantt Chart Tab |
| View Rev Rec Tab | Checkbox | Identifies whether the Role can view the Revenue Recognition Tab |
| View Scheduler Tab | Checkbox | Identifies whether the Role can view the Scheduler Tab |
| View Retro Tab | Checkbox | Identifies whether the Role can view the Retro Tab |
| View Epic Board | Checkbox | Identifies whether the Role can view the Epic Board |
You can set these field values for an individual Role record by editing the record and updating the fields in the ‘Project Overview Settings’ section.
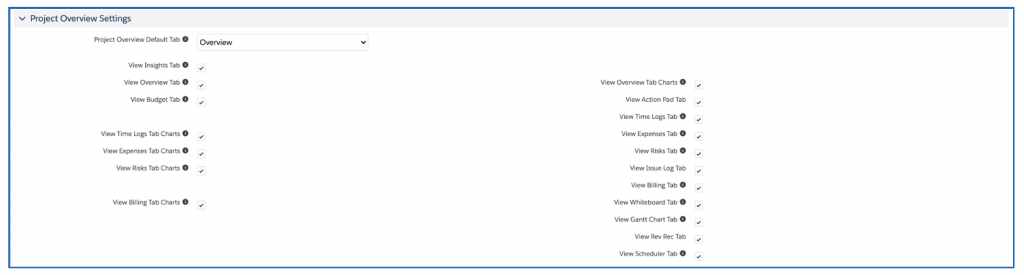
You can also manage these settings for all of your Role records from a new List View that has been included called ‘Role Permissions – Project Overview Page’
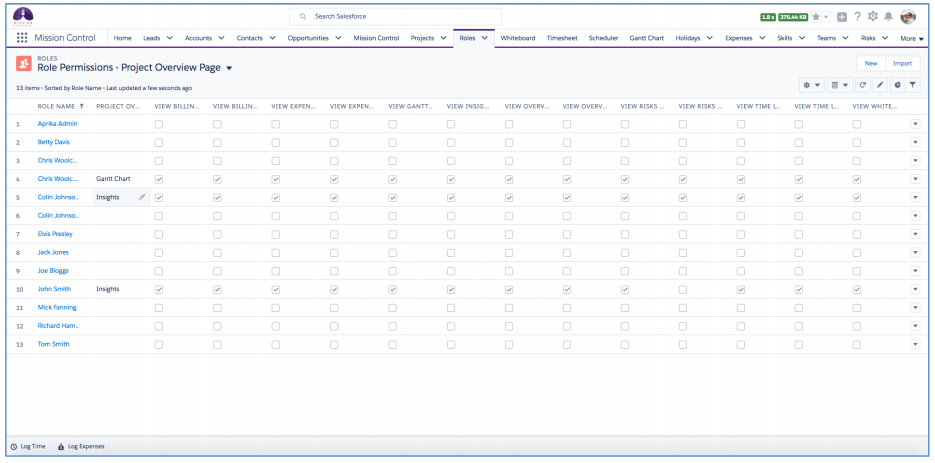
To ensure all of your Roles have access to the Project Overview upon initial upgrade to this version, an Install Script will run as part of the upgrade that will set all of the fields to TRUE. You will then be able to adjust the settings for each Role as required.
LEX Configuration
For customers using Salesforce Classic, you will not need to take any action to begin using the Project Overview Page. However, for Lightning Experience customers, you will have to make a small modification to the Page Layout.
Please Note: You will need to have already configured ‘My Domain’ within Salesforce to be able to use the Project Overview Page within Lightning Experience. Please refer to the Salesforce Help Documentation on how to configure ‘My Domain’.
To access the Project Overview Page in Lightning Experience, please navigate to a Project, where you will see a page similar to the one shown below.
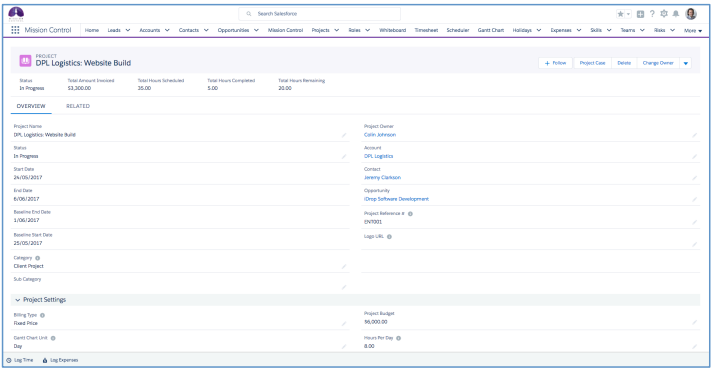
Then click the Settings Icon in the top right hand corner of the screen and click ‘Edit Page’
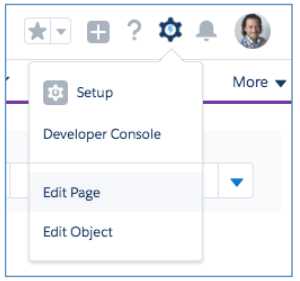
This will open up the Lightning App Builder and show you a screen like the one below.
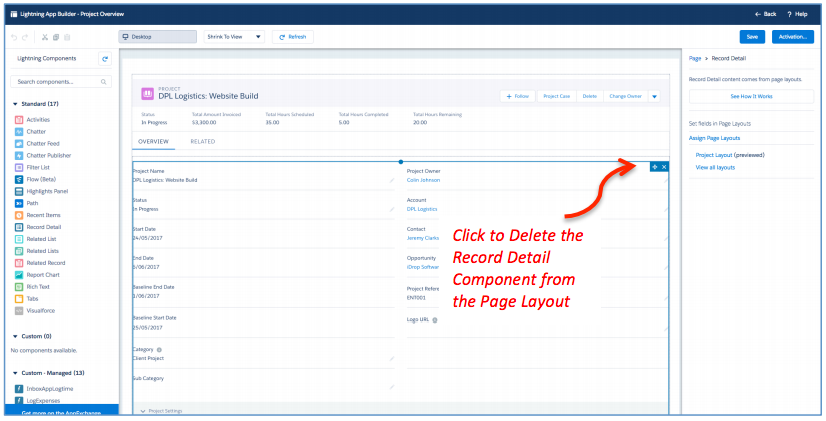
Click on the ‘Record Detail’ Component that is in the Overview Tab and delete it, as shown above. This will then result in your page looking like this:
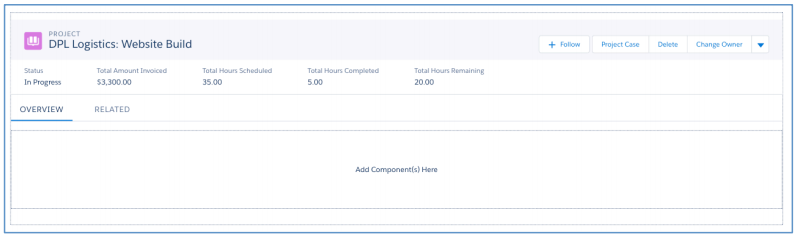
Using the left-hand menu, navigate to the Custom Components and drag the ‘ProjectOverview’ Component into the position where you have just removed the Record Detail Component from. This will result in the page now looking like this:
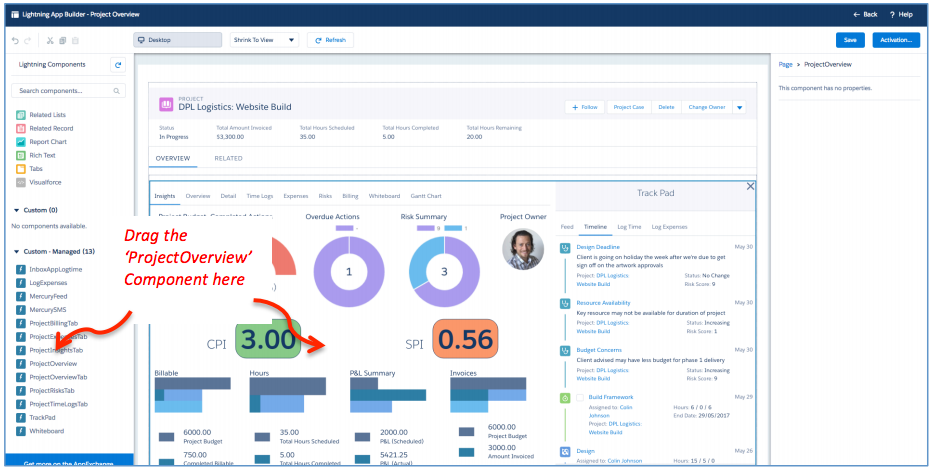
Then click ‘Save’ and ensure you follow the instructions as outlined below to set the page to be your org wide default.
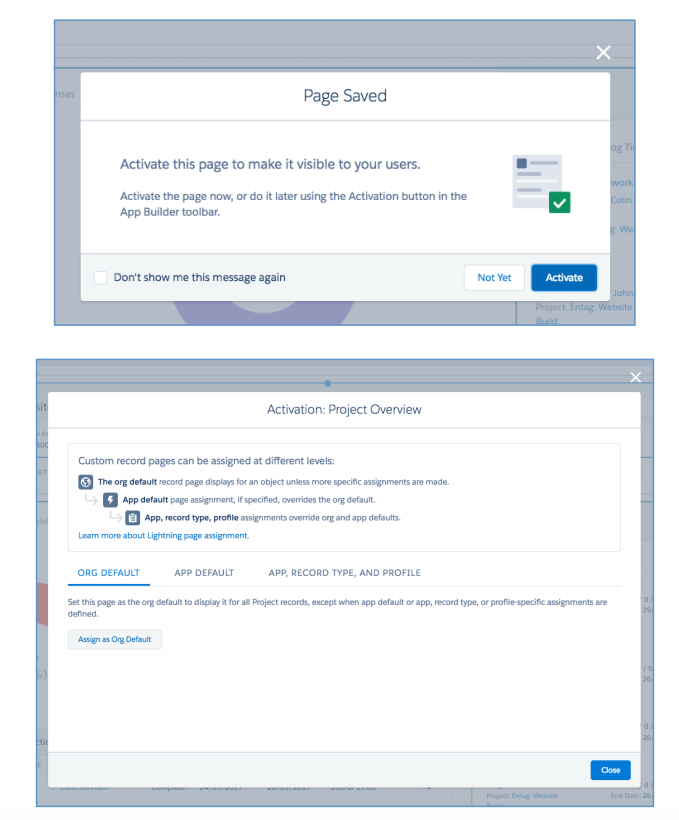
Then when you navigate back to the Project record, you’ll see the Project Overview Page now looks something like this:
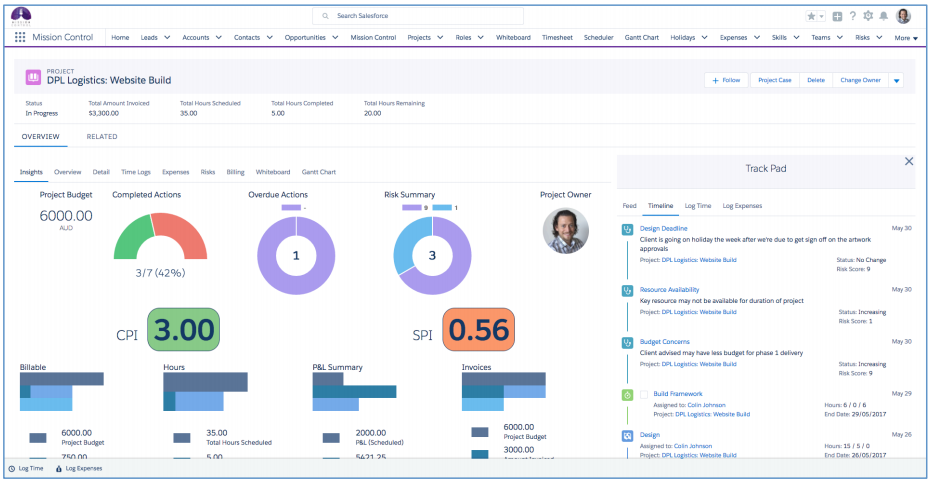
The RACI Matrix can be viewed on the ‘Overview’ Tab of the Project Overview Component. It provides an ‘at a glance’ view of the areas of interest / level of involvement for various people, whether that’s resources assigned to work on the project, or Project Stakeholders. RACI stands for:
To view the RACI Matrix, the ‘Generate RACI Members’ field on the Project must be set to ‘Manually’ or ‘Automatically’. When the Project meets this criteria, the ‘Enable RACI Matrix’ toggle will be displayed on the Overview Tab, as shown below.

This toggle setting will be persistently remembered for each individual User across all Projects.
Switching the toggle setting to TRUE will display the RACI Matrix, which will be positioned to the left of the first column within the Work Breakdown Structure table. The image below shows the RACI Matrix being displayed with existing RACI Members.

The image below shows the RACI Matrix being displayed without any RACI Members.

You are able to create RACI Members manually, or have them automatically generated as Roles / Project Stakeholders are associated to the Project.
A maximum of 3 RACI Member icons will be displayed for any individual RACI Type.

To view all of the RACI Members within an individual RACI Type, click the resource icon. This will open up the RACI Member Modal.

This Modal shows all existing RACI Members for the RACI Type, including visibility into their level of involvement in the Project.
Manually Generate RACI Members
To manually generate a RACI Member, click on the individual resource icon for the applicable member type (e.g. R, A, C or I).
![]()
Once you’ve clicked the icon, the ‘Manage RACI Members’ Modal will load.

From here, you can search for a Role or a Project Stakeholder and add them as a RACI Member.

As you add RACI Members, they will appear in the table. If a RACI Member is assigned as an owner across the WBS layers, that ownership will be displayed.

In the example above, Colin Johnson is the Owner of the Phase – the record we are creating RACI Members for, along with being assigned as the Project Owner.
Auto Generate RACI Members
Mission Control can be configured to automatically create RACI Members for your Projects. This is configured on the Control Pad of the Mission Control Console.
To enable this feature, within the ‘RACI Matrix’ Tile, you will need to carry out the following steps:
Below is an example of how the RACI Matrix Tile settings could be configured.

Note: In order to set ‘Enable Auto Generation by Default’ to TRUE, at least 1 RACI Member setting must be configured.
These Settings enable RACI Member records to be automatically created for all Projects. However, each Project can be opted in or out of having RACI Members automatically generated by setting the ‘Generate RACI Members’ field to the appropriate value.
With these Settings enabled, once a Project has the ‘Generate RACI Members’ field set to Automatically, RACI Members will be automatically created.
The ‘Resource Reassignment Wizard’ enables you to quickly re-assign ownership from one Role to another within a Project, Phase, Milestone or Action.
The Reassignment Wizard can be used in context of a Project, Milestone, Action or a Role.
Project Reassignment
Below is an example of the Resource Re-assignment Wizard:
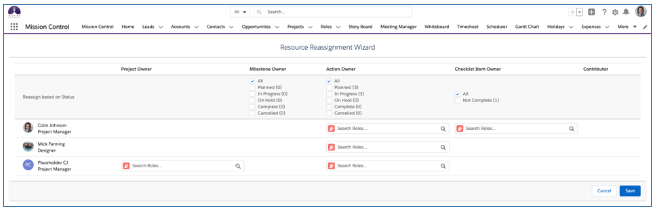
The page lists all Role records with involvement in the Project. Involvement is defined by being at least one of the following:
The Roles are listed alphabetically by First Name. For each instance where the Role has involvement in the Project, as outlined above, a Lookup field is displayed. These Lookup fields enable you to transfer the ownership of record(s) of that type to another Role.
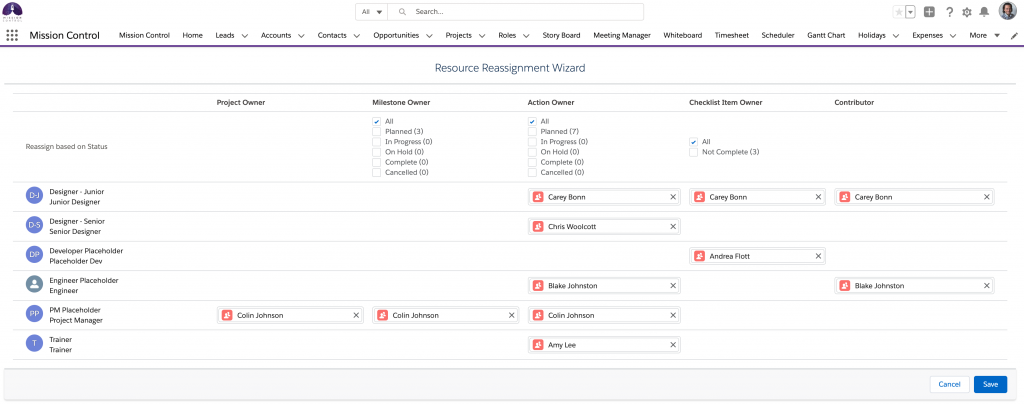
By default, when using the Reassignment Wizard, you will reassign all records. However, you can select which records to reassign based on their Status.
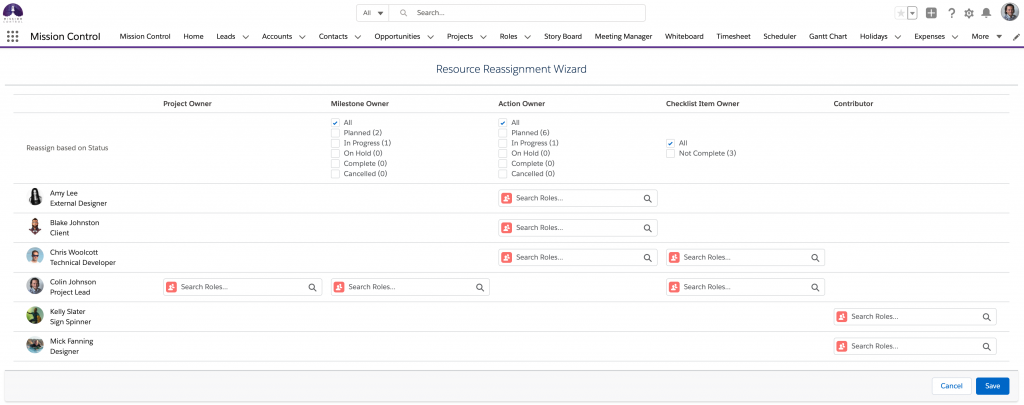
Copy Assignment
When reassigning ownership from one Role to another, they may be an Owner at multiple levels of the Project Plan. For example, in the image below, Kelly is an Action Owner, Checklist Item Owner and Contributor.

If we want to transfer ownership from Kelly Slater to Mick Fanning, we need to populate the Action Owner, Checklist Item Owner and Contributor lookup fields with Mick’s Role. However, rather than having to do that manually in all fields, you can populate one field and click the ‘copy’ button located to the right-hand-side of the fields.

This will auto-populate the same value in all other fields displayed for the row.
For example, looking at the wireframe above, Colin is a Project Owner, also owns some Milestones and Checklist Items. Therefore, those Lookup fields are visible, but as he doesn’t own any Actions, and isn’t a Contributor on any Actions, those fields are not visible.
Some example use cases for the Resource Re-assignment Wizard would include:
You access the Resource Re-assignment Wizard from the Project Page, by clicking the ‘Reassignment’ button as shown below.
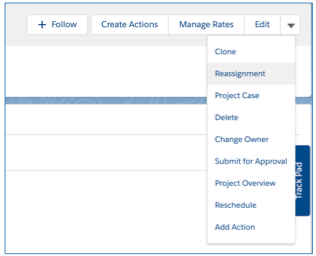
Phase Reassignment
When being used in context of a Phase, it will enable you to do a mass transfer of the Phase Owner and the Owner of records relating to the Phase, including Milestones, Actions, Checklist Items and Contributors.
Milestone Reassignment
When being used in context of a Milestone, it will enable you to do a mass transfer of the Milestone Owner and the Owner of records relating to the Milestone, including Actions, Checklist Items and Contributors.
Action Reassignment
When being used in context of an Action, it will enable you to do a mass transfer of the Action Owner and the Owner of records relating to the Action, including Checklist Items and Contributors.
Role Reassignment
The Reassignment Wizard can also be used on the Role record. This for example, would enable you to do a mass transfer of records across multiple Projects if a team member left the organisation, or was temporarily unavailable.
You access the Resource Reassignment Wizard from the Role Page, by clicking on the ‘Reassignment’ button as shown below.
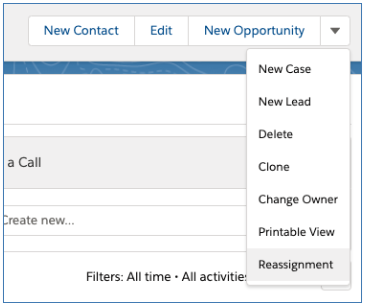
This will show one line for the Role you will be transferring from. You will be able to choose to transfer all records, or select which records to transfer based on Status.
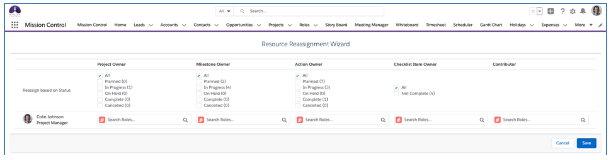
Clone Rate Adjustments
When reassigning ownership on a Project that has Rate Adjustments, you have the option to have the Rate Adjustments copied for the incoming Owner based on the Rate Adjustments for the outgoing Owner.
For example, if Kelly Slater is currently assigned as an Action Owner on a Project, and there are Rate Adjustment records related to the Project for Kelly, then when we reassign ownership to Mick Fanning, we can have Kelly’s Rate Adjustment records copied so they can be applied to Mick.

In the image above, there is a Checkbox in the ‘Copy Rate Adjustments’ column for Kelly Slater, indicating there are Rate Adjustments. As we are transferring ownership of Actions on this Project from Kelly to Mick, we will set the field to TRUE so we can create the same Rate Adjustment records for Mick.
The Auto Assignment Wizard is a feature within Mission Control that enables you to easily identify and auto-assign the most appropriate Roles to a Project, based on defined criteria including Capacity, Team Membership and Skill set. In order to use the Auto Assignment Wizard, the Project’s Actions must have values in the Start Date and End Date fields.
The Auto Assignment Wizard is accessible from the Project record, by clicking the ‘Auto Assignment’ button, as shown below.
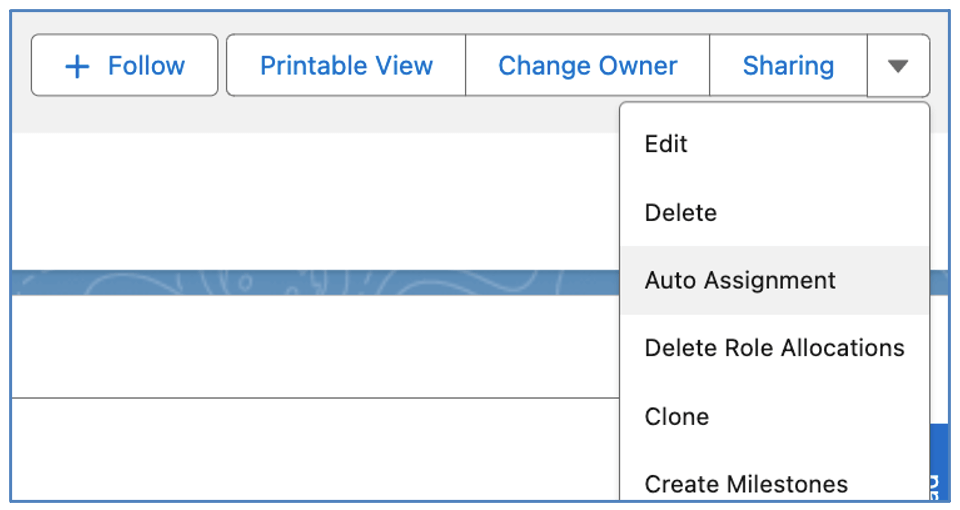
Note: If this button is not available on your Project records, please speak to your System Administrator.
When using the Auto Assignment Wizard, there are 3 steps to complete:
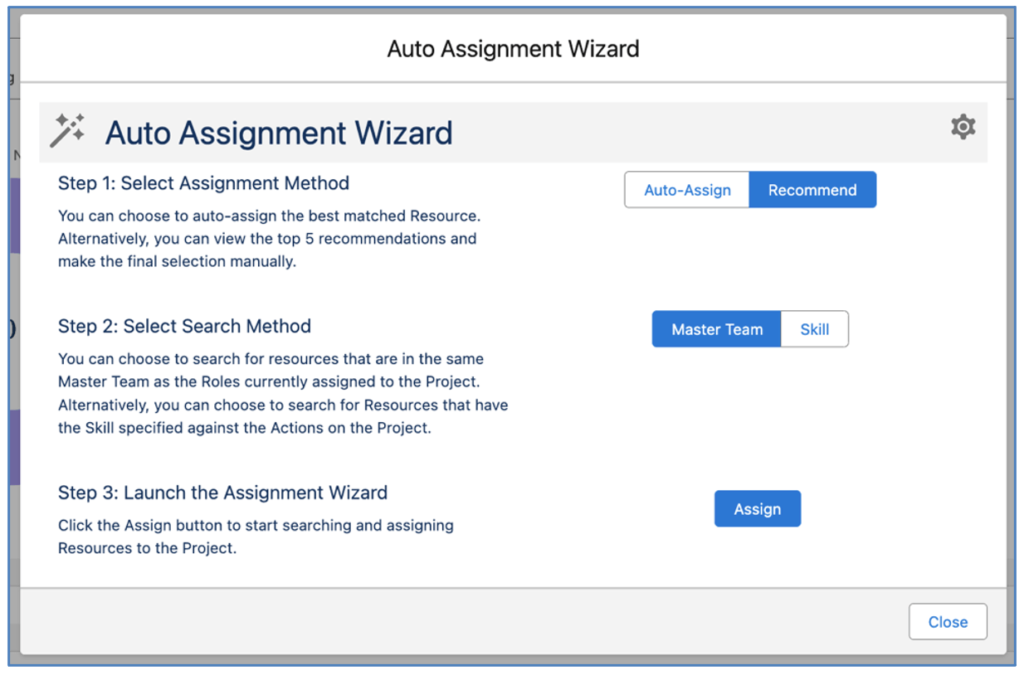
Step 1 – Select Assignment Method
This step lets you choose whether you automatically assign the best matched resources, or view a list of the top recommendations, allowing you to manually choose the final selections. To automatically assign resources, you will need to select ‘Auto-Assign’. To view the list of recommended resources, you will need to select ‘Recommend’.
Step 2 – Select Search Method
This step lets you choose the criteria that you will use to search for Roles. The options include:
The Master Team option will factor in how long each Role has been a member of the Team and their available capacity. The Skill option will factor in how long each Role has had the Skill, their proficiency in that Skill, their enjoyment factor of the Skill and their available capacity.
Within the Settings Modal of the Auto Assignment Wizard, you are able to control the weighting applied to each data point used in the auto-assignment process.
To use the ‘Master Team’ option, each Action, Contributor and Checklist Item on the Project needs to have a Role assigned. Each Role needs a value in the ‘Master Team’ field. To use the ‘Skill’ option, each Action, Contributor and Checklist Item on the Project needs to have a Role assigned. Each Action on the Project needs a Skill assigned.
Step 3 – Launch the Assignment Wizard
This step initiates the auto-assignment process. Whilst the process is running, you will see the screen below.
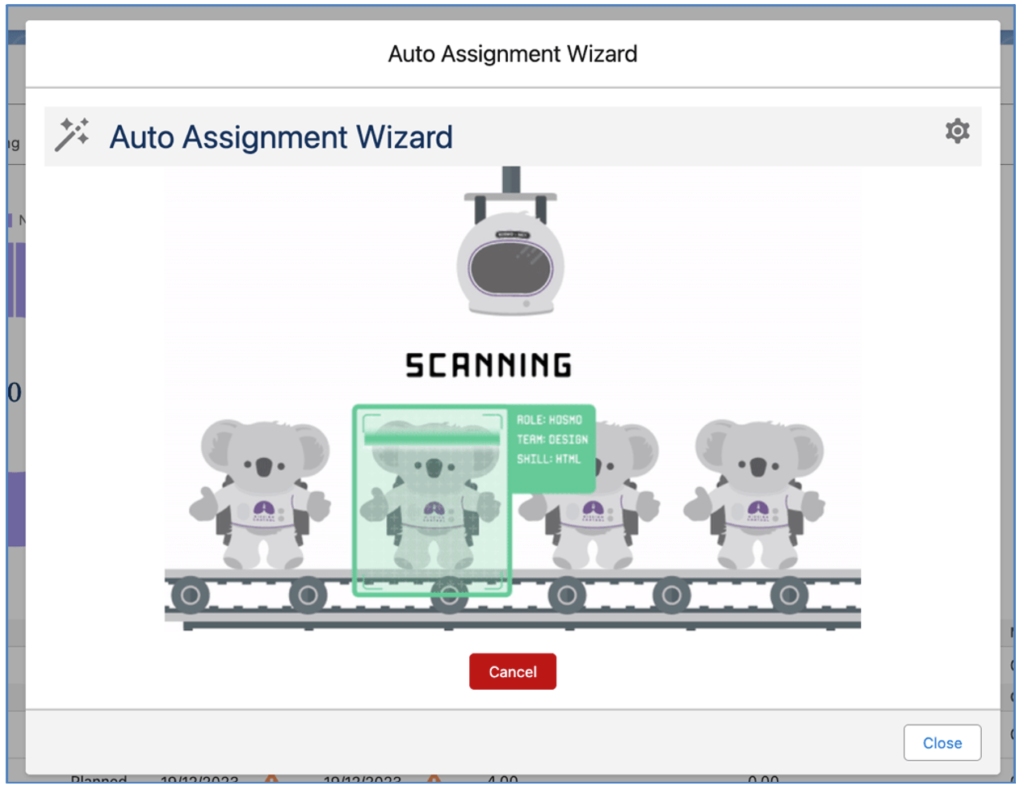
Once the auto-assignment process has completed, you will be presented with one of the following screens. This will be dependent on which option you selected during Step 1.
If you chose ‘Recommend’, you will be presented with a list of Recommendations. This will show you the Roles that most closely match the requirements for the Project. They are ranked based on their Match %. You are able to review the results and select a Role for each assignment. Once you have selected the Roles you want to be assigned, you will need to click the Assign button.
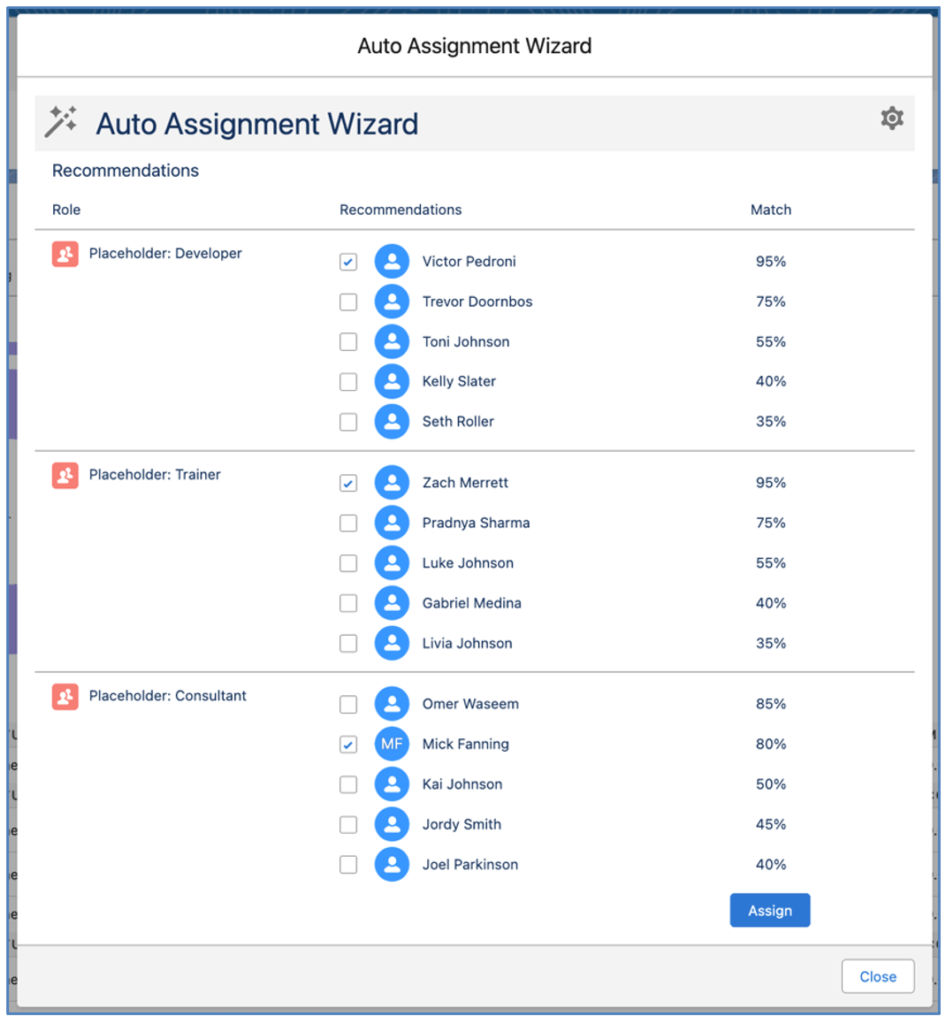
After clicking the Assign button having made your selections from the Recommendations, you will then get a confirmation screen showing the list of Roles assigned to the Project. When using the ‘Auto-Assign’ option, you will arrive on this screen without having to make any manual selection.
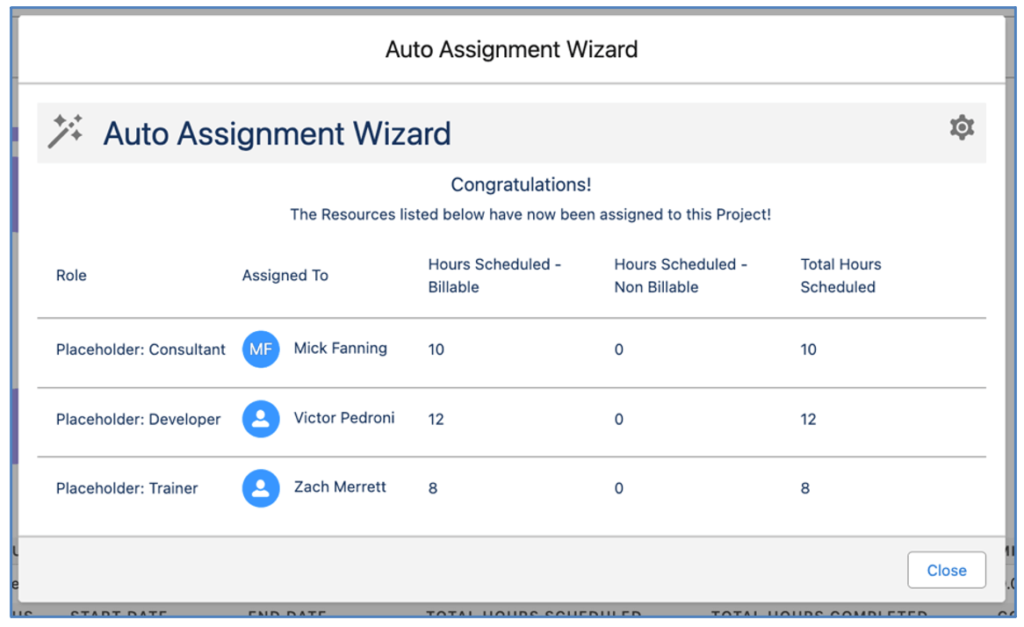
At this stage, the auto-assignment process is complete and these Roles have now been assigned to the Project.
Note: The auto-assignment process will assign Roles as Project Owners, Phase Owners, Milestone Owners, Action Owners, Contributors and Checklist Item Owners.
The Settings Modal within the Auto-Assignment Wizard provides you with access to the weighting values that are used for the ‘Master Team’ and ‘Skill’ assignment options. These Settings are Organization-wide settings, so all Users that are using the Auto Assignment Wizard will all use the same weighting values.
Note: In order to be able to edit the values within the Settings Modal, you will need to ensure the ‘Edit Auto Assignment Settings’ field on your Role record is set to TRUE.
To access the Settings Modal, click the ![]() icon in the top-right of the Auto Assignment Wizard component. This will open the Settings Modal.
icon in the top-right of the Auto Assignment Wizard component. This will open the Settings Modal.
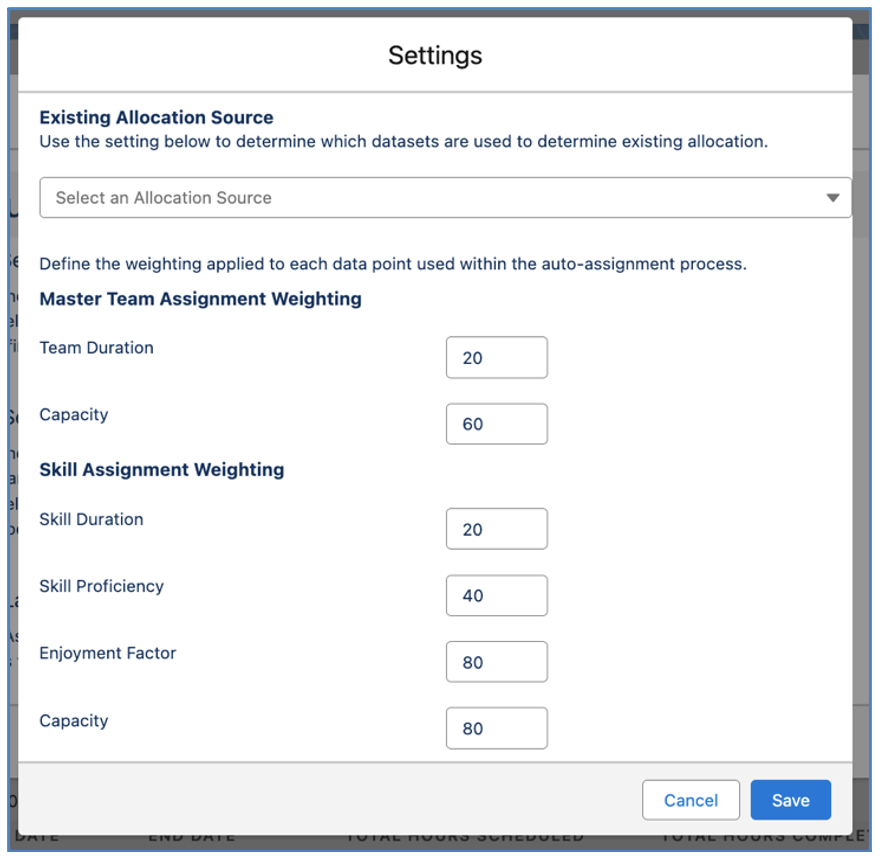
This Setting will only be visible for Customers using Role Forecasting. Specifically, it will be displayed if the ‘Auto-generate Role Allocation records’ setting within the Role Allocation Automation Settings on the Control Pad is set to TRUE.
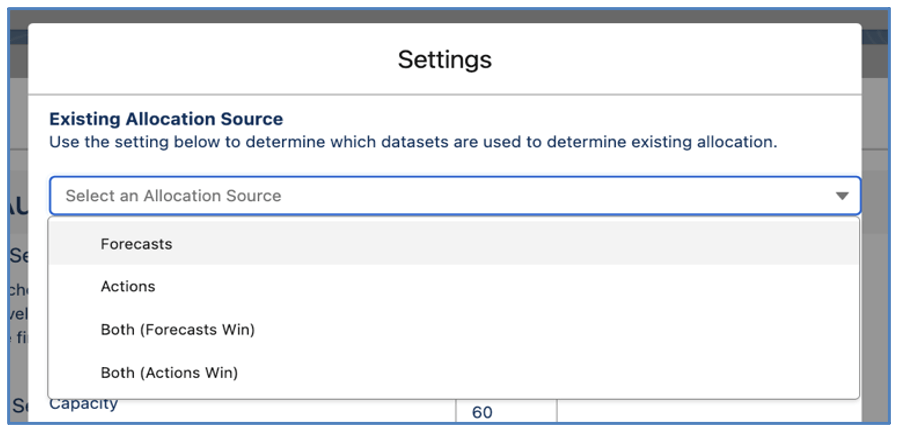
When the ‘Auto-generate Role Allocation records’ setting is TRUE, you will need to select a value for this Setting. This Setting enables you to determine which datasets will be factored in when calculating existing allocation towards capacity.
Note: allocations will always include Role Allocations relating to Holidays, regardless of which value is selected.
When the ‘Auto-generate Role Allocation records’ setting is FALSE, the following datasets will be used:
Master Team Assignment Weighting
When a User selects the Master Team Option in Step 2, the following parameters will be considered to determine how well the Role matches the assignment requirement.
Example Master Team Weighting
In this scenario, we have set our Master Team Assignment weightings as per the table below.
Setting | Value |
Team Duration | 20 |
Capacity | 60 |
This indicates that we are placing three times more importance on Capacity than how long the person has been a member of the team.
As each parameter will return a maximum of 5 Roles, the highest parameter score will be 5 and the lowest will be 1. The maximum score a Role could achieve in this scenario is 5 x the Team Duration Weighting and 5 x the Capacity Weighting. Based on these example weightings, the maximum score a Role could achieve is:
Team Duration: 5 x 20 = 100
Capacity: 5 x 60 = 300
Maximum Score: 400
Role | Team Duration Ranking | Team Duration Weighting | Capacity Ranking | Capacity Weighting | Assignment Score | Match % |
Colin | 5 | 100 | 2 | 120 | 220 | 55% |
Chris | 4 | 80 | 3 | 180 | 260 | 65% |
Mick | 3 | 60 | 1 | 60 | 120 | 30% |
Kelly | 2 | 40 | 4 | 240 | 280 | 70% |
Joel | 1 | 20 | 5 | 300 | 320 | 80% |
Based on these calculations, the Top 5 recommended Roles would be listed in the following order:
Joel: 80%
Kelly: 70%
Chris: 65%
Colin: 55%
Mick: 30%
When a User selects the Skill Option in Step 2, the following parameters will be considered to determine how well the Role matches the assignment requirement.
Example Skill Weighting
In this scenario, we have set our Skill Assignment weightings as per the table below.
Setting | Value |
Skill Duration | 20 |
Skill Proficiency | 20 |
Enjoyment Factor | 40 |
Capacity | 80 |
This indicates that we are placing the most importance on Capacity, followed by Enjoyment Factor.
As each parameter will return a maximum of 5 Roles, the highest parameter score will be 5 and the lowest will be 1. The maximum score a Role could achieve in this scenario is 5 x the Skill Duration Weighting, 5 x the Skill Proficiency Weighting, 5 x the Enjoyment Factor Weighting and 5 x the Capacity Weighting. Based on these example weightings, the maximum score a Role could achieve is:
Skill Duration: 5 x 20 = 100
Skill Proficiency: 5 x 20 = 100
Enjoyment Factor: 5 x 40 = 200
Capacity: 5 x 80 = 400
Maximum Score: 800
Role | Skill Dur. Rank | Skill Dur. Weight | Skill Prof. Rank | Skill Prof. Weight | Enjoy. Factor Rank | Enjoy. Factor Weight | Capacity Rank | Capacity Weight | Assign. Score | Match % |
Colin | 5 | 100 | 2 | 40 | 2 | 80 | 2 | 160 | 380 | 47.5% |
Chris | 4 | 80 | 3 | 60 | 3 | 120 | 3 | 240 | 500 | 62.5% |
Mick | 3 | 60 | 1 | 20 | 3 | 120 | 1 | 80 | 280 | 35% |
Kelly | 2 | 40 | 4 | 80 | 1 | 40 | 4 | 320 | 480 | 60% |
Joel | 1 | 20 | 5 | 100 | 1 | 40 | 5 | 400 | 560 | 70% |
Based on these calculations, the Top 5 recommended Roles would be listed in the following order:
Joel: 70%
Chris: 62.5%
Kelly: 60%
Colin: 47.5%
Mick: 35%
Automatically Run the Assignment Process
You are able to automatically invoke the auto-assignment process via a Flow or Apex Trigger. For example, you may want to execute the auto-assignment process automatically after a Project has been auto-generated from an Opportunity. This can be done by calling an invokable Apex Class.
There are two separate invokable Apex Classes. Which one you use will depend on whether you want to use the ‘Master Team’ or ‘Skill’ assignment method.
If you want to use the ‘Master Team’ assignment method, you will need to call the ‘AutoAssignmentWizardTeamMethod’ Apex Class. If you want to use the ‘Skill’ assignment method, you will need to call the ‘AutoAssignmentWizardSkillMethod’ Apex Class.
When calling either Apex Class, you will need to supply it with a Project ID or a list of Project IDs.
Once the Apex Class has processed, the person that invoked the process will receive a confirmation or failure email notification.
To provide Customers with flexible options around mass assignment across Projects, Teams can be assigned ownership in a number of ways. Depending on how you want to assign Roles to your Project’s work breakdown structure, you may find one of these options provides you with an efficient method of carrying out the assignment process.
Each of these mass assignment options are explained in further detail below.
Assign Team to Project
The ‘Assign Team to Project’ feature enables you to select a specific Team to be assigned to a Project, and each Role within that Team will be assigned ownership of specific sections of the Work Breakdown Structure (WBS), e.g. Phase Owner, Milestone Owner, Action Owner, Contributor, Checklist Item Owner.
There are pre-requisite configurations that need to be in place to be able to leverage this feature, including Team & Team Assignment Settings, and each record within the Project WBS needs to have a Placeholder (Asset) Role assigned as the owner.
Team & Team Assignment Settings
To use a Team in this process, the ‘Squad’ field on the Team must be set to TRUE.
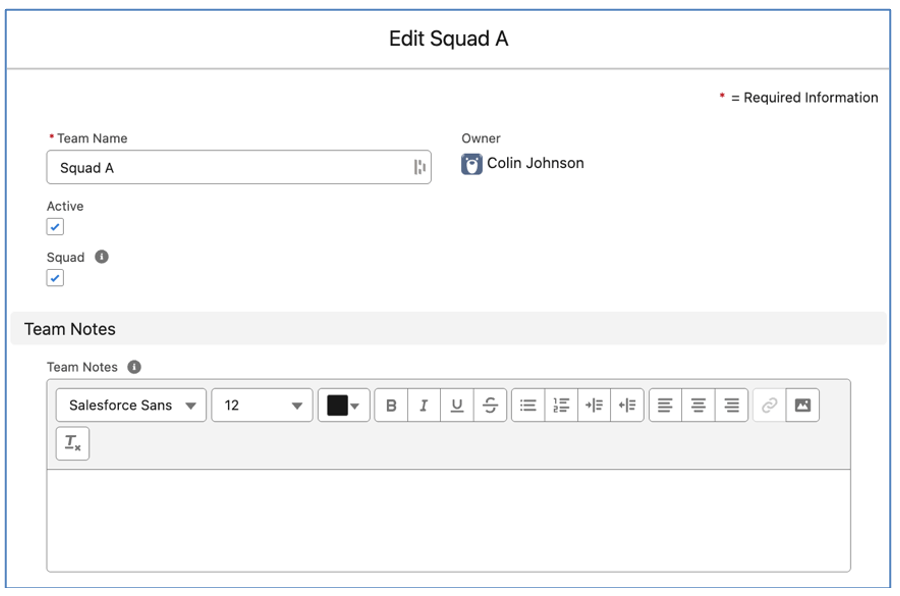
In addition, each Role assigned to the Team must have a value in the ‘Squad Placeholder’ field on their Team Assignment record.

Note: A Team cannot be set as a Squad Team if it has Team Assignment records without a ‘Squad Placeholder’ specified. You will need to populate the ‘Squad Placeholder’ field for each Team Assignment prior to setting the ‘Squad’ field on the Team to TRUE.
Note: Each Role should have a unique Squad Placeholder. For example, if you have 2 Roles that are both Developers, you would need 2 Placeholder Roles (e.g. Placeholder Developer 1 and Placeholder Developer 2).
Assigning a Team to a Project
To assign a Team to a Project, and reassign ownership to the Roles within the Team, you will need to populate the ‘Team Assigned’ field on the Project record.
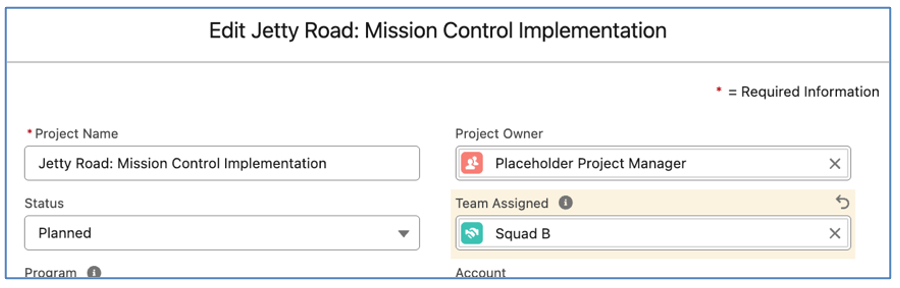
Note: The ‘Team Assigned’ field on the Project will only allow you to search for Teams where ‘Squad’ is set to TRUE.
When the ‘Team Assigned’ field is populated, the Project, Phase, Milestone, Action, Contributor and Checklist Item records will all undergo the reassignment logic as follows:
Team Assigned field is populated and was previously empty
The ‘Owner’ field for each record within the Project WBS will be reassigned based on the existing owner being populated in the ‘Squad Placeholder’ of a Team Assignment related to the Team being assigned.
Team Assigned field is being changed from one Team to another Team
The ‘Squad Placeholder’ for the existing owners will be identified based on their Team Assignment for the original Team assigned to the Project. The ‘Owner’ field for each record within the Project WBS will then be reassigned to the Role with the matching ‘Squad Placeholder’ on their Team Assignment for the new Team being assigned to the Project.
Team Assigned field was populated and is being set to empty
The ‘Owner’ field for each record within the Project WBS will be reassigned to the ‘Squad Placeholder’ specified on the Team Assignment for each Role within the Team that was assigned that is being removed.
Assign Team to Action
The ‘Assign Team to Action’ feature enables you to select a specific Team to be assigned to an individual Action. This will ensure 1 Role is set as the Action Owner and all other members of the Team will be assigned as Contributors.
There are pre-requisite configurations that need to be in place on the Team Assignment records to be able to leverage this feature.
Team Assignment Settings
One Team Assignment record needs to have the ‘Team Lead’ Field set to TRUE. This Role will be set as the Action Owner.
Assigning a Team to an Action
To assign a Team to an Action, you will need to populate the ‘Team Assigned’ field on the Action record.
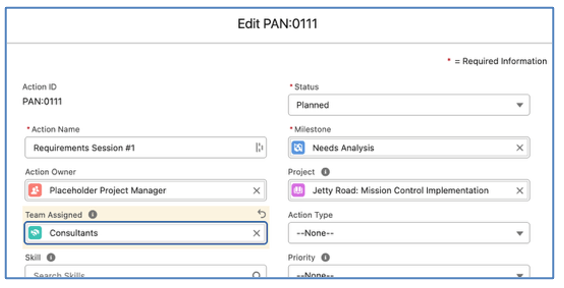
When the ‘Team Assigned’ field is populated, the Action will undergo the reassignment logic as follows:
Team Assigned field is populated and was previously empty
The ‘Action Owner’ will be assigned to the Role that has the ‘Team Lead’ set to TRUE on their Team Assignment record. All other Roles assigned to the Team will have a Contributor record created.
Team Assigned field is being changed from one Team to another Team
Existing Contributor records related to the Action will be deleted. The ‘Action Owner’ will be updated to the Role that has the ‘Team Lead’ set to TRUE on their Team Assignment for the new Team being assigned. All other Roles assigned to the Team will have a Contributor record created.
Team Assigned field was populated and is being set to empty
The ‘Action Owner’ field will be set to empty and all Contributor records related to the Action will be deleted.
The ‘Estimates’ feature within Mission Control enables Customers to conduct thorough PERT estimating process when assessing the level of effort required to complete a piece of work.
PERT Estimates are derived from 3 different estimate values:
The ‘PERT Estimate’ is calculated based on:
(Optimistic Estimate + (4 x Most Likely Estimate) + Pessimistic Estimate) / 6
The PERT estimating process is carried out in three stages:
Requesting Estimates
The first step in the PERT estimating process is to create requests for Roles to carry out estimates. This can be done via the ‘Request Estimates’ Component, which is accessible from the following pages:
The ‘Request Estimates’ Component will load as shown below.

The Display Filters enable you to determine which records should be displayed. The ‘Display’ options are:
Once you have selected the Display option, click the ‘Load’ button and the applicable records will be displayed, as shown below.

The next step is to select the Roles you wish to request estimates from. Within the ‘Add Estimators’ section, you can add individual Roles or add all Roles that are assigned ownership on the Project based on the following options:
Once Roles are added, they will be displayed within the Estimator section of the Component, as shown below.

For each piece of work (e.g. Action or Requirement), you can select all Estimators or as many as required, along with setting a Due Date.
Once all Estimates have been configured, click the Save button and the individual Estimate records will be created for the individual Estimators to complete.
This Component can also be used to view the Status of each Estimate that has been requested, allowing Project Managers to have a high level view of the progress the Estimators are making with their Estimates.
You are also able to request an estimate via the mini ‘Request Estimate’ component from the following pages:
For an individual Requirement card, you can click the Cup icon.
![]()
The mini component will open, allowing you to create Estimate records.

Completing Estimates
The second step in the PERT estimating process is for the individual Estimators to use the ‘Estimating Wizard’ to complete their Estimates. This can be done via the ‘Estimating Wizard’ Component, which is accessible by clicking on the ‘Estimate Wizard’ button from the following pages:
The ‘Estimating Wizard’ Component will load as shown below.

The ‘Estimates To Do’ section provides a list of all the Estimates the individual Estimator needs to complete. Clicking on the eye icon will load the ‘Estimate Workspace’ for that individual Estimate, as shown below.

The Estimate Workspace is broken into 3 sections:
Record requiring Estimate
This section displays the details of the record that needs to be estimated.

This will display the details of the Action or the Requirement that was selected from the To Do list. This section has two different display areas:
You can configure which fields are included in this section through the following Field Sets.
Action Object
Requirement Object
You can access the Field Set by going to Setup > Object Manager > [Object] > Field Sets
Estimators Estimate
This section is where the Estimator will complete their own individual estimates.

The Estimator will enter the estimate values for each of the Estimates (Optimistic, Most Likely and Pessimistic) and the PERT Estimate will calculate based on these values.

Note: You can create estimates for the individual related records (e.g. User Stories or Checklist Items) and roll those estimates up to the main Estimate. Refer to the ‘Related Information’ section below for further details.
Whilst you are working on your Estimate values, the Status can be updated to ‘Draft’. This will display on the ‘Request Estimates’ Component, allowing the Project Manager to see that Estimators are working on their Estimates.
Once the Estimate is ready to be submitted, you can update the Status field to ‘Submitted’. Once an Estimate has been submitted, the fields will be disabled, as shown below.

If you need to make amendments to your Estimate, you can click the ‘Recall’ button. This will revert the Status to ‘Draft’ and enable the fields for editing.
Once an Estimate has been submitted, it will be available for the Reviewer when they finalise the PERT estimates.
Related Information
If a Requirement or Action has related User Stories and/or Checklist Items, they will be displayed within the Related Information section.

These related records can be viewed to support the main Estimate. Alternatively, you can toggle on the ‘Enable Related Estimates’ setting in the top-right of the Related Information header.

The Estimator can work through each of the related records, entering the Optimistic, Most Likely and Pessimistic Estimates.

The PERT Estimate is calculated for each individual record and a summary PERT Estimate is available based on all of the individual estimations. If you wish to use these figures as the main Estimate, you can click the upload icon and these summary figures will be populated into the main Estimate fields.

The main Estimate can then be submitted for the Reviewer to finalise the PERT Estimate.
Finalising PERT Estimates
The third step in the PERT estimating process is reviewing all of the Estimates from the individual Estimators. This process is also carried out on the Estimating Wizard Component. However, you will only be able to enter ‘Reviewer Mode’ if the ‘View Reviewer Mode’ field on your Role record is set to TRUE.
To enter Reviewer Mode, you will need to toggle on the ‘Enable Review Mode’ setting located in the top right of the Estimating Wizard, as shown below.

When Reviewer Mode is enabled, the Reviewer will see an ‘Estimates To Review’ list, as shown below.

The ‘Estimates To Review’ section provides a list of all the Estimates the Reviewer needs to review.
Note: the list of records included in this list is based on the value of the ‘Reviewer Mode Access’ field on their Role record:
Clicking on the eye icon will load the ‘Estimate Workspace’ showing all Estimates related to the record requiring estimation.

The Reviewer’s Estimate Workspace is broken into 2 sections:
Record requiring Estimate
This section displays the details of the record that needs to be estimated.

Review Estimates
This section displays all of the Estimates from the individual Estimators. The Reviewer and their team can review and discuss the individual Estimates and agree a final PERT Estimate for the piece of work.

The Final Estimate figures are based on all related Estimates that have not been excluded. If you wish to exclude specific Estimates from the Final Estimate figures, you can set the ‘Exclude’ checkbox to TRUE against the individual Estimates.
The Reviewer will enter the PERT Estimate and Hours Scheduled values manually and click Save. These figures will then be saved directly on the Action or Requirement.

Once the Action / Requirement has a value in the PERT Estimate field, it will no longer be displayed in the ‘Estimates to Review’ list.
Daily Digest
The Daily Digest will include an ‘Estimates Summary’ section for any Role that has Estimates that fall into any of the following categories:
No configuration is required to enable this section to be included in the Daily Digest.
Role Configuration Requirements
If a Role requires access to the ‘Reviewer Mode’ feature of the Estimating Wizard, the following fields need to be set on their Role record.
The Project Health Check Object enables Project Managers to carry out periodic health checks on their Projects. Each Project Health Check provides a point in time overview of how a Project is performing. You are able to write a narrative summary for the following points:
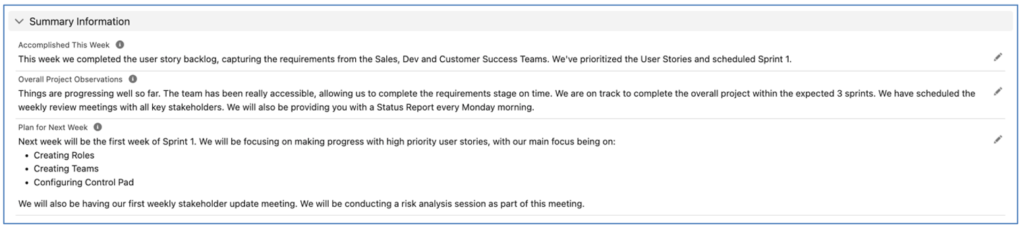
In addition, you can capture a rating for various areas of the Project using a Red, Amber, Green (RAG) rating. The areas of the Project you can complete the RAG rating for include:
For each RAG Rating, you will review that area of the Project based on the following values:
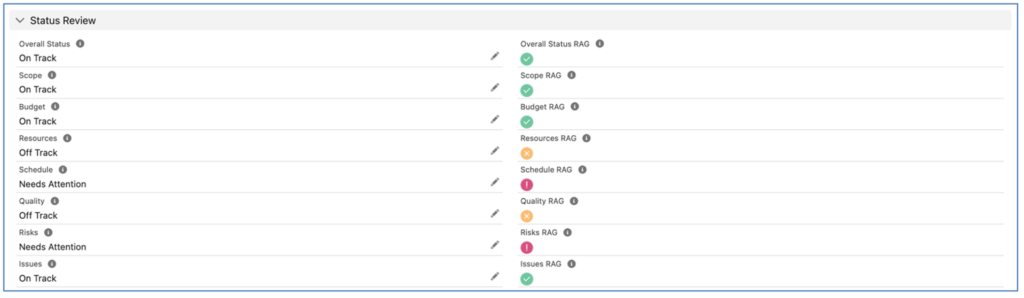
You are able to access all Project Health Checks related to a particular Project on the Related Tab of the Project record.
The Project Stakeholders Object enables you to associate Contacts, Users or Roles to a Project, identifying their Stakeholder position, including:
Project Stakeholders can added to a Project by going to the Project record, selecting the Project Stakeholders Related List and clicking the ‘New’ button.
When adding a Project Stakeholder, you will associate it to a User, Contact or Role. Note: An individual Project Stakeholder can only be associated to one of these records. You can also choose to set the Project Stakeholder to follow the Project on Chatter (if they are a User or a Role related to a User). You an also choose to subscribe the Project Stakeholder to receive the Project Status Report.
Project Status Report
The Project Status Report is a PDF that can be emailed to Project Stakeholders on a weekly basis. The Project Status Report comprises of the following sections:
Cover Page
The Cover Page includes key details such as the Project Name, along with the Account & Contact information for the customer. You can also include the customer’s logo and a ‘Hero’ image.
Below is an illustration of the Cover Page.
The elements that can be branded within the report include:
Your Logo will be visible in the top left of the page if you have specified a logo within the Gantt Chart Settings section of the Control Pad on the Mission Control Console. This logo has a fixed width of 200px.
The Customer Logo will be visible if you have populated the ‘Logo URL’ field on the Project record. Note, this URL must be a ‘Document’ that you add to Salesforce Documents, ensuring the ‘Externally Available Image’ Checkbox field is set to TRUE. This logo has a fixed height of 400px.
![]()
By default, the Hero Image will be the generic Mission Control image as illustrated in the example above. However, you are able to personalize the Hero Image with your own branding, or customize it appropriately for the individual project/customer. To override the generic Hero Image, you can populate the ‘Weekly Status Report – Hero Image URL’ field on the Project record. Note, this URL must be a ‘Document’ that you add to Salesforce Documents, ensuring the ‘Externally Available Image’ Checkbox field is set to TRUE.
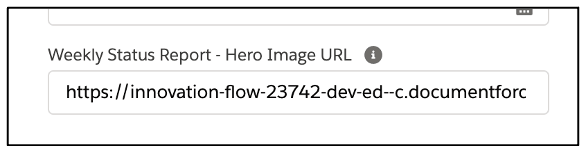
Below is an example of the Cover Page with the Hero Image overridden with a custom image.
Project Health Check
The Project Health Check Appendix can be optionally included in the Status Report by setting the ‘Weekly Status Report – Inc Health Check’ field to TRUE on the Project record. This Appendix will display the most recent Project Health Check related to the Project, based on the ‘Date’ field on the Project Health Check.
Below is an example of the Project Health Check Appendix.
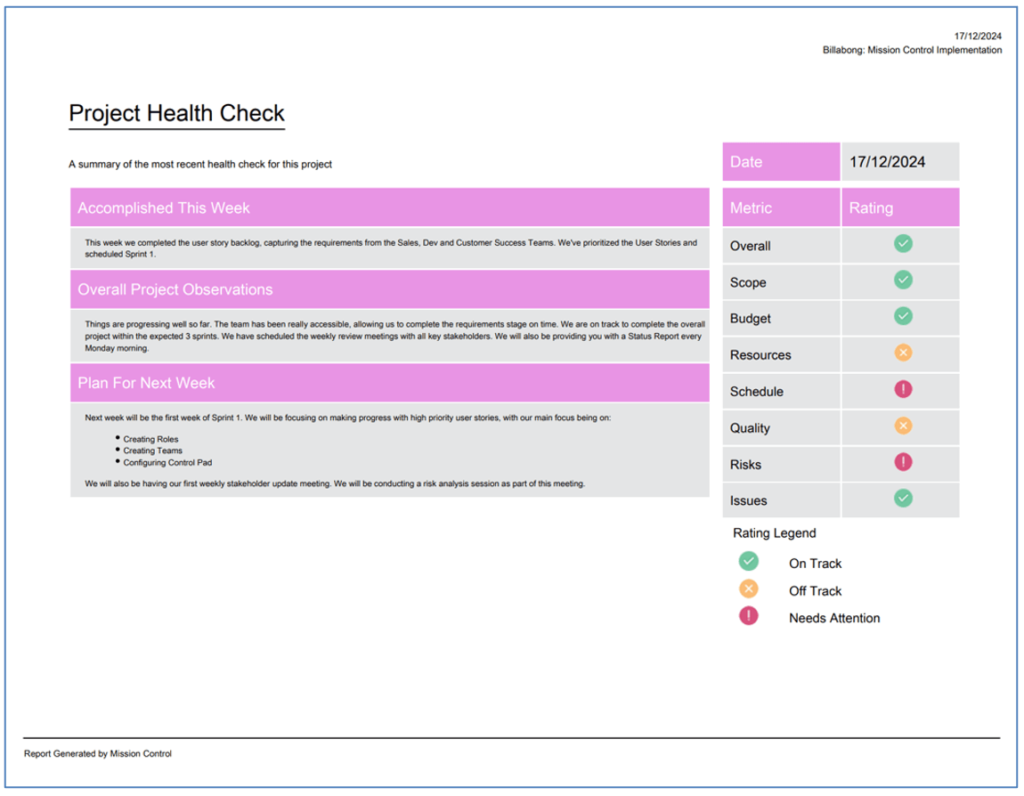
You can optionally choose which fields are displayed on the Appendix. On the Project record, you can set the following fields to TRUE / FALSE to have them displayed / hidden.
Note: They are all set to TRUE by default.
Project Summary
The Project Summary page provides a quick overview of the progress that has been made to date on the Project.
The following sections of this page will only be visible if the applicable Appendix has been selected to be included in the report:
Below is an example of the Project Summary page.
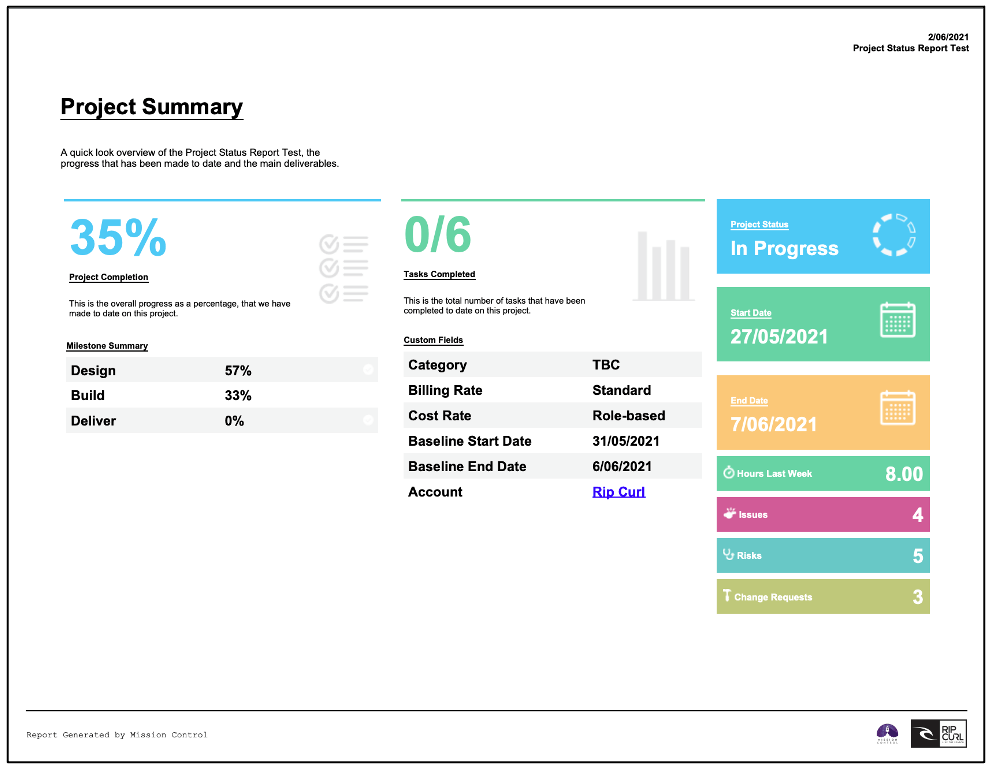
You can include up to 5 x Additional Fields from the Project Object on the Project Summary page. Please refer to the ‘Include Project Custom Fields’ section below for instructions on how to do this.
Summary Section Display Controls
You can control which sections of the Project Summary page are included in the PDF. Below is an illustration of the default view for the Project Summary.

If you do not wish to include the Project Summary page in the Project Status Report PDF, you can set the ‘Exclude PSR Summary Page’ field to TRUE on the Project.
Alternatively, you can control which of these sections are displayed, on a per Project basis. This is controlled through a number of fields available on the Project record, as outlined below. Each Checkbox field controls whether the section of the report is displayed in the PDF.
Field | Section Controlled |
Exclude PSR Project Completion Summary | Excludes the ‘Project Completion’ section in the left-hand column of the Project Summary |
Exclude PSR Milestone Summary | Excludes the ‘Milestone Summary’ section in the left-hand column of the Project Summary |
Exclude PSR Tasks Completed Summary | Excludes the ‘Tasks Completed’ section in the middle column of the Project Summary |
Exclude PSR Additional Information | Excludes the ‘Additional Information’ section in the middle column of the Project Summary, which conditionally displays if Custom Fields are added to the ‘Project: Status Report Fields’ Field Set |
Exclude PSR Project Status Summary | Excludes the ‘Project Status’ tile in the right-hand column of the Project Summary |
Exclude PSR Start Date Summary | Excludes the ‘Start Date’ tile in the right-hand column of the Project Summary |
Exclude PSR End Date Summary | Excludes the ‘End Date’ tile in the right-hand column of the Project Summary |
Exclude PSR Hours Summary | Excludes the ‘Hours Last Week’ tile in the right-hand column of the Project Summary |
Exclude PSR Issues Summary | Excludes the ‘Issues’ tile in the right-hand column of the Project Summary |
Exclude PSR Risks Summary | Excludes the ‘Risks’ tile in the right-hand column of the Project Summary |
Exclude PSR Change Request Summary | Excludes the ‘Change Request’ tile in the right-hand column of the Project Summary |
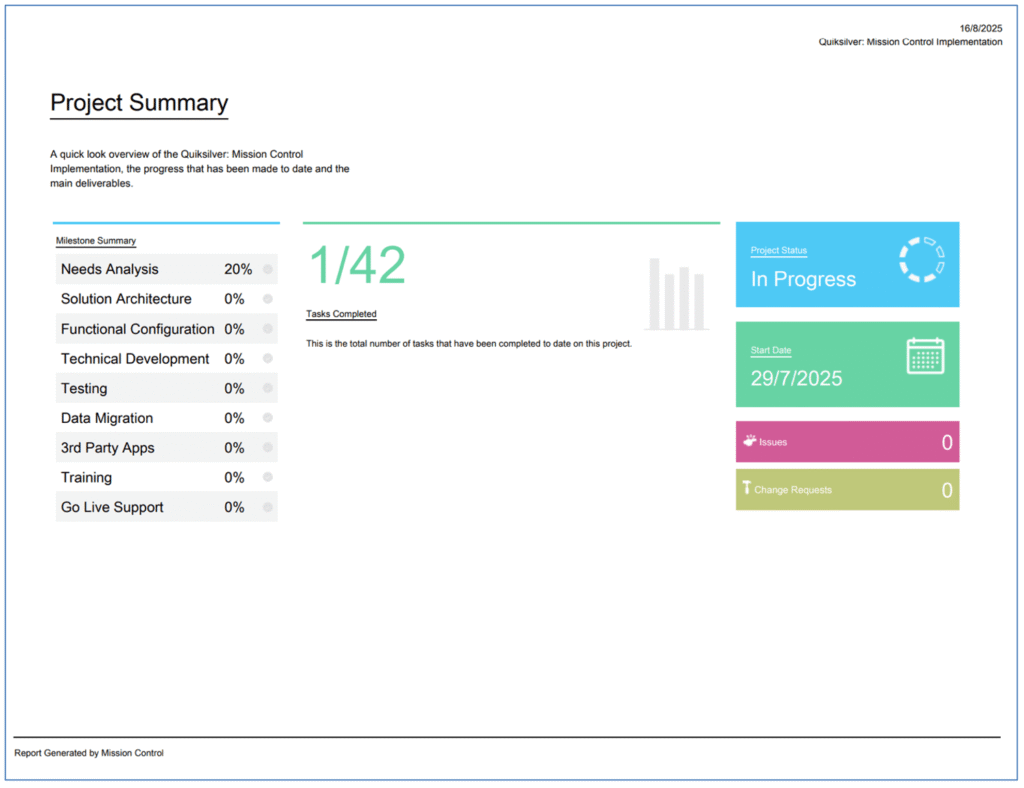
In the example above, the User has chosen to exclude the ‘Project Completion’, ‘End Date’, ‘Hours’ and ‘Risk’ sections of the Project Summary.
Project Detail
The Project Detail page(s) will provide a full breakdown of the project, including the following records:
By default, the following information will be displayed on the report:
Below is an example of the Project Detail page.
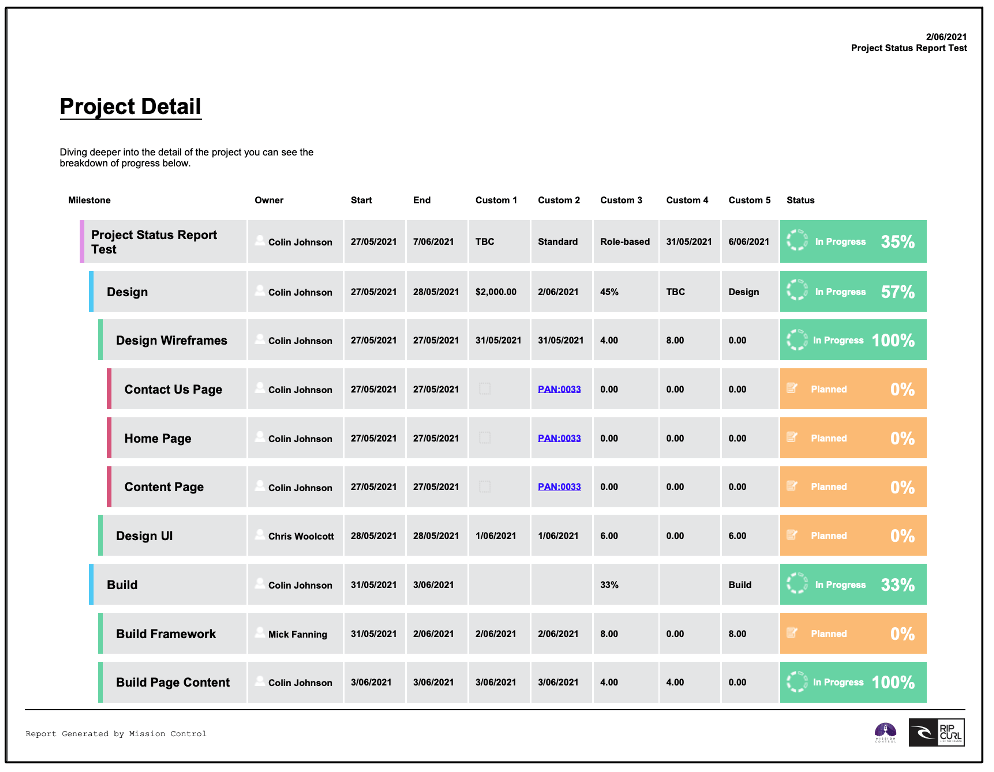
If you wish to exclude a particular Phase from the Project Status Report, you will need to set the ‘Exclude from Status Report’ field to TRUE. Note: This does not flow down to the related Milestones.
If you wish to exclude a particular Milestone from the Project Status Report, you will need to set the Milestone ‘Exclude from Status Report’ field to TRUE. This will flow down to all related Actions and Checklist Items, setting their ‘Exclude from Status Report Indicator’ field to TRUE.
If you wish to exclude a particular Action from the Project Status Report, you will need to set the Action ‘Exclude from Status Report’ field to TRUE. This will set the Action ‘Exclude from Status Report Indicator’ field to TRUE and flow down to all related Checklist Items, setting their ‘Exclude from Status Report Indicator’ field to TRUE.
If you wish to exclude a particular Checklist Item from the Project Status Report, you will need to set the Checklist Item ‘Exclude from Status Report’ field to TRUE. This will set the Checklist Item ‘Exclude from Status Report Indicator’ field to TRUE.
Records will be excluded from the Project Status Report based on the following field criteria:
Milestone: ‘Exclude from Status Report’ = TRUE
Action: ‘Exclude from Status Report Indicator’ = TRUE
Checklist Item: ‘Exclude from Status Report Indicator’ = TRUE
You can include up to 5 x Additional Fields from the Project, Milestone, Action and Checklist Item Objects on the Project Detail page. Please refer to the appropriate section below for instructions on how to do this.
Exclude Detail Page
You are able to provide your Project Stakeholders with a summary update, without including the ‘Project Detail’ pages of the Project Status Report.
To exclude the ‘Project Detail’ section of the PDF, you need to ensure the ‘Exclude PSR Detail Page’ is set to TRUE.
Restrict Display of Owner Name
The ‘Project Detail’ page includes the name of the person responsible for each item on the Project Plan, as shown below.

In some instances, you may wish to anonymize this information to prevent individual project resources being contacted directly by Project Stakeholders. This can be achieved by using the ‘PSR Anonymize Owner’ field on the Project record. You can select from the following options:
Blank
When set to Blank, the Owner field will not display a value, as shown below.

Role Title
When set to Role Title, the Owner field will display the value of the ‘Job Title’ field from the Role record for each Owner, as show below.
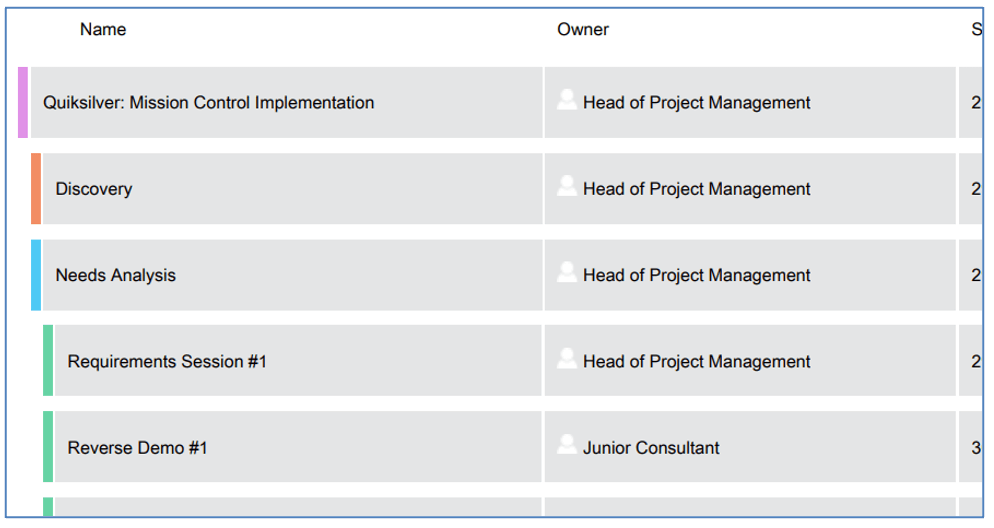
Role Function
When set to Role Function, the Owner field will display the value of the ‘Function’ field from the Role record for each Owner, as shown below.

If this field is empty, the Owner’s name will be displayed.
Gantt Chart
You can choose to include a copy of the Gantt Chart within the report. This can be done by setting the ‘Weekly Status Report – Include Gantt Chart’ field to TRUE. To include the Gantt Chart, you must ensure you go to the Gantt Chart Tab of the Project Overview page and click the ‘PNG Export’ button prior to the Project Status Report being generated. This will store an up to date PNG file of the Gantt Chart so it can be included in the Report.
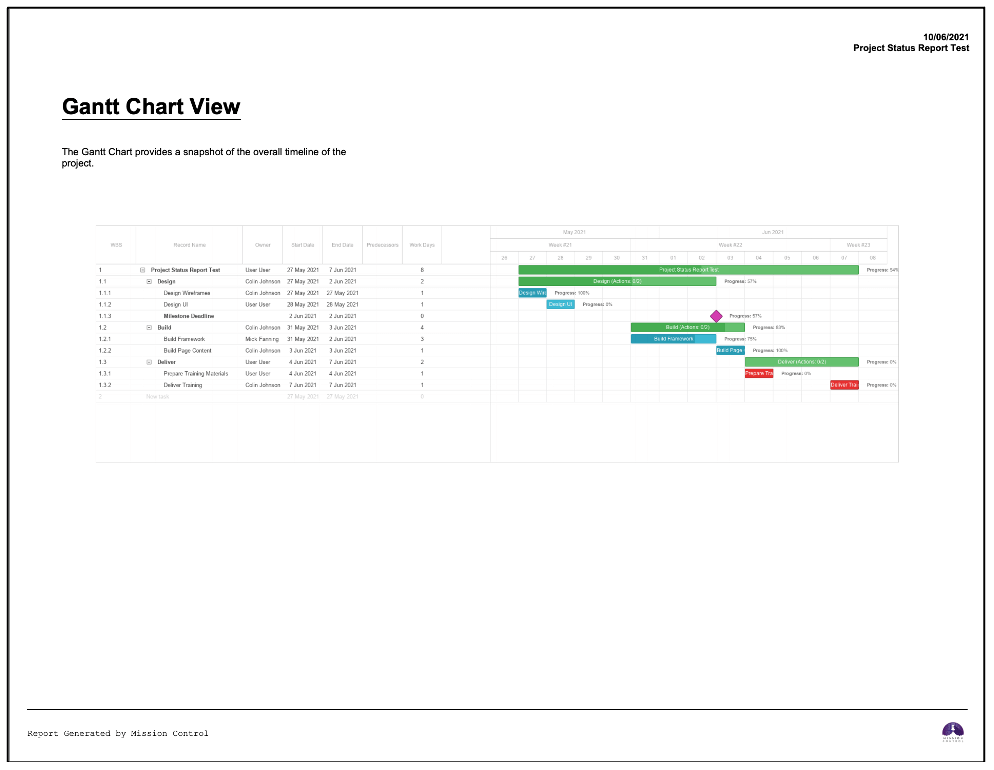
When you click the ‘PNG Export’ button, the PNG Image will be generated and the ‘Project Gantt Image Date’ field will be populated with Today’s date.
Time Log Appendix
The Time Log Appendix can be optionally included in the Status Report by setting the ‘Weekly Status Report – Include Time Logs’ field to TRUE on the Project record. This Appendix includes Time Logs with a Date of Last Week.
Below is an example of the Time Log Appendix.
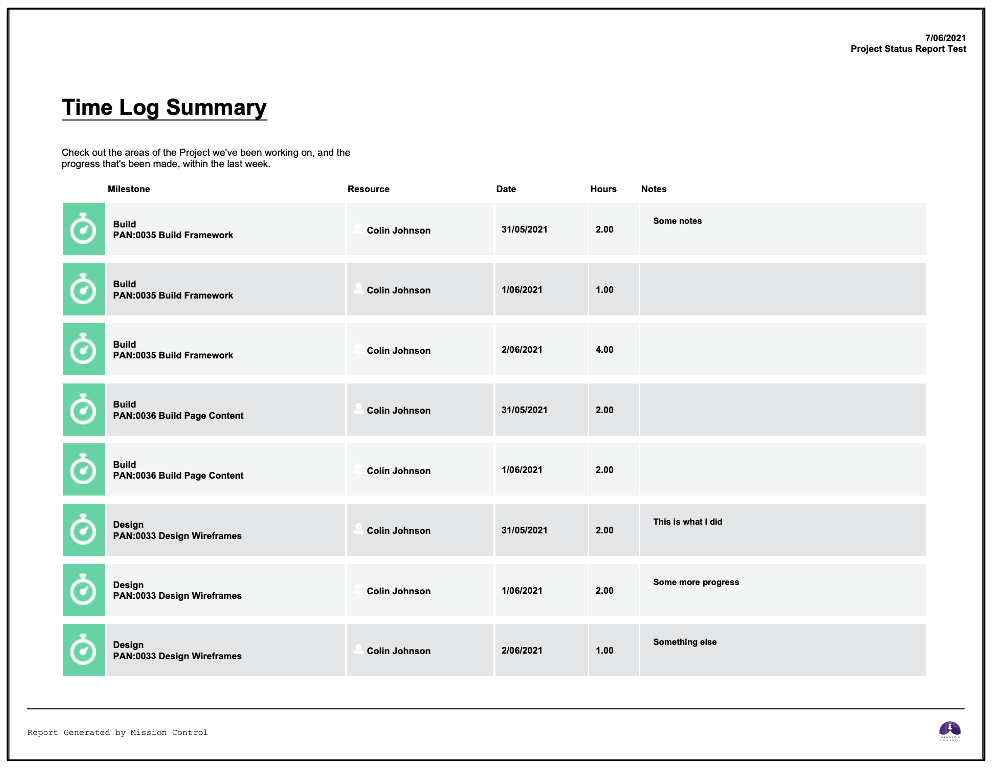
By default, the Time Log page within the Project Status Report will include Time Logs from ‘Last Week’. Customers can adjust this time period on a per Project basis by specifying a value in the ‘Weekly Status Report – Time Log Period’ field on the Project. The values within this field include:
If this field is null, the default ‘Last Week’ filter will be applied. If you specify ‘Last n Days’ you need to specify a value in the ‘Weekly Status Report – Time Log Days’ field, indicating how many days you want to report on.
A Validation Rule on the Project Object will prevent Users from setting the ‘Weekly Status Report – Time Log Period’ field to Last n Days without specifying a value in the ‘Weekly Status Report – Time Log Days’ field.
Exclude Time Logs
If you wish to exclude particular Time Logs from the Project Status Report, you will need to set the ‘Exclude from Status Report’ field on the Time Log Object to TRUE. Alternatively, if the ‘Exclude from Status Report Indicator’ field on the Action Object is TRUE, then the ‘Exclude from Status Report Indicator’ field on the Time Log Object will also be set to TRUE.
Time Log records will be excluded from the Project Status Report based on the following field criteria:
Time Log: ‘Exclude from Status Report Indicator’ = TRUE
If the Time Log is being excluded from the Status Report, it will not be included in the Project Hours ‘Hours Last Week’ section or the Time Log Summary Appendix.
Expenses (Appendix)
The Expense Appendix can be optionally included in the Status Report by setting the ‘Weekly Status Report – Inc Expenses’ field to TRUE on the Project record. This Appendix includes all Expenses where the ‘Exclude from Weekly Status Report’ field on the Expense record is set to FALSE.
Below is an example of the Expense Appendix.

To add Custom Fields to the Expense Appendix within the Project Status Report, Customers can add fields to the ‘Expense Status Report Fields’ Field Set on the Expense Object. Note: A maximum of 8 fields will be displayed on the Appendix.
Exclude Expenses
If you wish to exclude particular Expense records from the Project Status Report, you will need to set the ‘Exclude from Weekly Status Report’ field on the Expense Object to TRUE.
Budget Items (Appendix)
The Budget Item Appendix can be optionally included in the Status Report by setting the ‘Weekly Status Report – Inc Budget Items’ field to TRUE on the Project record. This Appendix includes Budget Items where the ‘Include in Weekly Status Report’ field on the Budget Item record is TRUE.
Below is an example of the Budget Item Appendix.
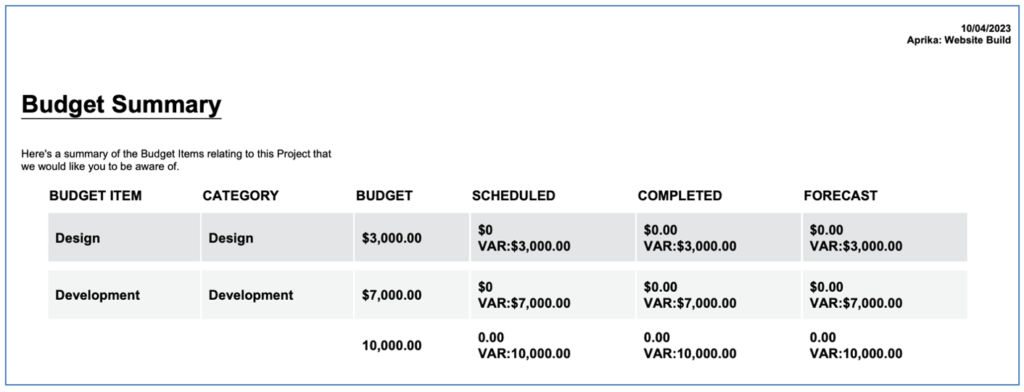
Issue Log Appendix
The Issue Log Appendix can be optionally included in the Status Report by setting the ‘Weekly Status Report – Include Issues’ field to TRUE on the Project record. This Appendix includes Issues where the ‘Include in Weekly Status Report’ field on the Issue record is TRUE.
Below is an example of the Issue Log Appendix.
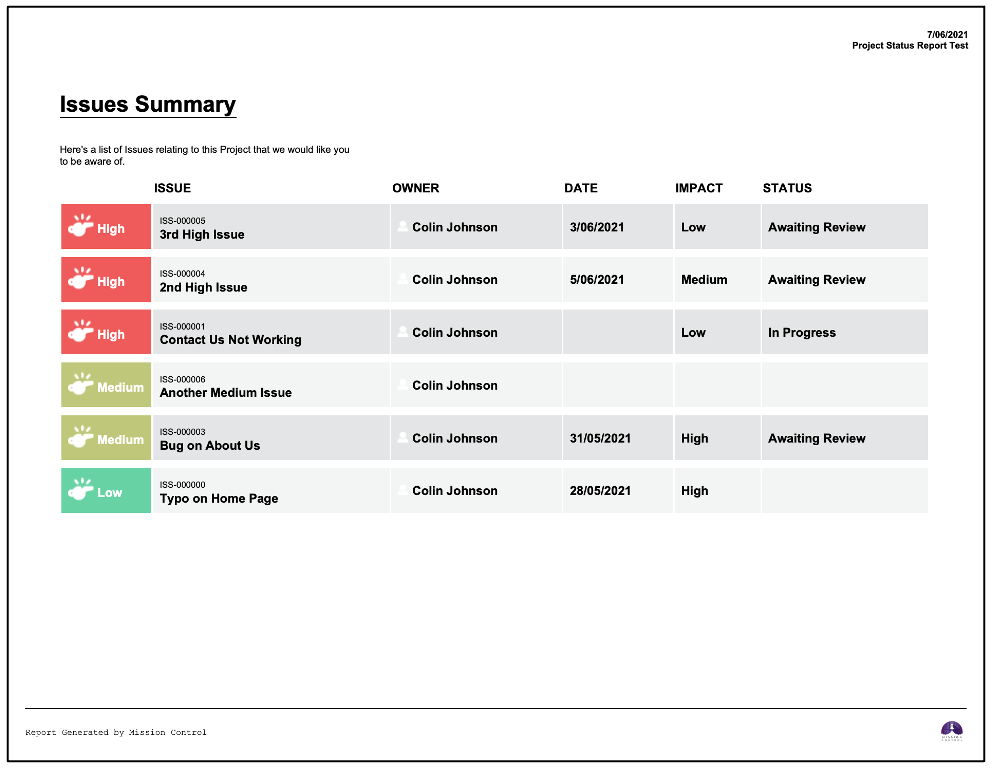
To add Custom Fields to the Issue page within the Project Status Report, Customers can add fields to the ‘Issue: Status Report’ Field Set, which is available on the Issue Object within Setup.
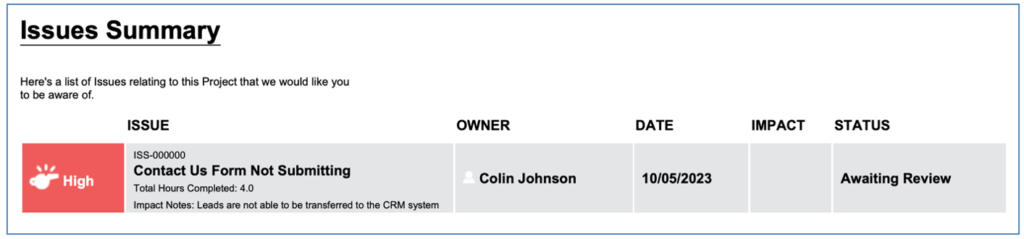
Any fields added to this Field Set will appear at the bottom of the ‘Issue’ cell of the Issues Summary Table, beneath the Issue Name.
Risk Log Appendix
The Risk Log Appendix can be optionally included in the Status Report by setting the ‘Weekly Status Report – Include Risks’ field to TRUE on the Project record. This Appendix includes Risks where the ‘Include in Weekly Status Report’ field on the Risk record is TRUE.
Below is an example of the Risk Log Appendix.
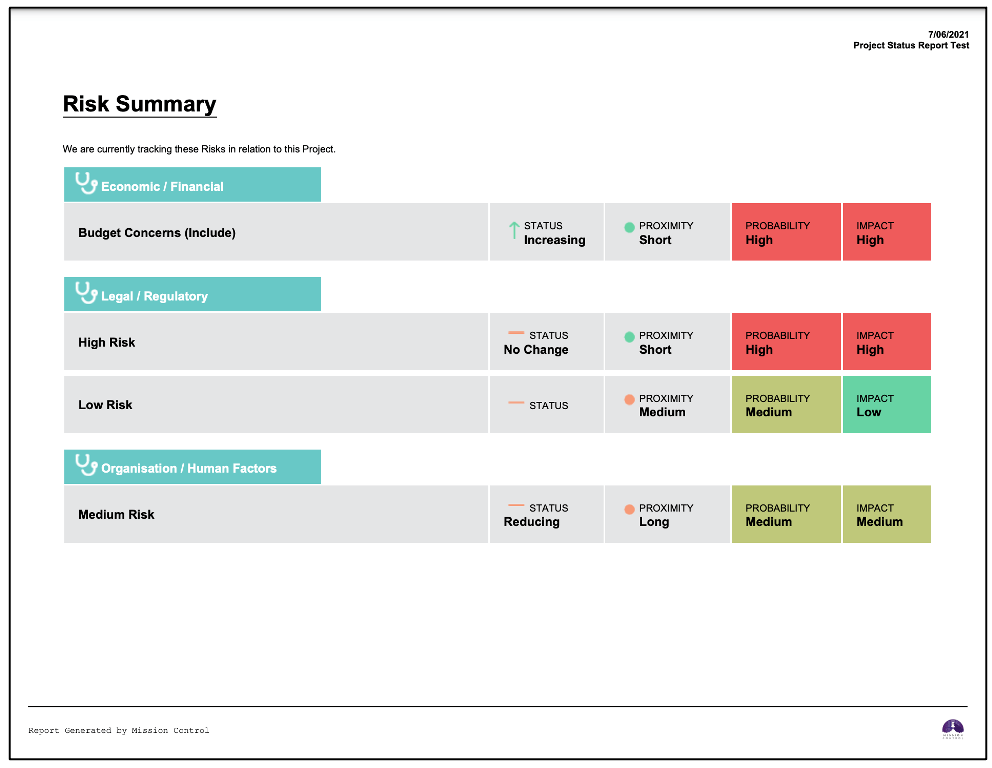
To add Custom Fields to the Risks page within the Project Status Report, Customers can add fields to the ‘Risk: Status Report’ Field Set, which is available on the Risk Object within Setup.
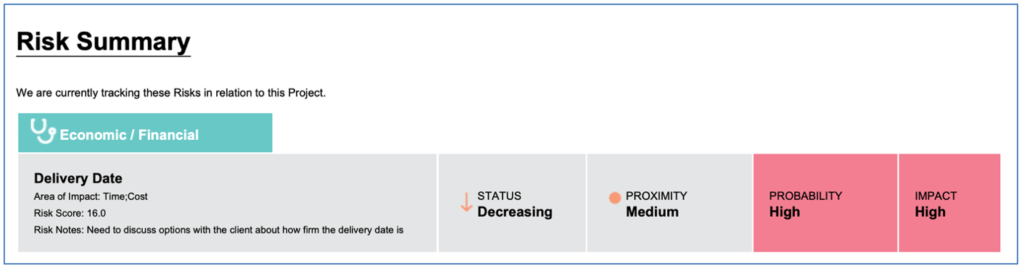
Any fields added to this Field Set will appear at the bottom of the ‘Risk’ cell of the Risk Summary Table, beneath the Risk Name.
Change Request Appendix
The Change Request Appendix can be optionally included in the Status Report by setting the ‘Weekly Status Report – Include CRs’ field to TRUE on the Project record. This Appendix includes Change Requests where the ‘Include in Weekly Status Report’ field on the Change Request record is TRUE.
Below is an example of the Change Request Appendix.
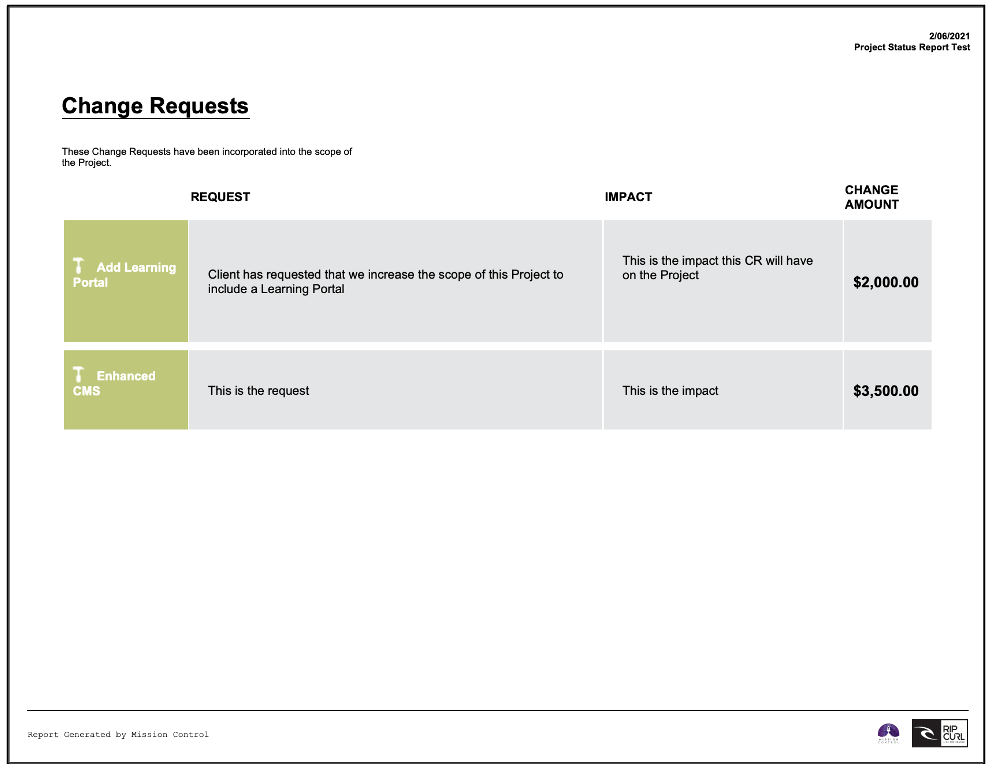
To add Custom Fields to the Change Request page within the Project Status Report, Customers can add fields to the ‘Change Request: Status Report’ Field Set, which is available on the Risk Object within Setup.
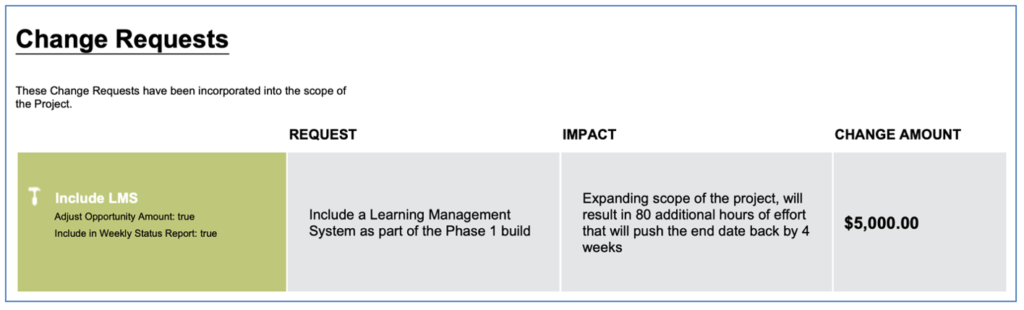
Any fields added to this Field Set will appear at the bottom of the ‘Change Request’ cell of the Change Requests Table, beneath the Change Request Name.
Project Stakeholders Appendix
The Project Stakeholder Appendix can be optionally included in the Status Report by setting the ‘Weekly Status Report – Inc Stakeholders’ field to TRUE on the Project record. This Appendix includes Project Stakeholders where the ‘Include in Weekly Status Report’ field on the Project Stakeholder is TRUE.
Below is an example of the Project Stakeholder Appendix.
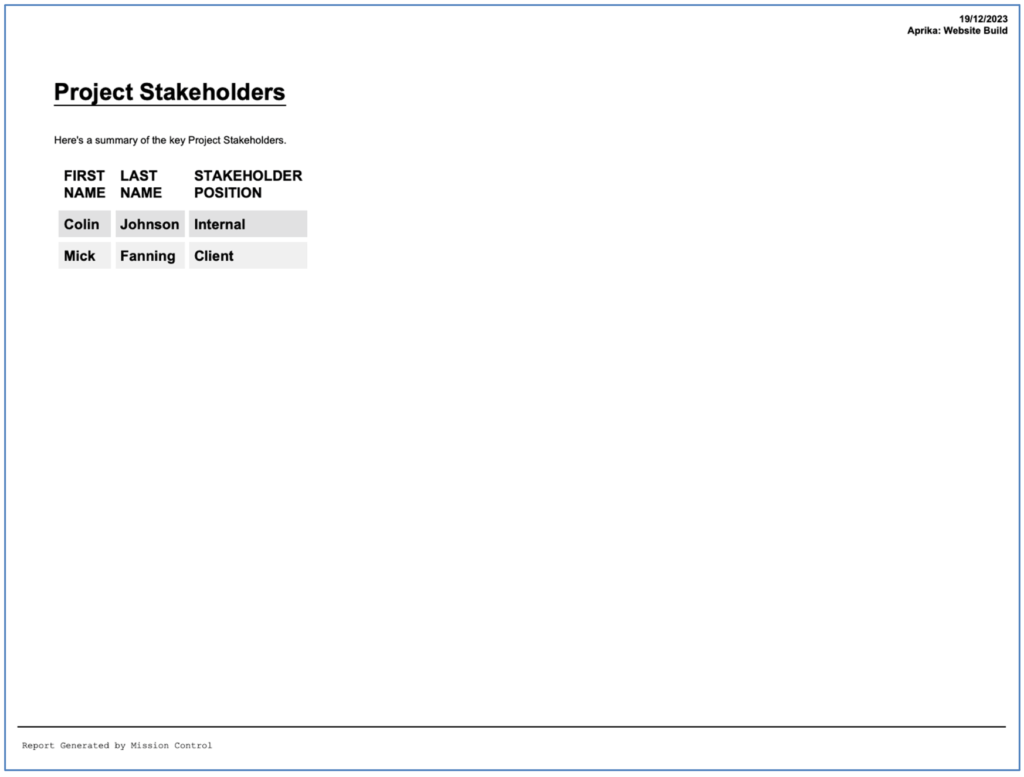
To add Custom Fields to the Project Stakeholder page within the Project Status Report, Customers can add fields to the ‘Project Stakeholder: Status Report Fields’ Field Set, which is available on the Project Stakeholder Object within Setup. Note: A maximum of 3 additional fields will be displayed on the Appendix.
Note: A Validation Rule on the Project Stakeholder Object will prevent you from setting the ‘Include in Weekly Status Report’ field to TRUE if the Role it relates to is an ‘Asset’ Role.
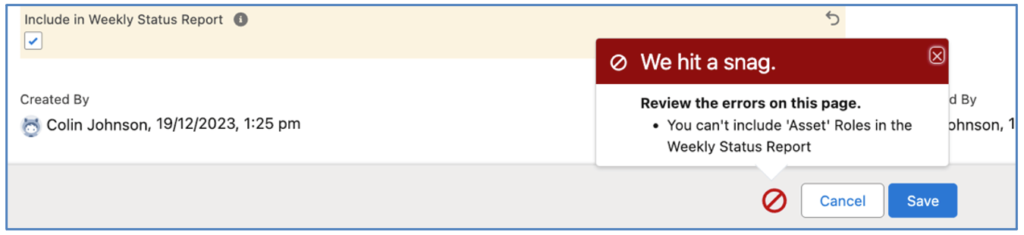
Back Page
The Back Page provides your Company Name, Phone Number and the email address of the Project Owner.
Below is an example of the Back Page.

By default, it will display the Phone field value from the User record related to the Role record that is set as the Project Owner. If the Role that is set as the Project Owner is not related to a User, then the Phone field value from the Company Information details will be displayed.
Previously the font type used in the footer of the Status Report was different to the font type used for the main page content. This has now been standardised across both content areas.
You are able to specify the Font Type that is applied to the Project Status Report.
To set the Font Type, you need to enter a value in the Font Type picklist field within the Project Status Report Settings Tile on the Control Pad of the Mission Control Console.

By default, the ‘Arial Unicode MS’ Font Type used.
Include Project Custom Fields
You can include up to 5 x Custom Fields from the Project record on the Project Summary and Project Detail pages of the Status Report. You can include different fields on each page by adding fields to the two different Field Sets.
Project Summary Custom Fields
These fields need to be added to a Field Set on the Project Object called ‘Project: Status Report Fields’. Whilst you can add more than 5 Fields to this Field Set, only the Top 5 Fields will be displayed within the Status Report.
You can access the Field Set by going to Setup > Object Manager > Project > Field Sets > Project: Status Report Fields.
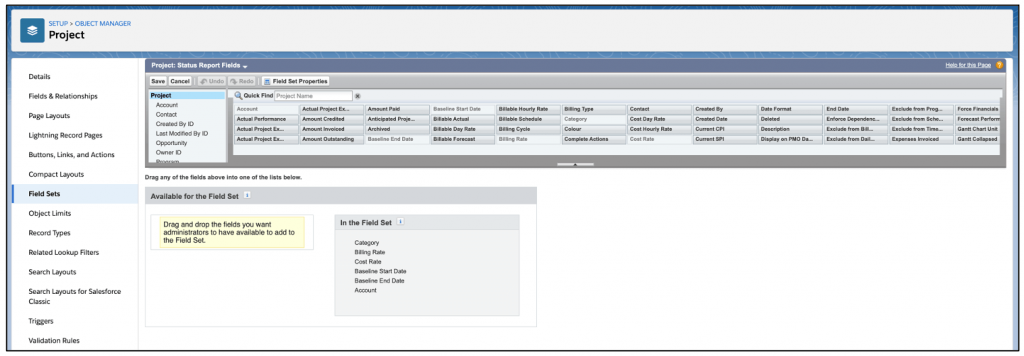
Once you have added your Fields, click Save.
Project Detail Custom Fields
These fields need to be added to a Field Set on the Project Object called ‘Project: Status Report Detail Fields’. Whilst you can add more than 5 Fields to the Field Set, only the Top 5 Fields will be displayed within the Status Report.
You can access the Field Set by going to Setup > Object Manager > Project > Field Sets > Project: Status Report Detail Fields.
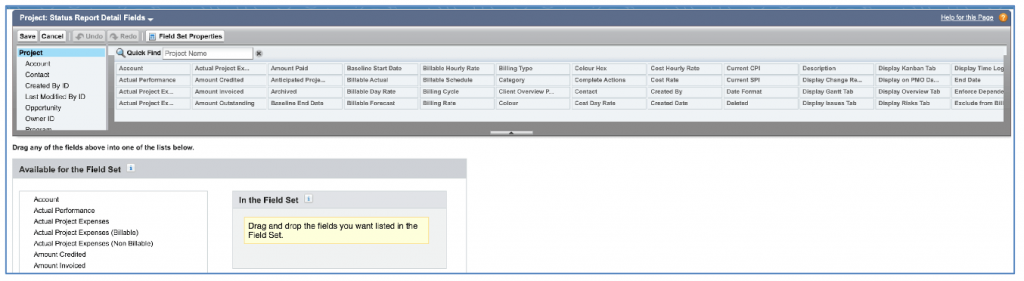
Once you have added your Fields, click Save.
Include Phase Custom Fields
You can include up to 5 x Custom Fields from the Phase Object on the Project Detail page of the Status Report.
These fields need to be added to a Field Set on the Phase Object called ‘Phase: Status Report Fields’. Whilst you can add more than 5 Fields to this Field Set, only the Top 5 Fields will be displayed within the Status Report.
You can access the Field Set by going to Setup > Object Manager > Phase > Field Sets > Phase: Status Report Fields.

Once you have added your Fields, click Save.
Include Milestone Custom Fields
You can include up to 5 x Custom Fields from the Milestone record on the Project Detail page of the Status Report.
These fields need to be added to a Field Set on the Milestone Object called ‘Milestone: Status Report Fields’. Whilst you can add more than 5 Fields to this Field Set, only the Top 5 Fields will be displayed within the Status Report.
You can access the Field Set by going to Setup > Object Manager > Milestone > Field Sets > Milestone: Status Report Fields.
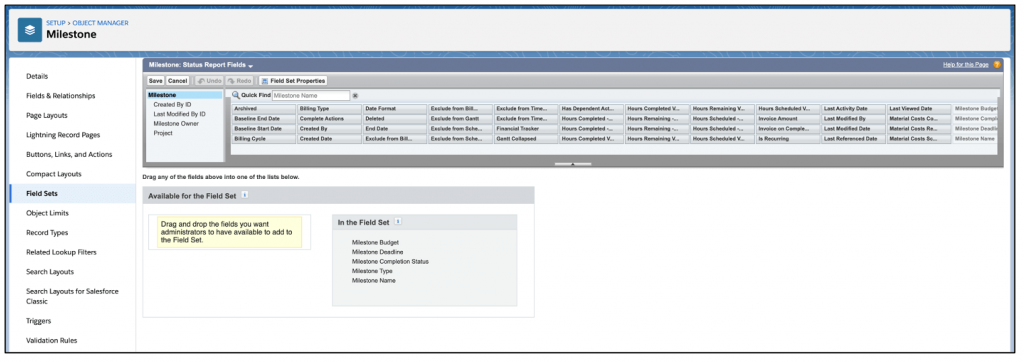
Once you have added your Fields, click Save.
Include Action Custom Fields
You can include up to 5 x Custom Fields from the Action record on the Project Detail page of the Status Report.
These fields need to be added to a Field Set on the Action Object called ‘Action: Status Report Fields’. Whilst you can add more than 5 Fields to this Field Set, only the Top 5 Fields will be displayed within the Status Report.
You can access the Field Set by going to Setup > Object Manager > Action > Field Sets > Action: Status Report Fields.
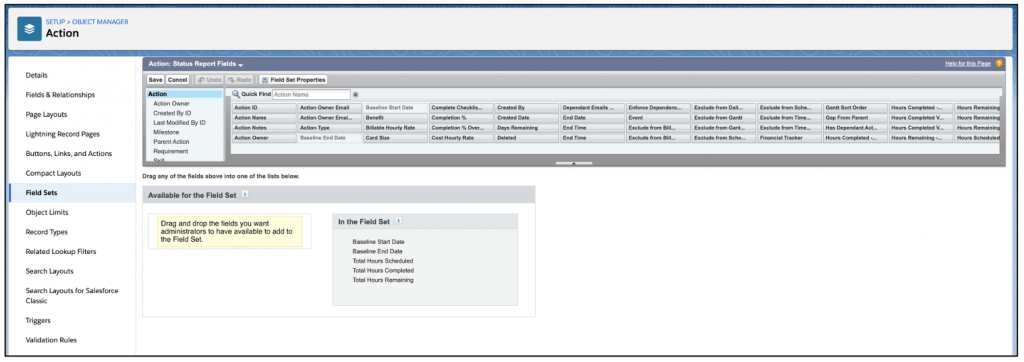
Once you have added your Fields, click Save.
Include Checklist Item Custom Fields
You can include up to 5 x Custom Fields from the Checklist Item record on the Project Detail page of the Status Report.
These fields need to be added to a Field Set on the Checklist Item Object called ‘Checklist Item: Status Report Fields’. Whilst you can add more than 5 Fields to this Field Set, only the Top 5 Fields will be displayed within the Status Report.
You can access the Field Set by going to Setup > Object Manager > Checklist Item > Field Sets > Checklist Item: Status Report Fields.
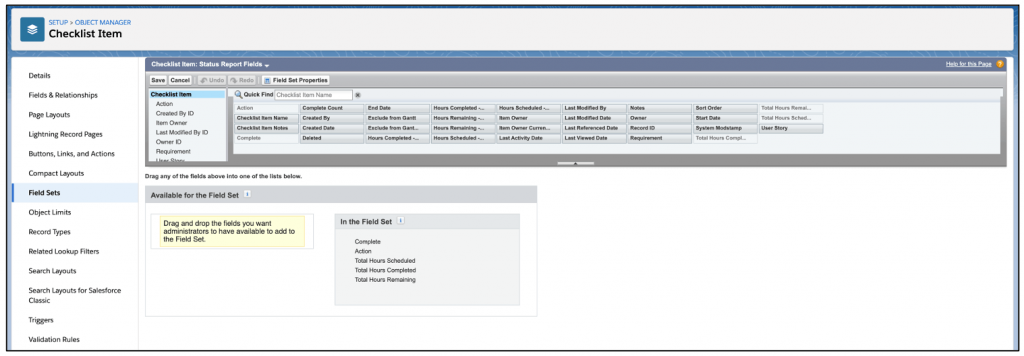
Once you have added your Fields, click Save.
The Custom Columns on the Detail Page will now display the full Field Name instead of ‘Custom 1’, ‘Custom 2, etc., if the same field has been included for each Object in the same Column.
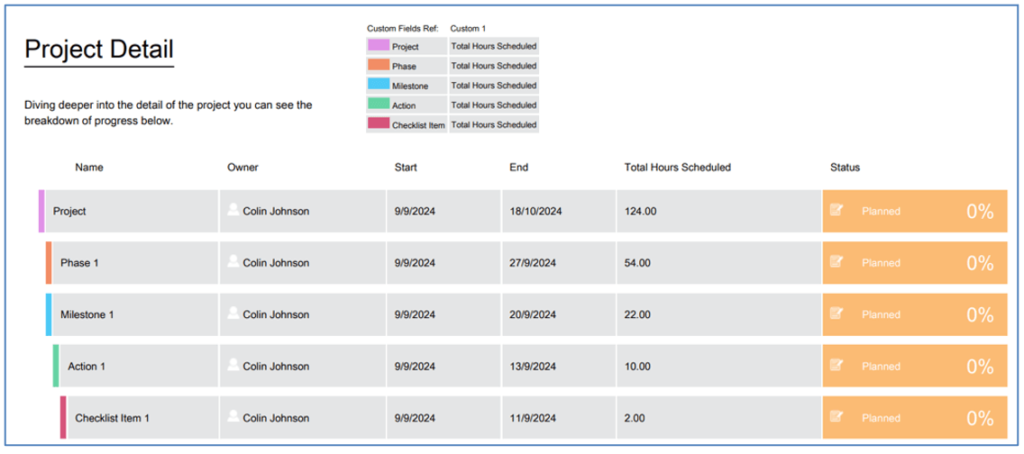
In the example above, the ‘Total Hours Scheduled’ field has been added to Column 1 for all Objects. Therefore, the Column Header is showing the Field Label instead of ‘Custom 1’.
Apply Date Range Filters
You can choose to apply a Date Range filter to the ‘Project Detail’ section of the Status Report. This is controlled by the following fields on the Project record:
These dates need to be manually entered and will only apply to the information displayed in the Project Detail page.
Setting up the Project Status Report
On the Control Pad of the Mission Control Console, there is a ‘Project Status Report’ Tile, as illustrated below.

To activate the Project Status Report, you will need to set the Checkbox to true and select the day and time you would like your reports to be generated and distributed.
On the Project, you will need to set the ‘Project Owner’ to a Role with an email address on it and set the ‘Generate Weekly Project Status Report’ field to true. If this field is false, a report will not be distributed, even if there are Project Stakeholders.
Note: The ‘Project Status Report Required Fields’ Validation Rule ensures the appropriate fields are populated if the ‘Generate Weekly Status Report’ is set to TRUE. This Validation Rule is Active by default.
There is also a button available on the Project record called ‘Preview Status Report’ that will enable you to manually generate the PDF as and when required.
You can also choose to include the following appendices within the Project Status Report:
For Issues, Risks and Change Requests, you may not want to share all records with your Project Stakeholders. To accommodate this scenario, there is a Checkbox field available on the Issue and Risk Objects called ‘Include in Weekly Status Report’. If this field is TRUE, the record will be included in the appendix.
To include any of the appendices within the weekly Project Status Report PDF, you need to ensure the following Project fields are set to TRUE:
The records are included based on the following filter criteria:
Time Logs
Include all Time Logs related to Actions within the Project that have a Date within the ‘Last Week’ date range.
Issues
Include all Issues related to this Project where ‘Include in Weekly Status Report’ is TRUE.
Risks
Include all Risks related to this Project where ‘Include in Weekly Status Report’ is TRUE.
Remove Mission Control Footer
The Project Status Report PDF includes ‘Report Generated by Mission Control’ in the page footer, as shown below.

If Customers wish to remove this from the PDF footer, they are able to do so by setting the ‘Remove Report Generated by Mission Control Footer’ setting to TRUE on the Project Status Report setting tile on the Control Pad of the Mission Control Console.
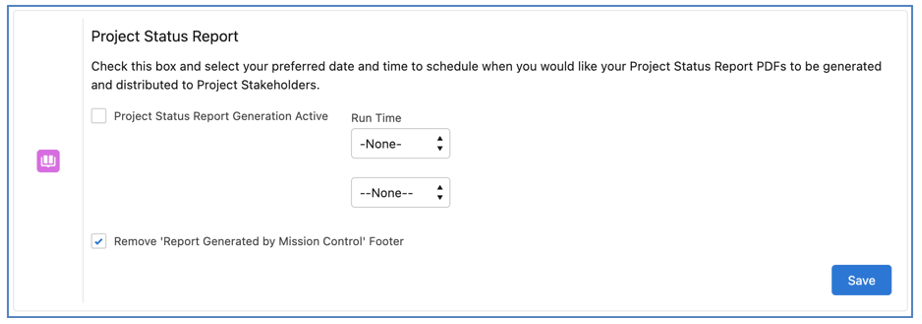
If this setting is FALSE, the text will be included in the Footer.
Report Distribution
When a Project is updated to meet either of the following two conditions:
The ‘Generate Weekly Project Status Report’ field will be set to FALSE. This ensures the automatic distribution of a Project’s Status Report will stop.
Distribute Reports on different days
Mission Control also provides the ability to distribute the Weekly Status Reports on different days of the week. For example, you may have one client that wants to receive their report on a Monday, and another that wants to receive it on a Tuesday.
On the Control Pad, you specify the day of the week and the time of day that the Weekly Status Reports should be distributed. This day is considered the ‘Default Distribution Day’.
If you have a Project that you would like to distribute the report on a different day to the ‘Default Distribution Day’, you can set the day of the week for that Project using the ‘Report Distributed On’ field.
It is expected behaviour that the Project Status Report email is sent from the user’s email who last updated the Project Status Report tile in the Control Pad. However, the sender display name on the email will be the name of the Project Owner and when the recipient responds to the email, the Project Owner will receive that email.
NOTE: This Feature is not available for customers on the Professional Edition of Salesforce. This is due to requiring features within Salesforce that are only available with Enterprise Edition and upwards. In order to use the read-only page feature, you will need to configure a Force.com Site. As part of configuring a Force.com Site, a Site Guest User will be created. This Site Guest User will require a Mission Control license.
The ‘Read-Only’ page allows you to provide your customers with a unique link that can be used to access a read-only, real-time view of the Project.
The page can be configured on a per-Project basis to include any of the following Tabs:
For any of the Tabs, records will only be displayed if the ‘Exclude from Client Page’ field is FALSE. This field can be found on each of the following Objects:
The Action, Checklist Item and Time Log Objects also have an additional field called ‘Exclude from Client Page Indicator’. If the parent record has been marked to be excluded, then the child record will automatically be marked to be excluded as well. For example, if I mark an Action to be excluded, then any Time Log or Checklist Item that relates to that Action will also automatically be excluded.
Overview Tab
Below is an example of the Overview Tab. By default it shows the Project, Milestone, Action and Checklist Item records.
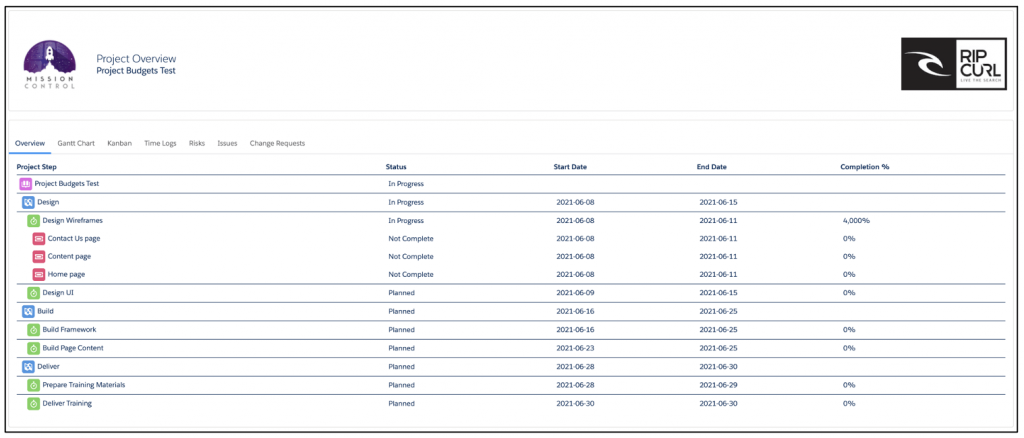
Overview Tab Default Field Settings
By default, the Overview Tab on the Read Only Page will display the following fields:
If you wish to remove any of the above fields, you can do so on the ‘Customer Read Only Page’ Tile on the Control Pad of the Mission Control Console.

Within the ‘Default Field Columns’ section, set the Checkbox to TRUE for each Field you wish to be displayed on the Overview Tab and click the Save button within the Tile.
Include Project Custom Fields
You can include up to 5 x Custom Fields from the Project record on the Project Summary and Project Detail pages of the Status Report. You can include different fields on each page by adding fields to the two different Field Sets.
Project Summary Custom Fields
These fields need to be added to a Field Set on the Project Object called ‘Project: Status Report Fields’. Whilst you can add more than 5 Fields to this Field Set, only the Top 5 Fields will be displayed within the Status Report.
You can access the Field Set by going to Setup > Object Manager > Project > Field Sets > Project: Status Report Fields.

Once you have added your Fields, click Save.
Project Detail Custom Fields
These fields need to be added to a Field Set on the Project Object called ‘Project: Status Report Detail Fields’. Whilst you can add more than 5 Fields to the Field Set, only the Top 5 Fields will be displayed within the Status Report.
You can access the Field Set by going to Setup > Object Manager > Project > Field Sets > Project: Status Report Detail Fields.

Once you have added your Fields, click Save.
Include Phase Custom Fields
You can include up to 5 x Custom Fields from the Phase Object on the Project Detail page of the Status Report.
These fields need to be added to a Field Set on the Phase Object called ‘Phase: Status Report Fields’. Whilst you can add more than 5 Fields to this Field Set, only the Top 5 Fields will be displayed within the Status Report.
You can access the Field Set by going to Setup > Object Manager > Phase > Field Sets > Phase: Status Report Fields.
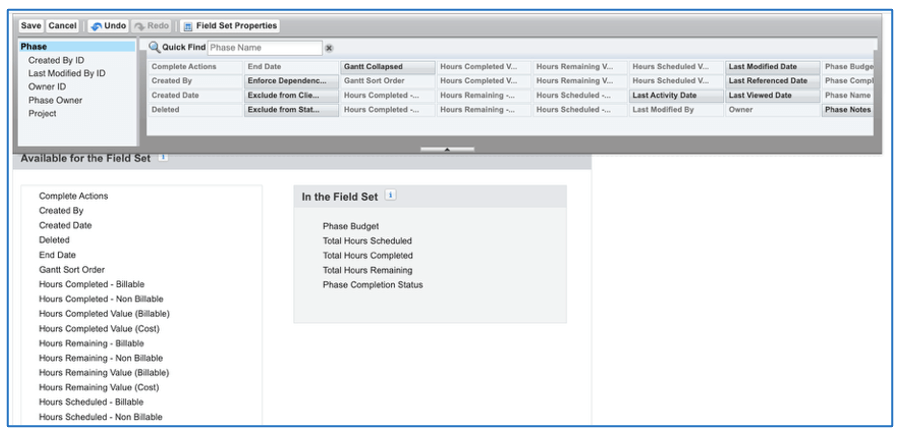
Once you have added your Fields, click Save.
Include Milestone Custom Fields
You can include up to 5 x Custom Fields from the Milestone record on the Overview Tab.
These fields need to be added to a Field Set on the Milestone Object called ‘Milestone: Status Report Fields’. Whilst you can add more than 5 Fields to this Field Set, only the Top 5 Fields will be displayed within the Overview Tab.
You can access the Field Set by going to Setup > Object Manager > Milestone > Field Sets > Milestone: Status Report Fields.
Once you have added your Fields, click Save.
Include Action Custom Fields
You can include up to 5 x Custom Fields from the Action record on the Overview Tab.
These fields need to be added to a Field Set on the Action Object called ‘Action: Status Report Fields’. Whilst you can add more than 5 Fields to this Field Set, only the Top 5 Fields will be displayed within the Overview Tab.
You can access the Field Set by going to Setup > Object Manager > Action > Field Sets > Action: Status Report Fields.
Once you have added your Fields, click Save.
Include Checklist Item Custom Fields
You can include up to 5 x Custom Fields from the Checklist Item record on the Overview Tab.
These fields need to be added to a Field Set on the Checklist Item Object called ‘Checklist Item: Status Report Fields’. Whilst you can add more than 5 Fields to this Field Set, only the Top 5 Fields will be displayed within the Overview Tab.
You can access the Field Set by going to Setup > Object Manager > Checklist Item > Field Sets > Checklist Item: Status Report Fields.
Once you have added your Fields, click Save.
Adding permissions for custom fields
Please keep in mind that if you’re using the Mission Control Customer Read Only permission set for the guest user, it only includes access to standard Mission Control fields. You may also find that you created a new custom field and selected the option to apply Read and Write Field Level Security for all Profiles thinking it would apply to the Guest User Profile as well but that may not be the case. Guest User Profile does not appear there as per Salesforce and the permission for the new field will have to be added by following the steps below.
This can be done in 2 ways, create a new permission set which is assigned to the Guest User or assigning the permissions on the Guest User Profile.
If you’d like to create a Permission set with access to the custom fields and assign to the Guest User, please follow these steps:
All done! If there are any other custom fields you want to show on this page, you can just update this permission set to include the access.
If you’d like to update the Guest User profile with access to the custom fields, please follow these steps:
When you need to include access to additional fields, you will need to repeat the steps above to update the Guest User profile.
Gantt Chart Tab
Below is an example of the Gantt Chart Tab.
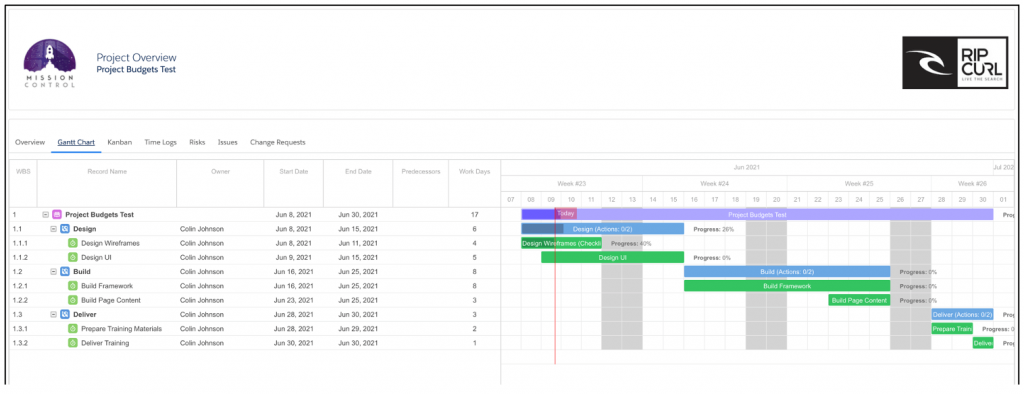
Kanban Tab
Below is an example of the Kanban Board Tab.
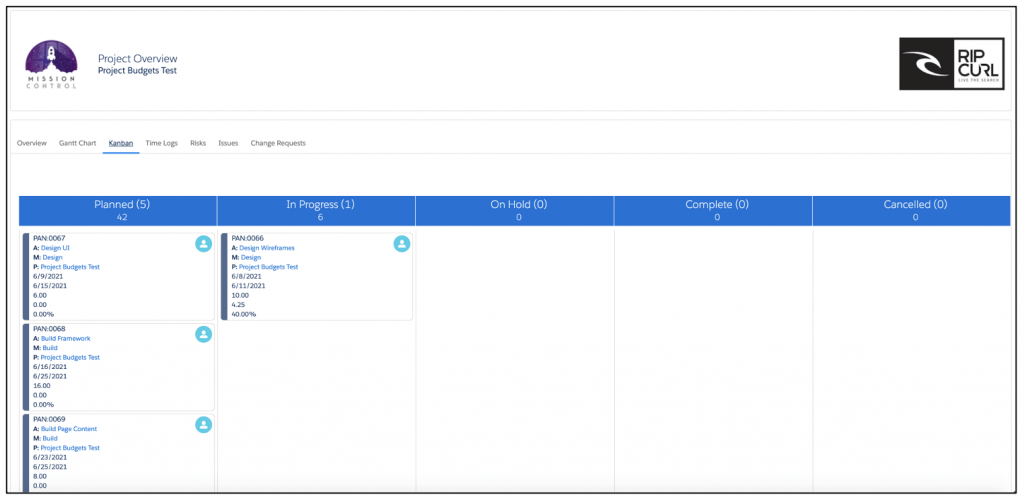
Time Logs Tab
Below is an example of the Time Logs Tab.

Time Log PDF Export
Within the Time Logs Tab of the Read Only Page, you can choose to display the ‘Generate PDF’ button, as shown below.

This enables your Client to export a PDF of the Time Logs. When the button is clicked, they have the option to set the timeframe for the export, as shown below.

Once the ‘Generate’ button is clicked, the PDF Report will be displayed.

To display the ‘Generate PDF’ button on the Read Only Page, you will need to ensure the ‘Display Time Logs Generate PDF Button’ field is set to TRUE on the Project.
Risks Tab
Below is an example of the Risk Log Tab.
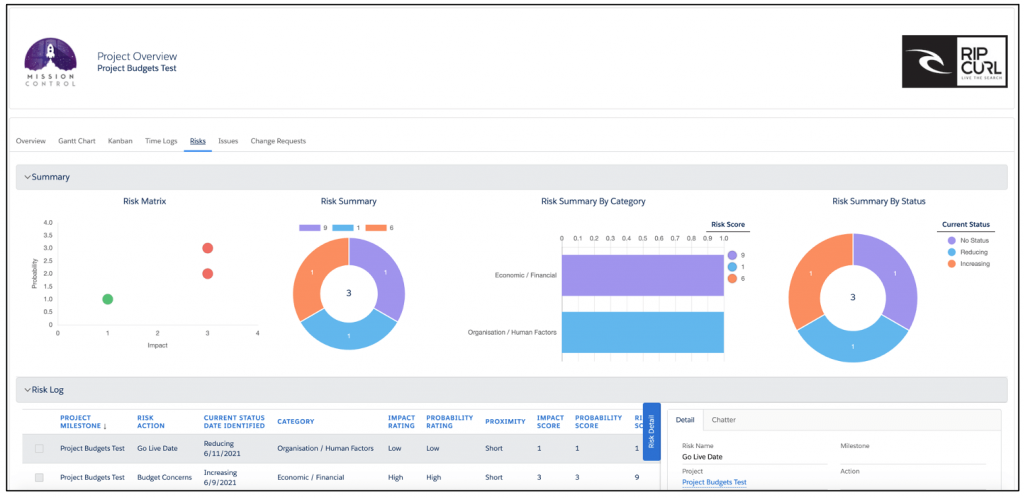
Issues Tab
Below is an example of the Issue Log Tab.
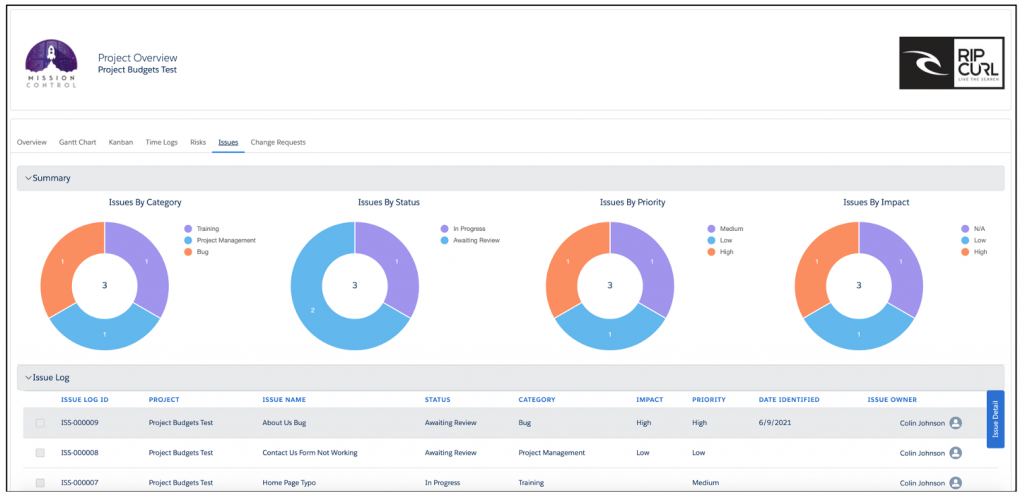
Change Requests Tab
Below is an example of the Change Requests Tab.
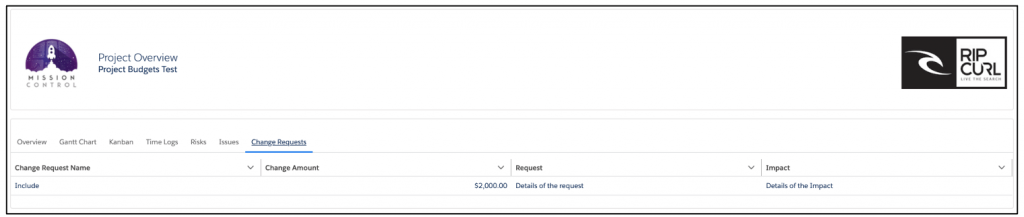
Project Health Checks Tab
If you create Project Health Checks and wish to share them with your Client via the Client Read Only Page, you can configure the ‘Health Checks’ Tab to be displayed.

The image above shows the list of Health Checks related to the Project on the left-hand side of the Tab. When the eye icon is clicked, the individual Project Health Check will be displayed on the right-hand side.
To include the Health Checks Tab on the Read Only Page, you will need to ensure the ‘Display Health Checks Tab’ field on the Project is set to TRUE.
You will need to configure a Sharing Rule for the Project Health Check Object as outlined below.
By default, the following fields are displayed for the individual Project Health Check record view:
You can add/remove fields from this view through the ‘Read Only Health Check Fields’ Field Set on the Project Health Check Object.
You can access the Field Set by going to Setup > Object Manager > Project Health Check > Field Sets > Read Only Health Check Fields.

Each Tab can be included on the read-only page by ensuring the appropriate field from the list below is set to TRUE on the Project record.
| Field Name | Comments |
| Display Overview Tab | Set this field to TRUE if you wish to include the Overview Tab on the read-only page |
| Display Gantt Tab | Set this field to TRUE if you wish to include the Gantt Chart Tab on the read-only page |
| Display Kanban Tab | Set this field to TRUE if you wish to include the Kanban Tab on the read-only page |
| Display Time Logs Tab | Set this field to TRUE if you wish to include the Time Logs Tab on the read-only page |
| Display Risks Tab | Set this field to TRUE if you wish to include the Risks Tab on the read-only page |
| Display Issues Tab | Set this field to TRUE if you wish to include the Issues Tab on the read-only page |
| Display Change Requests Tab | Set this field to TRUE if you wish to include the Change Requests Tab on the read-only page |
| Display Health Checks Tab | Set this field to TRUE if you wish to include the Health Checks Tab on the read-only page |
Page Branding
The page can display your logo and your customers logo. By default, it will display the Mission Control logo in the top-left corner of the header section.

You are able to configure the settings to display your logo on the top-left of the header. To do this, you need to ensure the following setting within the Gantt Chart Settings section of the Control Pad on the Console is set to reference your logo.
![]()
You are able to configure the settings to display your client’s logo in the top-right of the header. To do this, you need to populate the ‘Logo’ field on the Project record. The Customer Logo will be visible if you have populated the ‘Logo URL’ field on the Project record. Note, this URL must be a ‘Document’ that you add to Salesforce Documents, ensuring the ‘Externally Available Image’ Checkbox field is set to TRUE.
![]()
Below is an example displaying both custom logos.

Site Setup
In order to use the read-only page feature, you will need to configure a Force.com Site. As part of configuring a Force.com Site, a Site Guest User will be created. This Site Guest User will require a Mission Control license.
Configuring Force.com Site
The steps to complete this configuration are outlined below.
Navigate to Setup > User Interface > Sites and Domains > Sites
Register a Force.com Domain
Note: This step only applies if you do not already have a Force.com Domain. To register a Force.com Domain, enter [Your Company Name] into the text box and click ‘Check Availability’.
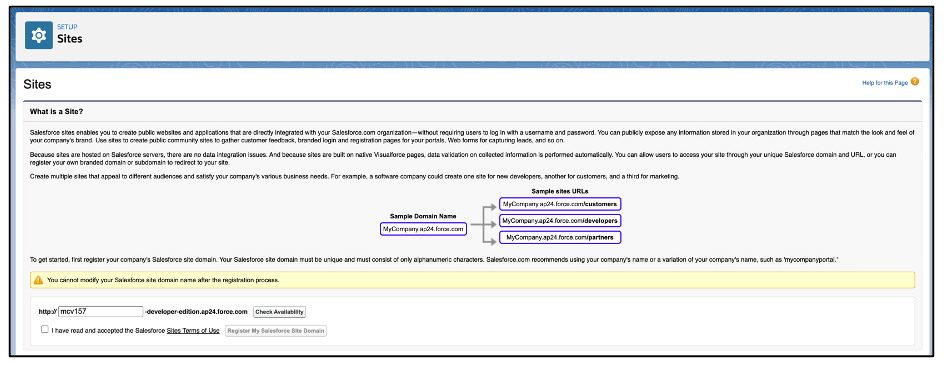
If the Force.com Domain Name is available, accept the Terms of Use checkbox and click ‘Register My Force.com Domain’. If it’s not available, choose another name for your Domain, such as an abbreviated or extended version of your business name.

Once you have a registered Domain, you will be able to create a new Force.com Site.
Create a Force.com Site
Click the ‘New’ button to create a new Site.
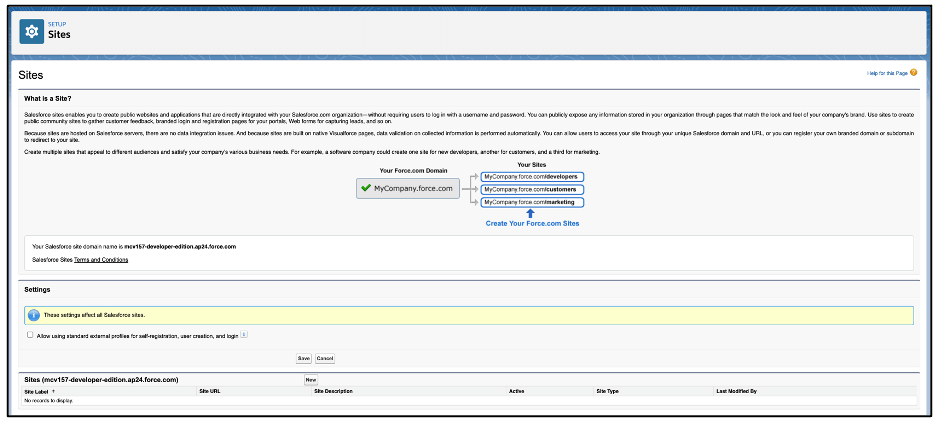
Configure your Site as shown below and click ‘Save’.
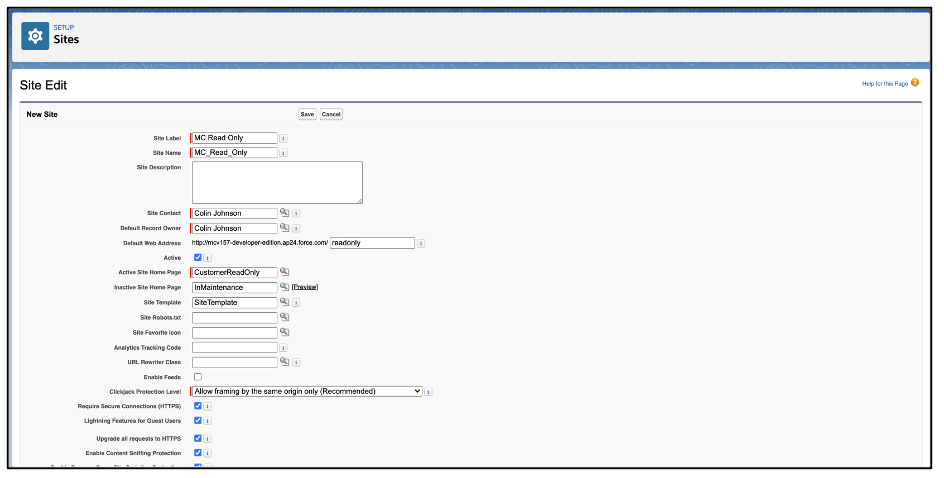
Granting Site Guest User Access
From the Site Details page click on the ‘Public Access Settings’ button. Next click on the ‘View Users’ button. Next click the ‘Full Name’ of the User displayed.
Scroll down to the Permission Set Assignments Related List and click the ‘Edit Assignments’ button. Move the ‘Mission Control Customer Read Only’ Permission Set from the Available Permission Sets column to the Enabled Permission Sets column and click ‘Save’.
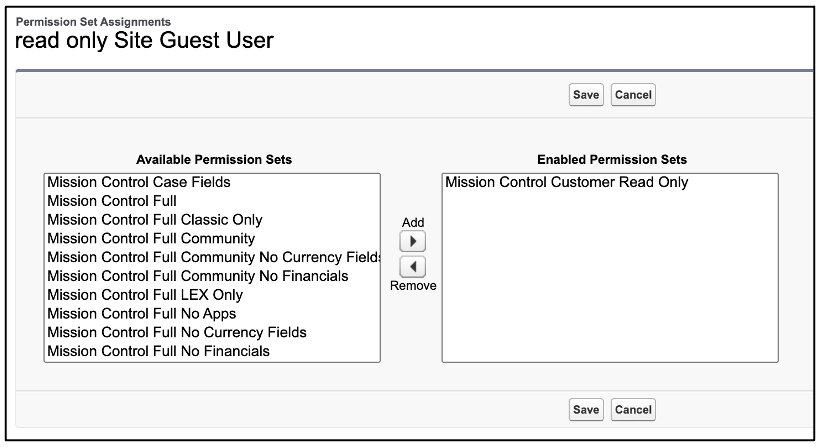
Scroll down to the Managed Packages Related List and click the ‘Manage Assignments’ button. Select Mission Control from the ‘Unassigned Packages’ so it appears in the ‘Selected Packages’ and click the ‘Add’ button.
Configure Sharing Rules
By default the Organization-Wide Defaults Sharing Settings for Default External Access is Private. In order for your customers to be able to view the information on the read-only page, we recommend the following Objects have Sharing Rules configured as outlined below.
| Object | Step 1 | Step 2 | Step 3 | Step 4 | Step 5 |
| Project | Read Only Page | Guest user access, based on criteria | Archived Equals FALSE | Share with Read Only Site Guest User | Read Only |
| Phase | Read Only Page | Guest user access, based on criteria | Exclude from Client Page Equals FALSE | Share with Read Only Site Guest User | Read Only |
| Checklist Item | Read Only Page | Guest user access, based on criteria | Exclude from Client Page Equals FALSE | Share with Read Only Site Guest User | Read Only |
| Change Request | Read Only Page | Guest user access, based on criteria | Exclude from Client Page Equals FALSE | Share with Read Only Site Guest User | Read Only |
| Issue | Read Only Page | Guest user access, based on criteria | Exclude from Client Page Equals FALSE | Share with Read Only Site Guest User | Read Only |
| Dependency | Read Only Page | Guest user access, based on criteria | Created By ID Not Equal to . (e.g. Period / Full Stop) | Share with Read Only Site Guest User | Read Only |
| Project Health Check | Read Only Page | Guest user access, based on criteria | Created By ID Not Equal to . (e.g. Period / Full Stop) | Share with Read Only Site Guest User | Read Only |
Note: If the Sharing Setting ‘Require permission to view record names in lookup fields’ is enabled, you will also need to configure the following Sharing Rule.
| Object | Step 1 | Step 2 | Step 3 | Step 4 | Step 5 |
| Role | Read Only Page | Guest user access, based on criteria | Created By ID Not Equal to . (e.g. Period / Full Stop) | Share with Read Only Site Guest User | Read Only |
Control Pad Setting
Once you have completed all of the above configuration steps, you will need to go to the Control Pad on the Mission Control Console. Within the ‘Customer Read Only Page’ Tile, select the URL of the Force.com Site you have configured and click ‘Save’. This URL will be referenced in the Unique URL for each Project.

Unique URL
For each Project, a unique Id will be generated and stored within the ‘External Project Id’ field. This unique Id, along with the Force.com Site URL will form the Unique URL for the Project that will be stored in the ‘Client Overview Page URL’ field.

To provide your customer with access to the read-only page for a Project, you will need to supply them with the URL contained within the ‘Client Overview Page URL’ field.
For a Project that does not have an External Project Id, simply click Edit, then click Save and the field will be populated. Likewise, if you need to refresh the field value, simply Edit, remove the field value, click Save and a new value will be populated.
Track Pad
The Track Pad provides you with quick access to the following features:
The Track Pad is accessible on the right-hand side of the Project Overview Page. However, as it is a stand-alone component, you can also add it to other pages within Lightning Experience. For example, you could add it to the Home Page so you can quickly see everything that’s going on across all of your projects.
When using the Track Pad on a Project Overview page, the Tabs will show records relative to the context Project. If you are using it elsewhere, for example, on the Home page, it will show you records for all Projects.
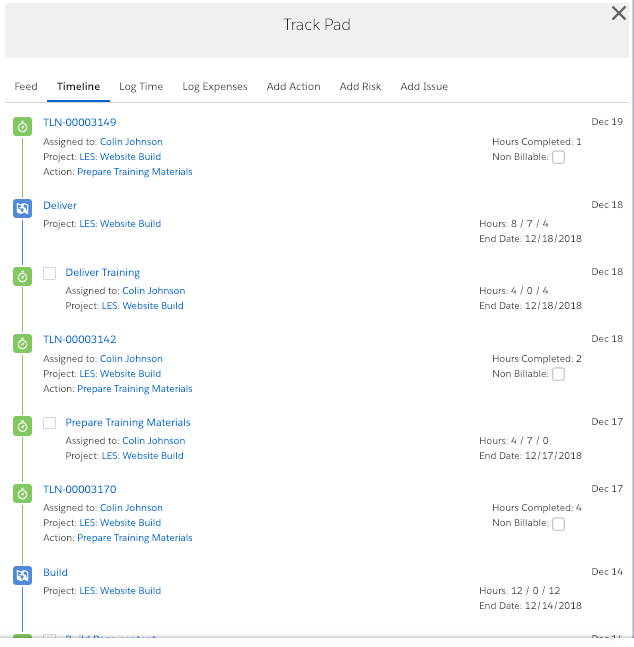
You will notice that whilst viewing the Track Pad in context of the Project Overview Page, you’ll see a X in the top-right hand corner. This enables you to collapse the Track Pad so you can use the full width of the screen for your Project Overview. Whilst the Track Pad is collapsed, you’ll see an arrow icon at the bottom-right hand corner. If you click this arrow, the Track Pad will be expanded again.
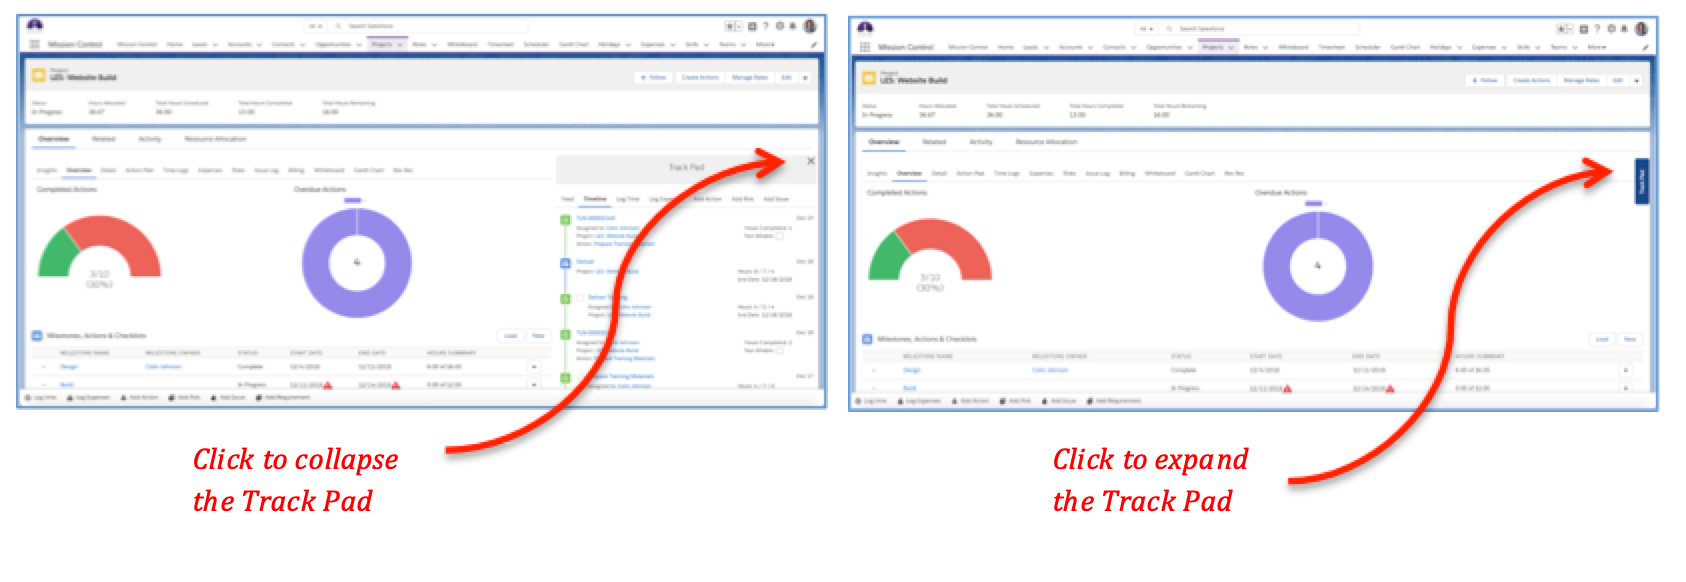
Feed
The Feed Tab provides you with access to the Chatter Feed for the Project.
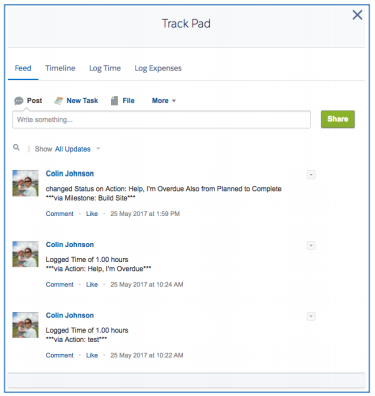
Timeline
The Timeline Tab pulls together a Timeline for your Project, brining together all of the key records onto one time line. The Objects that are included in the Timeline are listed in the table below with the date from that record that is used for the Timeline.

For Actions and Tasks that are displayed in the Timeline that are not yet complete, a Checkbox will be displayed to the left of the record name. To complete the Action or Task, simply set the Checkbox to TRUE.
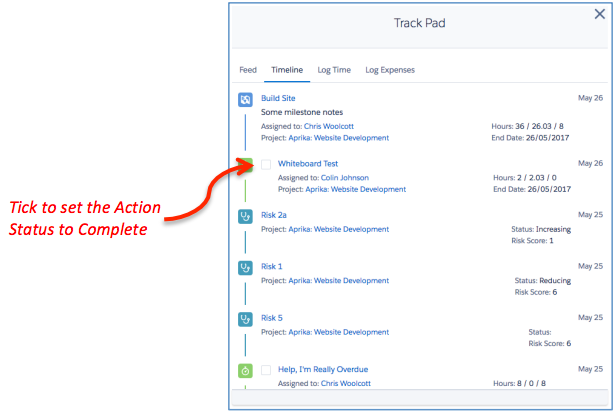
Log Time
The Log Time Tab provides you with access to the Time Logger Component. From here, you will be able to log your time or start/stop your time recording against any Action.
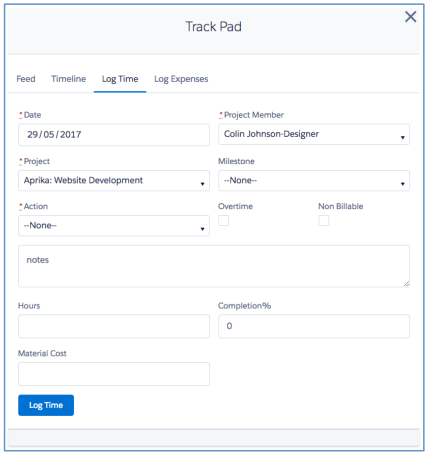
Whilst using the Track Pad on the Project Overview Page, the Project Member and Project fields will be pre-populated. If you’re using the Track Pad elsewhere, for example, on the Home page, the Project Member field will be pre-populated, but not the Project field.
Log Expenses
The Log Expenses Tab provides you with access to the Expense Logger Component. From here, you will be able to log your expenses against any project, as well as uploading a copy of the receipt if applicable.
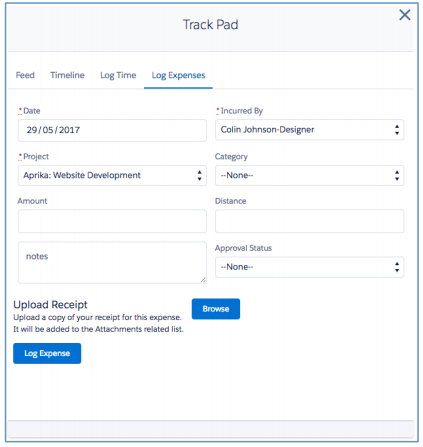
Whilst using the Track Pad on the Project Overview Page, the Incurred By and Project fields will be pre-populated. If you’re using the Track Pad elsewhere, for example, on the Home page, the Incurred By field will be pre-populated, but not the Project field.
Add Action
The Add Action Tab provides you with the ability to create a new Action relating to a Milestone within the Project. You’ll be able to specify all of the key fields, as well as access the Resource Assignment Wizard and Checklist Item Manager.

Whilst using the Track Pad on the Project Overview Page, the Action Owner and Project fields will be pre-populated. If you’re using the Track Pad elsewhere, for example, on the Home page, or the Mission Control Console, the Action Owner field will be pre-populated, but not the Project field.
You can customize which fields appear on the Add Action Component. This is controlled by a Field Set on the Action Object called ‘Add Action Component Fields’.
All existing fields on the Action Object are available for selection, excluding the following:
These fields are excluded from the Field Set as they will always appear on the Component by default.
The following fields are pre-selected within the Field Set and will be accessible from the Component.
If you wish to add Custom Fields or remove any of the above pre-selected fields, you can do so by editing the fields included within the Field Set.
Add Risk
The Add Risk Tab provides you with the ability to create a new Risk relating to the Project. You can quickly create a new Risk and the Project field will be pre-populated when using the Track Pad on the Project Overview Page.
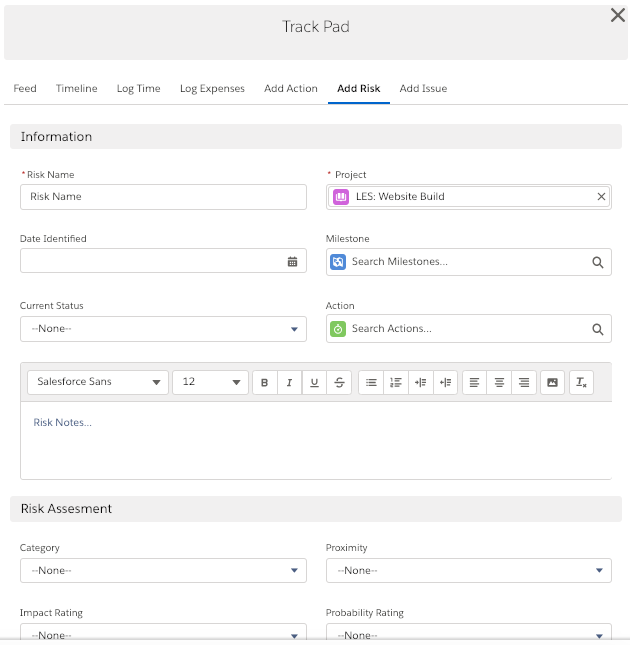
Add Issue
The Add Issue Tab provides you with the ability to create a new Issue relating to the Project. You can quickly create a new Issue and the Project field will be pre-populated when using the Track Pad on the Project Overview page.
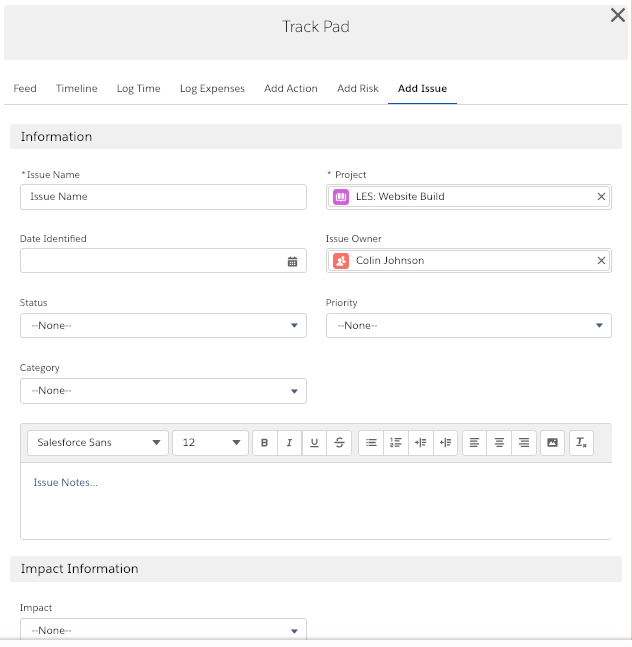
Tab / Chart Access
We’ve also aimed to provide you with as much flexibility as possible with regards to how you use the Track Pad. You can control whether a specific Role has access to the Track Pad, and whether they can have access to each Tab. A number of new fields have been added to the Role Object to enable you to set the access to each Tab. The new fields are summarised below.
| Field | Field Type | Comments |
| Track Pad Default Tab | Picklist | Allows you to specify which Tab you would like to appear when initially loading the Track Pad |
| View Track Pad | Checkbox | Identifies whether the Role can view the Track Pad |
| View Track Pad Feed | Checkbox | Identifies whether the Role can view the Feed Tab |
| View Track Pad Timeline | Checkbox | Identifies whether the Role can view the Timeline Tab |
| View Track Pad Time Logger | Checkbox | Identifies whether the Role can view the Log Time Tab |
| View Track Pad Expense Logger | Checkbox | Identifies whether the Role can view the Log Expenses Tab |
| View Track Pad Add Action | Checkbox | Identifies whether the Role can view the Add Action Tab |
| View Track Pad Add Risk | Checkbox | Identifies whether the Role can view the Add Risk Tab |
| View Track Pad Add Issue | Checkbox | Identifies whether the Role can view the Add Issue Tab |
You can set these field values for an individual Role record by editing the record and updating the fields in the ‘Track Pad Settings’ section.

You can also manage these settings for all of your Role records from a new List View that has been included called ‘Role Permissions – Track Pad’
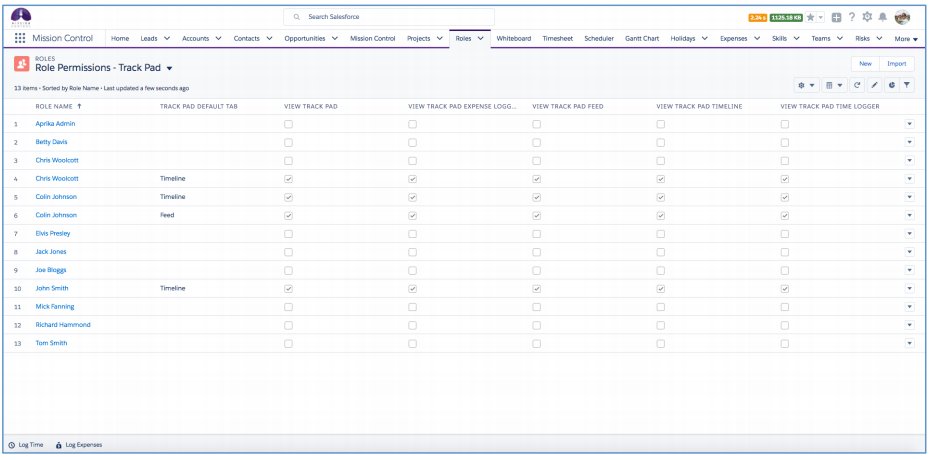
To ensure all of your Roles have access to the Project Overview upon initial upgrade to this version, an Install Script will run as part of the upgrade that will set all of the fields to TRUE. You will then be able to adjust the settings for each Role as required.
Lightning Experience ‘Utility Bar’
For customers using Lightning Experience, you will now be able to take advantage of the ‘Utility Bar’, which will provide you with the ability to access the ‘Log Time’ and ‘Log Expense’ Components from anywhere in Lightning Experience.
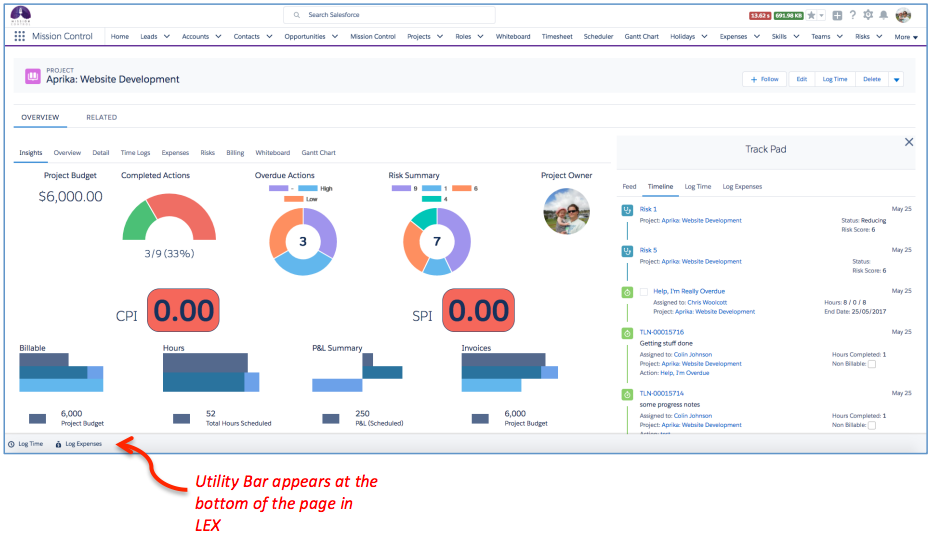
Log Time
To log time from the Utility Bar, simply click the ‘Log Time’ icon in the bottom left corner of the screen. This will open up the Time Logger Component. From here, you will be able to log your time or start/stop your time recording against any Action.
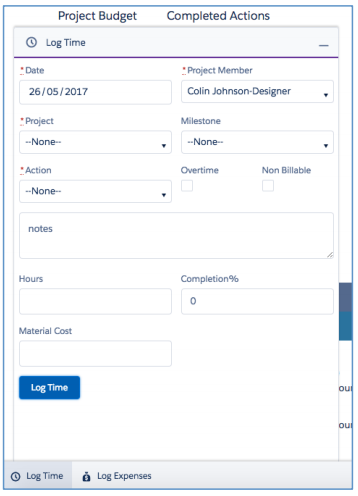
Log Expenses
To log expenses from the Utility Bar, simply click the ‘Log Expenses’ icon in the bottom left of the screen. This will open up the Expense Logger Component. From here, you will be able to log your expenses against any project, as well as uploading a copy of the receipt if applicable.
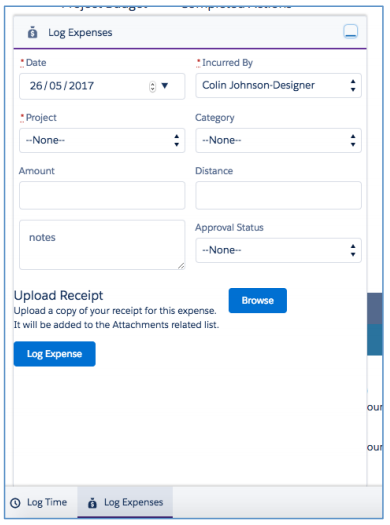
Add Action
To create a new Action from the Utility Bar, simply click the ‘Add Action’ icon in the bottom left of the screen. This will open up the Add Action Component. From here, you will be able to create a new Action against any Project.

Add Risk
To create a new Risk from the Utility Bar, simply click the ‘Add Risk’ icon in the bottom left of the screen. This will open up the Add Risk Component. From here, you will be able to create a new Risk against any Project.
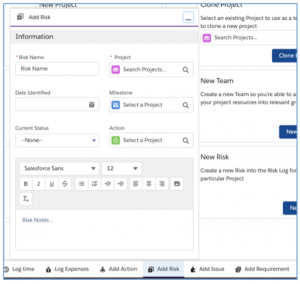
Add Issue
To create a new Issue from the Utility Bar, simply click the ‘Add Issue’ icon in the bottom left of the screen. This will open up the Add Issue Component. From here, you will be able to create a new Issue against any Project.
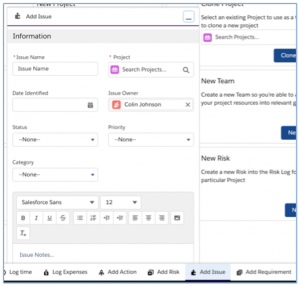
Add Requirement
To create a new Requirement from the Utility Bar, simply click the ‘Add Requirement’ icon in the bottom left of the screen. This will open up the Add Requirement Component. From here, you will be able to create a new Requirement against any Program.
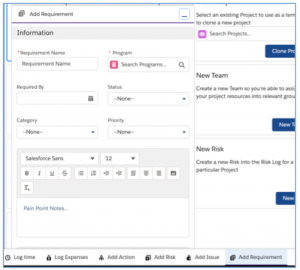
Configuration
A Lightning App has been included in the release. However, Salesforce does not currently allow customers to modify the apps that come as part of a Managed Package such as Mission Control. You will therefore need to configure a Lightning App in order to be able to use the Utility Bar in the footer of the Lightning Experience User Interface. Follow the instructions below:
Click Setup, then navigate to Apps > App Manager
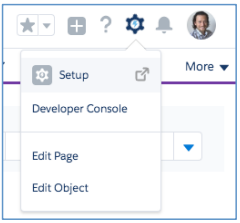
Click the ‘New Lightning App’ Button in the top-right section of the page. This will take you to a step-by-step wizard page as shown below.

Complete the ‘App Details & Branding’ section as below:
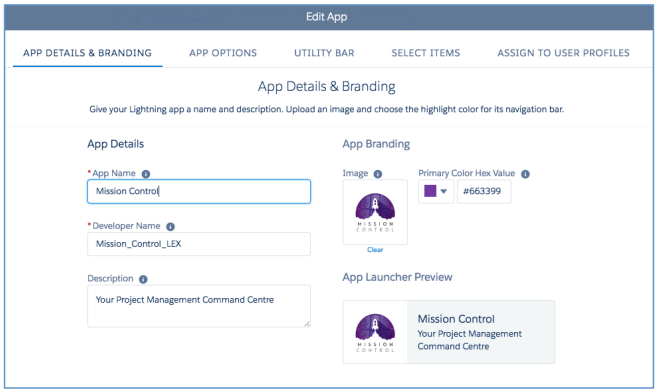 The Mission Control Logo can be sourced here: resources.aprika.com.au/logos/mc_logo_lex_app.png
Click Next and then select ‘Standard Navigation’ for the App Options Tab and then Click Next again.
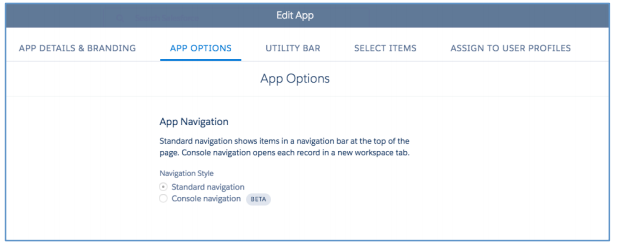
In the Utility Bar Tab, click on the ‘Add’ button.
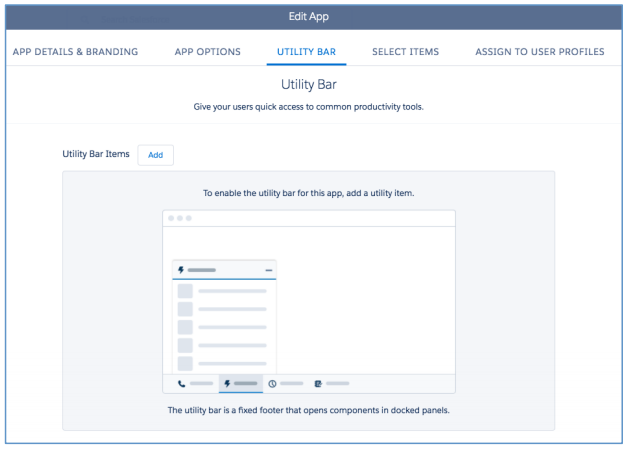
Add the ‘InboxAppLogTime’ Component and configure as shown below.
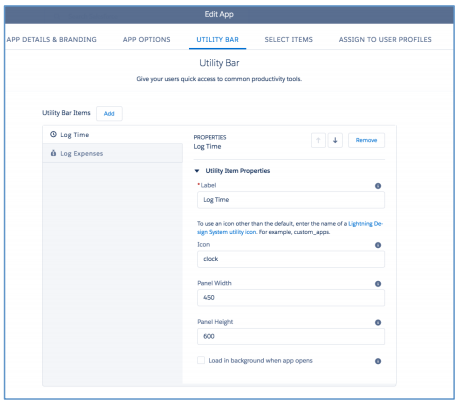
Add the ‘LogExpense’ Component and configure as shown below.
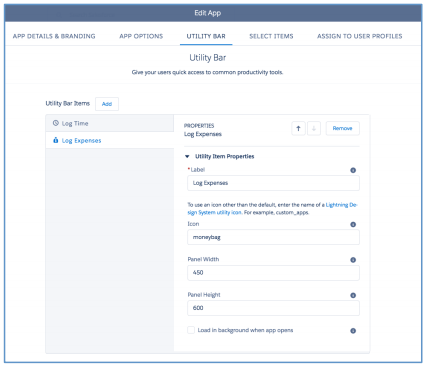
Click Next and then select the Tabs you want to appear in the ‘Selected Items’ section. Once you’re finished, Click Next.
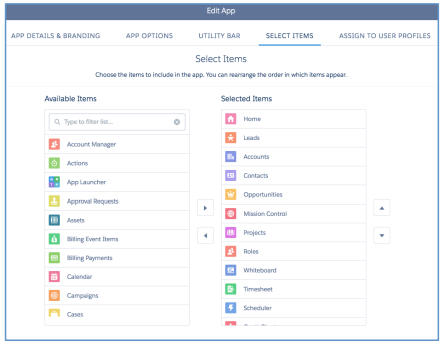
Then add the Profiles to the ‘Selected Profiles’ list that you wish to assign access to for this Lightning App and Click Done.
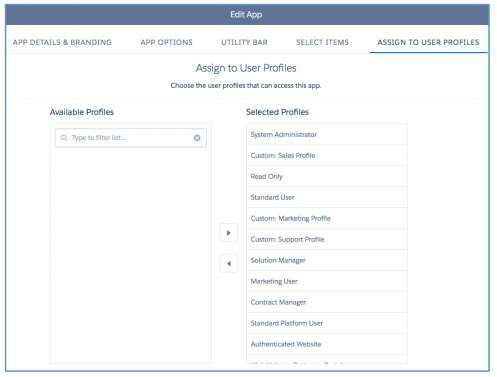
Your new Lightning App will now be available to select from the ‘App Launcher’ as shown below:
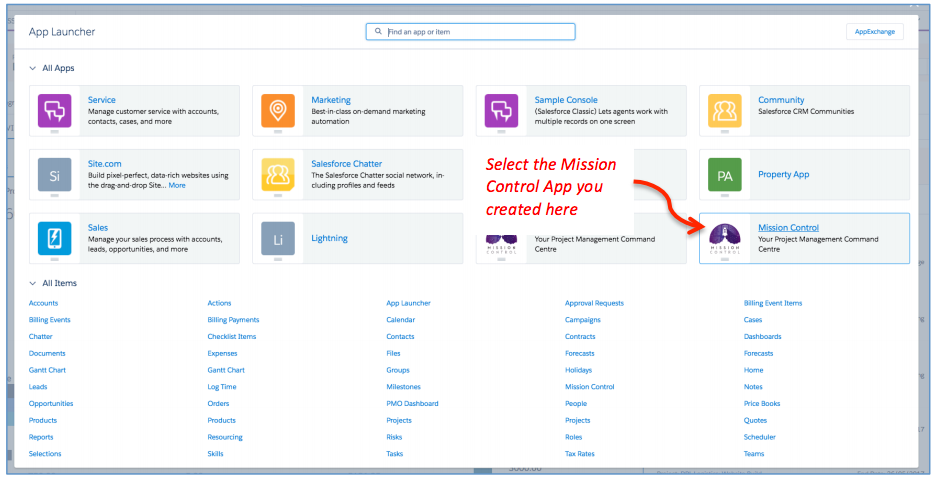
The Gantt Chart is available within The Project Overview page of specific Projects, or as a stand alone chart. The Gantt Chart displays the Actions and Milestones for your Projects on a grid and offers a number of features as follows:
You can launch the stand alone Gantt Chart from the Mission Control Console on the ‘Management Pad’ Tab as follows:
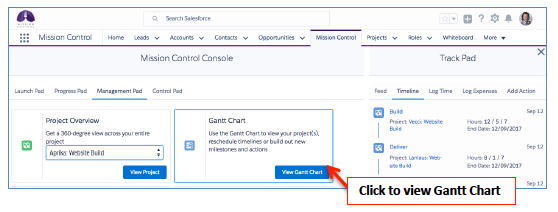
The Gantt Chart displays all of the Milestones and Actions for your selected Project(s) for the Entire Timeline of the Project(s) which you can navigate by scrolling left and right, as well as a Project List which allows you to collapse and expand the Projects and Milestones that are displayed.
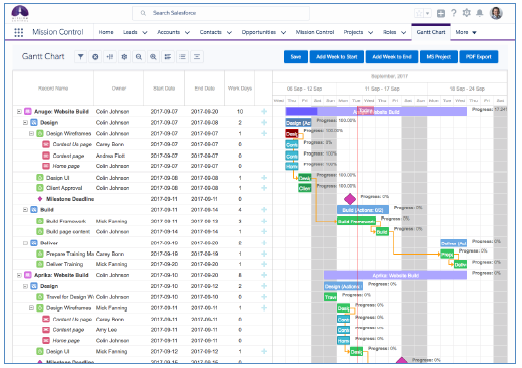
The top section of the Gantt Chart provides the ability to filter which Projects are displayed, whether or not to show the Project Data Table, the ability to zoom in and out of the grid, the ability to add a week at a time to the start or end of the timeline, as well as the PDF & MS Project exports. Don’t forget the Save button which you will need to save any changes you make!

The project data table on the left-hand side can be hidden and displayed as required using the show hide project list button. This section allows you to collapse or expand the Projects and Milestones that are displayed on the Gantt Chart and lists the Project, Milestone, Action and Checklist Item Names, Owners, Start and End Dates and number of Working Days. Here, you can also use the plus (+) icons to create new Milestones, Actions and Checklist Items.
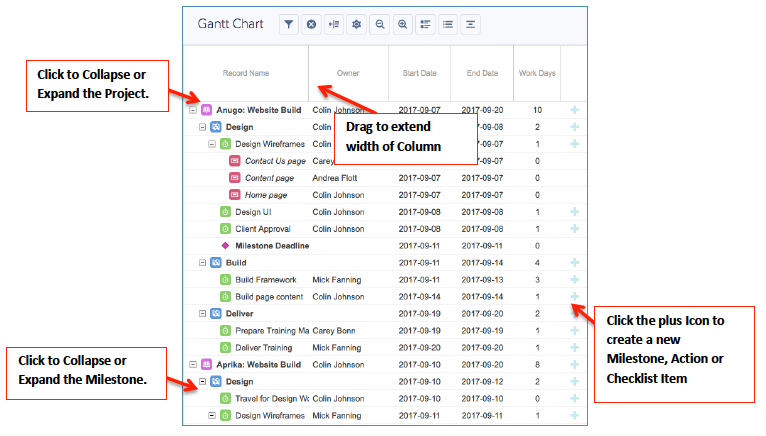
Creating new Phases & Milestones
You can create a new Milestone directly within the Gantt Chart using the + symbol next to the name of a Project.
If you use Phases within your Project Plans, you are able to turn on a setting that will allow you to create Phase records directly from the Gantt Chart.
To enable this feature, you will need to ensure the ‘Enable Phase Creation’ setting it set to TRUE.
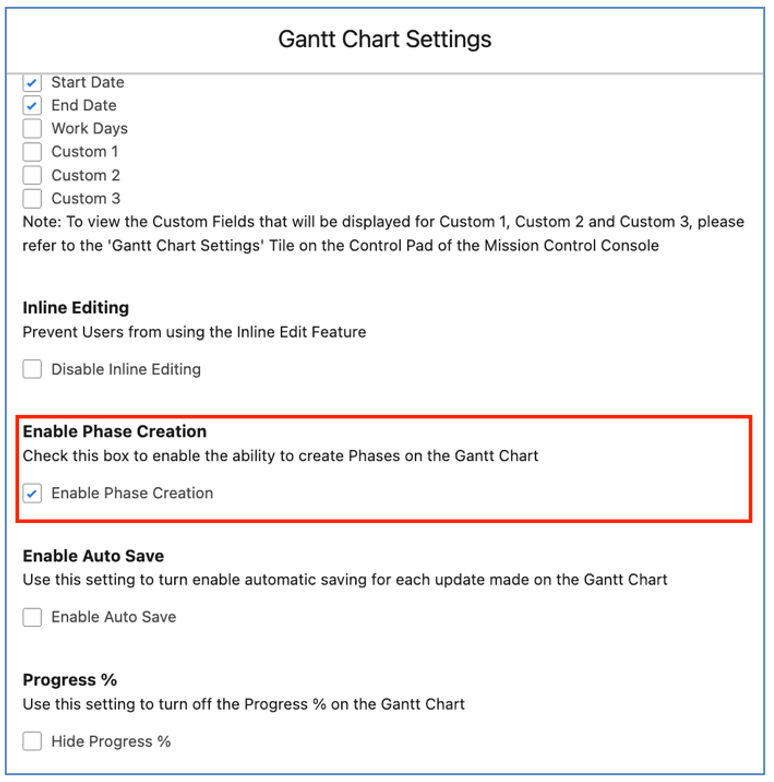
With this setting enabled, when you click the + icon on the Project row of the Gantt Chart, instead of the New Milestone Modal immediately loading, the User will be presented with the Modal below, allowing them to choose whether they want to create a Phase or a Milestone.
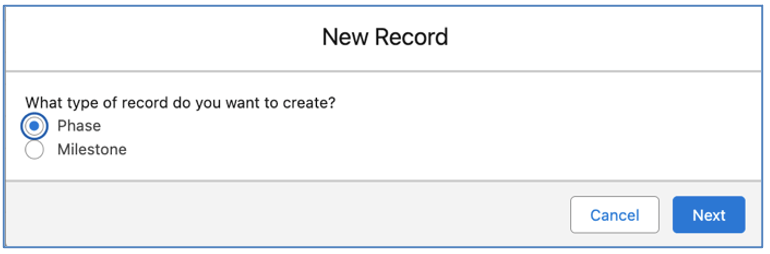
Once the Phase has been created, the User will be able to create related Milestones.
With this setting disabled, when you click the + icon on the Project row of the Gantt Chart, the New Milestone Modal will load by default.
This will open up a New Milestone Lightbox, allowing you to specify a Name, Budget, Deadline, Owner and Notes as follows:
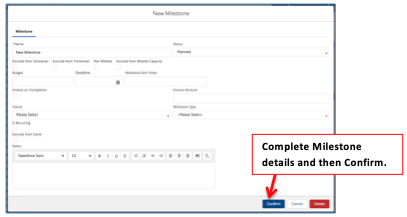
Note: When creating new Milestones on the Gantt chart, you need to Save the Lightbox and then Save the Gantt Chart.
Creating new Actions
You can create a new Action directly within the Gantt Chart using the + symbol next to the name of a Project. This will open up a New Action Lightbox, allowing you to specify a Name, Hours Scheduled, Owner, Start and End Date, and Notes as follows:
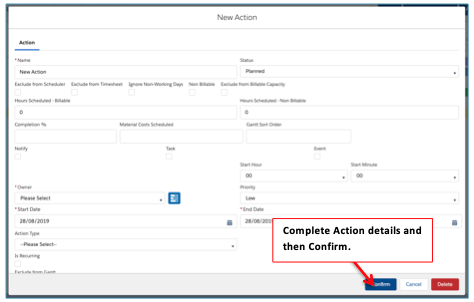
Note: When creating new Actions on the Gantt chart, you need to Save the Lightbox and then Save the Gantt Chart. For Skills Based Actions you will also be able to add the Skill.
Creating new Checklist Item
You can create a new Checklist Item directly within the Gantt Chart using the + symbol next to the name of an Action. This will open up a New Checklist Item Lightbox, allowing you to specify a Name, Owner and Notes as follows:
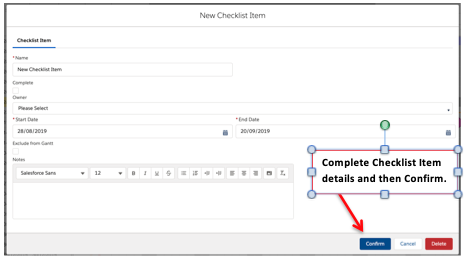
Editing Projects, Milestones, Actions & Checklist Items
You can also make changes to the Project, existing Milestones, Actions or Checklist Items by double clicking on the Action or Milestones within the Gantt Chart. For example, if you want to reassign from one Action Owner to another, you can double click on the Action, select a different Owner and click Save.
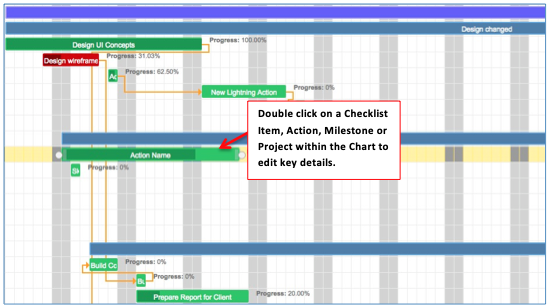
For the Project, Milestone and Checklist Item, you’re able to edit key fields within the default tab, or click onto the ‘Record Detail’ tab and edit the full record. In addition to this, for the Action, you’re also able to access the ‘Log Time’ tab to enter time against the Action.
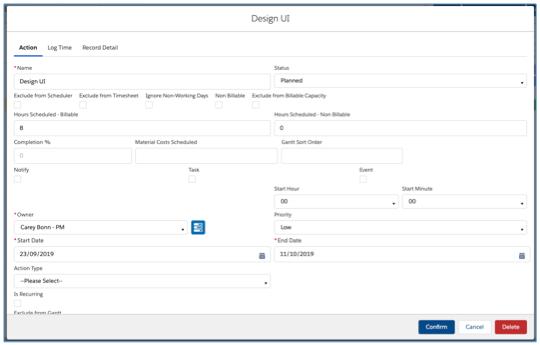
After making changes you will need to click the Confirm button in the Lightbox and then Save the Gantt Chart.
![]()
Control display of fields on Edit Modals
The Edit Modals on the Gantt Chart display certain fields out of the box. However, the fields displayed within these Modals can be customized using Field Sets on each Custom Object, as outlined below:
Each Field Set contains the default fields already selected. Customers can add or remove fields, and adjust the order in which they appear as required within each individual Field Set.
Drag n’ Drop Rescheduling
You can reschedule an Action simply by clicking and dragging to where ever you need to reschedule it to. Milestone dates will automatically adjust to match Actions when they are moved. Dependant actions will move with parent actions.
Note: Drag n’ Drop Rescheduling is only available when the timeline scale I set to days. To adjust the schedule whilst the timeline scale is set to anything else, please use the date fields within the Data Table.
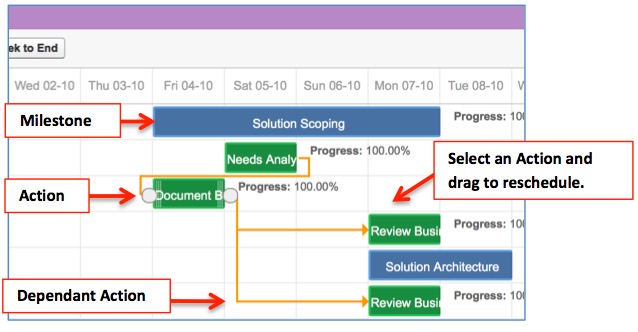
You can also extend or shorten the length of the Action by dragging the end of the Action.
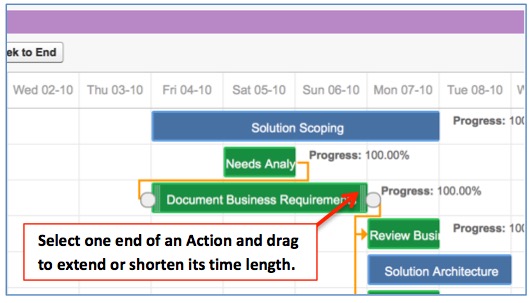
Hover Box Tooltips
Each layer of the Gantt Chart (e.g. Project, Phase, Milestone, Action, Checklist Item) has a Hover Tip that will appear when you hover over the record within the Gantt Chart, as shown below.

Each layer has preset default values. If a Customer wishes to include additional information in the Hover Tip, they can do so by adding fields to the applicable Field Set from the list below.
Any Fields added to the Field Set will appear beneath the default values.
You are able to turn off the hover box (see illustration below) that displays various field values.
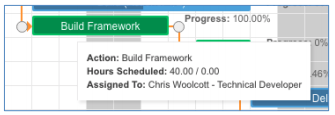
This can be turned off by navigating to the ‘Control Pad’ on the Console. Within the ‘Gantt Chart Settings’ section, set the ‘Disable Gantt Tooltips’ to be TRUE and click Save.

Note: This is an org-wide setting, so if it is turned off, it will be turned off for all Users.
Milestone Sort Order
You can specify the order of the Milestones. This will primarily be visualized on the Gantt Chart, but will also drive the ordering of Milestones on the Project Overview ‘Overview’ Tab.
The example below shows a Gantt Chart where the Milestone Sort Order field has been left blank on all Milestones.
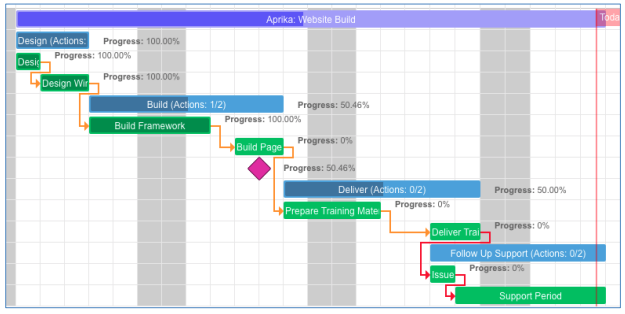
The example below shows a Gantt Chart where the Milestone Sort Order has been set as follows:
Design = 2
Build = 1
Follow Up Support = 3
Deliver = 4
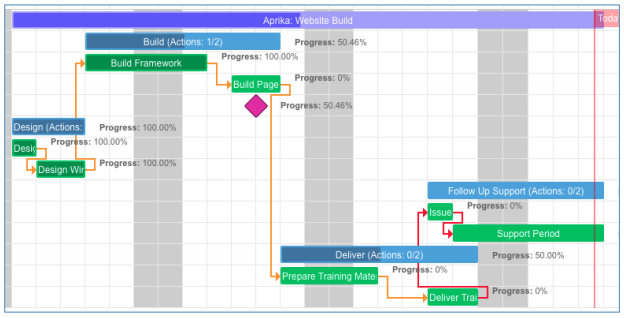
The Milestone Sort Order field is accessible from the Milestone Edit Modal Window on the Gantt Chart, as illustrated below.
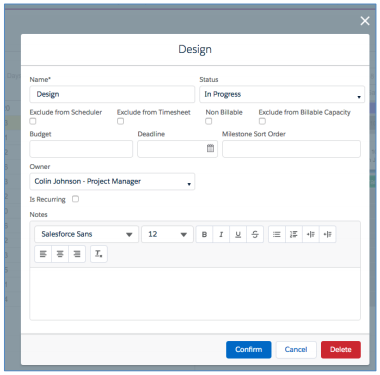
You can also drag and drop records within the Gantt Chart Data Table to adjust the ‘Sort Order’ field. To adjust the sort order, click and drag a record (e.g. Milestone, Action or Checklist Item) and drop it to the new location. Below is an illustration of the ‘Client Approval’ Action being moved to appear above the ‘Design UI’ Action.
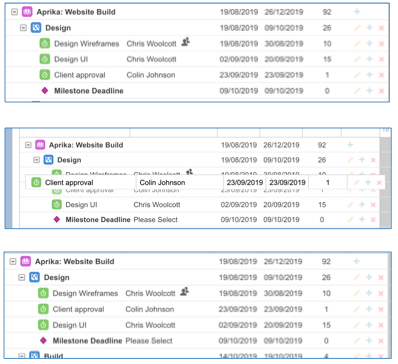
Once you have adjusted the sort order as required, please click the Save button on the Gantt Chart.
Note: This drag and drop functionality can also be used to re-parent child records from one parent to another (e.g. you can change an Action from relating to one Milestone and relate it to another.
Milestone Deadline
If a Milestone has a value in the Milestone Deadline field, this will be visible on the Gantt Chart via a pink diamond as shown in the illustration below.
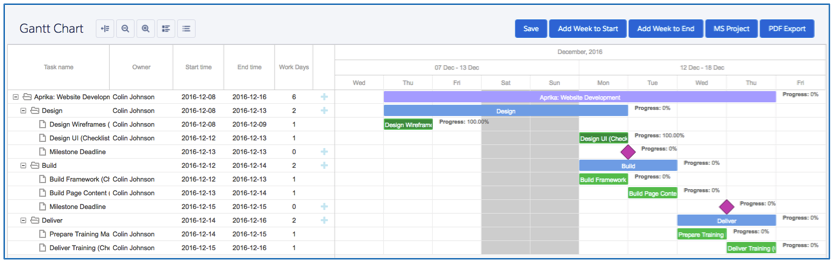
You are able to specify a meaningful description that can be associated to a Milestone Deadline. This description can be entered in the ‘Milestone Deadline Name’ field on the Milestone.
If this field is populated, this description will be displayed on the Milestone Deadline row of the Gantt Chart as shown above.
If this field is empty, a generic ‘Milestone Deadline’ description will be displayed on the Milestone Deadline row of the Gantt Chart as shown above.
Reschedule Actions on Action Owner Change
When an Action is reassigned to a different Action Owner within the Gantt Chart it will automatically reschedule to take into account that Role’s non working days.
For example, the ‘Utility Bar Test’ Action in the Gantt Chart below is currently assigned to Colin for Tuesday and Wednesday.

When it is reassigned to Chris, it automatically reschedules to Wednesday and Thursday as he is on PTO on Tuesday.
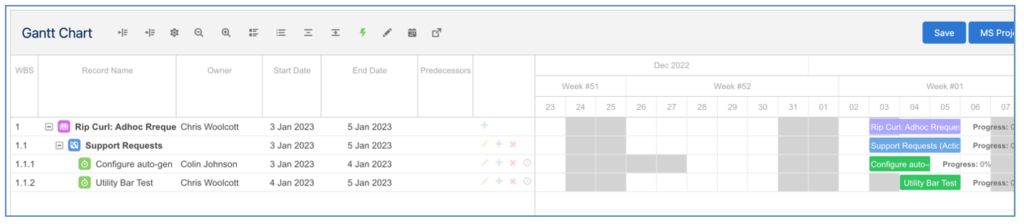
The same logic occurs when you reassign an Action outside of the Gantt Chart.
Standalone Gantt – Save Filters
The Standalone Gantt Chart filters can be saved and persistently set, including applying multiple filters. When you create a Filter on the Standalone Gantt Chart, you’re able to save as a Preset Filter using the feature at the top of the Filters Modal, as shown below.
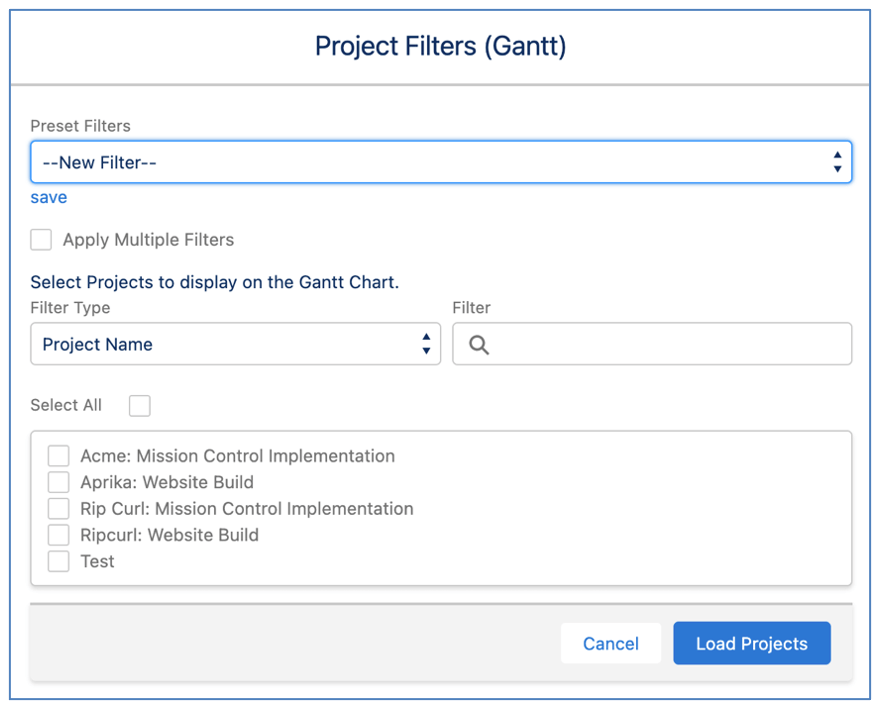
Preset Filters will be persistently applied when you reload the Gantt Chart, enabling you to have the Projects you want to view automatically load each time you visit the page.
Baseline Dates
The Gantt Chart provides you with the ability view the Baseline Dates as well as the actual Dates. The Baseline Dates can be toggled on/off by clicking the Baseline button.

When you toggle the Baseline Dates on, they will appear as a secondary line for each Action, Milestone or Project as shown in the illustration below.
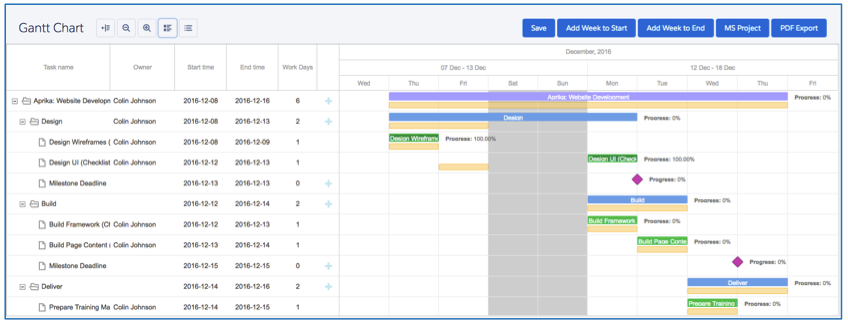
Reset Baseline Dates
A Checkbox field on the Project record called ‘Set Baseline Dates’ enables you to reset the baseline dates of a Project. When this field is set to TRUE, all of the Baseline Start Date and Baseline End Date values on the Actions will be updated to match the existing Start Date and End Date.
This will allow you to create Projects, adjust the scheduling of the Project and then once it’s ready to go live, you can commit the Baseline Dates.
Display Custom Fields
You can add 3 additional fields in the Data Table on the Gantt Chart. From the ‘Control Pad’ on the Console, within the Gantt Chart Settings section, you can specify up to 3 fields for each layer, including:
Below is an example of the settings within the Gantt Chart Settings Tile:
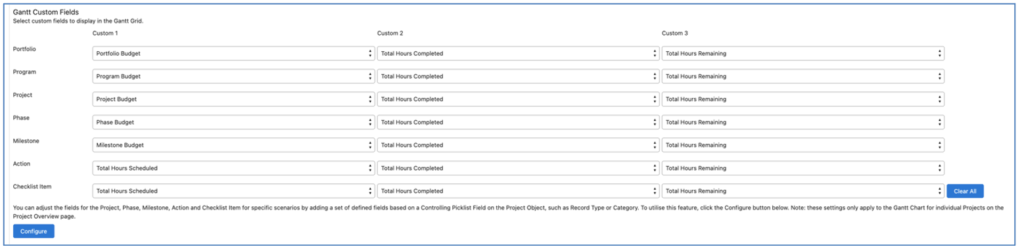
Once you’ve set these values on the Control Pad, you can then choose to add them from the Gantt Chart by ensuring the ‘Custom 1’, ‘Custom 2’ and ‘Custom 3’ settings are set to TRUE within the Gantt Chart settings.
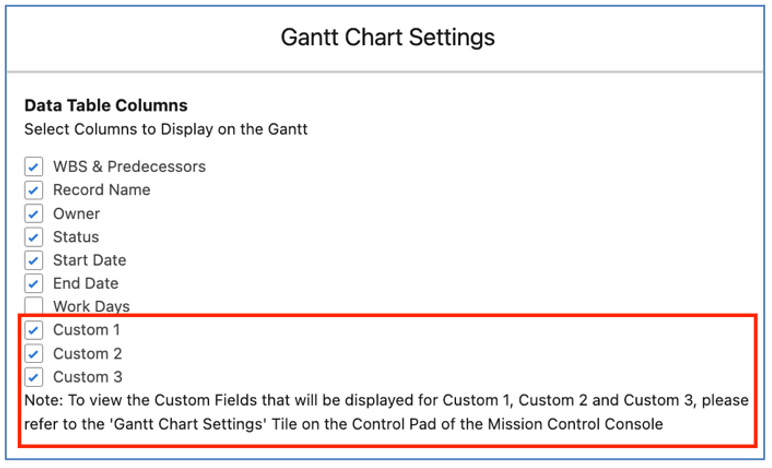
The 3 additional fields will appear on the right-hand side of the Data Table, as shown below.
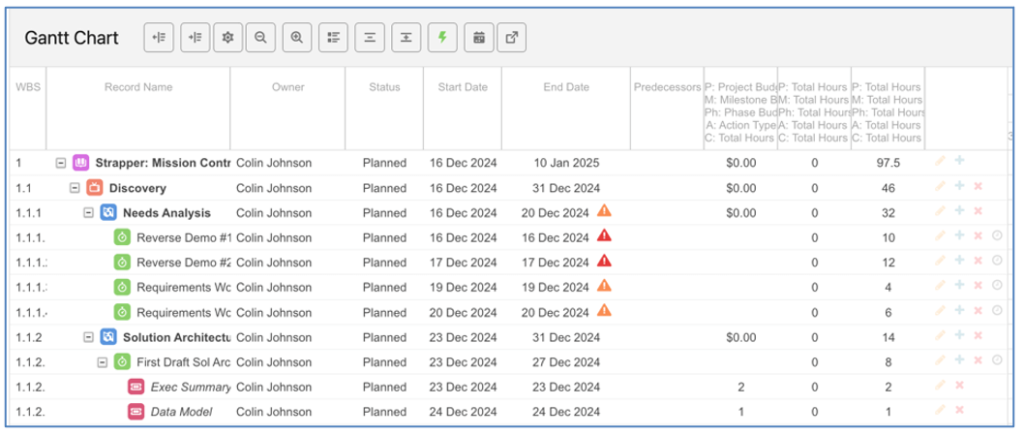
Project Specific Custom Fields
If you require different Custom Fields to be displayed for different types of Projects, you’re able to configure Project Specific settings. For example, you may be using the ‘Category’ field on the Project to differentiate the types of Projects you’re managing (e.g. Development Projects and Implementation Projects). You may wish to have different fields displayed in the Data Table of the Gantt Chart for your Development Projects versus the fields you want to display for Implementation Projects.
To configure the Custom Field settings based on a ‘Controlling Field’ from the Project record, you need to click the ‘Configure’ button within the ‘Gantt Custom Fields’ section of the Gantt Chart Settings Tile on the Control Pad.
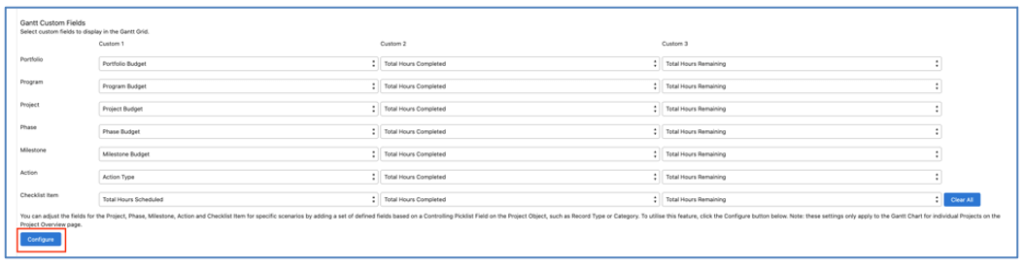
This will open a Modal that enables you to select the ‘Controlling Field’ and configure Custom Field settings based on each ‘Field Value’.
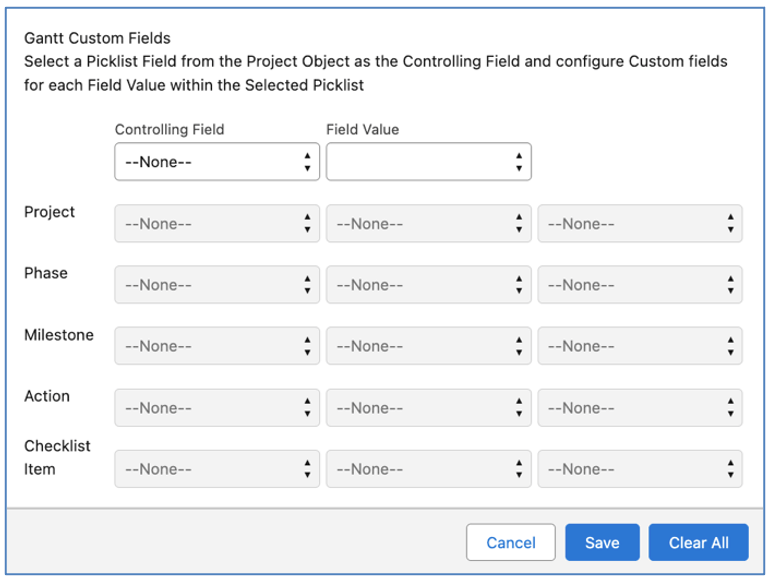
Once you have selected the Controlling Field and Field Value, you are able to select the Custom Fields for each layer of the Project.
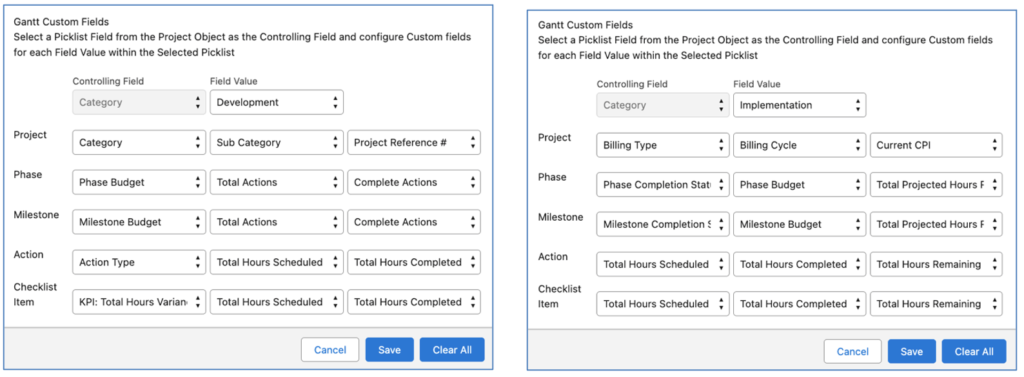
In the examples above, the Custom Field settings have been configured to display different fields based on the value of the ‘Category’ field on the Project.
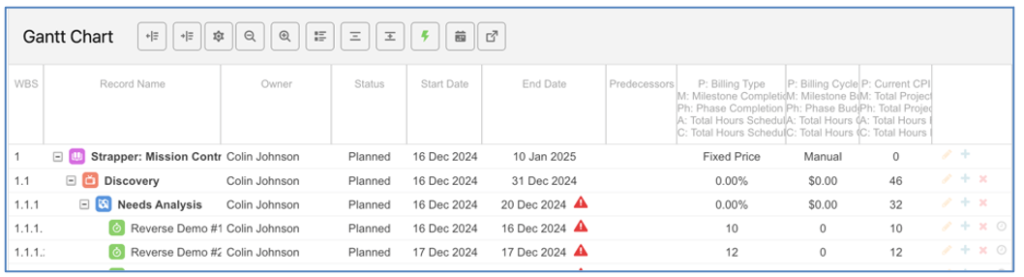
The above image shows the correct values being displayed for a Project where the Category is ‘Implementation’.
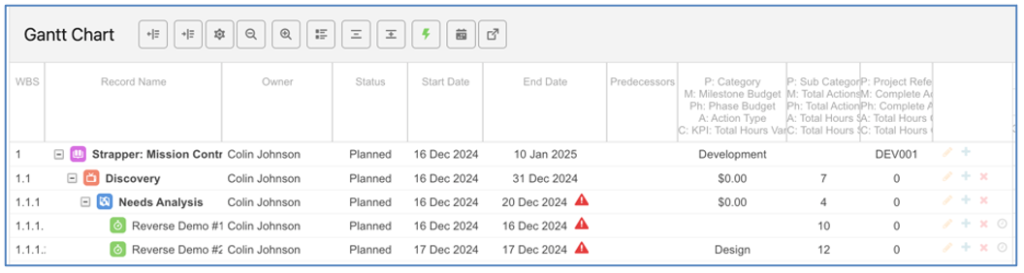
The above image shows the correct values being displayed for a Project where the Category is ‘Development’.
If a Controlling Field has been set and field settings have not been configured for some of the Picklist Values, the default settings from the Control Pad will be applied. Once a set of field settings have been configured for a Controlling Field, you will not be able to configure a set of field settings for a different Controlling Field.
Checklist Items
The Checklist Items can be toggled on/off by clicking the Checklist button.

When you toggle the Checklist Items on, they will appear as child items to the Action as per the illustration below. Note: Checklist Items cannot be rescheduled independently of the Action, but if you reschedule the Action, the Checklist Items will automatically reschedule to remain with the Action.

Note: If you create a Checklist Item on the Gantt Chart whilst you have the Checklist Item visibility toggled off, the new Checklist Item will remain visible on the Gantt Chart until you click Save, at which point, it will be hidden as per the setting.
Auto Scheduling
An ‘Auto Scheduling’ feature is available on the Gantt Chart that will automatically reschedule records when dependencies are created. For example, in the illustration below, there is one day of lag between the Build Framework and Build Page Content Actions.
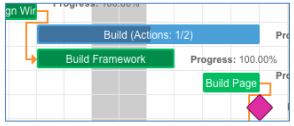
Once I create a dependency between the two Actions, in this instance a ‘Finish to Start’, the Auto Scheduling feature will automatically snap the child Action to start on the day following the completion of the parent Action, as shown below.

To ‘fine tune’ the scheduling of your Projects, you can turn off the Auto Scheduling feature.
To do this, there is a button available on the Gantt Chart, as shown below.

When Auto Scheduling is on, it will be displayed in green, when it is off, it will be displayed in red.

Inline Editing
To enable you to quickly create out the detail of a project plan directly on the Gantt Chart, you’re able to add new Milestones, Actions and Checklist Items using the inline edit functionality.
By default, the Inline Edit feature is disabled. To enable the feature, you will need to click the ![]() button on the Gantt Chart. Clicking this button will reveal a blank row at the bottom of the Gantt Chart as shown below.
button on the Gantt Chart. Clicking this button will reveal a blank row at the bottom of the Gantt Chart as shown below.
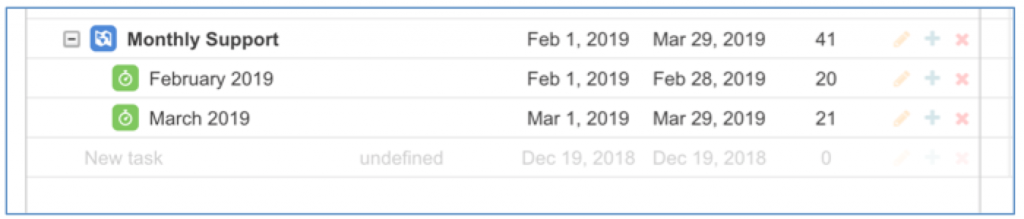
To add a new record, click into the ‘New Task’ area and you will then be able to quickly create new records by typing in the record name and hitting enter, as shown below where two new Milestones have been created.
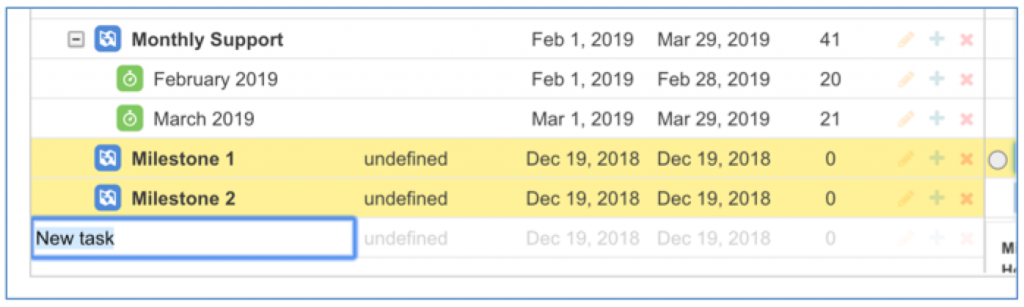
Once you’ve created a record, you can drag it to change the type (e.g. from a Milestone to an Action). To make the record an Action, drag it on to the Milestone you want to parent it to and upon release, the record will be displayed as an Action, as shown in the examples below.
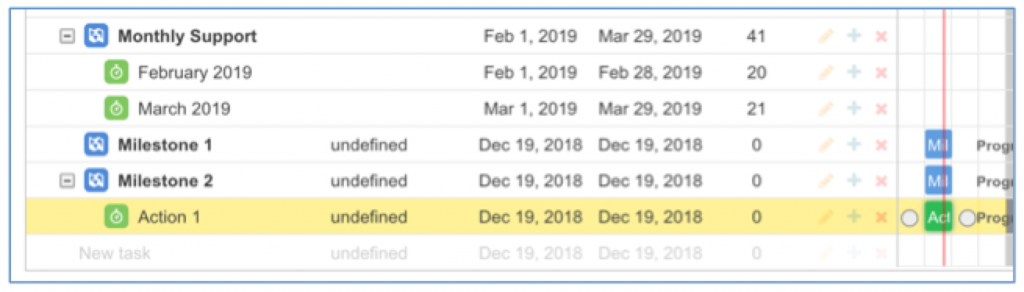
Any new records created, will assume the same record as the last one you created. For example, if I add a new record and make it an Action, then subsequent records will also be Actions, as shown below.
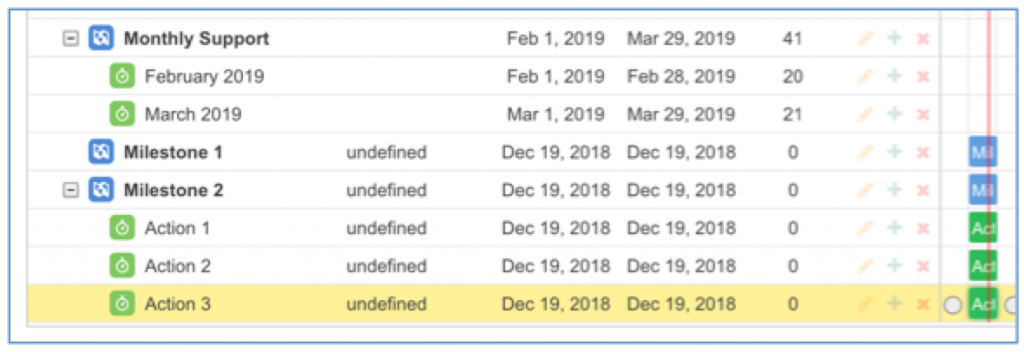
You can also change the record to be a Checklist Item, as shown below. To make the record a Checklist Item, drag it on to the Action you want to parent it to and upon release, the record will be displayed as a Checklist Item, as shown in the example below.
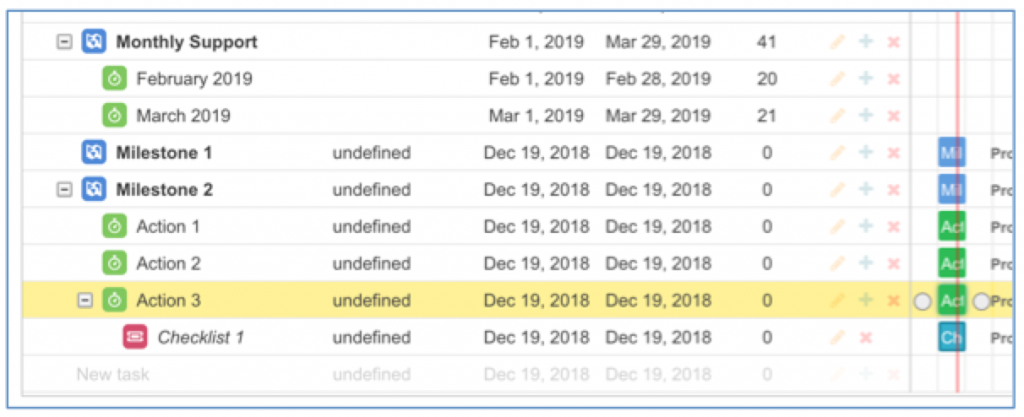
Before saving records created via the inline edit feature, you can change the record type between Milestones, Actions and Checklist Items. After saving the records, you will no longer be able to change the record type. However, you will still be able to re-parent from one parent to another, as shown in the example below where Action 3 has been re-parented from Milestone 2 to Milestone 1.
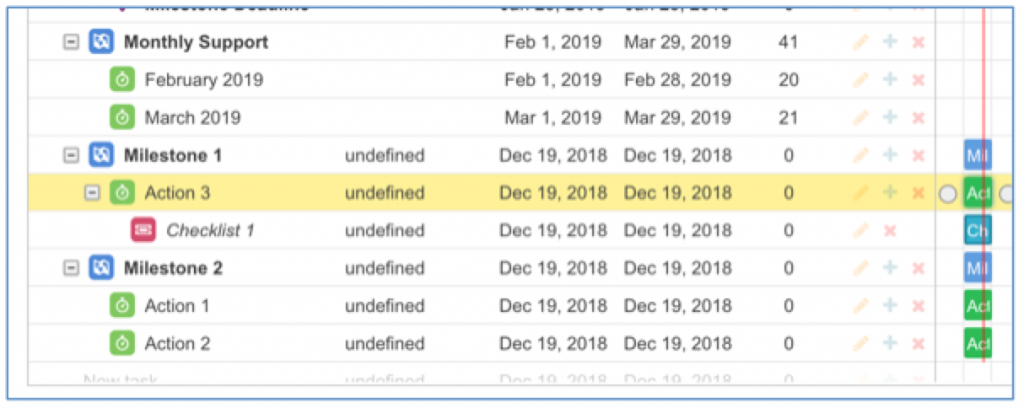
You can change the Action Owner using the inline edit feature within the Data Table of the Gantt Chart. To change the Action Owner, double-click into the Owner cell that you wish to change.

Start typing the name of the person you want to assign as the Action Owner. You will see their full name appear in the search box – click on the name and it will populate in the cell.

Click away from the cell and ensure you click the Save button at the top of the Gantt Chart to commit the change.
If you prefer not to use the ‘Inline Edit’ feature on the Gantt Chart, you’re now able to disable that from within the Gantt Chart settings. This can be done centrally for all Users within the Gantt Chart Settings section of the Control Pad on the Mission Control Console, or at an individual User level within the settings section of the Gantt Chart, which you can access by clicking the ![]() button.
button.
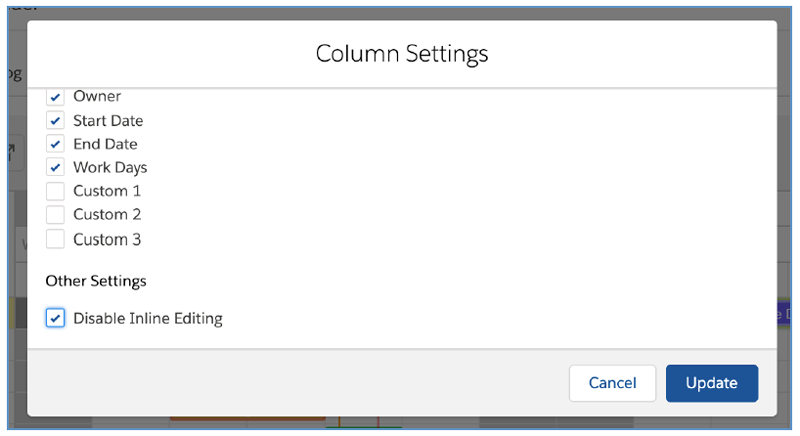
By default, changes you apply to the Gantt Chart are not saved until you click the main Save button at the top of the Gantt Chart.
However, if you would prefer each change to be saved immediately, you are able to turn on a setting that will automatically save each change. To enable this feature, you will need to set the ‘Enable Auto Save’ setting to TRUE.
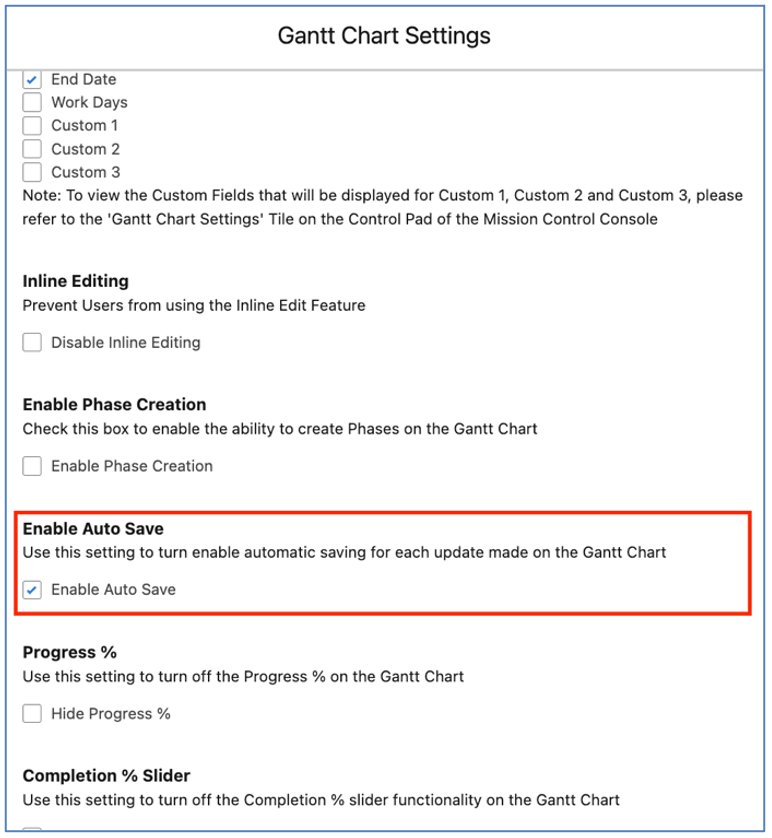
With this setting enabled, each time you make an update to any record on the Gantt Chart it will be saved immediately.
Hiding Records
To enable you to hide specific records from the Gantt Chart (for example, internal components of the project that may not be required to be presented to the customer), ‘Exclude from Gantt’ Checkbox fields are available on the Milestone, Action and Checklist Item Objects.
If the Milestone field is set to TRUE, the Milestone and all related Actions and Checklist Items will be hidden from view on the Gantt Chart / Gantt Chart PDF. If the Action field is set to TRUE, the Action and all related Checklist Items will be hidden from view on the Gantt Chart / Gantt Chart PDF.
Timeframe Scale Enhancement
The ‘Zoom In’ and ‘Zoom Out’ buttons enable you to zoom the scale from days to weeks to months to years. This will enable you to zoom out and see a larger duration without needing to endlessly scroll. Below are some examples of the various scale views.

Day Scale
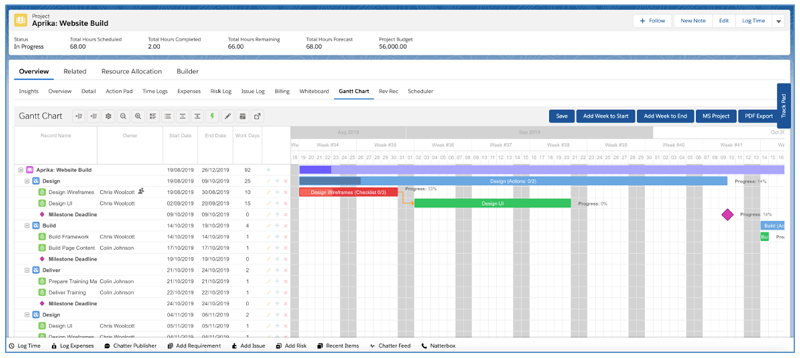
Week Scale
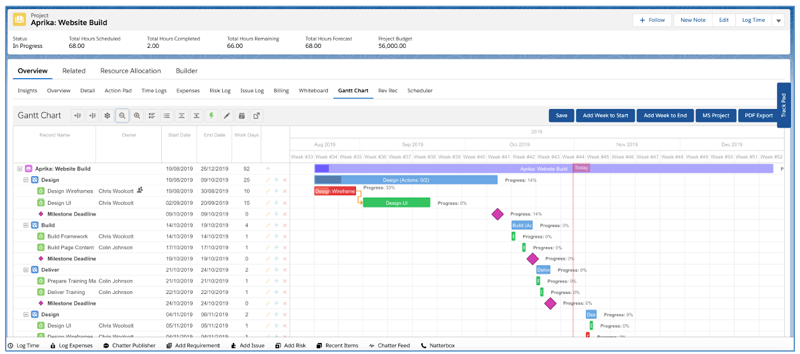
Month Scale
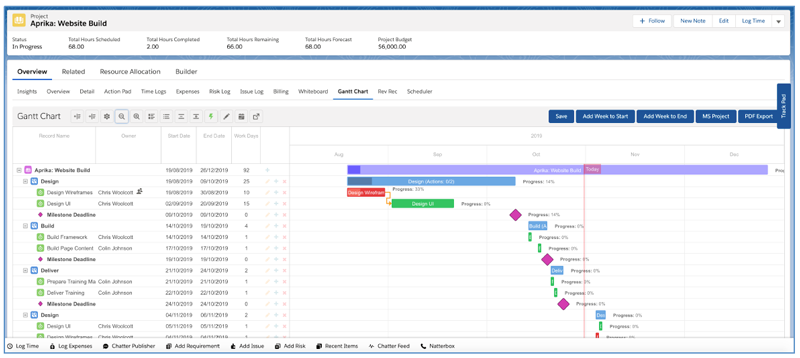
Year Scale
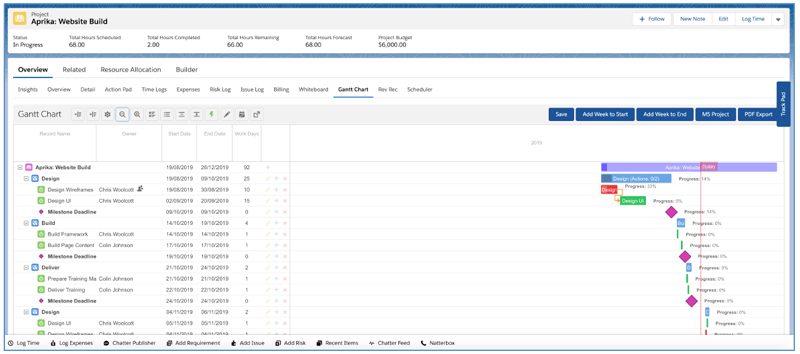
Note: It is recommended to be on the days scale when rescheduling Actions for more precise rescheduling.
Setting to control Progress % display
For each row of the Gantt Chart (e.g. Project, Milestone, Action, Checklist Item) there is a Progress value displayed to the right of bar within the Chart.

This progress information can be turned on / off within the Gantt Chart settings as shown below.
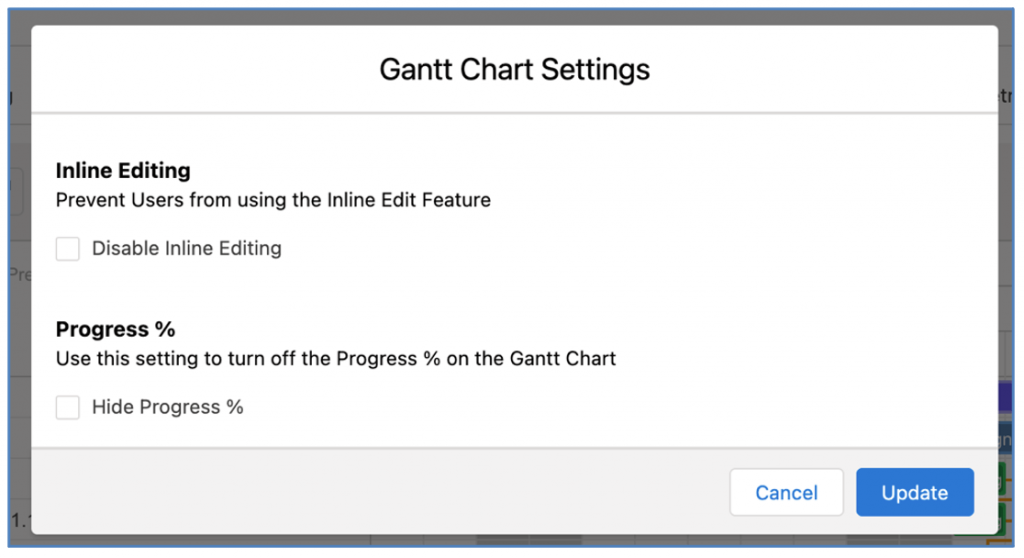
This setting can be controlled by individual Users within their own Gantt Chart Settings or centrally for all Users via the Gantt Chart Settings on the Control Pad of the Mission Control Console.
Completion % Slider
The slider feature on the Action bar within the Gantt Chart enables you to adjust the Completion % field on the Action record. When you use the slider, it will update the Completion % field and the Action will be considered to be manually overridden. Therefore, if Time Logs are created for this Action they will not automatically increase the Completion %, it will continue to need manual adjustment.
The Completion % slider is a triangular button accessible at the bottom of the Action bar, as shown below.

You are able to drag that forwards and backwards to increase or decrease the Action ‘Completion %’ field value as required.

This slider feature can be turned on / off as required via the Gantt Chart settings controlled by the individual User or centrally via the Control Pad of the Mission Control Console.
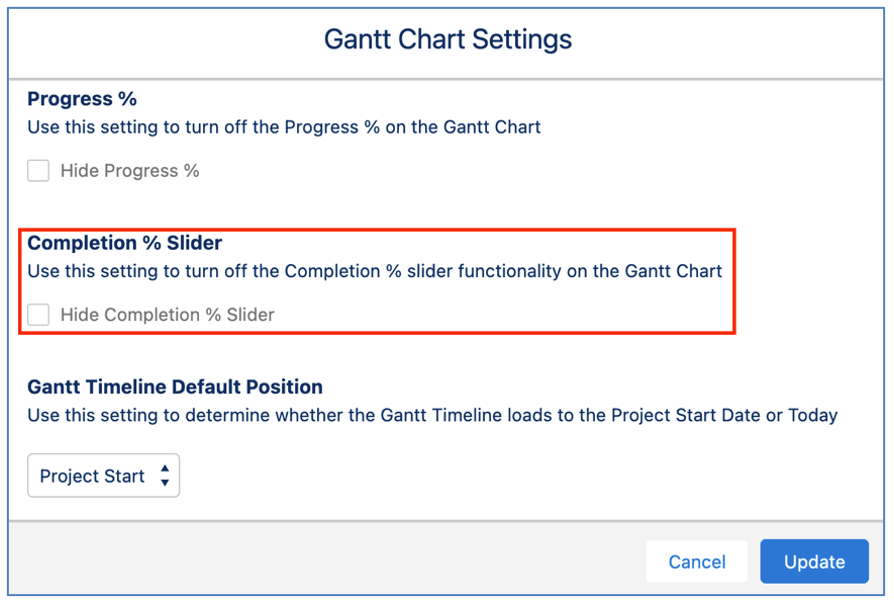
When this setting is set to FALSE, the triangular slider will not be accessible.
Load to Today
By default, the Gantt Chart loads to the first day of the Project. There is a custom setting that enables you to choose the default loading action from the following options:
This setting can be controlled via the Gantt Chart settings controlled by the individual User or centrally via the Control Pad of the Mission Control Console.
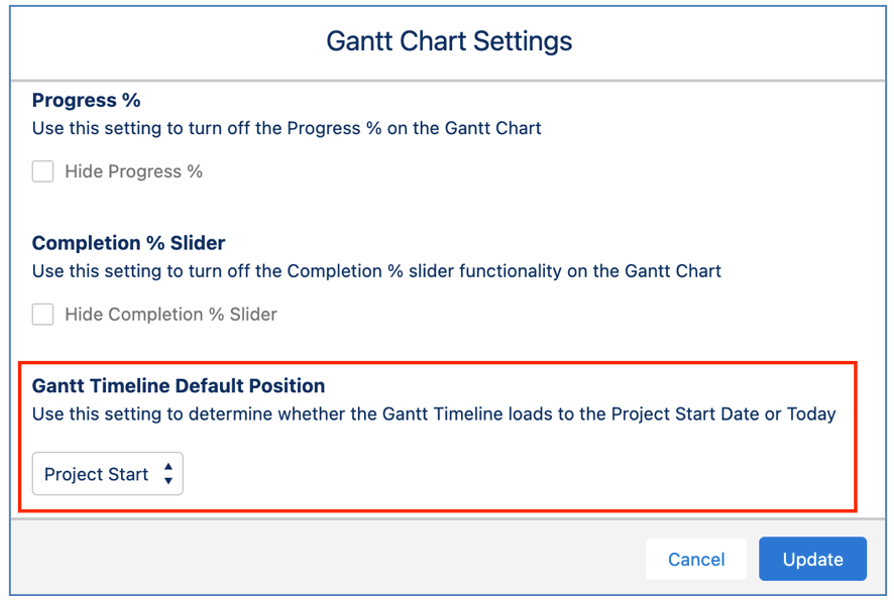
This setting controls the initial load behaviour. You are also able to quickly jump from the Project Start Date to Today, and vice versa by clicking the ![]() button.
button.
Start/End Date Warning Icons
The Red / Amber warning icons for the Start Date and End Date are displayed on the Gantt Chart, as shown below.
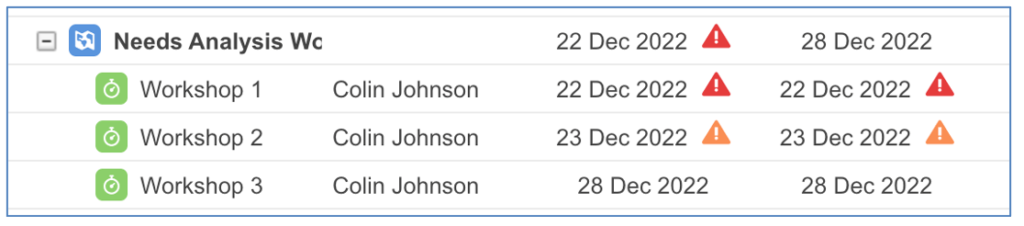
These icons can be turned off within the individual User settings on the Gantt Chart or via the Gantt Chart Override settings on the Control Pad of the Mission Control Console.
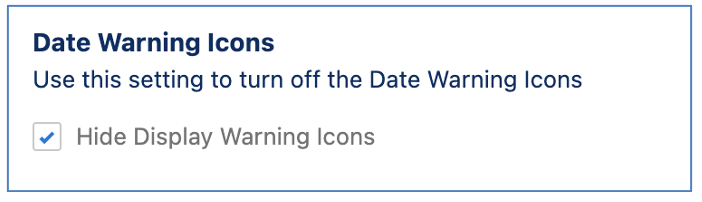
Dependencies
A number of additional Dependency options have been added to provide greater flexibility in managing predecessor relationships.
Previously you were able to create ‘Finish to Start’ or ‘Start to Start’ relationships. The parent in the relationship could be the Milestone or the Action and the child always had to be an Action.
The enhancements included in this release provide additional relationship types as well as greater flexibility in which records can be the parent and the child.
Dependencies are displayed on the Gantt Chart with orange connecting lines. Note, if the dependency forms part of the ‘Critical Path’, then the line will be red.
You are able to create any of the following relationship types:
Finish to Start
A Finish to Start (FS) dependency means the child record in the relationship cannot start until the parent record is finished. If the End Date of the parent record is adjusted, the FS relationship will ensure the child record is rescheduled accordingly to ensure it starts once the parent is completed. Below is an example of a Finish to Start dependency.
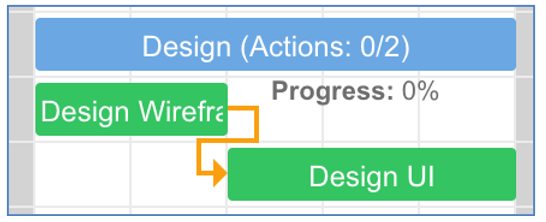
Start to Start
A Start to Start (SS) dependency means the child record in the relationship should start once the parent record has started. If the Start Date of the parent record is adjusted, the SS relationship will ensure the child record is rescheduled accordingly to ensure it starts on the same day as the parent. Below is an example of a Start to Start dependency.
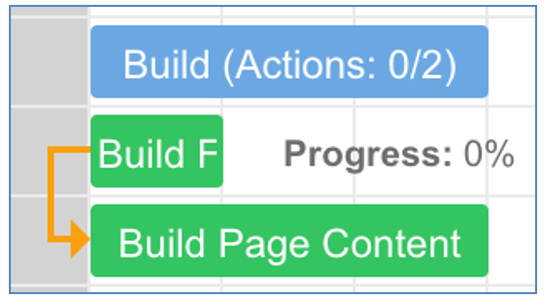
Finish to Finish
A Finish to Finish (FF) dependency means the child record in the relationship can only be marked as complete once the parent record has been completed. If the End Date of the parent record is rescheduled to extend beyond the End Date of the child record, then the child record’s End Date will also be rescheduled. Below is an example of a Finish to Finish dependency.

Lead & Lag
You can specify Lead or Lag on a Dependency. Lead indicates the child can start x days before the relationship trigger point. Lag indicates the child can start x days after the relationship trigger point. For example, the parent Action below has a duration of 3 days. There is a Finish to Start dependency between the two Actions. The dependency has 1 day of Lead applied to it. This means the child record can start 1 day before the parent record is completed.
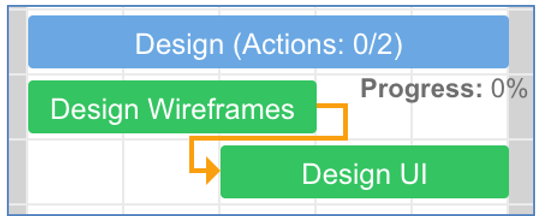
In the example below, there is 2 days of Lag applied. This means the child record will start 2 days after the parent record is completed.
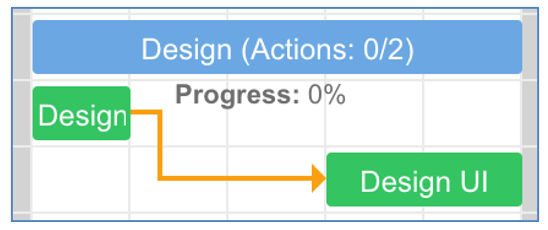
You can add Lead / Lag to a dependency by double-clicking on the dependency line. This will open up a pop up where you can set the Lead or Lag value.
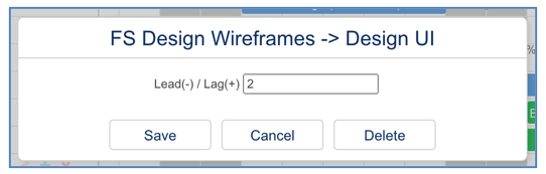
Supported Dependencies
You have the ability to specify both the parent and the child from the following records:
Certain relationships are not supported due to the roll up of dates between Milestones, Actions and Checklist Items. For example, you are unable to create a Finish to Start relationship between a Milestone and one of the Actions contained within that Milestone. The reason behind this is that the End Date of the Milestone is driven by the latest of the End Dates of all related Actions. Another example is where you are unable to add Lead to the child record in a Start to Start relationship between a Milestone and one of the Actions contained within that Milestone. The reason behind this is that the Start Date of the Milestone is driven by the earliest of the Start Dates of all related Actions.
The table below provides an overview of all supported dependencies, indicating whether they are possible within the same family tree structure and across different family tree structures. The term Family Tree is used in context of identifying whether the child record relates directly to the parent record. For example, Action A relates to Milestone A, and is therefore in the same family tree structure. Therefore, certain dependencies will not be available. However, Action B relates to Milestone B so a dependency between Milestone A and Action B would be crossing between two different family tree structures and therefore would be possible.
Dependency Type | Parent | Child | Same Family | Different Family |
Finish to Start | Phase | Phase | N/A | Yes |
Finish to Start | Phase | Milestone | No | Yes |
Finish to Start | Phase | Action | No | Yes |
Finish to Start | Phase | Checklist Item | No | Yes |
Finish to Start | Milestone | Phase | No | Yes |
Finish to Start | Milestone | Milestone | N/A | Yes |
Finish to Start | Milestone | Action | No | Yes |
Finish to Start | Milestone | Checklist Item | No | Yes |
Finish to Start | Action | Phase | No | Yes |
Finish to Start | Action | Milestone | No | Yes |
Finish to Start | Action | Action | Yes | Yes |
Finish to Start | Action | Checklist Item | No | Yes |
Finish to Start | Checklist Item | Phase | No | Yes |
Finish to Start | Checklist Item | Milestone | No | Yes |
Finish to Start | Checklist Item | Action | No | Yes |
Finish to Start | Checklist Item | Checklist Item | Yes | Yes |
Start to Start | Phase | Phase | N/A | Yes |
Start to Start | Phase | Milestone | Yes | Yes |
Start to Start | Phase | Action | Yes | Yes |
Start to Start | Phase | Checklist Item | Yes | Yes |
Start to Start | Milestone | Phase | N/A | Yes |
Start to Start | Milestone | Milestone | N/A | Yes |
Start to Start | Milestone | Action | Yes – No Lead | Yes |
Start to Start | Milestone | Checklist Item | Yes – No Lead | Yes |
Start to Start | Action | Phase | N/A | Yes |
Start to Start | Action | Milestone | N/A | Yes |
Start to Start | Action | Action | Yes | Yes |
Start to Start | Action | Checklist Item | Yes – No Lead | Yes |
Start to Start | Checklist Item | Phase | N/A | Yes |
Start to Start | Checklist Item | Milestone | N/A | Yes |
Start to Start | Checklist Item | Action | N/A | Yes |
Start to Start | Checklist Item | Checklist Item | Yes | Yes |
Finish to Finish | Phase | Phase | N/A | Yes |
Finish to Finish | Phase | Milestone | No | Yes |
Finish to Finish | Phase | Action | No | Yes |
Finish to Finish | Phase | Checklist Item | No | Yes |
Finish to Finish | Milestone | Phase | Yes | Yes |
Finish to Finish | Milestone | Milestone | N/A | Yes |
Finish to Finish | Milestone | Action | No | Yes |
Finish to Finish | Milestone | Checklist Item | No | Yes |
Finish to Finish | Action | Phase | Yes | Yes |
Finish to Finish | Action | Milestone | Yes | Yes |
Finish to Finish | Action | Action | Yes | Yes |
Finish to Finish | Action | Checklist Item | No | Yes |
Finish to Finish | Checklist Item | Phase | Yes | Yes |
Finish to Finish | Checklist Item | Milestone | Yes | Yes |
Finish to Finish | Checklist Item | Action | Yes | Yes |
Finish to Finish | Checklist Item | Checklist Item | Yes | Yes |
Creating Dependencies
You are able to create dependencies from within the Gantt Chart Data Table or within the Gantt Chart Timeline.
Data Table
To add a dependency within the Data Table, you can view two Columns, ‘WBS’ and ‘Predecessors’. These two columns can be toggled on / off within the Gantt Chart settings, as shown below:

When this setting is true, the WBS and Predecessor columns will be visible within the Gantt Chart Data Table, as shown below:
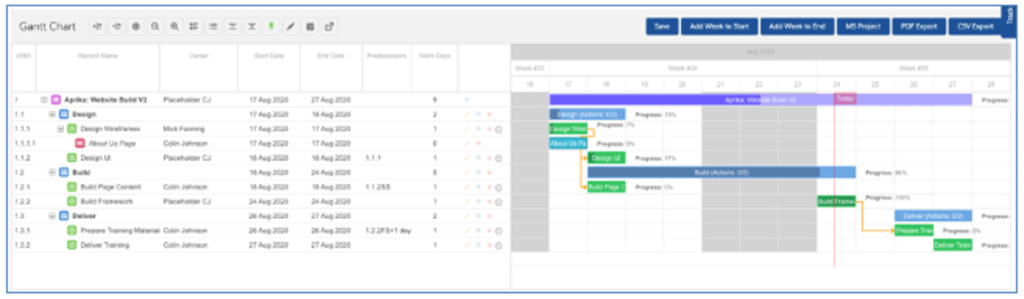
The real power of this feature is the ability to create ‘Dependencies’ directly within the Data Table. To create a Dependency, click into the Predecessor cell for the child Action, as shown below:
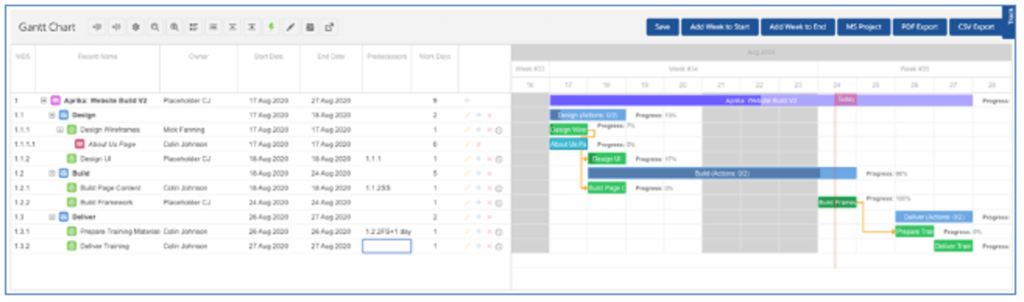
Enter the WBS number for the parent record (e.g. Action or Milestone). In the example above, we are making the ‘Deliver Training’ Action a child to the ‘Prepare Training Materials’ Action in a Finish to Start relationship. So we enter 1.3.1 into the Predecessor field.
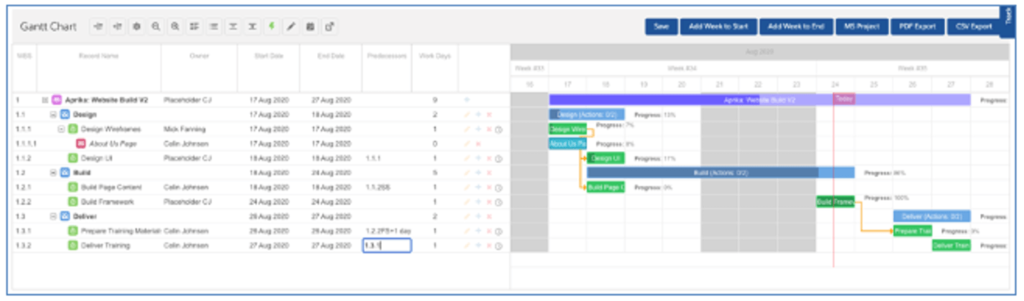
Once the WBS number has been populated, press the Enter key and the Dependency relationship will appear within the Gantt Chart, as shown below:
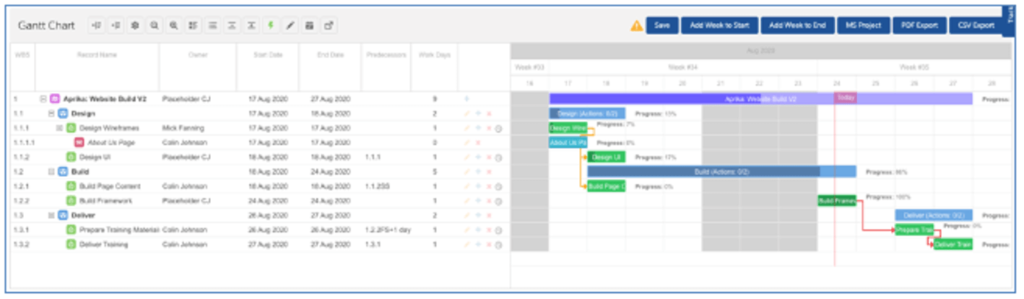
If you wish to create a Start to Start relationship, you must enter SS after the WBS number (e.g. 1.3.1SS). If you wish to create a Finish to Finish relationship, you must enter FF after the WBS number (e.g. 1.3.1FF).
If you wish to add Lead or Lag to the relationship, you must enter -n or +n after the WBS number (e.g. to add a 2 day Lead, enter 1.3.1+2).
Timeline
To add a dependency, click on the circle that appears at the start or end of the bar for the parent record when hovered over, and then drag to see a dotted line appear. Drag the dotted line to the circle that appears at the start or end of the bar for the child record. Once you let go it should appear as a solid orange line, indicating the dependency has been added.
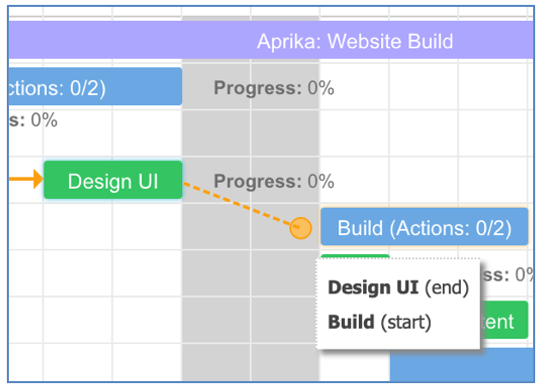
Remember, you will still need to save the Gantt Chart to save this dependency. If a line does not appear, it likely means the type of dependency you are trying to create is not supported and you will see a notification in the top right of the Gantt indicating ‘Link Type Not Supported’.
Deleting Dependencies
You can delete the dependency by double-clicking on the relationship line and clicking the Delete button. Alternatively, you can delete the value in the Predecessor column of the Data Table.
Cross Project Dependencies
You are able to create dependencies between records in separate Projects. For example, in the screenshot below, we have a Finish to Start dependency between the ‘Deliver Training’ Action on the Rip Curl Project and the ‘Design Wireframes’ Action on the Aprika Project. These are referred to as ‘Cross Project Dependencies’.
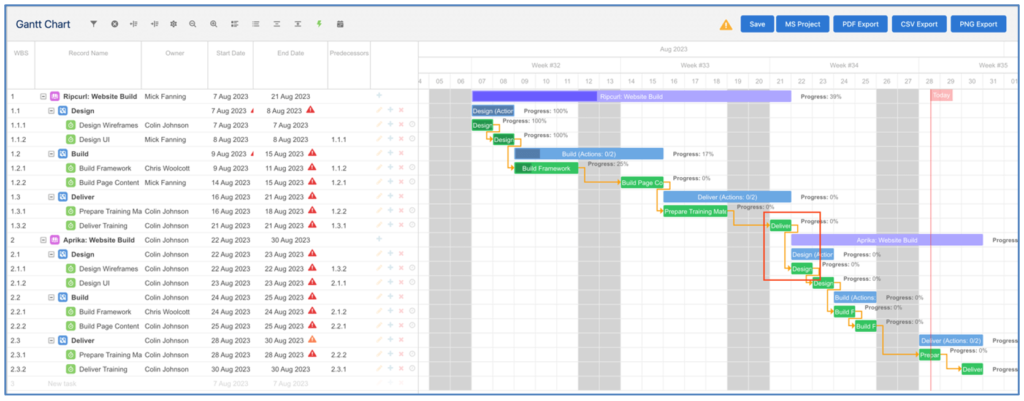
If the parent (e.g. the Deliver Training Action) is adjusted, this cross project dependency will ensure the child (e.g. the Design Wireframes Action) is also adjusted by the same period of time.
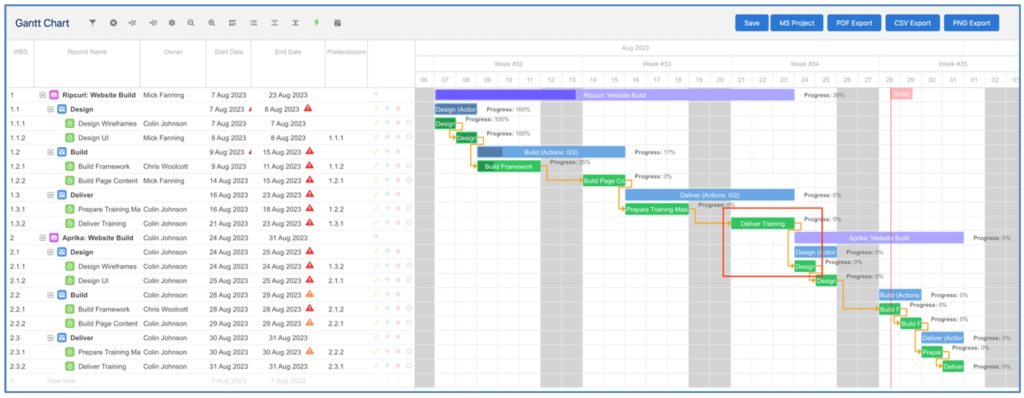
In the image above the ‘Deliver Training’ Action has been extended to a 3-day Action, moving the End Date from 21st August to 23rd August. The cross project dependency automatically moved the ‘Design Wireframes’ Action to be scheduled on 24th August instead of the 22nd August.
Enforcing Dependencies
Dependency enforcement logic is available for dependencies. This logic is controlled by a field on the Project Object called ‘Enforce Dependency Validation’. If this field is set to TRUE, the following logic will be applied:
If the field is set to TRUE and the parent records fall outside of this criteria, the User will receive an on-screen notification advising why the child Action is unable to be progressed.
Dependency Notifications
Each email notification was sent independently of any other dependencies tied to the same child record. For example, if Action C is a successor in Finish to Start relationships with Action A and Action B, an email would be sent when Action A was marked as Complete and another email would be sent when Action B was marked as Complete.
The distribution of these email notifications has been adjusted to only send one email once all predecessors has reached the correct trigger point.
The ‘Dependency Email Notification’ will be issued to those Roles involved in the child record to be notified that all predecessors have reached the correct Status value in order for work to commence on the child Action.
If a record is updated and is a predecessor (parent) in a dependency relationship to any successor (child) and all other predecessor records have already reached their trigger point, the email will be sent:
Below is an example of the Dependent Email Notification:
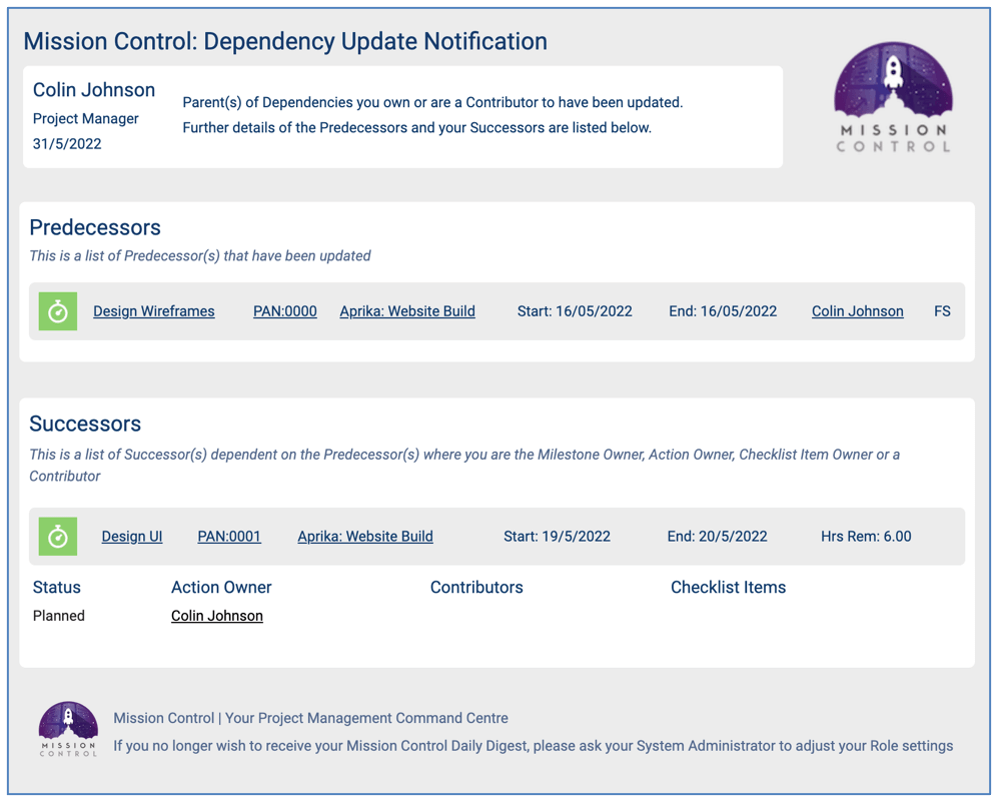
Note: In order for a Role to receive these email notifications, the ‘Receive Dependency Notifications’ field on their Role record should be set to TRUE.
Constraint Scheduling
Constraint Scheduling is a feature within Mission Control that can be enabled / disabled to accommodate your project scheduling scenarios. By default, Constraint Scheduling is disabled.
To enable Constraint Scheduling, you will need to set the ‘Enable Constraint Scheduling’ setting to TRUE. This setting can be found within the ‘Gantt Chart Settings’ Tile on the Control Pad of the Mission Control Console.

Constraint Scheduling provides greater flexibility when scheduling elements of your Project work breakdown structure that are part of a predecessor / successor dependency relationship. Once enabled, you will need to set the ‘Constraints’ Setting to TRUE in the Gantt Chart Settings – either for each individual User or centrally from the Control Pad if you are using the Gantt Chart Settings Override feature.

With Constraint Scheduling disabled, all dependency relationships automatically set the child to be scheduled immediately after the parent. This can be adjusted through the use of Lead and Lag. However, whenever the parent is rescheduled, the child will automatically be rescheduled by the same period of time.
With Constraint Scheduling enabled, Users have greater flexibility around scheduling parents, without adjusting when the child is scheduled, whilst also maintaining the dependency relationship. Constraint Scheduling allows the child’s scheduled dates to be influenced by the parent, but within the rules of the constraint placed on the child. The following Constraint Types are supported:
Let’s look at a scenario where Constraint Scheduling could be used within a Project. Mick Fanning is the Project Manager on the ‘Aprika: Website Build’ Project. Within that Project, there are 2 Actions – ‘Prepare Training Materials’ and ‘Deliver Training’. The ‘Deliver Training’ Action cannot be delivered before the ‘Prepare Training Materials’ Action is completed. Therefore, Mick creates a dependency between the 2 Actions, as outlined below.

However, the client has advised Mick that they will not be able to attend the training until after a specific date. This is where Mick can apply Constraint Scheduling. He wants to retain the dependency between the 2 Actions, however, he also needs to ensure the ‘Deliver Training’ Action does not get scheduled earlier than the specified date. When creating the dependency, Mick applies the ‘Start No Earlier Than’ Constraint Type and specifies the Constraint Date to the date provided by the client, as outlined below.

Mick’s team has progressed well on the Project and they are able to start the ‘Prepare Training Materials’ Action sooner than anticipated. They adjust the schedule for that Action. Without Constraint Scheduling, the child Action would also have been scheduled. However, due to the Constraint Scheduling rule, the ‘Deliver Training’ schedule will not be scheduled before the Constraint Date, as outlined below.

When Constraint Scheduling is enabled, the Constraint Type will be set to ‘As Soon As Possible’ by default. If the User sets the Constraint Type to any other value, a Constraint Date will be required. Whilst the Constraint Type and Constraint Date fields on the Gantt Chart will be visible for all levels (e.g. Portfolio, Program, Project, etc.), these fields will be read-only for the following levels and the Constraint Type will always be ‘As Soon As Possible’:
Users will be able to set the Constraint Type and Constraint Date for the following levels:
With Constraint Scheduling enabled, the Constraint will be applied regardless of whether the record is edited from the Gantt Chart or another page, such as the Create Actions page, or the Whiteboard.
If Constraint Scheduling was previously enabled and is subsequently disabled, the original Lead/Lag dependency logic will be resumed. For example, if you had Actions for ‘Prepare Training Materials’ and ‘Deliver Training’ and ‘Prepare Training Materials’ is set to start on Monday and ‘Deliver Training’ is set to not start before Thursday, there would be no lag, so in essence, ‘unofficial lag’. When the Constraint Scheduling feature is disabled, any modification to the Project would revert back to the original logic, so the dependency would end up snapping ‘Deliver Training’ to start immediately after ‘Prepare Training Materials’.
Note: When Constraint Scheduling is enabled, the ‘Lightning Bolt’ button on the Gantt Chart will be hidden as manual adjustment of scheduling will be prevented. The button will be visible, and continue to support the ability to turn on/off strict scheduling, if Constraint Scheduling is disabled.
Critical Path
The Critical Path is the path within the project that has the least amount of slack. Therefore, if any of the Actions within the Critical Path are delayed, the overall Project is likely to be delayed.
If an Action / Milestone falls within the Critical Path, through it’s relationships with other Actions / Milestones from it’s dependencies, the relationship will be highlighted red, as shown below.
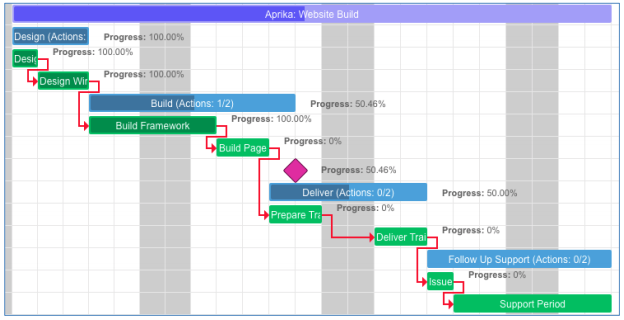
Note: Critical Path will support Lead and Lag between Actions. Lead is where the child Action starts prior to the parent Action finishing, whereas Lag is where there is a gap between the parent Action finishing and the child Action starting. See below for examples of Lead and Lag.
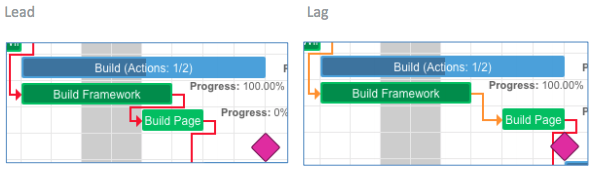
PDF Export
The PDF Export feature allows you to export a PDF version of the Gantt Chart. This can be for the entire length of the selected Projects, or for a specified date range.
To export the Gantt Chart to PDF, click on the PDF Export button.

This will open a pop up window allowing you to specify a date range to export, or you can leave it blank to expire the entire Project(s). After selecting your date range click the export button.

The PDF will then be downloaded and can be opened, saved and printed as required. Here is an example of the PDF version of the Gantt chart:
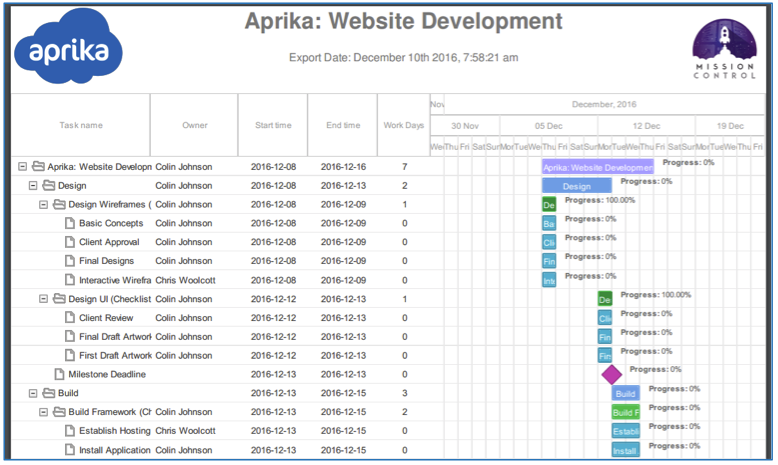
You are able to brand the PDF by including your logo, a secondary logo that is project specific and a custom title. You can also choose to include the baseline dates onto the PDF if required.
Display your Logo
If you want to include your own logo on the Gantt Chart PDF, you can specify the logo you would like to include from the Console as per the illustration below.
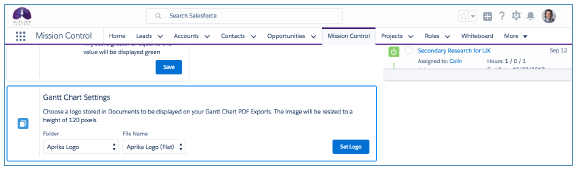
The logo selected here will appear at the top left of the Gantt Chart PDF.
Display Secondary Logo
You can also include a second logo on the Gantt Chart PDF that will appear at the top right. We anticipate this could be used to display your customer’s logo.
To add a secondary logo to the Gantt Chart, this is done on an individual project basis. To add the logo to a specific project, you first need to upload the logo as a ‘Document’ and then add the URL for that Document into the ‘Logo URL’ field on the Project record as shown below.
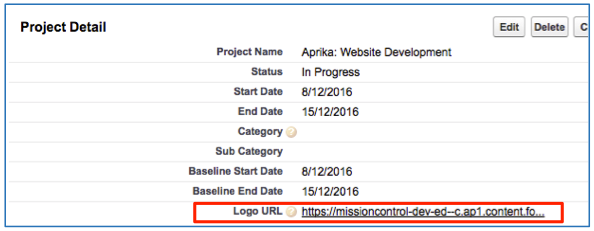
Display Custom Title
The Gantt Chart ‘Title’ will display the Project Name by default. However, you can also adjust the Title using the custom heading section at the time of generating the PDF, as shown below.

Display Baseline Dates
If you wish to export the Baseline Dates on the Gantt Chart PDF, you will need to select the ‘Raw Export’ option at the bottom of the Export
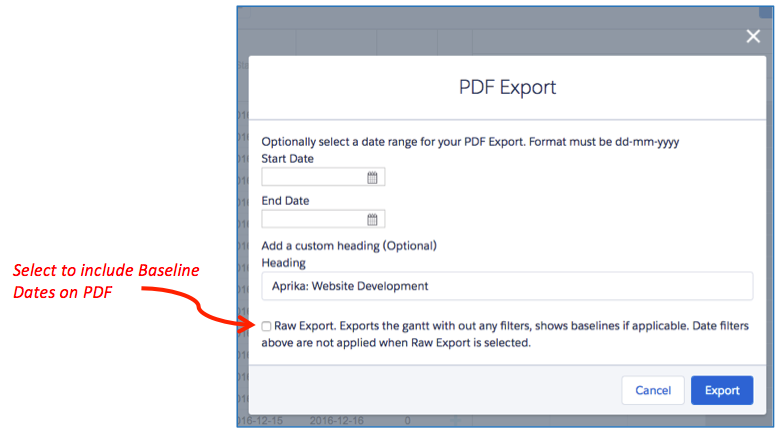
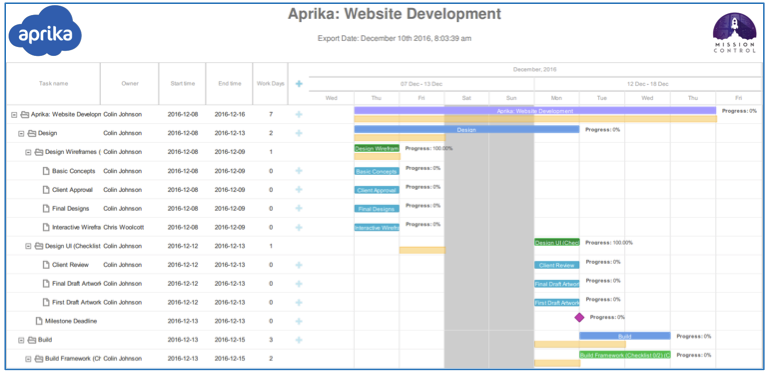
Export Data Table CSV
To export the Gantt Chart Data Table as a .csv file, click the ‘CSV Export’ button located on the top right-hand-side of the Gantt Chart, as shown below:

When you click the button, a .csv file will be downloaded with the File Name ‘Gantt Chart Export YYMMDD.csv’, and will contain the export of the Data Table, as shown below:
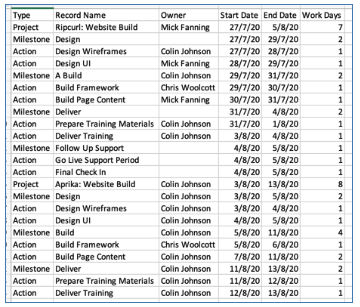
Export Data Table CSV
To export the Gantt Chart Data Table as a .csv file, click the ‘CSV Export’ button located on the top right-hand-side of the Gantt Chart, as shown below:
When you click the button, a .csv file will be downloaded with the File Name ‘Gantt Chart Export YYMMDD.csv’, and will contain the export of the Data Table, as shown below:
Mission Control allows you to export your Projects as ‘XML’ files, which can then be imported into Microsoft Project.
To Export a project for MS Project, select your desired Project on the Gantt Chart and then Click the MS Project Project button.

Then click the Export button in the pop up window as follows:
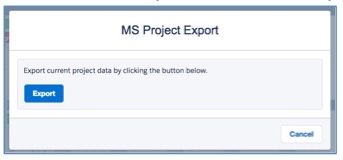
The XML file will then be generated allowing you to save it to your computer. Once saved, you can then open MS Project and select the “New from Excel Workbook” option.
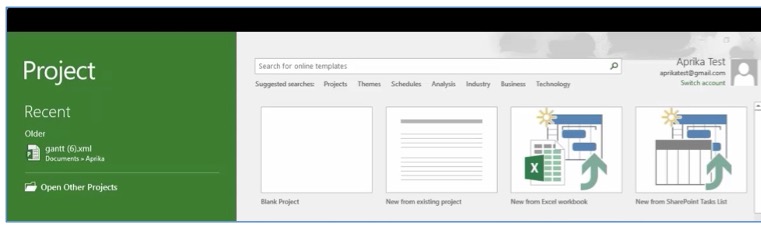
You will then be able to locate and select your “XML” file and click open, then click finish and the project will be imported as follows:
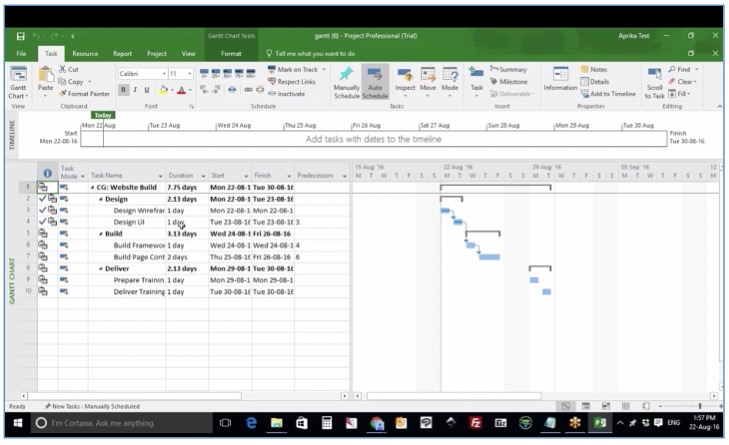
Mission Control provides you with the ability to import your Project Plans from MS Project .mpp files.
To import a Project from MS Project, you will need to go to the Standalone Gantt Chart and click the ‘Import/Export’ button.

This will open the Import/Export Modal, which contains a variety of options for you to import and export Mission Control Project Plans.
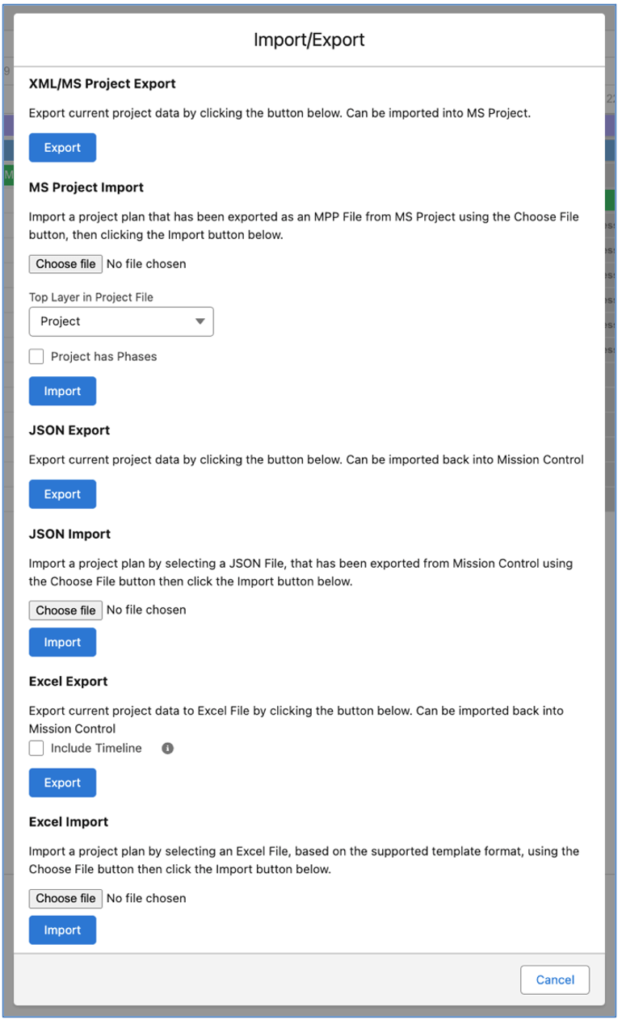
Within the ‘MS Project Import’ section, you need to complete the following steps:
In the example below, the Project Plan being imported has a Portfolio as the Top Layer but does not contain any Phases.
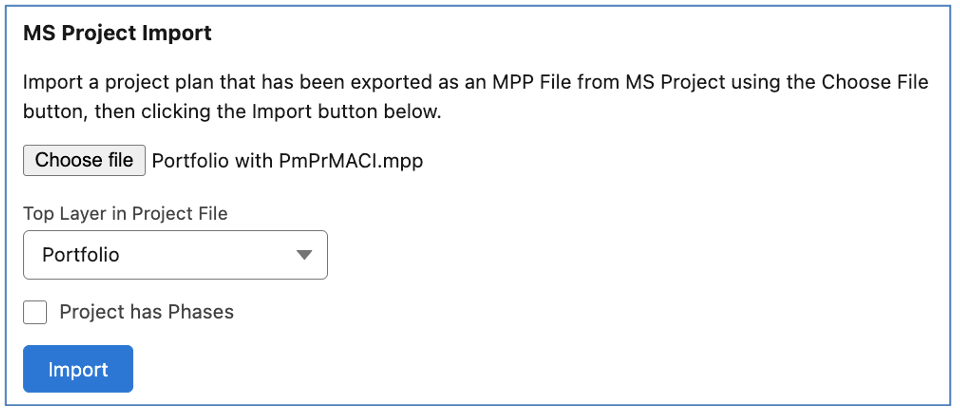
In the image below, you can see the draft records, comprising of a Portfolio, with related Programs and Projects with their Milestones, Actions and Checklist Items.
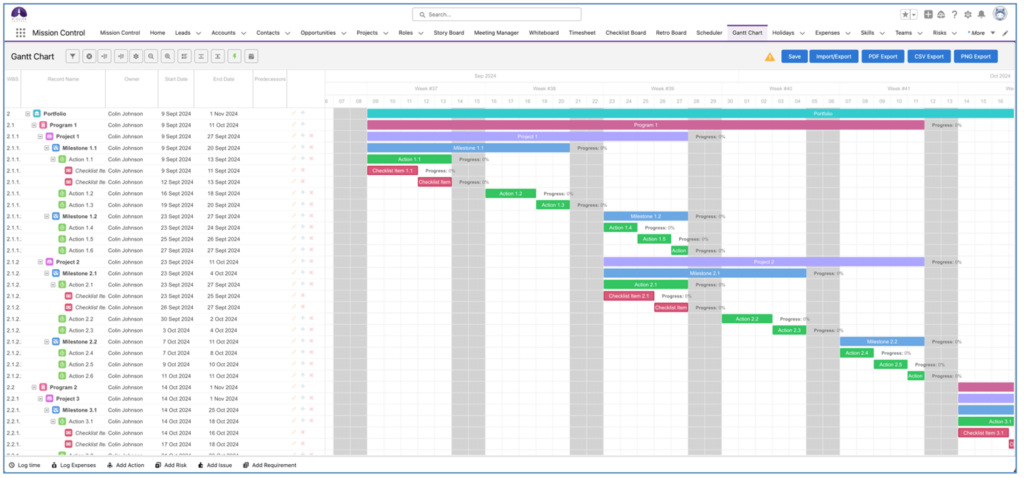
Once the file has been imported, it will be displayed as a set of draft records on the Standalone Gantt Chart. At this point, you will be able to click the ‘Save’ button to save all the records. Once they have been saved, you will be able to edit the records to add any additional information required.
Note: MPP Files from MS Project Versions 1998 through to 2019 are supported.
To enable the transfer of a Project Plan from one Salesforce Org to another, Customers can use the JSON Import/Export feature available on the Gantt Chart. For example, if you have created a Project Plan in a Sandbox Org and you want to transfer it to your Production Org, you can export the JSON file from the Sandbox Org and import it into the Production Org. This will be a more efficient process than using the Salesforce Data Loader to export/import each individual Custom Object at a time.
This process includes all fields from the following Objects within Mission Control:
To export the JSON File of a Project, from the Gantt Chart, click the ‘Import/Export’ button. Click the ‘Export’ button within the JSON Export section of the Modal.
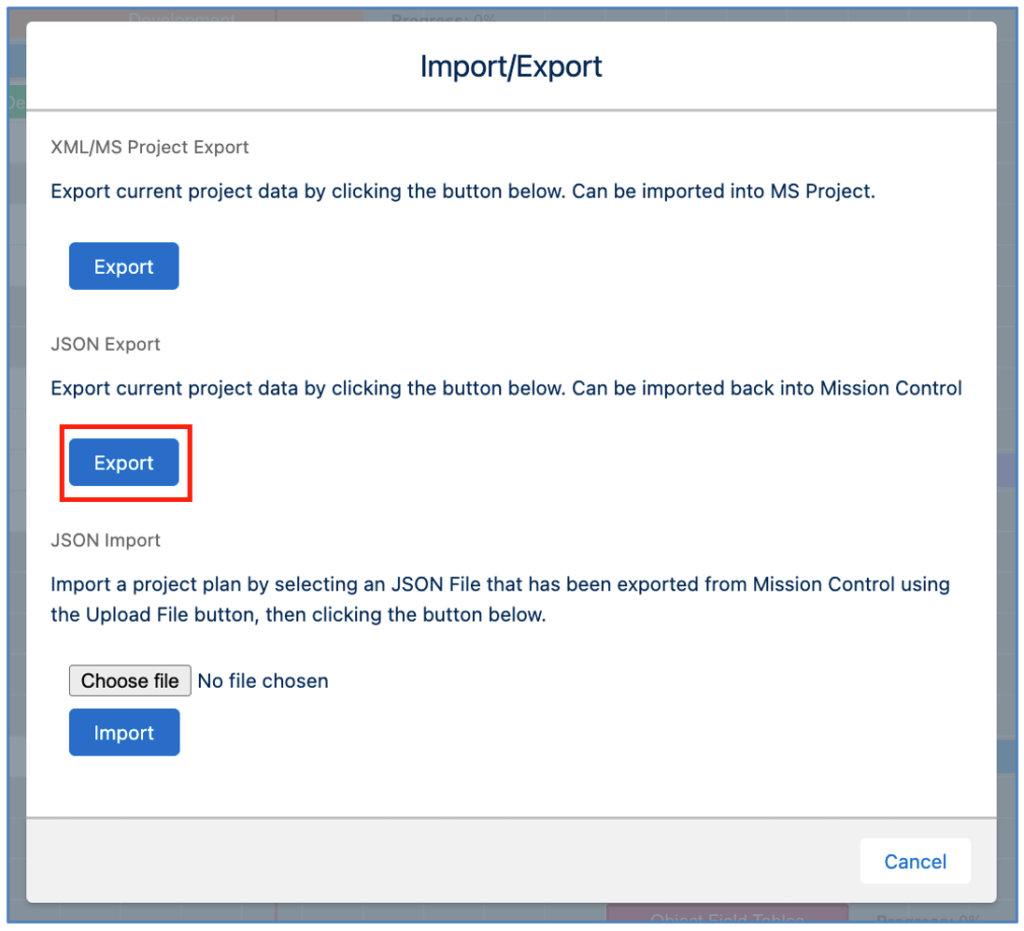
The JSON File will be downloaded to your computer. It will have a File Name format of ‘Mission Control Export YYMMDD.json’. This file can then be used to import the Project Plan into another Salesforce Org.
Note: To import a JSON File, you need to use the Standalone Gantt Chart. The Import button will not be accessible from the Gantt Chart on the Project Overview Page.
To import the JSON File of a Project, from the Gantt Chart, click the ‘Import/Export’ button. Click the ‘Choose file’ button and select the JSON File you want to use. Then click the ‘Import’ button within the JSON Import section of the Modal.
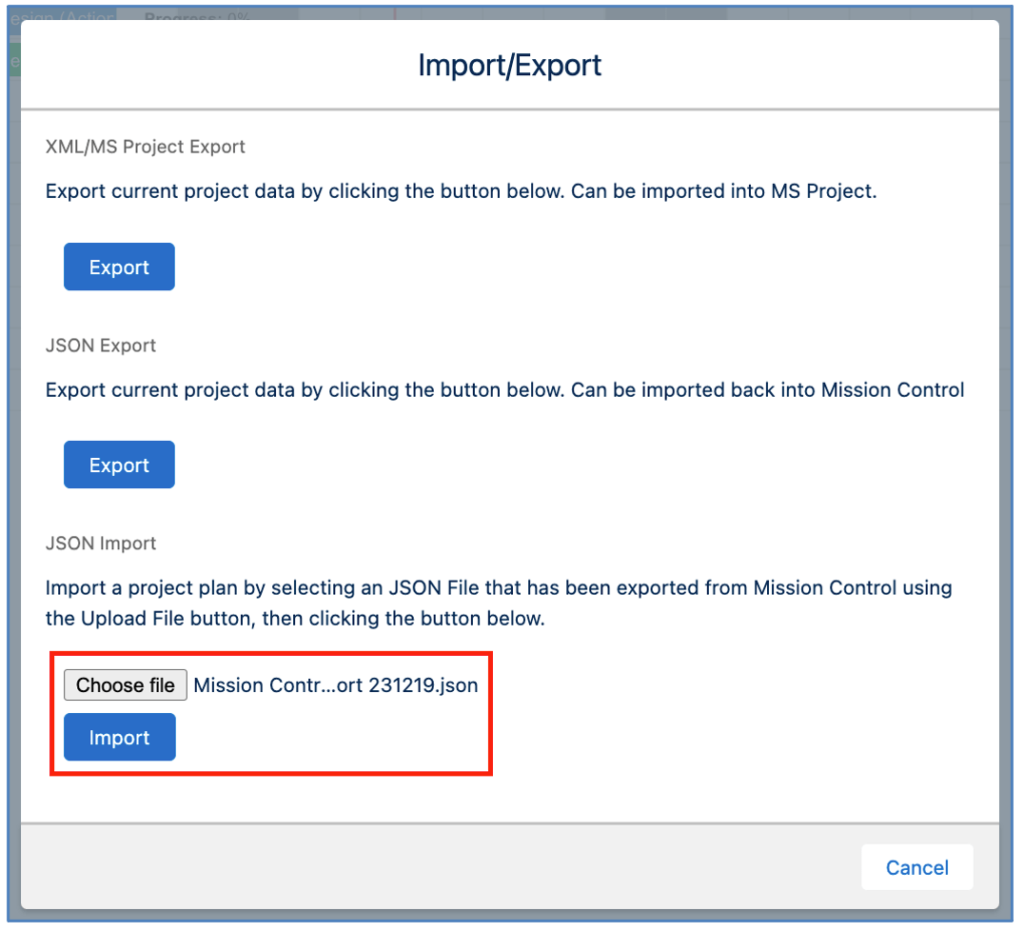
When the file has been uploaded, the Project Plans will be displayed on the Gantt Chart. You will not be able to make any edits until the master Save button has been clicked and the records have been created. The only exception is the values within the ‘Owner’ column in the Gantt Chart’s Data Table can be modified prior to clicking Save.
Whilst in draft mode, the Owners will appear with asterixis around the Owner’s Name, as shown below.
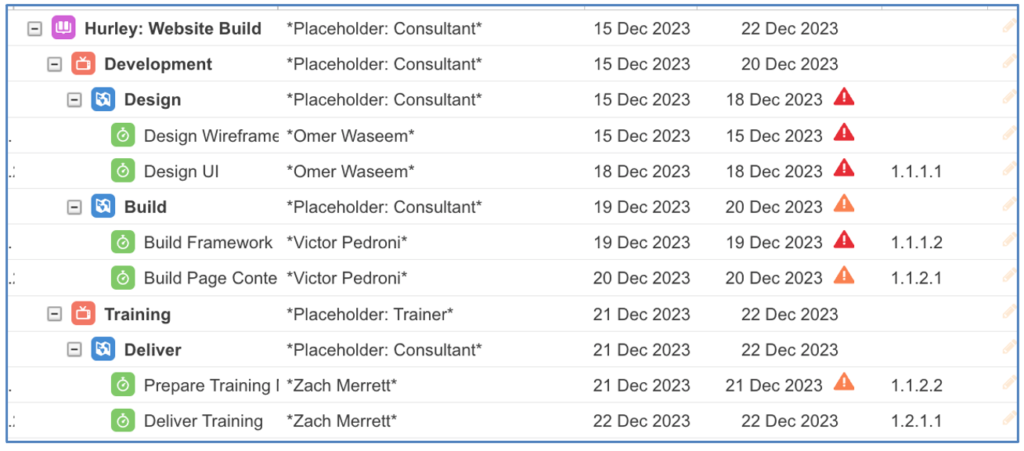
Once saved, if a Role can be found with a matching Name, it will be saved on the record. Any names of Owners that cannot be found within the target Org will be set to blank.
You are able to export and import your Mission Control Project Plans using Excel files. This functionality is accessible from the Gantt Chart by clicking the ‘Import/Export’ button.
You can access the Export feature from the Project Overview, Program Overview, Portfolio Overview and Standalone Gantt Charts. You can access the Import feature from the Standalone Gantt Chart.
The columns included in the Excel file cannot be adjusted by adding or removing fields. The fields available in the file include:
Excel Export
Within the Import/Export Modal of the Gantt Chart, you will need to navigate to the ‘Excel Export’ section, as shown below.
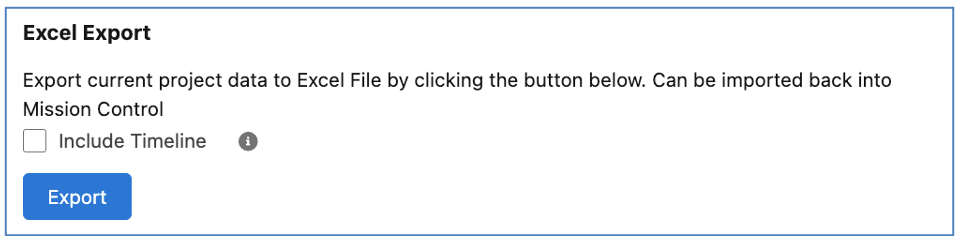
When exporting the Project Plan you are able to choose to export it with or without the ‘Timeline’. The Timeline is simply a visual illustration within the Excel file of the Project timeline, as shown below. The format of the Date columns will be YYYY-MM-DD.
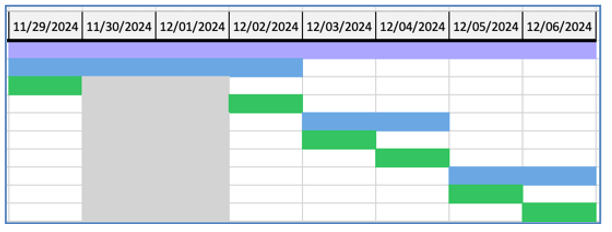
Each cell represents an individual day and if the record (e.g. Project, Milestone, Action, etc.) is scheduled to be worked on during that day, it will be shaded. Therefore, the Timeline provides a Gantt illustration.
Below is an example of the Excel file that does not include the Timeline.
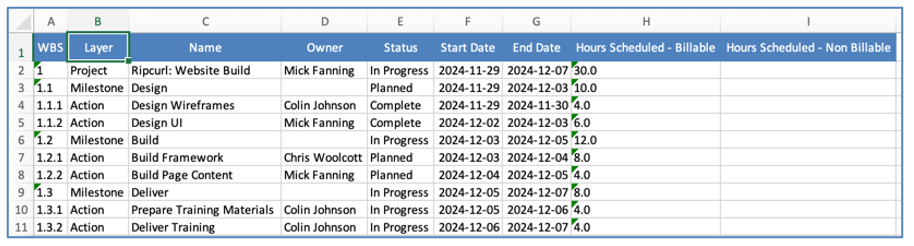
Below is an example of the Excel file that includes the Timeline.

Note: If you modify the date values, the Timeline cells will not reflect those changes.
When you export a Project Plan, the Excel file will have a file name structure of [Project Name] [YYMMDD].xlsx. For example, for the Rip Curl: Website Build Project being exported on the 20th December 2024, the file name would be “Rip Curl Website Build 241220.xlsx”.
Excel Import
Within the Import/Export Modal of the Gantt Chart, you will need to navigate to the ‘Excel Import’ section, as shown below. Note: this is only accessible from the Standalone Gantt Chart.
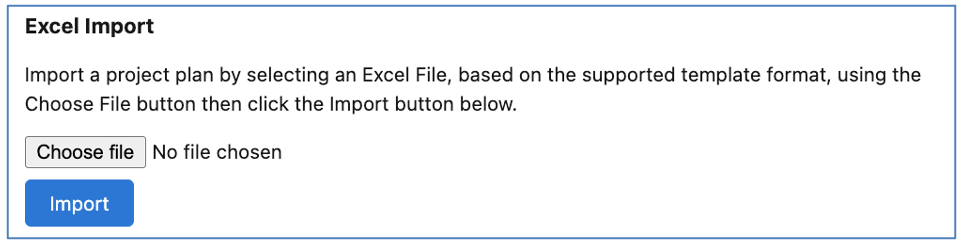
When preparing your import file, you will need to ensure it contains all the required columns, as shown below.
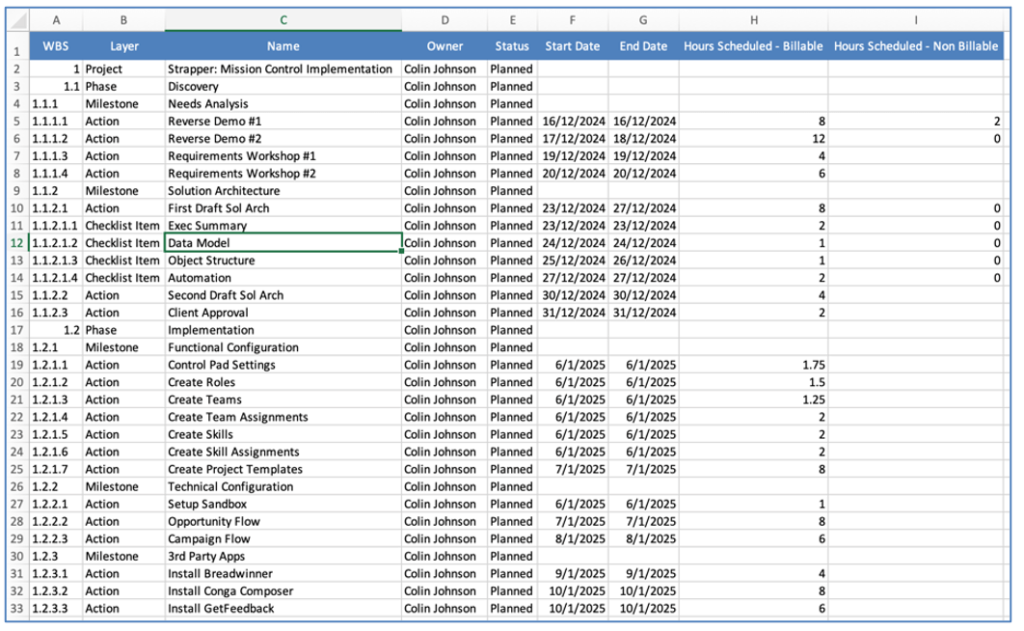
You will need to ensure the following:
To import the Excel file, navigate to the Standalone Gantt Chart, click the Import/Export button and scroll down to the ‘Excel Import’ section. Click the ‘Choose file’ button, select your import file and then click the Import button.
The Project Plan will be displayed on the Gantt Chart, and you will then be able to click the ‘Save’ button.
By default the Gantt Chart will display the Project ‘Work Breakdown Structure’, which comprises of Phases, Milestones, Actions and Checklist Items, as per the example below.

It can be configured to allow Users to toggle the data source to view Role Forecasts instead, as per the example below.

On the Standalone Gantt Chart, you are able to view Role Forecasts for both Projects and Opportunities. Where a Role Forecast relates to both a Project and an Opportunity, the Project will be displayed as the parent record.

When viewing the Forecasts view, Users are able to drag and drop Role Forecasts to reschedule the date range.
Note: Dependencies are not supported on Role Forecasts.
Users can double-click the individual Role Forecast to access the Edit Modal, which will provide access to the following tabs:
The visibility and default loading of these Tabs is controlled on the Role record, using the following fields:
You can control which fields are displayed on the ‘Role Forecast’ Tab of the Edit Modal.

This is controlled via the ‘Role Forecast Gantt Edit Modal’ Field Set on the Role Forecast Object. This can be accessed via Setup > Object Manager > Role Forecast > Field Sets.
You can control which fields are displayed in the Tooltips Box when hovering over the Role Forecast on the Gantt Chart.

This is controlled via the ‘Role Forecast Gantt Chart Tooltip Fields’ Field Set on the Role Forecast Object. This can be accessed via Setup > Object Manager > Role Forecast > Field Sets.
Enabling the Role Forecast Gantt Chart
To enable the ‘Role Forecast Gantt Chart’ feature, you will need to set the ‘Enable Role Forecast Gantt Chart’ Setting to TRUE. This Setting can be found on the Gantt Chart Tile on the Control Pad of the Mission Control Console.

When this Setting is TRUE, a Picklist will be displayed on the Gantt Chart, as shown in the image below.

By default, it will be set to ‘Actions’, this will show the Work Breakdown Structure of the Project. To view Role Forecasts instead, Users can click the picklist and select ‘Forecasts’.

Note: This is a persistent setting that will be remembered on a per User basis each time they visit the Gantt Chart.
The Gantt Chart Lightning Component can be added to the Page Layout of any parent Object that a Project relates to. For example, out of the box the Project Object has Lookup fields to the Account, Contact, Opportunity and Program Objects. Therefore, you will be able to add the ‘LightningGantt’ Lightning Component to the Page Layout of any of these Objects, and it will display all related Projects. Setting a component height of approximately 1000 is recommended. Below is an example of the Gantt Chart being added to the Opportunity Page Layout.
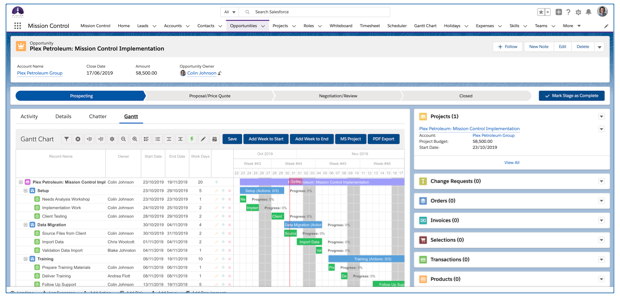
If you have created your own Custom Lookup Fields to other Objects, you will also be able to add the Lightning Component to the Page Layout for those Objects.
Note: This feature is only available in Lightning Experience.
By default, Actions are coloured Green on the Gantt Chart. If the Priority is set to High, the Action will be coloured Red, and if the Priority is Medium, it will be coloured Amber. You can now specify your own colours based on the Action Status field, which will override the default settings of the Gantt Chart.
You set the colours based on Action Status from the Gantt Chart Settings section of the Control Pad on the Mission Control Console. Below is an example where each Status has been provided it’s own Hex Colour Code.
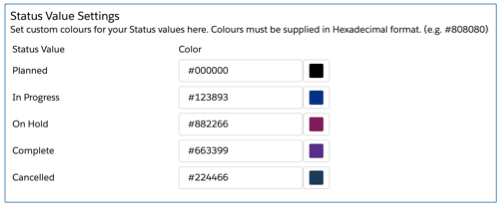
Once these settings have been saved, the Action bars on the Gantt Chart will be displayed with those colours, as illustrated below.
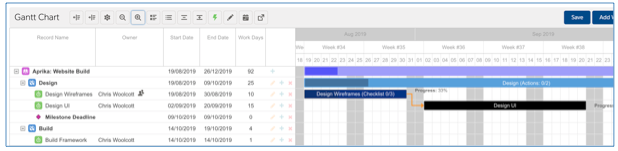
For each record displayed on the Gantt Chart (e.g. Project, Milestone, Action or Checklist Item), you can access the Modal window for that record by clicking the pencil icon, or by double-clicking on the bar for that record on the chart timeline.
Within the Modal for each record you have access to the following Tabs.
Project | Milestone | Action | Checklist Item |
Project Summary Record Detail Chatter | Milestone Summary Record Detail Chatter | Action Summary Log Time Record Detail Chatter | Checklist Summary Record Detail Chatter |
For each Role record you have the ability to specify which of these Tabs they have access to, and which will load by default. This is controlled via fields within the ‘Gantt Chart Settings’ section of the Role Page Layout.
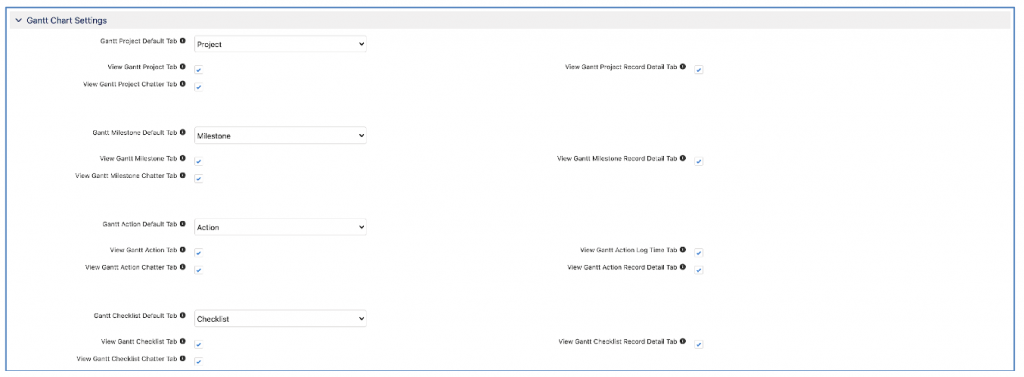
For your convenience, these fields will be pre-populated as part of an Install Script. Full details of the Install Script can be found later in these release notes.
Control Pad Gantt Chart Settings
To enable you to centrally configure the Gantt Chart settings for all Users, the Gantt Chart Settings on the Control Pad of the Console have been updated to include a Gantt Chart Settings Override feature. I

If this is TRUE, the Settings icon on the Gantt Chart will not be visible and the column selections in the Gantt Data Table will be controlled based on the Control Pad Gantt Chart Settings.
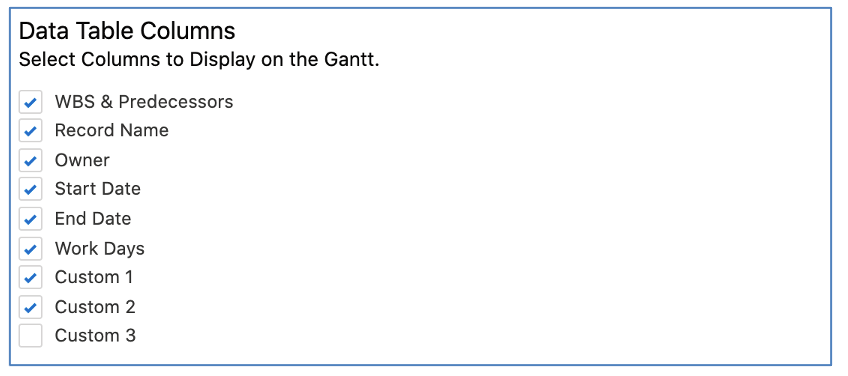
The Scheduler provides a calendar style view of Action records and is an excellent resource capacity planning tool.
The scheduler offers the following features:
You can access the Scheduler for all projects from the Scheduler tab, or to instantly open the scheduler for a specific project, you can launch it from the Mission Control Console, as follows;
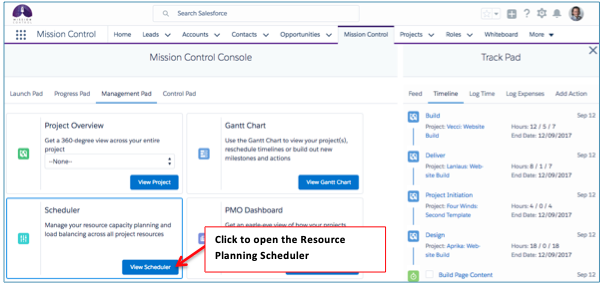
Once you have accessed the scheduler, it will appear as follows.
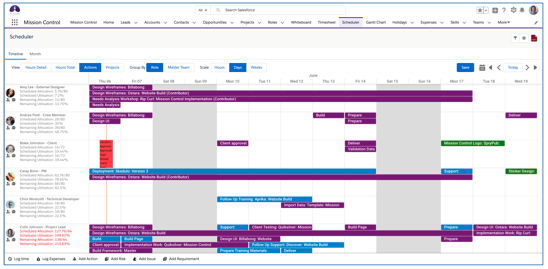
The Scheduler features two Tabs, giving you a different view:
Timeline
Within the Timeline Tab, you have options to control the View, Group By and Scale values, as outlined in below.
View
The View options allow you to determine what information is being displayed within the Timeline, including:
Financials
The Financials View will show you a breakdown of the ‘Hours Scheduled Value (Billable)’ field across all Actions that are scheduled to be worked on during the timeline. The shading of the cells reflects the Hours Shading Breakpoint % values in the Scheduler Settings. Below is an example of the Financials View:
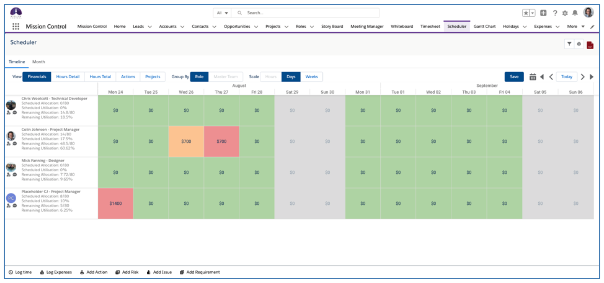
Note: If a User does not have Field Level Security access to the Hours Scheduled Value (Billable) field, they will not see any information on this View.
Hours Detail
The Hours Detail View will show you a breakdown of the hours assigned to each Role, categorised into the following areas:
Below is an example of the Hours Detail View:
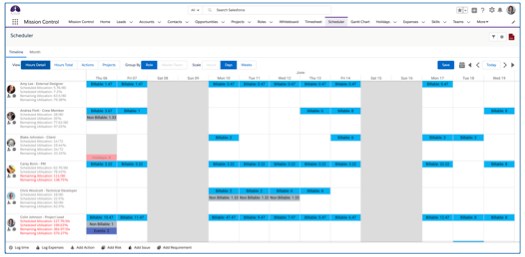
Note: The Hours Detail View can only be used with the Role Group By and Days and Weeks Scale values.
Hours Total
The Hours Total View will show you a summary of the hours assigned to each Role. Below is an example of the Hours Total View:
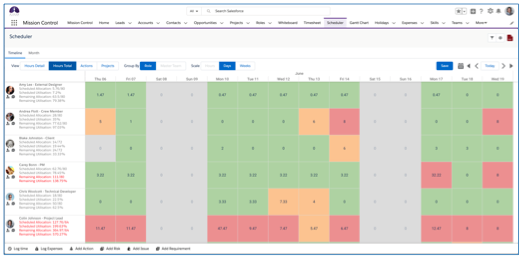
Note: The Hours Total View can only be used with the Role Group By and Days and Weeks Scale values.
Actions
The Actions View will show you the separate ‘bars’ for the individual Actions assigned to the Action Owner / Contributor. Below is an example of the Actions View:
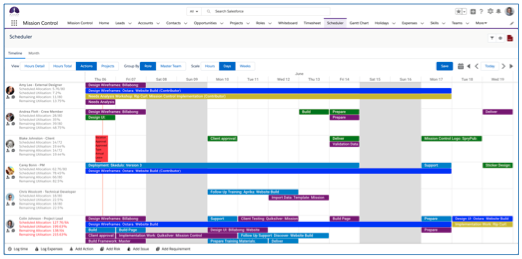
Note: The Action View is the only view that will support edits being made to the records.
Projects
The Projects View will provide a high level summary view of work scheduled. In this View, Actions within the same Project that are scheduled to occur on the same day or consecutive days will be grouped into a single ‘bar’. Below is an example of the Projects View:
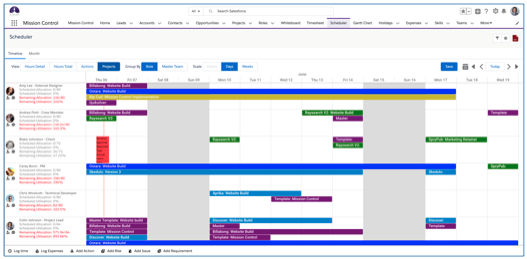
Note: The Projects View can only be used with the Days and Weeks Scale values.
Group By
The Group By options allow you to determine how the Rows are organised, including:
Role
The Role Group By option will display each Role in alphabetical order, based on the Role’s First Name. Below is an example of the Role Group By view:
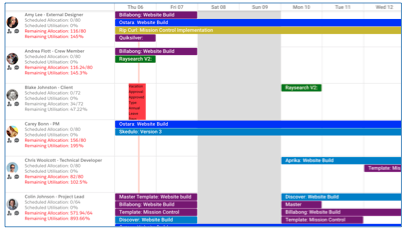
Master Team
The Master Team Group By option will display each Role in alphabetical order, based on the Role’s First Name, grouped within their ‘Master Team’. Below is an example of the Master Team Group By view:
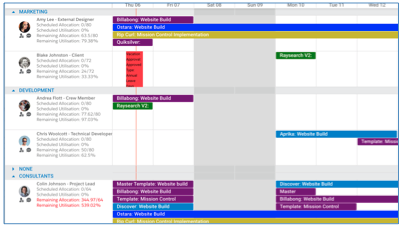
Scale
The Scale options allow you to determine the scale used across the Timeline, including:
Hours
The Hours Scale will display the Timeline scale per hour, based on the number of hours and days you’ve selected in the Scheduler Settings. Below is an example of the Hours Scale showing 8am to 6pm over a 3-day period.
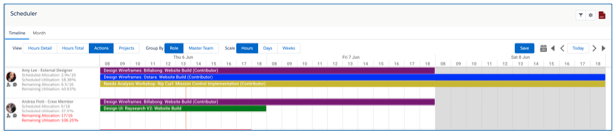
Note: The Hours Scale can only be used with the Actions View.
Days
The Days Scale will display the Timeline scale per day, based on the number of weeks you’ve selected in the Scheduler Settings. Below is an example of the Days Scale showing a 4-week period.
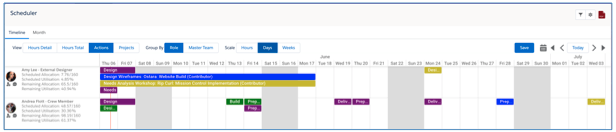
Weeks
The Weeks scale will display the Timeline scale per week, based on the number of weeks you’ve selected in the Scheduler Settings. Below is an example of the Weeks Scale showing a 52-week period.
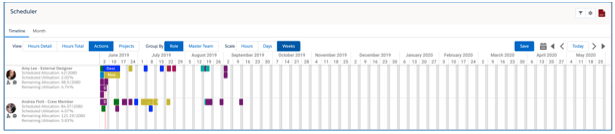
Months
The Month Scale will display the Timeline scale per month, based on the number of months you’ve selected in the Scheduler Settings.
Below is an example of the Actions View with the Months Scale showing a 12-month period.
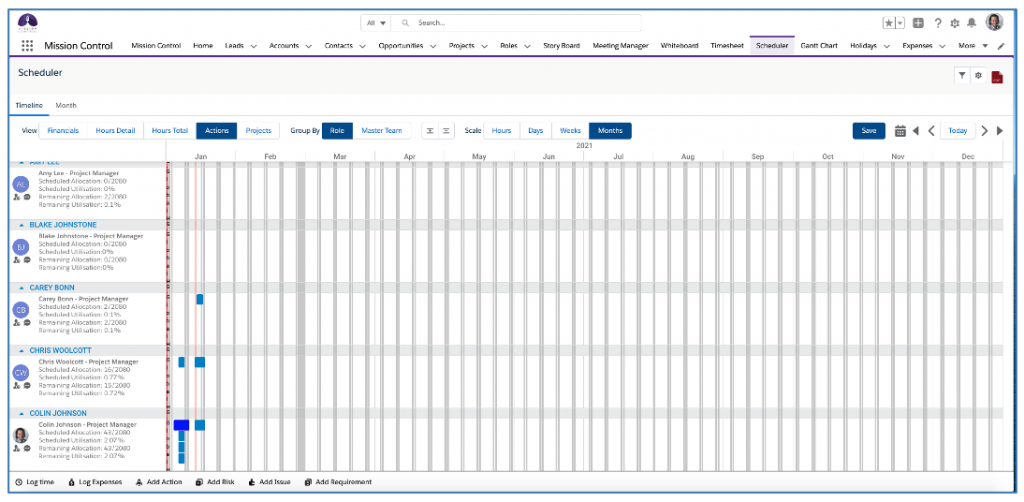
Below is an example of the Hours Total View with the Months Scale showing a 6-month period.
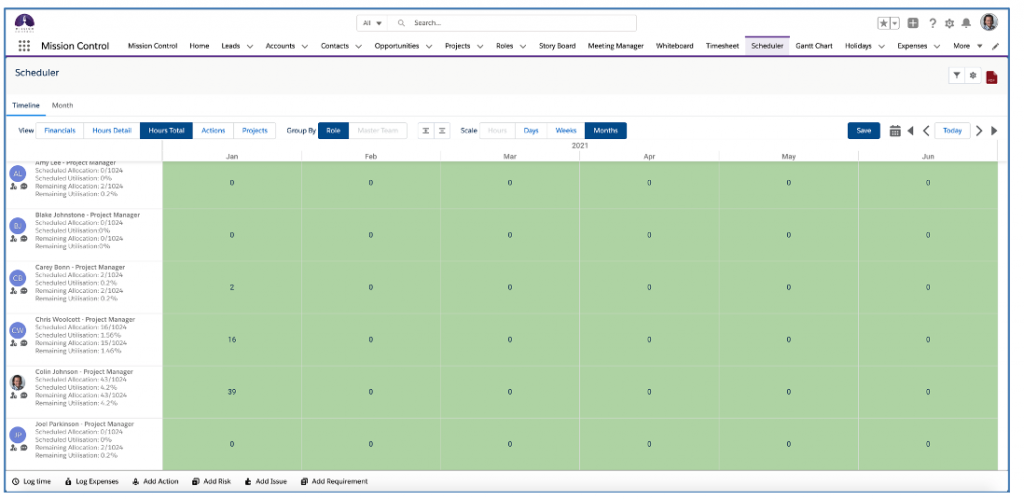 Month
Month
The Month Tab provides a month in view calendar display. All Actions across all Projects will be displayed. Below is an example of the Month View:
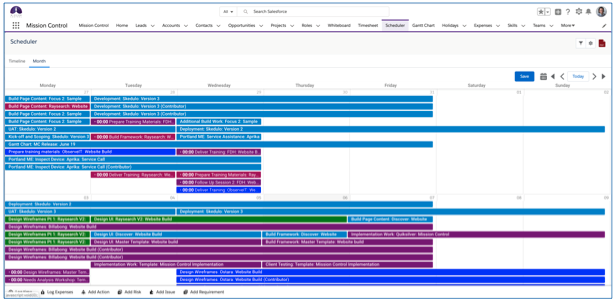
Note: If you use the Scheduler Filters to filter to an individual Role, any Holidays assigned to that Role will also be displayed on the Month View.
Scheduler Features
There is a range of features that the Scheduler provides to help you manage your resource capacity, each feature is explained in further detail below.
Scheduler Settings
The Scheduler Settings are accessible by clicking the ![]() icon, located in the top-right corner of the Scheduler. Note: These Settings are persistently remembered, and controlled at the individual User level.
icon, located in the top-right corner of the Scheduler. Note: These Settings are persistently remembered, and controlled at the individual User level.
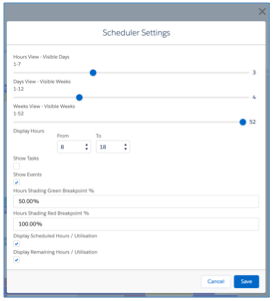
Hours View – Visible Days
This Slider allows you to specify how many days will be displayed when using the Hours View. The maximum value for this Slider is 7 days.
Days View – Visible Weeks
This Slider allows you to specify how many weeks will be displayed when using the Days View. The maximum value for this Slider is 12 weeks.
Weeks View – Visible Weeks
This Slider allows you to specific how many weeks will be displayed when using the Weeks View. The maximum value for this Slider is 52 weeks.
Display Hours
The From and To fields allow you to specify the hours that will be displayed on the Timeline when using the Hours View.
Show Tasks
This Checkbox enables you to toggle on / off the ability to display Salesforce Tasks on the Scheduler.
Show Events
This Checkbox enables you to toggle on / off the ability to display Salesforce Events on the Scheduler.
Hours Shading Green Breakpoint %
This percentage value will be used on the Hours Total View. If the sum of hours scheduled for a Role is less or equal to this value, the cell will be shaded Green.
Hours Shading Red Breakpoint %
This percentage value will be used on the Hours Total View. If the sum of hours scheduled for a Role is greater or equal to this value, the cell will be shaded Red.
Display Job Title
This Checkbox enables you to toggle on / off the Job Title, which appears next to the Role’s Name.
Display Scheduled Hours / Utilisation
This Checkbox enables you to toggle on / off the ability to view the Scheduled Allocation and Scheduled Utilisation figures for each Role.
Display Remaining Hours / Utilisation
This Checkbox enables you to toggle on / off the ability to view the Remaining Allocation / Remaining Utilisation figures for each Role.
Show Collapsible Sections
When using the ‘Actions’ or ‘Projects’ View you have the ability to collapse / expand the rows of individual Roles displayed, as illustrated below.
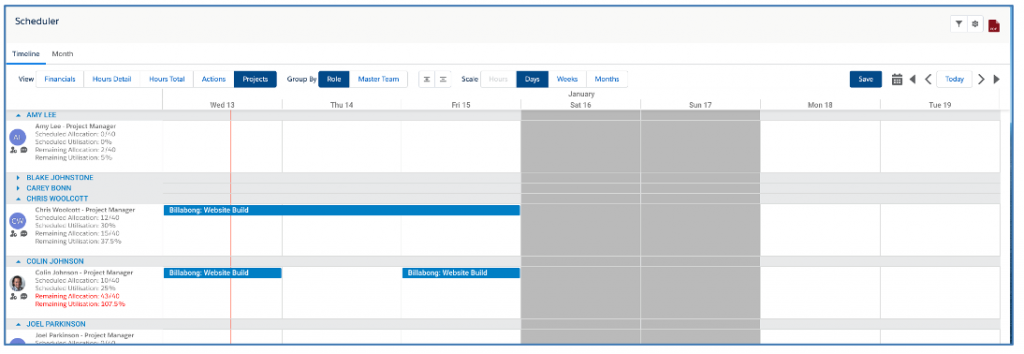
You can also collapse / expand all rows by using the + / – buttons located between the Group By and Scale Options.

This feature can be toggled on / off within the Scheduler Settings, as shown below:
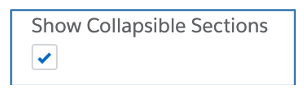
If this setting is FALSE, the + / – buttons will be hidden, along with the collapsible header above each row.
Show Section Hours Summary
Within the ‘Actions’ View of the Scheduler, you can choose to display an hours summary for each cell within the Timeline.
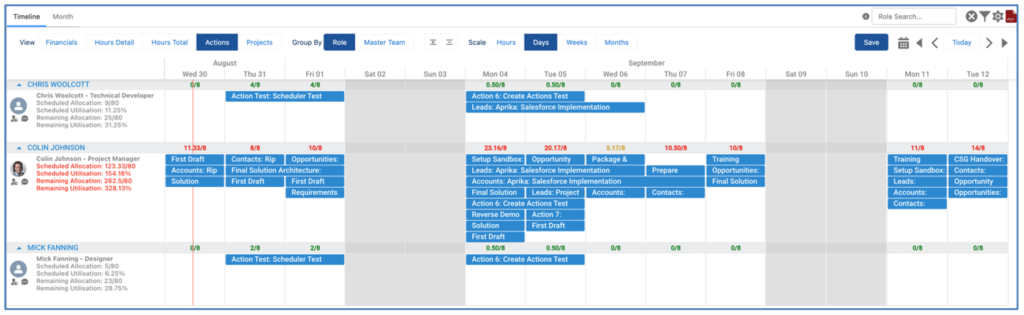
The hours summary will be colour-coded using the ‘Hours Shading Green Breakpoint %’ and ‘Hours Shading Red Breakpoint %’ Settings.
This is enabled within the Setting Modal of the Scheduler. To enable this feature, the ‘Show Section Hours Summary’ Setting must be set to TRUE. Note: in order to use this feature, the ‘Show Collapsible Sections’ Setting must also be set to TRUE.
Hours Source
By default, the Scheduler uses the ‘Total Hours Scheduled’ as the data source for displaying capacity / allocations. Within the Scheduler Settings, you’re able to adjust the source of hours that will be used by choosing one of the following four options within the ‘Hours Source’ setting.
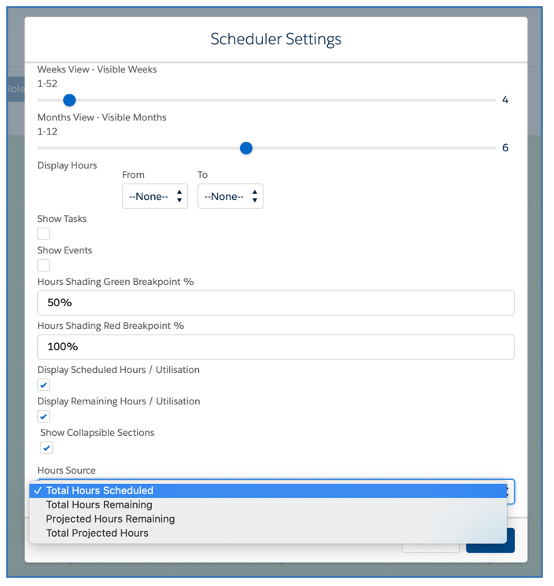
The selected option will be used across all Views within the Scheduler.
Holidays Source
To provide flexibility for customers to choose whether they view all Holidays or only approved Holidays on the Scheduler, there is a setting within the Scheduler Settings that enables you to choose whether you view:
If this setting is null, only Approved Holidays will be displayed on the Scheduler.

When viewing Holidays on the Scheduler, Approved Holidays will display in Red and any other Holidays will display in Amber.
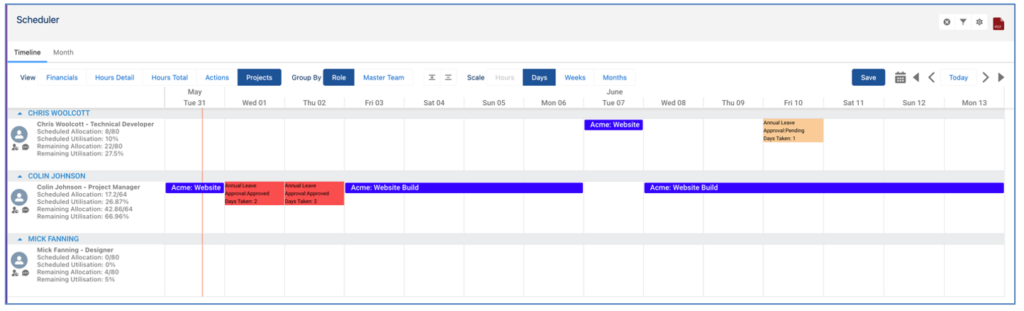
Customize Bar Display
By default, the bars representing Actions that appear on the Action and Project Tabs of the Scheduler display the following text:
These default values can be replaced by any field on the Action or Project Object. This is done by using the following custom settings within the Scheduler Settings Modal:
These settings can reference any field on the Object. Therefore, if a Customer wishes to compile a Formula Field that included multiple values, such as the Action ID, Action Name, Milestone Name and Project Name, they could create that Custom Field on the Action Object and then select that field to be displayed as the Action Bar Text setting.
Polling & Pagination
For customers with large volumes of data, the Polling & Pagination settings can assist in optimising the performance of the Scheduler.
These Settings are controlled from the ‘Scheduler Settings’ Tile on the Control Pad of the Mission Control Console.
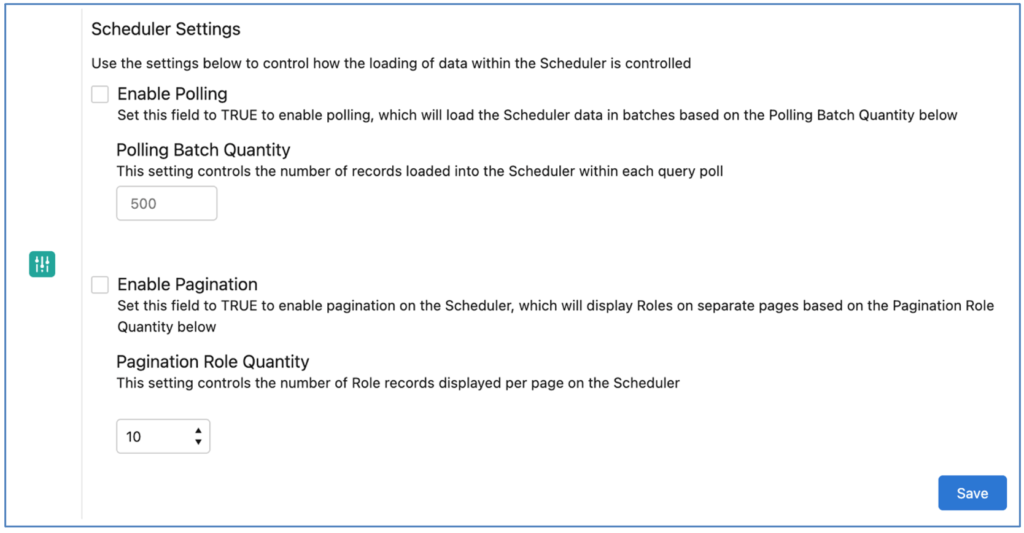
Enabling the Polling Setting will load the data into the Scheduler in batches, based on the ‘Polling Batch Quantity’. This ensures Salesforce Governor Limits are not invoked if trying to load a large volume of data at once.
Enabling the Pagination Setting breaks the Scheduler up into pages and will load a set number of Roles per page, based on the ‘Pagination Role Quantity’ setting.
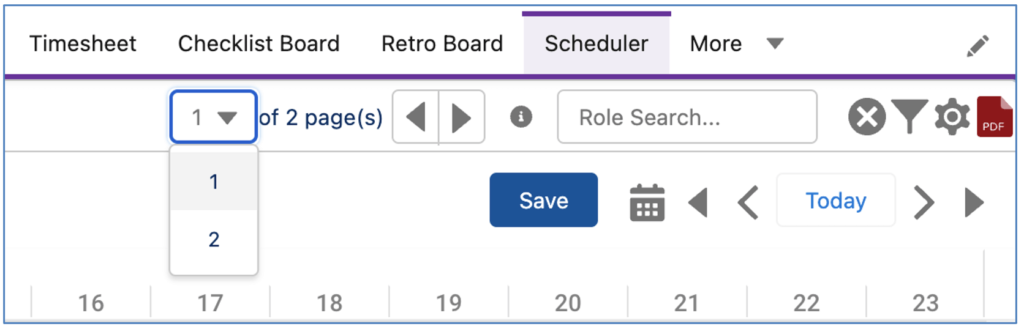
With pagination enabled, page navigation will be displayed in the top-right of the Scheduler, as shown above.
Quick Search
The ‘Role Search’ field located at the top-right of the Scheduler enables you to perform a quick search/filter based on the Role Name.
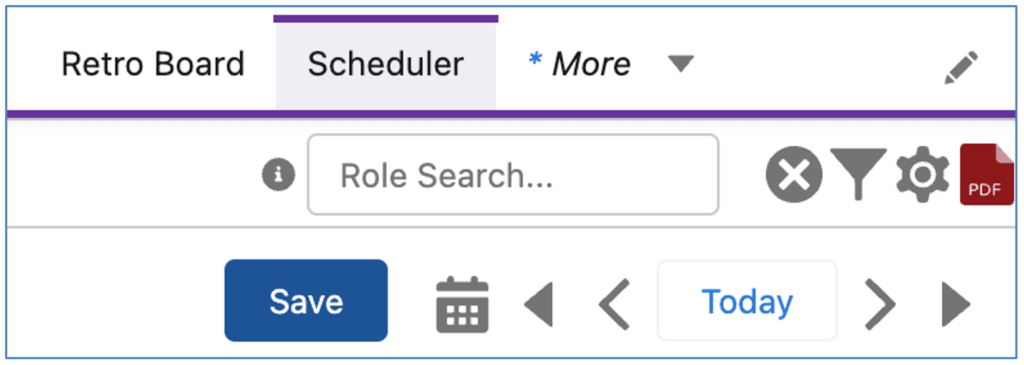
By entering a text string within this search field and hitting enter, the Roles displayed will be filtered based on the Role ‘Name’ including the search string.
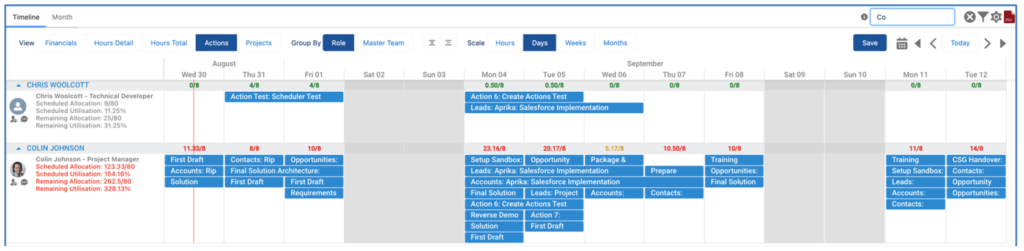
For example, in the image above the User has entered ‘Co’ in the search field and the results have been filtered to show the Roles for Chris Wolcott and Colin Johnson.
Scheduler Filters
The Scheduler Filters are accessible by clicking the ![]() icon, located in the top-right corner of the Scheduler. Note: These Filters can be saved and persistently remembered, and are controlled at the individual User level.
icon, located in the top-right corner of the Scheduler. Note: These Filters can be saved and persistently remembered, and are controlled at the individual User level.
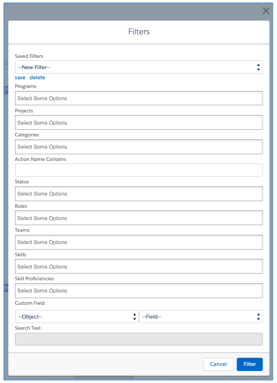
You are able to filter based on a combination of the following records / fields:
To save a Filter selection, click the ‘save’ and enter a ‘Filter Name’ and then click save.
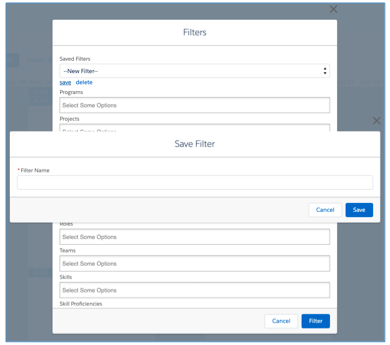
The Filter will then be available for the individual User to access within their ‘Saved Filters’ picklist. When a Saved Filter is applied, it will be persistently remembered each time you visit the Scheduler.
View All Roles / Assigned Roles.
To provide flexibility for customers when using the Scheduler, to choose whether they view all Roles or only Roles assigned as Action Owners or Contributors, there is a ‘Display Roles’ filter within the Scheduler Filters that enables you to choose whether you view:
When viewing the Scheduler via the Project Overview or the Scheduler Anywhere component, this Filter will be set to ‘Assigned Roles’ by default. Therefore, you will only see a list of Roles that are assigned as either an Action Owner or a Contributor.

When viewing the main Scheduler, Users will be able to select whether they view ‘All Roles’ or ‘Assigned Roles’.
PDF Export
You are able to export the Scheduler as a PDF using the ![]() icon located in the top-right corner. When you click the icon, you will be able to specify the File Name, Header Text and Footer Text prior to generating the PDF, as shown below:
icon located in the top-right corner. When you click the icon, you will be able to specify the File Name, Header Text and Footer Text prior to generating the PDF, as shown below:
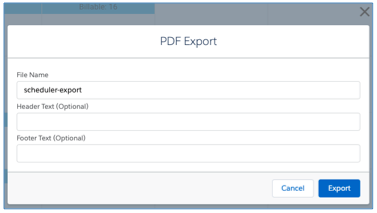
Once you’ve completed these (optional) details, you can click Export and the PDF will be generated.
Date Navigation
There are a number of ways to navigate the period displayed on the Scheduler, as shown below.
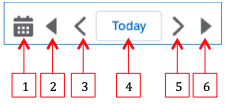
Saving Changes
Any adjustments you make to the Scheduler will not be saved until you click the ‘Save’ button, which is located in the top-right corner of the Scheduler. If there are unsaved changes, a warning icon will be displayed, as shown below.

Timeline Settings
When you have the Timeline Tab selected, you will see the View, Group By and Scale settings as outlined below.

Each of these features are explained earlier in this document.
Editing Actions
Rescheduling
From the Actions View of the Scheduler, you’re able to drag and drop Actions to reschedule to a different point in time, and / or to adjust the number of days.
The example below illustrates how an Action is rescheduled from Monday and Tuesday to Thursday and Friday.

The example below illustrates how an Action’s End Date has been extended from Tuesday to Thursday.

Editing
By double-clicking on an Action within the Scheduler, you will open the ‘Action Summary’ component, which will give you access to:
The example below illustrates the Action component with all of the various tabs.
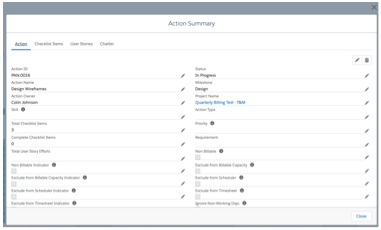
Edit Holidays
To edit an existing Holiday directly from the Scheduler, Users are able to double-click the cell containing the Holiday.
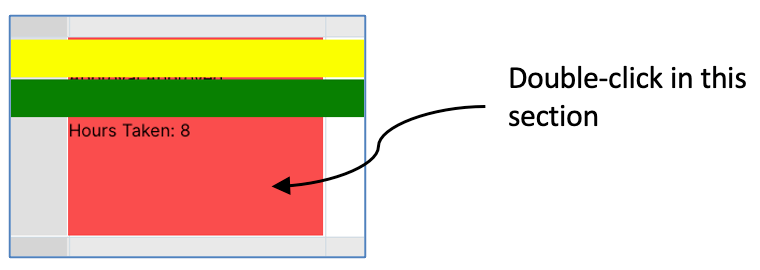
The Holiday Edit Modal will open, allowing the User to make changes directly to the Holiday record without needing to leave the Scheduler.

Note: If you double-click in a cell that doesn’t contain a Holiday, the New Action / Holiday Modal will open.
Adding Actions or Holidays
You are able to create a new Action or a new Holiday record directly from the Scheduler. Drag your mouse across the day(s) and when you release your mouse, the following modal will load.
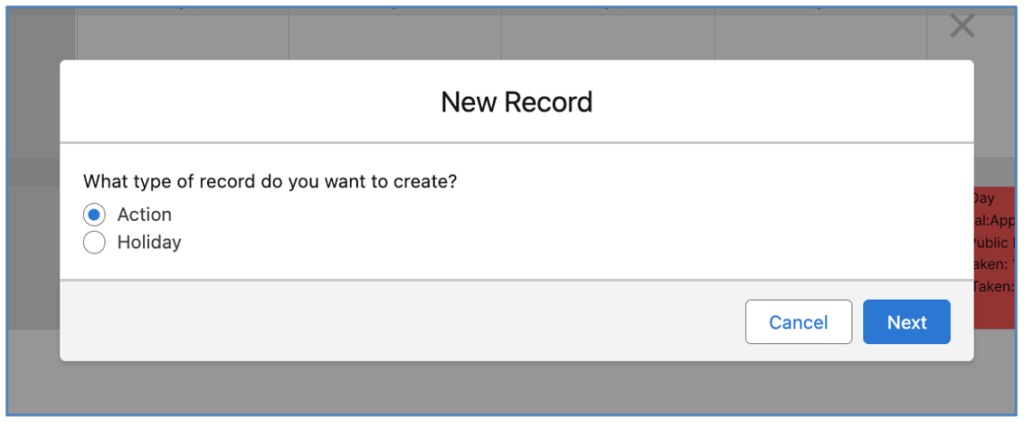
To create an Action, select the applicable option and click the Next button. The following screen will appear, enabling you to create the Action.
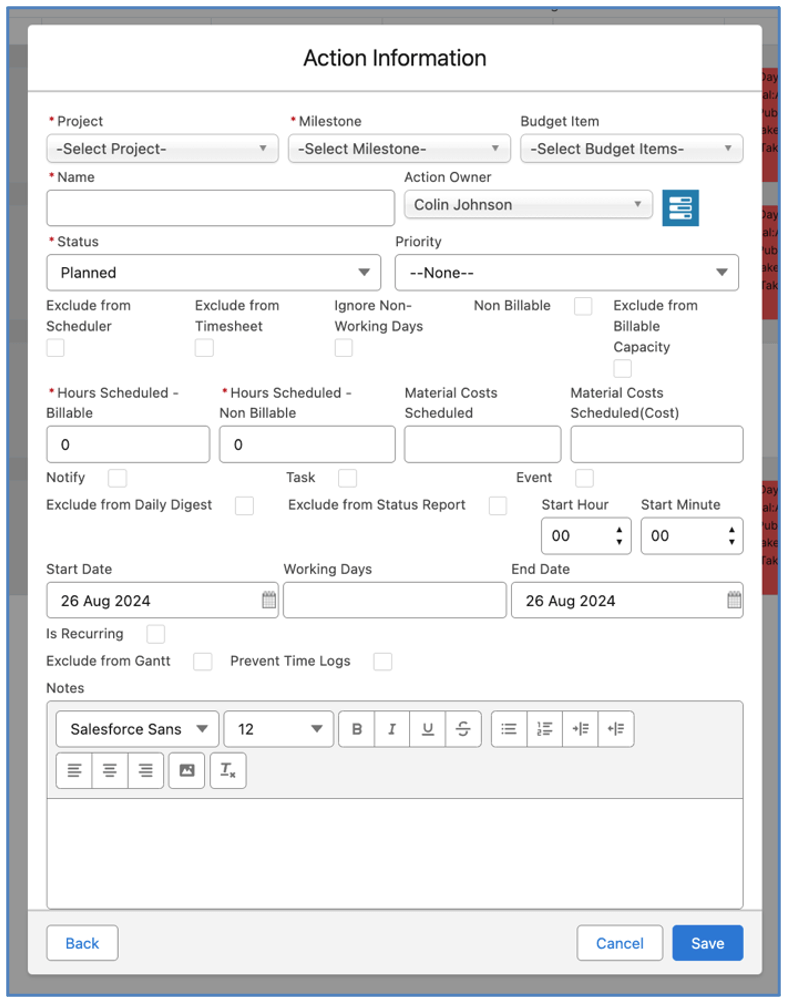
To create a Holiday, select the applicable option and click the Next button. The following screen will appear, enabling you to create the Holiday.
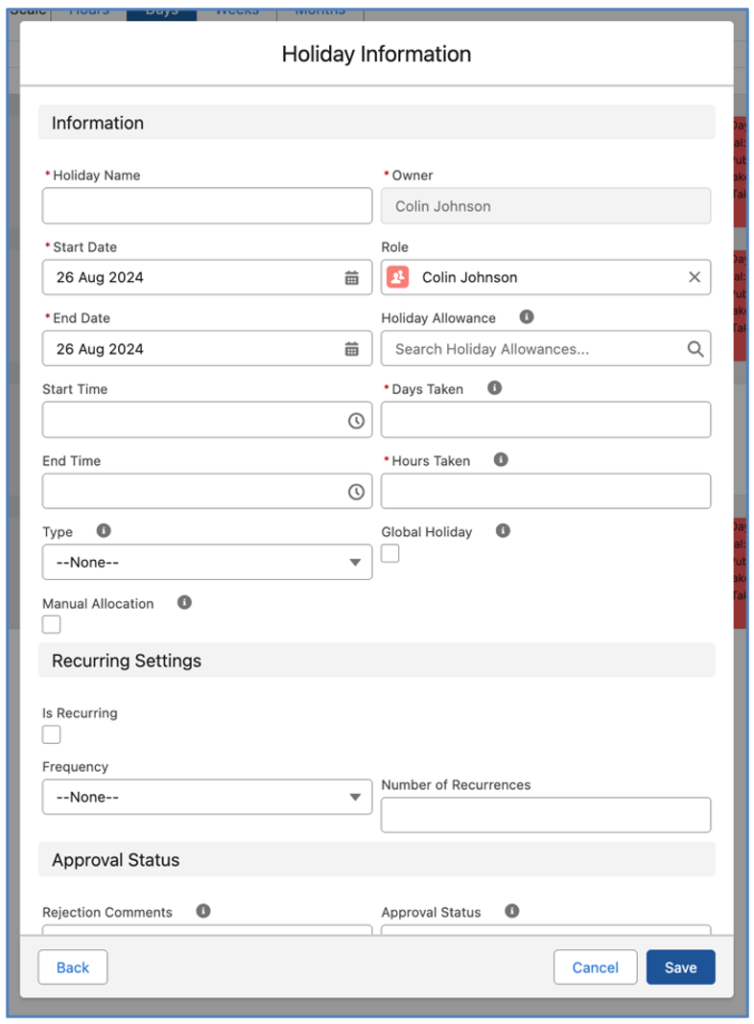
The new records will automatically appear on the Scheduler.
Reassigning Actions
You can drag an Action from one Role to another if you need to reassign ownership. You can do this for the Action Owner, or for a Contributor.
Role Access
When on the Timeline Tab, you will have a row for each Role. Within each row, you’re able to access the Role Profile and Role Chatter components.
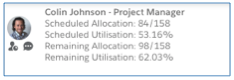
Utilisation Figures
The Timeline view of the Scheduler also provides you with visibility into the hours allocation and utilisation of each Role.
Role Profile
You’re able to click the ![]() icon to open the ‘Role Profile’ component, that will give you access to the Teams and Skills this Role is associated with. Within either of the Teams or Skills tabs, you can view / edit / add to their profile.
icon to open the ‘Role Profile’ component, that will give you access to the Teams and Skills this Role is associated with. Within either of the Teams or Skills tabs, you can view / edit / add to their profile.
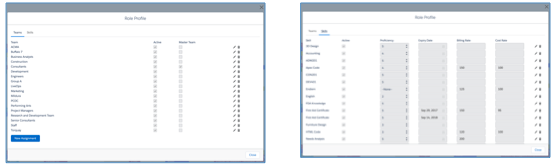
Role Chatter
You’re able to click the ![]() icon to open the ‘Role Chatter’ component, that will enable you to post to the Chatter Feed for that individual Role.
icon to open the ‘Role Chatter’ component, that will enable you to post to the Chatter Feed for that individual Role.
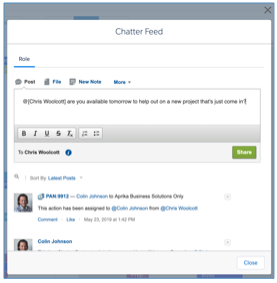
Action Tab Hover Content
The Hover Box that appears when you hover over a bar on the Scheduler when on the Action View Tab displays the following information by default.
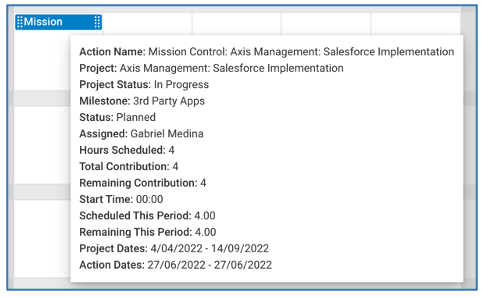
You are able to replace these default values by adding fields into the ‘Scheduler Hover’ Field Set, which is available on the Action Object within Salesforce Setup.
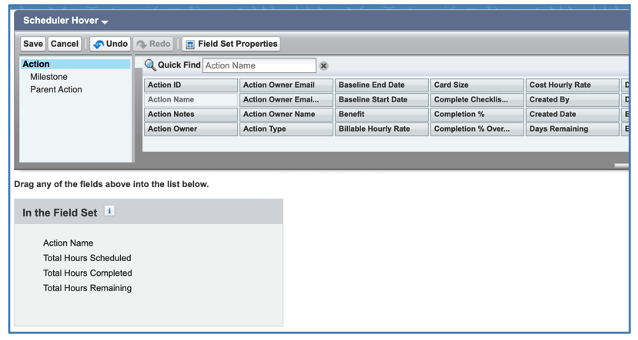
Once you’ve added your required fields to the Field Set, they will be visible in the Hover Box, along with the ‘Scheduled This Period’, ‘Remaining This Period’, Project Dates’ and ‘Action Dates’ information.
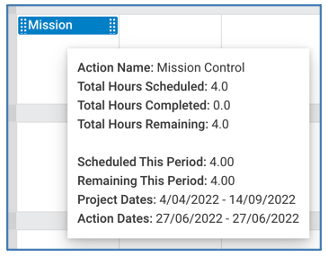
To reset to the default values, you need to remove all fields from the Field Set.
Holiday Information Setting
By default, the Name of the Holiday will be visible on the Scheduler, along with the Approval Status, Type, Days Taken and Hours Taken.
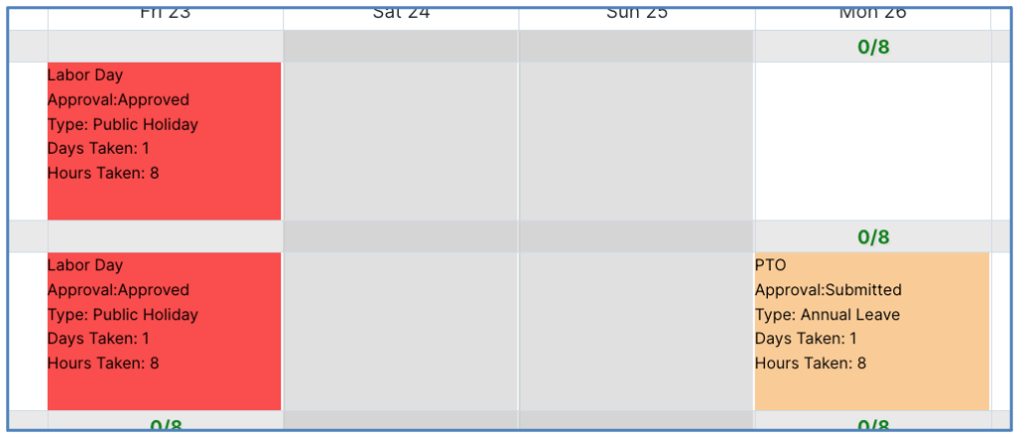
For Customers that may not wish to display the detail of Holidays on the Scheduler, there are settings available within the Scheduler Settings Tile on the Control Pad of the Mission Control Console that provide options on what information is displayed for Holiday records on the Scheduler.

Display Holiday Information
This setting allows you to control what information is displayed. The options are:
Each of these settings will change the information that is displayed on the Scheduler for a Holiday, as shown below.
Note: These settings do not restrict visibility of Holiday records related to the Role record of the User viewing the Scheduler. They will continue to be able to the default ‘Display Holiday Details’ for their Holiday records.
Display Holiday Details
This is the default setting, which shows the Holiday Name, Approval Status, Type, Days Taken and Hours Taken.
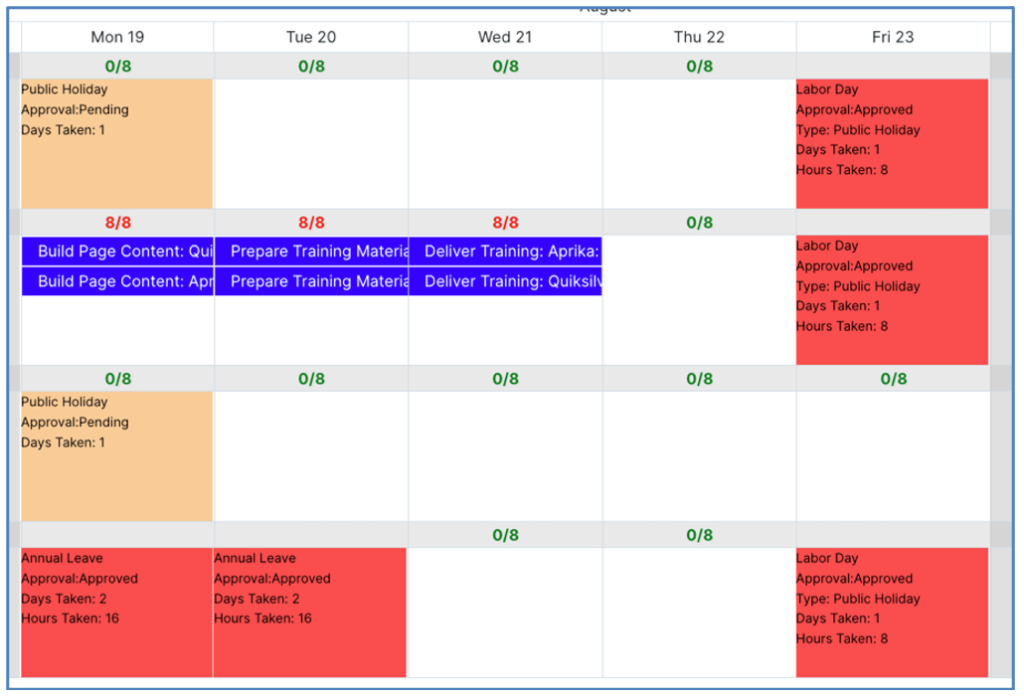
Display Holiday Generic Description
This setting enables you to display a generic statement explaining the Role is unavailable. Note, to select this option, you need to enter a value in the ‘Holiday Generic Description’ setting, as shown below.
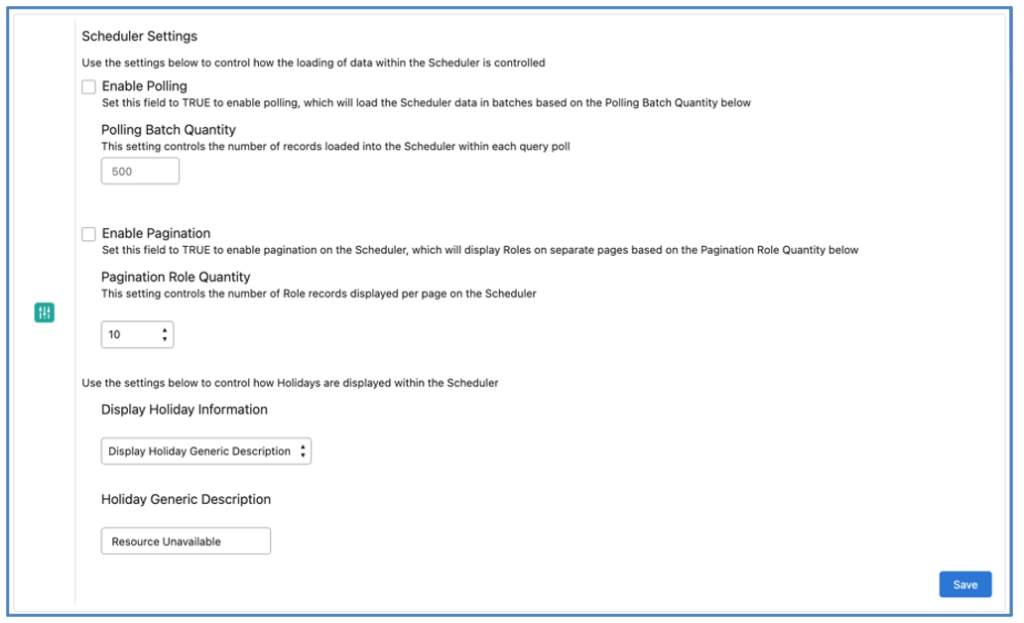
With these settings in place, the Holidays will only display the generic description, as shown below.

Display No Information
This setting removes all information and simply shows the Role as being unavailable, as shown below.
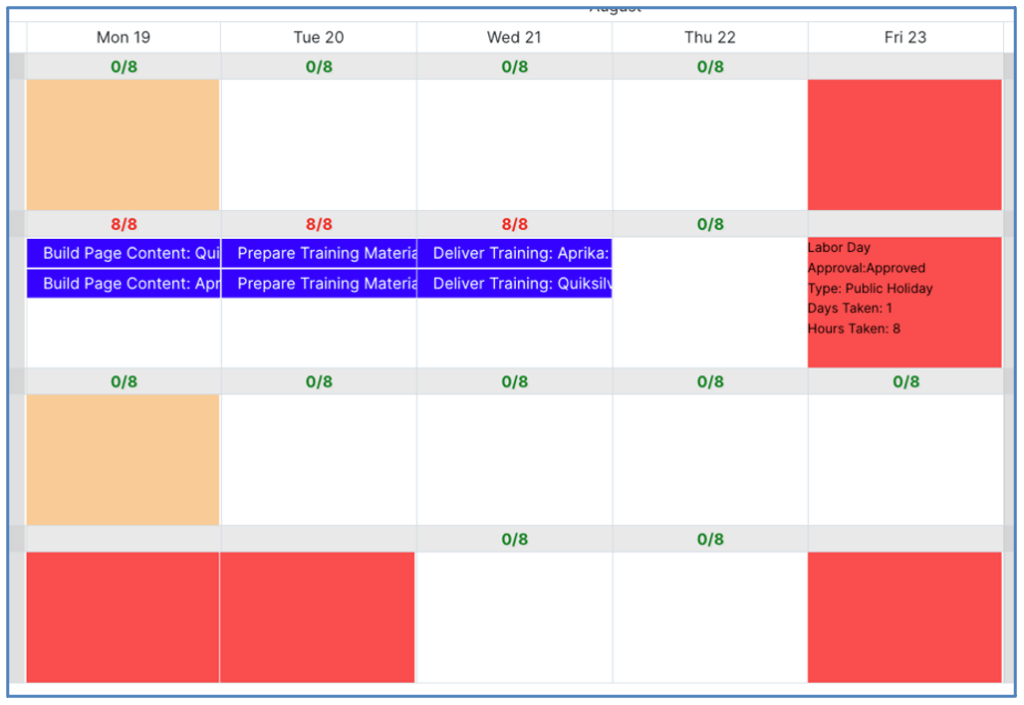
Tab & Modal Access
You can control which Tabs each User has access to on the Scheduler through a collection of fields on their individual Role records. There are Checkbox Fields on the Role record that control whether the person is able to see the following sections of the Scheduler:
Main Tabs
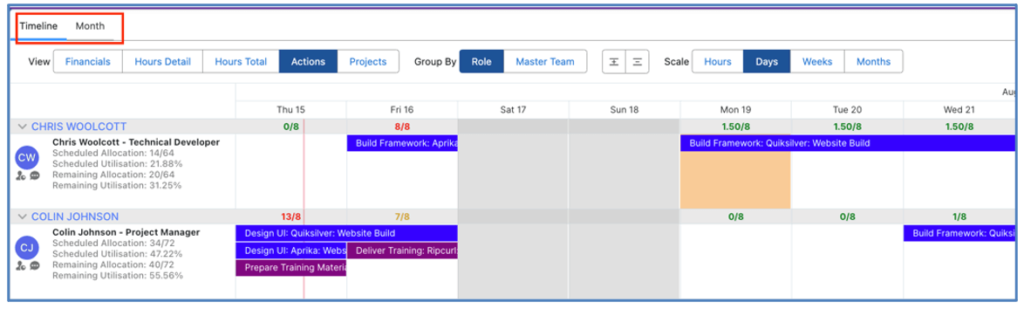
View Buttons
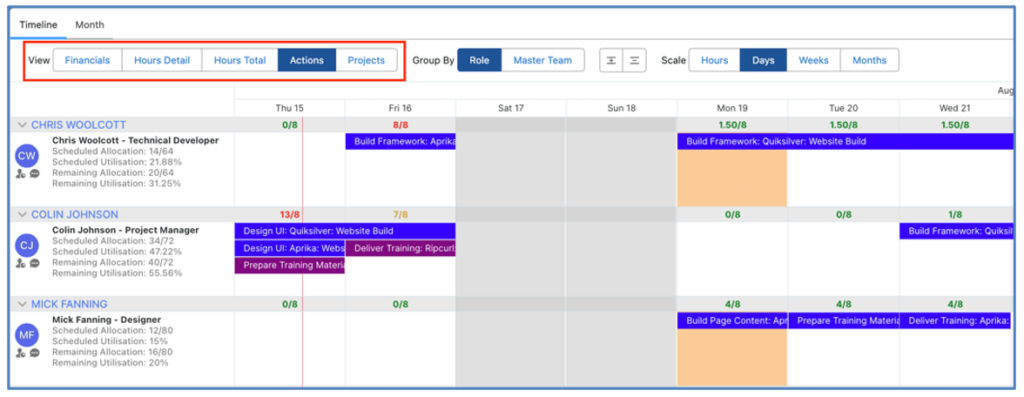
Action Modal Tabs
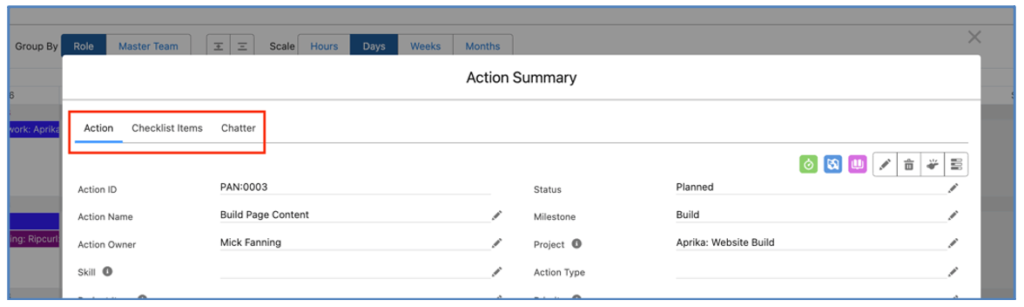
The fields within the ‘Scheduler Settings’ section of the Role record allow you to control which of the above Tabs/Buttons are available to the individual person.

You are also able to set the ‘Default Tab’ within the Action Summary Modal. For example, if the User would prefer the Chatter Tab to load by default, this can be controlled through this field.

These fields can also be updated in bulk via the above ‘Role Permissions – Scheduler’ List View for all Roles.
Project Tab Hover Content
The Hover Box that appears when you hover over a bar on the Scheduler when on the Project View Tab displays the following information by default.

You are able to replace these default values by adding fields into the ‘Project Scheduler Hover’ Field Set, which is available on the Project Object within Salesforce Setup.
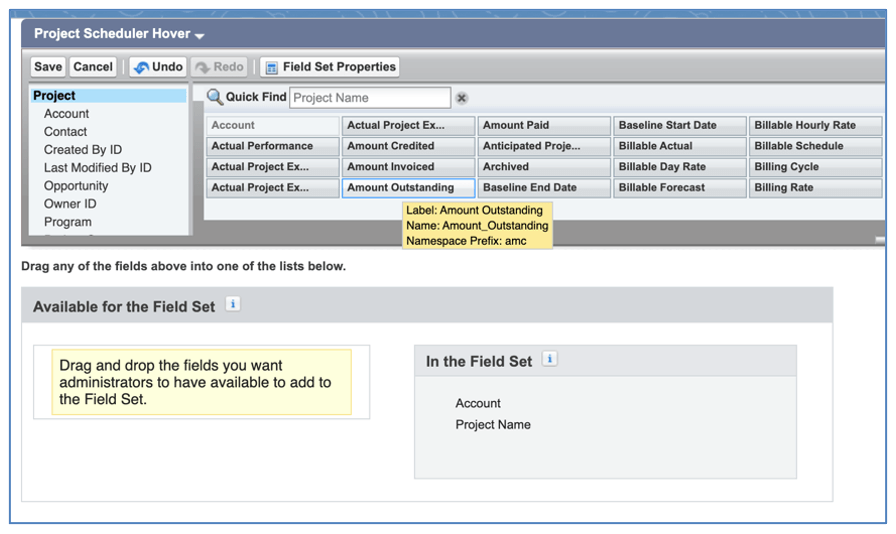
Once you’ve added your required fields to the Field Set, they will be visible in the Hover Box, along with the ‘Scheduled This Period’ and ‘Remaining This Period’ information.
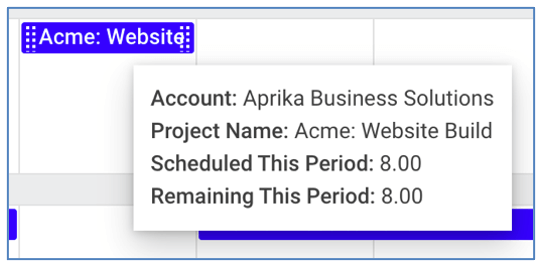
To reset to the default values, you need to remove all fields from the Field Set.
Scheduler Anywhere
The Scheduler component has been enhanced to support being added to the Page Layout of any parent Object that a Project relates to. For example, out of the box the Project Object has Lookup fields to the Account, Contact, Opportunity and Program Objects. Therefore, you will be able to add the ‘Scheduler Anywhere’ Visualforce Component to any of these Objects, and it will display all related Projects. Setting a Component Height of approximately 1000 is recommended. Below is an example of the Scheduler being added to the Account Page Layout.
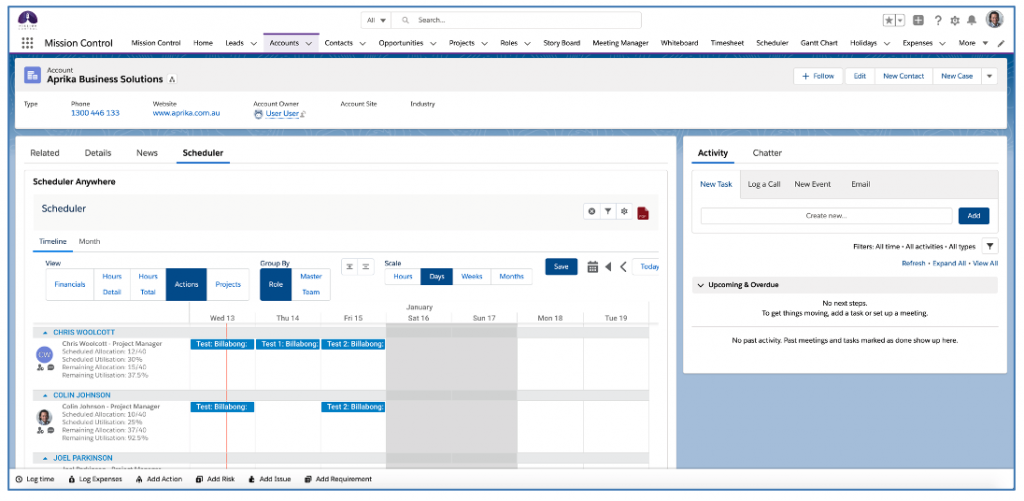
If you have created your own Custom Lookup Fields to other Objects, you will also be able to add the Lightning Component to the Page Layout for those Objects.
Note: This feature is only available in Lightning Experience.
Role Forecasting encompasses a range of features that provide the ability to soft book resources based on potential Opportunities and/or live Projects without knowing the granular detail of all the individual Actions that will be needed.
There are 3 Custom Objects that are core to using the Role Forecasting features, these include:
From either an Opportunity or a Project, a User will be able to access the Role Forecast Component. This page enables Users to create Role Forecast requirements, specifying the hours being booked, as well as distributing those hours via the Role Allocation records throughout the duration of the Role Forecast period.
Role Allocation Summary
Role Allocation Summary records are created automatically for a one month period. Role Allocations are related to the appropriate Role Allocation Summary record, based on a number of criteria, including:
The Role Allocation Summary records are used by the Resource Planner, instead of the individual Role Allocation records. This dramatically reduces the time required to process large volumes of data.
The Role Allocation Summary Object is not designed to have Users manually create or edit records.
Reduce Future Role Allocations To Zero
There are 3 Settings within the ‘Role Allocation Automation Settings’ Tile on the Control Pad of the Mission Control Console called:

These Settings enable you to specify what happens to Role Allocation records when an Action’s Status field is set to ‘Cancelled’, ‘On Hold’ or ‘Complete’.
For example, if an Action is scheduled from 28th October to 8th November for 40 hours, Role Allocation records would be generated for each of the 10 working days for 4 hours per day. On the 5th November, the Status of the Action is set to ‘On Hold’. Any Role Allocation greater or equal to the 6th November would have their Hours Scheduled fields set to 0.
If the Status of an Action is switched back from one of these values, the Role Allocation records will be re-generated.
Following on from the example above, on the 7th November, the Action Status is set back to ‘In Progress’. This will result in Role Allocation records being re-generated for the 7th and 8th November, with the remaining hours split across the two records.
Note: In order to utilise these features, Customers need to ensure the ‘Status’ field on the Action Object is configured as part of the Action Field History Tracking.
Role Forecast Component
The ‘Role Forecast’ component enables you to create Role Forecast and related Role Allocation records. The component is accessible from the Opportunity and Project Objects. It can be added as a component on a Lightning Page Layout or accessed via the ‘Manage Forecast’ button as shown below.
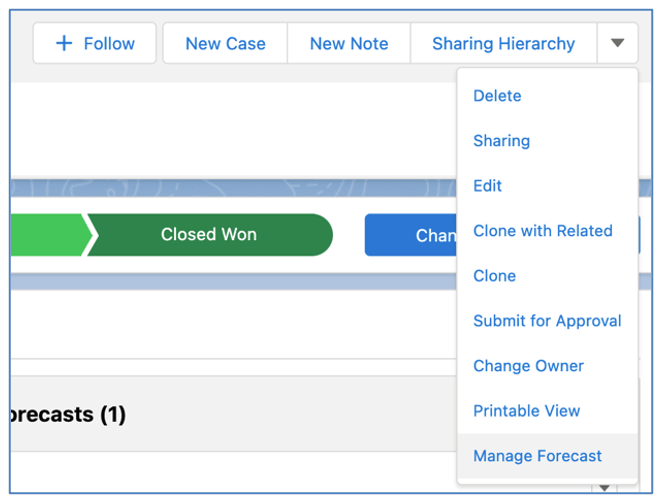
If you have not yet created any Role Forecast records, the Role Forecast component will be as shown below.
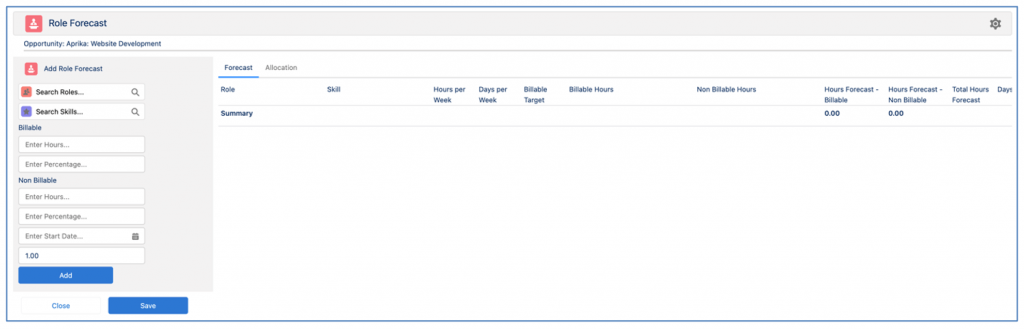
If you have created Role Forecast records, they will be visible in the Forecast Tab, as shown below.
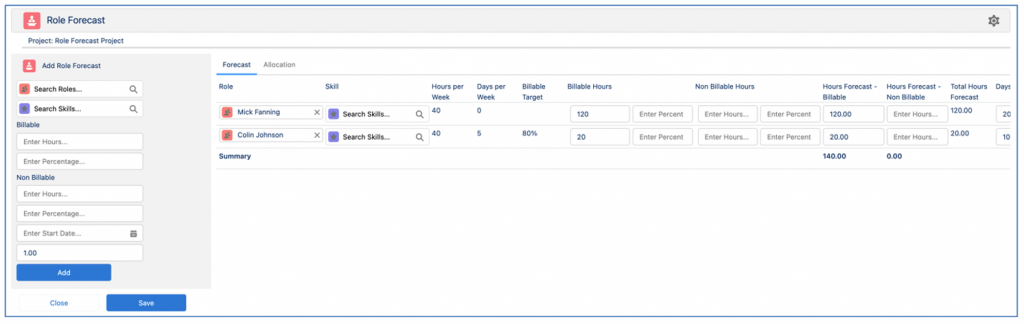
Related Role Allocation records will be visible in the Allocation Tab, as shown below.
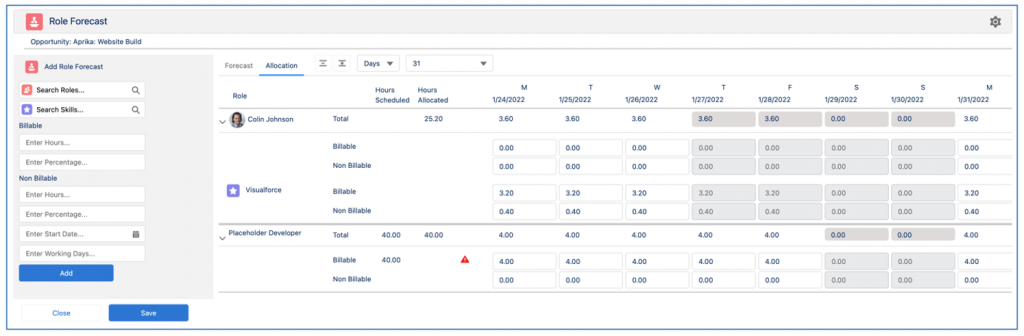
Add Role Forecast
When adding a new Role Forecast, you need to select the Role and optionally select a Skill. Note, if you select a Role, the Skill field will be filtered to show the Skills that are assigned to that Role. If you select a Skill first, the Role field will be filtered show Roles with that Skill.
When entering Billable and Non Billable hours, you can choose to enter a specific number of hours or you can enter a percentage. The percentage will be used to calculate the number that will be added to the ‘Hours Forecast – Billable’ and ‘Hours Forecast – Non Billable’ fields on the Role Forecast record.
For example, if Mick Fanning has an Hours per Week value of 40 and a Billable Target value of 80% he is expected to do 32 hours of billable work and 8 hours of non billable work per week. Therefore, if I create a Role Forecast for Mick for 7 days using the percentage values rather than entering a specific number of hours, I would get the following results.
Percentage | Hours | Explanation of result |
Billable: 50% | 22.40 | Mick is expected to do 32 hours of billable work per week. This Role Forecast is requesting 50% of Mick’s billable time, therefore (32 / 5 * 7) * 50% = 22.40 |
Non Billable: 25% | 2.8 | Mick is expected to do 8 hours of non billable work per week. This Role Forecast is requesting 25% of Mick’s non billable time, therefore (8 / 5 * 7) * 25% = 2.8 |
You will also be required to enter a Start Date and a number of Working Days. For example, if I set the Start Date to be Monday 24th January and Working Days to be 7, the End Date of the Role Forecast will automatically be calculated based on the Working Days, so would be Tuesday 1st February. Holidays will also be taken into consideration when calculating the End Date, so if the Role was on Holiday on Thursday 27th and Friday 28th January, the End Date would be set to Thursday 3rd February.
Below is an example of adding a Role Forecast based on the above scenario.

When the Role Forecast is added, the following fields are automatically populated:
Field | Population Criteria |
Hours Forecast – Billable | Either Billable Hours or calculated using Billable Percentage |
Hours Forecast – Non Billable | Either Non Billable Hours or calculated using Non Billable Percentage |
End Date | Start Date + Working Days (factoring in Holidays & Non Working Days) |
Billable Hourly Rate | Based on Billable Hourly Rate from Skill Assignment or Role, Rate Adjustments will take priority if available |
Cost Hourly Rate | Based on Cost Hourly Rate from Skill Assignment or Role, Rate Adjustments will take priority if available |
The Billable Hourly Rate and Cost Hourly Rate fields can be adjusted if they need to be modified from the source rates for this specific Role Forecast. The following fields will all automatically calculate to provide you with a summary of all Role Forecast records:

Using Rate Card Financials on Opportunities
A Lookup field can be added to the Opportunity Page Layout that enables you to specify a Rate Card to be used when sourcing the Billable Hourly Rate and Cost Hourly Rate for Role Forecasts. When this Rate Card field is populated, any Role Forecast records that are created in relation to the Opportunity will source the appropriate rates from the Rate Card Entries relating to the Rate Card. If a Role Forecast is created for a Role which results in no rates being sourced from the Rate Card Entries, the existing Role rate logic will be used instead.
If Role Forecast records exist prior to a Rate Card being specified on the Opportunity, or if the Rate Card is changed, the financial calculations of the Role Forecasts will be recalculated.
When adding a Role Forecast within the Manage Forecast Component, you can leverage the Resource Assignment Wizard (RAW) to search for a Role based on their Teams / Skills / Skill Proficiencies / Availability.
![]()
If you are unsure of which Role to add, you can click the blue RAW icon to open the Resource Assignment Wizard. Note: before doing so, you need to specify values in the Start Date and Working Days or End Date fields.

Click the Resource Assignment Wizard icon to launch the RAW and search for available Roles.
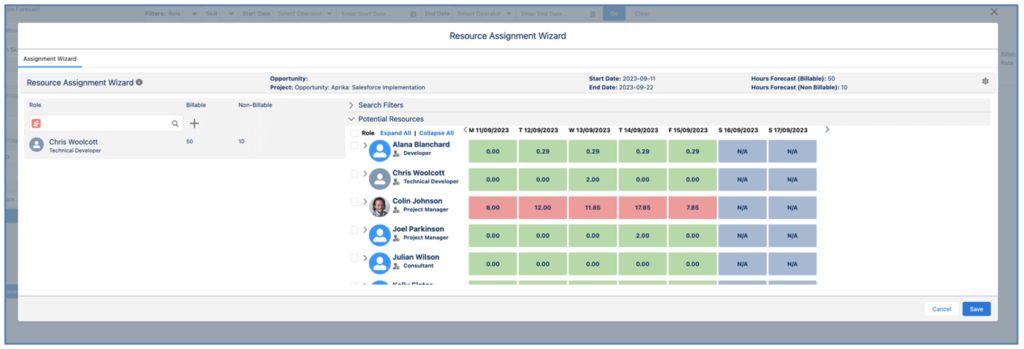
Their name will be populated in the Role field. Once you’ve completed the remaining field values, you can click the ‘Add’ button to create the Role Forecast record.
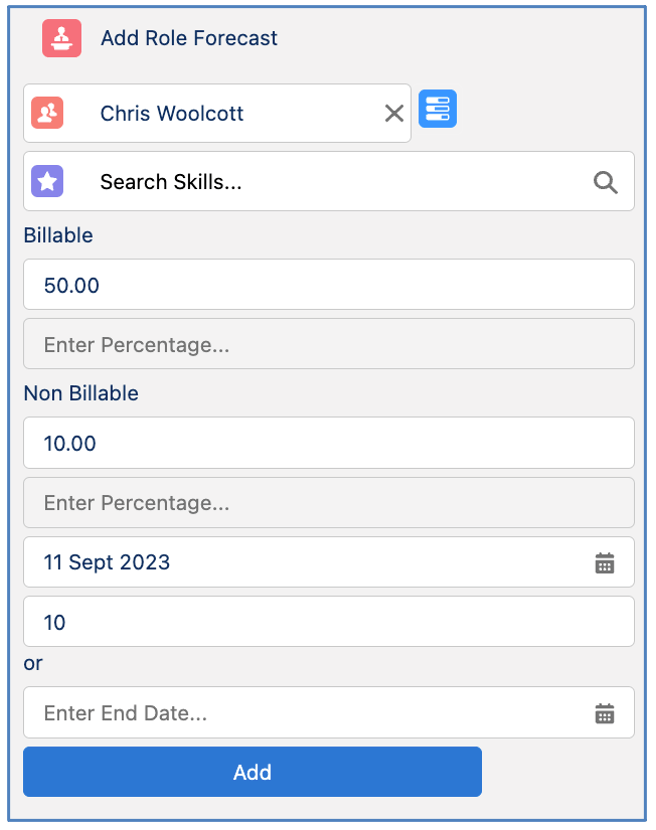
Once the Role Forecast record has been added to the Forecast Tab, the Role Allocation records will be available on the Allocation Tab. By default, the hours from the Role Forecast will be evenly distributed across each of the working days between the Start Date and End Date of the Role Forecast.

You will be able to expand / collapse all of the records by using the + / – buttons. You can also choose to view the Role Allocation records as individual Days or grouped by Weeks.
You can modify the distribution of the hours across the Role Allocation records, for example if you need to front load the effort or back load the effort. Note: when modifying the hours on the Weeks view, the hours will be evenly distributed between each working day within that week.
If you have manually distributed the hours you will see the ![]() icon. This indicates the hours have been manually distributed. If you click on this icon, it will reset the hours to be evenly distributed between the Role Allocation records.
icon. This indicates the hours have been manually distributed. If you click on this icon, it will reset the hours to be evenly distributed between the Role Allocation records.
If the total hours across all Role Allocation records does not equal the value of the hours field on the Role Forecast record, you will see the ![]() icon. This serves as a warning notification so you can review the hours on the Role Allocation records and adjust them accordingly.
icon. This serves as a warning notification so you can review the hours on the Role Allocation records and adjust them accordingly.
Adjust Start Date & End Date
When a Role Allocation record is created or edited with Total Hours Scheduled greater than zero, and it is before the existing Start Date of the Action, Contributor or Role Forecast that it relates to, the Start Date and Working Days fields of the parent record (e.g. Action, Contributor or Role Forecast) will be adjusted to be based on the date from the Role Allocation record.
When a Role Allocation record is created or edited with Total Hours Scheduled greater than zero, and it is after the existing End Date of the Action, Contributor or Role Forecast that it relates to, the End Date and Working Days fields of the parent record (e.g. Action, Contributor or Role Forecast) will be adjusted to be based on the date from the Role Allocation record.
Role Forecast: Specify Working Days or End Date
When adding a new Role Forecast on the ‘Manage Forecast’ Component, you are able to specify the Start Date and Working Days or the Start Date and End Date.
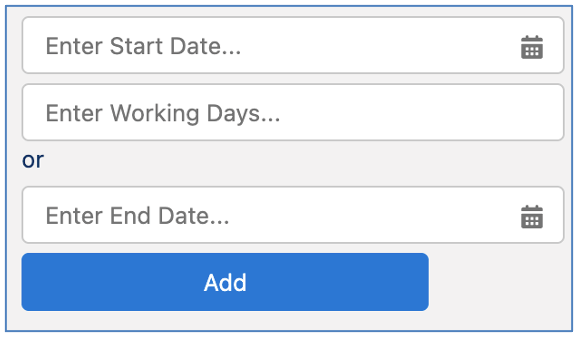
When the User enters the Start Date and Working Days, the End Date of the Role Forecast is automatically calculated when the Role Forecast record is added to the Forecast Tab.
When the User enters the Start Date and End Date, the Working Days field will be automatically calculated when the Role Forecast record is added to the Forecast Tab.
You are unable to add values in both the Working Days and End Date fields of the Add Role section. If you enter a value in Working Days and then enter a value in End Date, the value in Working Days will be automatically cleared.
Role Forecast: Apply Filters
You can apply filters to the Forecast and Allocation Tabs of the ‘Manage Forecast’ Component. These filters are accessible at the top of the Forecast Tab. When applied, they will filter the results of both Tabs.
![]()
These filters enable you to filter the data based on the following options:
To apply filters, make your selection and click the ‘Go’ button. To remove existing filters, click the ‘Clear’ button.
Clear All Values
When distributing hours on the ‘Manage Forecast’ or ‘Manage Distribution’ Component, you can use the ![]() icon to clear all existing Role Allocation field entries.
icon to clear all existing Role Allocation field entries.
![]()
When you click this icon, it will reset all fields to 0 if they are currently greater than 0. This enables Users to restart the manual distribution and gradually build up the allocation as they enter values into the individual Role Allocation fields.
Component Settings
The Settings icon on the Role Forecast component provides access to the following settings:
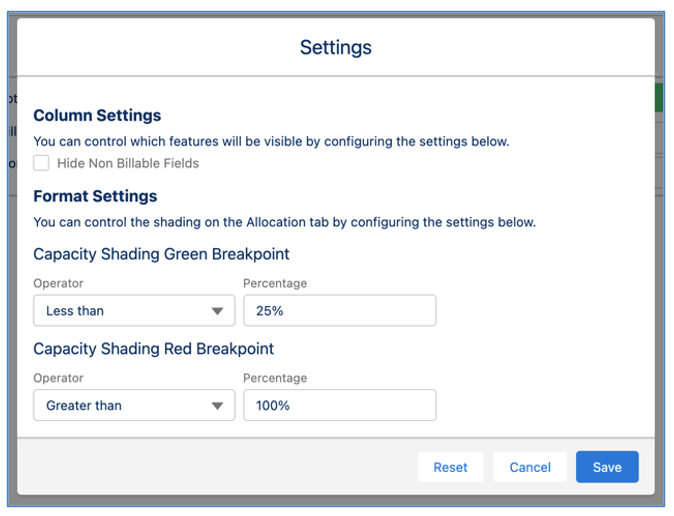
You are able to:
These settings are controlled by individual Users.
Add Custom Fields on Role Forecast Component
Customers can add Custom Fields to the Role Forecast Object and add them to the ‘Manage Forecast Custom Fields’ Field Set, in order for them to display on the Manage Forecast Component.
You are able to convert Role Forecast records relating to a Project into Actions, so they can be considered a firm allocation of resources and people can log time against those Actions.
To convert Role Forecasts to Actions, you need to set the ‘Convert Role Forecasts to Actions’ field on the Project to TRUE. This will convert each individual Role Forecast into an Action. It will also clone the Role Allocations related to the Role Forecast. Therefore, if any manual adjustment has been made to the Role Allocations, this will be carried over to the Role Allocations related to the Actions.
As Actions need to be related to a parent Milestone, this conversion process also creates a Milestone. The name of the Milestone will be ‘Role Forecasts’ by default. However, you can define your own default Milestone Name using the ‘Role Forecast Conversion’ setting within the ‘Role Allocation Automation Settings’ Tile on the Control Pad of the Mission Control Console.

Once a Role Forecast is converted, the ‘Converted to an Action’ field will be set to TRUE. This will ensure the same Role Forecast will not be converted again if the User carries out the conversion process a subsequent time.
When an Action is converted from a Role Forecast record, the ‘Converted from Role Forecast’ field on the Action is populated, allowing you to identify which Role Forecast it was converted from.
The table below outlines which fields are populated on the Action when a Role Forecast is converted.
Role Forecast Field | Action Field |
Role Name – Skill Name e.g. Colin Johnson Colin Johnson – Training | Action Name |
Role | Action Owner |
Skill | Skill |
Start Date | Start Date |
End Date | End Date |
Hours Forecast – Billable | Hours Scheduled – Billable |
Hours Forecast – Non Billable | Hours Scheduled – Non Billable |
Manual Allocation | Manual Allocation |
If any Role Forecast records are unable to be converted to Actions, the User that invoked the conversion process will receive an email notification. This email will contain a list of the Role Forecast records that were unable to be converted. The most likely reason the conversion process would fail is due to mandatory fields or validation rules a customer has configured within their own Org.
The ‘Resource Planner’ component will be accessible from the Management Pad of the Mission Control Console and directly from a Tab in the navigation menu. It will provide a summary of the hours booked against each Role across:
This will provide insight into the full capacity of all resources within the business. The Resource Planner includes 2 Tabs:
Access to each of these Tabs can be controlled directly on the Role record for each individual User. You are also able to specify the default tab, as shown below.

Overview Tab
When using the Resource Planner, the Overview Tab will load by default. It comprises of 3 main sections:
Below is an example of the Overview Tab.

Data Settings
This section lets you specify what data will be displayed on the Overview Tab, covering:

The Display setting provides you with the option of choosing whether you view Role Allocation records related to Forecasts, Actions or both. This Display setting will be persistently remembered between visits to the Resource Planner. The options are:
The Start Date will default to today and the End Date will default to Today +3 months.
The Group By buttons provide you with the ability to toggle the view of the data within the Capacity Table. Role will display each Role alphabetically. Master Team will group the Roles by Master Team. This toggle option will be persistently remembered between visits to the Resource Planner.
Capacity Overview Chart
The Capacity Overview Chart provides a stacked capacity from all Role Allocations included in the date / filter range and will split it between:
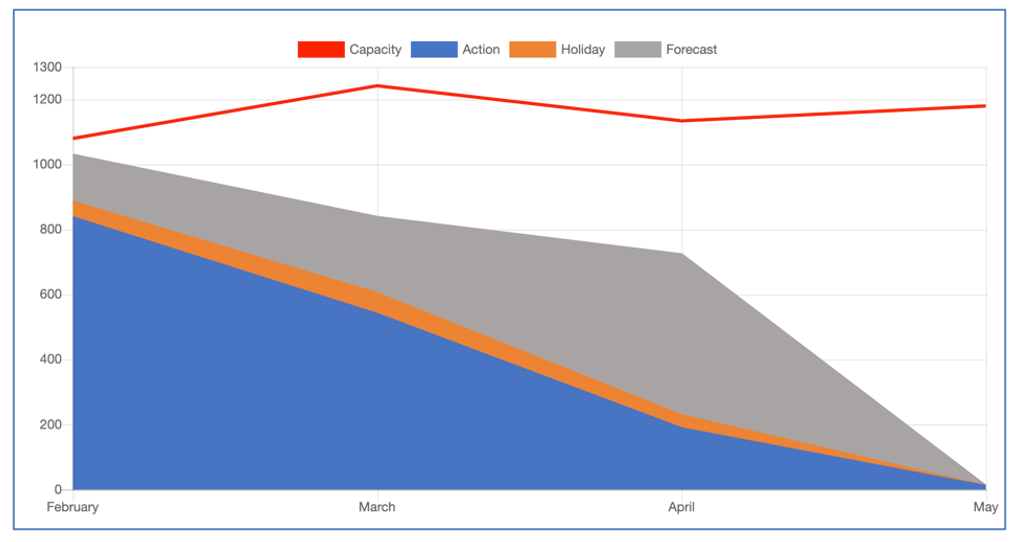
The red line represents the overall capacity of the team for each period. Combining the capacity and the total Role Allocations, you can view a high-level summary of where you may have too few or too many resources to match the expected workload.
Capacity Table
The Capacity Table provides insight into the capacity of each individual Role. The table can display each individual Role sorted alphabetically or grouped into Master Team. This is controlled by toggling the Role and Master Team buttons within the Data Settings section.
The information displayed within the Capacity Table is as follows:
When using the Master Team Group By option, the Capacity Table will show the Team Names, and you’re able to expand / collapse the Role information within each Master Team for individual Role figures.
Planner Tab
The Planner Tab of the Resource Planner comprises of 2 main sections:
Below is an example of the Planner Tab.
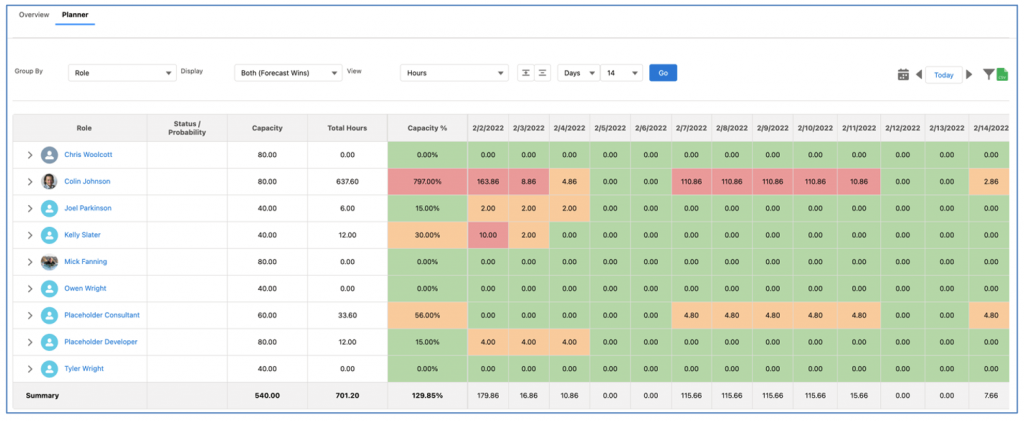
Data Settings
This section lets you specify what data will be displayed on the Planner Tab, covering:
![]()
Group By
The Group By setting enables you to choose how you group the data within the Capacity Table. The options include:
Project/Opportunity
When grouping by Project/Opportunity, you will see a high-level summary of capacity by Project / Opportunity sorted alphabetically. You can expand / collapse into the detail by clicking on the + / – buttons in the Data Settings section. This will show a breakdown of the hours for the Project/Opportunity by each Role.
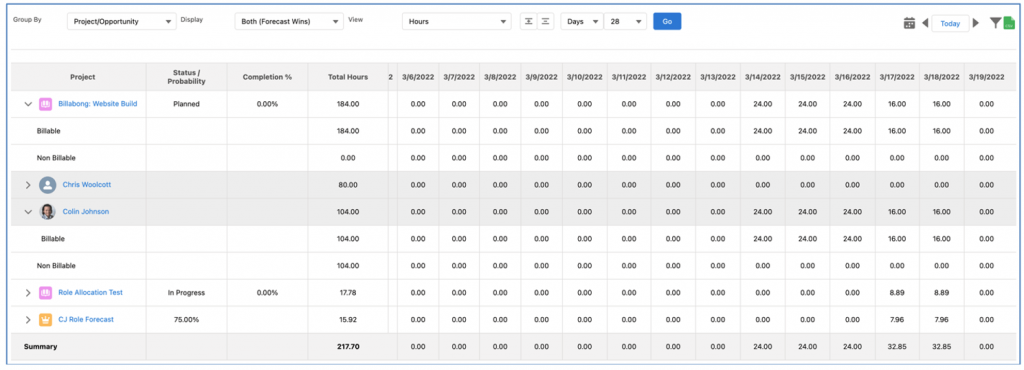
Role
When grouping by Role, you will see a high-level summary of capacity by Role sorted alphabetically. You can expand / collapse into the detail within each Role by clicking on the + / – buttons in the Data Settings section. This will show a breakdown of hours for the Role by each Project/Opportunity.

Master Team > Role
This Group By option will display all Roles within their Master Teams. Master Teams will be sorted alphabetically in ascending order. The image below shows an example of this Group By option.

Note: Any Role that does not have a Master Team assigned will be grouped into a Team called ‘None’.
Function > Role
This Group By option will display all Roles within their Function. Functions will be sorted alphabetically in ascending order. The image below shows an example of this Group By option.

Note: Any Role that does not have a Function assigned will be grouped into a Team called ‘None’.
Display
The Display setting provides you with the option of choosing whether you view Role Allocation records related to Forecasts, Actions or both. This Display setting will be persistently remembered between visits to the Resource Planner. The options are:
Role Allocation records relating to Holiday records will always be included.
View (Source)
The View (Source) setting enables you to choose what data is summarised within the Capacity Table, the options include:
These values will only be accessible if the User has Field Level Security access to the underlying fields.
View (Timeline)
The View (Timeline) setting enables you to choose the date timeline within the Capacity Table, the options include:
You are also able to specify how many columns are display (e.g. you may choose to view 14 days, 8 weeks, etc.).
Date Navigation
The various date navigation buttons enable you to select and move between date ranges. The options include:
CSV Export
The CSV Export icon enables you to export the contents of the Capacity Table as a CSV file. It will be exported with a file name of MC_Resource_Planner_YYYY_MM_DD.csv.
Filters
The Resource Planner provides the ability to apply a combination of filters as required. These filters can also be saved and persistently applied. Preset Filters are created and accessed by individual Users and cannot be shared with other Users.
To access the Filter modal, you need to click the Filter icon which is accessible from the Data Settings section of either the Overview or Planner Tabs.
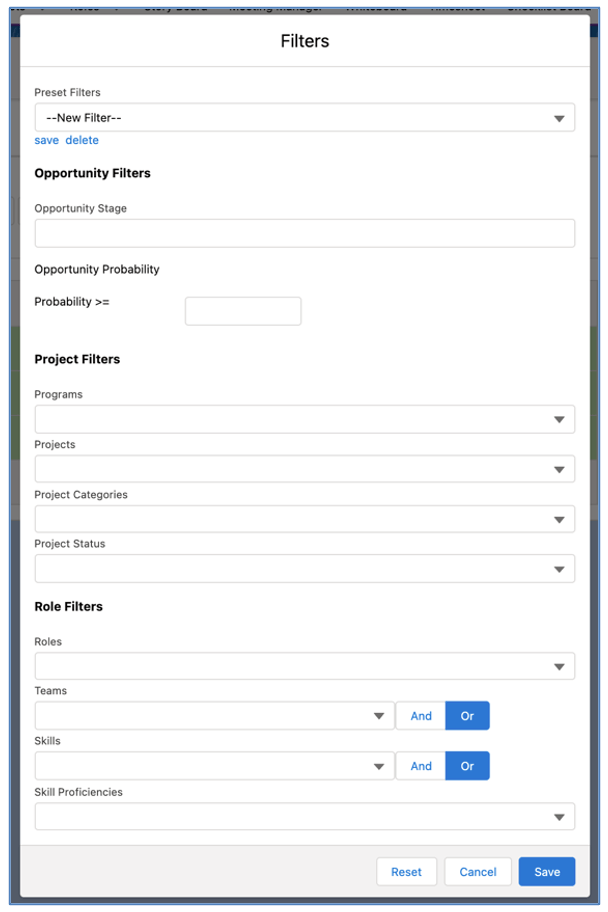
The filters allow you to determine which Role Allocations are included within the dataset, as well as filtering the Roles. The filter options for controlling Role Allocations include the ability to apply filters based on Opportunities and Projects.
Opportunity Filters
You can choose to filter Opportunities based on the Opportunity Stage value(s) and/or the Probability % being greater or equal to a particular percentage value.
Project Filters
You can choose to filter Projects based on the following options:
The Opportunity and Project filters will be used to determine the Role Allocations that will be displayed.
Role Filters
You can choose to filter the results to only show particular Roles, the options include:
Filter: Exclude Roles with Capacity Allocation >=
The ‘Exclude Roles with Capacity Allocation >=’ Filter allows you to filter out Roles that have already been assigned enough work to exceed a specified percentage of their capacity.

In the example above, any Role that has already been assigned work for 100% of their availability for all periods within the date range, will be excluded from the Planner Table.
This Filter will allow Resource Managers to filter out any Role that already has sufficient work and be able to focus in on those Roles that still have capacity to take on additional assignments.
When using this Filter, a toggle button will be displayed on the Planner. This will allow you to toggle between those Roles that are ‘Included’ or ‘Excluded’ based on the Filter.

In the example above, the Roles that are ‘Included’ are being viewed.

In the example above, the Roles that are ‘Excluded’ are being viewed.
Filter: Do not exclude Placeholder Roles from Capacity
The ‘Do not exclude Placeholder Roles from Capacity’ Filter provides Users with the flexibility of optionally including Placeholder availability within the Capacity figures for a particular filter.

With this Filter set to TRUE, Placeholder Roles will be included in capacity calculations even if the ‘Exclude Capacity Figures for Placeholder Roles’ Setting is enabled.
Resource Planner Settings
The Settings icon on the Role Forecast component provides access to the following settings:

You are able to:
Decimal Display Setting
A new setting has been added to the Resource Planner Settings Modal allowing users to specify whether they wish to view whole numbers or numbers with 2 decimals.
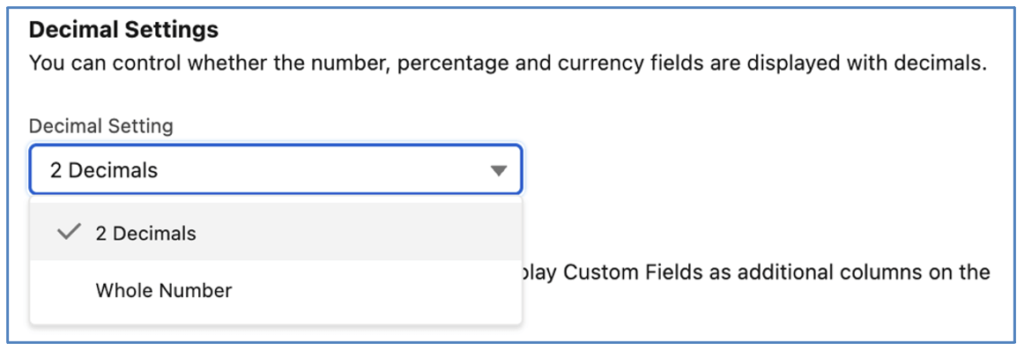
Column Display Settings
Settings have been added to the Resource Planner Settings Modal allowing users to display/hide standard fields as well as specifying up to 3 additional fields.
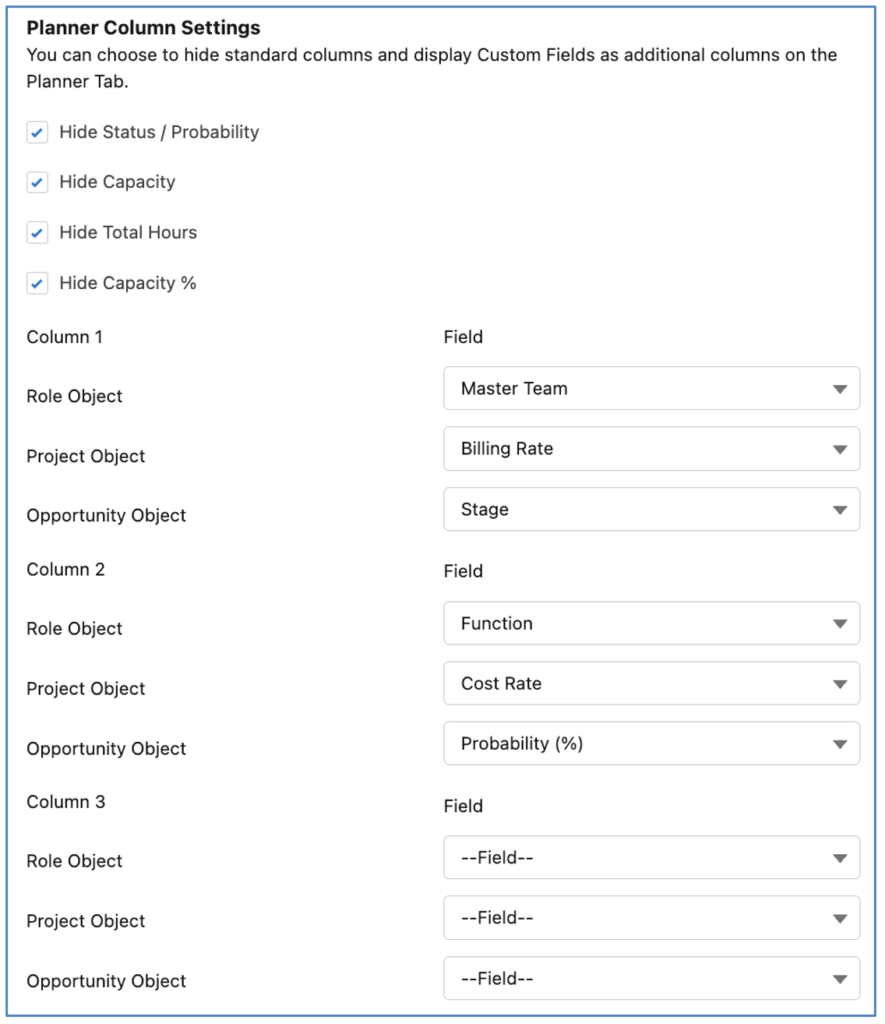
Custom Fields can be added for the Role / Project / Opportunity records displayed on the Planner section of the Resource Planner.
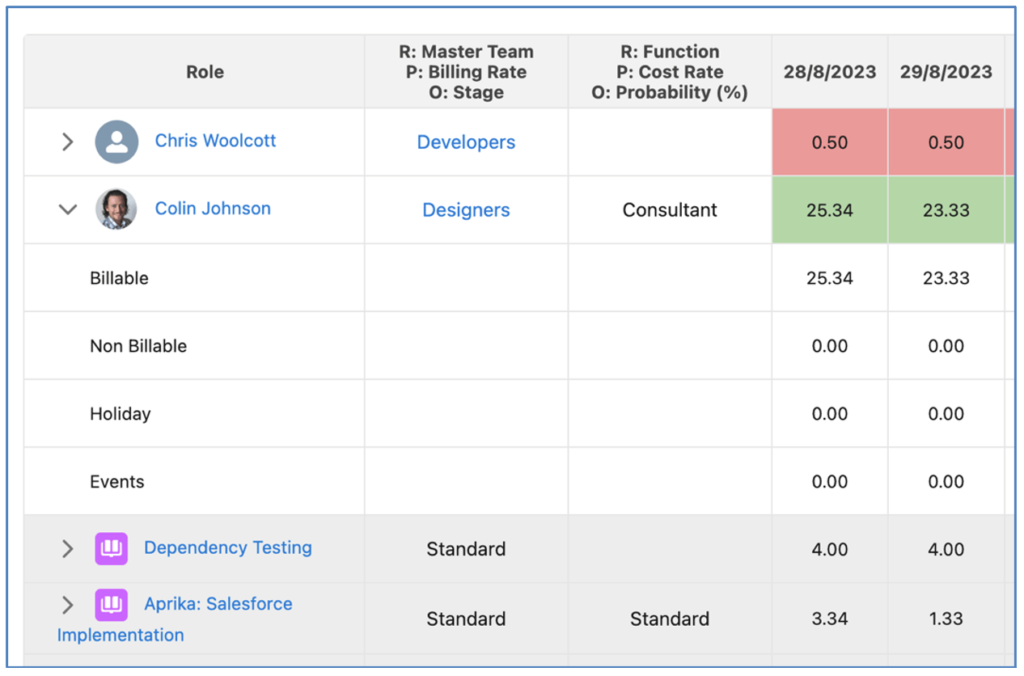
The fields specified for each Object are displayed in the same column. The Labels include R: or P: or O: identify whether it’s the Role, Project or Opportunity. In the example above, in the first Custom Field column, the ‘Master Team’ field is being displayed for the Role, the ‘Billing Rate’ is being displayed for the Project and the ‘Stage’ is being displayed for the Opportunity.
Setting: Exclude Capacity Figures for Placeholder Roles
The ‘Exclude Capacity Figures for Placeholder Roles’ Setting enables the use of Placeholders to assign upcoming resource demand, without having the Placeholder Role’s ‘Hours per Week’ factored into the available capacity of the team.

A Role is identified as a Placeholder by setting the ‘Placeholder’ field to TRUE, as shown in the image below.

If this Setting is FALSE, the Placeholder’s ‘Hours per Week’ will be factored into the capacity calculations on the Resource Planner.
Setting: Period Cell Value Display
The ‘Period Cell Value Display’ Setting enables Customers to control the information displayed in each cell relating to a particular period. The options available include:
Value
When set to ‘Value’, the hours will be displayed, as shown below.

This is the sum of hours assigned to the Role for that particular period.
Value & Percentage
When set to ‘Value & Percentage’, the hours will be displayed, along with the percentage of the Role’s availability that these hours are consuming, as shown below.

This is the sum of hours assigned to the Role for that particular period, and the percentage calculates based on the sum of hours / sum of availability. For example, if Kelly Slater works 40 hours per week and has 24 hours assigned for the period, the percentage would be 60%.
Percentage
When set to ‘Percentage’, it will display the percentage value derived by calculating how much of the Role’s availability is being consumed by the hours they’ve been assigned, as shown below.

This is the percentage of their availability already assigned, which is calculated based on the sum of hours / sum of availability. For example, if Kelly Slater works 40 hours per week and has 24 hours assigned for the period, the percentage would be 60%.
These settings are controlled by individual Users.
Role Assignment Manager Tab
The Role Assignment Manager feature is a component available within the Resource Planner in Mission Control. It provides Resource Managers with the ability to view all Role Allocations assigned to Roles across a selection of Projects, for a period of time.
The Role Assignment Manager is a key tool for managing resource assignment across Projects. It assists Resource Managers in being able to carry out a number of processes, including:

How to access the Role Assignment Manager
The Role Assignment Manager is accessed via one of the Tabs on the Resource Planner. You can control who has access to the Assignment Manager Tab by setting the ‘View RP Assignment Manager Tab’ field on the individual User’s Role record.

If this field is set to TRUE, the User will be able to access the Tab from the Resource Planner.

If this field is set to FALSE, the User will not be able to access the Tab from the Resource Planner.

Note: If you want the Assignment Manager Tab to load by default when you visit the Resource Planner, you can set ‘Resource Planner Default Tab’ to be Assignment Manager on your Role record.
Data Settings & Filters
When loading the Assignment Manager Tab, the ‘Settings & Filters’ section will be displayed. This enables you to specify the Settings related to the date range and display format applied to the Assignment Manager. The Filters section enables you to select which Roles and Projects you wish to view.
Settings
The Settings section enables you to specify the date range to apply to the reporting period being viewed, along with the format of how the Roles will be grouped.

Filters
The Filters section enables you to apply filters to the Roles and Projects being viewed within the Assignment Manager.

Roles can be filtered by Master Team or Team. If the Master Team toggle is being used, you can select multiple Teams – however, the AND/OR toggle will be restricted to OR. If the Team toggle is being used, you can select multiple Teams, and specify whether the Roles should be members of all Teams (e.g. Set Toggle to AND) or can be a member of any of the teams (e.g. Set Toggle to OR).
Projects can be selected in one of two ways – List or Filter. The List option displays all Projects in a list view, excluding any that have Template = TRUE or Archive = TRUE.

Alternatively, the Filter option provides the ability to specify a set of filter parameters based on Project Fields.

Filters can also be saved and used as pre-set filters, which can be persistently applied when using the Assignment Manager.
Once your Filters have been specified, click the ‘Filter’ button to load the results into the Assignment Manager section.
Assignment Manager
The Assignment Manager section of the Component displays a row for each Role and a selection of columns for each Project.

For each Role, a minimum of 2 rows of data will be visible, as shown below.

The top row displays Role Forecast information, the bottom row displays Action information. This provides Resource Managers the ability to carry out a ‘double resource’ process.
Double-resourcing is where a Role has been allocated to a Project through Role Forecast records, and then assigned hours across Actions & Checklist Items. For example, Kelly Slater is a Project Manager working on the Rip Curl: Mission Control Implementation Project. He requires a Developer on the Project, and submits a Resource Request for 100 hours. The Resource Manager determines that Mick Fanning is the most suitable Role for this and creates a Role Forecast record for Mick against the Project. Kelly then assigns Mick to a variety of Actions on the Project plan. The sum of the hours assigned to Mick across these Actions currently totals 48. When the Resource Manager is viewing this information on the Assignment Manager, they can see Mick is allocated to the Project for 100 hours (Role Forecast) but has only been assigned 48 hours (Actions). This ‘double resourcing’ insight enables the Resource Manager to identify that Mick may be available to transfer the other 52 hours to another Project, or can reach out to Kelly to ensure Mick is still in fact required for the full 100 hours.
Where Role Forecasts relate to a specific Skill, the Role will have additional rows displayed. As shown below, Charles Lewis has been allocated to the Project for a total of 50 hours.
This is made up from the following Role Forecast records:
For each Role, there are a number of ‘Summary’ columns, which provide key information relating to all of the Project specific columns. These Summary columns include:
For each Project, the following columns will be displayed:
Creating Role Forecast Records
To create a Role Forecast record from the Assignment Manager, you need to enter a value in the Hours or Percentage field (either Billable or Non Billable) and double-click within the cell. This will open up the ‘Role Forecast Information’ Modal.

Within this Modal, you can complete the remaining fields to create the Role Forecast record, including:
Once you have completed the required information, click Save to return to the main Component.
You will need to click the main ‘Save’ button to commit all new records.

Note: The yellow warning icon will display if there are unsaved changes.
Editing Role Forecast Records
The Assignment Manager enables you to edit existing Role Forecast records. To do so, you can simply adjust the figure in the required cell to modify the number/percentage. If you need to modify other fields, such as Skill, Start Date, End Date, Billable Hourly Rate, Cost Hourly Rate, etc., you can double-click into the cell and it will open the ‘Role Forecast Information’ Modal, as shown below.

If the cell value reflects multiple Role Forecast records, when you double-click into the cell, the ‘Select Role Forecast’ Modal will display. This enables you to select the specific Role Forecast record you wish to modify. By selecting the individual record, the ‘Role Forecast Information’ Modal will open.

You will need to click the main ‘Save’ button to commit all changes made to existing records.

Note: The yellow warning icon will display if there are unsaved changes.
Deleting Role Forecast Records
The Assignment Manager enables you to delete Role Forecast records you no longer require. To delete a Role Forecast record, double-click into the cell containing the record. This will open up the ‘Role Forecast Information’ Modal. From here, you will be able to click the ‘Delete’ button.

If the cell value reflects multiple Role Forecast records, when you double-click into the cell, the ‘Select Role Forecast’ Modal will display. This enables you to select the specific Role Forecast record you wish to delete. By selecting the individual record, the ‘Role Forecast Information’ Modal will open.

You will need to click the main ‘Save’ button to commit all required record deletions.

Note: The yellow warning icon will display if there are unsaved changes.
Assignment Manager Pagination
The Assignment Manager will display a maximum of 25 Roles and 25 Projects in one view. The Component supports pagination, so if you have more Roles / Projects, they will be displayed across multiple pages and the page navigation in the top-left corner of the Assignment Manager section will enable you to navigate between pages.

Within the Component ‘Settings’, you can adjust the number of records displayed per page. The image below illustrates each page will have a maximum of 15 Roles and 15 Projects.

Each of these Settings can be set to values of 5, 10, 15, 20 and 25.
Assignment Manager Quick Search
You can leverage the Role ‘Quick Search’ text box located within the ‘Assignment Manager’ section header, as shown below.

By entering a text string within this search field and hitting enter, the Role(s) displayed will be filtered based on the Role ‘Name’ including the search string.

For example, in the image above, the User has entered ‘je’ in the search field and the results have been filtered to show the Roles for Jennifer Jones and Jessica Lee. To remove the quick search filter, simply clear out the string from the text box.
Component Settings & Admin
Within the Resource Planner ‘Settings’ Modal, there are a number of Settings that can be used to configure the Assignment Manager section of the Assignment Manager Component. This Settings Modal is located in the top-right corner of the Resource Planner.
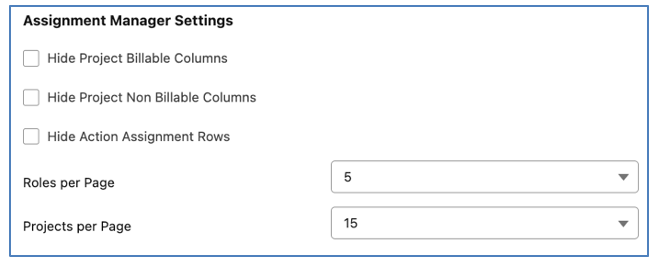
The image above shows the Settings that apply to the Assignment Manager. Below is an explanation of each Setting.
Hide Project Billable Columns
If this Setting is TRUE, the Billable Hours, Billable % and Billable Total Columns will be hidden for each Project.
Hide Project Non Billable Columns
If this Setting is TRUE, the Non Billable Hours, Non Billable % and Non Billable Total Columns will be hidden for each Project.
Hide Action Assignment Rows
If this Setting is TRUE, the Action Assignments row will be hidden for each Role.
Roles per Page
This Setting controls how many Roles are displayed per page.
Projects per Page
This Setting controls how many Projects are displayed per page.
By default, the ‘Role Forecast Information’ Modal will display the following fields from the Role Forecast Object:
You can adjust the fields that are available within the ‘Role Forecast Information’ Modal via a Field Set on the Role Forecast Object. This Field Set is called ‘Assignment Manager Custom Fields’.
Resource Requests Tab
If you have a large pool of resources that could be assigned to your Projects, you may centralise the resource assignment process. This is where the Resource Request feature comes in. Instead of each Project Manager looking at available resources through features like the Resource Assignment Wizard or Scheduler, they would instead submit a Resource Request for each resource they need on their Project. These Resource Requests would then be reviewed by the centralised resource management team, who would identify and assign the most appropriate resource to work on the Project.
The Resource Request feature is a component available within the Resource Planner in Mission Control. It provides Resource Managers with the ability to view all Resource Requests, search for Resources (Roles) that match the requirements, review and compare the potential Resources, and assign the selected Resource to the Project.

The Resource Request Manager is accessed via one of the Tabs on the Resource Planner. You can control who has access to the Resource Request Tab by setting the ‘View RP Resource Request Tab’ field on the individual User’s Role record.

If this field is set to TRUE, the User will be able to access the Tab from the Resource Planner.

If this field is set to FALSE, the User will not be able to access the Tab from the Resource Planner.

Note: If you want the Resource Request Tab to load by default when you visit the Resource Planner, you can set ‘Resource Planner Default Tab’ to be Resource Request on your Role record.
Project Managers can submit Resource Requests for the Resource Manager to review / assign. This can be done by clicking the ‘New’ button from the Resource Request related list on the Related Tab of the Project Page or the Opportunity Page.

When creating a new Resource Request record, the User will need to provide the following information:
The remaining fields should be left empty, as these will be populated by the Resource Manager:
Any Resource Request where ‘Resource Assigned’ is empty and ‘Declined’ is FALSE will appear on the Resource Request Tab for the Resource Manager to process.
When looking at the Resource Request Tab, the ‘Resource Requests’ section on the left-hand-side displays a list of all Resource Request records that need to be reviewed. These will be grouped by Project Name and sorted alphabetically. Within each Project, the Resource Requests are sorted alphabetically based on ‘Function’.

There are a variety of icons that provide you with the ability to carry out key functions. Each icon’s function is explained below.
| Icon | Function |
Opens a Modal enabling you to add a new Resource Request | |
| Opens a Modal enabling you to edit the individual Resource Request record. For example, if you wish to decline the request | |
| Populates key field information from the individual Resource Request record into the ‘Request Information’ and ‘Search Criteria’ sections | |
| Opens a Chatter Modal, enabling you to collaborate on the Resource Request or the Project Chatter Feed | |
Enables the deletion of an individual Resource Request record |
When reviewing Resource Requests on the Resource Planner, the left-hand-side section displays a list of all Resource Requests that need to be reviewed. You can identify whether the Resource Request relates to an Opportunity or a Project based on the icon displayed.

In the image above, the ‘Aprika: Webite Build’ Resource Requests relate to a Project. The ‘Billabong: Salesforce Implementation’ Resource Requests relate to an Opportunity. Where a Resource Request relates to both an Opportunity and a Project, the Project icon will be displayed.
When you click on the eye icon of an individual Resource Request record, key field information will be populated into the ‘Request Information’ and ‘Search Criteria’ sections of the Resource Request page, as shown below.
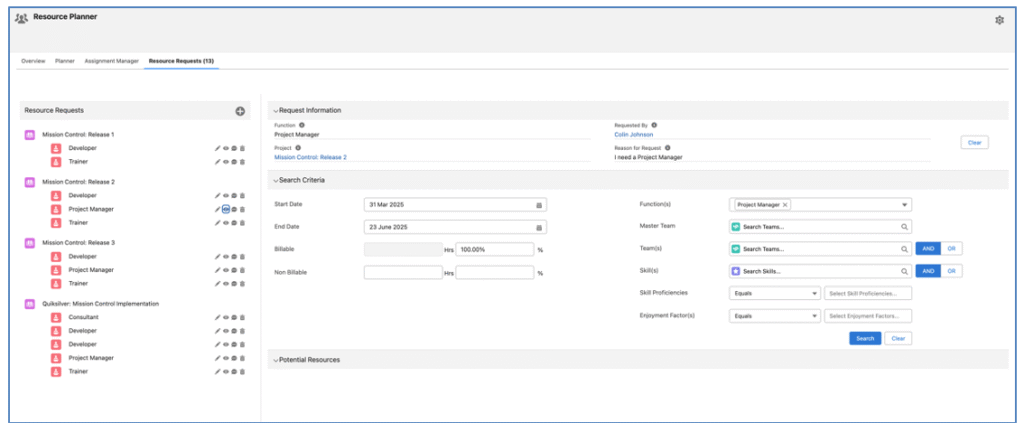
You can further refine your search criteria, including search parameters such as Master Team, Teams, Skills, Skill Proficiencies and Enjoyment Factors.

Note: any Search Criteria you enter will be stored on the Resource Request when you click the ‘Search’ button and will be pre-populated the next time you click the eye icon for the Resource Request record.
When you have specified all of the required Search Criteria, you can click ‘Search’, which will return any matching Roles in the ‘Potential Resources’ section. If you wish to clear the Search Criteria, click the ‘Clear’ button. This will remove any search parameters you’ve entered, excluding those populated based on the fields from the Resource Request record.
The ‘Potential Resources’ section of the Resource Request Tab provides individual resource profile cards for each Role that has been returned as a potentially suitable resource for the request.

The search results displayed will not include any Roles already assigned to the Project.
The profile cards provide insights into key attributes of the Role’s ability to match the requirements of the Resource Request.

Charge Level
The ‘Charge Level’ image will display 3 money bag icons, indicating how expense the Role is, based on the value of the ‘Charge Level’ field on their Role record. The images display based on the following logic:
| Charge Level | Charge Level Image |
| Low | |
| Medium | |
| High |
This helps determine how affordable / expensive the Role is without displaying their specific Billable / Cost rates.
Capacity Overview
The Capacity Overview provides insight into the Role’s availability during the period being requested. The Progress Bar provides a visual indication of how much of their capacity is already allocated elsewhere. Below that, their Capacity, Allocation and Availability figures are displayed.
The ‘Allocation’ figure is determined based on the ‘Existing Allocation Source’ setting within the Resource Request Settings section of the Settings on the Resource Planner.

The options are:
If this Setting is empty, the ‘Both (Actions Win)’ option will be applied.
Team Overview
The Team Overview section provides insight into which Teams the Role is a member of that you are searching for within the Search Criteria for the Resource Request. The green tick indicates the Role is a member of the Team, the red cross indicates the Role is not a member of the Team.
Skill Overview
The Skill Overview section provides insight into which Skills the Role is assigned to that you are searching for within the Search Criteria for the Resource Request. The green tick indicates the Role is assigned to the Skill, the red cross indicates the Role is not assigned to the Skill. If they are assigned to the Skill, the Skill Proficiency and Enjoyment Factor will also be displayed.
The number of Roles displayed within the Potential Resources section will vary based on the Search Criteria. You can scroll horizontally to view all of the Roles returned as potential matches. However, you can also use the ‘Role Search’ and ‘Compare’ features to further filter the results.
Role Search
You can use the ‘Role Search’ box to filter the profile cards based on the Role ‘Name’. This is located within the ‘Potential Resources’ Header.

For example, if I enter ‘Chr’ into the Search and hit Enter, the results will be filtered down to only show Chris Woolcott and Christopher Allen.

To return to the full list of Potential Resources, simply clear the text entered in the Role Search field.
Compare Resources
You can use the ‘Compare’ feature to filter the Profile Cards to allow you to perform a side by side comparison. For example, if my search results return 20 Roles, I may want to compare Roles 1, 8 and 17. Instead of scrolling horizontally see how well each Role matches the Resource Request, I can tick the Checkbox within each Role’s Profile Card and click the ‘Compare’ link located in the ‘Potential Resources’ Header.

When you click the ‘Compare’ link, it will only display Profile Cards where the Checkbox is TRUE. This allows you to conduct a side-by-side comparison of the Potential Resources.
To return to the full list of Potential Resources, click the ‘View All’ link located in the ‘Potential Resources’ Header.
Once you have identified the Role that will fulfil the Resource Request, you can click the ‘Select’ button on their Profile Card to open the ‘Resource Assignment’ Modal.

Within the Resource Assignment Modal, you’re able to create Role Forecast records and/or transfer ownership.
Create Role Forecasts
The ‘Role Forecast’ section of the Modal enables you to create Role Forecast records for the Role being assigned to the Project to fulfil the Resource Request.
When creating Role Forecast records, you can choose how many records are created, from the following options:
Note: Where multiple Role Forecast records are being created, a pro-rated Role Forecast may be created at the beginning and/or end of the period. For example, if I’ve selected ‘1 per week and my Start Date is the 5th March and the End Date is the 19th March with Billable Hours set to 30, there will be 3 Role Forecast records created as follows.
Role Forecast 1
Start Date: 5 March
End Date: 9 March
Hours Billable: 8.16
Hours breakdown:
| 3 March | 4 March | 5 March | 6 March | 7 March | 8 March | 9 March |
| 2.70 | 2.73 | 2.73 |
Role Forecast 2
Start Date: 10 March
End Date: 16 March
Hours Billable: 13.65
| 10 March | 11 March | 12 March | 13 March | 14 March | 15 March | 16 March |
| 2.73 | 2.73 | 2.73 | 2.73 | 2.73 |
Role Forecast 3
Start Date: 17 March
End Date: 19 March
Hours Billable: 8.19
| 17 March | 18 March | 19 March | 20 March | 21 March | 22 March | 23 March |
| 2.73 | 2.73 | 2.73 |
This example is based on Saturday and Sunday being configured as Non Working Days.
If you do not wish to create Role Forecasts (for example, you may just want to transfer ownership), you can set the following fields to null/empty:
With all of these fields null, no Role Forecast records will be generated.
Ownership Reassignment
The ‘Ownership Reassignment’ section of the Modal enables you to transfer ownership from a Role that is currently assigned to the Project.
Select a Role in the Lookup field, identifying the Role you want to transfer ownership from. This Lookup field will display all Roles that are assigned to the Project at any of the following levels:
This will transfer ownership to the new Role.
When assigning a Role to a Resource Request that is related to an Opportunity, you will be able to create Role Forecast records. However, the ‘Ownership Reassignment’ section will not be displayed, as this is only applicable to a Project.
When auto-generating a Project from an Opportunity, Resource Requests related to the Opportunity will be updated to also relate to the Project.
To fully leverage the Role Forecasting functionality, a number of automated settings need to be enabled. These can all be controlled via the ‘Role Allocation Automation Settings’ section on the Control Pad of the Mission Control Console.

In order to enable these Role Allocation Automation Settings, the Field History Tracking needs to be enabled for the following Objects/Fields.
Role Forecast | Role Allocation | Action | Contributor |
Start Date End Date Hours Forecast – Billable Hours Forecast – Non Billable Role | Hours Scheduled – Billable Hours Scheduled – Non Billable Hours Scheduled Value (Billable) Hours Scheduled Value (Cost) Action Date Holiday Role Role Forecast | Start Date End Date Hours Scheduled – Billable Hours Scheduled – Non Billable Action Owner Total Checklist Items Status | Contribution Billable Contribution Non Billable Role Start Date End Date |
Auto-generate Role Allocation records
For Role Forecast and Action records that have a shorter duration, the Role Allocation records will be created immediately via Apex Triggers. However, to accommodate Salesforce governor limits when generating Role Allocation records for Role Forecasts and Actions that have a longer duration, these records will be created via Apex Batch Classes.
To activate this Apex Trigger Batch Class logic, set the Checkbox field to TRUE, select a Frequency and click the Save button.
Note: if this setting is inactive, Role Allocation records will need to be created manually.
Role Allocation Limit
The default limit for transferring the creation of Role Allocation records from the Apex Trigger to the Apex Batch Class is set to 100. Depending on other customisation customers have in their Salesforce Org, they may need to reduce this limit to avoid Salesforce governor limits.
To set a custom limit, enter a value in the Role Allocation Limit field and click the Save button.
Enable Double Resourcing
If this Setting is enabled, Role Allocations relating to Actions will be rolled up to Role Forecasts to provide visibility into how many of the Role Forecast hours have been assigned to Actions on the Project.
Reduce Future Role Allocations to zero for Cancelled Actions
If this Setting is enabled, Role Allocation records will have their Scheduled Hours set to zero if they are scheduled beyond when an Action Status was set to Cancelled.
Reduce Future Role Allocations to zero for Complete Actions
If this Setting is enabled, Role Allocation records will have their Scheduled Hours set to zero if they are scheduled beyond when an Action Status was set to Complete.
Reduce Future Role Allocations to zero for On Hold Actions
If this Setting is enabled, Role Allocation records will have their Scheduled Hours set to zero if they are scheduled beyond when an Action Status was set to On Hold.
Generate Role Allocations based on Checklist Items
Customers can choose to generate Role Allocation records based on Checklist Items, rather than Action Owner and Contributor assignments.
This feature can be turned on / off via the ‘Consider Checklist Item Hours / Dates’ setting within the Role Allocation Automation Settings section of the Control Pad on the Mission Control Console.
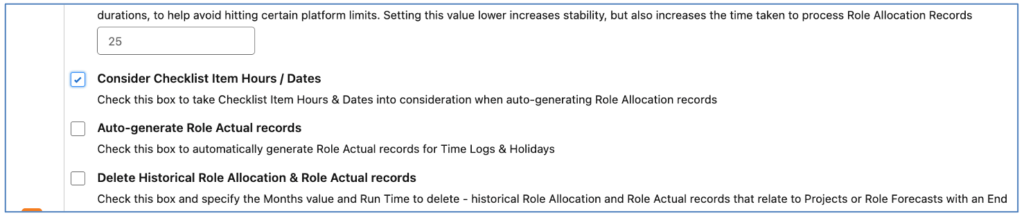
When this Setting is TRUE, Role Allocations will be generated based on the following order of priority:
Checklist Item has Hours | Checklist Item has Dates | Role Allocation Generation |
Yes | Yes | Generated based on Checklist Item Hours & Dates |
Yes | No | Generated based on Checklist Item Hours & Action or Contributor Dates |
No | Yes | Generated based on Action Owner / Contributor Hours and Action or Contributor Dates |
No | No | Generated based on Action Owner / Contributor Hours and Action or Contributor Dates |
Note: If you manually distribute the hours via the Hours Distributor and you allocate hours to a date outside of the existing Checklist Item dates, the Checklist Item dates will not be updated.
Note: To utilise this feature, you will need to ensure the ‘Total Checklist Items’ field on the Action Object is configured for Field History Tracking.
Auto-generate Role Actual records
To have Role Actual records automatically created for Time Logs and Holidays, this setting will need to be activated. To activate, set the Checkbox field to TRUE and click the Save button.
Periodically Delete Role Allocations & Role Actuals
There is a Custom Setting within the Role Allocation Automation Settings section of the Control Pad on the Mission Control Console that enables the periodic deletion of Role Allocations and Role Actuals.

This Setting enables you to specify a number of months value (e.g. 6, 12, 24, etc.). When this Setting is activated, the months value will be used to determine when Role Allocation and Role Actual records will be deleted.
Role Allocation and Role Actual records relating to Actions will be automatically deleted when the Project ‘End Date’ is older than Today + the months value specified in the Setting. Role Allocations relating to Role Forecasts will be automatically deleted when the Role Forecast ‘End Date’ is older than Today + the months value specified in the Setting.
The table below provides examples of whether the records would qualify for deletion, where the months value has been set to 6 months.
Parent Record | End Date | Today’s Date | Delete records | Reason |
Project | 1/12/2022 | 16/1/2023 | No | Today – End Date is less than 6 months |
Project | 10/7/2022 | 16/1/2023 | Yes | Today – End Date is greater than 6 months |
Role Forecast | 17/7/2022 | 16/1/2023 | No | Today – End Date is less than 6 months |
Role Forecast | 30/4/2022 | 16/1/2023 | Yes | Today – End Date is greater than 6 months |
This logic will run daily, at the ‘Run Time’ specified within the Setting.
Historical Data Generation
This feature enables you to create Role Allocation and Role Actual records for existing Actions. For example, if you have been using Mission Control without enabling the Role Forecasting functionality and decide to begin using it, you will want to have Role Allocation records and Role Actual records creating for historical Actions so you have the required data. This process will look at time logs, holidays, and actions whose last modified dates are between now and the selected ‘Generate back to’ date.
This feature generates Role Allocations for the working days between the Start Date and End Date of an Action. For this to be possible, certain fields are required to be populated such as Start Date, End Date, Action Owner and Hours Scheduled – Billable/Hours Scheduled – Non Billable. Please keep in mind that Role Allocations & Role Actuals will only be generated for Roles that are assigned as Action Owner or Contributors for Actions, Project Member for Time Logs and Role for Holidays. The status field on Action has no impact on the generation of these records.
To generate Role Allocation and Role Actual records for historical Actions, you will need to set the Activate Checkbox field to TRUE and select a Date and click the Save button. This date will be used to determine how far back in time Role Allocation and Role Actual records should be generated.
Once the records have been generated, there will be a notification beneath the Date field confirming the date the process last run and the date data was generated back to.
Role Allocation Distribution Rules
When modifying Role Forecast records, a User may amend key fields that will require related Role Allocation records to be modified. The table below summarises the distribution rules that will be applied to each scenario based on whether the Role Allocation records are evenly distributed or manually distributed.
Modification Scenario | Even Distribution | Manual Distribution |
Start Date is brought forward to start earlier | Create additional Role Allocation records for working days being added to the duration and evenly distribute the hours across all of the Role Allocation records | Create additional Role Allocation records for the working days being added to the duration and set them to 0 hours, the User will then manually distribute as required |
Start Date is moved back to start later | Delete the Role Allocation records for the outgoing days. Redistribute the hours across the Role Allocation records for the days between the new Start Date and End Date. | Delete the Role Allocation records for the outgoing days. The User will manually distribute the hours across the remaining Role Allocation records. |
End Date is brought forward to start earlier | Delete the Role Allocation records for the outgoing days. Redistribute the hours from the Role Allocation records between Today and the original End Date across the Role Allocation records for the days between Today and the new End Date. | Delete the Role Allocation records for the outgoing days. The User will manually distribute the hours across the remaining Role Allocation records. |
End Date is moved back to start later | Create additional Role Allocation records for working days being added to the duration and evenly distribute the hours from the Role Allocation records between Today and the original End Date across all of the Role Allocation records from Today through to the new End Date | Create additional Role Allocation records for the working days being added to the duration and set them to 0, the User will manually distribute as required. |
Start Date and End Date both moved by the same number of working days but Start Date still occurs before the original End Date | Delete he Role Allocation records for the outgoing days. Create additional Role Allocation records for working days between the new Start Date and End Date that don’t already have an existing Role Allocation and evenly distribute the hours across all of the Role Allocation records between the Start Date and End Date. | Delete the Role Allocation records for the outgoing dates. Create new Role Allocation records as needed. Mirror the original Role Allocation Hours across all current Role Allocation records (for example the hours scheduled for Day 1 of the original date range will be scheduled to Day 1 of the new date range). |
Start Date and End Date both brought forwards (e.g. to start early) in time by the same number of days but End Date still occurs later than the original Start Date | Delete the Role Allocation records for the outgoing days. Create additional Role Allocation records for working days between the new Start Date and End Date that don’t already have an existing Role Allocation and evenly distribute the hours across all of the Role Allocation records between the new Start Date and End Date. | Delete the Role Allocation records for the outgoing dates. Create new Role Allocation records as needed. Mirror the original Role Allocation Hours across all current Role Allocation records (for example the hours scheduled for Day 1 of the original date range will be scheduled to Day 1 of the new date range). |
Start Date and End Date both moved by the same number of days and no overlap exists with the existing date range | Delete the Role Allocation records for the outgoing days. Create additional Role Allocation records for working days between the new Start Date and End Date that don’t already have an existing Role Allocation and evenly distribute the hours across all of the Role Allocation records between the new Start Date and End Date. | Delete the Role Allocation records for the outgoing dates. Create new Role Allocation records as needed. Mirror the original Role Allocation Hours across all current Role Allocation records (for example the hours scheduled for Day 1 of the original date range will be scheduled to Day 1 of the new date range). |
Hours Forecast – Billable or Hours Forecast – Non Billable is increased | Additional hours are split evenly across Role Allocation records for the Action Owner from Today through to the End Date. | No changes will be made, the User will manually distribute the change |
Hours Forecast – Billable or Hours Forecast – Non Billable is increased after the Start Date has passed | Additional Hours are plight evenly across Role Allocation records for the Action Owner from Today through to the End Date. | No changes will be made, the User will manually distribute the change |
Hours Forecast – Billable or Hours Forecast – Non Billable is decreased | The reduction in hours is evenly removed from each Role Allocation record from the Start Date or Today (whichever is greater) through to the End Date. The hours will only reduce down to 0, they will not be put into a negative. | No changes will be made, the User will manually distribute the change |
Hours Forecast – Billable or Hours Forecast – Non Billable is decreased after the Start Date has passed | The reduction in hours is evenly removed from each Role Allocation record from Today through to the End Date. The hours will only reduce down to 0, they will not be put into a negative. | No changes will be made, the User will manually distribute the change |
Role is changed | Delete the Role Allocation records for the outgoing Role. Create Role Allocation records for the new Role. | For all Role Allocation records from Today through to the End Date, reassign to the new Role. |
Role Forecast Conversion
This feature enables you to specify the default Milestone Name to be used when converting Role Forecasts to Actions.
The ‘Delete Role Allocations’ component enables you to perform a mass deletion of all Role Allocations records related to the parent record. You can load the component from the following records:
Note: This Mass Delete function will also delete any Role Actual records that are related to the Role Allocation records being deleted.
The component is accessed by clicking the ‘Delete Role Allocations’ button, as shown below.
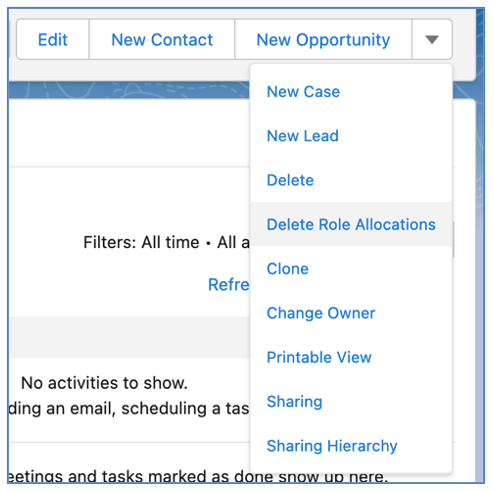
When you access the component, it will provide a summary of the parent record along with the number of Role Allocation records that will be deleted, as illustrated below.
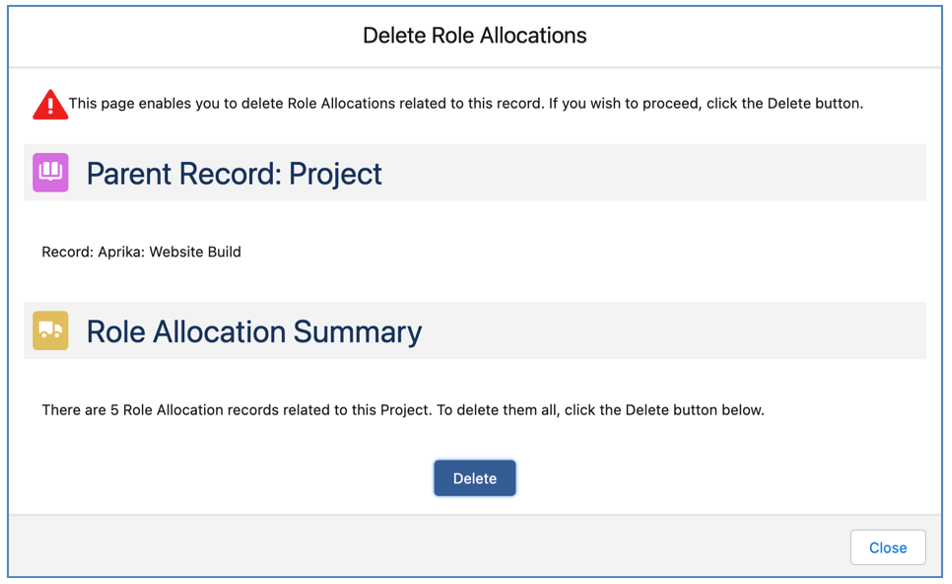
Once you click the Delete button, you will be presented with a dialogue box asking you to confirm you wish to go ahead with the deletion of the records.
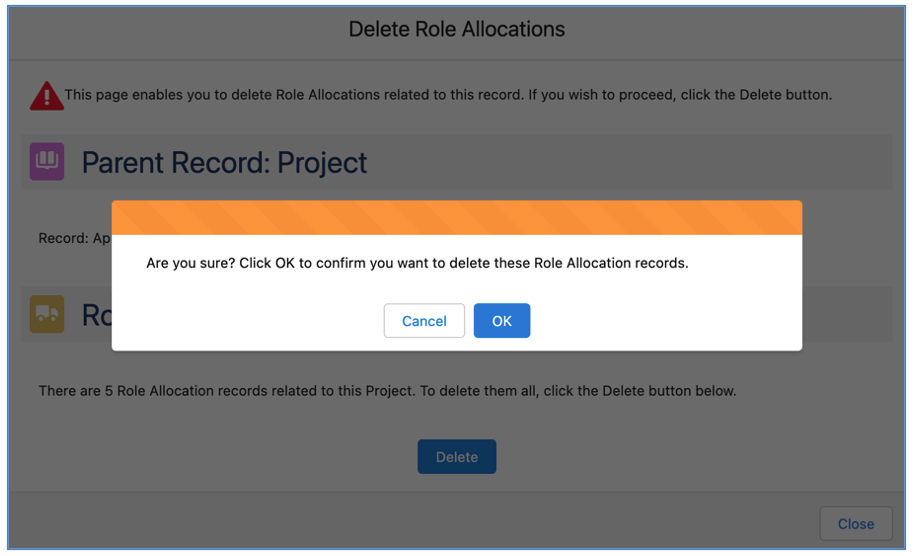
Once you click OK, you will receive a notification on screen that the records have been submitted for deletion.

You will also receive an email confirming the deletion was successful or unsuccessful.
If you are generating Role Allocations and Role Actuals, but you have Projects that you do not require these records to be generated for, you are able to prevent their generation. To do this, you need to ensure the ‘Do Not Generate Role Alloc/Actuals’ field on the Project is set to TRUE.
You may consider using this feature for an internal Project where you are not tracking time, or perhaps don’t intend scheduling hours at a granular level. By using this setting on such Projects, you will save using unnecessary data storage.
Logging Time in Mission Control can be done in the following ways:
The Timesheet, Whiteboard and Cirrus Insight time logging features are covered in separate sections of this document.
The Log Time Component allows users to quickly select a Project, Milestone and Action, to quickly and easily log time and update the status of Actions ‘on the go’.
This component is available in a variety of places throughout Mission Control, including:
You can access the Log Time Component from these pages by clicking the clock icon.
By default, the Log Time Component layout appears as shown below.
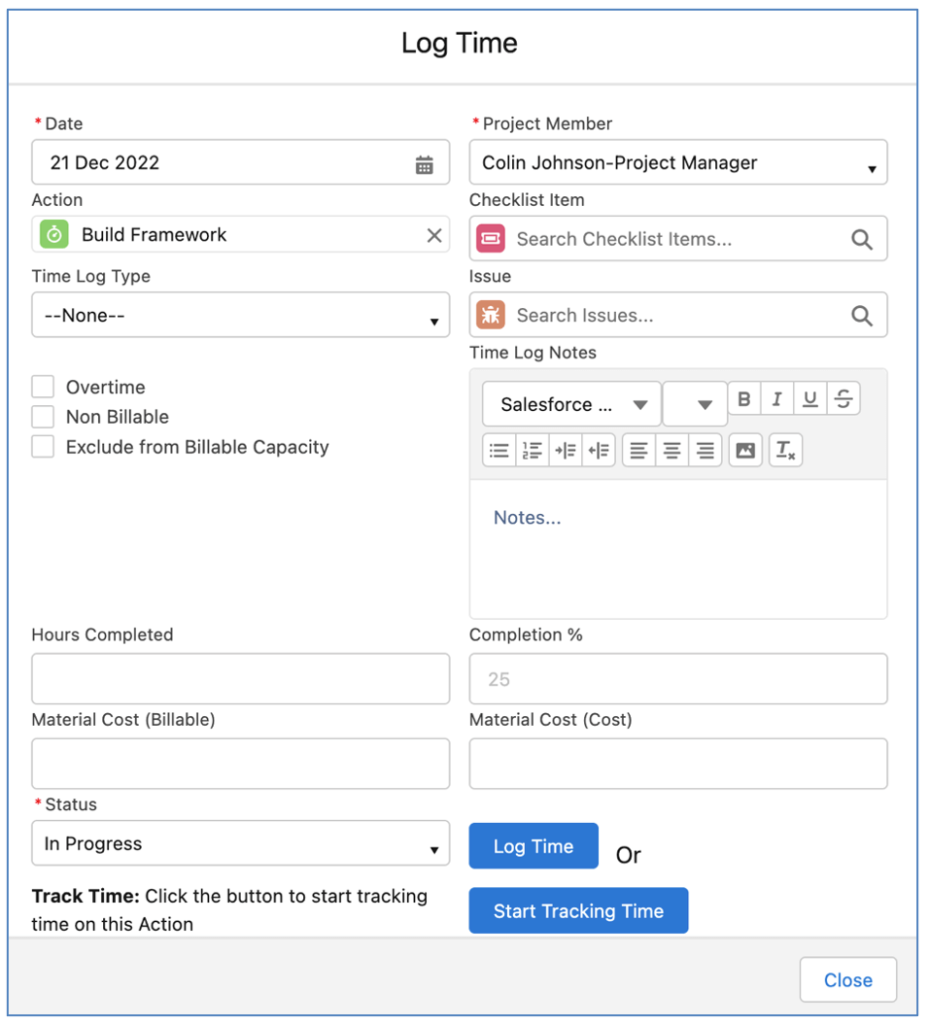
You are able to customize this layout by adding fields to the ‘Log Time Component Fields’ Field Set on the Time Log Object.
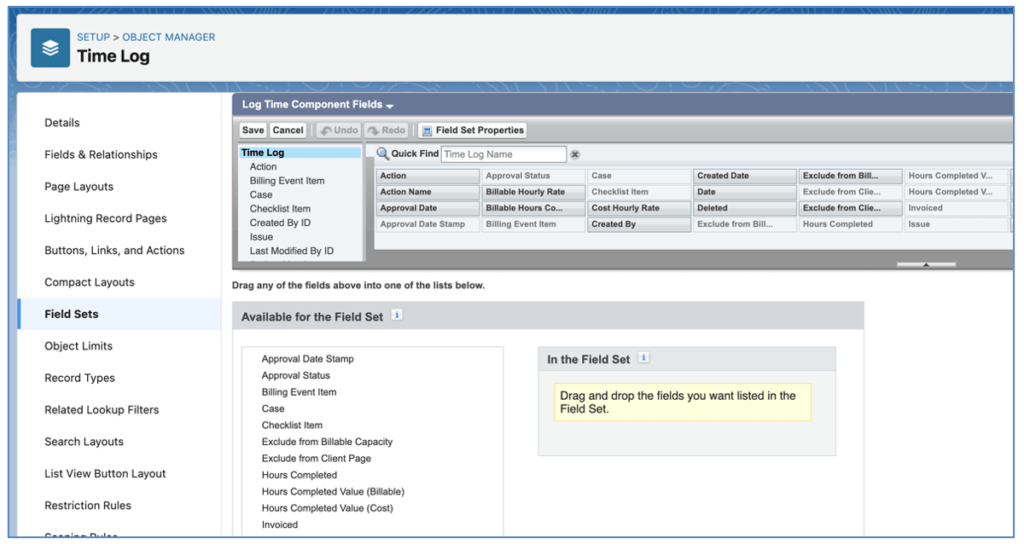
If the ‘In the Field Set’ section of this Field Set is empty, then the default layout will be applied.
The following fields will always be included on the Component:
Once you add Fields to the Field Set, only standard fields listed above and those added to the Field Set will be available on the Log Time Component. For example, in the image below, we have added 4 fields to the Field Set.
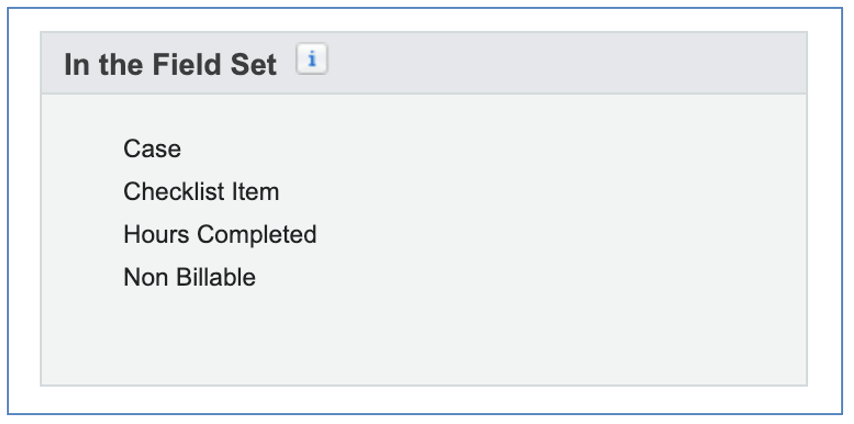
When using the Log Time Component in this scenario, the standard Fields and the Fields from the Field Set will be accessible on the Component.

To reset to the default collection of Fields, you will need to remove all Fields from the ‘In the Field Set’ section of the Field Set.
When using the Log Time Component on the Salesforce Mobile App or via the Browser on a mobile device logged in as a Community User, the User will have access to the following mobile friendly Tabs:
The Action List Tab provides the ability to quickly log time for multiple Actions in one go. By default, the list will show Actions assigned to the Role related to the User for ‘This Week’. This Action list will include Actions where the Role is either the Action Owner or a Contributor.
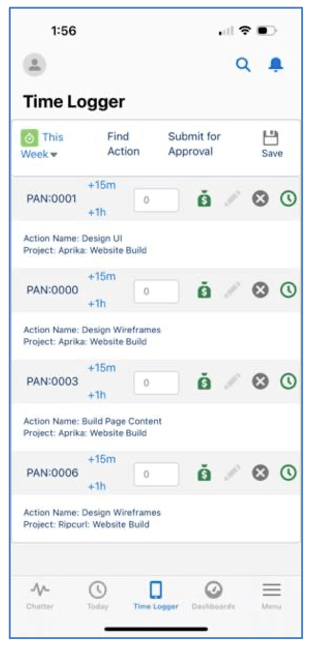
There are four filter options:
Whichever option you have selected, it will be persistently remembered on subsequent visits to the Component. The following filter criteria is used to determine the Actions displayed in the List View:
Note: If the User’s Timesheet Setting or the Control Pad Override Timesheet Setting for ‘Show Overdue Actions’ is set to TRUE, any Overdue Actions for the Role will also be included.
For each Action included in the List View, you will see a row as illustrated by the image below:

The Action ID will appear in the Grey section at the top along with all of the time logging actions, each of which are explained below:
| Button/Icon | Function |
 | Clicking this +15m link will increase the Hours Completed box by 0.25 |
 | Clicking this +1h link will increase the Hours Completed box by 1.00 |
 | The Hours Completed box identifies the number of hours you want to log. This can be entered manually or you can use the +15m or +1h links to increment |
| The money bag icon indicates whether the Time Log will be created as Billable or Non Billable. If the icon is Green it will be Billable. Click the icon to toggle to a Red icon to make it Non Billable. If the Action ‘Non Billable Indicator’ field is TRUE, the icon will be Red by default and you will not be able to toggle to Green. | |
| The pencil icon allows you to open a modal to add more information relating to the Time Log, such as Time Long Notes, Time Log Type, etc. | |
| The cancel icon allows you to cancel the draft Time Log if you no longer want to submit it | |
 | The clock icon allows you to use the Start/Stop time tracking function. If the Clock is Green, you can click it to start tracking time. If it’s Red (it will appear at the top of the list), you can click it to stop tracking time. |
Within the White section, you can view additional fields from the Action to provide more information to the User.
Saving Time Logs
To save your Time Logs, you will need to click the Save Icon, which is in the top right section of the Component, as shown below.
![]()
Start/Stop Time Tracking
When you click the Green Clock icon, it will start tracking time for that Action. The Action will appear at the top of the list with a Red Clock icon. This indicates that you are currently tracking time for that Action. You will also see the length of time that has been tracked.
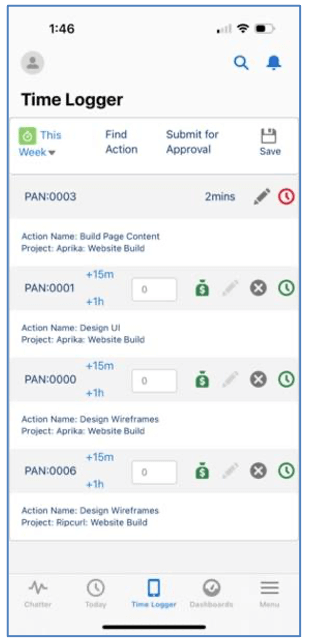
To stop the timer, you need to click the Red Clock icon. Once you’ve done this, you’ll receive a confirmation notification that the timer has been stopped.
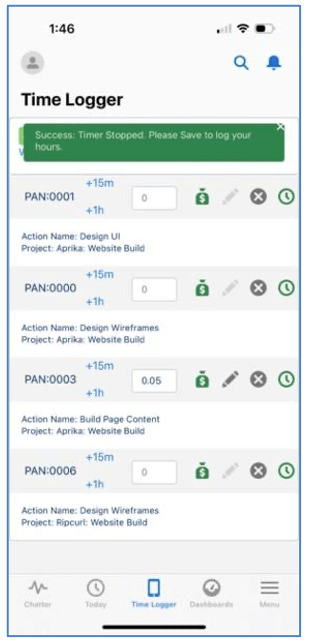
At this point, your Time Log has not been saved. You can now choose to toggle the Billable / Non Billable icon and/or click the pencil icon to add more information. To save the record, you need to click the Save icon in the top right.
Note: The fields displayed per Action are controlled by a Field Set. Please refer to the ‘Mobile Time Logger Field Sets’ section for further information on using this Field Set to customize your display.
If you are working on an Action that does not appear on your Action List, for example, you’ve been asked to assist on something that has not yet been assigned to you, you can click on the ‘Find Action’ Tab. This will load the time logger that enables you to manually search for an Action by selecting the Project, Milestone and Action you wish to log time against.

Once you’ve completed all of the relevant field information, you can click the Save button and your Time Log will be created.
If your Time Logs need to be submitted for Approval, you can click on to the ‘Submit for Approval’ Tab and you will see a list of all the Time Logs you currently have with an Approval Status of ‘Pending’.
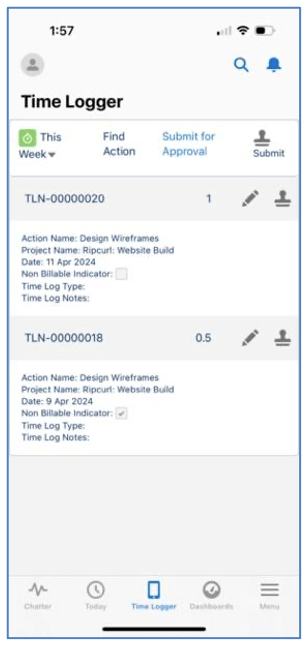
From this Tab, you’re able to click the pencil icon to edit information on the individual Time Logs. You can also click the Submit icon for individual Time Logs or click the Submit icon in the top-right section of the Component to submit all Time Logs.
![]()
Note: The fields displayed per Time Log are controlled by a Field Set. Please refer to the ‘Mobile Time Logger Field Sets’ section for further information on using this Field Set to customize your display.
To add the Time Logger to the Salesforce Mobile App, you will need to go to:
Setup > Apps > Mobile Apps > Salesforce > Navigation
Ensure ‘Time Logger’ is in the Selected Column and click Save.
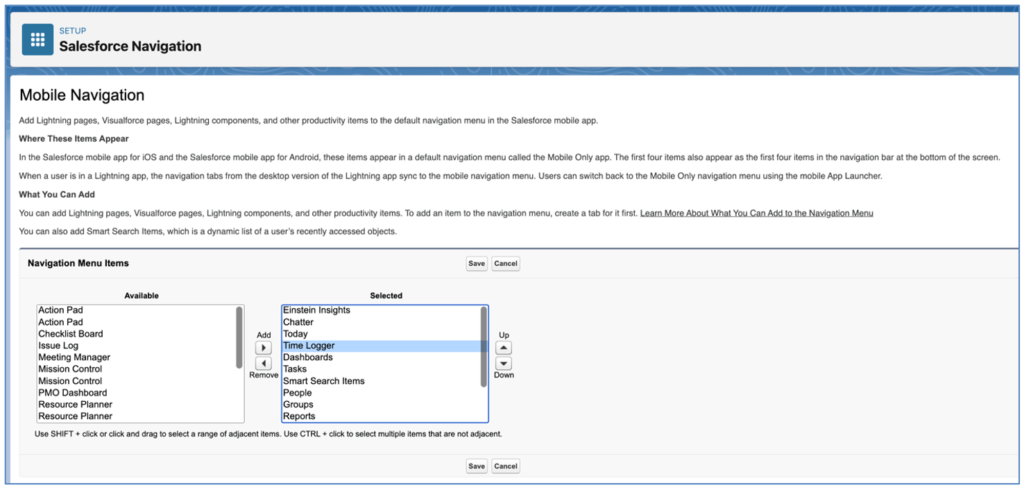
When you login to the Salesforce Mobile App, you will then see the Time Logger in the navigation menu.
You can control which fields are included in each of the Tabs within the Mobile Time Logger Component by updating the applicable Field Sets.
Action List
To specify the fields you want to appear for each Action included in the ‘Action List’ Tab, you will need to update the ‘Mobile Time Logger Fields’ Field Set on the Action Object.
The first field within the Field Set will be displayed in the Grey section and the remaining fields will be appear in the White section.
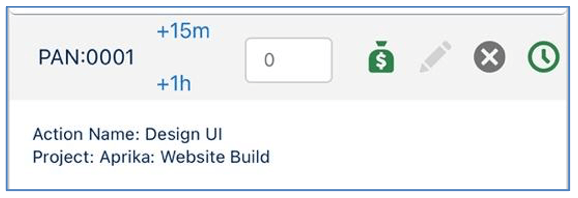
By default, the following fields are included in this Field Set:
Below is an example where the Action Name has been set as the first field within the Field Set and the Start Date, End Date and Status have been included.
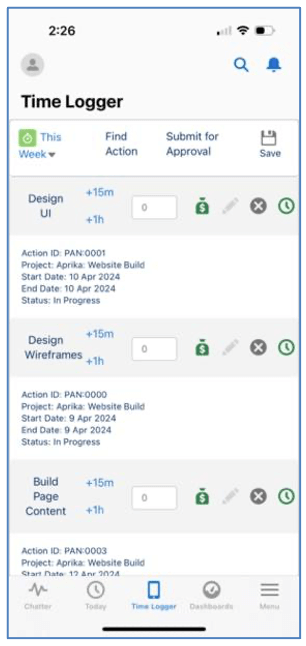
Add Time Log Information
To specify the fields you want to appear within the ‘Time Log Information’ Tab, which allows you to specify additional information when submitting a Time Log, you will need to update the ‘Mobile Time Logger Add Time Fields’ Field Set on the Time Log Object.
By default, the following fields are included in this Field Set:
Below is an example where the ‘Exclude from Client Page’ and ‘Billing Event Item’ fields have been included to appear at the top of the page.
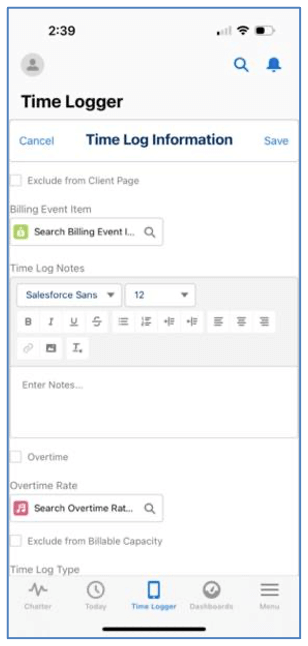
Submit for Approval
To specify the fields you want to appear for each Time Log included in the ‘Submit for Approval’ Tab, you will need to update the ‘Mobile Time Logger Time Log Fields’ Field Set on the Time Log Object.
The first field within the Field Set will be displayed in the Grey section and the remaining fields will be appear in the White section.
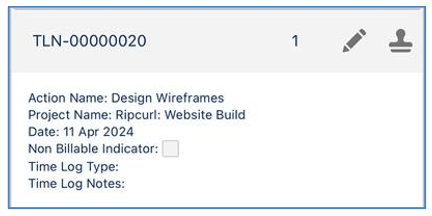
By default, the following fields are included in this Field Set:
Below is an example where the Action Name has been set as the first field within the Field Set and the Overtime and Exclude from Billable Capacity Indicator have been included.
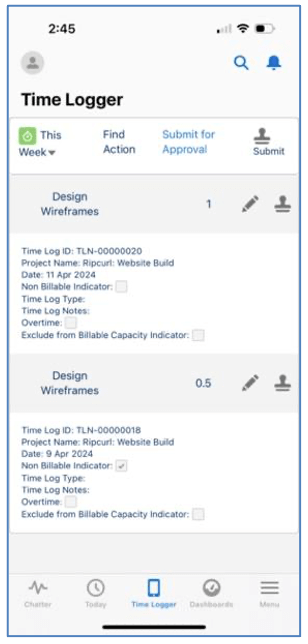
The side bar Time Logger is a Visualforce component that allows users to quickly select a Project, Milestone and Action so they can log time and update the status of Actions from anywhere within Salesforce.com.
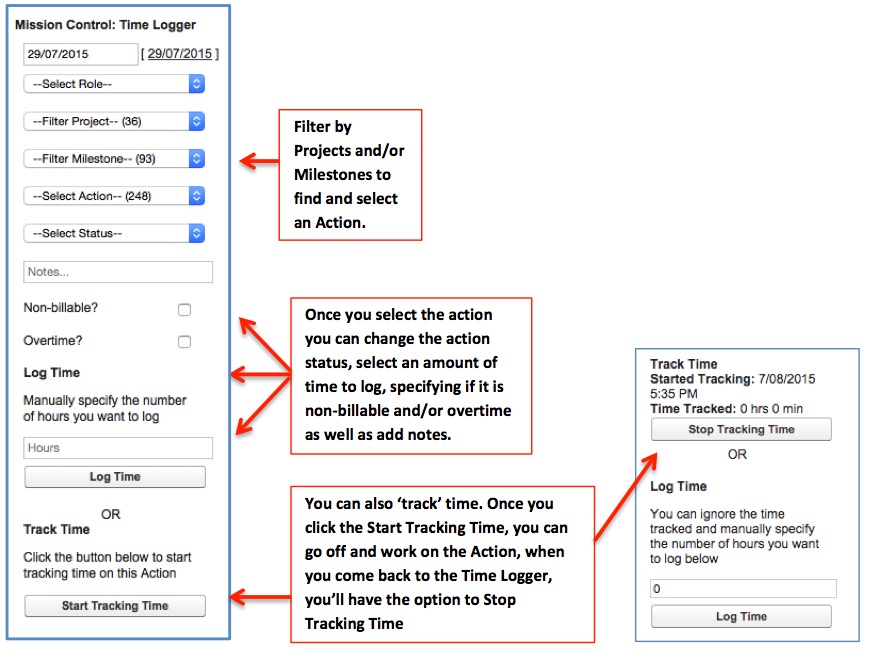
This can be added to the Side Bar by clicking Setup > Customize > Home > Home Page Layouts. Click Edit and select ‘Time Logger’ in the Narrow Components section. Click Save.
If you would like this Time Logger to appear on all Side Bars, not just on the SFDC Home Page, you can configure this by clicking Setup > Customize > User Interface. Ensure the Sidebar Setting ‘Show Custom Side Bar Components on All Pages’ is set to TRUE. Click Save.
You can log time manually by going to an actions detail page, and clicking the ‘New Time Log’ button the Time Logs related list.
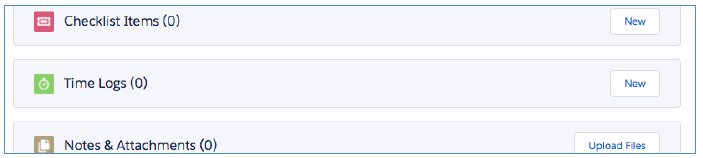
From here you can record the details for the time log such as Project Member, Date, Hours Completed, whether it is Non Billable or Overtime and any material expenses incurred. The remaining fields will be populated once you have saved the entry.
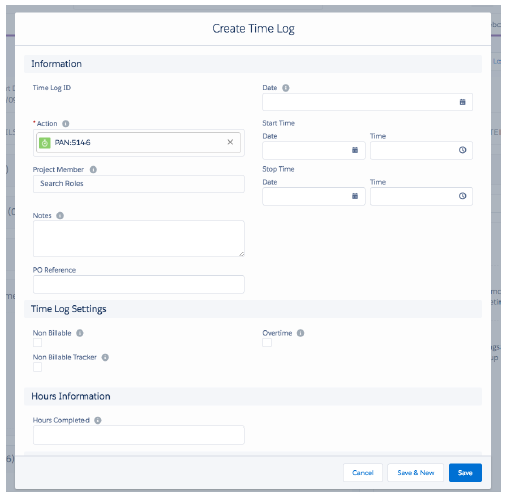
The Timesheet allows Users to view all of their Actions that are due within a given week. The User is able to log time & comments; view existing time already logged, view their Holidays for the period, complete actions as well as link through the Actions and Milestones. To access the Timesheet page, click on the ‘Timesheet’ button from the ‘Progress Pad’ Tab on the Mission Control Console, in the ‘Log Your Time’ section, or go directly to the Timesheets tab.
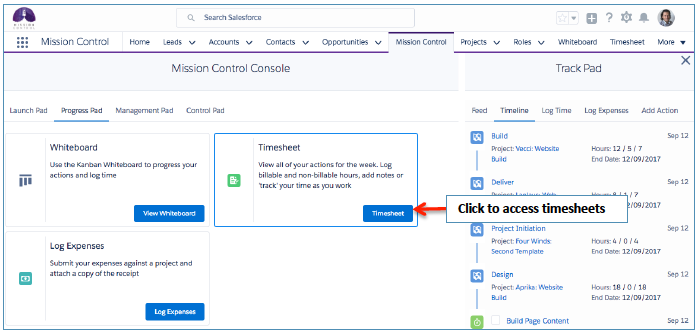
If you have not logged any time for the week in view, no values will be visible in the hours fields. However, once you have entered time, when you subsequently revisit the Timesheet, those hours will be visible. You can log your time, use the start/stop time tracking functionality and submit your timesheets. Roles with the ‘Manage Timesheets’ or the ‘Manage Subordinate Timesheets’ permission can also manage timesheets for other Roles.
The Timesheet features three tabs, which are:
Timesheet
The Timesheet is the main way of entering Time Logs against your Actions. The new Timesheet is illustrated below.
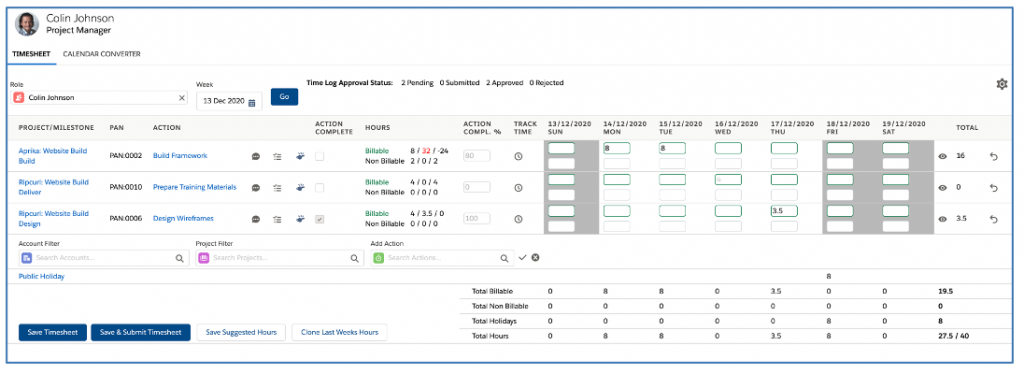
To enter time, you simply add the number of hours in to the appropriate billable or non-billable field for the relevant day. Note: If you want to add time to an Action you have previously entered time against, simply increment the number in the time field for that action. To add notes to your time entry, double click the field you’re entering time in and the following modal will appear.
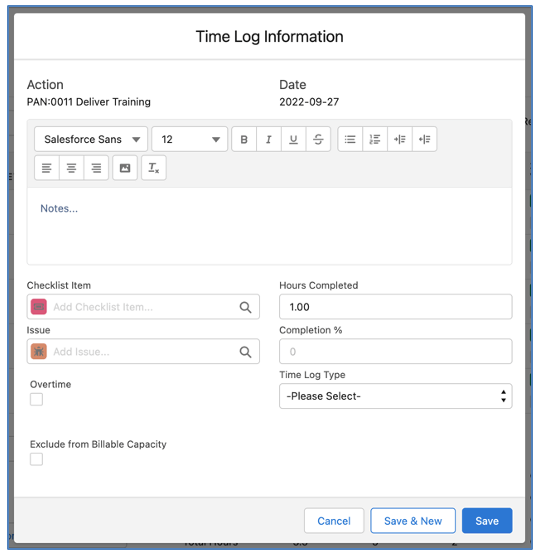
If you need to create multiple Time Logs for the same Action / Day, you can click the ‘Save & New’ button. For example, you may need to create a 2 hour Time Log with a Time Log Type of ‘Admin’ and a 1 hour Time Log with a Time Log Type of ‘Meetings’.
When a cell on the Timesheet has existing Time Logs and you increase the number to log more time, you will have the option to associated that additional time to one of the existing Time Logs or to create a new Time Log, as shown below.

To associate the additional time to an existing Time Log, select the Time Log you want to add the time to. Alternatively, to create a new Time Log, click the ‘Add New’ button.
Edit existing Time Logs
You’re able to edit existing Time Log entries directly from the Timesheet. If you click the ![]() icon, you’ll access the ‘Time Log Summary’ component, as shown below.
icon, you’ll access the ‘Time Log Summary’ component, as shown below.

From here, you’re able to edit or delete individual Time Log records. You can edit the Hours Completed, Non Billable, Overtime and Exclude from Billable Capacity checkboxes, edit the Notes as well as view the Approval Status.
Alternatively, you can double-click into the cell for a particular Action/Day. For example, ff you need to reduce hours for a Time Log that you have already created, you can reduce the number within the cell.
If the cell value is made up of multiple Time Logs, the Modal will appear, enabling you to select which Time Log you would like to apply the reduction to.
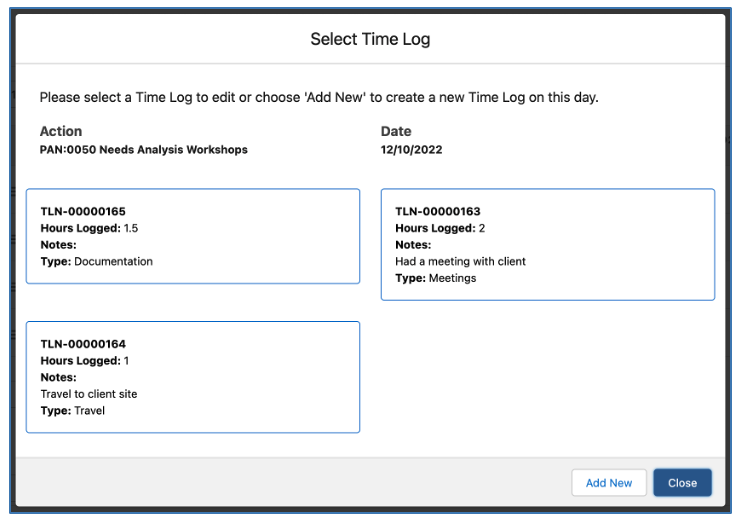
Chatter Feed
If you need to collaborate with colleagues whilst on the Timesheet, you’re able to click the ![]() icon to open up the Chatter component where you’re able to post on to the Action, Milestone or Project Chatter Feeds.
icon to open up the Chatter component where you’re able to post on to the Action, Milestone or Project Chatter Feeds.
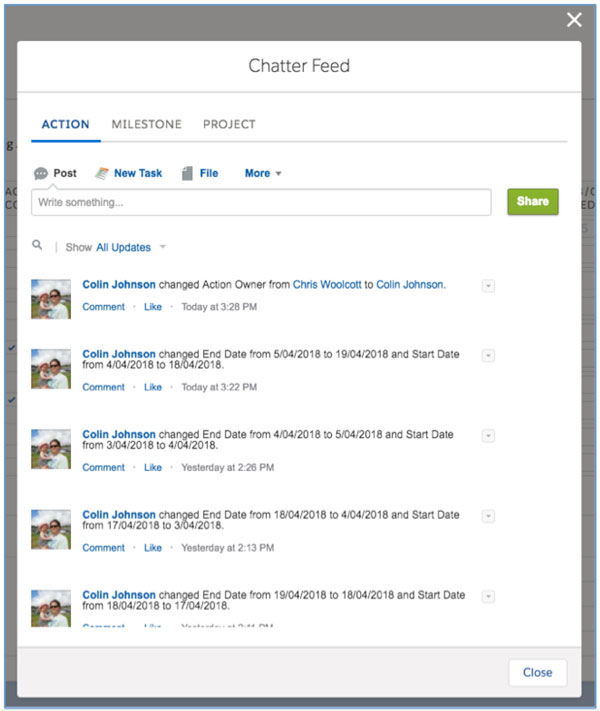
Checklist Items
You can access the Checklist Items relating to each Action displayed on the Timesheet by clicking on the ![]() icon.
icon.
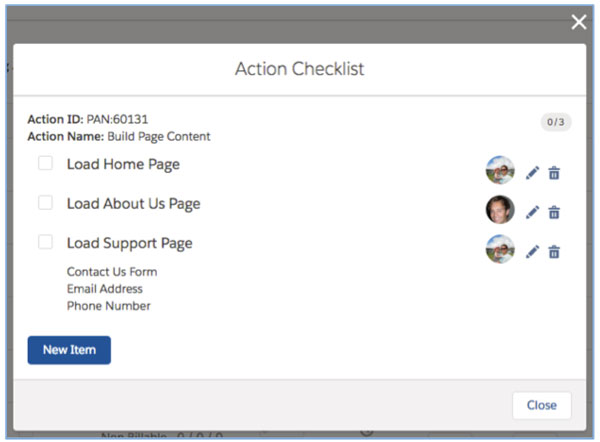
Suggested Hours
The ‘Suggested Hours’ feature divides the Hours Scheduled across the working days between the Start Date and End Date of an Action. The Suggested Hours are displayed on the Timesheet as grey numbers, as illustrated below:

If you would like to convert the Suggested Hours into actual Time Logs, simply click the ‘Save Suggested Hours’ button at the bottom left of the page and it will create Time Logs for each individual Suggested Hours entry.
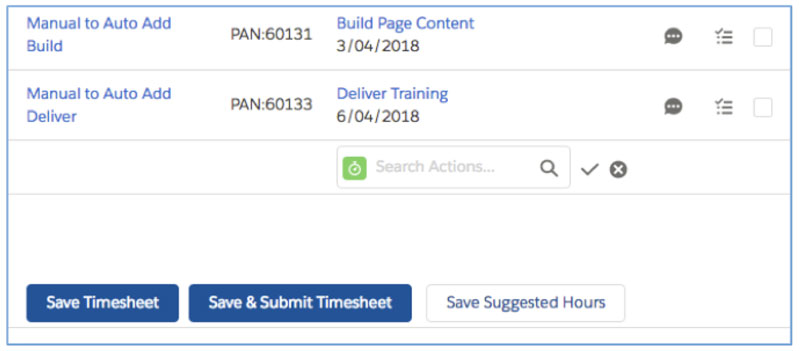
Save & Submit Timesheet
Where you are using the Time Log Approval functionality, new Time Log records you create will be set with an approval status of ‘Pending’. The ‘Save & Submit Timesheet’ button allows you to change the status value from ‘Pending’ to ‘Submitted’ for all Time Log records displayed on the Timesheet.
When a User clicks the ‘Save & Submit Timesheet’ button, if the total hours logged is less than the target, they will be prompted to see if they wish to continue with the submit process. This notification can be turned off within the Timesheet Settings if required.
Clone Last Weeks Timesheet
If you work on similar Actions from one week to another, the ‘Clone Last Weeks Timesheet’ feature will work well for you.
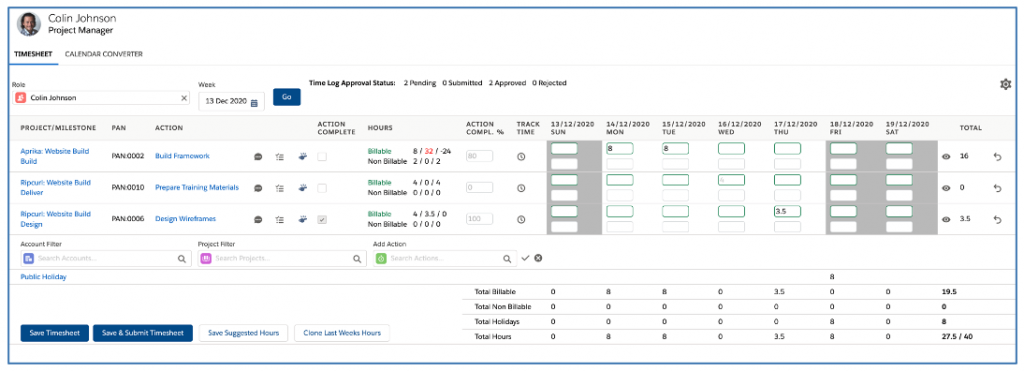
The ‘Clone Last Weeks Timesheet’ button, located bottom left of the Timesheet, enables you to open up a modal window that will display a draft view of Time Log records for this week, based on the Time Logs you created last week.
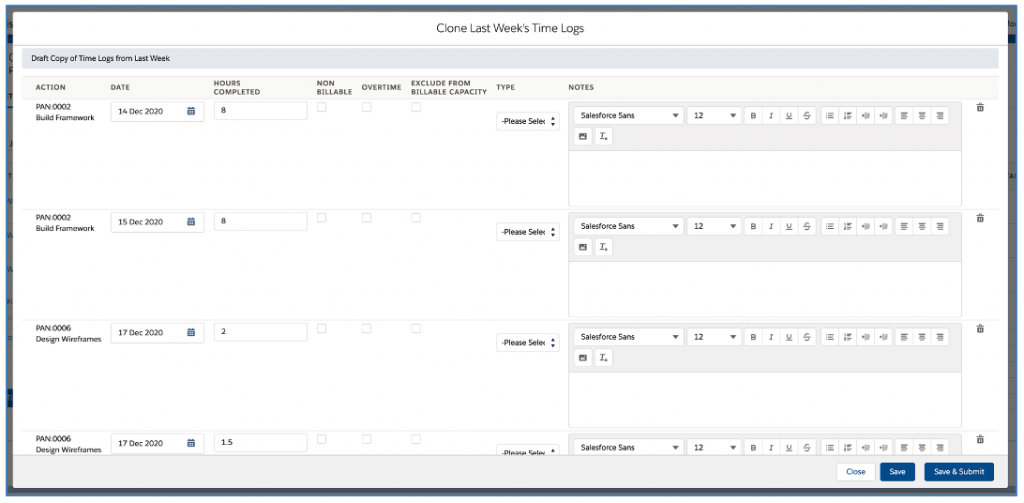
Prior to saving the Time Logs, you can if required, adjust the dates, hours, notes, etc. You also have the option to delete individual Time Logs if they’re not required.
Daily & Weekly Summary
The Daily & Weekly Summary figures enable you to see the Total Hours as well as a breakdown of Billable, Non Billable and Holidays.

You’re also able to view a total of the hours logged per Action.
Quick Search Actions
If you need to add an Action to the Timesheet in order to log time against it that week, you’re able to do so using the quick search feature:
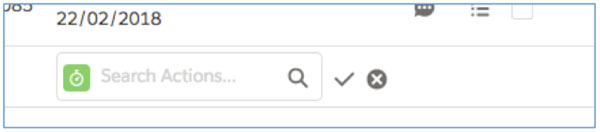
You can type in a string of text and the results will filter to show any Actions where the search string has been found in the Project, Milestone or Action.
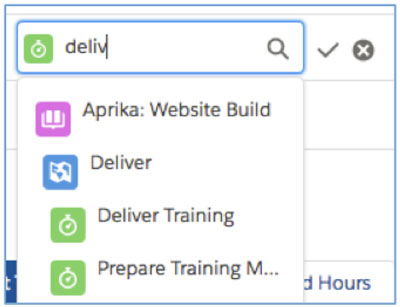
Once you’ve found the Action you would like to add, click the icon and that Action will be loaded into the Timesheet.
Collapsible Rows
You are able to collapse / expand rows on your Timesheet. This can be done on each row, or you can click the +/- buttons to collapse all / expand all.
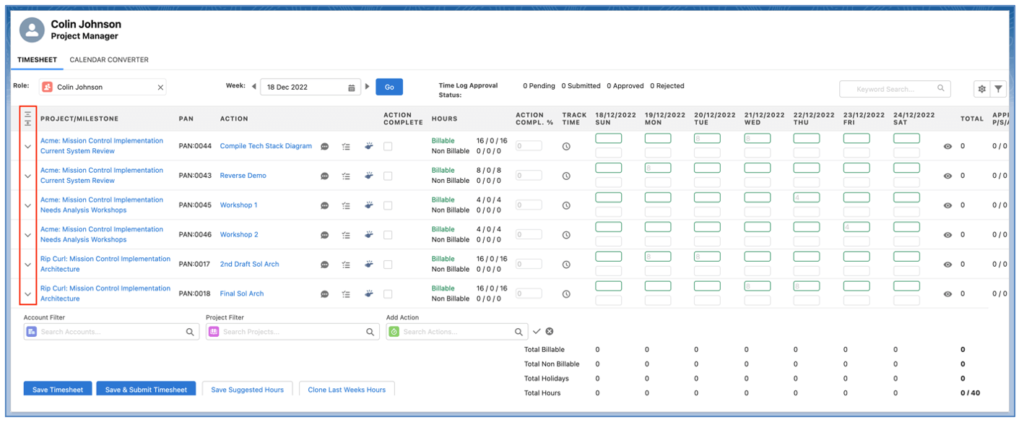
When you collapse / expand any individual row, all rows relating to the same Project will also be collapsed / expanded.
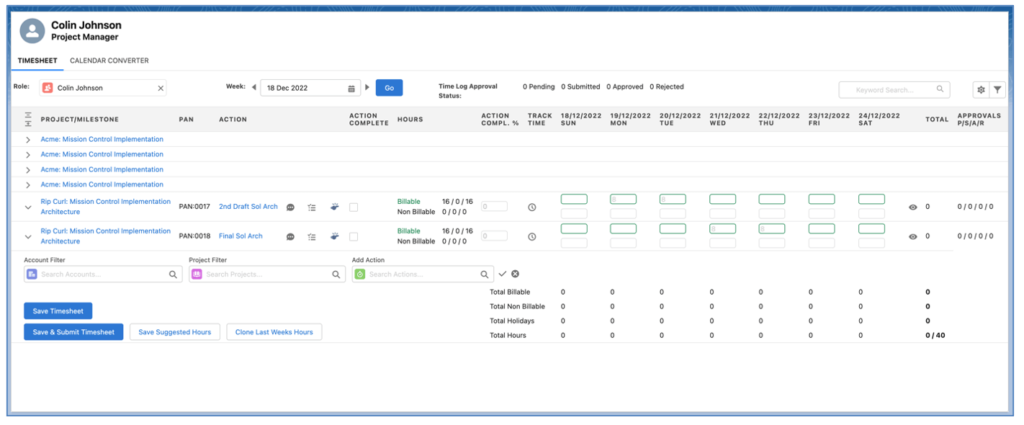
Collapsed rows will still reflect in the summary numbers at the bottom of the Timesheet.
Timesheet Filters
You can apply Filters to your Timesheet to ensure you’re only viewing the Actions that are most important to you. Simply click on the Filter icon to open up the Filters modal and apply the filters as required.
![]()
The Filters can be applied as required, alternatively, you can save any Filter selection, and that will be persistently applied each time you visit the Timesheet.
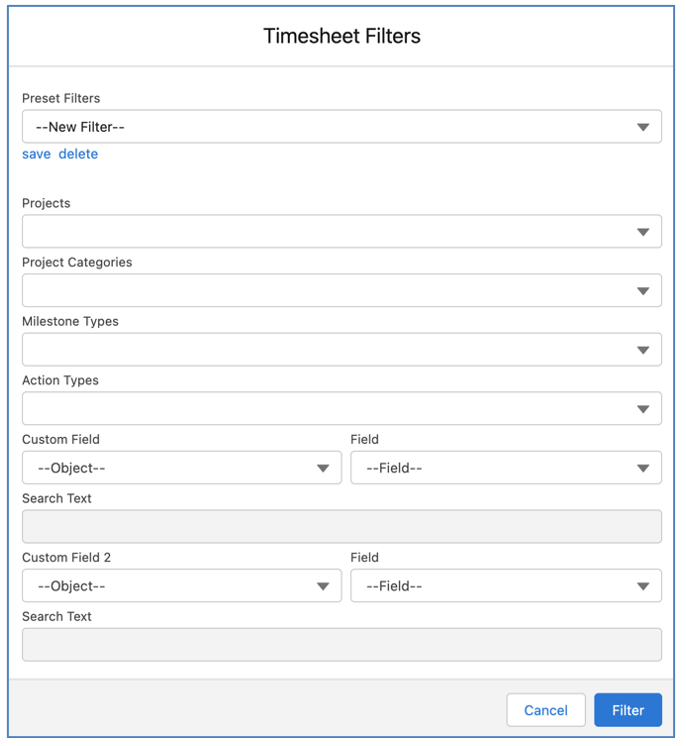
Preset Filters are created and accessed by individual Users and cannot be shared with other Users.
Grouping Time Logs by Time Log Type
The ‘Group Time Logs by Time Log Type for each Action’ setting within the Timesheet Settings enables a feature that will display multiple rows per Action, grouping the Time Logs by the ‘Time Log Type’ field.
To enable this feature, set the following setting to TRUE within the Timesheet Settings:
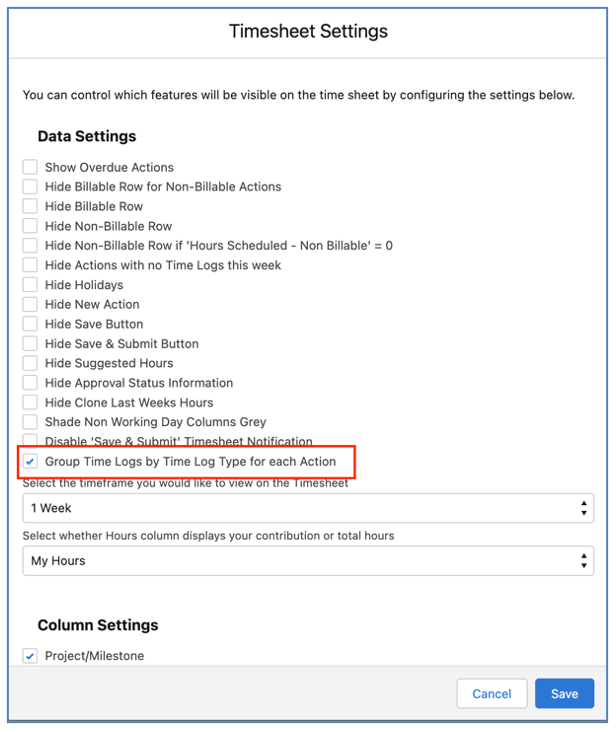
This setting can be controlled by individual Users within their Timesheet Settings Modal. Alternatively, it can be controlled centrally for all Users via Timesheet Settings on the Control Pad of the Mission Control Console.
When this setting is FALSE, all Time Logs will be grouped into one single row on the Timesheet, as shown below.

When this setting is TRUE, each Time Log will be grouped into a row based on its Time Log Type field value, as shown below.
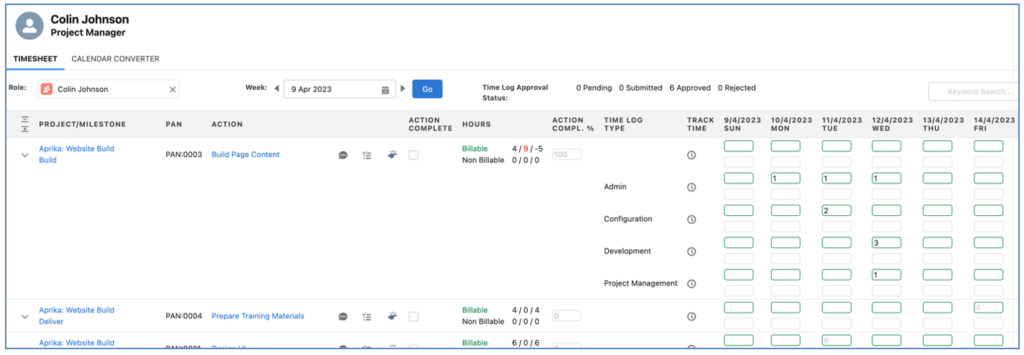
With this feature enabled, if a User has not yet logged any time against the Action this week, they will see one row for the Action.
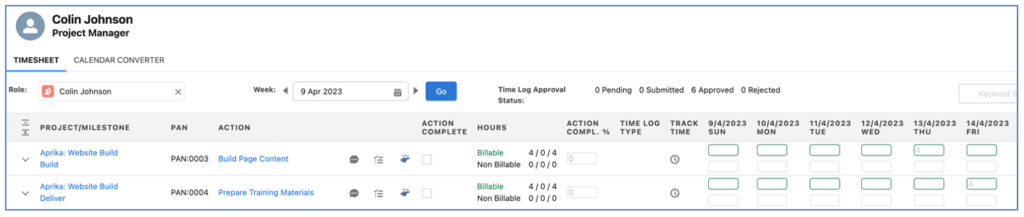
If the User logs time and does not specify a Time Log Type field value, that Time Log will appear in the first row for that Action.
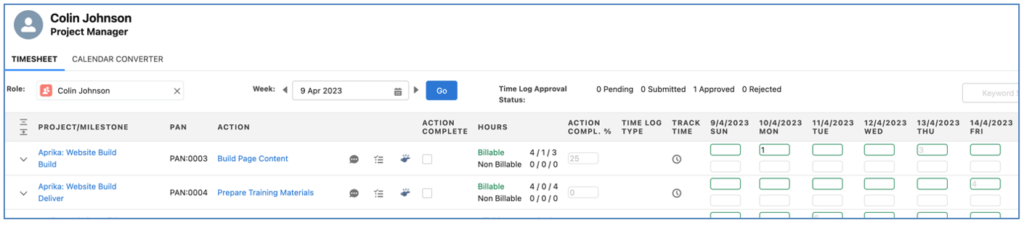
Once the User creates a Time Log with a value specified in the Time Log Type field, a row will appear on the Timesheet for that Time Log Type value.
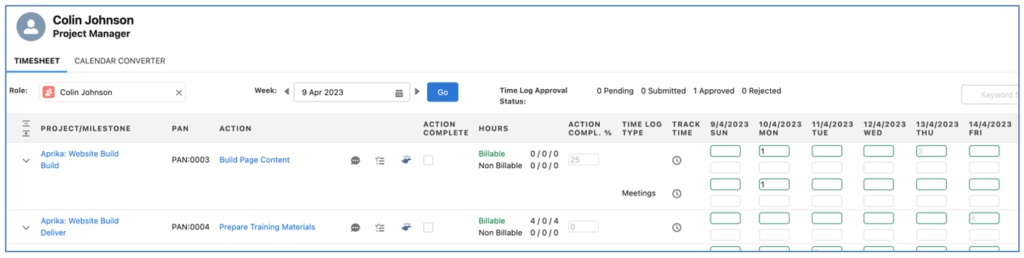
Once a row is displayed on the Timesheet for a Time Log Type for a specific Action, if the User needs to log additional time for that same Action for the same Time Log Type value, they can enter the hours directly on that row.
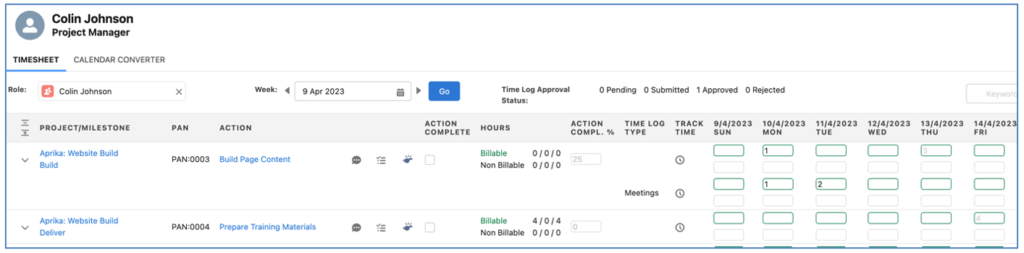
This removes the need to double-click into the hours field to open the ‘Time Log Information’ Modal in order to specify the Time Log Type value.
Tab Display Settings
The Timesheet includes Tabs that provide access to the following:
For each Role record, you have the ability to specify which of these Tabs they have access to, and which will load by default. This is controlled via fields within the ‘Timesheet Settings’ section of the Role Page Layout.

The fields that control User access to the Timesheet Tabs include:
Field | Field Type | Comments |
Timesheet Default Tab | Picklist | Allows you to specify which Tab you would like to appear when initially loading the Timesheet |
View Timesheet Tab | Checkbox | Identifies if the User linked to this Role can view this Tab on the Timesheet |
View Calendar Converter Tab | Checkbox | Identifies if the User linked to this Role can view this Tab on the Timesheet |
View Timesheet Approvals Tab | Checkbox | Identifies if the User linked to this Role can view this Tab on the Timesheet |
View Timesheet Rejections Tab | Checkbox | Identifies if the User linked to this Role can view this Tab on the Timesheet |
You can also manage these settings for all of your Role records from a List view on the Role Object Tab called ‘Role Permissions – Timesheet’.
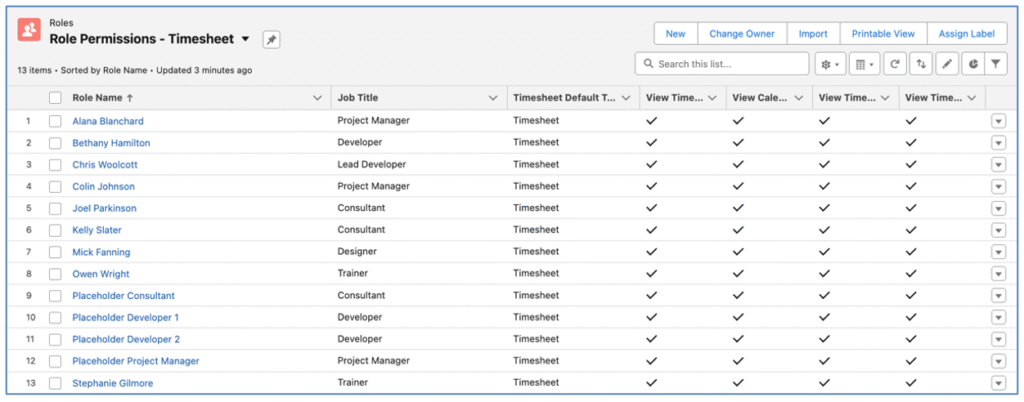
This List View provides you with the ability to bulk update Role records.
Customisation Options
To provide you with as much customisation as possible, the Timesheet has a Settings section that you can access by clicking the ![]() icon.
icon.
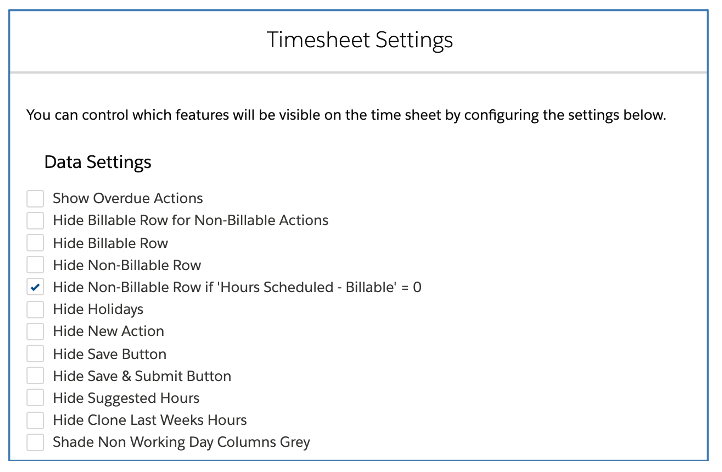
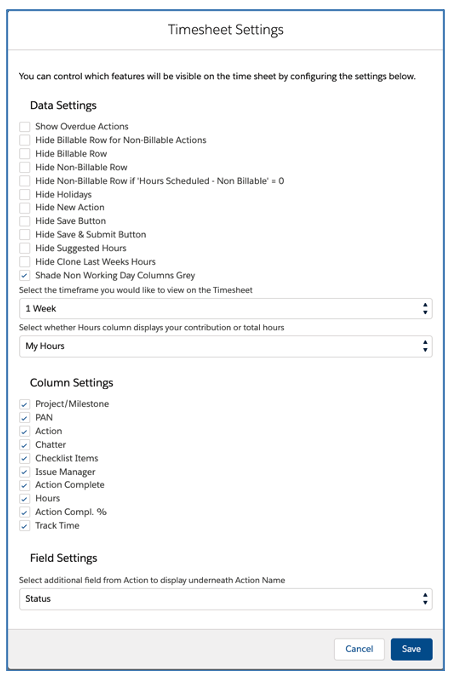
Within the Settings section, you’re able to configure your own personal preferences, based on the following:
Data Settings
The ‘Hide Non Working Day Columns (Does Not Include Holidays)’ Setting enables Users to remove the ability to log time against a non working day.

When this Setting is enabled, non working days (excluding Holidays) will not have fields displayed, preventing the User from entering hours into these days by mistake. In the example below, Monday is specified as a non working day on the Role’s record, and Saturday and Sunday are specified as non working days via the Business Hours setting.
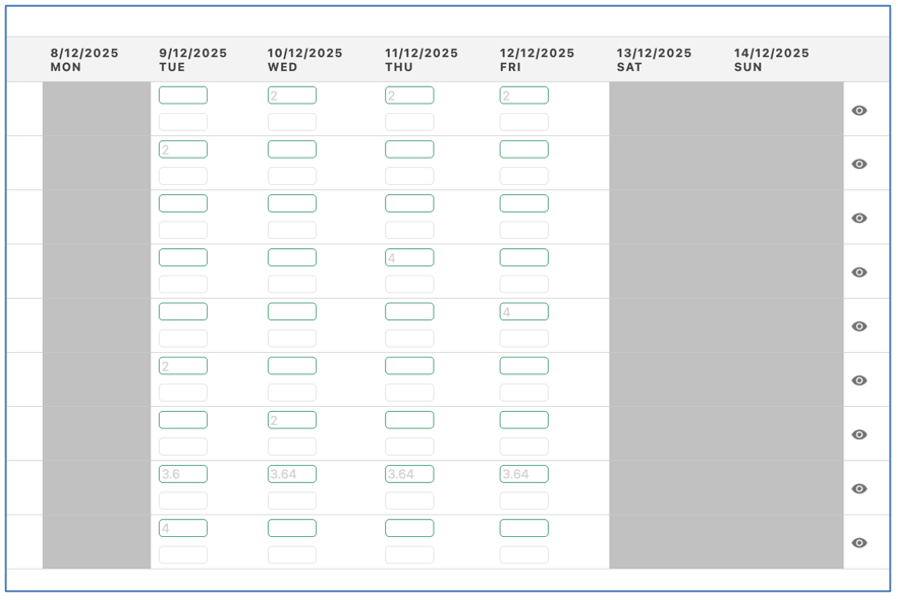
If the User logs time to one of these days outside of the Timesheet, the cells will be displayed for that individual Action. For example, the User has logged 2 hours via the Whiteboard against the Deliver Training Action for Monday 8th December.

This Setting can be controlled by individual Users or centrally via the Timesheet Override Settings on the Control Pad of the Mission Control Console.
Custom Date Range of Days Displayed
A Timesheet Setting is available that enables Users to control the number of days displayed for time entry. The ‘Select the timeframe you would like to view on the Timesheet’ Setting enables you to specify the number of day columns that will be available for time entry. The options within this setting are:
This Setting can be controlled by individual Users or centrally via the Timesheet Override Settings on the Control Pad of the Mission Control Console.
Timesheet Monthly View Setting
When using the ‘1 Month’ timeframe view on the Timesheet, you are able to specify which day of the month will be displayed as the first day on the Timesheet.
For example, you ask your team to log their time and track it on a monthly basis. You have set up the Timesheet to display 1 month. However, you monitor this from the 26th of the month through to the 25th of the following month.
To ensure the Timesheet displays the correct dates to ensure your team can view their entire Timesheet for the reporting period, you can set the ‘Select the Start Day to be used for the 1 Month view. Will default to 1 if left empty’ setting to 26, as shown below.

When the Users load the Timesheet, the first day displayed on the Timesheet will be the 26th of the prior month and will display each day through to the 25th of the current month.
Custom Date Range of Actions Displayed
A Timesheet Setting is available that enables Users to control the date range used to determine which Actions are displayed on the Timesheet.
The ‘Select the timeframe to apply when loading existing Actions on to the Timesheet’ Setting enables you to control the period of time used to determine which Actions should appear on the Timesheet by default. The options within this setting are:
Note: If the ‘Show Overdue Actions’ Setting is TRUE, overdue Actions will also be displayed as well as Actions that fall within the date parameters from the above options.
This Setting can be controlled by individual Users or centrally via the Timesheet Override Settings on the Control Pad of the Mission Control Console.
Hours Source
By default, the ‘Hours’ column of the Timesheet will display figures relating to the hours allocated to your Role for the Action.
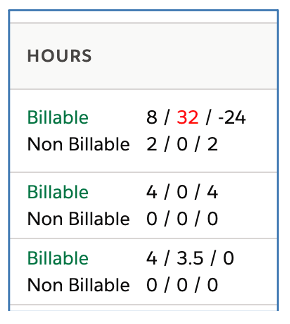
For example, an Action may have 8 ‘Hours Scheduled – Billable’ and Mick Fanning maybe the Action Owner, but has Kelly Slater as a Contributor with responsibility for 6 hours. In this example, Mick would see a value of 2 in the Hours column.
The Hours can be set to ‘My Hours’ or ‘All Hours’. The My Hours setting will display only your contribution. The All Hours setting will display all hours relating to the Action.

This feature is controlled within the Timesheet Settings, which can be controlled by the individual User or centrally on the Control Pad of the Mission Control Console.
Timesheet Column Width Setting
There are ‘Column Width Settings’ within the Timesheet Settings that enable you to adjust the width of the following columns on the Timesheet:
By default, the width of these columns will be as shown below:
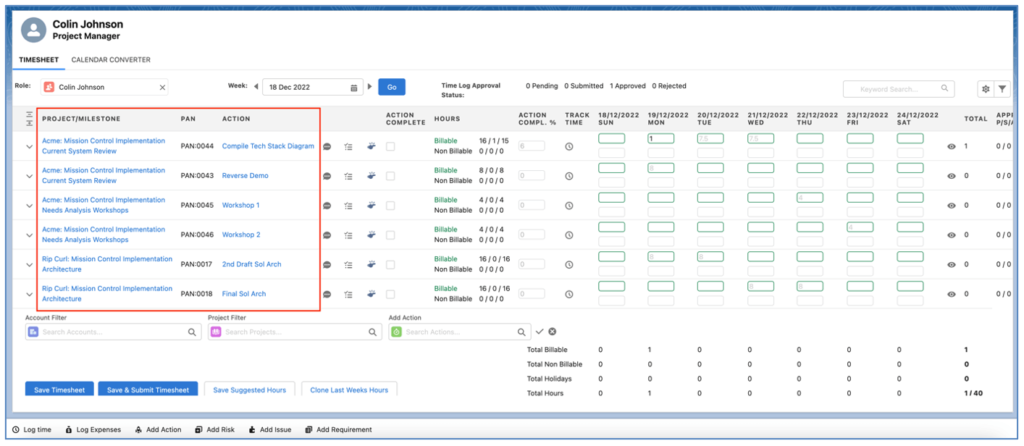
By entering values in the Column Width Settings, you are able to specify your desired column widths, as shown below:
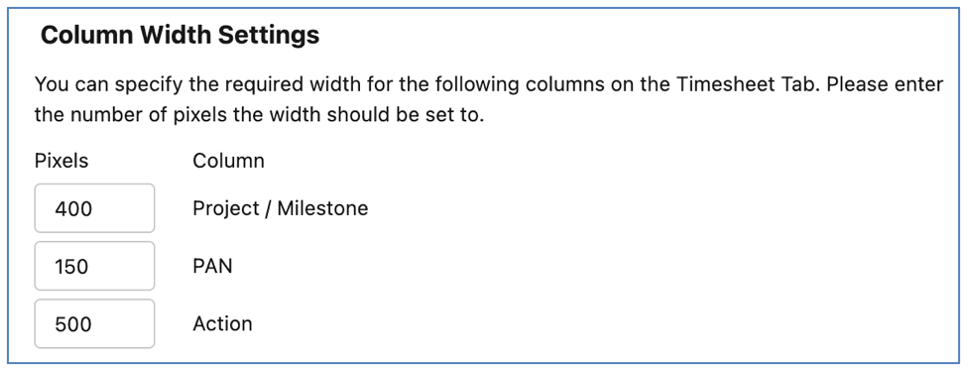
The width of these columns will then be set based on these Setting values, as shown below.
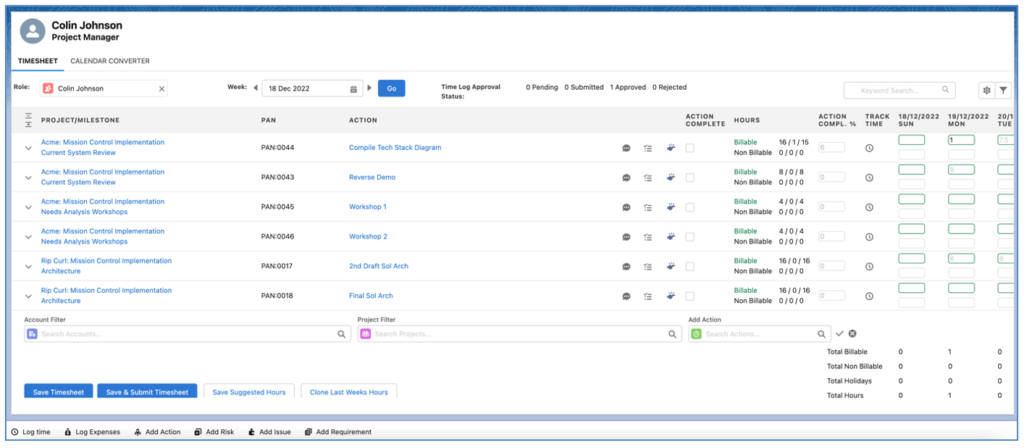
To reset the column widths back to the default values, you will need to remove the values in these Column Width Settings.
This Setting can also be controlled centrally from the Timesheet Settings on the Control Pad of the Mission Control Console.
Pagination
For Users that have large volumes of Actions displaying on their Timesheet, you are able to enable Pagination. This setting can be controlled by individual User settings or controlled centrally via the Timesheet Override Settings on the Control Pad of the Mission Control Console.
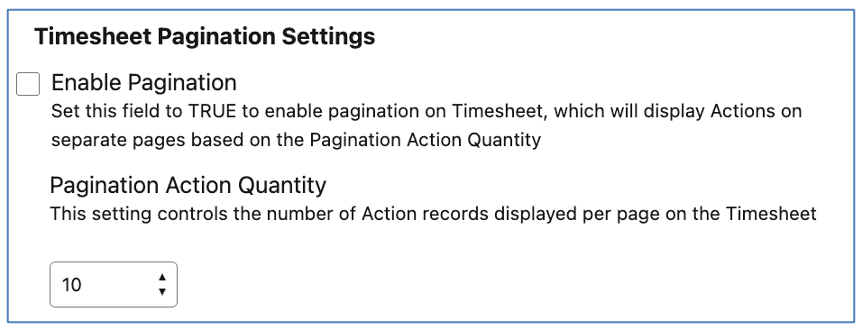
When Pagination is enabled, the User will be able to navigate between pages using the page dropdown and the navigation buttons located next to the Keyword Search field in the top right corner of the Timesheet.

The pagination navigation will only appear if the dataset returns multiple pages.
Timesheet Sorting Setting
By default, the rows within the Timesheet are sorted based on the following criteria:
For Customers that wish to sort the Timesheet in a different way, the ‘Timesheet Sort Order Settings’ within the Timesheet Settings enable you to specify up to 3 sort order options.
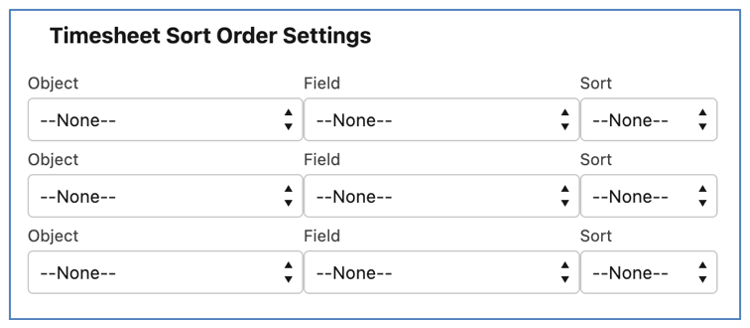
You can specify the Object, Field and Sort Order (e.g. ASC or DESC).
This Setting can also be controlled centrally from the Timesheet Settings on the Control Pad of the Mission Control Console.
Column Settings
The Column Settings provide you with the ability to choose which columns you have visible on the Timesheet. For example, if you don’t want to see the ‘PAN’ column set the checkbox to FALSE and that Column will no longer appear on the Timesheet.
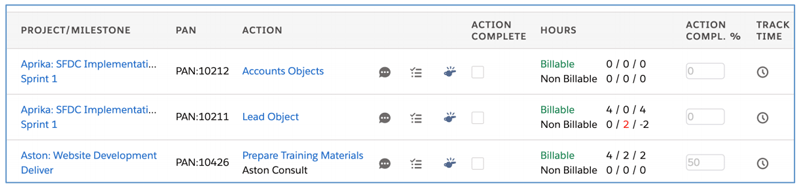
Field Settings
There is a provision for you to be able to include one additional field from the Action Object to be visible on the Timesheet. The field you select here will be displayed directly underneath the Action Name, as shown below:
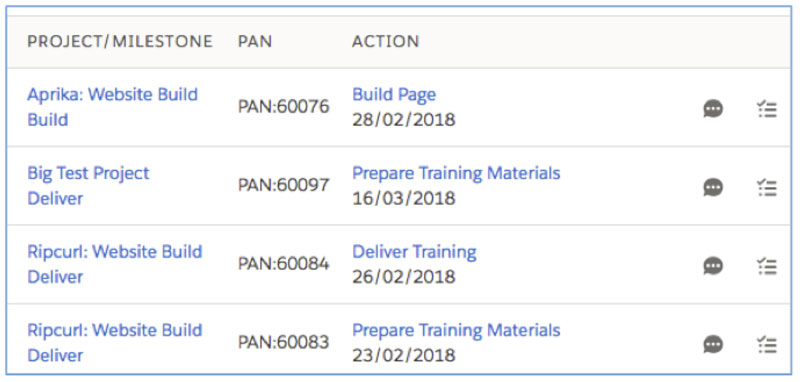
Additional Custom Fields
As well as the one additional field that can be displayed below the ‘Action Name’, a further 6 Custom Fields can be added to the Timesheet for each Action.
These additional Custom Fields are configured within the ‘Timesheet Additional Field Settings’ section of the Timesheet Settings.
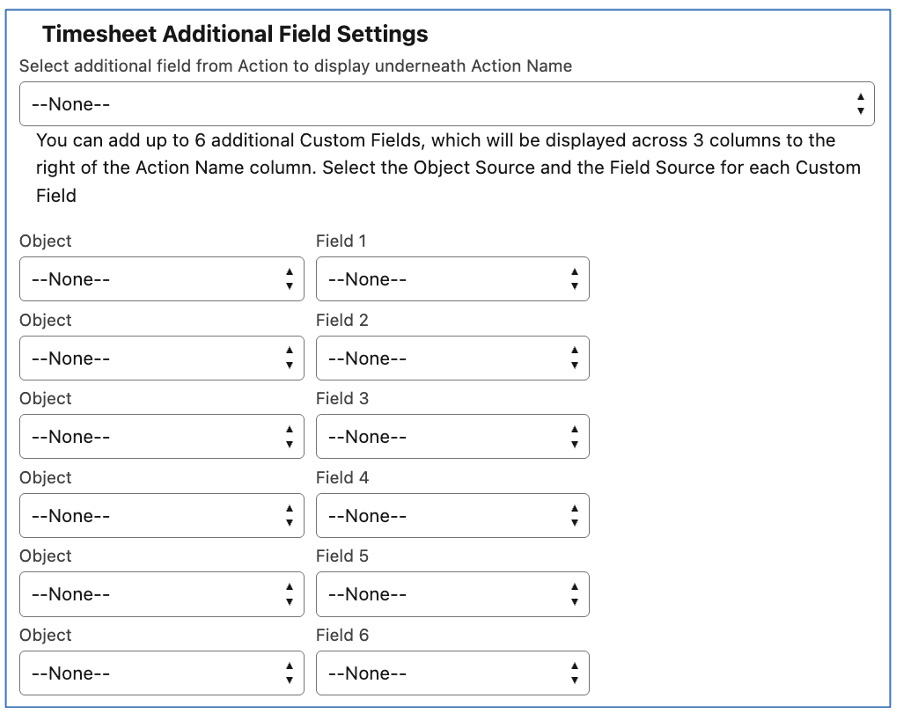
These fields can be sourced from the Project, Milestone or Action record. For each Custom Field, you need to select the Object and the Field.
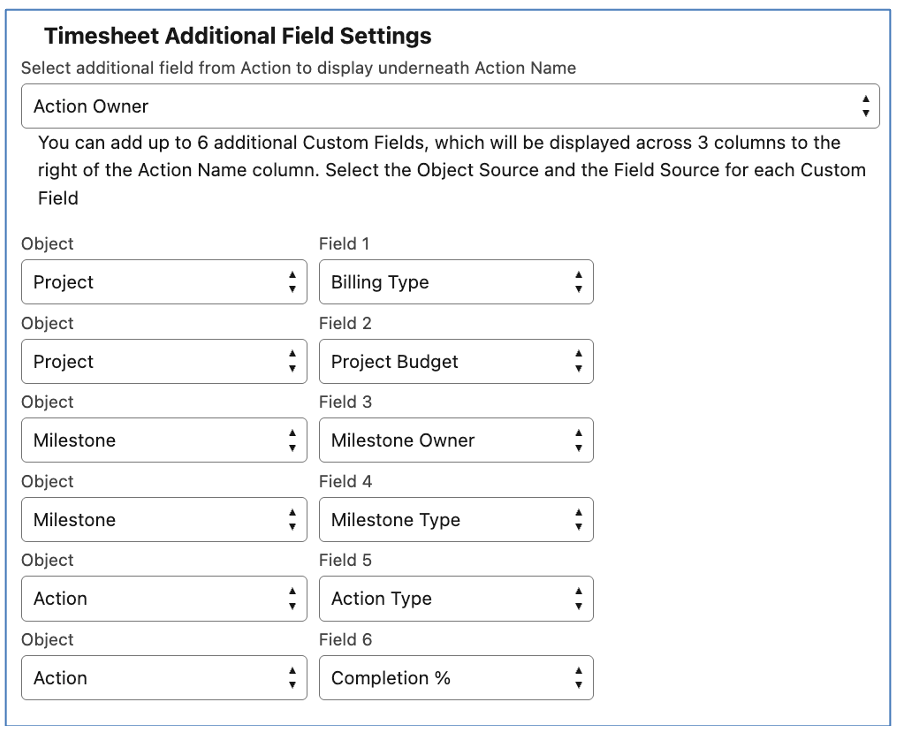
In the example above, fields from the Project, Milestone and Action have been defined.
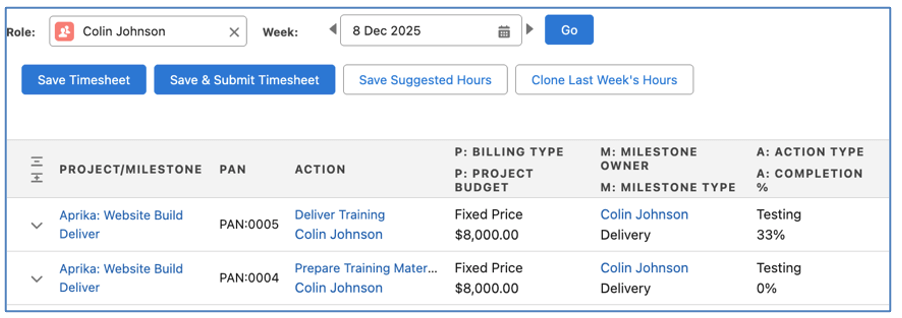
The example above shows the location of the Custom Field under the Action Name, along with the 6 additional Custom Fields.
This Setting can be controlled by individual Users or centrally via the Timesheet Override Settings on the Control Pad of the Mission Control Console.
Time Log Information Modal – Custom Fields
When logging time from the Timesheet, you can access the ‘Time Log Information’ modal to enter further information relating to the hours, such as Notes, relating the Time Log to a Checklist Item, setting it as Overtime, etc.
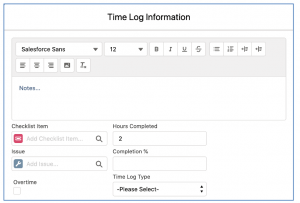
You can choose to hide standard fields from the Time Log Information Modal. By default, the Modal provides Users with access to the following fields:
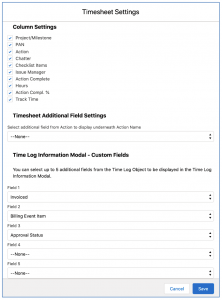
Within the Timesheet Settings, you are able to select specific fields to be hidden, as shown below.
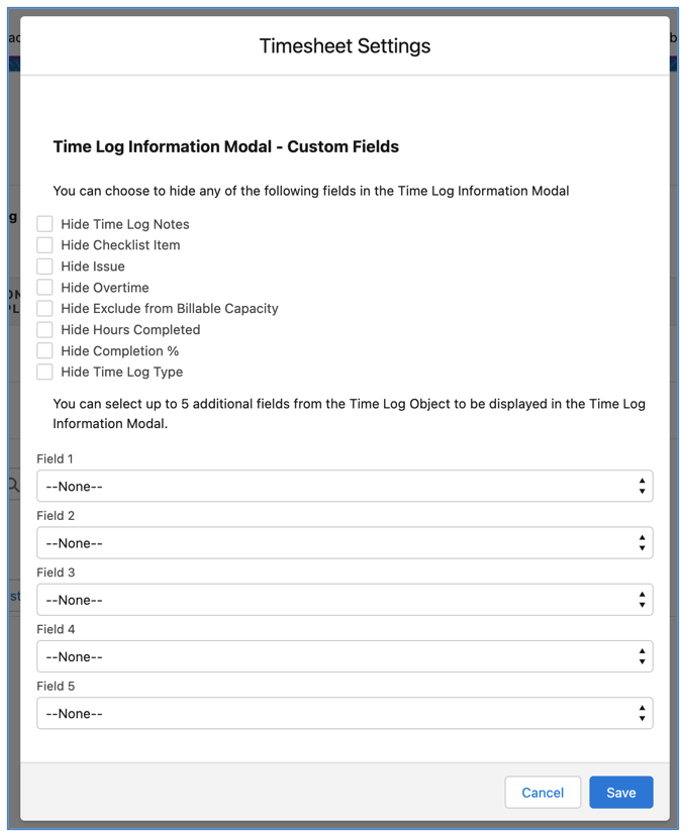
You can specify up to 5 additional fields from the Time Log Object to be accessible from this modal. Users can set the fields they would like to be included in this modal from within the Timesheet Settings, as shown below.
The Timesheet Settings by default can be managed by each individual User on their own Timesheet. However, if you wish to manage these centrally for your entire business, you can do so on the Control Pad of the Mission Control Console.
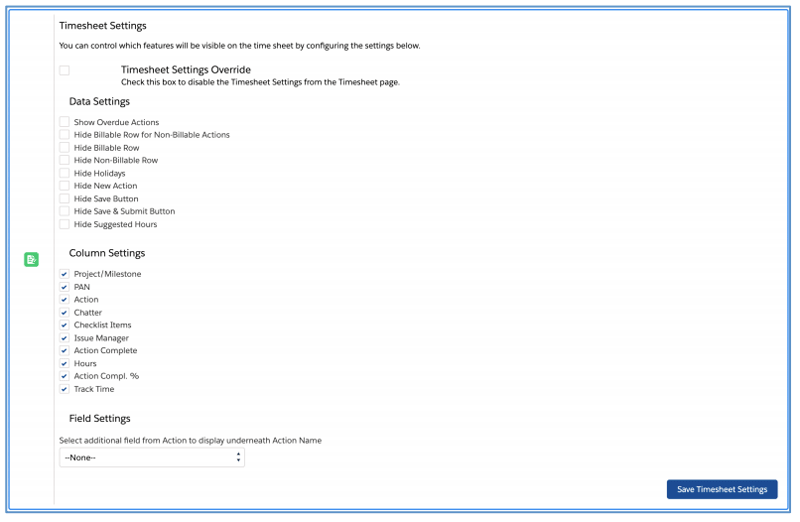
Set the ‘Timesheet Settings Override’ field to TRUE and configure the settings as required, then click Save and these settings will be applied to every User’s Timesheet.
Time Log Summary Modal – Custom Fields
The ‘Time Log Summary Modal’ is accessible by clicking the ‘eye’ icon on the Timesheet. By default it shows the following field information:

To provide customers with the ability to choose which fields are displayed on the Modal, a Field Set is available on the Time Log Object called ‘Timesheet – Time Log Summary Fields’. The following fields are selected by default:
If you wish to add Custom Fields or remove any of the above pre-selected fields, you can do so by editing the fields included within the Field Set.
Timesheet Offset
If you would like the Timesheet to start on a different day than Sunday, then the Start Day can be offset from the Project Automation Settings section of the Control Pad.

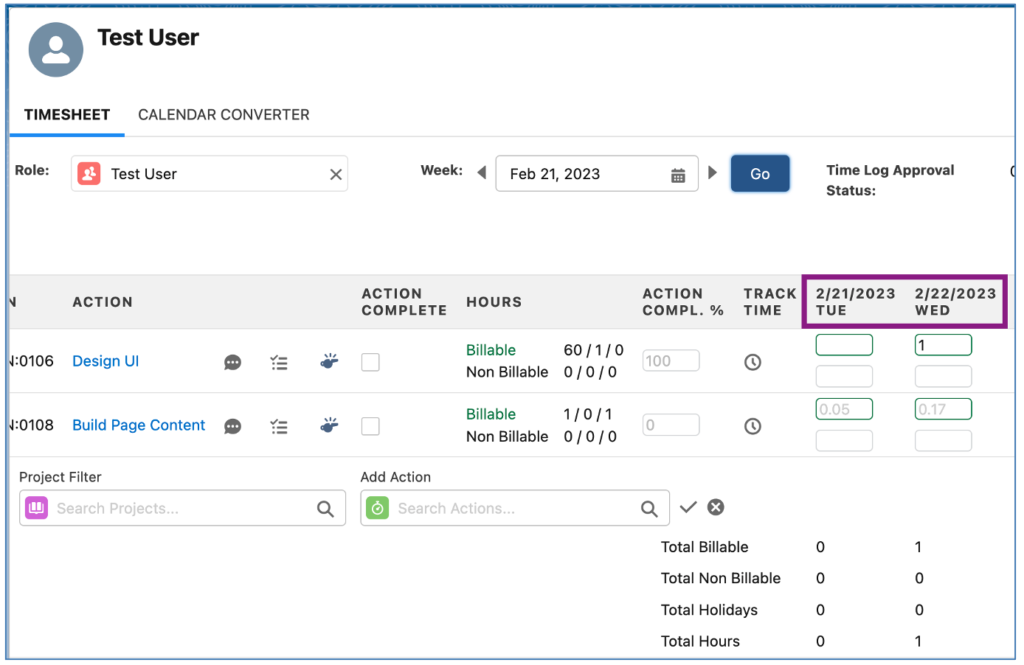
Calendar Converter
The Calendar Converter provides you with an alternative way of logging time by dragging and dropping on the calendar, or by converting Mission Control Actions or Salesforce Events you may have in your Salesforce Calendar. For example, if you’re entering events into your Google or Outlook Calendar to capture your project work, and syncing your Google or Outlook Calendar to Salesforce, these Salesforce ‘Events’ will be displayed on the Calendar Converter tab on the Timesheet, as shown below.
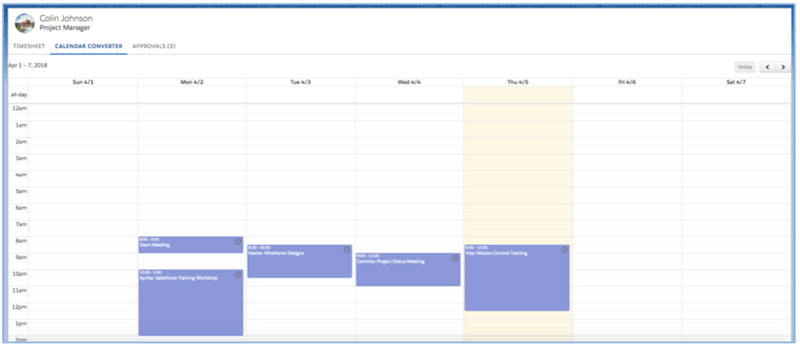
To create a Time Log from any of these Event records, you simply need to click the ![]() icon. This will open up the Time Log component that lets you select the Project / Milestone / Action, enter your Notes and then click the ‘Log Time’ button.
icon. This will open up the Time Log component that lets you select the Project / Milestone / Action, enter your Notes and then click the ‘Log Time’ button.
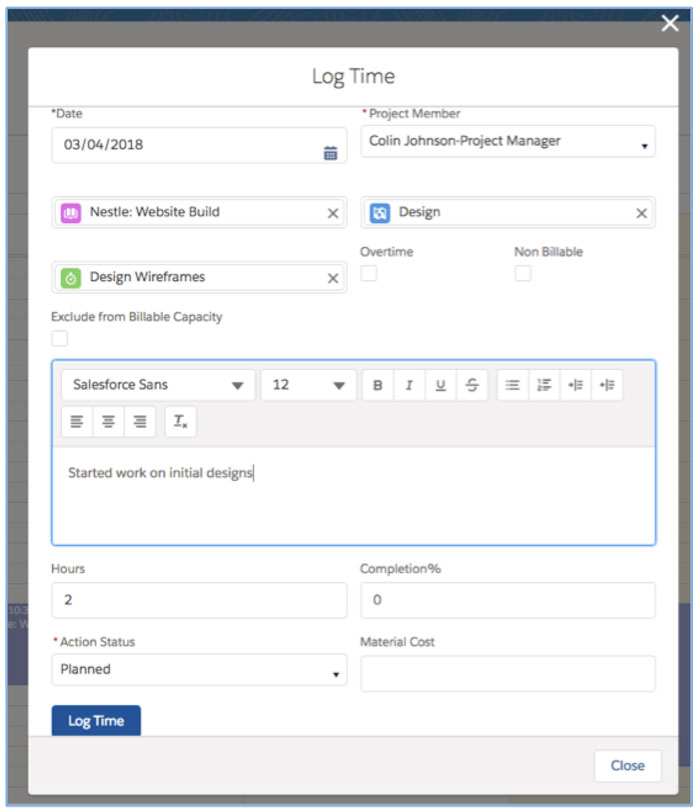
Once the Time Log has been created, the Event on the Calendar Converter will be displayed in the Colour relative to the Project, so you’re able to identify that the Event has already been converted to a Time Log.
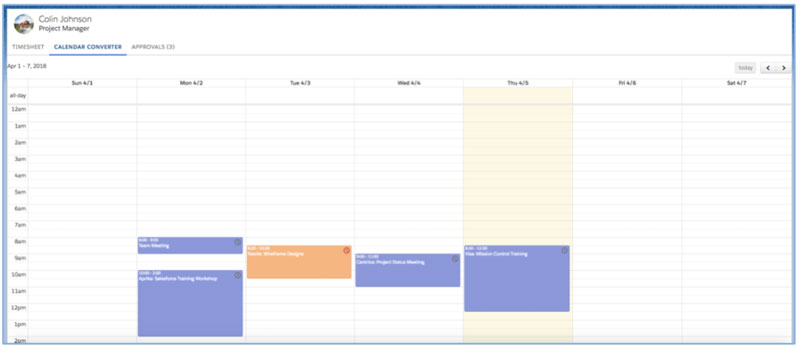
Actions with Start Times
Actions that have the Start Hour and Start Minute fields populated are visible on the Calendar Converter. You can identify an Action based on the icon displayed in the top right corner of the calendar entry, as shown below.
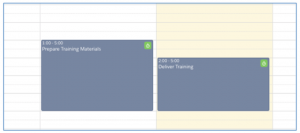
To convert this into a Time Log, click the Action icon and it will open up the Time Log entry component, with the Action, Date and Hours Completed pre-populated as shown below.
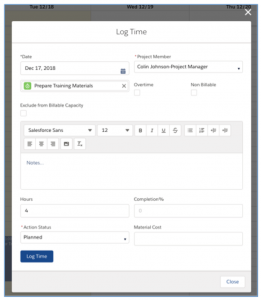
Once you have created the Time Log, the Action icon will be replaced with a red clock icon.
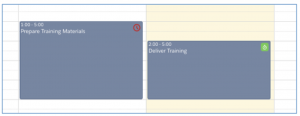
Clicking on this icon will open the Time Log Summary component, enabling you to edit / delete the Time Log details as required.
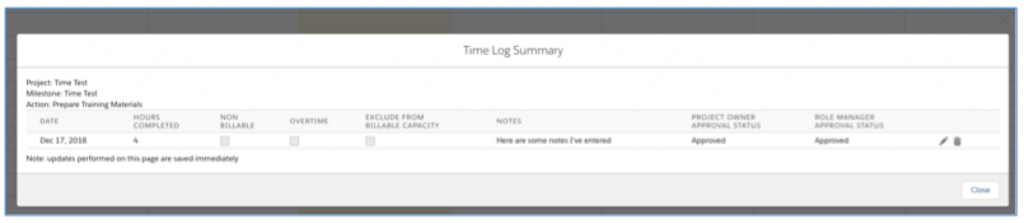
If you delete the Time Log, the Action icon will re-appear, enabling you to log time again if required.
Drag n’ Drop to add Time Logs
You can create a brand new Time Log entry simply by dragging and dropping the duration you’re wanting to log time for, as shown below.
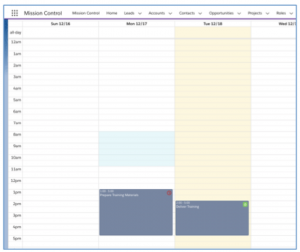
Once you stop dragging, the Time Log entry component will open with the Date and Hours Completed fields pre-populated.
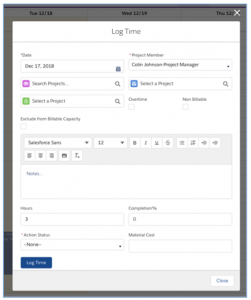
Once you select the Project and Action you can log your time and that new Time Log will appear on the Calendar, as shown below.

Drag n’ Drop to edit Time Logs
If you need to edit the number of hours, or the date of an existing Time Log on the Calendar, you can drag and drop to resize, which will change the ‘Hours Completed’ value, or from one date to another, which will change the Date.
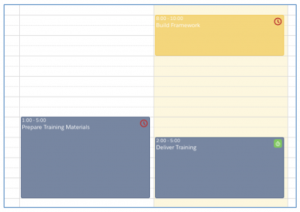
Approvals
Time Logs can be put through an Approval Process. If using the approval process, Time Logs will not be calculated against the billable/cost values of a project until the Time Log has been approved.
There are two approval options that can be used:
Role Manager: On an individual’s Role record, you will be able to specify the ‘Timesheet Approver’. This field will link to another Role record and will be referenced on the Time Log record if ‘Role Manager’ approval is required
Project Owner: The Role record specified as the ‘Project Owner’ on the Project will be referenced on the Time Log if ‘Project Owner’ approval is required.
Both options can be set for each Project by ensuring the following Checkbox fields are set to TRUE.
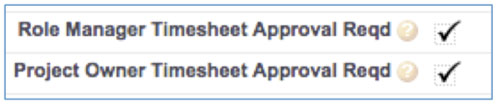
Each approval option contributes to the overall ‘Approval Status’ of the Time Log. The Time Log has three approval status fields as follows:
All fields are picklists with values:
Both ‘Role Manager Approval Status’ and ‘Project Owner Approval Status’ fields must be set to Approved in order for the ‘Approval Status’ to be ‘Approved’.
Once the master ‘Approval Status’ is set to approved, the Hours Completed Value (Billable) and Hours Completed Value (Cost) will be calculated and accounted for on the parent Action.
If you do not wish to utilise this feature, simply ensure the Project fields ‘Role Manager Timesheet Approval Reqd’ and ‘Project Owner Timesheet Approval Reqd’ are FALSE. All Time Log records will automatically default to an Approval Status of ‘Approved’.
A List View is available, which is called ‘Time Logs Requiring My Approval’. This list view will display all Time Logs where the ‘RM Approver Current User’ or ‘PO Approver Current User’ is TRUE. The columns displayed on the list view are:
The approving User will be able to review and approve Time Log records using the inline edit functionality within the List View.
Ignore Time Log Approvals
Customers may have a requirement to approve Time Logs for a Project, but may not need to approve Time Logs for a certain part of the Project. For example, if a Non Billable Milestone is added to a client Project, whilst the Time Logs for other Actions may need approval, Actions related to this Non Billable Milestone may not need to go through approvals.
The ‘Ignore Time Log Approvals’ field on the Milestones and Action enable specific Milestones or Actions within the Project to be able to ignore the approvals process if it’s been set as required on the Project. If the field is set to TRUE on the Milestone, it will be applied to all related Actions.
If this field is set to TRUE on the Milestone or the Action, any Time Logs related to those records will automatically be set to Approved.
Update Approval Status when Reparented
The Approval Status of a Time Log will be reviewed if the Time Log is reparented from one Action to another. For example, Mick logs time against an Action on Project A and realises it was the wrong Action and he then reparents it to the correct Action on Project B. If Project B has different Time Log Approval settings to Project A, the Approval Status of the Time Log will be updated to reflect the requirements of Project B.
Expanding on the example above, the table below illustrates the settings for Project A and Project B and the resultant change to the Approval Status once the Time Log has been reparented.
Project A | Project B |
Project Owner Timesheet Approval Reqd = FALSE Role Manager Timesheet Approval Reqd = FALSE Time Log fields prior to reparenting Approval Status = Approved Project Owner Approval Status = Approved Role Manager Approval Status = Approved | Project Owner Timesheet Approval Reqd = TRUE Role Manager Timesheet Approval Reqd = FALSE Time Log fields after reparenting Approval Status = Submitted Project Owner Approval Status = Submitted Role Manager Approval Status = Approved |
Automatic Approval for no Timesheet Approver
Where a Project has the ‘Role Manager Timesheet Approval Reqd’ field set to TRUE, but the Role that has logged time does not have someone set as their ‘Timesheet Approver’, the Time Log ‘Role Manager Approval Status’ will automatically be set to Approved.
You can also submit all of your pending Time Logs in one go via the Timesheet.
The Approvals tab on the Timesheet provides you with an efficient way of approving any Time Logs that are submitted for your approval.
Note, the Approvals tab will only be visible on the Timesheet if you have Time Logs to approve.
When you click on the Approvals tab, you’ll see a list of the people that you need to review / approve Time Logs for on the left-hand side of the page.

Clicking on to one of the Roles listed will then display the Time Logs that require your approval, as shown below:
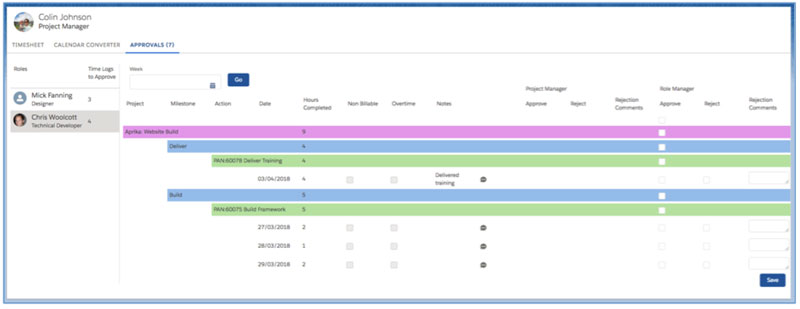
The main section of the page will show you all of the Time Logs that require your approval. The Time logs are grouped by Project > Milestone > Action. The Date, Hours, Non-Billable, Overtime and Notes fields are visible for each Time Log. You also have access to the Time Log Chatter Feed should you need to collaborate with colleagues to clarify anything.
There are sections for approval that is required as the ‘Project Manager’ or the ‘Role Manager’. You will only have the ability to approve as either of these, if you are specified as that approver. For example, if I’m not the Project Manager, but I’m the person’s Role Manager, I will only be able to approve the Time Logs as the Role Manager.
There are Checkboxes to ‘Approve’ or ‘Reject’ the Time Logs, as well as a field for entering ‘Rejection Comments’
Approvals Tab Settings
You are able to select which fields are visible on the Approvals Tab of the Timesheet. By default, the following fields will all be displayed:
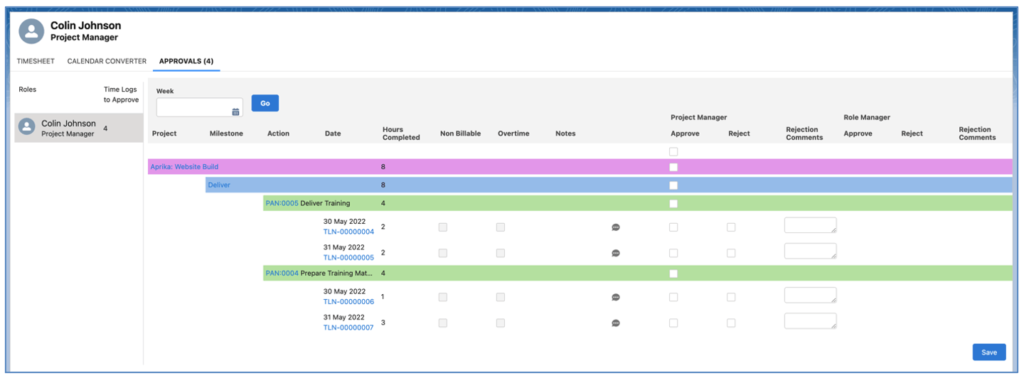
Within the Timesheet Settings, you are able to select specific fields to be hidden, as shown below.
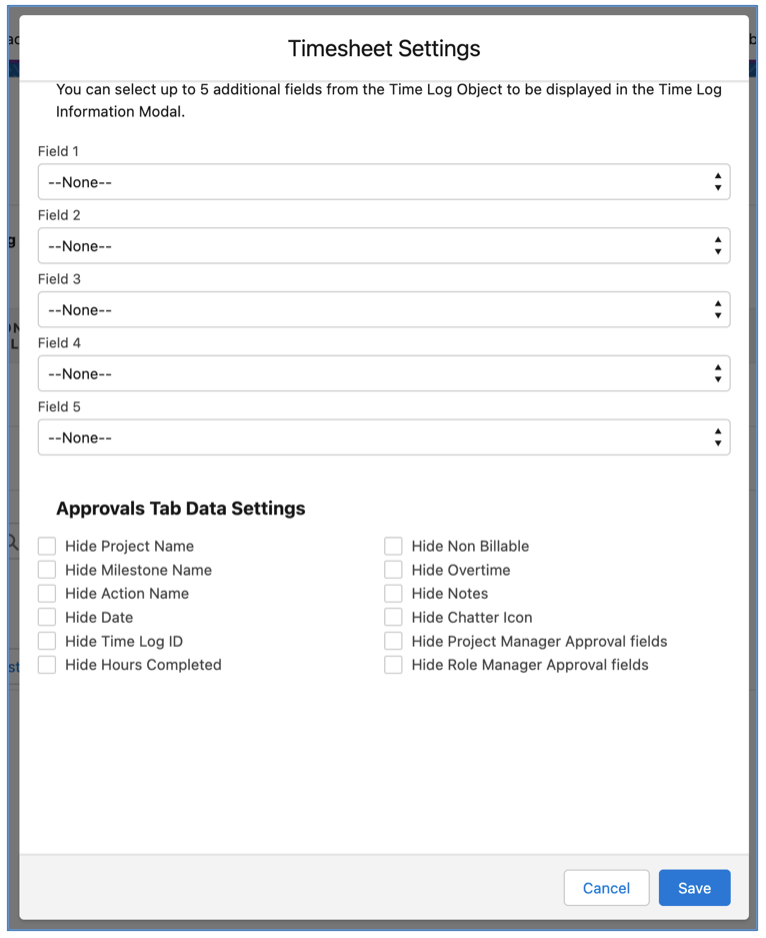
This can be controlled by individual Users by modifying their own Timesheet Settings directly on the Timesheet. Alternatively, if you are using the Timesheet Settings on the Control Pad to override individual User preferences, it can be managed there as well.
Approvals Tab – Custom Fields
By default, the Approvals Tab on the Timesheet will display the following fields:
All of these standard Fields can be turned on/off via the Timesheet Settings.
For Customers that wish to include additional Fields on to the Approvals Tab, you will need to add Fields to the ‘Timesheet Approvals Tab Custom Fields’ Field Set.
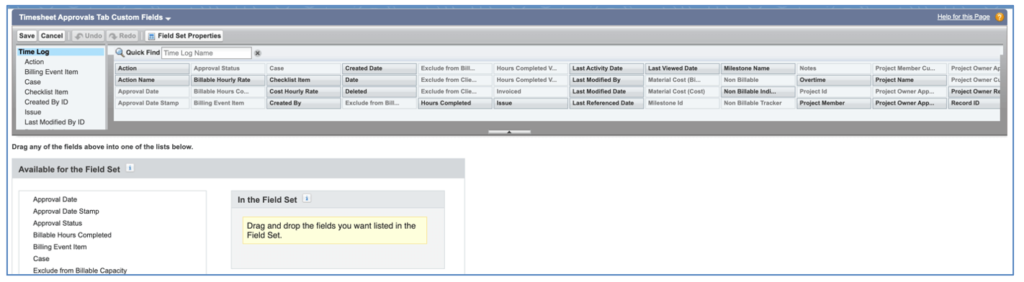
Any Field added to this Field Set will be placed to the right of all standard Fields.
The Rejections Tab of the Timesheet provides access to any Time Logs you have submitted, that have subsequently been rejected.
If any of your Time Logs have been rejected, you will see the Rejections Tab on the Timesheet, as shown below.
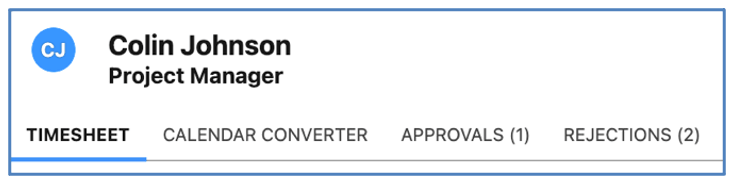
When you click on the Rejections Tab, you will see the Time Logs that you previously submitted that are currently rejected, along with any rejection comments.

Within the Rejections Tab, you are able to edit the individual Time Logs to make the necessary adjustments. To do this, click the pencil icon to edit the record.
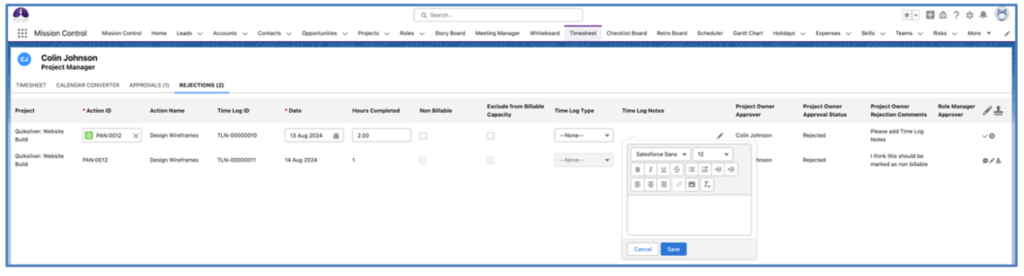
Once you’ve made the necessary updates, you can click the tick icon to save the changes. Once all of your changes have been made, you can click the submit icon, as shown below.
![]()
This icon can be clicked to resubmit individual Time Logs, or you can click the master icon in the top-right to resubmit all of the rejected Time Logs.
The Daily Digest also contains a section showing you any Time Logs you currently have that have an Approval Status of Rejected.
A List View on the Time Log Object called ‘My Rejected Time Logs’ enables you to view a list of the Time Logs you have submitted that have been rejected. This will dynamically display Time Logs for the individual User based on the Time Logs being associated to their Role record.

This List View provides the ability to inline edit the Time Logs to enable Users to make the required changes and manually adjust the applicable approval status field(s) back to Submitted.
If you have Actions that you want to exclude from the Timesheet, you are able to set the ‘Exclude from Timesheet’ field to TRUE. This field is available to be applied at the Project, Milestone and individual Action levels. If you apply it at the Project, all Actions on that Project will be excluded from the Timesheet. If you apply it at the Milestone, all Actions relating to that Milestone will be excluded from the Timesheet.
Any Action that has the ‘Exclude from Timesheet Indicator’ field set to TRUE will be excluded from the Timesheet.
Note, this can also be controlled at the Contributor level. Therefore, if the Action Owner wishes to have the Action appear on their Timesheet, but an individual Contributor does not, you can set the field to be TRUE on the individual Contributor record(s).
You are able to exclude specific Roles from the Lookup on the Timesheet, so when you’re searching for a Role, you can choose to exclude specific Roles (e.g. Placeholders, Clients, etc.).
This is controlled by the following field on the Role record:
This field can be found in the ‘Permission/Notification Settings’ section of the Role page.
If this field is set to TRUE, the Role will not be accessible in the Lookup for the Timesheet or the Log Time component.
If you have Actions that you want to restrict Roles from logging time against, you are able to set the ‘Prevent Time Logs’ field to TRUE. This field is available to be applied at the Project, Milestone and individual Action levels. If you apply it at the Project, all Actions on that Project will be unable to have time logged against them. If you apply it at the Milestone, all Actions relating to that Milestone will be unable to have time logged against them.
Any Action that has the ‘Prevent Time Logs Indicator’ field set to TRUE will be excluded from the Timesheet and logging time will be prohibited from any other pages such as the Whiteboard, Action Pad, etc.
If a User attempts to log time against an Action manually, they will receive the following notification.
‘This Action has been configured to not allow Time Logs. Please speak to the Project Manager’
To prevent Users from leaving their Start/Stop time tracking running too long, you can leverage the ‘Restrict Time Tracking Maximum Duration’ setting. This setting is accessed from within the Project Automation Settings Tile of the Control Pad of the Mission Control Console.
![]()
To activate this setting, you will need to set the checkbox to TRUE and select a duration from the picklist field. The picklist values range from 00.25 to 12.00 in increments of .25.
When this setting is enabled, the time tracker will automatically be stopped once it has reached the maximum duration.
If the time tracker is unable to be stopped, due to hitting a Validation Rule or mandatory field requirement, etc., the User will receive an email notification advising that the time tracker has reached the maximum allowed duration and has been unable to be stopped.
An example of the email notification is as follows:
![]()
You are able to issue out Timesheet Submission reminder emails and Timesheet Exception notification emails when people have not submitted sufficient time on their Timesheet.
Timesheet Submission Reminder
The Timesheet Submission Reminder is an email template that will be sent to individual Role records on a specified day of the week if they have not logged the required percentage of hours for the current week. For example, you may choose to schedule this reminder to go out on a Friday afternoon if people have not logged more than 90% of their time for the week.
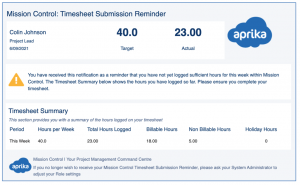
Each individual Role can be opted in to receive this email notification by setting the ‘Receive Timesheet Reminder’ field to TRUE on their Role record.
The settings on the Control Pad allow you to enable this email notification. You can specify the date, time and percentage. Any Role that has not logged enough hours on their Timesheet for the current week to meet the percentage specified, will receive the Timesheet Submission Reminder. The percentage is based on the ‘Hours per Week’ field on their Role record. The email will be issued at the time specified based on the individual User’s Time Zone setting.
Timesheet Exception Notification
The Timesheet Exception Notification is an email template that will be sent to the Role that is the ‘Timesheet Approver’ for other Roles on a specified day of the week. The person will receive this email if any Role that they are the Timesheet Approver for has not logged the required percentage of hours for last week. For example, you may choose to schedule this notification to go out on Monday morning if people have not logged more than 90% of their time for last week.
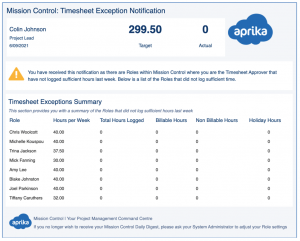
Each individual Role can be opted in to receive this email notification by setting the ‘Receive Exception Notification’ field to TRUE on their Role record.
The settings on the Control Pad allow you to enable this email notification. You can specify the date, time and percentage. Any Role that the person is the Timesheet Approver for will be included in this exception notification if they have not logged enough hours on their Timesheet for last week to meet the percentage specified. The percentage is based on the ‘Hours per Week’ field on the individual Role records. The email will be issued at the time specified based on the individual User’s Time Zone setting.
Control Pad Settings
You can enable the distribution schedule for the Timesheet Submission Reminder and Timesheet Exception Notification emails from the ‘Timesheet Notifications’ section on the Control Pad of the Mission Control Console.
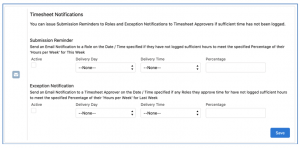
Set the Active field to TRUE, specify the Delivery Date, Delivery Time and Percentage and click Save. This will be scheduled to distribute the emails to any Role that has the appropriate field on their Role record set to TRUE. The emails will be distributed on the date/time specified based on the individual User’s Time Zone settings.
To provide greater control over the Timesheet Submission and Exception emails being sent out, you can specify which Time Logs should be factored into the calculation of their ‘Hours per Week’ percentage.
For example, Acme Inc. expects all of their project resources to have 90% of their time logged by 4pm on Friday. If this target hasn’t been met, the Timesheet Submission email will be sent out. However, they would like this percentage to only be based on Time Logs that have been submitted or approved. If the person has created the Time Log, but not yet submitted it, it should not be counted.
To specify which Time Logs should be included when determining if the Role has logged sufficient time for the week, Acme Inc. configures the ‘Approval Status’ setting within the Timesheet Notifications Tile on the Control Pad of the Mission Control Console.

In the example above, only Time Logs that have an Approval Status of ‘Submitted’ or ‘Approved’ will be factored in when determining if the Role has achieved the percentage target.
For Customers approving Time Logs & Expenses, you are able to delegate the approval process whilst the main approvers are away from the business on Holiday (e.g. extended PTO, Sick Leave, etc.).
For both Time Logs & Expenses, there are two options for approval:
When creating a Holiday record, Users can choose whether or not approval delegation is required. For example, if Mick Fanning is taking Friday afternoon as PTO, he may decide he doesn’t need to delegate approvals. Whereas, if he’s going on PTO for 2 weeks, it would make sense to ensure Time Logs and Expenses he would normally approve are being approved by a delegated approver in his absence.
To utilise the Delegated Approvals feature, you will need to activate the ‘Enable Delegated Approvals’ setting within the ‘Custom Settings’ Tile on the Control Pad of the Mission Control Console.
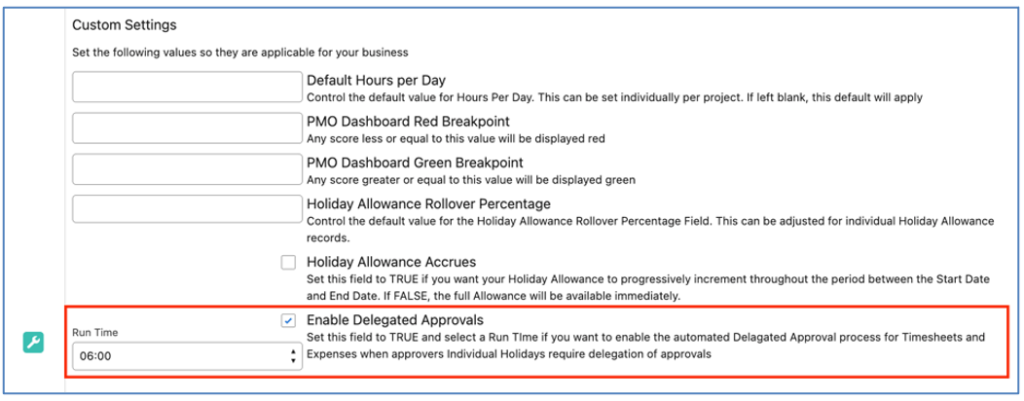
You will need to set the Checkbox to TRUE and select a Run Time and click the Save button within the ‘Custom Settings’ Tile.
Each day, the delegated approval process will run at the time specified and handover the approval from the Approver to the Delegated Approver on the Start Date of the Holiday and return the approval to the Approver from the Delegated Approver on the End Date of the Holiday.
To use the Time Log Delegated Approval process, the following fields need to be populated on the Role record of the person that is going to be delegating approval to another person:
When Time Log approval delegation is required for a Holiday, the following fields must be populated on the Holiday record:
For a Holiday that has either of these fields set to TRUE, the following activities will be carried out as part of the delegated approval process.
Holiday Start Date
Delegate Timesheet Approvals (Proj Owner) = TRUE:
Delegate Timesheet Approvals (Role Mgr) = TRUE:
Holiday End Date
Delegate Timesheet Approvals (Proj Owner) = TRUE:
Delegate Timesheet Approvals (Role Mgr) = TRUE:
Note: these activities will be processed at the Run Time specified for the ‘Enable Delegated Approvals’ setting.
The Role that is the delegated approver will receive an email notification – refer to the ‘Delegated Approver Notification’ section below.
To use the Expense Delegated Approval process, the following fields need to be populated on the Role record of the person that is going to be delegating approval to another person:
When Expense approval delegation is required for a Holiday, the following fields must be populated on the Holiday record:
For a Holiday that has either of these fields set to TRUE, the following activities will be carried out as part of the delegated approval process.
Holiday Start Date
Delegate Expense Approvals (Proj Owner) = TRUE:
Delegate Expense Approvals (Role Mgr) = TRUE:
Holiday End Date
Delegate Expense Approvals (Proj Owner) = TRUE:
Delegate Expense Approvals (Role Mgr) = TRUE:
Note: these activities will be processed at the Run Time specified for the ‘Enable Delegated Approvals’ setting.
The Role that is the delegated approver will receive an email notification – refer to the ‘Delegated Approver Notification’ section below.
Delegated Approver Notification
When a Role has been assigned as a Delegated Approver, they will be sent an email notification on the Start Date of the Holiday. An example of the email notification is below.
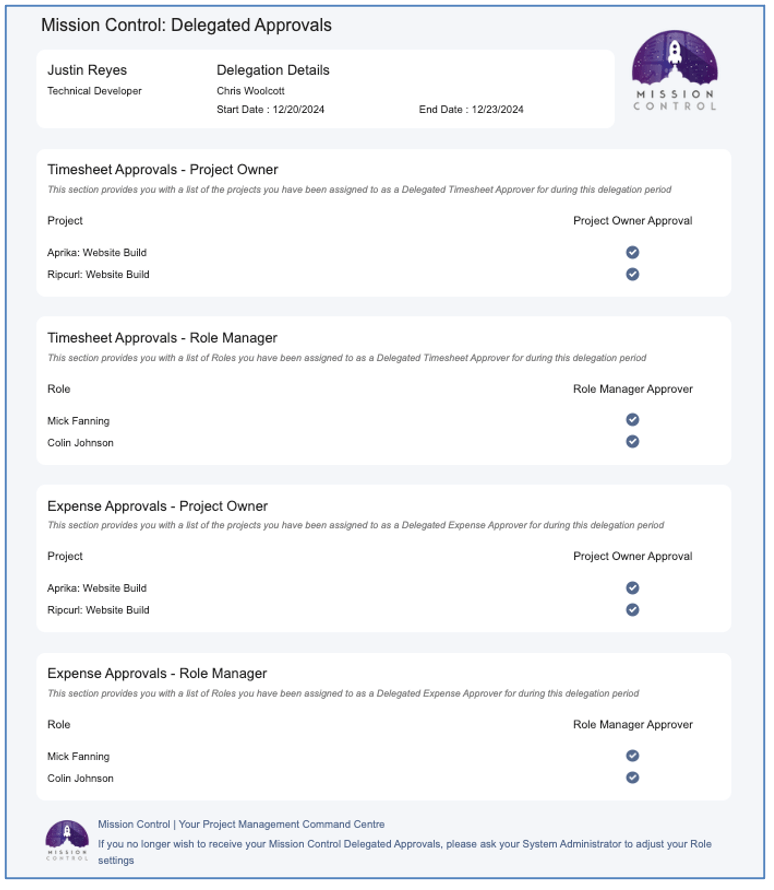
Note: this email notification will be processed at the Run Time specified for the ‘Enabled Delegated Approvals’ setting.
To log time from a Case, you need to ensure the ‘Action’ field is added to the Case Page Layout. You will also need to edit the Case Page within the Lightning App Builder and add the ‘Add Action’ and ‘Log Time’ Tabs to the page, as shown below.
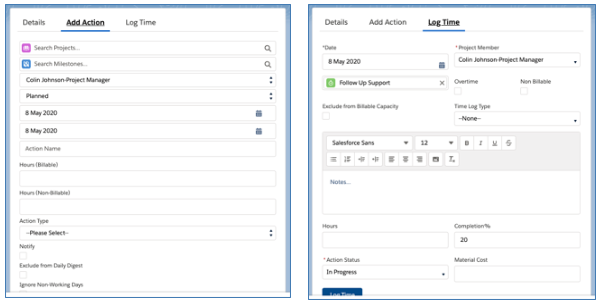
Once you have associated the Case to an Action, the Log Time component will automatically identify the correct Action to associate the Time Log to. The Time Log will then be created and relate to both the Action and the Case.
A Permission Set is available within Mission Control that can be assigned to Users that require to log time from the Case Object. This Permission Set is called ‘Mission Control Case Fields’.
Note: This functionality is only available within Lightning Experience.
The ‘Status Path’ component provides a snapshot of the current Status of all related records at the level below the record you are viewing within the Project Plan. For example, if I’m looking at the Component on the Milestone Page, it will display all of the related Actions. It can be added to the Project, Milestone or Action Lightning Page Layouts using the Lightning App Builder. The Component will dynamically display records as follows:
This Component is read-only, to have it reflect changes, they will need to be applied directly on the individual records.
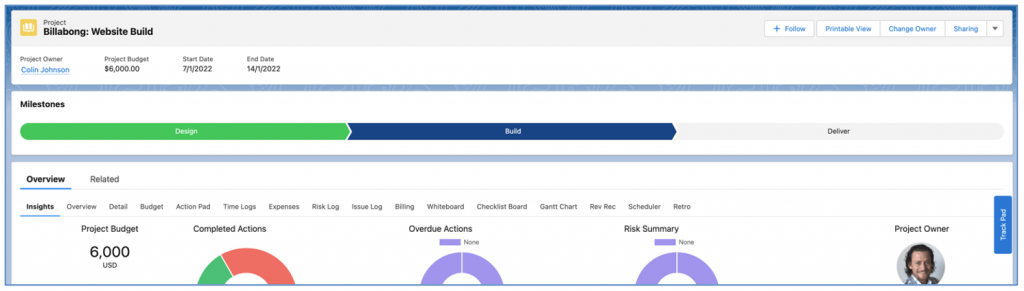
Each section of the Path will be populated with the Name field from the record. The sections are coloured based on the Status of the record, as outlined below.
The records will be displayed based on the following sort order.
Milestone | Action | Checklist Item |
Milestone Sort Order End Date Start Date Name | Gantt Sort Order End Date Start Date Action Name | Sort Order End Date Start Date Item Name |
Users can submit expenses within Mission Control, linking them to the relevant project if applicable and even submitting them for approval. This can be done on an individual basis from the Expenses related list of the Relevant Project, or directly via the Expenses tab if not related to a Project, or, in bulk using the Expense Log page.
To create an Individual Expense record, click the ‘New Expense’ button on the Expenses Tab or via the Expenses related list on the Project detail page, as per the illustrations below.
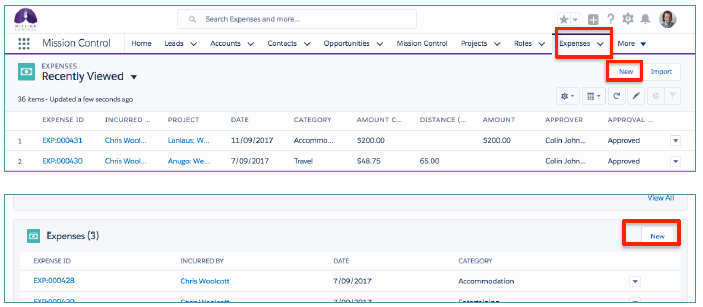
On the next screen, complete the details about the expense such as; the expense type, who it was incurred by, the date and the amount. You can also log expenses for mileage costs by entering the number of kms/miles travelled. If you use this option the claim amount will be calculated based on the distance multiplied by the mileage rate recorded on the related Role record. (You will need to set up your mileage rates first). Complete the details and then Save.
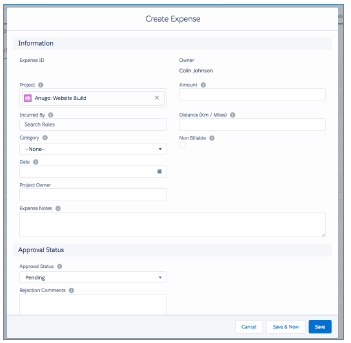
To record multiple expenses at one time, select the “Expense Log” button on the ‘Progress Pad’ Tab of the Mission Control Console.
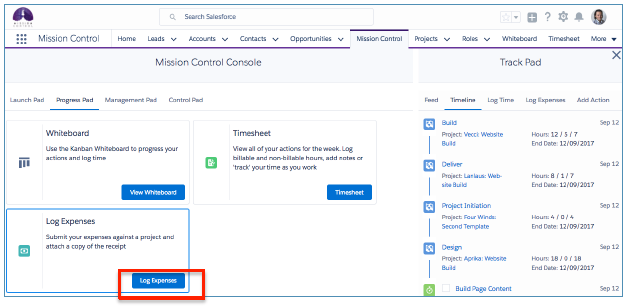
You can then select the Role that the expenses relate to, and add as many rows as you need to record all of your expenses in the one page. Once you have completed all of the expense information, you can click the Create Expenses button to create the expenses.
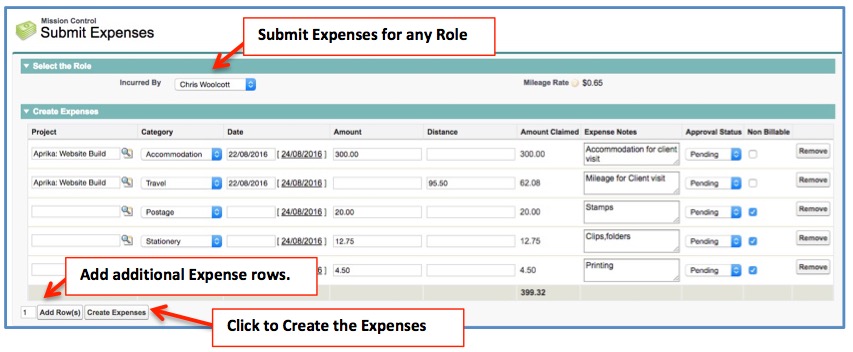
Expense Mark Ups
To apply a Mark Up to your Project Expenses, you can specify the ‘Expenses Mark Up %’ on the Project. For example, a Marketing Agency running a Launch Event for a customer may choose to apply a 10% mark up on Expenses incurred as part of the Project.
When logging Expenses against a Project, the User is able to specify whether or not to apply the mark up. If mark up is required, the User will need to ensure the ‘Mark Up Required’ field is set to TRUE. By default, the mark up will be calculated based on the ‘Expenses Mark Up %’ field on the Project. However, if a different percentage of mark up is required, the User can enter a value in the ‘Custom Mark Up %’ field of the individual Expense.
When logging an Expense, the User will enter values into the ‘Cost Amount’ and ‘Cost Tax Amount’ fields. The ‘Amount’ and ‘Tax Amount’ fields will automatically be calculated factoring in any mark up that may be required.
Should you want to specify a fixed mark up amount, rather than using the Mark Up %, you can manually enter a value into the ‘Custom Mark Up Amount’ field. This field can be used instead of applying the ‘Mark Up %’.

If the ‘Custom Mark Up Amount’ contains a value and ‘Mark Up Required’ Checkbox is TRUE, the ‘Amount’ field will be based on the ‘Cost Amount’ + ‘Custom Mark Up Amount’ instead of ‘Cost Amount’ + (‘Cost Amount’ * ‘Mark Up %’).
Expense Approvals
If you require Expenses to be approved, you have two options as to who needs to approve the Expense, as outlined below:
There are two fields on the Project record called ‘Project Owner Expense Approval Reqd’ and ‘Role Manager Expense Approval Reqd’, as illustrated below:

Project Related Expenses
If you require the Project Owner to approve Expenses related to the Project, you will need to set the ‘Project Owner Expense Approval Reqd’ to true.
If you require the Role Manager to approve Expenses related to the Project, you will need to set the ‘Role Manager Expense Approval Reqd’ to true.
If you do not require approvals for Expenses related to a Project, both fields should be left false.
Non Project Expenses
Expenses that are not related to a Project will require approval, if the ‘Expense Approver’ field is populated.
Submitting Expenses for Approval
When you create an Expense, you will have the option to click the ‘Save Expense’ button or the ‘Save & Submit Expense’ button.
The Save Expense button will save the Expense and set the Approval Status to Pending if approval is required, and Approved if approval is not required.
The Save & Submit Expense button will save the Expense and set the Approval Status to Submitted if approval is required, and Approved if approval is not required.
Submitting Expenses for Approval
Once you are ready to submit the expense you can update it to submitted directly on the record, or via the “My Pending Expenses” related list.
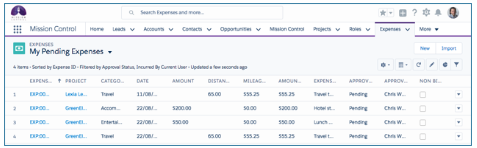
Approving Expenses
To approve Expenses, go to the Expense Object Tab and select the ‘Expenses Requiring My Approval’ List View. This will display all Expenses that require your approval, either as the Project Owner or the Role Manager. Using the inline edit functionality of the List View, you’ll be able to update the Project Manager Approval Status and / or Role Manager Approval Status to Approved.
Only once an Expense has been set to ‘Approved’, will the amount be attributed to the Project. Expenses do not have to relate to a Project, so you may wish to consider using this Object for all of your staff expenses, not just those related to project work. You can also use the ‘Notes & Attachments’ related list to upload supporting documentation such as receipts.
You can also log expenses (and upload supporting receipts) directly from the Salesforce1 Mobile App as per the screenshots below.
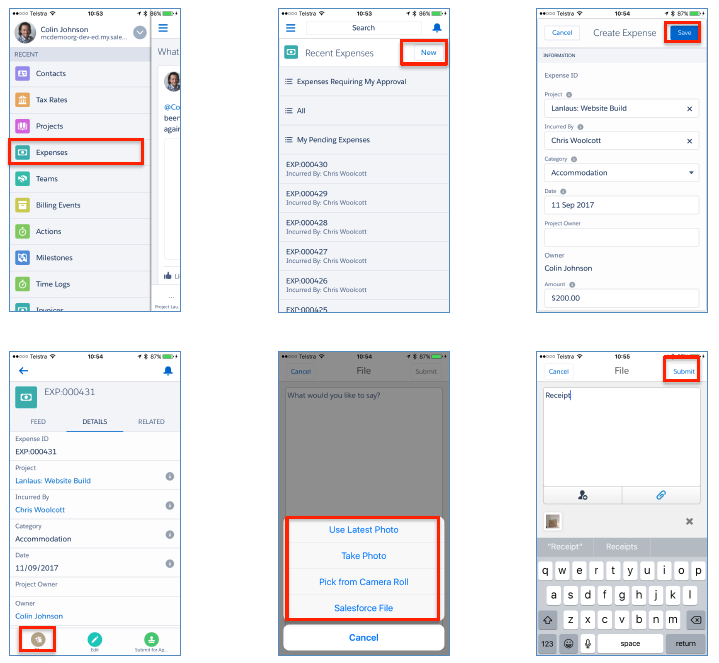
Expense Rejections
A List View on the Expense Object called My Rejected Expenses’ enables you to view a list of the Expenses you have submitted that have been rejected. This will dynamically display Expenses for the individual User based on the Expense being associated to their Role record.

This List View provides the ability to inline edit the Expense records to enable Users to make the required changes and manually adjust the applicable approval status field(s) back to Submitted.
The Daily Digest also contains a section showing you any Expenses you currently have that have an Approval Status of Rejected.
The Whiteboard is a ‘Kanban’ board that enables you to visualise all of your Actions based on their current Status. You can launch the Whiteboard directly from the Mission Control Console, by clicking on the ‘Progress Pad’ Tab:
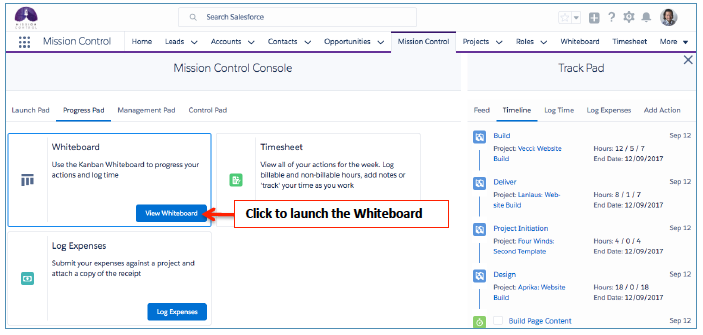
Each Action is displayed as a ‘Sticky Note’, or ‘Card’ on the Whiteboard, showing details such as:
You can drag and drop the Action cards from one column to another. For example, if you have an Action that has progressed from ‘Planned’ to ‘In Progress’, you can simply drag it from the Planned column and drop it into the In Progress column.
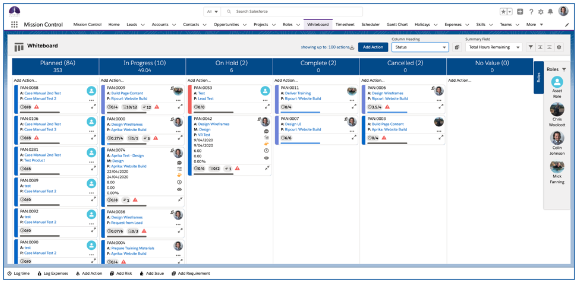
Note: When you log time against a ‘Planned’ Action, it will automatically get updated to ‘In Progress’.
Add Milestone
You can add a new Milestone by clicking the ‘Add Milestone’ button located in the header of the Whiteboard.

When you click the ‘Add Milestone’ button, it will open the standard Milestone Page Layout. Once you click Save within the Modal, the Milestone will be created and will be available for you to reference from the Whiteboard.
Add Action
You can add a new Action by clicking the blue ‘Add Action’ button located in the header of the Whiteboard.

This will open up the New Action modal, where you are able to enter full details for a new Action and then click Save.
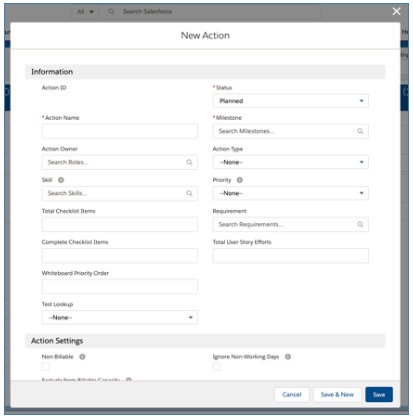
Quick Add Action
You can quickly add a new Action by clicking the ‘Add Action’ just below the column header. This will open up the Quick Add section, as shown below:
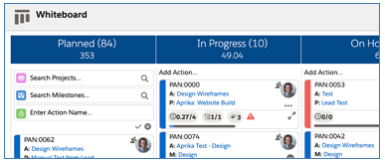
Simply select the Project and Milestone, type in the Action Name, and hit enter. The Action will be created and the fields reset to enable you to add another Action if required.
If you have a Validation Rule or field requirement that prevents the Action from being created, a New Action page will open up where you can complete the required fields and save the record.
Action Card
Below is an example of an Action Card on the Whiteboard.
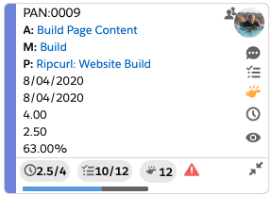
The Action Card offers you a lot of functionality, each feature of the card is explained below.
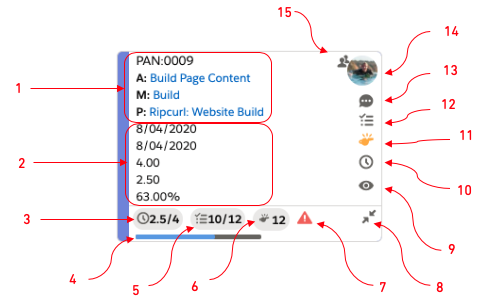
Collapse / Expand All
The Action Cards can show a lot of information, and as such, can take up a fair amount of space, and you may wish to have a more compact view. The Cards can be collapsed or expanded as required between the ‘Detail’ and ‘Compact’ views, based on how much information you wish to view. Below are examples of the expanded and collapsed Cards.
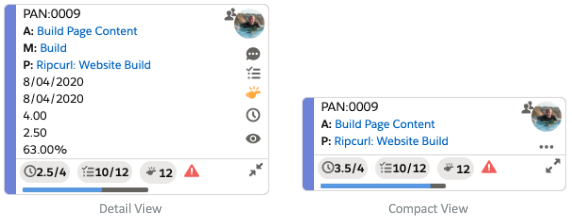
Within the Whiteboard Settings, you can specify the default view for any new Actions. You are able to collapse / expand individual Actions by clicking the ![]() or
or ![]() icon in the bottom right of the Card. You are also able to collapse / expand all Actions at once by clicking the Expand All or Collapse All button within the Whiteboard Header, as shown below.
icon in the bottom right of the Card. You are also able to collapse / expand all Actions at once by clicking the Expand All or Collapse All button within the Whiteboard Header, as shown below.

Action Sort Order
By default, the Action Cards will be displayed based on the following values:
If you need to reorganize the priority of Actions within a specific column, you are able to drag and drop them up or down within the column and that adjustment will be persistently remembered.
The Whiteboard Priority Order field value is adjusted by dragging an Action up / down within a column, but if the Action is dragged left / right into another column, the values will not be adjusted.
Users have the ability to control the Sort Order of cards should they not wish to use the default sort order. This can be controlled within the Whiteboard Settings modal, as shown below:

Users can disable the Whiteboard Priority Order field from being used as the initial sorting value. In addition, they can specify up to 5 fields to sort by, and the direction (e.g. ASC / DESC).
Column Heading
You’re able to dynamically adjust the Column Headings. By default, Status columns will be displayed. However, if you want to switch from viewing columns for Status to Priority, you just need to select the Picklist in the ‘Column Heading’ field as below.

This will dynamically switch the column headings on the Whiteboard and rearrange all of the Actions based on their ‘Priority’ value.

The Column Heading options include all Picklist fields on the Action, plus the ability to select ‘Milestone’ if the Whiteboard is filtered to just display Actions relating to one Project.
You are also able to select which values within the selected Column Heading field are displayed as columns. For example, if Status is selected, by default, all values will have a column displayed, as shown below.

However, you can choose which options you wish to be displayed by clicking the ![]() icon.
icon.
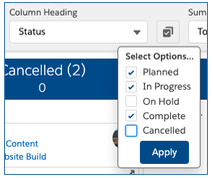
Once you make the selection and click Apply, only the selected values will have a column displayed. This will be persistently remembered until the Column Heading field is changed.

You can set a separate persistent value for the ‘Column Heading’ for when you are viewing the Whiteboard via the Project Overview.

This enables Users to set the persistent ‘Column Heading’ to be Milestone in context of the Project Overview if required.
Summary Field
You’re able to dynamically adjust the Summary Field. By default, the ‘Summary Field’ will be set to Total Hours Remaining. You have the option to change this to a range of other Number or Percent fields on the Action Object.
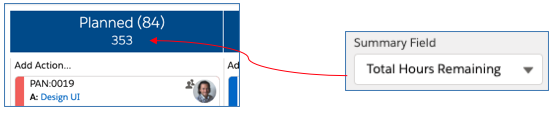
The Summary Field will be persistently remembered for each User.
Action Filters
You can apply any combination of filters to make sure you’re viewing the Actions that are most important to you. Simply click on the Filter icon to open up the Filters modal and apply the filters as required.

The filters can be applied as required, alternatively, you can save any Filter selection, and that will be persistently applied each time you visit the Whiteboard.
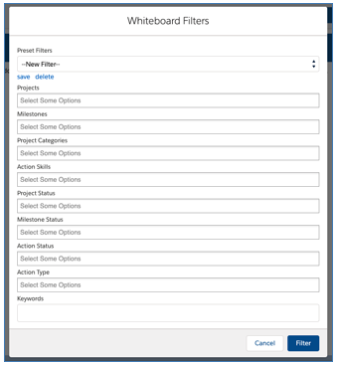
Preset Filters are created and accessed by individual Users and cannot be shared with other Users.
Whiteboard Settings
The Whiteboard Settings modal enables you to customise various settings to control which features are accessible on the Whiteboard.
These Whiteboard Settings can be controlled by each individual User by clicking on the ![]() icon on the Whiteboard. Alternatively, you can choose to override these settings at an organisation-wide level from the Control Pad of the Console. If you override from the Control Pad, Users will no longer have access to the Settings icon on the Whiteboard.
icon on the Whiteboard. Alternatively, you can choose to override these settings at an organisation-wide level from the Control Pad of the Console. If you override from the Control Pad, Users will no longer have access to the Settings icon on the Whiteboard.
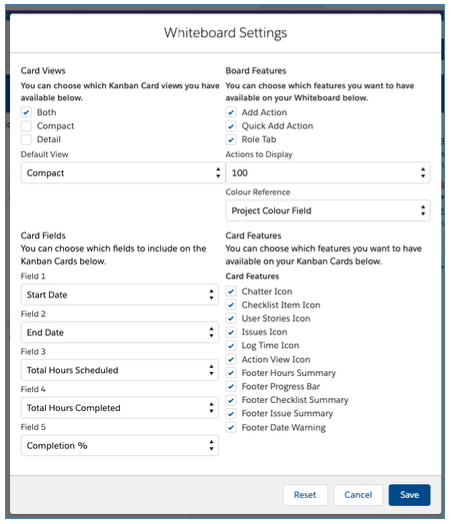
Roles Tab
The ‘Roles’ Tab located on the right-hand-side of the Whiteboard allows you to view all of the active Roles within Mission Control.
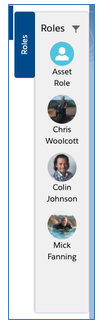
You can expand / collapse the Tab, which will be persistently remembered between visits to the Whiteboard. Therefore, if you don’t wish to use the Role Tab, you can keep it collapsed.
The primary purpose of the Roles Tab is to enable you to re-assign an Action from one owner to another. You can do this by dragging and dropping the right person on top of the image of the existing Action Owner, which will transfer ownership, as shown below.
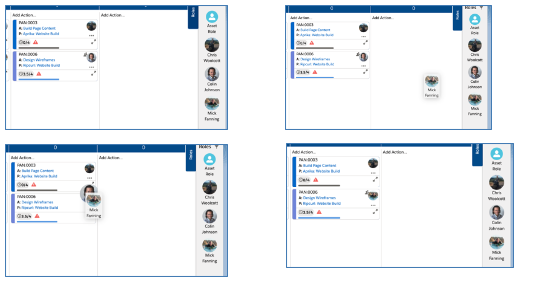
You can filter to find Roles that match the criteria you require. For example, you may be looking for Roles that have a specific Skill or are a member of a particular Team. To access the Role Filters, click the Filter icon at the top of the Role Tab, which will open the Role Filters modal as shown below.
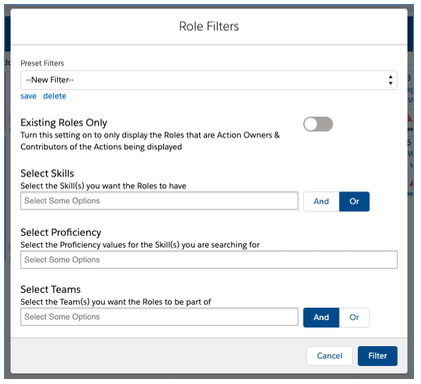
Within the Role Filters, you can:
The filters can be applied as required, alternatively, you can save any Filter selection, and that will be persistently applied each time you visit the Whiteboard.
The Whiteboard Lightning Component can be added to the Page Layout of any parent Object that a Project relates to. For example, out of the box the Project Object has lookup fields to the Account, Contact, Opportunity and Program Objects. Therefore, you will be able to add the ‘Whiteboard’ Lightning Component to the Page Layout of any of these Objects, and it will display all related Actions. Setting a component height of approximately 1000 is recommended. Below is an example of the Whiteboard being added to the Account Page Layout.
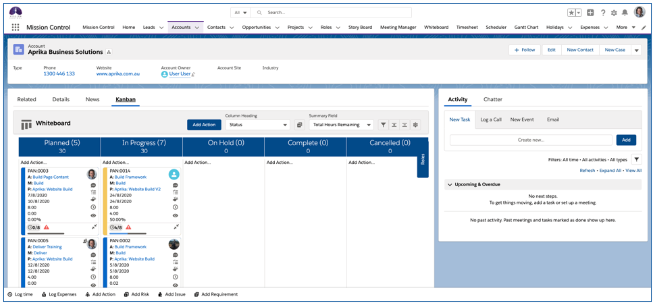
If you have created your own Custom Lookup Fields to other Objects, you will also be able to add the Lightning Component to the Page Layout for those Objects.
Note: This feature is only available in Lightning Experience.
An important part of any Project is reviewing how it went, and identifying learnings that can be taken into future Projects. The Retrospective Board enables you to carry out a ‘lessons learned’ assessment of a Project, or even a Phase / Sprint within a Project.
When conducting a ‘Retrospective’ you can identify ‘Learnings’. For each Learning, you can indicate your opinion as to whether it was something that worked well that you can take into future projects, or perhaps it didn’t go so well and you may choose to try something else next time round. You’re also able to tag each Learning against a number of Categories. These parameters will enable you to search the Retrospective Board in advance of kicking off a new Project to identify Learnings from previous Projects. For example, you may want to search for all Learnings that ‘Worked Well’ with a Category of ‘Documentation’ prior to commencing a business requirements gathering exercise.
When creating a Learning, you can allocate one of the following ‘Opinion’ values:
When identifying the Categories a Learning relates to, you can allocated it to as many of the following values:
The Retrospective identifies a specific review / lessons learned ceremony that has been conducted. The Retrospective relates to a particular Project, and a Project can have multiple Retrospectives related to it. For example, you may choose to conduct one Retrospective ceremony at the end of the Project. Alternatively, you may choose to conduct a Retrospective each time you complete a Milestone / Sprint during the Project.
Within a Retrospective, you will create Learning records. These Learnings identify the individual items the team has reviewed. Each Learning will relate to a specific Retrospective, and a Retrospective can have multiple Learnings related to it.
The Retrospective ceremony will be carried out using the Retrospective Board. This is a Kanban Board that displays Learnings. Below is an illustration of what the Retrospective Board looks like.
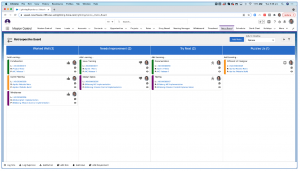
Creating a Retrospective
To create a new Retrospective from the Retro Board, you need to click the ‘Add Retro’ button, which can be found located in the top-right section of the board near the ‘Column Heading’ picklist field.

When you click the button, that will open the ‘New Retrospective’ Modal. From here, you will be able to enter the appropriate fields and click Save.
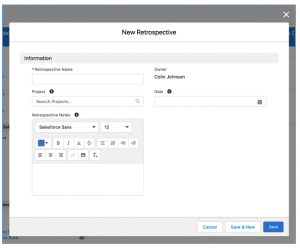
Once you’ve done this, the Retrospective will be available to associate Learnings when you are creating them from the individual Kanban Columns.
Creating a Learning
To create a Learning, you can expand the ‘Quick Create’ section within a Kanban Column by clicking on the ‘Add Learning…’ text.
This will open up the Quick Create section where you can specify the Project and Retrospective the Learning will relate to, as well as entering the Learning name.

When you select a Project, the Retrospectives search box will be filtered to only show Retrospectives that relate to the selected Project. Once you enter the Learning Name, hit Enter to create the Learning. You will then see the Learning Card appear on the Kanban.
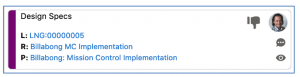
After the Learning has been created, you can click on the eye icon to open the Learning Summary Modal. From here, you can:
When you edit the Learning, you can select the Categories that it relates to. Each of these Categories will then appear on the Learning Card as shown below.
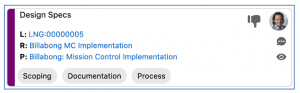
If you want to change the Opinion for a particular Learning, you can drag the Learning Card between the Kanban columns.
Kanban Columns
By default, the columns on the board will be based on the ‘Opinion’ field of the Learning record. This will show you columns for:
You can change the columns by selecting a different option in the ‘Column Heading’ picklist, which is located in the top-right section of the board near the Add Retro button.
The options available for the Column Heading setting are:
This setting is persistent, so if you choose to change from Opinion to another option, such as Project, the next time you load the Retro Board the columns will be based on the Project setting.
Auto-Refresh Polling
One of the main things that drives the success of a Retrospective ceremony is that it is an interactive, collaborative session involving multiple project team members.
One of the really cool features of the Retro Board is the ability to turn on the ‘Auto Refresh’ setting. When turned on, you will automatically see new Learnings appear on your Retro Board as your colleagues are creating or updating them. You can turn on the Auto Refresh feature by clicking the ‘Play’ button, which is located in the top-right section of the board near the Column Heading picklist field.

By default, this setting is turned off – indicated by the ‘Play’ button. If it’s turned on, you will see a ‘Pause’ button. This setting is persistent, so if you switch it on, the next time you load the Retro Board it will still be switched on.
Learning Cards
Below is an example of the Learning Card on the Retro Board.
The Learning Card offers you a lot of functionality, each component of the card is explained below.
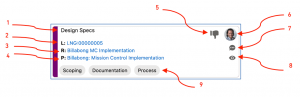
Filters
You can apply filters to the Retro Board to find the Learnings you require. For example, you may want to view all of the Learnings with an Opinion of ‘Worked Well’ that relate to Projects of a certain Category.
You can access the Filters Modal by clicking the Filter icon, which is located in the top-right section of the board near the ‘Column Heading’ picklist field.
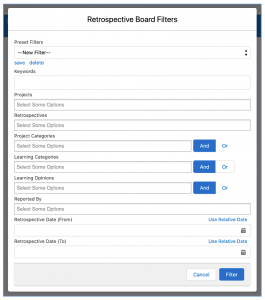
Within the Modal, you can apply the required filters. You can choose to save your filter selections as a ‘Preset Filter’ that can be applied persistently each time you visit the Retro Board.
Note: Preset Filters are created and accessed by individual Users and cannot be shared with other Users.
Retrospective Board Custom Settings
You are able to include up to 5 x Custom Fields to be displayed on the Learning Card. These fields can be selected within the Settings section of the Retro Board.
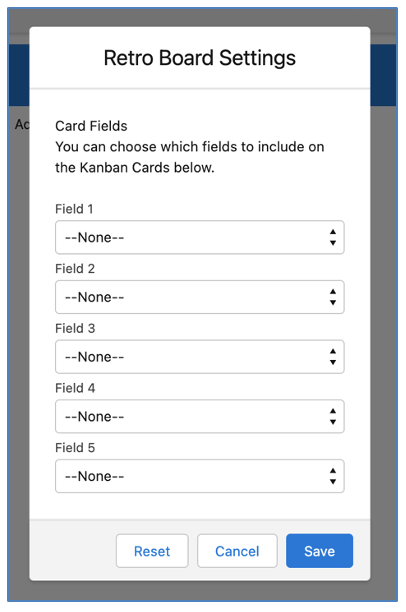
If you have set any Custom Fields to be displayed, they will appear between the Project name and the Category Pills.

To remove any Custom Fields from the Learning Card, you will need to open the Settings Modal and click the Reset button.
Accessing the Retrospective Board
There are a number of ways to access the Retro Board, as outlined below:
Standalone Tab
The primary way to use the Retrospective Board is via the ‘Retro Board’ Tab, which gives you access to the standalone board – this means you’ll be able to view Learnings from multiple Projects / Retrospectives. The Retro Tab is included within the Mission Control ‘App’ so will be available on the Navigation Menu as shown below.
![]()
You can also add the Retro Board Tab to your own custom App menus.
Project Overview Component
The ‘Retro’ Tab on the Project Overview provides access to the Retro Board, filtered to show Learnings specifically related to Retrospectives that are related to the Project.

Access to the Retro Tab on the Project Overview can be controlled for each individual User on their Role record. To provide a User access to the Retro Tab, ensure the ‘View Retro Tab’ field on their Role record is set to TRUE.
Add Custom Tab
You can add the ‘RestrospectiveBoard’ Component to the page within Lightning Experience for the following Objects:
You will need to edit the Lightning Page within the Lightning App Builder and follow the steps below:
You will then be able to access the Retro Board in context of that particular record.
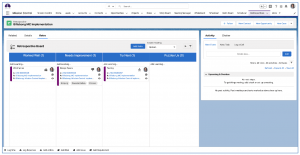
Note: When this component is added to the Milestone page, it will be filtered by default to display Learnings relating to the Project that the Milestone relates to. You can then further refine the results by filtering for a particular Retrospective.
For Customers running Agile Projects, the Milestones within a Project can be set up to be used as Sprints. For Sprint Milestones, you can utilise the ‘Sprint Board’ component, which provides access to the following features:
The key requirements to managing Agile Projects in Mission Control is to identify at least 1 Milestone as the ‘Backlog’ as well as which Milestones will be ‘Sprints’. This can be done via 2 fields on the Milestone record:
A Milestone cannot be set as both a Backlog and a Sprint Milestone.
Planning Board
The Planning Board Tab provides access to the key features required to plan out an individual Sprint. When you first load the Planning Board, if the ‘Sprint’ field is FALSE, you will need to set it to TRUE, along with populating the ‘Sprint Start Date’ and ‘Sprint End Date’ and click Save.
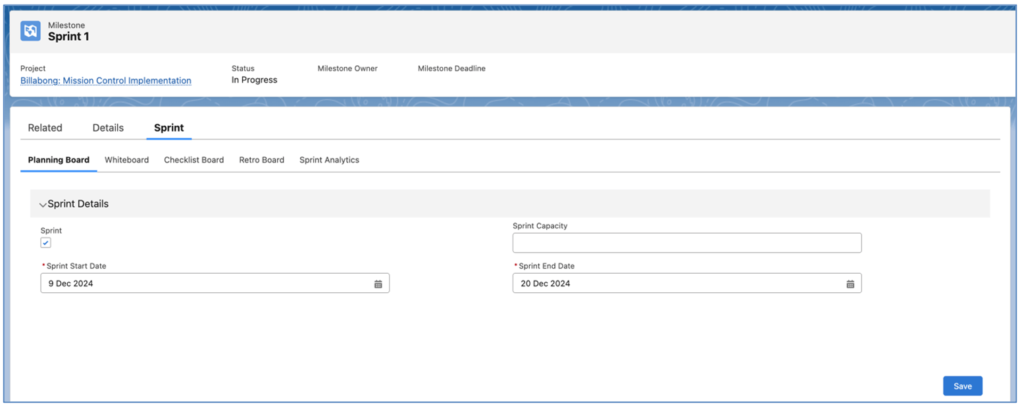
Once these fields have been populated, the remaining sections of the Planning Board will be displayed, including:

The first thing you’ll need to do is to add the Roles you are assigning to the ‘Sprint Team’ that will be working on Actions within this Sprint. The Capacity Charts will automatically update as you work through your Sprint Planning. Details of each section of the Planning Board are included below.
Capacity Charts
The Capacity Charts provide insight into the capacity of the Sprint Team, and how much of their capacity has been assigned to Actions. These charts will help Project Managers to ensure the correct amount of work has been assigned across the team involved in the Sprint.
Total Capacity
The Total Capacity gauges provides a high level overview of the ‘Sprint Capacity’ of the entire Sprint Team and how much of the capacity has been allocated – based on the Total Hours Scheduled on related Actions.
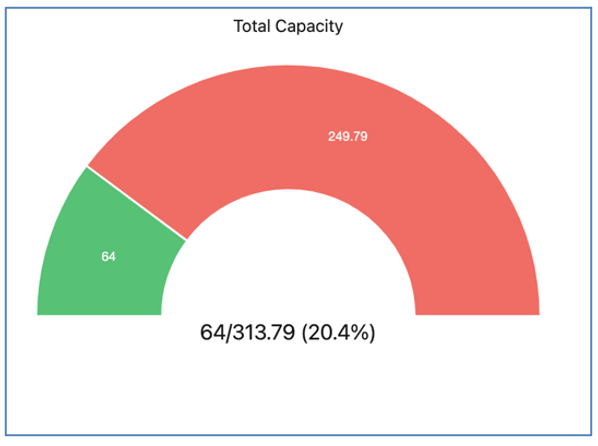
Function Capacity
The Function Capacity bar chart provides insight into the capacity of all Roles based on their ‘Function’. This helps to identify how much of the capacity remains available for each Functional area within the Sprint Team.
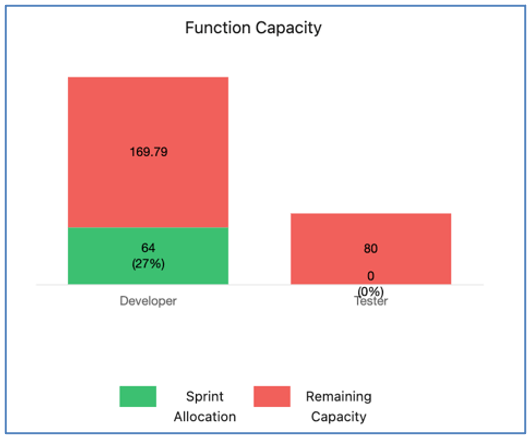
Role Capacity
The Role Capacity bar chart provides insight into the capacity of each individual Role within the Sprint Team. This helps to identify how much of the capacity remains for each individual Sprint Team member.
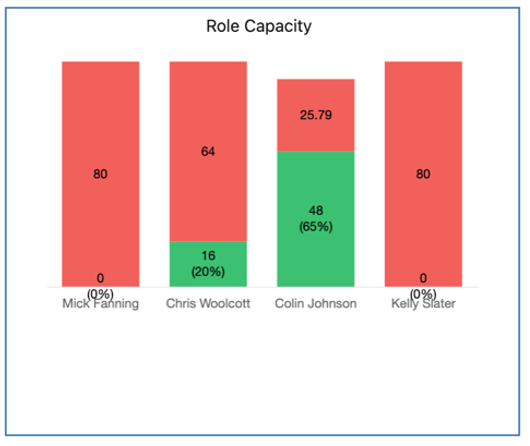
All of the Capacity Charts will dynamically update as you add Roles to the Sprint Team and assign Actions to them.
Sprint Team
The Sprint Team section allows you to build up the team of Roles that will be working on Actions within the Sprint.
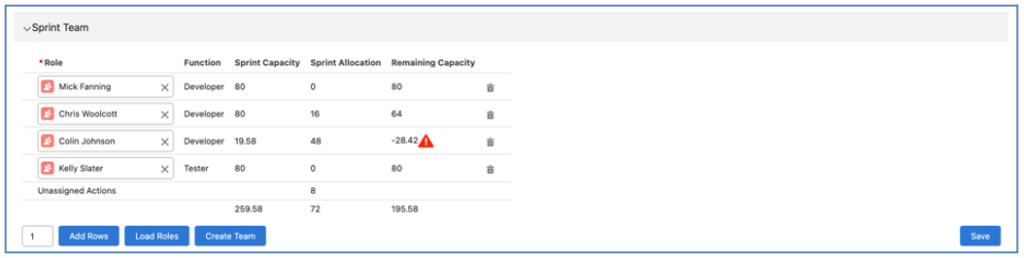
When you first start planning a Sprint, the Sprint Team will be empty. You will need to add Roles to your Sprint Team.

You can build out your Sprint Team by adding individual Roles using the ‘Add Rows’ button. This will add an empty row in the Sprint Team table for you to search for the required Role. Note: You can add multiple rows at once by entering a number into the number cell to the left of the button.
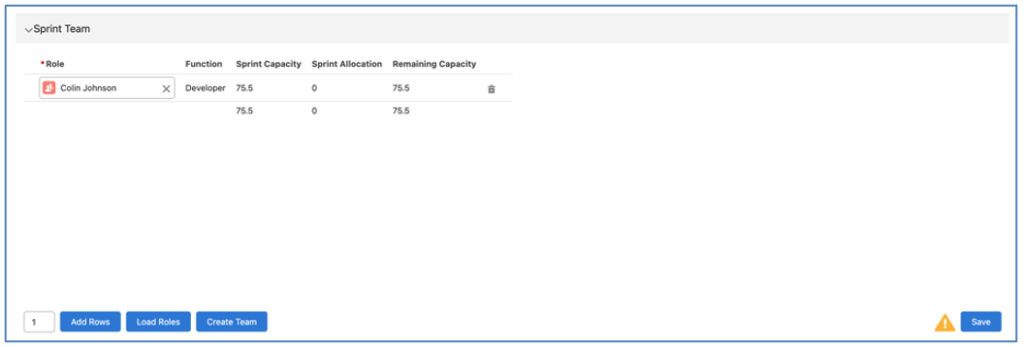
Alternatively, you can click the ‘Load Roles’ button and choose to add Roles that are members of a Team or part of an existing Sprint. First of all, select whether you’re adding from a Team or a Sprint.
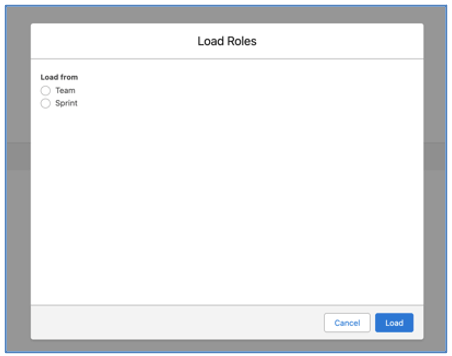
If you select Team, you will then have an option to select which Team you want to add as Sprint Team members.

If you select Sprint, you will then have an option to select a Project, and a particular Sprint Milestone. This enables you to copy the Sprint Team from that Sprint to this current Sprint.

When Roles are added to the Sprint Team, the Sprint Capacity, Sprint Allocation and Remaining Capacity will automatically be updated. A row will also be automatically displayed in the ‘Existing Allocations’ section for the Role.
The Sprint Board shows ‘Available Capacity’ for each Role that is part of the Sprint Team. If you wish to only allocated a part of that capacity to this particular Sprint, you can enter a value into either ‘Sprint Capacity Hours’ or ‘Sprint Capacity Percent’.

You can only enter a value into one or the other of the hours or percent fields – when one field contains a value, the other field will be disabled. If either of these fields contain a value, the ‘Sprint Capacity’ will be calculated based on those field values, as outlined below:
Sprint Capacity Hours: Sprint Capacity will be based on this value
Sprint Capacity Percent: Sprint Capacity will be based on ‘Sprint Capacity Percent’ x ‘Available Capacity’
If neither field contains a value, ‘Sprint Capacity’ will equal ‘Available Capacity’.
You can use the ‘Create Team’ button to create a new Team record and Team Assignment records for all of the Roles assigned to the Sprint.
Existing Allocations
The Existing Allocations section provides insight into work that has been assigned to the Roles within the Sprint Team from Actions on the Project outside of the existing Sprint, other Projects, Holidays and Salesforce Events.
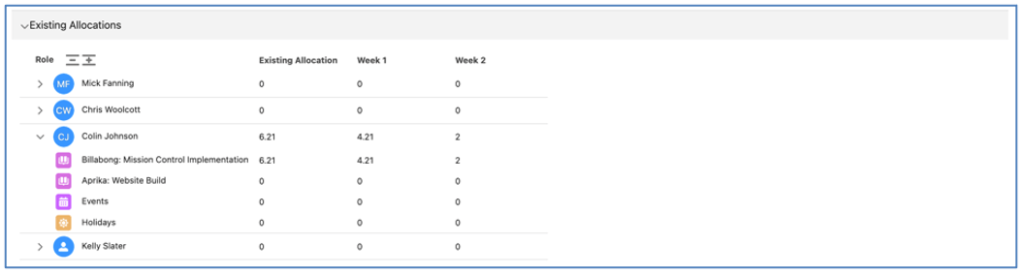
These existing allocations are deducted from the Role’s availability for the duration of the Sprint to identify the ‘Sprint Capacity’.
Sprint Allocations
The Sprint Allocations section is where you can assign Actions to the Sprint from the Backlog, as well as enter the hours scheduled and assign Action Owners, Contributors and build out Checklist Items.

There are 2 areas within the Sprint Allocation section:
The Backlog Milestone section provides access to Actions that are currently assigned to the ‘Backlog’ Milestone. If the Project only has 1 Backlog Milestone, that will automatically be populated and the Actions relating to that Milestone will be displayed in the list. However, if you have multiple Backlog Milestone records on the Project, you will need to manually select which Milestone you want to use.
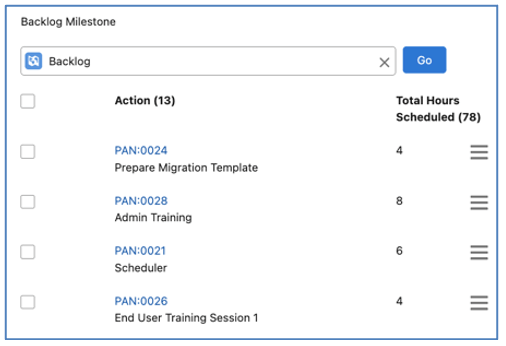
The Actions related to the Milestone will be displayed, showing the Action ID, Action Name and Total Hours Scheduled. You can use the hamburger icon to adjust the priority order by dragging Actions up or down. This will adjust the ‘Whiteboard Priority Order’ field on the Actions.
You can drag and drop individual Actions from the Backlog to the Sprint Milestone section, which will reassign the Action to be related to the Sprint Milestone. If you wish to drag multiple Actions at once, you can use the select checkboxes on the left-hand-side of the Backlog list and drag and drop them all at the same time.

As Actions are assigned to the Milestone, and have hours scheduled, the Sprint Allocation values in the Capacity Charts and Sprint Teams sections will automatically update. This will provide you with real-time insight into the capacity and allocation of effort for the Sprint. If any Actions need to be moved back into the Backlog, you can drag them back from the Sprint Milestone into the Backlog list.
Any Actions assigned to the Sprint Milestone that have not been assigned to one of the Roles within the Sprint Team will appear as a separate entry within the Sprint Team section, showing that there are ‘Unassigned Actions’ contained within the Sprint.
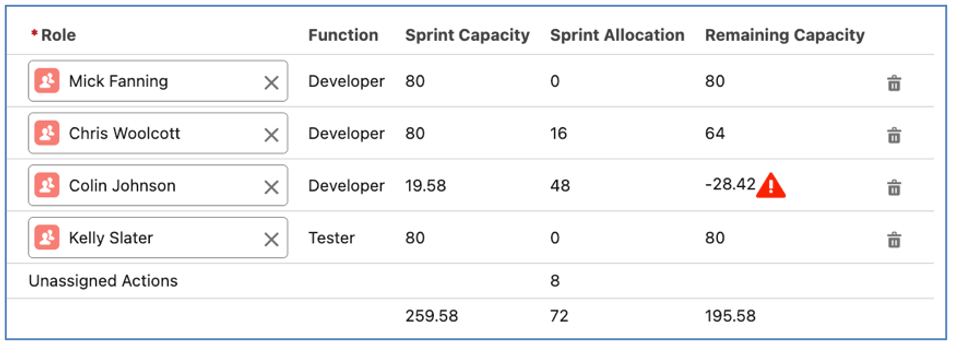
Each Action assigned to the Sprint can have the Action Owner set, along with Contributors via the Resource Assignment Wizard.
The Whiteboard Tab provides access to the Whiteboard, filtered to display Actions related to the Milestone record.
The Checklist Board Tab provides access to the Checklist Board, filtered to display Checklist Items related to Actions related to the Milestone record.
The Retro Board Tab provides access to the Retrospective Board, filtered to Learnings relating to the Milestone.
The Sprint Analytics Tab provides access to various charts providing insight into the performance of the Sprint, including:
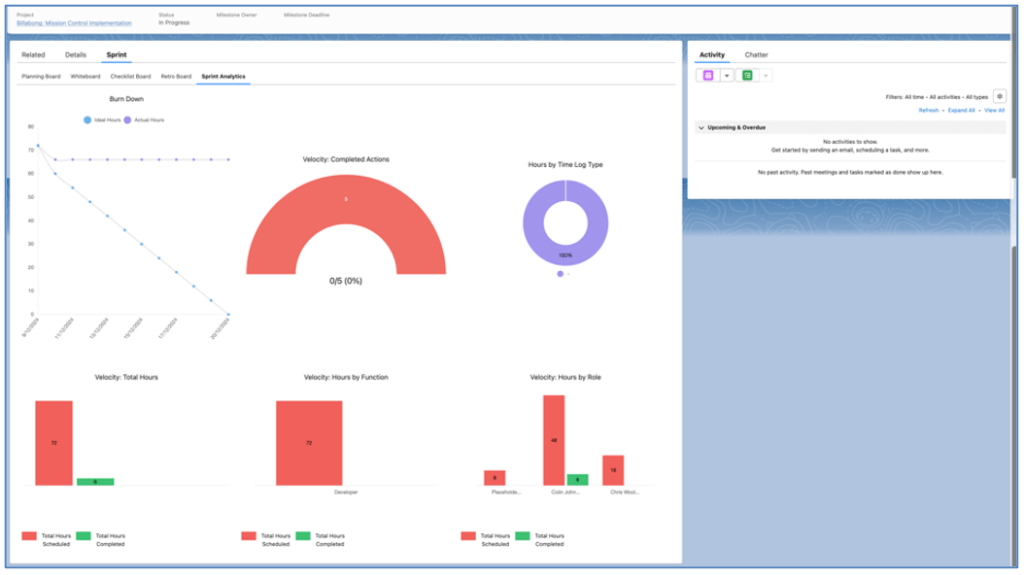
Below is an overview of the information each chart provides.
Burn Down
The Burn Down Chart illustrates the ‘ideal’ and ‘actual’ delivery of hours throughout the Sprint.
Velocity: Completed Actions
This gauge shows the total number of Actions assigned to the Sprint and how many of those Actions were Completed.
Hours by Time Log Type
This donut chart provides insight into the number of hours logged to the Sprint, categorised by Time Log Type.
Velocity: Total Hours
This bar chart provides insight into the velocity of total hours, illustrating the number of hours scheduled and the number of hours completed during the Sprint.
Velocity: Hours by Function
This bar chart provides insight into the velocity of hours by Function, illustrating the number of hours scheduled and the number of hours completed during the Sprint, grouped by the Role ‘Function’ field.
Velocity: Hours by Role
This bar chart provides insight into the velocity of hours by Role (person), illustrating the number of hours scheduled and the number of hours completed during the Sprint, grouped by Role.
Add Sprint Board to Milestone Page
To add the Sprint Board to the Milestone Page within Lightning Experience, you will need to follow the steps below.
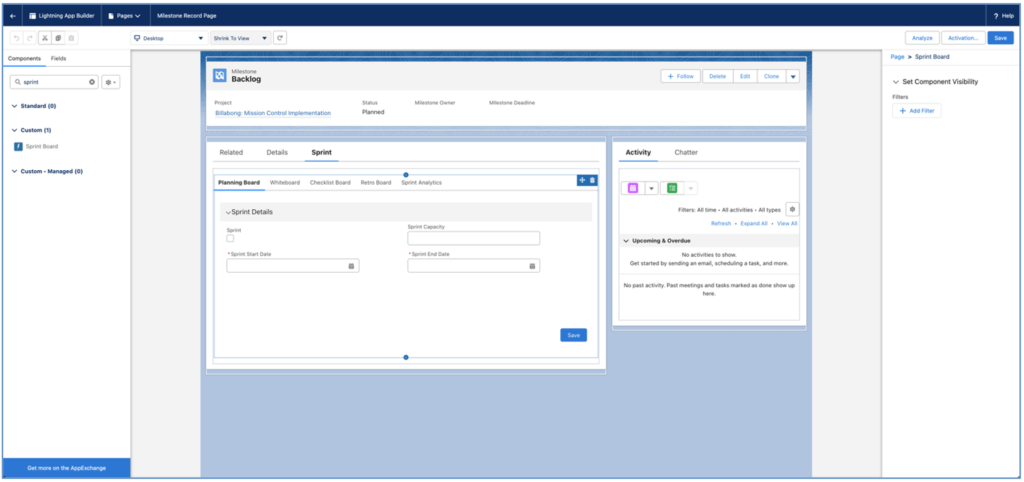
Please note, the Sprint Board is not accessible within Salesforce Classic.
Mission Control provides the ability to manually specify the ‘Completion %’ of an Action or Checklist Item. This field enables users to specify the progress their effort on the Action to date has resulted in. Typically, a user would specify this value if the progress is not aligned with the effort expended to date.
By default, this field will be calculated automatically when you log time against the Action or Checklist Item. If you feel you are tracking accurately on the delivery in relation to the scheduled effort, then you can leave this field to be maintained automatically.
For example, if you have a Checklist Item with an ‘Hours Scheduled – Billable’ value of 8 hours, and you create a Time Log for 4 hours, if you feel you will complete the work in the remaining 4 hours, you can leave this field to be calculated automatically. In this situation, the Completion % field will be set to 50% (e.g. 4 hours completed / 8 hours scheduled).
However, if you feel you are progressing quicker or slower than the scheduled effort indicates, you can manually override the Completion % field. When logging time, you can enter a value in the Completion % field, and that will be used to calculate the following ‘Projected Hours’ formula fields:
When logging time, the Time Log will relate to an Action and you can use the ‘Action Completion %’ field. You can optionally choose to relate it to a Checklist Item that relates to the Action. When the Checklist Item field is populated, the ‘Checklist Item Completion %’ field will appear.
![]()
Note: If you manually override the Completion % value, you will need to maintain it manually from that point onwards. The ‘Completion % Overridden’ Checkbox field on the Checklist Item will be set to TRUE. On pages such as the Timesheet, Track Pad Time Logger, etc., for Checklist Items where the Completion % is being maintained automatically, the value will be displayed in a Grey, whereas fields being manually maintained will be displayed in Black.
An extension to the ‘Action Completion % Management’ feature outlined above is the ‘Action Progress Tracking’.
If you plan to use the Completion % feature outlined in the previous section, you will also have the ability to track the value of this field on a weekly basis for reporting purposes.
A batch process can be scheduled from the Mission Control console that will operate once a week at your specified time and day of week (See below screenshot of the relevant section of the Mission Control Console).
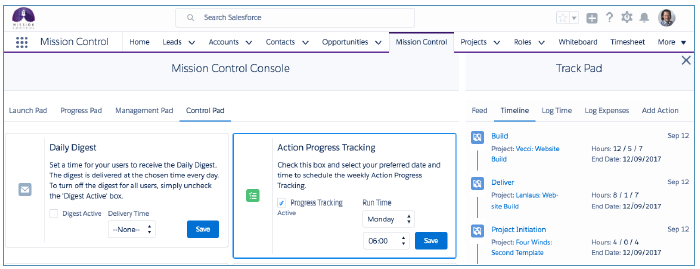
To schedule this batch process, select your preferred ‘Run Time’ tick the ‘Progress Tracking Active’ checkbox and click Save.
This process will create / update ‘JSON’ file that will be stored in the Notes/Attachments section of the Project record (See below screenshot).

The files will be created / updated with the ‘Completion %’ value for each Action on Projects where the Project Status is not ‘Completed’ and Archived is FALSE.
This file will be used by the PMO Dashboard to identify the ‘Earned Value’ – please refer to the PMO Dashboard section for an explanation of Earned Value.
Note: Whilst the current progress tracking solution is not utilising the Field Tracking History data, it is recommended that you switch on field tracking for the Action ‘Completion %’ field as this will serve as a back up source for tracking the changes.
The PMO Dashboard provides you with the ability to establish a variety of key performance indicators relating to your projects, including:
Planned Value: The percentage of ‘Hours Scheduled – Billable’ accounted for based on the Action ‘Start Date’ to the end of the selected week. For Example, an Action has an ‘Hours Scheduled Value (Billable)’ value of $1,200 and has a Start Date of 17/08/15 and an End Date of 26/08/15. The Total days (excluding non-working days) is 8. Therefore ‘Week 1’ of the Project will have a ‘Planned Value’ of $756 (e.g. 5 days / 8 days = 63%. 63% * $1,200 = $756).
Earned Value: The Earned Value is calculated based on the ‘Completion %’ multiplied by the ‘Hours Scheduled Value (Billable). For example, if I have specified that I am 40% completed on an Action, which has an Hours Scheduled Value (Billable) value of $1,200, the Earned Value is $480.
Actual Cost: The Actual Cost is the sum of the ‘Hours Completed Value (Billable) on the Time Logs. For example, if I have logged a total of 4 hours and my Billable Hourly Rate is $150, the Actual Cost would be $600.
Recognised Revenue: This calculates how much of the revenue due to be earned has been recognised so far. If the Project’s Billing Type = Fixed Price, this is calculated based on Completion % * Hours Scheduled Value (Billable), otherwise it references the ‘Hours Completed Value (Billable)’.
CPI: This indicator identifies how the Project, Milestone or Action is performing against the scheduled revenue. The higher the score, the better you’re performing (e.g. you’re delivering the work more efficiently than you scheduled it to be delivered).
SPI: This indicator identifies how the Project, Milestone or Action is performing against the scheduled time line. The higher the score, the better you’re performing (e.g. you’re delivering the work quicker than you scheduled it to be delivered).
CPI / SPI Breakpoints: The CPI and SPI values will be coloured red, amber or green based on the breakpoints you have set. These breakpoints can be set on the Mission Control Console Page in the ‘Project Automation’ section.
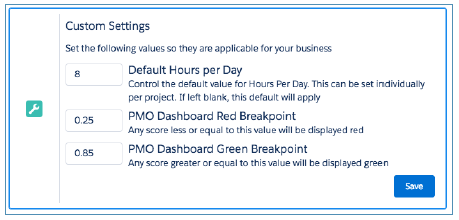
Using the PMO Dashboard
The PMO Dashboard can be accessed from the ‘Management Pad’ Tab of the Mission Control Console within the ‘PMO Dashboard’ section.
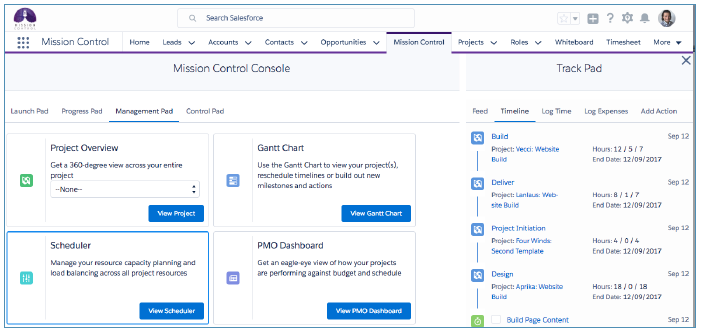
The PMO Dashboard will initially load as per the screenshot below:

You can set the ‘Master Date’ that you want to use to view data for. This will load the Completion % value from the JSON file for each Action, and use all Time Logs up to the last day of the selected week, if the Action Start Date occurs on or prior to the last day of the selected week.
You also have the ability to set the ‘Comparison Date’ should you wish to evaluate two snapshots of data side by side.
Once you’ve selected the dates you wish to analyse, click the ‘Load Dashboard’ button to view the results.
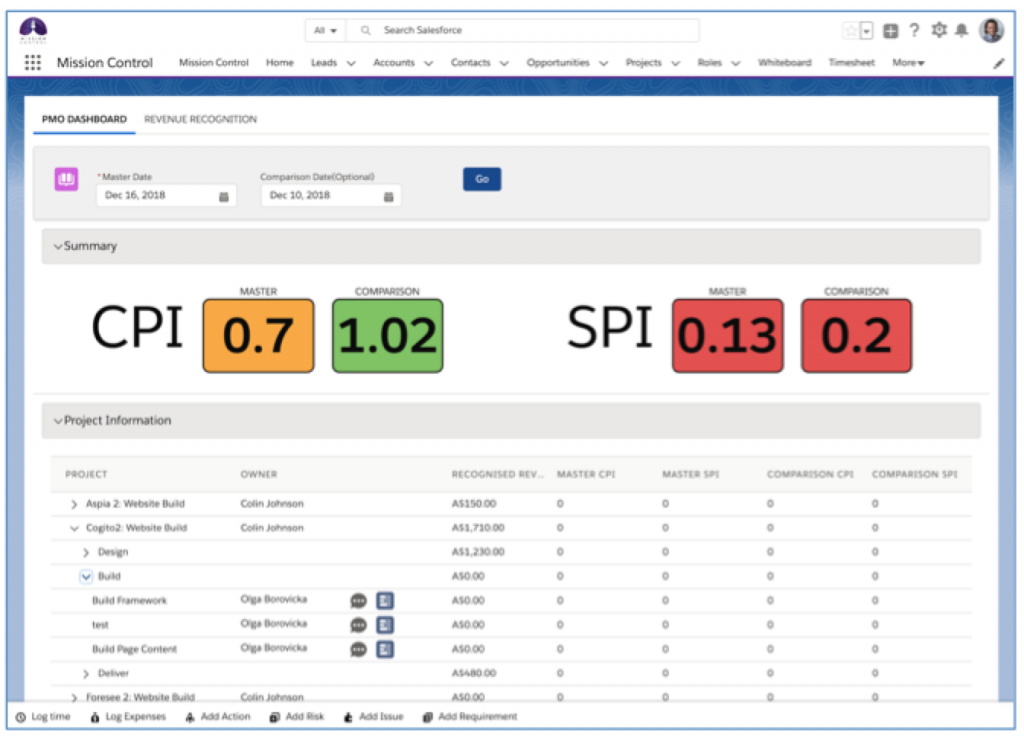
The Dashboard Summary section provides an overall CPI and SPI rating for all records. They will be colour-coded based on the breakpoints you have specified on the Mission Control Console.
The Project Information section provides you with the ability to drill down from the Project, to the Milestones, to the Actions to view the individual values. Any CPI or SPI value beneath the red breakpoint will be highlighted red.
To expand or collapse the data tree, click on the triangle to the left of the appropriate Project or Milestone.
To open up any record in a new tab in your browser, click on the Project Name, Milestone Name or Action Name.
Please note, for a Project to be displayed on the PMO Dashboard, it must have the ‘Display on PMO Dashboard’ field set to TRUE. You will need to manually add this field to the page layout.
Access to Chatter
At the Action level of the ‘Project Information’ section, you now have access to the Chatter Component. When you open that, you will be able to collaborate on Chatter at the Action, Milestone or Project level.
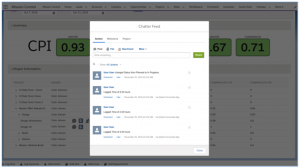
Access to Resource Assignment Wizard
At the Action level of the ‘Project Information’ section, you now have access to the Resource Assignment Wizard, should you need to view / adjust the details of the Action Owner and Contributors.
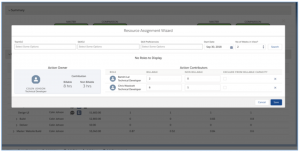
Access to Resource Allocation
At the Action level of the ‘Project Information’ section, you now have access to the Contributors icon. When you hover over that icon, you’ll be able to see which Roles have been allocated to the Action.
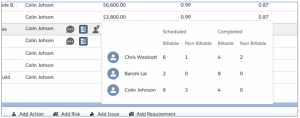
The Revenue Recognition page provides you with insight into how your financials are spread across the duration of your project. There are two main sections to the page:
You’re able to set the date range for your reporting period and also export the detail section to a CSV file. Below is a wireframe of the Revenue Recognition page.

Header Section
The Header Section enables you to set the parameters for your report. You can set the Start Date, End Date and choose whether you would like to view Weekly or Monthly periods. Once you’ve made your selection, click on Go and the Summary and Detail sections will populate with the data. Note, for a Project to be included, the ‘Display on PMO Dashboard’ field needs to be set to TRUE.
You can click the ‘CSV’ icon located on the right side of the Header Section to export the Detail data as a CSV file.
Summary Section
The Summary Section will show you to cumulative line charts. The left-hand chart shows you ‘Revenue Recognition’ and the right-hand chart shows you ‘Profit & Loss’.
Detail Section
The Detail Section will show you the financial data for your projects, broken up by the period (Weekly or Monthly) that you’ve specified in the Header Section.
You’re able to click the Collapse All button ![]() to view a high level summary of the Period data.
to view a high level summary of the Period data.

You’re able to click the Expand All button ![]() to view a detailed view of the Project data per Period.
to view a detailed view of the Project data per Period.

In order to view data on the Revenue Recognition report, you need to ensure the ‘Action Progress Tracking’ and ‘Use the Completed % Functionality’ settings on the Control Pad of the Mission Control Console are enabled.
Data stored within the JSON file on the Project record, which is updated weekly as part of the ‘Action Progress Tracking’ feature is used for some of the calculations. All calculations take into account the number of working days / non-working days during each period.
The table below provides a detailed explanation of each column of data within the Detail section.
| Column | Description |
| Project | The Project Name |
| Project Budget | The Project Budget stored in the JSON file for this Period |
| Completion % | The Project Completion Status stored in the JSON file for this Period. If no value exists in the JSON for the period, the current Project Completion Status is used |
| Cumulative Scheduled Value Billable (PV) | The value of the Hours Scheduled Value – Billable from all Actions on the Project that is scheduled to have been recognised by this Period. PV = Planned Value. Planned Value is the percentage of revenue you are planned to earn during the period you are evaluating. |
| Cumulative Scheduled Value Cost | The value of the Hours Scheduled Value – Cost that is scheduled to have been recognised by this Period |
| Cumulative Scheduled P&L | The Cumulative Scheduled Value Billable (PV) – Cumulative Scheduled Value Cost |
| Cumulative Completed Value Billable (AC) | The value of the Hours Completed Value (Billable) from all Time Logs on the Project that occurred during this Period. AC = Actual Cost. Actual Cost identifies how much of the revenue has already been used in achieving the current completion percentage. |
| Cumulative Completed Value Cost | The value of the Hours Completed Value (Cost) from all Time Logs on the Project that occurred during this Period. |
| Cumulative Completed P&L | The Cumulative Completed Value Billable (AC) – Cumulative Completed Value Cost |
| Earned Value (EV) | The Earned Value calculates the Project Budget * Completion %. EV = Earned Value. Earned Value identifies how much revenue has been earned based on how much of the work has been completed as a result of the effort expended to date |
| Earned Value P&L | The Earned Value (EV) – Cumulative Completed Value Cost |
| Cumulative Projected Completed Value Billable | Historic Periods will show the Cumulative Completed Value Billable (AC). Current / Future Periods will show the revenue left to be recognised, split across the periods based on the number of hours remaining calculated from the current Project Completion Status. |
| Cumulative Projected Completed Value Cost | Historic Periods will show the Cumulative Completed Value Cost. Current / Future Periods will show the cost left to be incurred, split across the periods based on the number of hours remaining calculated from the current Project Completion Status. |
| Cumulative Projected Completed P&L | The Cumulative Projected Value Billable – Cumulative Projected Value Cost |
Project Overview Page
The Revenue Recognition page is also accessible on the Project Overview as a new sub-tab. This can be controlled via the Project Overview permissions on the Role record, like all other Project Overview Tabs.
Below is an example of the Revenue Recognition being viewed on the Project Overview page.

Revenue Recognition Polling Setting
The Revenue Recognition Tab on the PMO Dashboard and Project Overview loads data from multiple Projects. To control the performance of the Revenue Recognition page, there is a ‘Revenue Recognition Batch Size’ setting within the Project Automation Settings Tile on the Control Pad of the Mission Control Console.
This setting can be set to a specific number that will determine how many Projects are process per batch during the page loading process.

By default, it will be set to 10. The lower the number, the more data that can be loaded, albeit with longer load times. This makes it possible to view a larger number of Projects on the page at once.
The ‘Role Utilisation Report’ enables you take into account Time Logs and Holidays, so you’re able to get a full picture of the utilisation for each Role.
In addition to reporting on the ‘Utilisation’ of each Role, it will also allow you to report on the ‘Billable Performance’ and ‘Scheduled Performance’ as well. To support this, the ‘Billable Target %’ on the Role Object is used to calculate the target number of ‘Billable’ hours each Role should achieve. For example, if Mick Fanning has an ‘Hours per Week’ value of 40 and a ‘Billable Target %’ value of 80%, then his Billable Target Hours would be 32.
In some situations, a customer may wish to have the flexibility of reducing the Billable Target Hours from one week to another, based on whether the Role has been assigned to specific Actions that fall outside of their usual target. For example, working on a support issue as part of an ongoing contract, or working on an RFP that the business is responding to.
To provide customers with the ability to identify certain Actions that should be excluded from the Billable Hours Target, a field referred to as ‘Exclude from Billable Capacity’ is available on the Project, Milestone, Action and Time Log Objects. This ‘Exclude from Billable Capacity’ Checkbox has been added to key pages throughout the system such as:
You can access the Role Utilisation Report from the ‘Management Pad’ of the Console (see below). It can also be added to the main navigation menu.
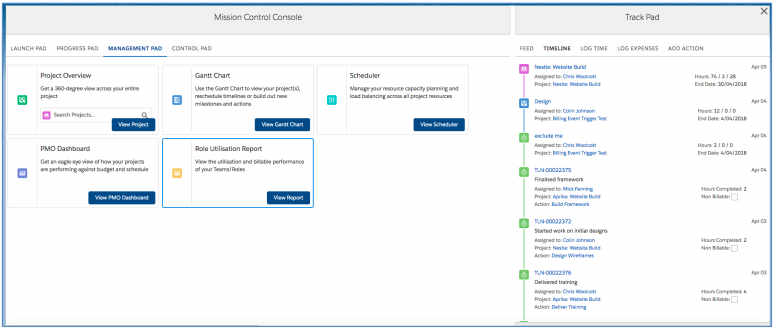
When you initially load the Role Utilisation Report, you will be required to select who you’re wanting to view details for. This selection can be made by selecting Team(s) or individual Role(s). You’re also able to specify the timeframe and whether you’d like to group the data weekly or monthly.

Once you’ve made your selections, the data will load for each Role, as shown below.
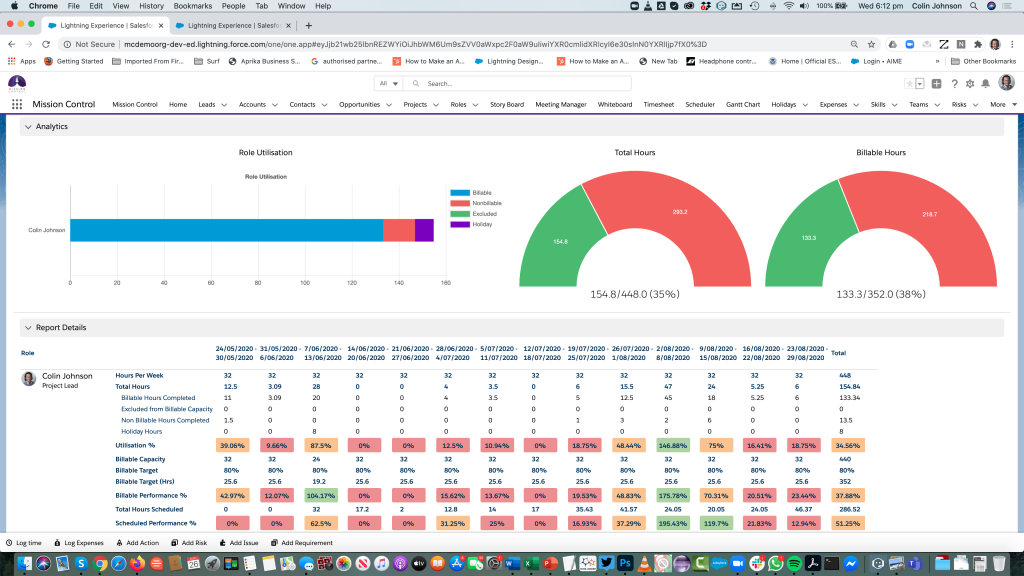
The individual figures displayed are explained below.
Note: By default, the Hours from a Time Log will only be included in the Hours Completed values inside the Role Utilisation Report after the Time Log is Approved. When the ‘Disable Time Log Rollup on Approval Status’ setting in the Control Pad is checked, it will roll up the hours and the financial information to the parent records before the Time Log is Approved. It will also include the Hours from a Time Log in the Hours Completed values inside the Role Utilisation Report before the Time Log is Approved.
Filter By
You are able to filter the Role Utilisation Report by three options:
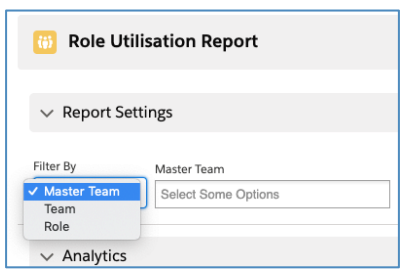
Once you’ve made your ‘Filter By’ selection, you are then able to type in the ‘Select Some Options’ field to identify the values you require in your filter.
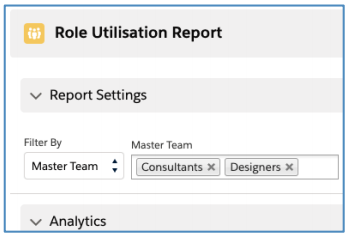
Group By
You can choose to group your results by either the Role or the Master Team. For the Team and Role filters, the Role is the only Group By option available. However, if you have filtered by Master Team, you also have the option to Group By Master Team.
The Role Group By setting shows results for each individual Role, as illustrated below:
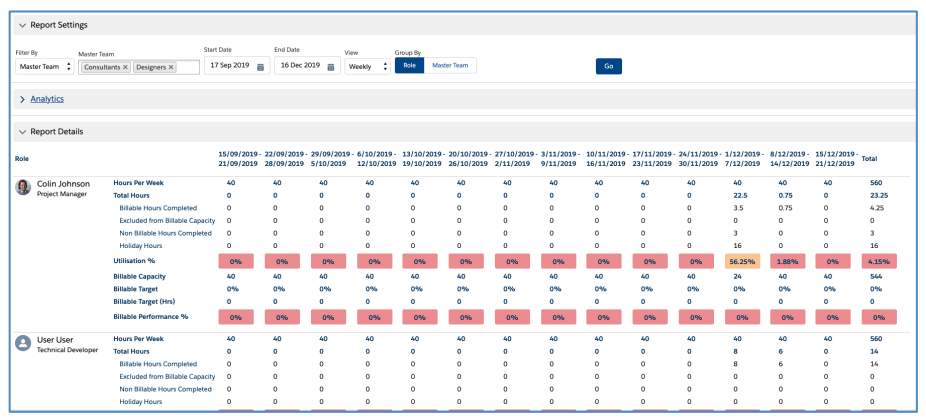
The Master Team Group By setting shows a summary set of results for all Roles combined within the Master Team, as illustrated below:
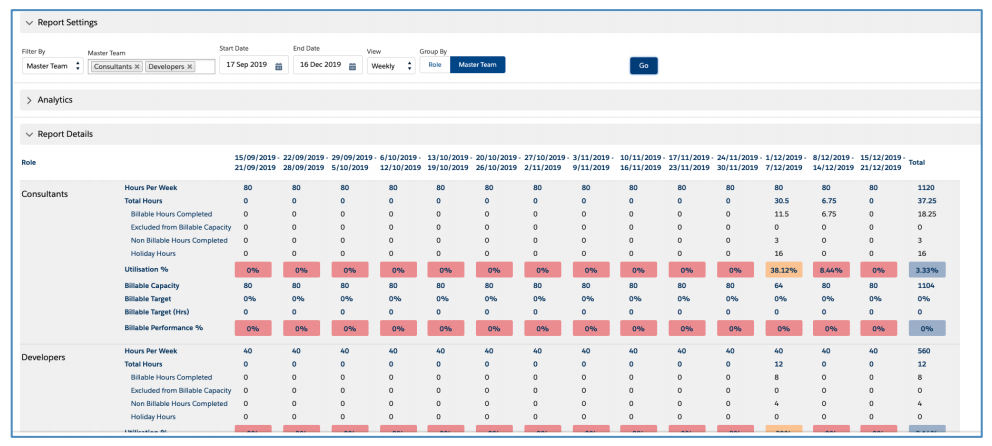
Analytics Charts
The Analytics Charts provide you with insight into the following metrics:
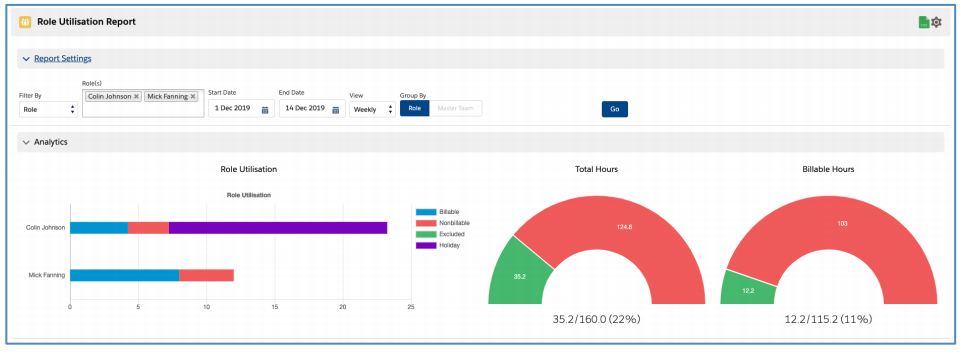
By default the X Axis on the ‘Role Utilisation’ Bar Chart is based on Hours. You can adjust this to display a percentage instead. This is controlled within the Settings of the Role Utilisation Report page.
Hours X Axis
The image below illustrates the Role Utilisation Chart with an X Axis set to Hours.

This is controlled by ensuring the ‘Chart Settings’ setting is set to Hours.
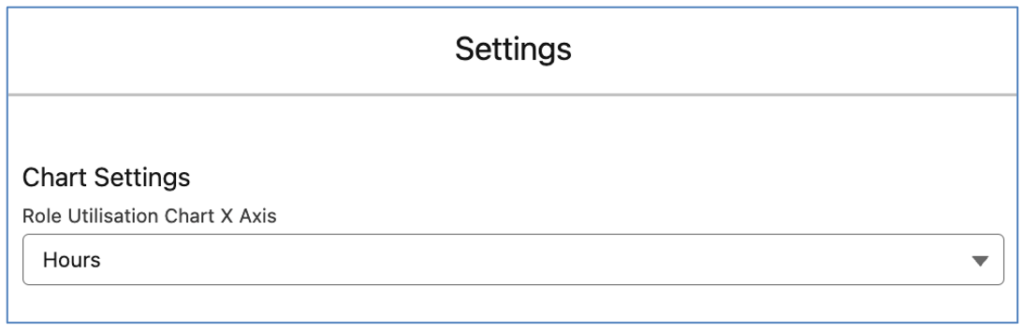
Percentage X Axis
The image below illustrates the Role Utilisation Chart with an X Axis set to Percentage.
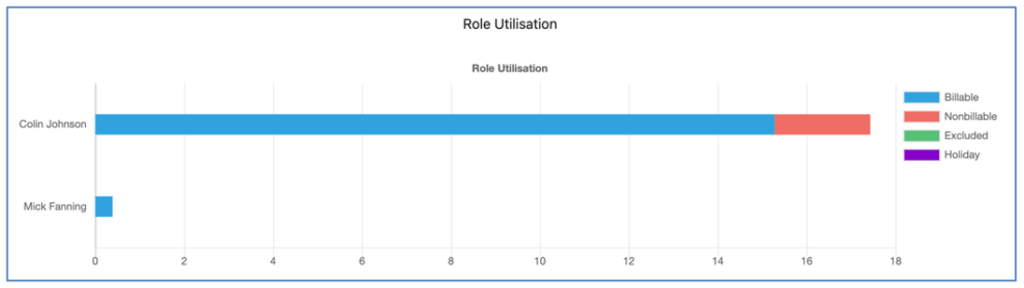
This is controlled by ensuring the ‘Chart Settings’ setting is set to Percentage.
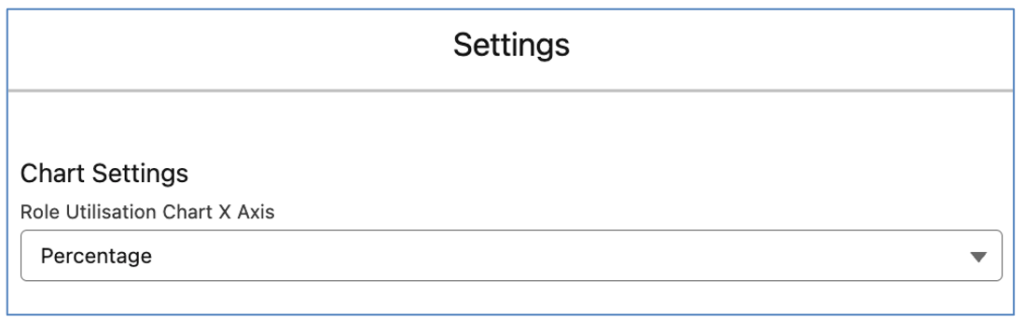
Persistent Collapsible Sections
The Role Utilisation Report is broken up in to three sections:
Each section can be collapsed / expanded as required. These preferences will be persistently remembered between visits.
Page Settings
You’re able to configure the information displayed on the report, as well as set the breakpoints for the Utilisation %, Billable Performance % and Scheduled Performance % figures by clicking on the ![]() icon.
icon.
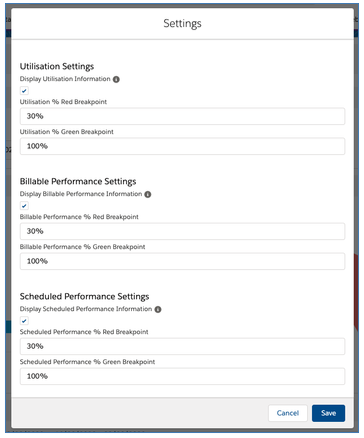
Exclude Projects, Milestones & Actions
If you have Actions that you wish to exclude from the Role Utilisation Report, you are able to set the ‘Exclude from Utilisation’ field to TRUE. This field is available to be applied at the Project, Milestone or individual Action levels.
If you apply it at the Project, all Actions on that Project will be excluded from the Role Utilisation Report. If you apply it at the Milestone level, all Actions relating to the Milestone will be excluded from the Role Utilisation Report.
Any Action that has the ‘Exclude from Utilisation Indicator’ field set to TRUE will be excluded from the Role Utilisation Report.
Hours per Week
The Hours per Week field will display 0 if both of the following criteria apply:
The Role Utilisation Report will reference the applicable Role Availability record(s). If no Role Availability records exist, the Role ‘Hours per Week’ field will be referenced instead.
You can restrict a User’s access to the Role Utilisation Report, to only be able to view the results for their own Role record.
To do this, you will need to set the ‘Restrict Role Utilisation to My Role’ field on their Role record to TRUE. When this field is TRUE, the following rules will apply when the User views the Role Utilisation Report:
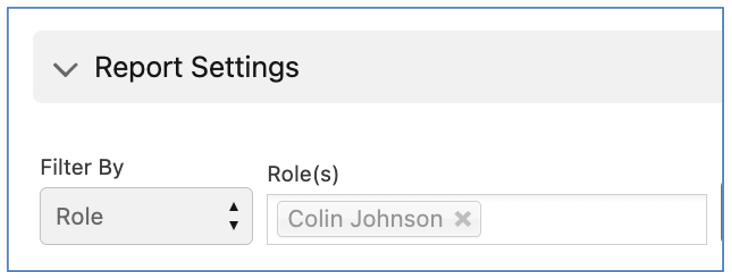
This enables the User to view their own Role Utilisation information without being able to view the data for other Roles.
Role Utilisation Report Filters
When you initially load the Role Utilisation Report, you will be required to select who you’re wanting to view details for. This selection can be made by selecting Master Team, Team or Role. You’re also able to specify the timeframe and whether you’d like to view the data Daily, Weekly, Monthly or Quarterly. Finally, you can also choose how the data is grouped – Role or Master Team.
By default, the End Date will always be set to Today and the Start Date will be 3 months prior to the End Date.

Filter By
You are able to filter the Role Utilisation Report by three options:

Pre-Set Filters
You are able to save a filter selection using the ‘Pre-set Filters’ feature within the Report Settings section of the report.
In the example below, the User has selected the ‘Consultants’ and ‘Developers’ Master Team values.

As this is a filter the User wants to use frequently, they want to save it as a pre-set filter. To do this, they click the ‘Create’ link, enter a Filter Name and click ‘Create’.

The filter parameters are saved and applied to the Role Utilisation Report. As this is a pre-set filter, it will be persistently remembered on a per User basis. To remove a pre-set filter, the User can click the Clear button, as shown below.

When a pre-set filter is cleared, the User will be required to select an existing pre-set filter or manually apply filters.
Role Utilisation Single User Component
The individual Role Utilisation component enables Users to keep track of their individual ‘Role Utilisation’, who may not have access to the main Role Utilisation Report.

The single user component provides access to the same information available on the main Role Utilisation Report. The content of the ‘Details’ section is controlled by the Settings on the main Role Utilisation Report.
Users can choose the period of time they wish to report on from the following periods:
This value is remembered persistently for each individual Users each time the component is viewed.
To use this component, it will need to be added to the Lightning Page on the Role Object. The component name is ‘roleUtilisationSingleRole’. It will dynamically adjust based on whether it has been added to the main section of the page, or the narrower side panel.
The Portfolio Custom Object sits above the Program Custom Object. A Portfolio can have multiple Programs related to it. This provides a 7-layer project structure as outlined below:
Key information from fields on the Program records that relate to the Portfolio will be rolled up automatically to fields on the Portfolio record, including:
The Portfolio Object includes a Lightning Page Layout that provides access to the following tabs:
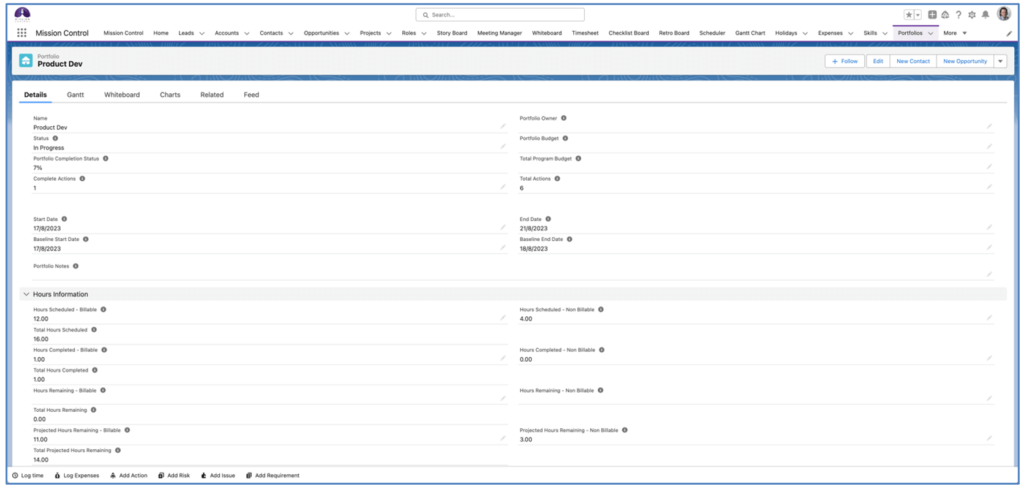
The Program Custom Object sits above the Project Custom Object. A Program can have multiple Projects related to it.
Project Field Roll Up
Key information from fields on the Project records that relate to the Program will be rolled up automatically to fields on the Program record, including:
Program Lightning Page
The Program Object includes a Lightning Page Layout that provides access to the following tabs:
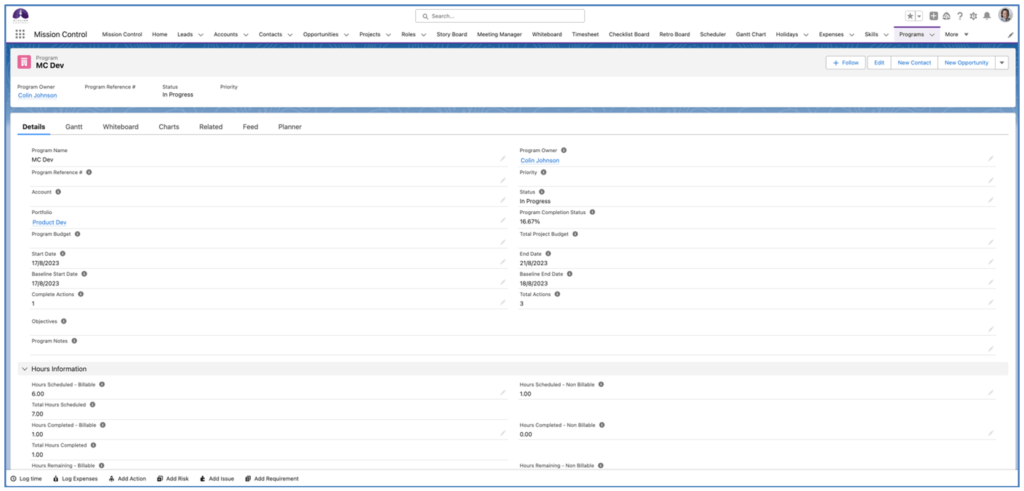
The Program Planner will enable you to quickly capture new Requirements relating to a Program. They can be allocated to the Program ‘Backlog’ or assigned to a Project. Within each Program, you’re able to document User Stories and build out Checklist Items so they’re ready for when you convert the Requirement to an Action (more to come on that in a moment).
We envisage the Program Planner being used to manage the higher-level requirements for a program of works that will be delivered across a number of related projects. Examples of such complex programs could include a major implementation of Salesforce for a customer, where you will be delivering the work in multiple projects or managing the requirements of a product roadmap.
The Program Planner is illustrated in the wireframe below.
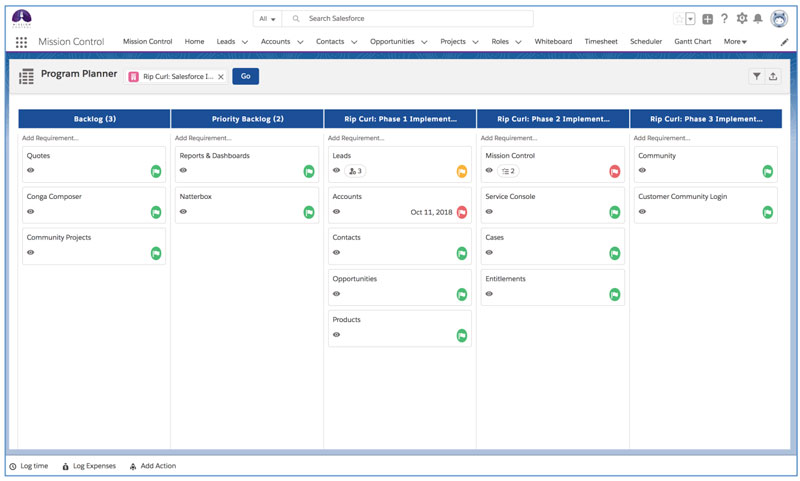
To use the Program Planner, you first of all need to create a Program. You can do this via the Program Tab in the navigation menu, or from the Launch Pad of the Mission Control Console.
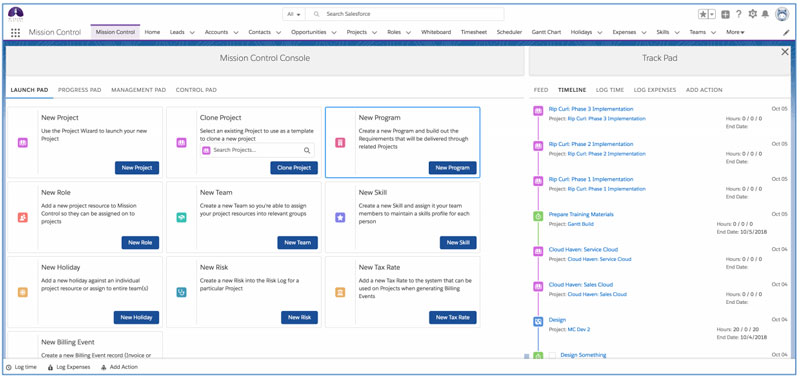
Once you’ve created your Program, you’ll be able to access the Program Planner from the ‘Management Pad’ on the Mission Control Console.
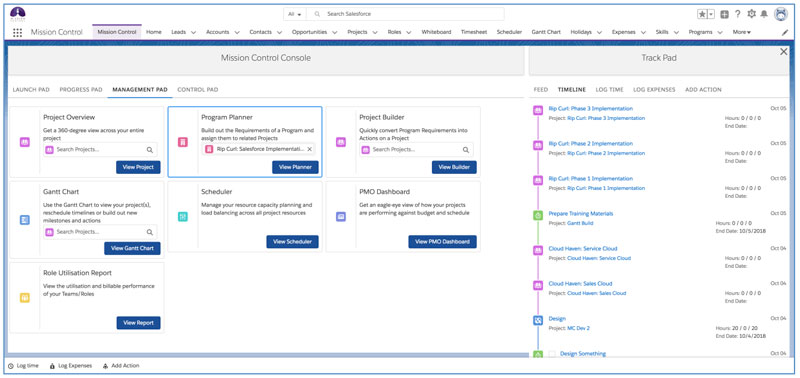
Unless you’ve already related Projects to your Program, when you first view the Program Planner for a new Program, you will see it has two columns for ‘Backlog’ and ‘Priority Backlog’:
![]()
There are a number of tasks the Program Planner enables you to do, including:
Let’s take a closer look at how to do each of these tasks.
Create Requirements
You can begin creating Requirements quickly by clicking on the ‘Add Requirement…’ link at the top of any of the columns. That will open the quick create field as shown below. Simply enter the name of the Requirement, hit enter and you’ll see the Requirement appear on the Planner and you’ll be able to then go on to create another Requirement if needed.
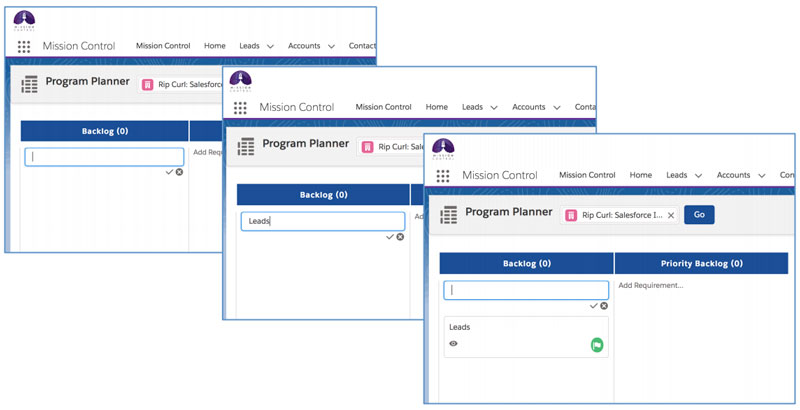
You can continue creating Requirements in the Backlog and then dragging them to the Priority Backlog, or you can create them directly in the Priority Backlog column using the ‘Add Requirement…’ feature.
Edit Requirements
If you click on the ![]() icon for an individual Requirement, the Requirement modal will open, which will give you access to:
icon for an individual Requirement, the Requirement modal will open, which will give you access to:
![]()

On the Requirement Tab, you’re able to edit the details of the Requirement record by clicking the ![]() icon or deleting it by clicking the
icon or deleting it by clicking the ![]() icon.
icon.
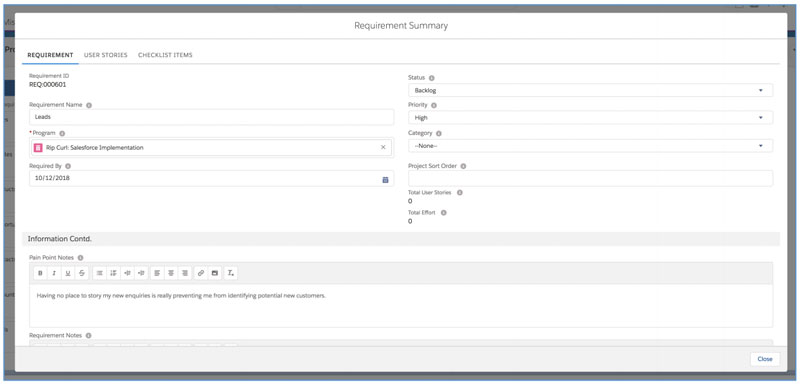
When editing the record, you can make changes to any of the fields and then scroll to the bottom of the page and click Save.
Add User Stories
User Stories are the detailed scenarios that need to be delivered as part of the Requirement. To add new User Stories relating to a Requirement, click the ‘User Stories’ Tab in the Requirement Modal and then click the ‘New Story’ button.
![]()
This will open a new draft User Story for you to create. Fill in the relevant fields and you can click the ![]() to save and close, or the
to save and close, or the ![]() to save and open a new User Story ready to create.
to save and open a new User Story ready to create.
All User Stories relating to the Requirement will be listed in the User Stories tab of the Requirement Modal.
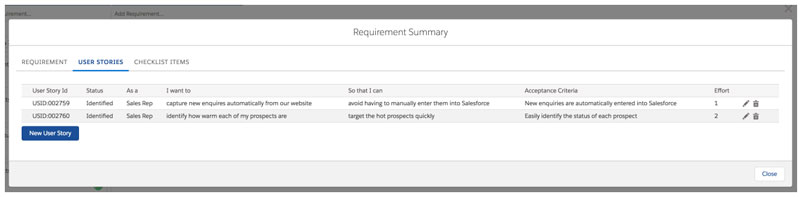
When you look at the Requirement card on the Program Planner, you’ll be able to identify how many User Stories are related to the Requirement.
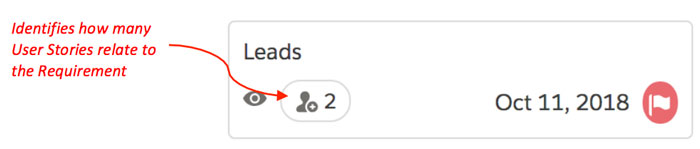
Add Checklist Items
Checklist Items are the sub-tasks that sit underneath an Action on a Project. You’re able to create Checklist Items under the Requirement, and when you convert the Requirement to an Action on a Project, the Checklist Items will be related to the new Action.
To add Checklist Items relating to a Requirement, click the ‘Checklist Items’ Tab in the Requirement Modal and then click the ‘New Item’ button.
![]()
This will open a new draft Checklist Item for you to create. Fill in the relevant fields and you can click the ![]() to save and close, or the
to save and close, or the ![]() to save and open a new Checklist Item ready to create.
to save and open a new Checklist Item ready to create.
All Checklist Items relating to the Requirement will be listed in the Checklist Items tab of the Requirement Modal.
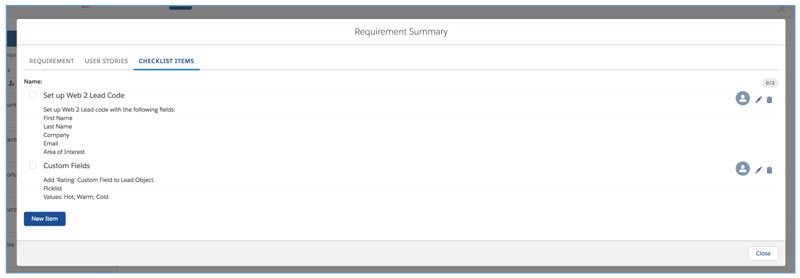
When you look at the Requirement card on the Program Planner, you’ll be able to identify how many Checklist Items are related to the Requirement.

Add Projects
You can relate Projects to your Program, so you can drag and drop the Requirements to a Project, in essence, assigning the Requirement to be delivered as part of that Project. You can relate existing Projects or create new Projects by clicking on the ![]() button. This will open the following modal window:
button. This will open the following modal window:
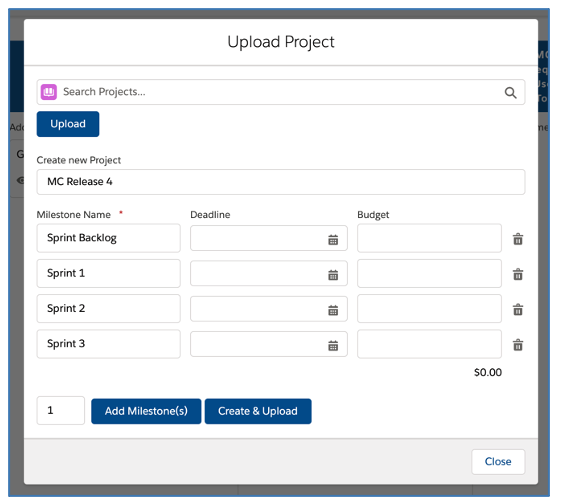
Once you’ve added your Projects to your Program, they’ll automatically appear to the right of the ‘Priority Backlog’ column.
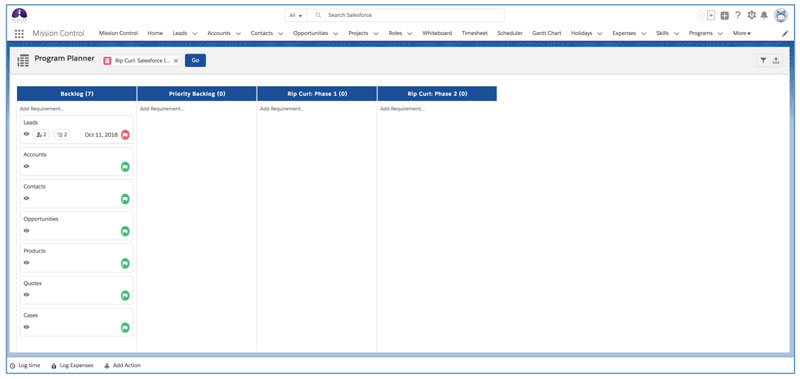
Note: You’re able to drag and drop the Project columns to re-order them, but the Backlog and Priority Backlog will always be positioned on the left.
Now you have Projects on your Program Planner, you’re able to drag and drop your Requirements, assigning them to individual Projects. You’re also able to create new Requirements directly on any of the Project columns.
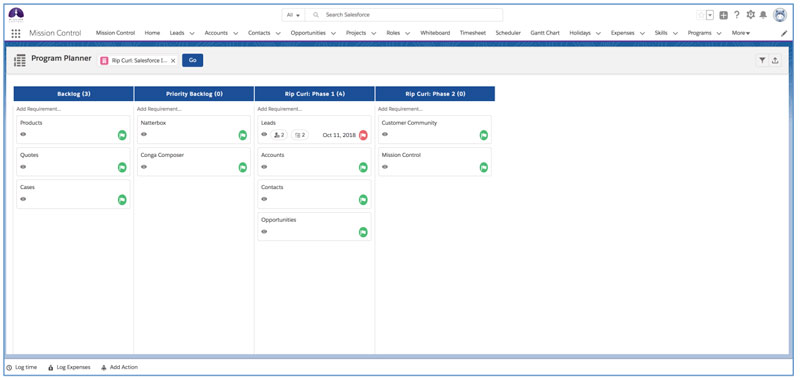
You can apply a filter to your Program Planner by clicking the ![]() button. You can save any of your filters for ongoing use.
button. You can save any of your filters for ongoing use.
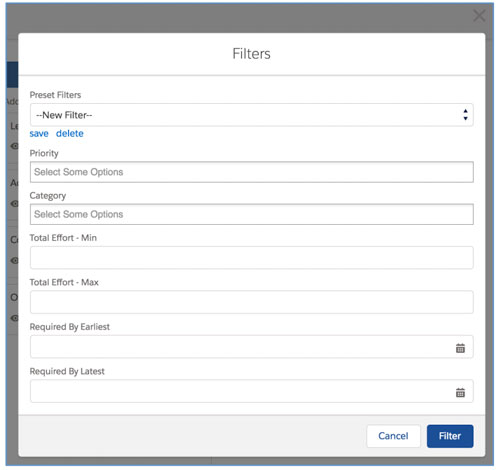
If you want to hide a Project from the Planner without removing the relationship to the Program, you can set the ‘Exclude from Program Planner’ to TRUE on the Project record.
The Story Board provides you with a Kanban interface to manage the User Stories related to Requirements, within context of a particular Program.
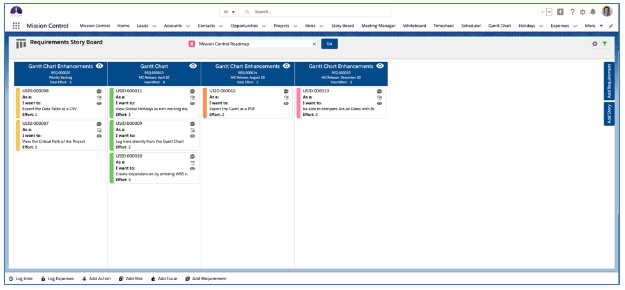
You’re able to use the Story Board to:
To access the Story Board, you go to the Management Pad of the Mission Control Console, and within the Story Board tile, search and select the required Program and click the ‘View Story Board’ button.
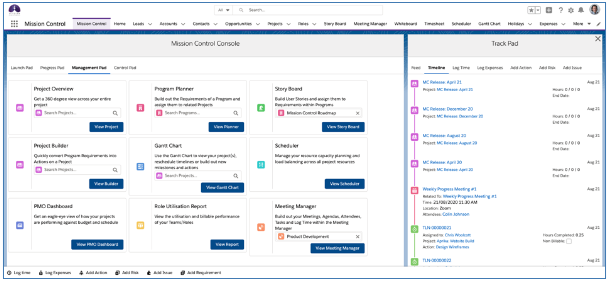
When you initially load the Story Board, you will be required to apply a Filter, to load in the Requirements & User Stories.
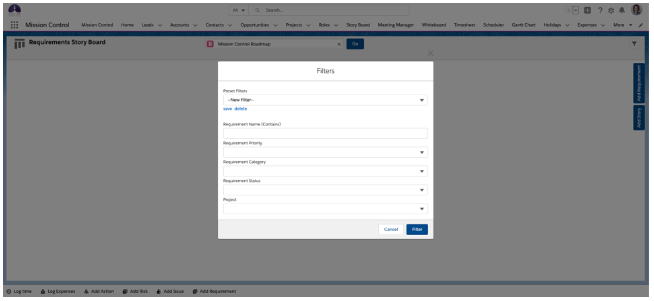
You are able to apply filters on a variety of fields, including:
You can save Filters and they will be available within the ‘Preset Filters’ section.
Note: When you switch from one Program to another, Preset Filters will persist, but manually applied filters will be removed and you will be presented with the Filters modal again.
Creating Requirements
On the right-hand-side of the Story Board, there is an ‘Add Requirement’ Tab. Clicking this Tab will expand the tab and you will be able to enter the required information for the new Requirement record. Once saved, the Requirement will be visible on the Story Board.
Note: This Tab displays the standard Requirement Page Layout.
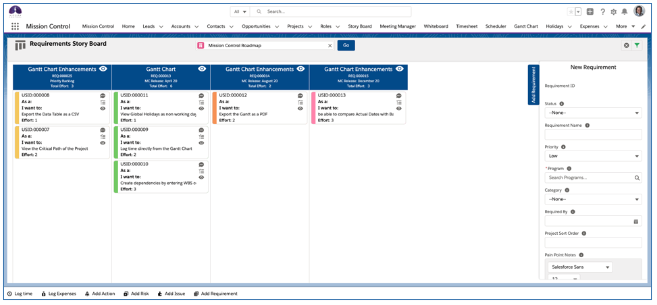
Editing / Deleting Requirements
You are able to open the Requirements modal by clicking the ![]() icon within the Requirement column header.
icon within the Requirement column header.

From this modal, you are able to edit the Requirement, delete the Requirement, manage User Stories and Checklist Items.
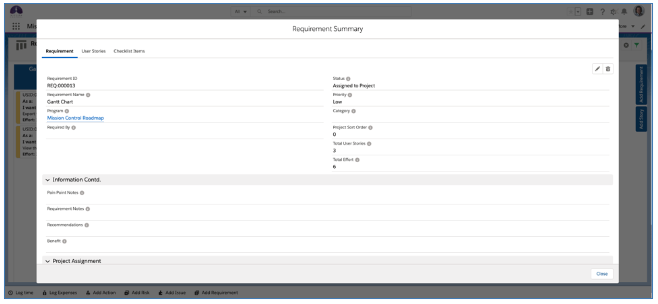
Creating new User Stories
On the right-hand-side of the Story Board, there is an ‘Add Story’ Tab. Clicking this Tab will expand the tab and you will be able to enter the required information for the new User Story record. Once saved, the User Story will be visible on the Story Board within the applicable Requirement column.
Note: This Tab displays the standard User Story Page Layout.

Editing / Deleting User Stories
You are able to open the User Story modal by clicking the ![]() icon within the User Story Card.
icon within the User Story Card.
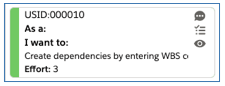
From this modal, you are able to edit the User Story or delete the User Story.
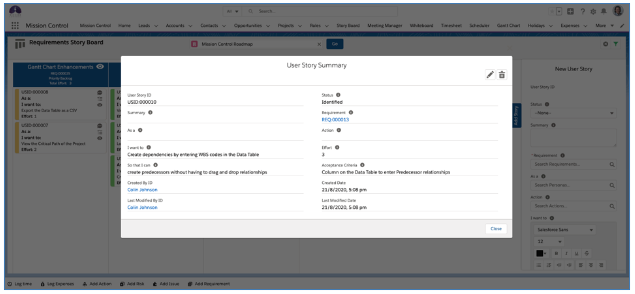
Chatter Collaboration
You can access the Chatter feed for the User Story record by clicking on the ![]() icon within the User Story card.
icon within the User Story card.
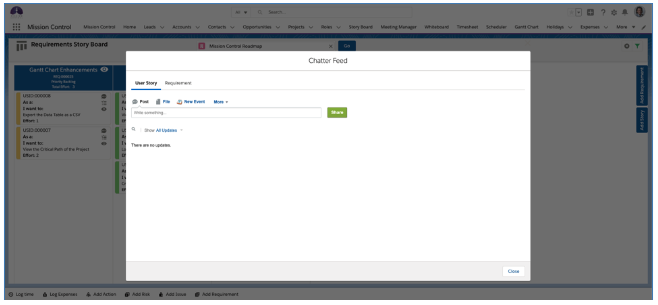
From this modal, you are able to collaborate on the User Story or Requirement Chatter feed.
Creating Checklist Items
You can access the Checklist Item Manager by clicking the ![]() icon within the User Story card.
icon within the User Story card.
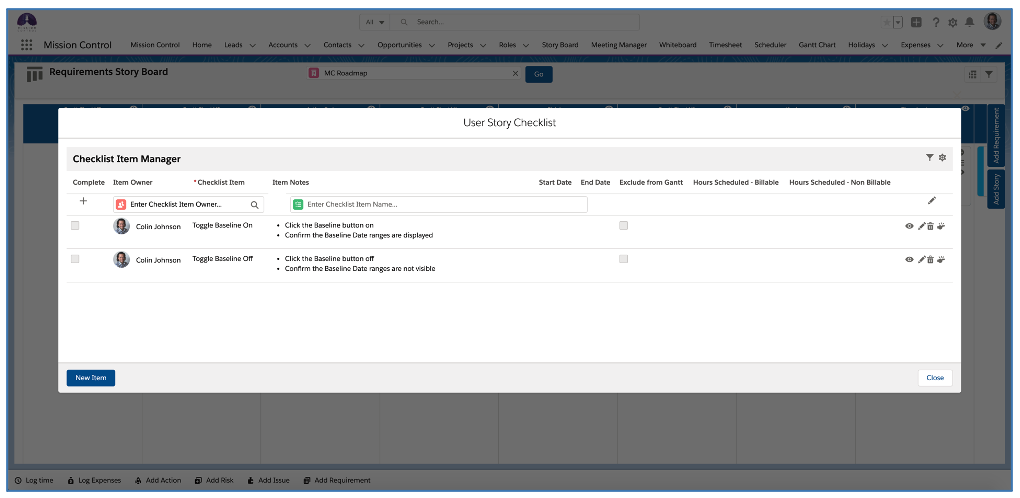
From this modal, you are able to create Checklist Items related to the User Story.
Reparenting User Stories
The Story Board enables you to drag and drop User Story cards from one Requirement to another. For example, if the Requirement included within one Project has too many User Stories for the capacity of the Project, you can drag to reparent to a different Requirement that will be delivered as part of a different Project.
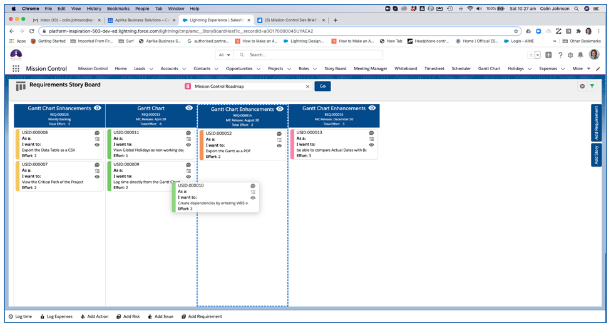
The ‘Project Builder’ assists with building the detail of a Project. You’re able to:
If you haven’t created any Milestones underneath your Project, when you load the Project Builder, you’ll get a screen that looks like this:
![]()
From here, you’re able to click the ‘Add Milestone’ button to create new Milestones.
In the example below, the Project already has some Milestones created, and we’re ready to start building out the detail by adding Actions. We have two options here:
![]()
To create an Action manually, simply click the ‘Add Action’ button and enter the appropriate field values and click Save. The new Action will automatically appear in the relevant Milestone column.

Converting Requirements & User Stories
You’re also able to convert Requirements & User Stories into Milestones & Actions. To do this, you need to click on the ‘Requirements’ Tab on the right-hand side of the Project Builder. This will expand a section that will display all of the Requirements that are related to the Project, that have not yet been converted to an Action.
You have 3 options to convert Requirements and User Stories into a Project Plan:
You can choose which conversion method you want to use using the ‘Convert’ Setting within the Requirements Tab.
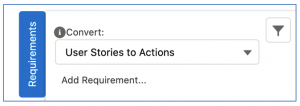
This is a persistent setting, and will be remembered between visits to the Project Builder.
When you convert Requirements/User Stories into Actions, the sum of the ‘Effort’ field on the User Stories will be used to populate the ‘Hours Scheduled – Billable’ field of the Action.
Requirements to Actions
This conversion method will convert the Requirement into an Action within an existing Milestone. Any User Stories and Checklist Items that relate to the Requirement will be updated to the Action that is created.
When using this conversion method, you will see the Requirement cards within the Requirements Tab, as illustrated below.
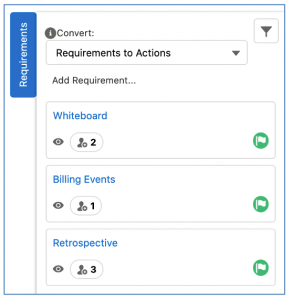
To convert a Requirement to an Action, ensure the ‘Convert’ setting is set to Requirements to Actions and then simply drag and drop the Requirement into a Milestone Column and it will create the Action.
Requirements to Milestones
This conversion method will convert the Requirement into a Milestone, and each individual User Story will be converted into an Action within the new Milestone.
When using this conversion method, you will see the Requirement cards within the Requirements Tab, as illustrated below.
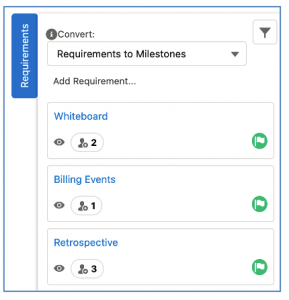
To convert a Requirement to a Milestone, ensure the ‘Convert’ setting is set to Requirements to Milestones and then simply drag and drop the Requirement onto the Project Builder.
User Stories to Actions
This conversion method will convert User Stories into Actions. Using this method enables you to convert User Stories relating to the same Requirement into different Milestones. Any Checklist Items that relate to the User Story will be related to the Action.
When using this conversion method, you will see the Requirement and User Story cards within the Requirements Tab, as illustrated below.
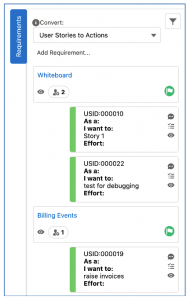
To convert an individual User Story to an Action, ensure the ‘Convert’ setting is set to User Stories to Actions and then simply drag the User Story card into a Milestone Column and it will create the Action. If you want to convert all User Stories relating to a particular Requirement to the same Milestone, you can drag the Requirement card into a Milestone Column and it will create an Action for each User Story.
To edit the Action further, or to assign Contributors, you can click the ![]() icon on the individual Action, where you’ll be able to edit key fields such as Hours Scheduled, Start Date, End Date, and access the Resource Assignment Wizard to manage Contributors.
icon on the individual Action, where you’ll be able to edit key fields such as Hours Scheduled, Start Date, End Date, and access the Resource Assignment Wizard to manage Contributors.
Requirement & User Story Delivery Status Tracking
You are able to track the ‘Delivery Status’ of Requirements and User Stories once they have been converted to Actions on Projects.
There is a Picklist field on the Requirement Object and the User Story Object called ‘Delivery Status’, which contains the same values as the Action Status field, as follows:
This field will be automatically updated based on the Status value of the Action in the following situations:
Requirement Converted to Action: the Requirement Delivery Status field is updated to match the Action Status. User Story Delivery Status field needs to be updated manually
Requirement Converted to Milestone: – the User Story Delivery Status field is updated to match the Action Status. The Requirement Delivery Status is updated to match the Milestone Status
User Story Converted to Action: the User Story Delivery Status field is updated to match the Action Status. The Requirement Delivery Status is updated to match the Milestone Status
You are able to Filter the Program Planner and Story Board based on the Delivery Status of the Requirement and/or User Story.
The ‘Meeting Manager’ enables you to collaborate as a team, keeping you on top of all the discussions across your projects. This feature comprises of the following components:
The ‘Meeting Manager’ lets you keep a track of your progress meetings. Whether that’s project specific, program specific or as a team, across number pieces of work, you’ll be able to record the meetings, who attended, what was discussed, what was resolved and what is still outstanding. You’re also able to effortlessly log time on behalf of all attendees.
Below is an illustration of the Meeting Manager.
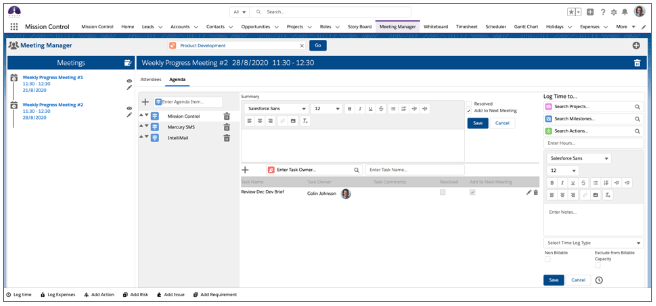
Create a new Meeting Manager
To create a new Meeting Manager, go to the Launch Pad on the Mission Control Console and click the ‘New Meeting Manager’ button within the New Meeting Manager Tile, as shown below.
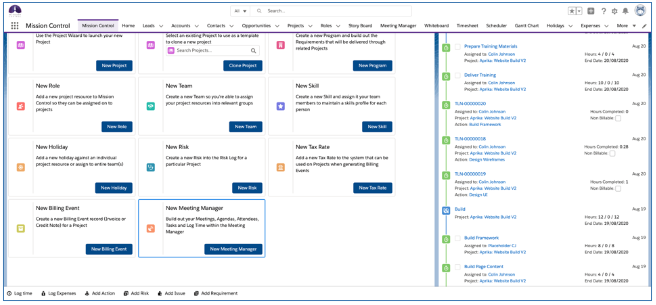
The Meeting Manager will open, and you will be required to enter a Meeting Manager Name, then click the Save button.
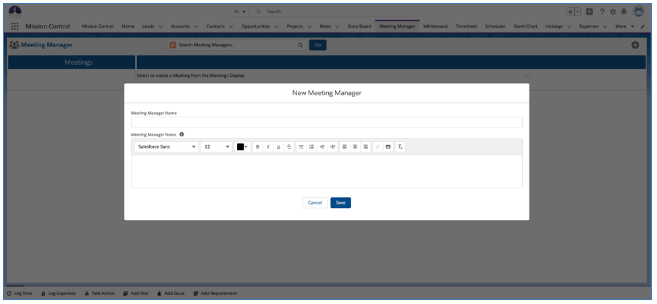
The new Meeting Manager will then be ready to start planning your meetings, as shown below.
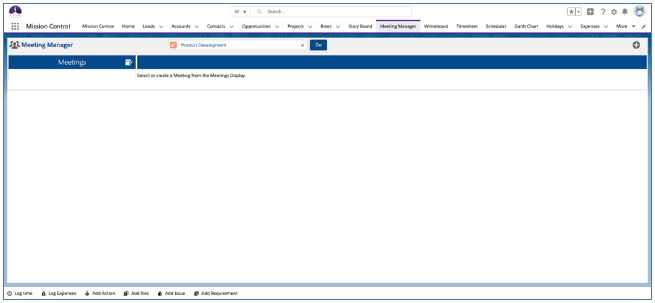
Meeting Manager records can be related to a Project. When creating a Meeting Manager, you can choose to populate the ‘Project’ field, as shown below.
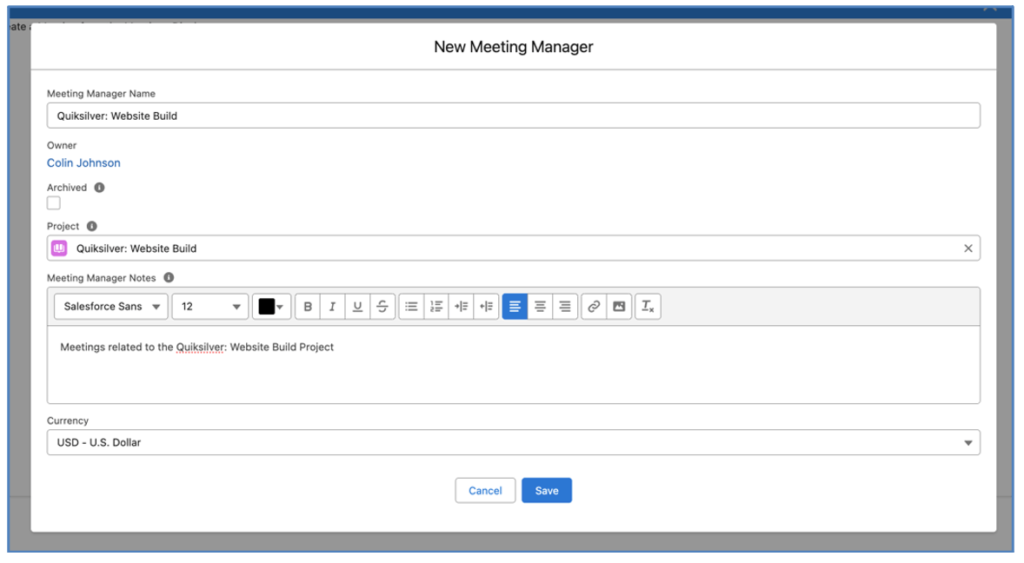
This means you will be able to see the Meeting Manager records in the Related Lists sections.
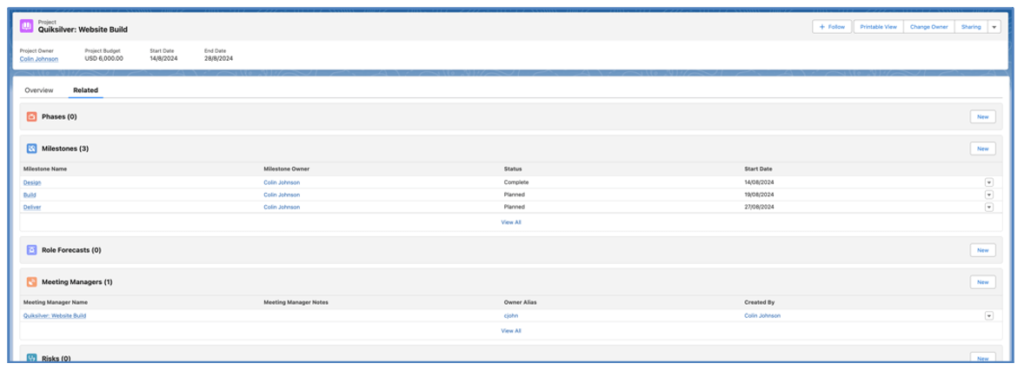
You are also able to add the Meeting Manager component to the Project Lightning Page, as shown below.
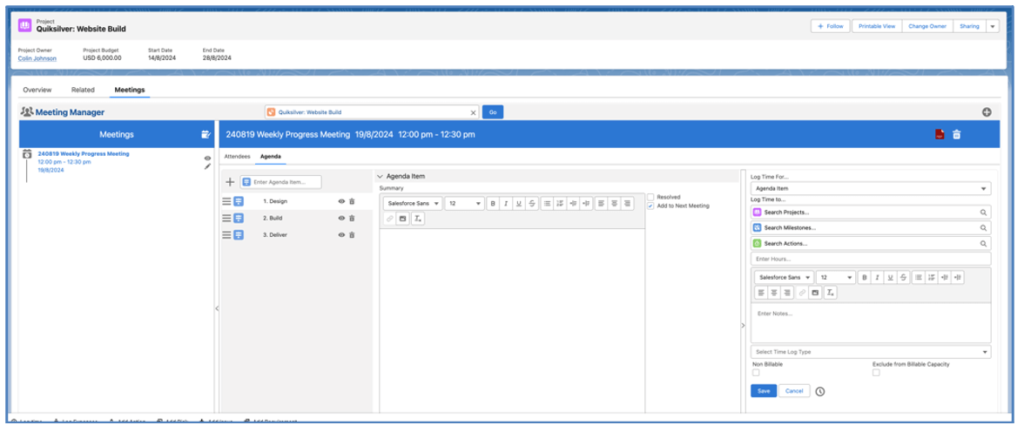
When using the Meeting Manager in context of a Project, it will only display Meeting Managers that are related to the Project. If only one Meeting Manager relates to the Project, it will be loaded by default.
Accessing the Meeting Manager
To load the Meeting Manager page for an existing Meeting Manager, go to the Management Pad on the Mission Control Console, and within the Meeting Manager tile, search for the required Meeting Manager, and click the ‘View Meeting Manager’ button.

Creating a Meeting
To create a new Meeting within the Meeting Manager, click the new meeting icon ![]() . This will open the New Meeting modal where you will be able to create a new Meeting from scratch, or load from an existing meeting.
. This will open the New Meeting modal where you will be able to create a new Meeting from scratch, or load from an existing meeting.
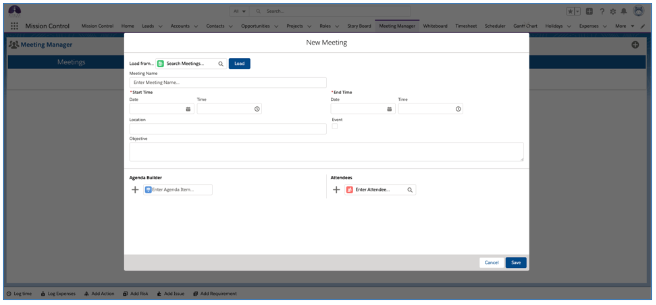
Create a new Meeting
To create a new Meeting from scratch, you will need to enter values into the key fields, including:
Note: If you set the Event field to true, this will create a Salesforce Event record, and all Roles that are linked to User records, that are marked as Attendees will be added to this Event.
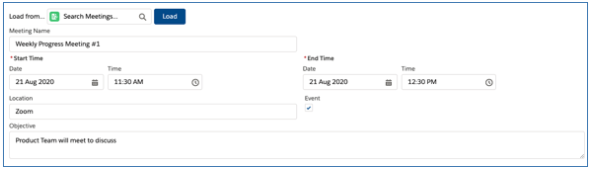
Next, you will need to add your Agenda Items, which can be done within the Agenda Builder section. To add an Agenda Item, enter the description of the Agenda Item and either click the + icon, or hit enter, and that Agenda Item will be added, as shown below:
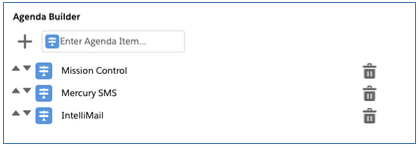
Within the Agenda Builder section of the Meeting Builder, instead of creating Agenda Items manually, you are able to click the ‘Create from Milestones’ button.
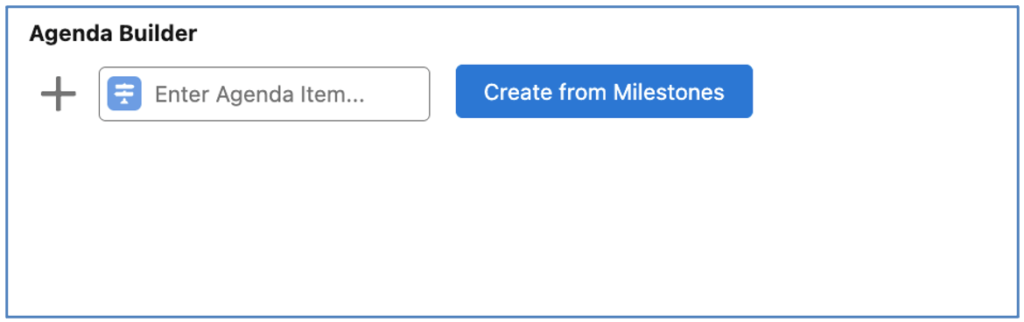
When this button is clicked, Agenda Items will be added to the Agenda Builder for each Milestone included on the Project that the Meeting Manager relates to.
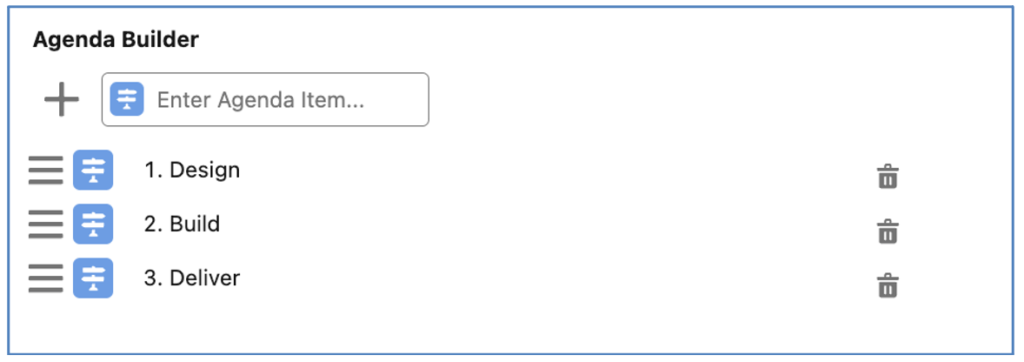
Note: This button will only appear if the Meeting Manager is related to a Project. Once clicked, the button will no longer be displayed.
Next, you will need to add your Attendees – these are Roles within Mission Control. They can be added by searching for their name within the Enter Attendees field. Once you’ve found the required Role record, click the + icon to add them as an Attendees, as shown below:
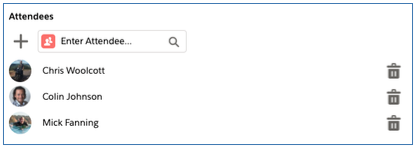
Once you’ve entered the Meeting information, Agenda Items and Attendees, you will need to click Save.
Within the Attendees section of the Meeting Builder, instead of adding individual Attendees manually, you are able to click the ‘Add Team(s)’ button.

This will open ‘Add Team(s)’ Modal where you are able to search and select a Team that you would like to add Attendees from.

Once you have selected the required Team, you are able to select all or some of the Roles displayed and click the Add button.
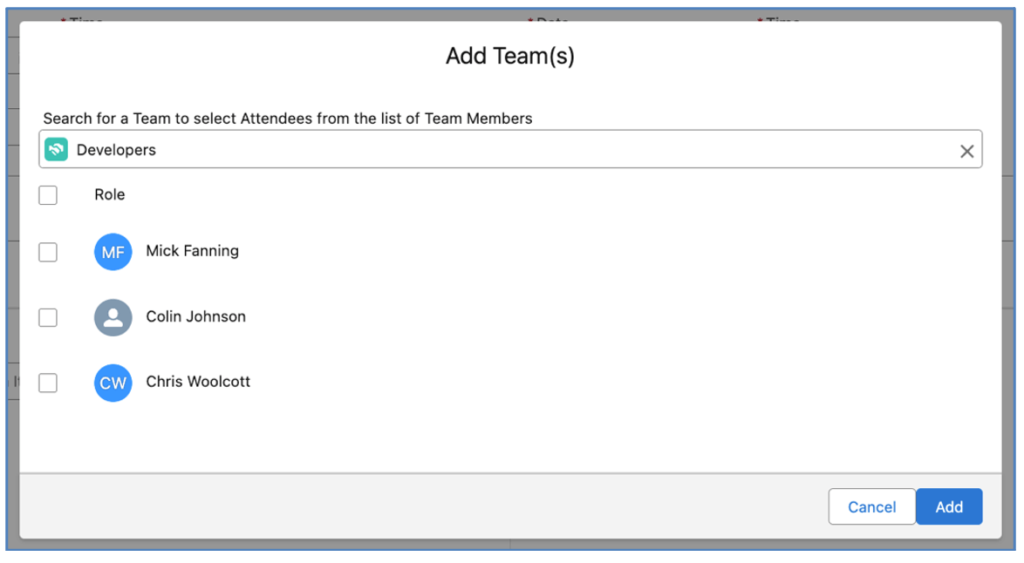
This will add each of the Selected Roles as Attendees.
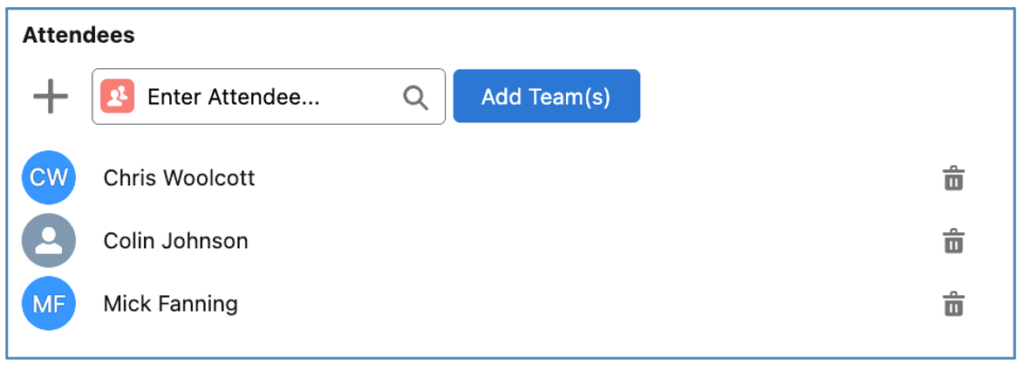
To add Roles from another Team, click the ‘Add Team(s)’ button again to repeat the process.
Add Project Stakeholders as Attendees
If your Project has related Project Stakeholders, you are able to add them as Attendees. Within the Attendees section of the Meeting Builder, you are able to click the ‘Add Stakeholder(s)’ button.
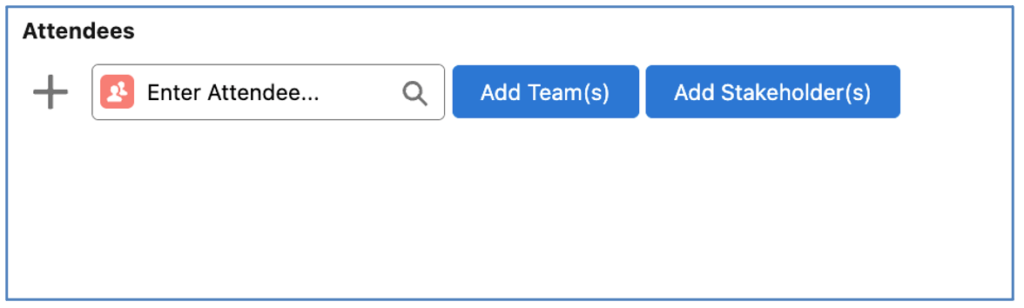
This will open ‘Add Stakeholder(s)’ Modal where you are able to the Stakeholders that you would like to add as Attendees.
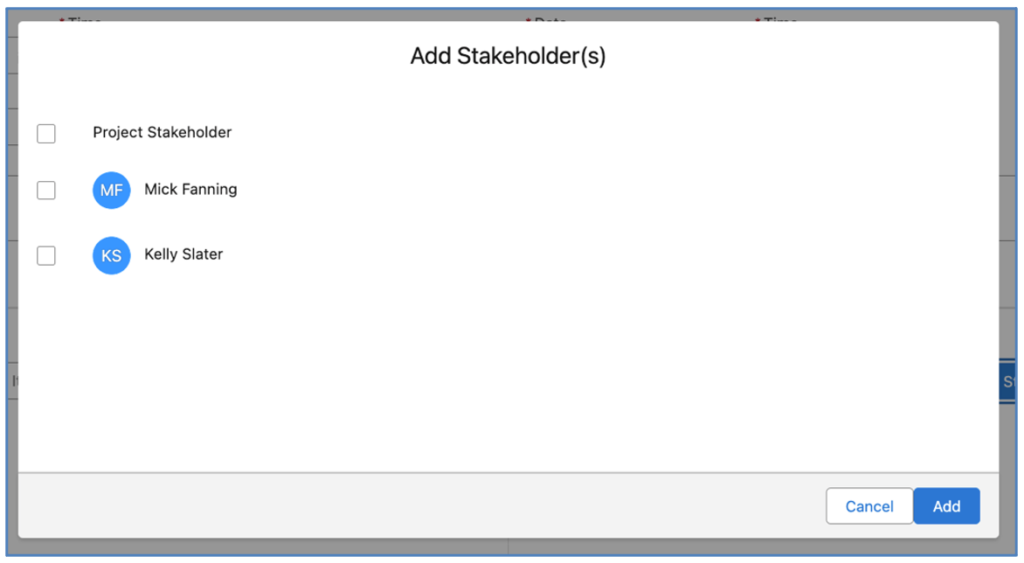
You are able to select all or some of the Project Stakeholders displayed and click the Add button. This will add each of the Selected Roles as Attendees.
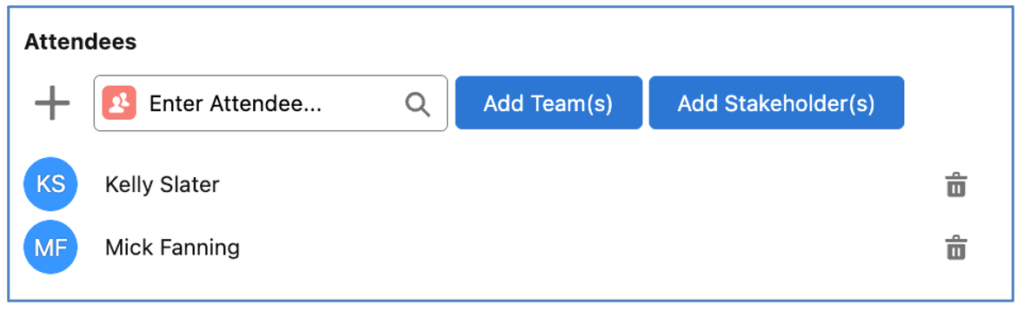
The Meeting will then appear in the Meetings section of the Meeting Manager, as shown below:
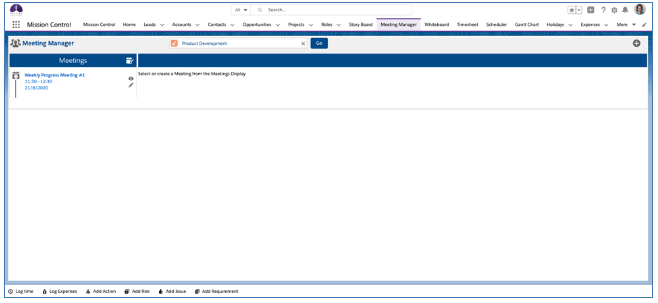
Load from existing Meeting
Instead of creating a new Meeting from scratch every time, you can use the ‘Load from…’ feature, which lets you copy over the Meeting, Attendees along with Agenda Items and Agenda Tasks that are marked as ‘Add to Next Meeting’.
When creating a new Meeting, search for the existing Meeting in the ‘Load from…’ field, and click the Load button.

This will load in the previous Meeting information, allowing you to make changes. Once you’ve made the necessary changes, you can click Save and the new Meeting will be added to the Meetings section of the Meeting Manager.
Managing a Meeting
Within a Meeting, you’re able to perform a number of different actions, including:
To view the details of a Meeting, click the ![]() icon for the required Meeting within the Meetings timeline. This will load the Meeting into the main section of the Meeting Manager, as shown below:
icon for the required Meeting within the Meetings timeline. This will load the Meeting into the main section of the Meeting Manager, as shown below:
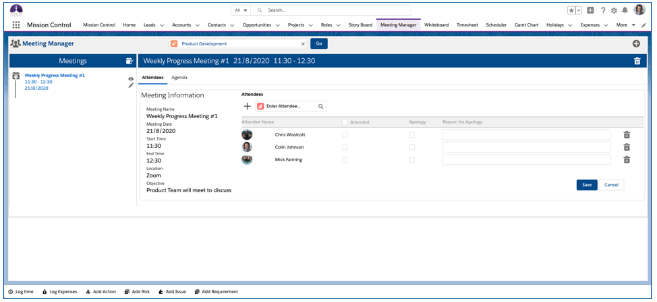
Within the Meeting, there are two Tabs for Attendees and Agenda.
Attendees Tab
The Attendees section provides details of the Meeting, along with the Attendees. From here, you’re able to:
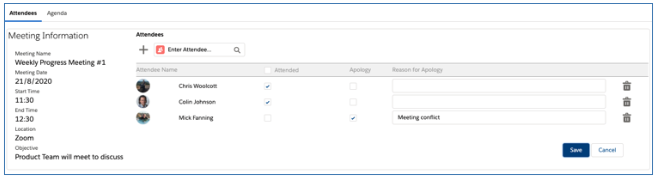
Agenda Tab
Once you’ve updated the Attendees, you can switch over to the Agenda Tab to begin the Meeting. Within this section, you’re able to:
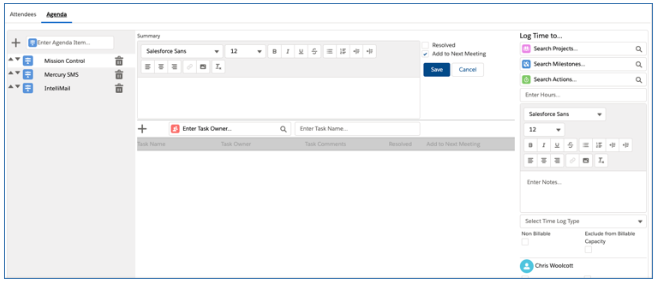
By default the ‘Add to Next Meeting’ checkbox is set to true. Any Agenda Item or Agenda Task that has this field as true will be included in the next Meeting when created via the ‘Load from’ feature. If you have resolved an Agenda Item, you will need to set the Add to Next Meeting checkbox to false and check the Resolved checkbox to true. Resolved Agenda Items and Agenda Tasks will not be included in the next Meeting.
Creating Agenda Tasks
To create an Agenda Task against an Agenda Item, enter a Task Owner, Task Name and Task Comments, then click the + icon, or hit enter. The Agenda Task will then be added to the Task List, as shown below:
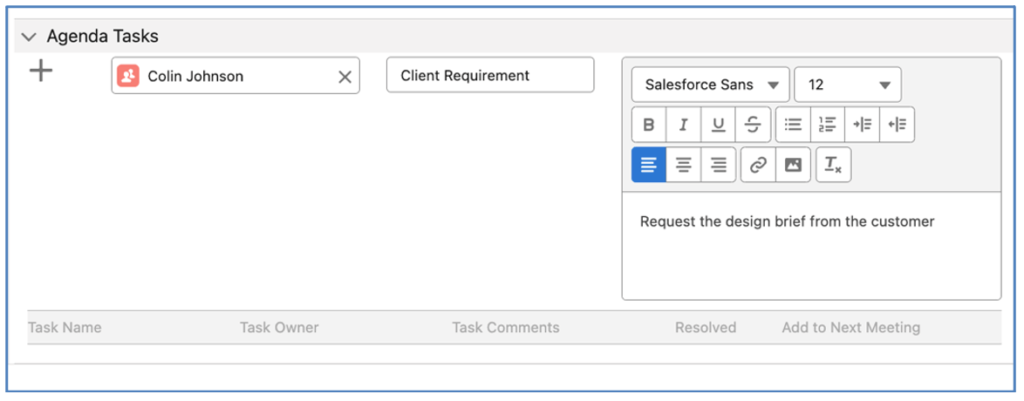
Click the + icon to create the new Agenda Task, and it will appear in the Task List, as shown below.
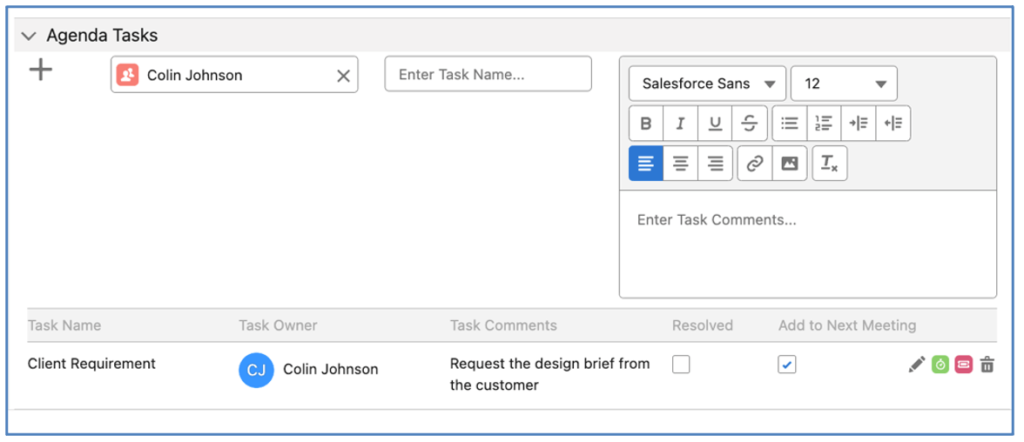
The Task Owner field will remain populated in the Quick Create section, should you require to create another Agenda Task for the same Role.
Once an Agenda Task is created, you are able to edit to add notes/comments. By default the ‘Add to Next Meeting’ checkbox will be set to true. If an Agenda Task has been resolved and you do not wish it to be included in the next Meeting, you will need to edit the Agenda Task and set the Resolved checkbox to true.
Promote Agenda Task to Action
You are able to ‘promote’ an Agenda Task to an Action. This may be required when an Agenda Task has been reviewed and determined to need work on a specific Project to be carried out.
To promote an Agenda Task to an Action, you can click on the green Action icon, located to the right of the Edit icon for the Agenda Task on the Meeting Manager.
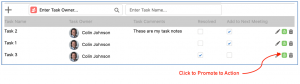
When you click the icon, it will open up the Action Modal allowing you to create a new Action. From here, you will be able to select which Project and Milestone the Action will relate to, as well as accessing the Resource Assignment Wizard.
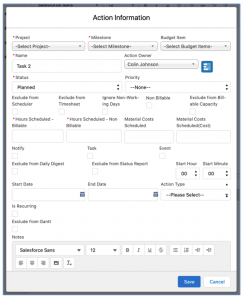
Once an Agenda Task has been promoted to an Action, if you click the green Action icon, it will open the Action Summary modal, as shown below.
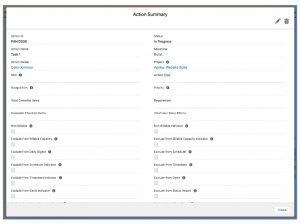
Promote Agenda Tasks to Checklist Items
You are able to ‘promote’ an Agenda Task to a Checklist Item. This may be required when an Agenda Task has been reviewed and determined to need work on a specific Project to be carried out.
To promote an Agenda Task to a Checklist Item, you can click on the red Checklist Item icon, located to the right of the green Action icon and Edit icon for the Agenda Task on the Meeting Manager.
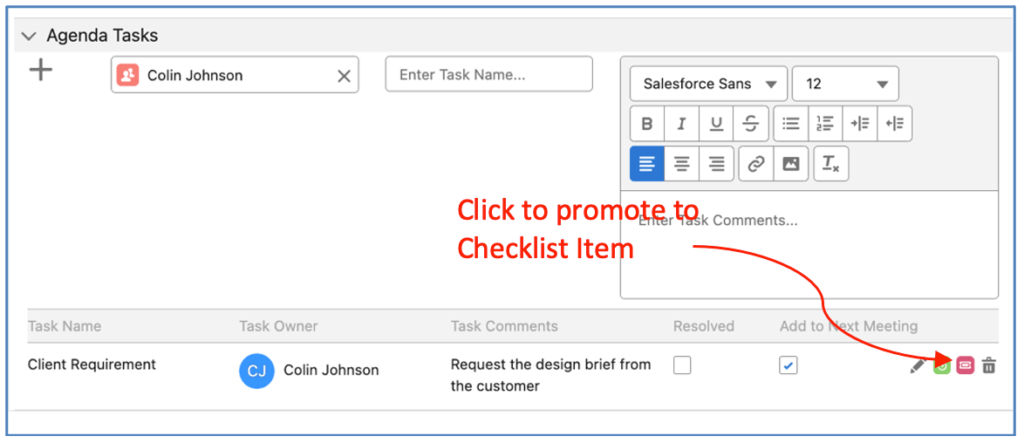
When you click the icon, it will open up the Checklist Item Modal allowing you to create a new Checklist Item. From here, you will be able to select which Action the Checklist Item will relate to.
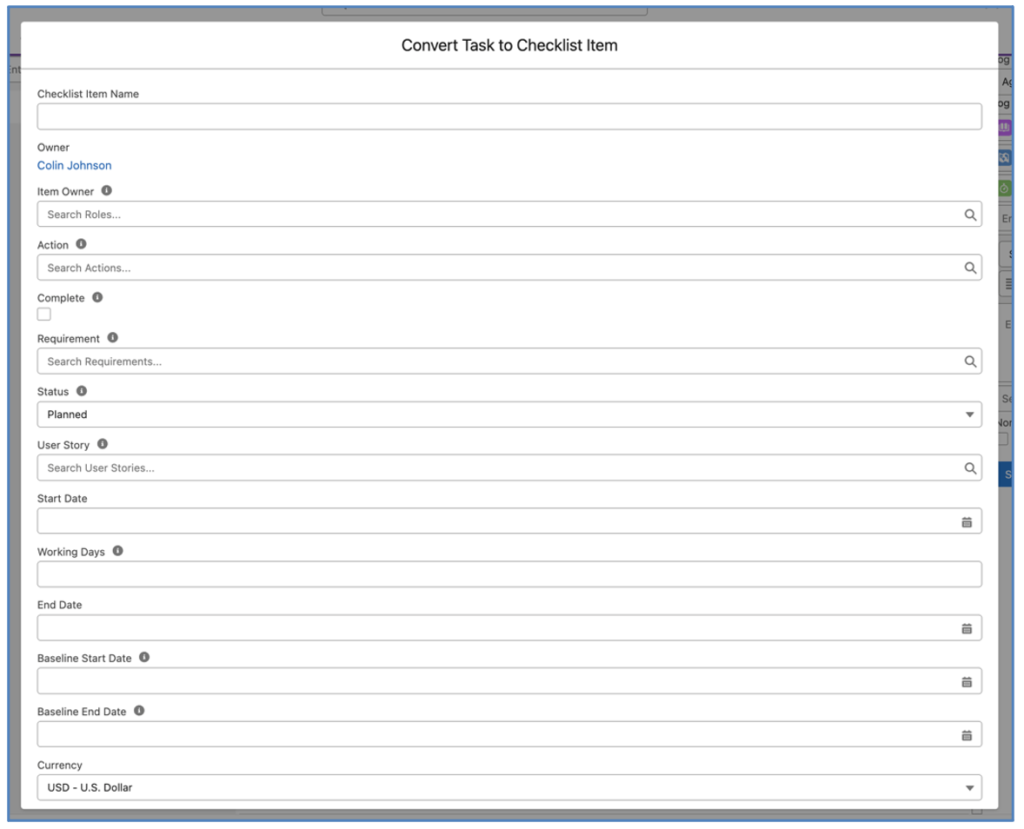
Once an Agenda Task has been promoted to a Checklist Item, if you click the red Checklist Item icon, it will open the Checklist Item Summary modal, as shown below.
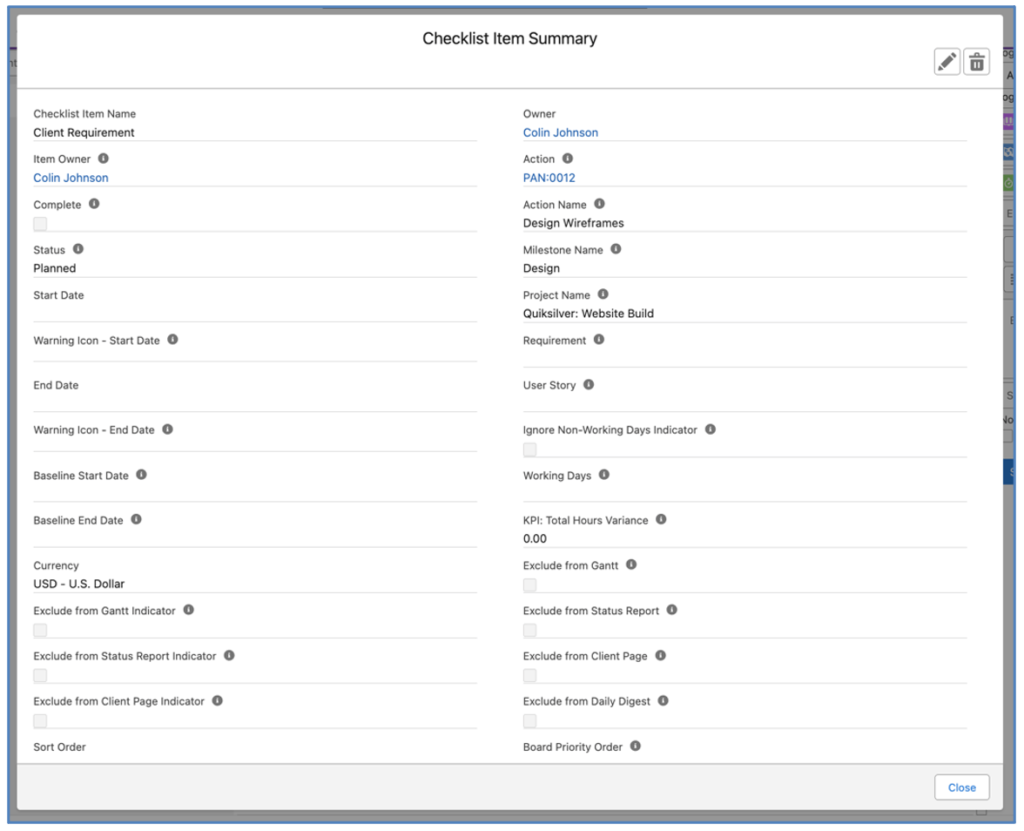
Logging Time
A great productivity boosting feature of the Meeting Manager is the ability to log time for all Attendees. Located on the right-hand-side is the Time Logger. From here, you’re able to select the Action that you wish to log time against.
At the top of the Log Time section of the Meeting Manager, there is a ‘Log Time For…’ Picklist field, which provides you with the option to select a value of Meeting or Agenda Item. This is a persistent setting and will be remembered each time you use the Meeting Manager.
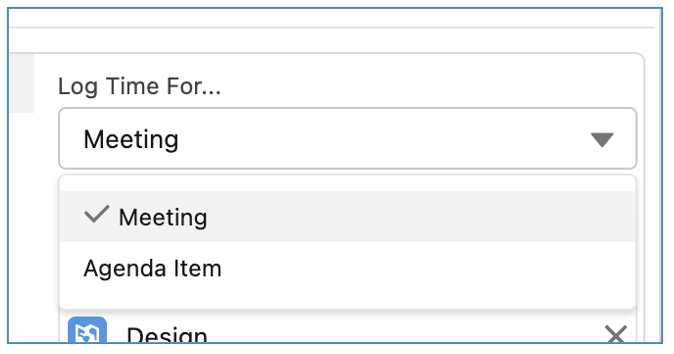
When set to Meeting, you will be able to log time for the entire duration of the meeting. For example, you may be having a meeting to review one individual Project and want to log time for the entire meeting to that Project. If you’re using the Start/Stop feature, you can start at the beginning of the meeting and stop at the end.
When set to Agenda Item, you are able to log time to separate Actions for each individual Agenda Item. For example, you may be having a meeting to review the progress of several different Projects. Therefore, you may need to allocate time spent reviewing each Project. If you’re using the Start/Stop feature, you will need to start and stop for each individual Agenda Item.
Within the Time Logger, you select the Project, Milestone & Action, and you have the option to manually enter the time, or click the clock to use the start/stop time tracking function.
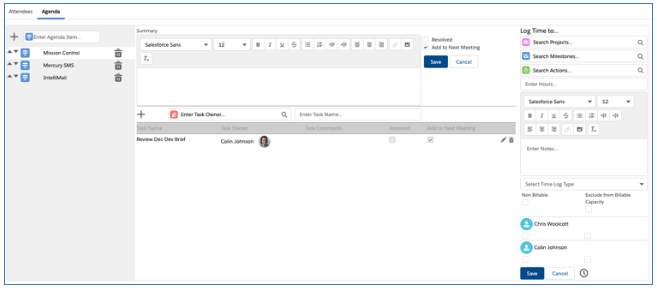
When entering time, a Time Log will be created for each Attendee. For example, if you enter 0.25 hours, and there are 4 Attendees, 4 individual Time Logs for 0.25 hours will be created. For each individual Attendee, you can mark the time to be Non Billable and/or Excluded from Billable Capacity.
Archive Meeting Manager Records
You are able to archive a Meeting Manager record. This will remove the Meeting Manager from the Search Field on the Meeting Manager, which allows you to switch from one Meeting Manager to another.

However, archived Meeting Manager records will still appear in the results of the Meeting Manager tile on the Management Pad of the Mission Control Console. This will enable Users to still access the Meeting Manager for archived records.
Meeting Notes PDF
You can generate a ‘Meeting Notes’ PDF that can be downloaded and circulated. This PDF contains the following details:
To generate the Meeting Notes PDF, click on the PDF icon which is located in the top-right section of the Meeting Manager.
![]()
When you click the icon, it will open up the Meeting Notes PDF allowing you to download and circulate as required. Below is an example of the Meeting Notes PDF.
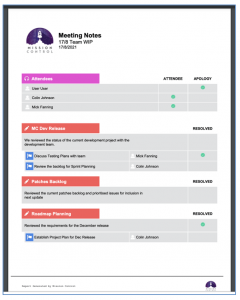
Meeting Notes PDF Branding
The Meeting Notes PDF includes sections for:
The Headers for these two sections are branded with the following colours by default.
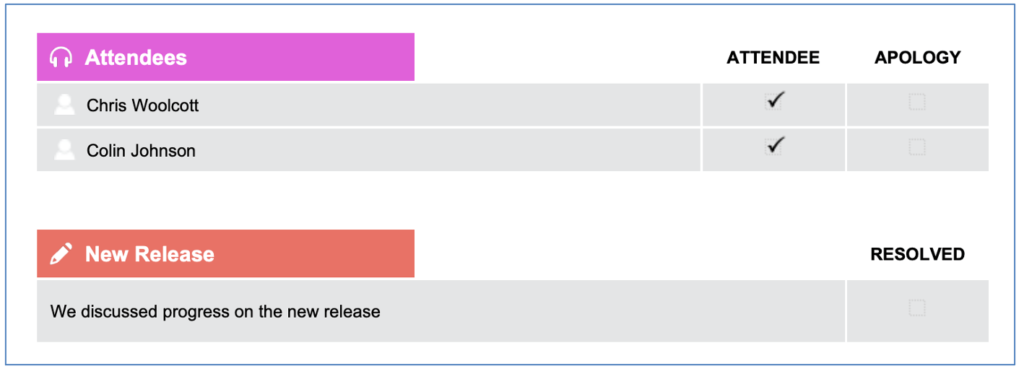
For Customers that want to apply different colours to the Header sections, there are Custom Settings on the Control Pad of the Mission Control Console.
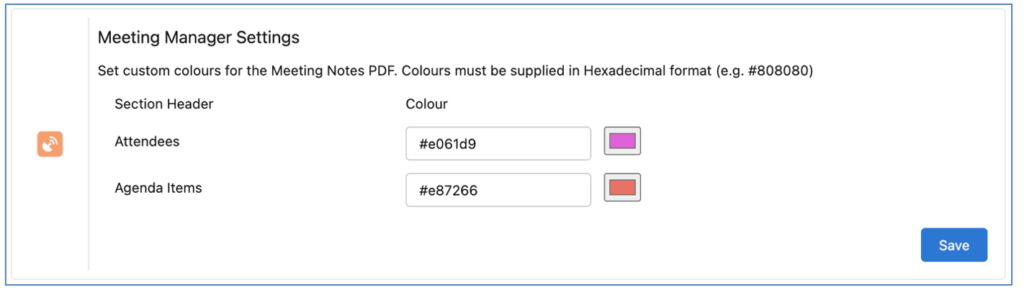
You can enter Hexadecimal references to match your own branding colours, as shown below.
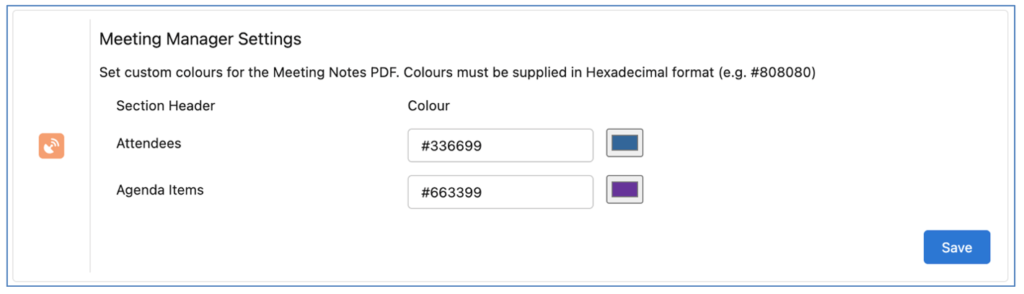
These colours will be reflected in the PDF as shown below.
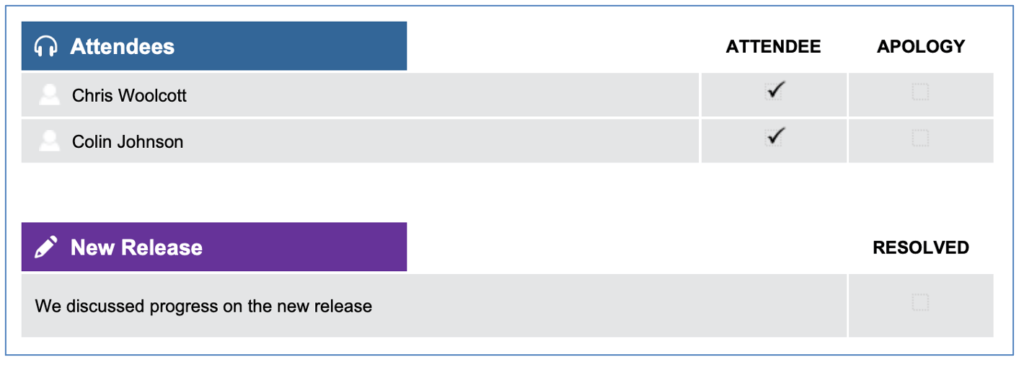
To reset to the default values, clear your custom values from the Colour fields so they are empty and click Save.
Add Custom Fields to the Meeting Builder Page
If you have added Custom Fields to the ‘Meeting’ Object, and would like them to be accessible on the Meeting Builder Component you will need to include the fields in the ‘Meeting Builder Additional Fields’ Field Set.
You can access the Field Set by going to Setup > Object Manager > Meeting> Field Sets > Meeting Builder Additional Fields.
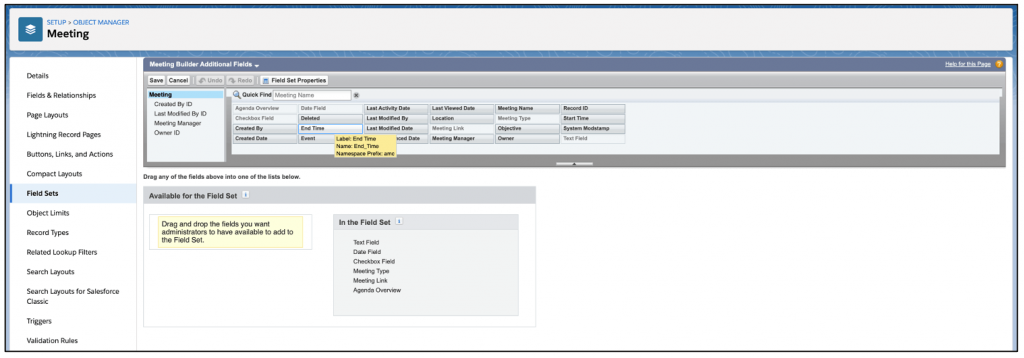
The fields added to this Field Set will be displayed on the Meeting Builder in the section highlighted below.
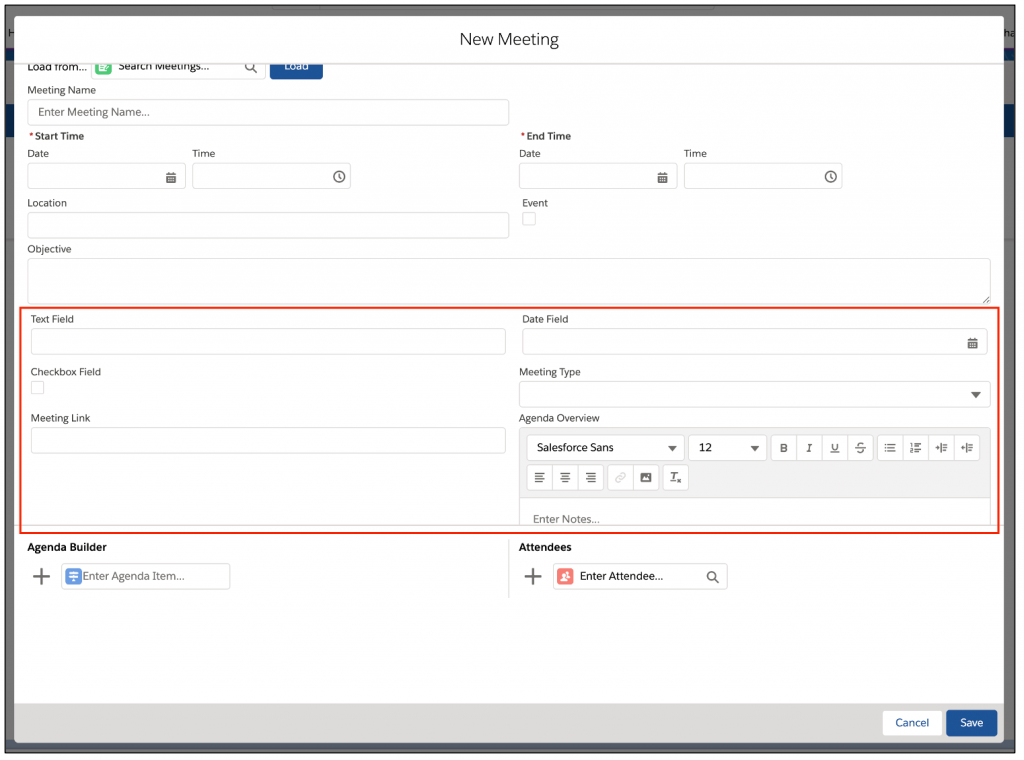
There are settings within the Meeting Manager Settings Tile on the Control Pad of the Mission Control Console that enable you to customize the Header Settings, including:
By default, the Meeting Notes Header section will appear as shown below.
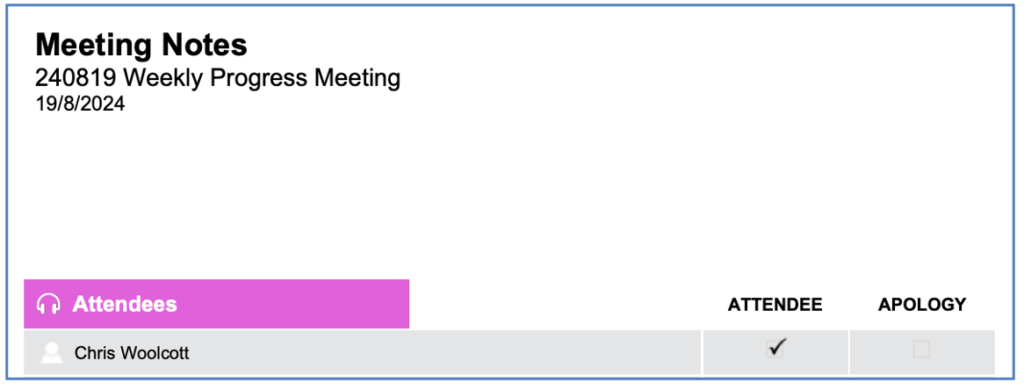
Meeting Notes Title
By default, the Title will appear as ‘Meeting Notes’. If you wish to override this, you can specify a value in the ‘Meeting Notes Title Override’ field on the Meeting Manager Settings Tile, as shown below.
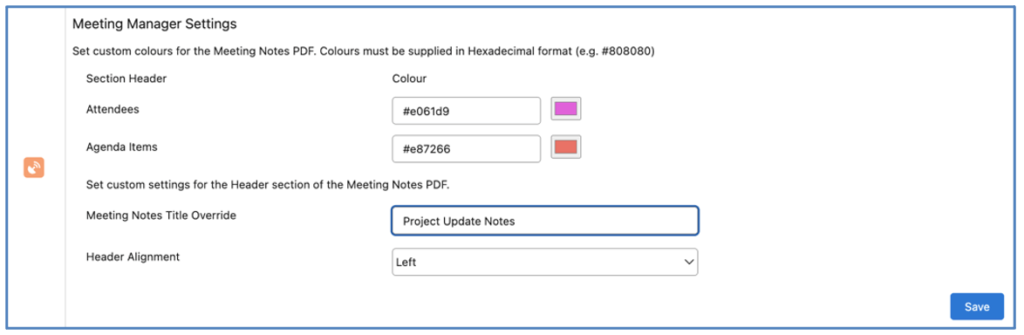
When this setting is populated, the Header section will appear as shown below.
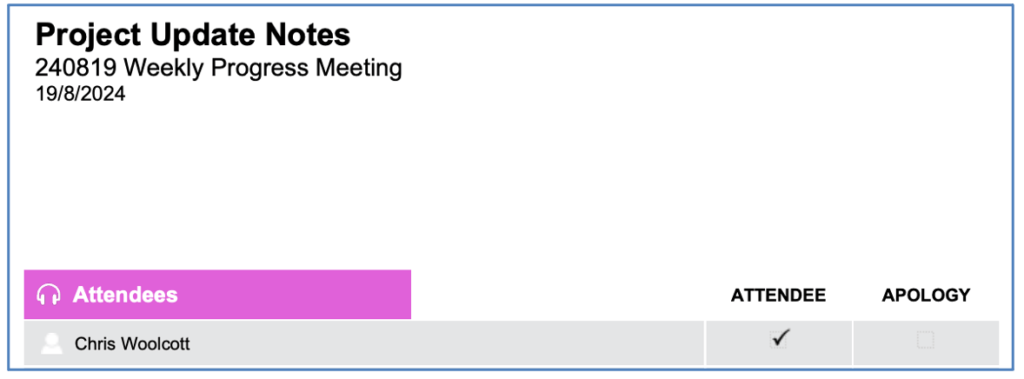
To reset to the default value, remove the value in the override field and Save the settings.
Header Alignment
By default, the Title section will be left-aligned, as shown in the image below.

If you wish to adjust this, you can specify a value in the ‘Header Alignment’ field on the Meeting Manager Settings Tile, as shown below.
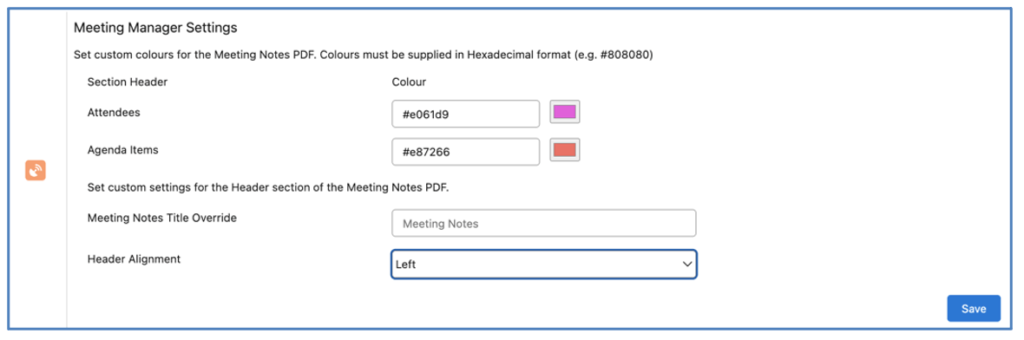
The options are:
Below is an example of the Header section being aligned to the Center.
Below is an example of the Header section being aligned to the Right.
By default, the Attendees Table is displayed on the Meeting Notes PDF, as shown below.
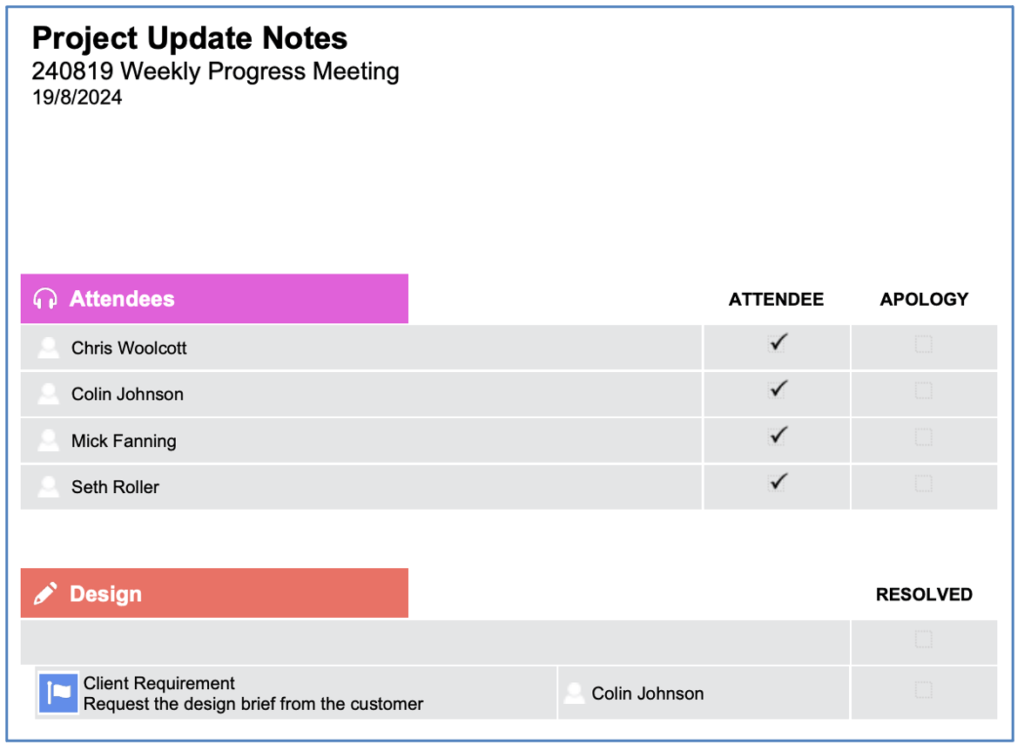
You are able to hide the Attendee table on a per Project basis, by setting the ‘Hide Meeting Notes Attendees List’ field to TRUE.
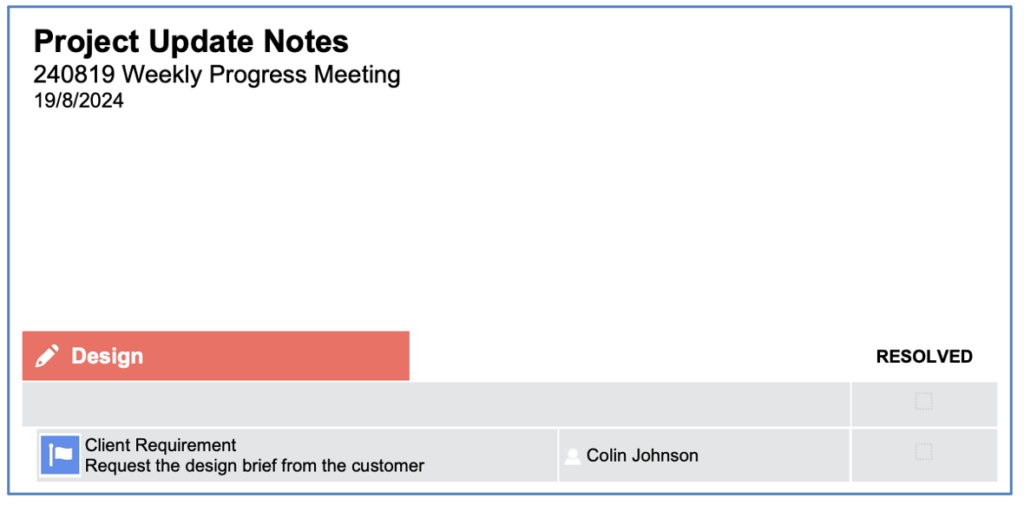
Note: This feature is only applicable to Meeting Notes PDF files that are generated from Meeting Managers that are related to a Project.
By default, the Task Comments field of the Agenda Tasks are displayed underneath the Task Name on the Meeting Notes PDF, as shown below.
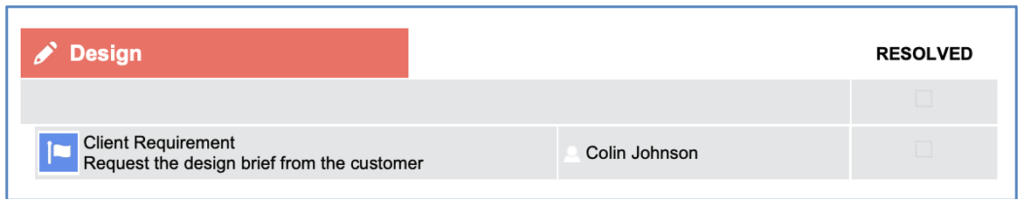
You are able to hide the Task Comments field on a per Project basis, by setting the ‘Hide Meeting Notes Agenda Task Comments’ field to TRUE.

Note: This feature is only applicable to Meeting Notes PDF files that are generated from Meeting Managers that are related to a Project.
Sharing Trigger
The relationship between the Meeting Manager, Meeting, Agenda Item and Agenda Task are all ‘Lookup’ relationships. Therefore, if a Customer wants to apply Sharing Rules to the ‘Meeting Manager’ feature, the rules would need to be applied to all of these Objects individually.
To simplify this sharing requirement, Mission Control will automatically apply all of the Sharing Records on the Meeting Manager record to the Meeting, Agenda Item and Agenda Task records.
You are therefore able to set the Org-wide default for all of these Objects to Private, and any rules that you apply the Meeting Manager will be replicated automatically on the other 3 Objects.
This sharing logic ensures those Users that have access to the parent Meeting Manager record, also have the same level of access to the individual related records.
To enable this feature, you will need to ensure the ‘Enable Meeting Manager Sharing Rules to Cascade’ setting is set to TRUE within the Project Automation Settings section of the Control Pad on the Mission Control Console.
There is logic that will carry out the cascading deletion of related records when a parent record is deleted amongst the Meeting Manager Objects, including:
If the Meeting Manager record is deleted, the cascading deletion logic will also delete the following:
If the Meeting record is deleted, the cascading deletion logic will also delete the following:
If the Agenda Item is deleted, the cascading deletion logic will also delete the following:
There are a number of individual Lightning Components that can be added to the Portfolio, Program or Project Pages. Each component provides you with a specific analytic insight into the Portfolio / Program / Project. The components include:
Using the Lightning App Builder, you can add any of these charts to your Lightning Experience page. You’re also able to add all 10 charts to your Salesforce Classic page layout by adding the ‘programCharts’ or ‘projectCharts’ Visualforce Page to a single column section on the respective Object page layout.
Below is an illustration of how you could display these charts using a 3-column page design in Lightning App Builder.
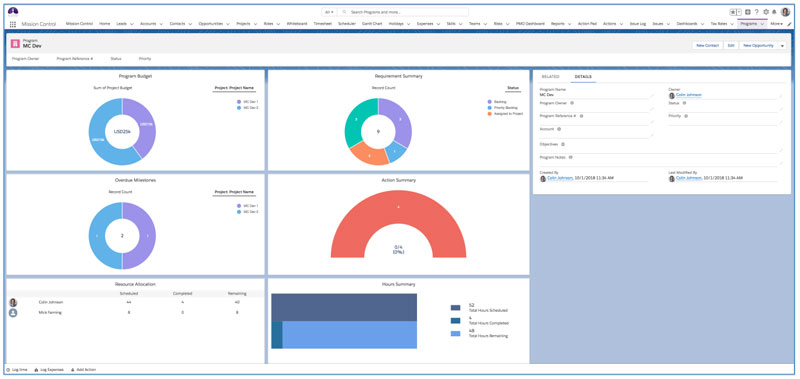
Below is an example of each chart for your reference.
Budget Summary
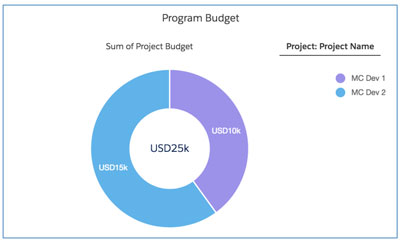
Requirements Summary
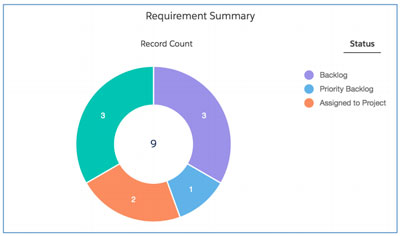
Overdue Milestones
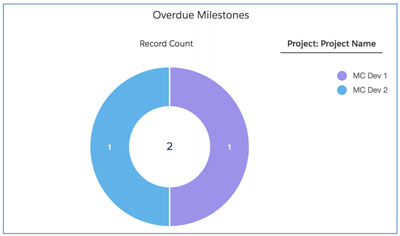
Action Summary
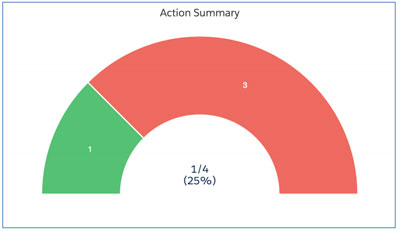
Resource Allocation
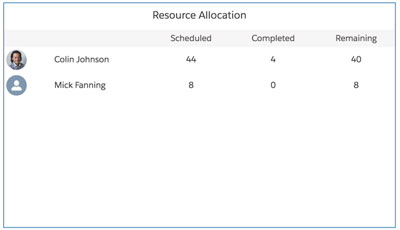
Hours Summary
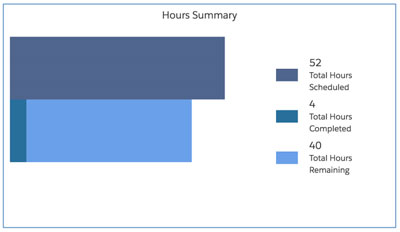
Risk Summary
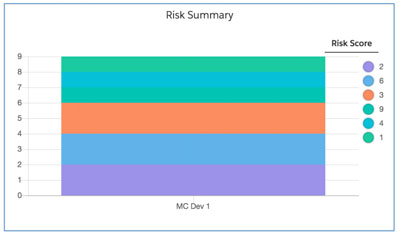
Risk Matrix
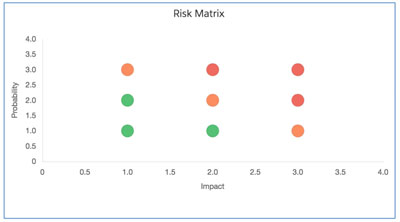
Expense Summary
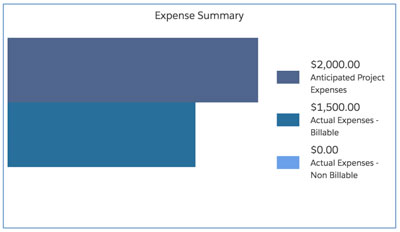
Billing Summary
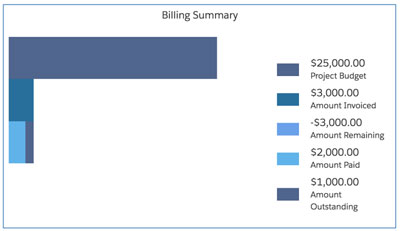
The Action Pad is accessible as a stand-alone page, which you can access via the ‘Progress Pad’ on the Mission Control Console.
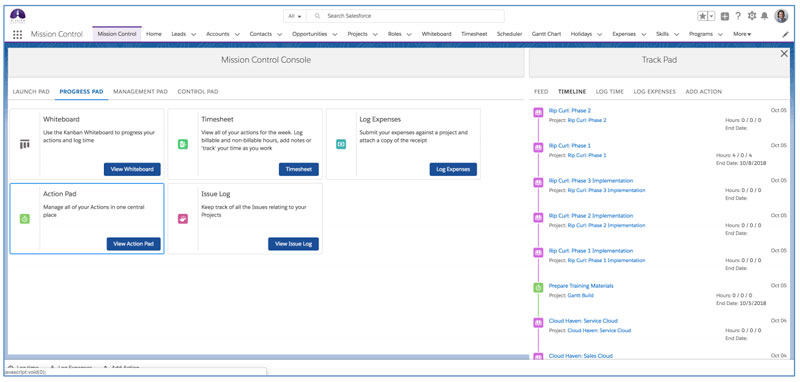
You can also access it on the Project Overview as a new sub-tab. This can be controlled via the Project Overview permissions on the Role record, like all other Project Overview Tabs.
Below is an example of the Action Pad being viewed as a stand-alone page.
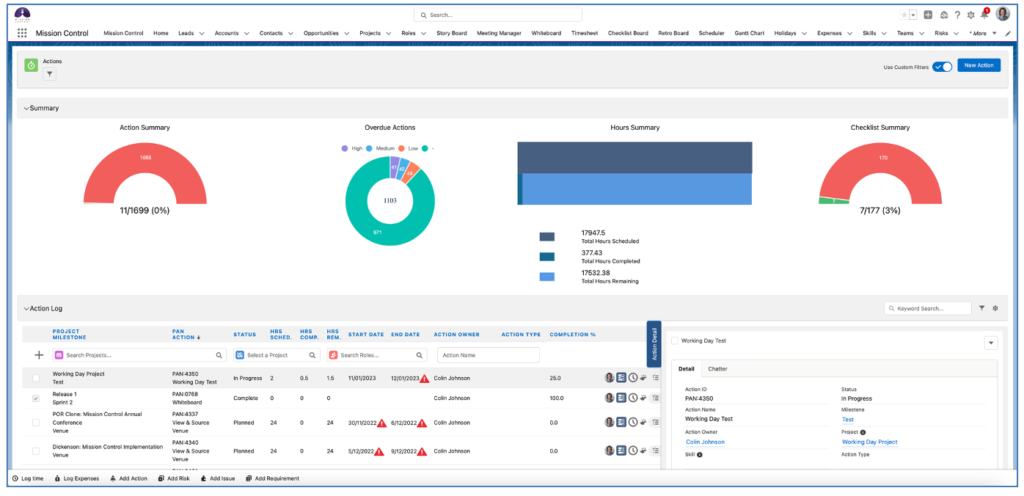
It comprises of two main sections – Summary and Action Log. Each can be collapsed to allow you to focus on the area of interest.
Action Pad Filters
The Action Pad can be filtered in one of two ways. You’re able to determine which Actions are displayed, by selecting a ‘List View’ filter on the Action Object. Alternatively you can toggle to use the custom filters.
When the ‘Use Custom Filters’ toggle is switched off, you will be able to access the List View filters, as shown below.

When the ‘Use Custom Filters’ toggle is switched on, you will have access to the Custom Filter component like that available on the Whiteboard.

Your setting will be persistently remembered, so if you were using the Custom Filters option the last time you were on the Action Pad, the next time you visit the page, the Custom Filters will be switched on by default.
When using the Action Pad on the Project Overview page, it’s filtered to show all of the Actions related to that Project. On the stand-alone page, you will be able to determine which Actions are displayed, by selecting a ‘List View’ filter on the Action Object.
Summary Section
The Summary section includes 4 charts, providing you with a high level overview of the following:
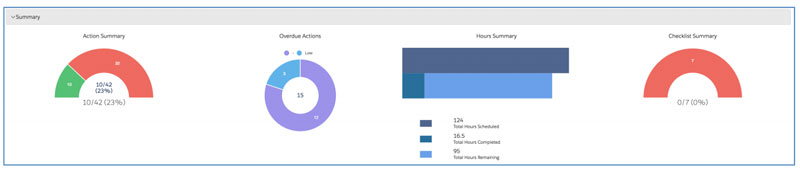
Action Log Section
The Action Log section provides you with a working ‘pad’ where you can do numerous tasks, including:

Quick Create Actions
You’re able to quickly create new Actions using the quick create feature located at the top of the Action Log – see below.

Providing you don’t have any Validation Rules or mandatory field requirements preventing an Action from being created with just the Action Name, Milestone and Action Owner populated, you’ll be able to rapidly create new Actions using this feature.
If a Validation Rule or field requirement does prevent the Action from being created, a new Action page will open up where you can complete the required fields and save the record.
Using the quick create feature, new Actions will appear at the top of the list in your Action Log and you can then click on any of them to go into them and edit further information.
Sort by any Column
Within the Action Log, you’re able to sort the data by any of the columns. Just click on the column you would like to sort by and the data will be re-organised accordingly. You can identify which column is being used for sorting by the directional arrow – in the example below, the End Date is being used.
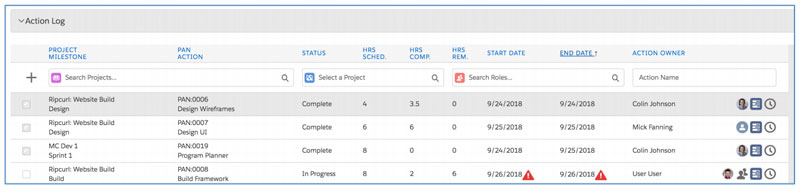
Log Time
You can click on the ![]() icon to log time. This will open up the same component you can access from the Whiteboard. This will allow you to log time already completed, or use the start/stop time tracking feature.
icon to log time. This will open up the same component you can access from the Whiteboard. This will allow you to log time already completed, or use the start/stop time tracking feature.
View Contributors
Where an Action has Contributors assigned to it, the ![]() icon will appear. Nothing new here you say…well, now if you hover over the icon, you’ll see a table showing the allocation of hours scheduled / completed / remaining to each Role – see below for an example.
icon will appear. Nothing new here you say…well, now if you hover over the icon, you’ll see a table showing the allocation of hours scheduled / completed / remaining to each Role – see below for an example.
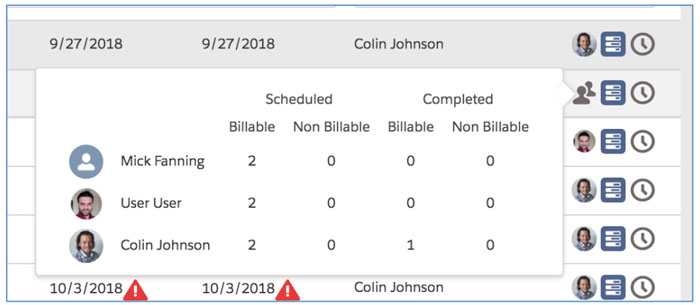
This component is also available on the Whiteboard, Gantt Chart and Project Overview page where the Contributors icon is visible.
Complete Actions
You can quickly mark an Action’s Status as Complete by ticking the box on the left-hand side of the table, or at the top of the work pad.
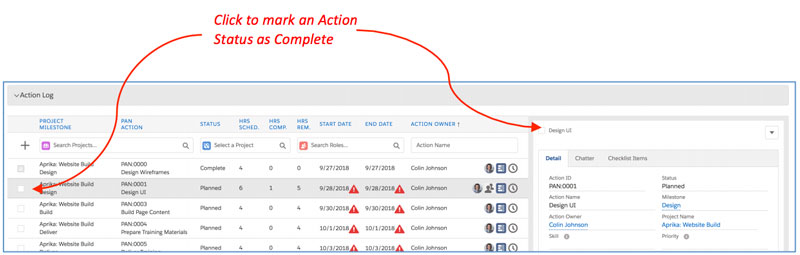
Edit Actions
If you need to edit any of the field information on the individual Action records, select Edit from the drop down list located in the top-right corner of the work pad. This will open the Action edit modal, where you’ll be able to make changes and click Save.
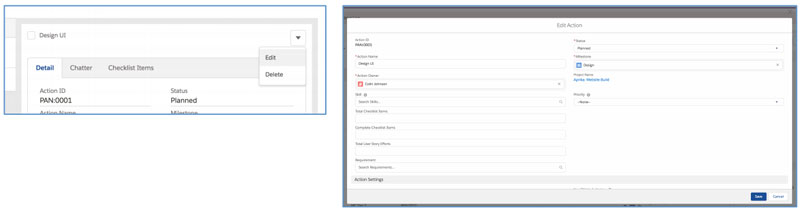
Manage Issues
You’re also able to manage Issues that relate to your Actions from the Action Log. Simply click on the ![]() icon to open the Issue Manager component.
icon to open the Issue Manager component.
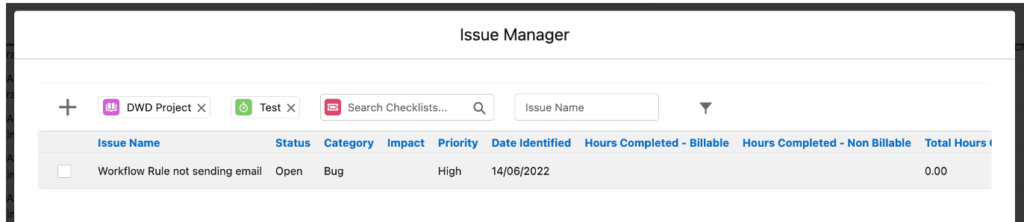
Manage Checklist Items
You’re also able to manage your Action’s Checklist Items from the Action Log. Simply click on the ![]() icon to open the Checklist Item Manager.
icon to open the Checklist Item Manager.
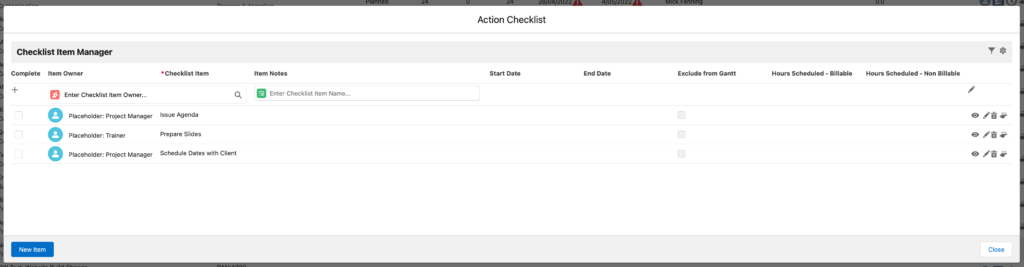
Collaborate via Chatter
If you need to collaborate with colleagues on an Action, you can click on the ‘Chatter’ tab within the work pad to access the Chatter Feed for the individual Action.

Collapse / Expand Persistent Settings
The ‘Summary’ and ‘Action Log’ sections of the Action Pad can be collapsed and expanded. Each User can choose whether these sections are expanded or collapsed and their preferences will be remembered as persistent settings.
This means that if you would prefer to have the Summary section collapsed, you can collapse it when you view the Action Pad and then each subsequent visit, that section will continue to be collapsed until you click to expand it.
Action Log – Custom Settings
The fields within the Action Log section of the Action Pad can be customized to the User’s personal preferences. Alternatively, you may choose to control these settings for all Users leveraging the Override settings on the Control Pad of the Mission Control Console.

The Settings can be accessed by clicking the settings icon located on the right-hand side of the Action Log section of the Action Pad near the Keyword Search and Filter button, as shown below.
Within the Settings, you’re able to select which standard columns you have displayed as well as specifying up to 5 custom fields to be included.
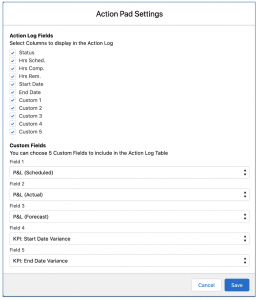
If you wish to ensure all Users have the same settings, you can use the Action Pad Override Settings feature on the Control Pad of the Mission Control Console.
Action Log – Keyword Search
You can use the Keyword Search feature to quickly search and filter the Actions within the Action Log of the Action Pad. Simply enter the text you wish to search for, press return and any Action not matching the search string will be removed from the list of records.
The search string is applied to all fields that are displayed within the Action Log. For example, if you search for ‘Data’ it would display Actions if the Project, Milestone or Action contains the word Data.
Project Overview Filters
You are able to apply the Custom Filters from within the Project Overview Action Pad Tab. The Custom Filter modal can be accessed by clicking the Filter icon located on the right-hand side of the Action Log section of the Action Pad near the Keyword Search and Settings button, as shown below.
By default the Action Pad will display all Actions relating to the Project. You can use the Filter Modal to further reduce the Actions displayed. For example, you may wish to only include Actions where the Status is Planned or In Progress.
Role AND / OR Toggle
You are able to use the AND / OR Toggle at the top of the Role Filters section to determine whether multiple filters are queried as AND or as OR.
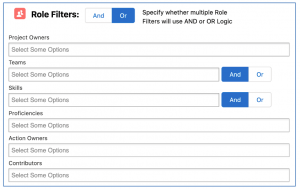
For example, if Mick Fanning is looking to see Actions where he is the Project Owner as well as any Actions where he is the Action Owner, he would have the Toggle set to OR. The results shown would be all Actions where Project Owner = Mick Fanning as well as all Actions where Action Owner = Mick Fanning. Whereas, if he was only looking for Actions that he is responsible for within Projects that he manages, he would have the Toggle set to AND. The results in this instance would only include Actions where the Project Owner = Mick Fanning AND the Action Owner = Mick Fanning.
Custom Field Filters
You can use the Custom Field filters to apply filters to the Action Pad based on any field from the Project, Milestone or Action Object.

In the Custom Field section of the Filter Modal, you are able to specify whether the filter logic between the 2 Custom Fields is AND or OR.
This provides greater flexibility to construct dynamic filters that can be used across various Users.
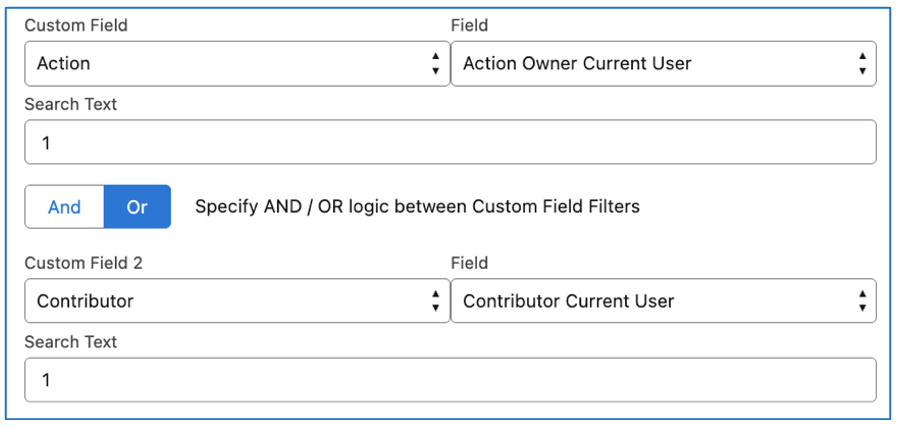
In the example above, the Whiteboard will filter to show Actions where the person looking at the page is either the Action Owner or a Contributor. This can be saved as a dynamic query that can be assigned to all Users.
When using the Action Pad in context of the Project Overview, Users can apply different filters to those applied when using the Standalone Action Pad.
For example, on the Standalone Action Pad, a User may want to apply a Filter that shows Actions where that person is the Action Owner, or a Contributor, where the End Date is ‘This Week’. However, when viewing the Action Pad on a Project Overview, they may want to apply a Filter that shows Actions where the Status is ‘Planned’ or ‘In Progress’.
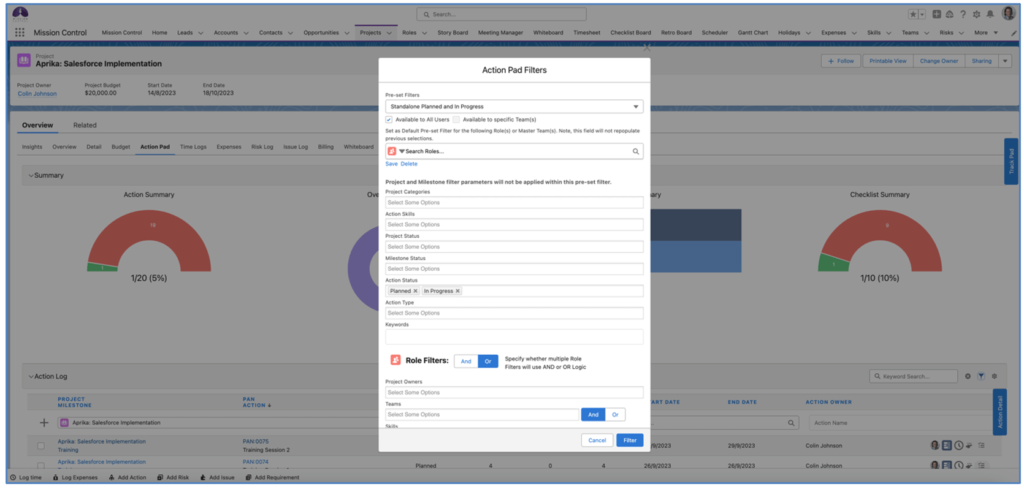
In the image above, the User has applied a pre-set Filter for use on the Project Overview page. This filter will be automatically applied any time this User views the Action Pad on the Project Overview for any Project.
The Issue Object enables you to track ‘Issues’ relating to your Project. To help you easily manage your Issues, you can use the ‘Issue Log’ page. The Issue Log is accessible as a stand-alone page, which is accessible from the ‘Progress Pad’ on the Mission Control Console.
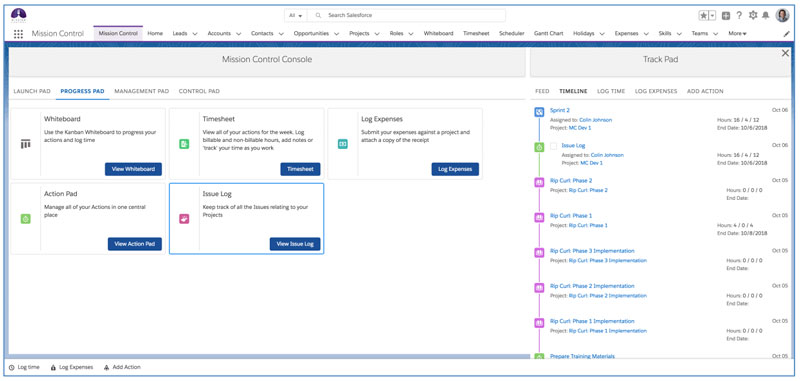
You can also access it on the Project Overview as a new sub-tab. This can be controlled via the Project Overview permissions on the Role record, like all other Project Overview Tabs.
Below is an example of the Issue Log being viewed as a stand-alone page.

It comprises of two main sections – Summary and Issue Log. Each can be collapsed to allow you to focus on the area of interest.
When using the Issue Log on the Project Overview page, it’s filtered to show all of the Issues related to that Project. On the stand-alone page, you will be able to determine which Issues are displayed, by selecting a ‘List View’ filter on the Issue Object.
Summary Section
The Summary section includes 4 charts, providing you with a high level overview of the following:

Issue Log Section
The Issue Log section provides you with a working ‘pad’ where you can do numerous tasks, including:

Quick Create Issues
You’re able to quickly create new Issues using the quick create feature located at the top of the Issue Log – see below.
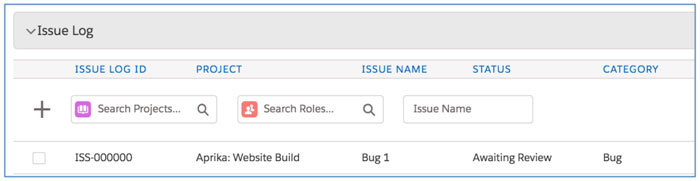
Providing you don’t have any Validation Rules or mandatory field requirements preventing an Issue from being created with just the Issue Name populated, you’ll be able to rapidly create new Issues using this feature.
If a Validation Rule or field requirement does prevent the Issue from being created, a new Issue page will open up where you can complete the required fields and save the record.
Using the quick create feature, new Issues will appear at the top of the list in your Issue Log and you can then click on any of them to go into them and edit further information.
Sort by any Column
Within the Issue Log, you’re able to sort the data by any of the columns. Just click on the column you would like to sort by and the data will be re-organised accordingly. You can identify which column is being used for sorting by the directional arrow – in the example below, the Category is being used.
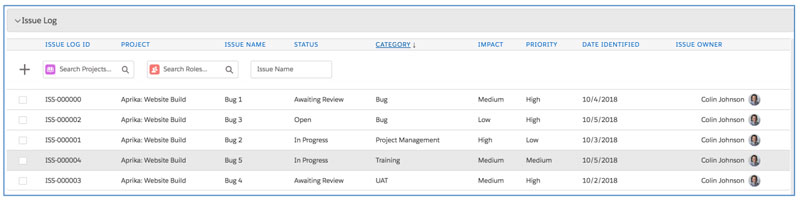
Complete Issues
You can quickly mark an Issue’s Status as Complete by ticking the box on the left-hand side of the table, or at the top of the work pad.
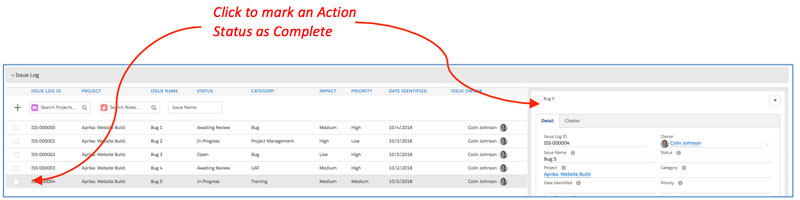
Note: when you mark an Issue as Complete, a Trigger will automatically populate the ‘Date Resolved’ to Today, if it’s not already populated.
Edit Issues
If you need to edit any of the field information on the individual Issue records, select Edit from the drop down list located in the top-right corner of the work pad. This will open the Issue edit modal, where you’ll be able to make changes and click Save.
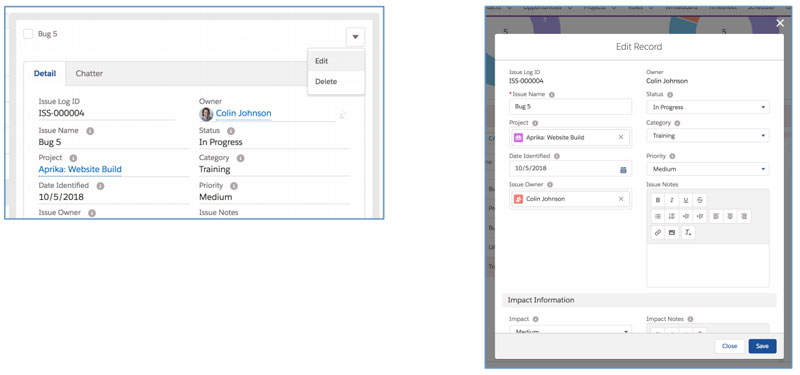
Collaborate via Chatter
If you need to collaborate with colleagues on an Issue, you can click on the ‘Chatter’ tab within the work pad to access the Chatter Feed for the individual Issue.
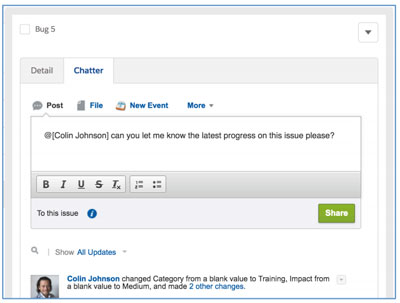
Collapse / Expand Persistent Settings
The ‘Summary’ and ‘Issue Log’ sections of the Issue Log can be collapsed and expanded. Each User can choose whether these sections are expanded or collapsed and their preferences will be remembered as persistent settings.
This means that if you would prefer to have the Summary section collapsed, you can collapse it when you view the Issue Log and then each subsequent visit, that section will continue to be collapsed until you click to expand it.
Issue Manager
The Issue Manager is a component that enables you to create, manage, resolve or delete Issues in context of a particular Action or Checklist Item. Below is an illustration of the Issue Manager.
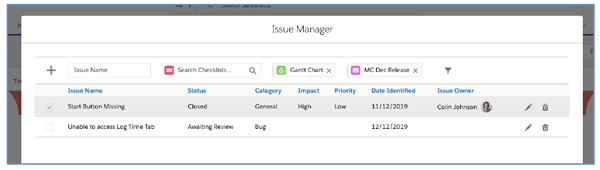
The Issue Manager can be accessed by clicking the ![]() icon. Which is available on the following pages within Mission Control:
icon. Which is available on the following pages within Mission Control:
To easily identify if Issues relate to the record you’re viewing, the icon will be Grey if there are no Issues, and Yellow if there are Issues, as illustrated below:
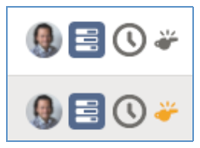
The Issue Manager offers similar functionality to the Issue Log, including:
You can also apply filters to the Issue Manager by clicking the ![]() icon, which will give you access to the filters options below:
icon, which will give you access to the filters options below:
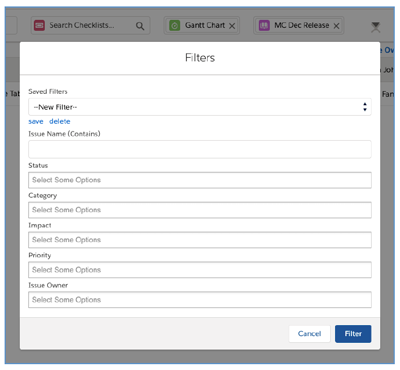
Filters can be saved for subsequent use and will be persistently remembered between visits.
The Change Request Object enables you to track Change Requests relating to a Project. The main reasons a Change Request occurs are:
Depending on when the Change Request is received, and the impact the request will have on the Project, the changes may be associated to an existing Opportunity, or a new Opportunity. There will also be four potential outcomes of the Change Request, including:
The Change Request record is a child to the Project and the Opportunity. You can therefore create a Change Request from the Change Request related list on either on the Project or the Opportunity.
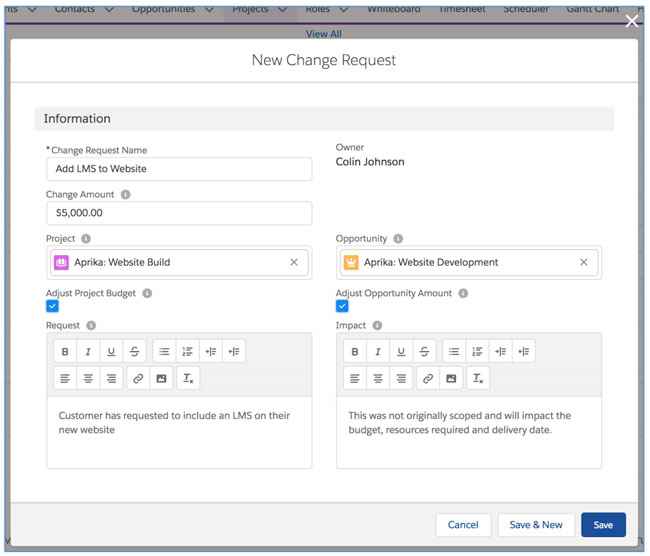
If you set the ‘Adjust Project Budget’ or the ‘Adjust Opportunity Amount’ fields to TRUE, the respective fields will be adjusted based on the value entered in the ‘Change Amount’ field.
Note: If the Opportunity has related Opportunity Line Items, you will not be able to use the ‘Adjust Opportunity Amount’ as the field is not directly editable due to being controlled by the sum of the related Opportunity Line Items.
The following features have been included to keep you running efficiently. These features can be managed via the Project Automation section of the Mission Control console.
Disable Mission Control Triggers
Within Mission Control, there are various Apex Triggers that execute when records are inserted, updated or deleted within Mission Control Custom Objects.
Customers may want to disable these Triggers from executing in certain situations, such as:
To disable all Mission Control Triggers from executing, you will need to set the following Custom Setting to TRUE.
Chatter Roll-Ups
If this feature is active, chatter posts will be posted on to the Action, Milestone & Project Chatter Feeds identifying progress changes such as Status changes, time logs, etc. Note: Field History Tracking needs to be configured for the Action, Milestone and Project for these Roll Ups to work.
Auto Project Status
If this feature is active, the project status automatically gets updated based on the related milestone that is furthest along. It will not update to ‘Completed’ unless all milestones are at a stage of ‘Completed’. Note this is active by default, unless disabled.
Auto Milestone Status
If this feature is active, the milestone status will automatically be updated based on the related action that is furthest ahead. It will not update to ‘Completed’ unless all actions are at a stage of ‘Completed’. Note this is active by default, unless disabled.
Auto Action Status
If this feature is active, all actions relating to a milestone will be updated to match the status of the Milestone if it is manually updated. Note this is active by default, unless disabled.
When a Milestone is changed from On Hold to either Planned or In Progress, Action Status fields will be updated by reviewing Field History Tracking of the Action Status field to determine the prior value. If Field History Tracking is not configured for the Status field, it will be updated based on the following logic:
Auto Project to Milestone Status
If this feature is active, all Milestones relating to a Project will be updated to match the status of the Project if it is manually Complete or Cancelled. Note this is active by default, unless disabled.
Auto Phase to Milestone Status
If this feature is active, all Milestones relating to a Phase will be updated to match the status of the Phase if it is manually Complete or Cancelled. Note this is active by default, unless disabled.
Auto Checklist Item to Action Status
If this feature is active, the Action Status based on what is happening with the related Checklist Items.
For example, if you have 4 Checklist Items relating to an Action and all of them currently have a Status of ‘Planned’, as soon as you move one of them to ‘In Progress’, the Action Status will automatically be updated to ‘In Progress’ too. As soon as all related Checklist Items have a Status of ‘Complete’, the Action Status will automatically be updated to ‘Complete’.
Auto Action to Checklist Item Status
If this feature is active, the Status field of all Checklist Items related to an Action when the Status field of the Action is changed.
For example, if you have 4 Checklist Items related to an Action and you mark the Action Status as ‘Complete’, all of the related Checklist Items will also be updated to ‘Complete’.
Disable Status being set to Complete if unresolved Risks or Issues
The ‘Status’ fields on the Project Milestone, Action and Checklist Item are updated automatically by default, based on changes made to the child record.
For example, if a Project has 3 Milestones and the Status of all of them is set to Complete, then the Project Status will automatically be updated to Complete.
For customers who want to prevent a record from being set to Complete if there are unresolved Risks or Issues related to that record, can choose to enable a Custom Setting.
The ‘Disable Status being set to Complete if unresolved Risks or Issues’ setting within the Project Automation Settings section of the Control pad on the Mission Control Console should be set to TRUE if you wish to utilise this feature.
With this Setting set to TRUE, a Project, Milestone, Action or Checklist Item will not be able to be set to Complete if it has related Risks or Issues that are considered unresolved.
A Risk is considered resolved if the ‘Current Status’ field is set to Closed. An Issue is considered resolved in the ‘Status’ is set to Closed.
If a User tries to set a record’s Status field to Complete and it does have unresolved Risks or Issues, they will be presented with the following notification:
This record has unresolved Risks / Issues. You are unable to set Status to Complete until they are closed.
Auto Action Reschedule
This feature automatically reschedules dependant actions by the same number of days, when the parent action is rescheduled. Note this is active by default, unless disabled.
Time Log Update Action Status
This feature automatically updates the status of an action to ‘In Progress’ when time is logged against it if it is currently set as ‘Planned’. Note this is active by default, unless disabled.
Time Log Update Checklist Item Status
This feature automatically updates the status of an Checklist Item to ‘In Progress’ when time is logged against it if it is currently set as ‘Planned’. Note this is active by default, unless disabled.
Dependent Action Notification Alerts
This feature sends an email to the Action Owner of any Actions that are dependant on another Action, when the parent Action’s Status is updated to ‘Completed’.
Action notification emails are optional and are not switched on by default. Individual Action Owners can subscribe / unsubscribe to these notifications as required. In order for Action Owners to receive notification emails the ‘Receive Action Notifications’ checkbox on the Role record must be set to TRUE. You can also disable this functionality entirely within the Project Automation section of the Mission Control console by ticking the ‘Disable Automatic Notifications for Dependant Actions’ checkbox and clicking Update.
An example of the email notification is as follows:
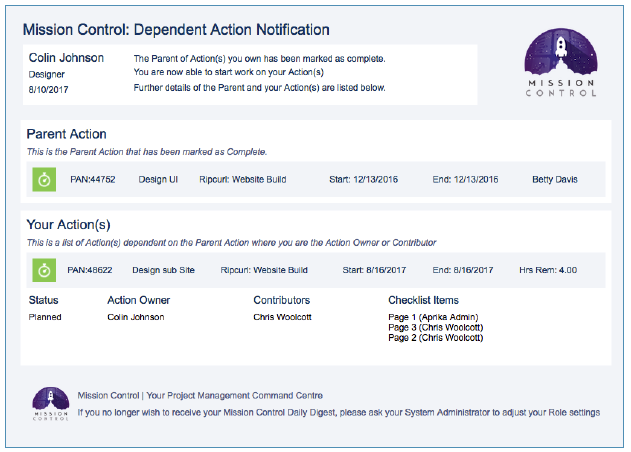
Action Rescheduling
Mission Control allows you to ignore weekends and non-working days when existing Actions are being rescheduled.
A ‘Non Working Day’ is defined as a Holiday record, which is either assigned to an individual Role, or via a Holiday Assignment.
When an Action is rescheduled (e.g. the Start Date or End Date are changed) the rescheduling process will move the date forward to the next working day.
For example, an existing Action has the following values:
Start Date: Wednesday 19th August 2015
End Date: Friday 21st August 2015
If the Action is updated so the dates are moved forwards by two days, the result would end up being an End Date on a Sunday, so the End Date will be moved forward by one day. Therefore, the final result will be:
Start Date: Friday 21st August 2015
End Date: Tuesday 25th August 2015
In the same scenario, where the Action Owner also has a Holiday record for Monday 24th August, the end result would be:
Start Date: Friday 21st August 2015
End Date: Wednesday 26th August 2015
This rescheduling feature will execute once the record has been saved. Therefore, if you’re applying the change on the Gantt Chart or the Scheduler, it will not adjust for weekends and non-working days until the changes are saved.
Weekends can be shaded grey on the Gantt Chart to make day of the week identification simpler. Note, the standard ‘Business Hours’ feature within Salesforce.com has been used to identify which days of the week should be highlighted grey. In the illustration below, the Business Hours settings will result in Saturday and Sunday being highlighted grey.

To access the Business Hours section, please follow the appropriate click path below:
If you do not wish to use this feature, it can be disabled within the Project Automation section of the Mission Control Console as per the illustration below.

Disable adjusting End Date if Start Date changed
The ‘Disable adjusting End Date if Start Date changed’ Custom Setting enables you to control the behaviour of the Working Days and End Date fields on an Action when the Start Date is modified.

If the Setting is FALSE, when the Start Date is adjusted and the Working Days field is not null, the End Date will be adjusted to be equal to Start Date + Working Days.
If the Setting is TRUE, when the Start Date is adjusted and Working Days field is not null, the Working Days field will be adjusted to equal End Date – Start Date.
Action rescheduling around Holidays
If this feature is active, the Start Date / End Date of Actions will automatically be adjusted if they are on the same date as a Holiday. Note: In addition to this setting being FALSE, the ‘Auto-generate Role Allocation records’ feature within the Role Allocation Automation Settings needs to be enabled in order for the Actions to be rescheduled.
Disable Core Status and Enable Custom Status
Setting this to TRUE allows you to use your own values in the custom Status field instead of using the core Status field values. For further information, please refer to this Knowledge Article:
https://knowledge-mc.aprika.com/s/article/Custom-Status-Values
Prevent Unassigned Roles from logging time
If this feature is active, Roles that are not the Action Owner, a Contributor or the Item Owner of a related Checklist Item will be prevented from logging time against the Action
Roll Up Time Log Hours regardless of Approval Status
You are able to choose whether Time Log hours and associated financials roll up to the Action whether or not the Time Log has been approved.
By default, the hours and associated financials of a Time Log will only be rolled up to the Action once the Approval Status is set to Approved.
If you wish to have the hours and associated financials roll up to the Action immediately regardless of whether or not the Time Log has been approved, you can set the following setting to TRUE within the Project Automation Settings section of the Control Pad on the Mission Control Console.
Disable Time Log Rollup on Approval Status
If this setting is FALSE, the Time Log will need to be approved in order for the hours and associated financials to roll up to the Action. If this setting is TRUE, the hours and associated financials of the Time Log will roll up to the Action immediately, regardless of the Approval Status.
Upgrade Action
If you enable this feature after you have created Time Logs, you will need to click the ‘Run Script’ button below the setting (see image below).

This script will update any existing Time Logs to set the ‘Roll Up To Action’ checkbox field to TRUE if the Approval Status is ‘Approved’. Once the script has completed, you will receive an email notification if the process was unable to update the Time Logs. If successful, you will see a Success confirmation next to the Run Script button.
Billing Event Chatter Notifications
If this feature is active, a Chatter Post will be created on the Billing Event Chatter Feed when a PDF is generated from the automated billing process. Note this is active by default, unless disabled.
Deletion of Approved Time Logs
If this feature is active, a Time Log will not be able to be deleted if the Approval Status field is ‘Approved’.
Deletion of Invoiced Time Logs
If this feature is active, a Time Log will not be able to be deleted if the Invoiced field is true.
If this feature is active, an Expense will not be able to be deleted if the Approval Status field is ‘Approved’.
If this feature is active, an Expense will not be able to be deleted if the Invoiced field is true.
Transfer Cloned Records to Running User
If this feature is active, when a Project is automatically created from an Opportunity or Project Request, the running user will be assigned as the Project Owner. If it’s inactive, the Owner will match that set on the Template
Disable Automated Management of Contributors
If this feature is active, Contributor records will not be automatically managed and will require manual creation / edits / deletions.
Disable Fixed Price Billable Hours Enforcement
If this feature is active, the Action ‘Hours Completed – Billable’ will be prevented from exceeding ‘Hours Scheduled – Billable’ for Fixed Price or Fixed Price + Expenses Projects
Disable Fixed Price Non Billable Hours Enforcement
If this feature is active, the Action ‘Hours Completed – Non Billable’ will be prevented from exceeding ‘Hours Scheduled – Non Billable’ for Fixed Price or Fixed Price + Expenses Projects
Disable Action Hours Override from Checklist Item Hours
If this feature is active, the Action Hours will not be automatically overridden when Checklist Item hours fields are populated
Enable Meeting Manager Sharing Rules to Cascade
If this feature is Active, the Sharing Rules for the Meeting Manager Object will cascade down to the Meeting, Agenda Item and Agenda Task Objects
Disable controlling Action date fields independently from Checklist Item date fields
This setting enables customers to choose whether the Action Start Date and End Date are controlled by the same fields on the related Checklist Items.
The ‘Disable Controlling Action date fields independently from Checklist Item date fields’ Setting is FALSE by default. When set to FALSE, the Action Start Date and End Date can be controlled independently from the Checklist Item Start Date and End Date fields.
When the Setting is TRUE, the Action Start Date will automatically be updated to ensure it matches the earliest of the Checklist Item Start Dates and the Action End Date will automatically be updated to ensure if matches the latest of the Checklist Item End Dates.
Enable Reduction of Hours Scheduled for Cancelled Actions
There is an ‘Enable Reduction of Hours Scheduled for Cancelled Actions’ setting within the Project Automation Settings Tile on the Control Pad of the Mission Control Console.

If this Setting is TRUE, the ‘Hours Scheduled – Billable’ and ‘Hours Scheduled – Non Billable’ fields will be reduced if the Status of the Action is set to ‘Cancelled’. How these fields are reduced will vary based on the Reduction Rule selected for this Settings.
Set to Zero
When the Reduction Rule is set to ‘Set to Zero’, the following updates will be made to the Action (and related Role Allocations):
Match Hours Completed
When the Reduction Rule is set to ‘Match Hours Completed’, the following updates will be made to the Action (and related Role Allocations):
If this Setting is FALSE, the ‘Hours Scheduled – Billable’ and ‘Hours Scheduled – Non Billable’ fields will not be reduced if the Status of the Action is set to ‘Cancelled’.
Enable Project Sharing Management
If this feature is active, Sharing Records will be automatically created on the Project Object when a Role is assigned to a child Object and cascaded down to related Objects (e.g. Phases, Issues, Checklist Items, etc.)
Enable Meeting Manager Sharing Rules to Cascade
If this feature is active, Sharing Rules applicable to the Meeting Manager will cascade down to the related Meetings, Agenda Items and Agenda Tasks
Enable Time Log Decimal Rounding
If this feature is active, the Time Log Decimal will be rounded to the specified decimal setting. The Time Log Decimal Rounding feature enables customers to choose whether the ‘Hours Completed’ field value on the Time Log is rounded to the nearest specified decimal.
This feature is controlled by a setting within the Project Automation Settings section of the Control Pad on the Mission Control Console.

To enable this feature, set the Checkbox field to TRUE and select a value in the picklist to identify your preferred decimal rounding setting. The rounding options are:
The table below provides examples of each of these settings being applied to a Time Log.
Setting | Original Value | New Value | Reason for New value |
.00 Down | 1.13 | 1.00 | Rounded down to the nearest .00 |
.00 Up | 1.13 | 2.00 | Rounded up to the nearest .00 |
0.25 | 1.13 | 1.25 | Rounded up to the nearest .25 |
0.50 | 1.13 | 1.50 | Rounded up to the nearest .50 |
.00 Down | 2.67 | 2.00 | Rounded down to the nearest .00 |
.00 Up | 2.67 | 3.00 | Rounded up to the nearest .00 |
0.25 | 2.67 | 2.75 | Rounded up to the nearest .25 |
0.50 | 2.67 | 3.00 | Rounded up to the nearest .50 |
.00 Down | 3.81 | 3.00 | Rounded down to the nearest .00 |
.00 Up | 3.81 | 4.00 | Rounded up to the nearest .00 |
0.25 | 3.81 | 4.00 | Rounded up to the nearest .25 |
0.50 | 3.81 | 4.00 | Rounded up to the nearest .50 |
Restrict Time Tracking Maximum Duration
If this feature is active, the start/stop time tracking feature on the Time Log Object is restricted to the maximum length specified. Once this duration has been met, the Time Tracking will be automatically stopped
Timesheet Offset
By default the Timesheet page will display a full week based on your organisation locale. E.g.: Sunday – Saturday. You can adjust this to display Monday – Sunday, or any other adjustment you would like, by moving the start day forward or backwards with the offset picklist.
Enable Task/Event Prefix Override
Enables you to set a Custom Prefix or No Prefix within the Name of the Task or Event that is created from an Action.
Revenue Recognition Batch Size
This Setting enables you to adjust the number of records processed in each batch as part of the loading process for the Revenue Recognition
Disabling Automatic Updates
Automatic updates are enabled by default. However if you would like to disable any of the features you can do so from the Mission Control console. To disable automatic updates simply tick the updates that you would like to disable and then click the Update button.
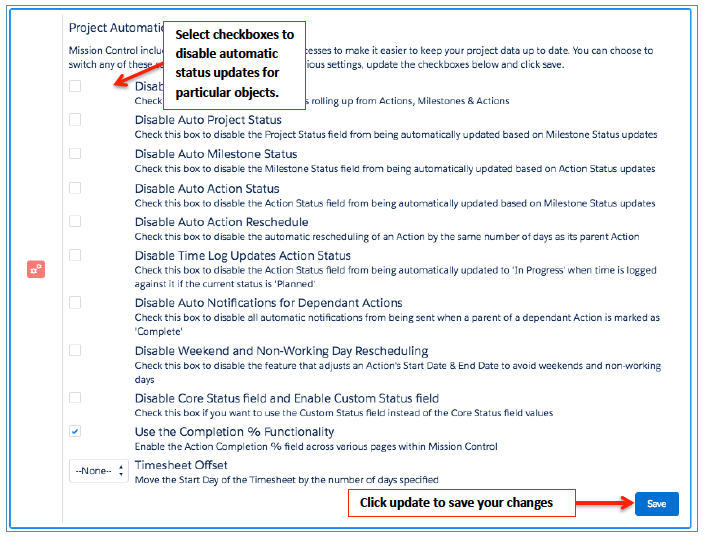
To prevent pick lists continuously growing as you load more and more Projects into the system, a new ‘Archived’ checkbox has been added to the Project record. Once a Project has this field set to TRUE, it will no longer appear in any of the pick list fields on the Console, Time Log, Whiteboard, etc. You will still be able to access the Project record directly by navigating to the Project tab or searching for it using the standard salesforce.com global search functionality.
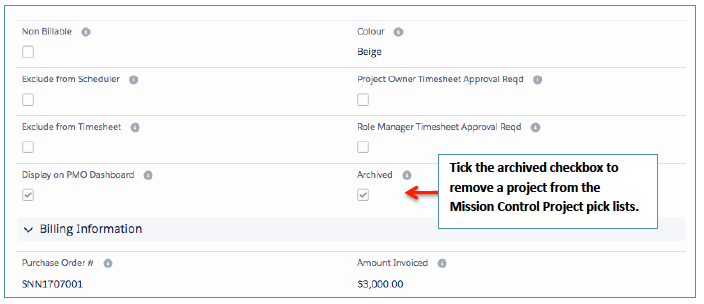
You’re also able to archive a Milestone within a Project. If you set the ‘Archived’ Checkbox Field to TRUE on the Milestone record, the Milestone and related Actions & Checklist Items will be removed from the following pages within Mission Control:
All of the records will still be accessible via the standard page layouts.
Whilst you can create custom reports and dashboards to meet your own requirements, Mission Control comes with a set of standard reports as well as a dashboard.
To access the Mission Control dashboard, click the Dashboards tab and select Mission Control Dashboard from the drop down, which is contained in the Mission Control Dashboards folder.
The underlying reports that feed the Mission Control dashboard can all be located in the Mission Control Reports folder within the Reports tab. The reports supplied with Mission Control are listed below:
Report Name | Description |
Actions by End Date | Displays all Planned and In Progress Actions, grouped by Action End Date |
Actions by Status | Displays all Actions with an End Date This Month, grouped by Action Status |
Completed Projects by Actual Performance | Displays summary of Projects that are Complete, grouped by Actual Performance |
Current Projects by Forecast Performance | Displays the number of Projects by Forecast Performance |
Hours Remaining Summary by Action Owner | Matrix Report: Displays the total Hours Remaining by End Date for each Action Owner |
Hours Remaining Summary by Role | Displays total Hours Remaining by Role Name for Actions with an End Date of less or equal to the Next 7 Days |
Hours Remaining Summary by Status | Displays a summary of the number of Hours Remaining by Action Status |
Project Summary by Status | Displays a summary of all Projects by Status |
Resource Utilisation Report – Last 3Mth | Shows the utilisation of each Role within Mission Control over the last 3 months |
Top Projects by Hours Allocated | Displays the top Projects by the Hours Allocated |
Top Projects by Hours Remaining | Displays the top Projects by the Hours Remaining |
Holiday Allowance Remaining Summary | Provides a summary of all Holiday Allowance records grouped by Role and Holiday Allowance ‘Type’ |
Holiday Allowance Remaining Role | Provides a summary of all Holiday Allowance records grouped by Holiday Allowance ‘Type’ |
Project P&L Performance | Identifies the performance of all Projects across all time in relation to the KPI: P&L Variance field. Grouped by Project Owner then P&L Performance |
Action P&L Performance | Identifies the performance of all Actions across all time in relation to the KPI: P&L Variance field. Grouped by Project Owner, Project Name then P&L Performance |
Billing Events Raised This Fiscal Year | Summary of all Invoice Billing Events raised this Fiscal Year, based on Invoice Date, grouped by Project |
Project Hours Performance | Identifies the performance of all Projects across all time in relation to the KPI: Total Hours Variance field. Grouped by Project Owner then Project Hours Performance |
Revenue Forecast v Actuals | Role Allocation Automation must be turned on for this report to work. Provides insight into the Forecast and Actual revenue associated with Role Allocation records, grouped by Project and Month. |
Cumulative Budget Burnt | Note: This Report is limited to a 12 month period. Provides insight into the cumulative budget burnt on Projects based on the Hours Completed Value (Billable) field on Time Logs. Grouped by Project Name and Month (based on the Date of the Time Logs) |
Project Burn Down | Shows Hours Burn Down by Project. Filtered on Projects with a Created Date this Fiscal Year where Total Hours Completed > 0. Note: Supports a maximum of 12 months reporting period. |
Billing Event Exceptions Reports & Dashboard
To ensure Customers configure their Projects and Milestones correctly to achieve their required Billing Event generation, a number of Validation Rules, Reports and a Dashboard are included within Mission Control.
Mission Control provides a variety of flexible options to assist customers in generating their invoices (Billing Events). For each method of generating a Billing Event, key fields on the Project and Milestones are required.
The table below includes a list of the Validation Rules included within Mission Control that can be used by Customers to ensure all fields are configured correctly for the Billing Event generation method required.
Object | Rule | Description | Active |
Project | Enforce Day Rates for Standard | If Billing Rate = Standard, ensure a value is entered in Billable Day Rate. If Cost Rate = Standard, ensure a value is entered in Cost Day Rate | FALSE |
Milestone | Field Req Milestone Billing Type | Ensure various supporting fields are populated correctly if ‘Milestone billing Type’ is populated | TRUE |
Project | Field Req Billing Cycle | Ensure various supporting fields are populated correctly if ‘Billing Type’ is set to Periodic | TRUE |
Project | Field Req Deposit to TM | Ensure various supporting fields are populated correctly if ‘Billing Type’ is set to Deposit to T&M | TRUE |
Project | Field Req Fixed Price | Ensure various supporting fields are populated correctly if ‘Billing Type’ is set to Fixed Price | TRUE |
Project | Field Req Fixed Price plus Expenses | Ensure various supporting fields are populated correctly if ‘Billing Type’ is set to Fixed Price + Expenses | TRUE |
Project | Field Req Time and Materials | Ensure various supporting fields are populated correctly if ‘Billing Type’ is Time & Materials | TRUE |
Project | Field Req Controlled on Milestones | Ensure various supporting fields are populated correctly if ‘Billing Type’ is Controlled on Milestones | TRUE |
If you are generating Billing Events within Mission Control, it is highly recommended that you activate all of these Validation Rules.
To provide Customers with the ability to easily identify any Projects that may not be correctly configured for the required Billing Event generation method, a Dashboard and a number of reports are included within Mission Control.
The Reports included to assist with Billing Event Exceptions are:
Time Logs with No Billable Value
Reports on Time Logs where the Non Billable Indicator field is set to FALSE and the Hours Completed Value (Billable) field is set to zero.
Time Logs Not Invoiced < Last Bill Date
Reports on Time Logs where Invoiced = FALSE and Approval Date is less than the Periodic Billing Last Date.
Note: Due to a Salesforce limitation a filter required for this report is unable to be included by default. Therefore, in order to use this report, customers will need to add the below filter manually.

Time Logs Not Invoiced >= Last Bill Date
Reports on Time Logs where Invoiced = FALSE and Approval Date is greater or equal to the Periodic Billing Last Date.
Note: Due to a Salesforce limitation a filter required for this report is unable to be included by default. Therefore, in order to use this report, customers will need to add the below filter manually.
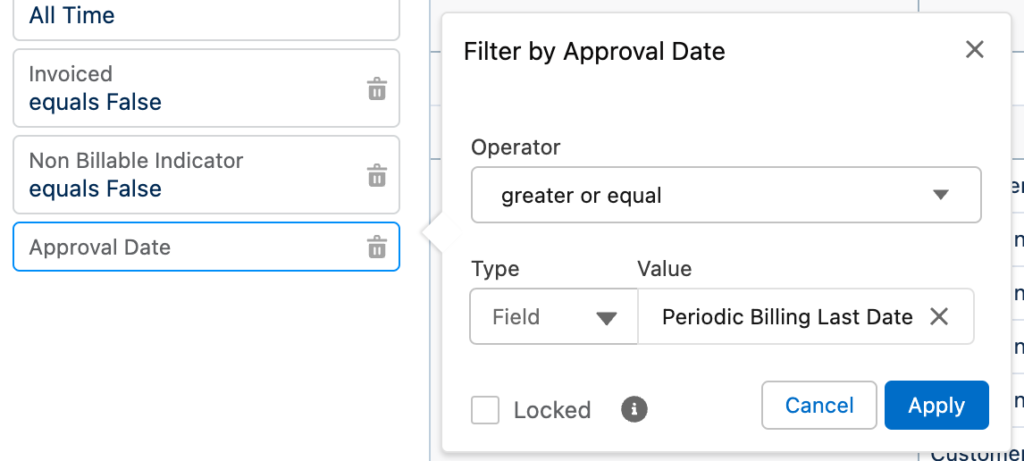
Time Logs Not Approved w/ Billing Cycle
Reports on Time Logs that have not yet been approved that relate to a Project that has a value in the Billing Cycle field.
Projects set to Standard with No Rates
Reports on Projects where Billing Rate or Cost Rate are set to Standard and no Billing Day Rate or Cost Day Rate values have been supplied.
Projects with Next Billing Date Mismatch
Reports on Projects configured for Periodic or Retainer Billing where the Periodic Billing Next Date does not match what is expected.
Projects with no Invoice on Comp Mstones
Reports on Projects with a Billing Cycle of Milestone that have no Milestones with the ‘Invoice on Completion’ field set to TRUE.
The ‘Mission Control Billing Exceptions’ Dashboard
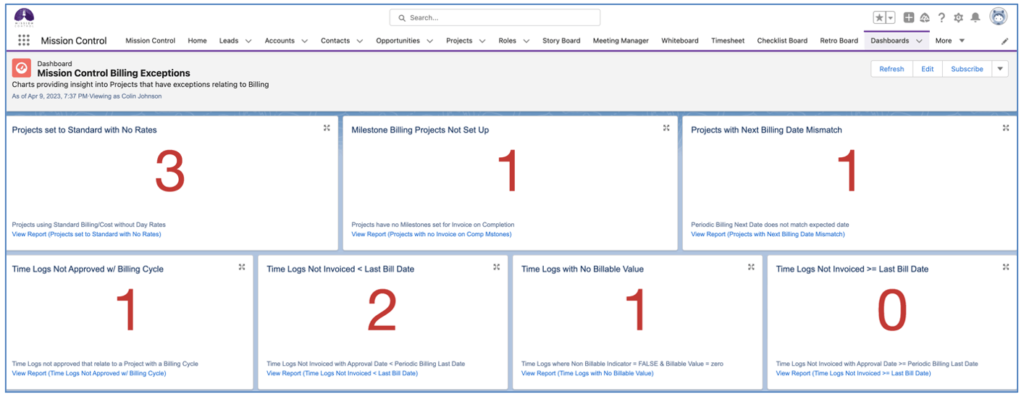
Customers can use the ‘Subscribe’ feature to receive this Dashboard via email.
Users are able to create Pre-set Filters via the Filter Modal on various key feature pages within Mission Control, including:
These Filters can be created so they are only accessible for the individual User that created them. Alternatively, they can be made available to:
When creating a Filter, you can select your filter parameters and click the ‘Create’ link at the top of the Filter Modal. In the example below, a Filter is being created that will display Actions on the Whiteboard that have a Status of ‘Planned’ or ‘In Progress’.
Note: To assign default filters to other Users, the ‘Apply Default Filters’ field on your Role record will need to be set to TRUE.
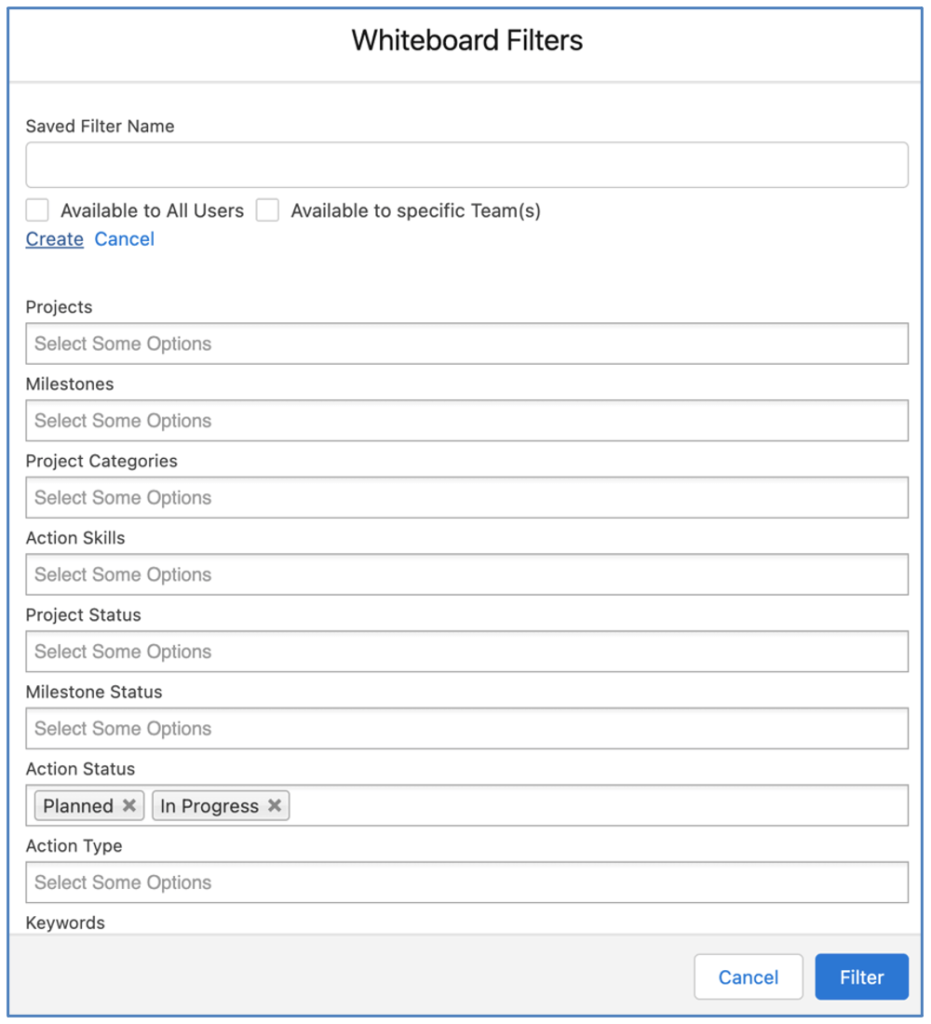
After clicking Create, specify the Name of the Filter.
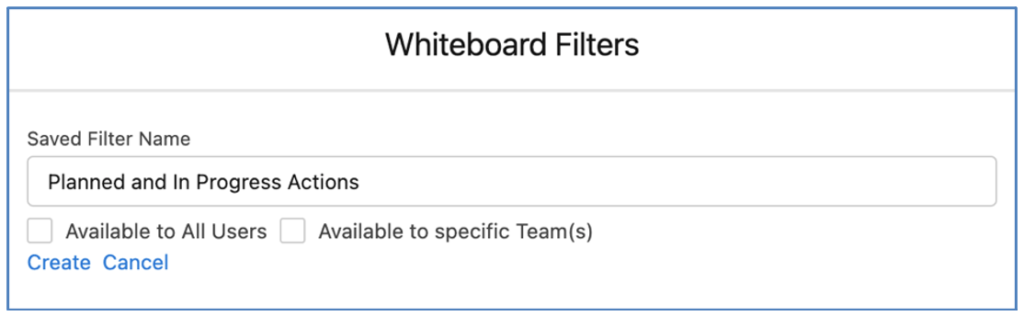
If this Filter is only going to be used by the person creating it, simply click ‘Create’ and the Filter will be saved and available for you to use as a Pre-set Filter.
Alternatively, if you intend to share this filter with other Users, tick one of the following options:
If you select ‘Available to All Users’ the Filter will be shared with all Mission Control Users. If you select ‘Available to specific Team(s)’, an additional section will be displayed allowing you to specify which Team(s) you want to share the Filter with.
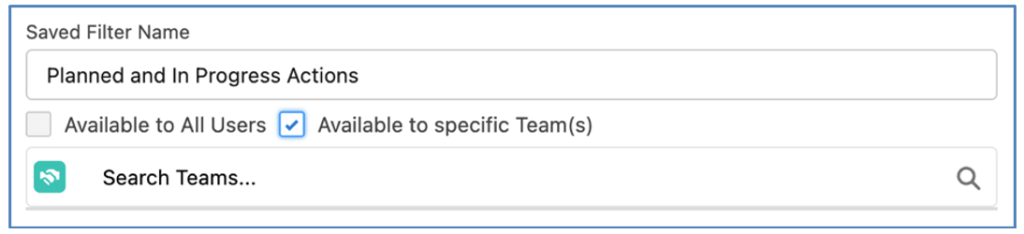
Select the Team(s) that you wish to share the Filter with and click Create. This Filter will then be shared with any User that has a Role record that is associated to the Team(s) selected.
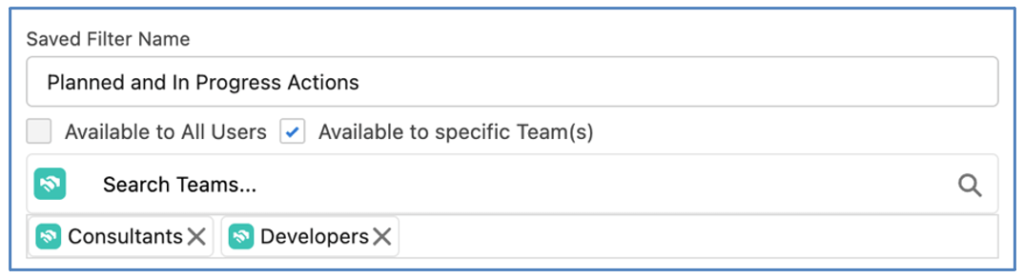
You can also specify that the Filter should be applied as a Default for particular Roles / Teams. When you select either of the options of ‘Available to All Users’ or ‘Available to Specific Team(s)’ the following section will appear.

You can select to search for Roles or for Teams by clicking the drop down arrow on the left of the Search Box.
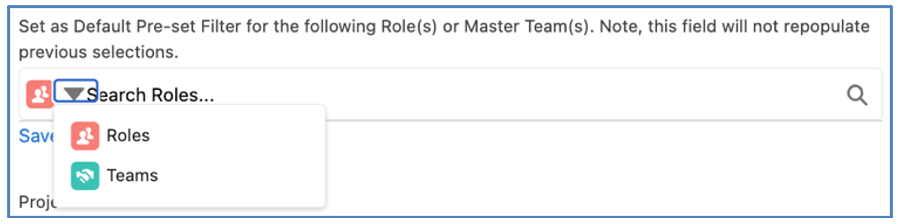
When you select Roles or Teams within this section, once you click Create, this Filter will be applied as their Pre-Set Filter when using this page.
Note: This section will not display the values specified at creation when it is reloaded as Users may have changed their Pre-Set Filter preferences. This section simply allows you to initially set the Filter as a default.
Note: When creating a new Role record, when the ‘Master Team’ field is populated for the Role, Pre-Set Filters will be set for this Role based on any existing defaults for the Master Team.
Mission Control comes with a collection of permission sets, which can be used to provide appropriate level of access to the Mission Control package.
This will allow a System Administrator to quickly provide access to Mission Control without needing to assign access to the individual components. The permission set can be assigned by going to Your Name > Setup > Manage Users > Permission Sets > [Select Permission Set] > Manage Assignments Button > Add Assignments Button and then select the users you want to add.
Recommendation: We recommend, where appropriate, that you use these Permission Sets as they are maintained with each new release of Mission Control to ensure your Users always have access to new features as they are released.
| Permission Set | Description |
| Mission Control Full | Full Access to the Mission Control Application |
| Mission Control Full Classic Only | Full Access to the Mission Control Application. Access to Classic App and VF Tabs, but not LEX App and Components |
| Mission Control Full LEX Only | Full Access to the Mission Control Application. Access to Lightning App and Components, but not Classic App and Visualforce Tabs |
| Mission Control Full No Apps | Full Access to the Mission Control Application, but does not have any Apps assigned. |
| Mission Control Full No Financials | Full Access to the Mission Control Application with no visibility of Financial Fields (e.g. Billing or Cost) on the Role, Project, Milestone, Action, Time Log or Skill Assignment Objects |
| Mission Control Full No Currency Fields | Full Access to the Mission Control Application with no visibility of Currency Fields across any Object |
| Mission Control Full No Financials Classic Only | Full Access to the Mission Control Application with no visibility of Financial Fields (e.g. Billing or Cost) on the Role, Project, Milestone, Action, Time Log or Skill Assignment Objects. Access to Classic App and VF Tabs, but not LEX App and Components |
| Mission Control Full No Financials LEX Only | Full Access to the Mission Control Application with no visibility of Financial Fields (e.g. Billing or Cost) on the Role, Project, Milestone, Action, Time Log or Skill Assignment Objects. Access to LEX App and Components, but not Classic App and VF Tabs |
| Mission Control Full No Financials Read Only | Full Access to the Mission Control Application with no visibility of Financial Fields (e.g. Billing or Cost) on the Role, Project, Milestone, Action, Time Log or Skill Assignment Objects. Read-Only Field Level Security. |
| Mission Control Full Read Only | Full Access to the Mission Control Application. Read-Only Field Level Security. |
| Mission Control Opportunity & Product Fields | Access to the Opportunity & Product Fields required to auto-generate Projects within Mission Control from an Opportunity |
| Mission Control Case Fields | Contains fields on, or related to the Case Object |
| Mission Control Full Community | Full Access to the Mission Control Application, specifically for Community Users. |
| Mission Control Full Community No Currency Fields | Full Access to the Mission Control Application, specifically for Community Users, with no visibility of Currency Fields across any Object |
| Mission Control Full Community No Financials | Full Access to the Mission Control Application, specifically for Community Users, with no visibility of Financial Fields (e.g. Billing or Cost) on the Role, Project, Milestone, Action, Time Log or Skill Assignment Objects |
| Mission Control Customer Read Only | Provides Read Only Access to the Site Guest User for the Customer Read Only Page |
| Mission Control Timesheet Only | Provides the minimum level of access required across the system for a User to use the Timesheet |
Please ensure you review any of these Permission Sets in detail to ensure they are providing the appropriate level of access to your Users. If you wish to create a variation on any of the above Permission Sets, you can do so by clicking the ‘Clone’ button and making the required adjustments.
If you would like to take advantage of Mission Controls billing functionality you should start by completing the billing setup section on the ‘Control Pad’ Tab of the Mission Control Console.

In the Billing Automation section, tick the ‘Invoice Generation Active’ checkbox to have invoices and credit notes automatically created for new or modified billing events every 5 minutes. If you do not choose this option you will need to manually generate invoices and credit notes when required.
If you perform billing on a periodic basis, you should tick the ‘Periodic Billing Active’ checkbox to enable periodic billing to run and automatically create billing event records for the relevant projects. Projects with a billing type of ‘Periodic’ will be included in the schedule based on the billing cycle information for the specific project. Be sure to click the ‘Update’ button to apply your settings.
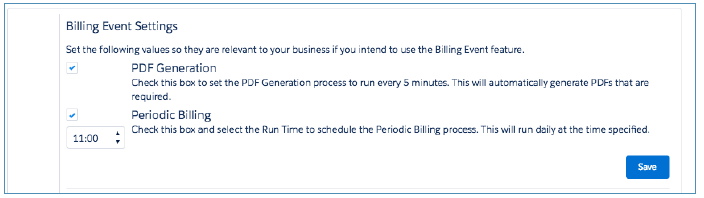
The Invoice Details section allows you to customise the template used to generate the PDF of invoices and credits.
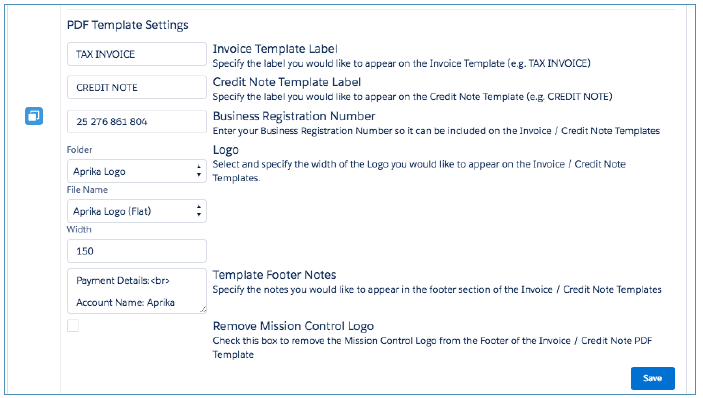
The footer text area is limited to 255 characters and allows you to enter plain text, or, if you want to include formatting to the footer, you can also add HTML tags. In the example above we have used to make the text Bold,
to add Line Breaks, and to apply an Underline. Note: HTML tags count towards your character limit.
Once you have applied or changed your custom invoice details, remember to click the ‘Update’ button to save.
Next you will want to record some tax rates.
Invoice Address Source
By default, the address displayed on the Billing Event PDF is sourced from the ‘Billing Address’ fields on the Account record. Customers can specify an alternative address source if required.
The ‘Invoice Address Source’ field on the Billing Event can be used to specify which address should be displayed. The options include:
If this field is left blank, the Billing Address of the ‘Account’ specified on the Billing Event will be used. If the ‘Account’ field on the Billing Event is empty, the Billing Address of the ‘Account’ specified on the Project will be used.
To specify alternative fields to be used for the address, there are three sets of ‘Address Source’ settings in the ‘Billing Event Settings’ Tile on the Control Pad of the Mission Control Console.
Within these fields, you can enter the API Label of the fields to be used as the address source for each scenario.

In the image above, we have specified which fields are to be used as the address source.
Invoice Address Format
By default, the format of addresses displayed on the Billing Event PDF are as follows:
Format | Example |
Street City State Postal Code Country | 1 Collins Street Melbourne VIC 3000 Australia |
Customers can use the ‘Company Address Format’ and ‘Customer Address Format’ settings to customize the address format. These settings can be found in the ‘Billing Event Settings’ Tile on the Control Pad of the Mission Control Console.

Below is an illustration of customized address format and how they would display.
Format | Example |
Street, City, State, Postal Code, Country | 1 Collins Street, Melbourne, VIC, 3000, Australia |
Street, City, State, Postal Code, Country | 1 Collins Street, Melbourne, VIC, 3000, Australia |
The Tax Rates object allows you to record the specific tax information relevant to your company. You can establish various Tax Rates and then select the relevant rate on each specific project. The tax rate object allows you to specify the Tax Label and Rate as well as specific currency and date formatting to use on invoices generated. To create a tax rate, go to the Tax rates tab and click the new button.
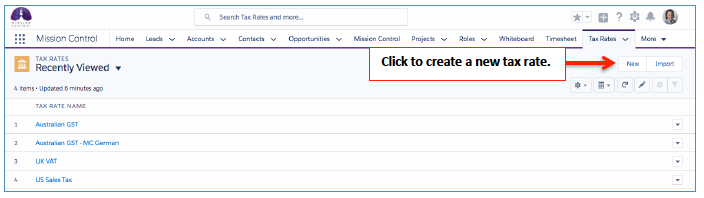
Enter the details for the tax rate and then click save. Please note that the data entered here will be used to calculate the tax rate as well as to format invoices and credit notes as follows:
Currency Code: Displayed on the Invoice/Credit Note
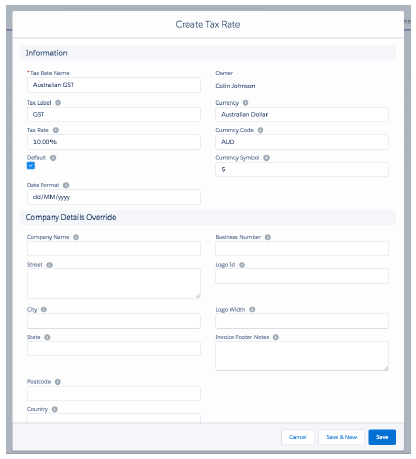
Date Formatting
The Date Format field must be populated using Java Simple Date Format such as dd/MM/yyyy or MM/dd/yyyy. If the date format is not entered, or entered incorrectly the running users locale will be used to format the dates. Please see some sample date formats as follows:
| EEE MMM d, yyyy | Thursday September 1, 2016 |
| dd/MM/yy | 01/09/16 |
| dd/MM/yyyy | 01/09/2016 |
| MM/dd/yyyy | 09/01/2016 |
| M.d.yyyy | 9.1.2016 |
| yyyy-MM-dd | 2016-09-01 |
| MMM d yyyy | September 1 2016 |
Note: Date formatting is case sensitive.
If you have multiple business entities all using the same instance of Mission Control, you’re able to override the ‘Business Entity’ details. You’re also able to override the PDF ‘Labels’ to meet your own requirements, whether that’s terminology preferences or to translate to another language.
Override Business Entity
There are a number of new fields now available on the Tax Rate Object that enable you to override the Company Name, address, logo and invoice footer notes. If you have two separate business entities using the same instance of Mission Control, you can set up separate Tax Rate labels for each company and apply the override field values as shown below.
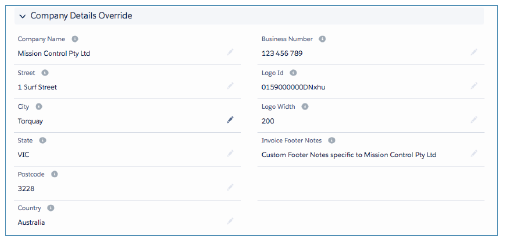
Override Template Labels
There are a number of new fields now available on the Tax Rate Object that enable you to override the various labels on the Invoice / Credit Note PDF templates. These can be used should you wish to translate any of the labels to another language.
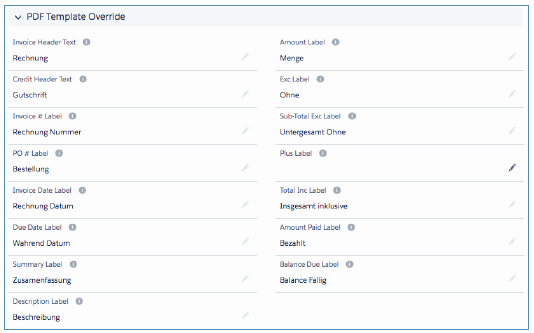
Override Template Fields
You can customize the Invoice PDF on Billing Events, hiding or replacing the fields used by default. This customization is managed on the individual Tax Rate records. A number of fields exist on the Tax Rate Object that allow you to customize the layout of the Invoice PDF, as outlined below.
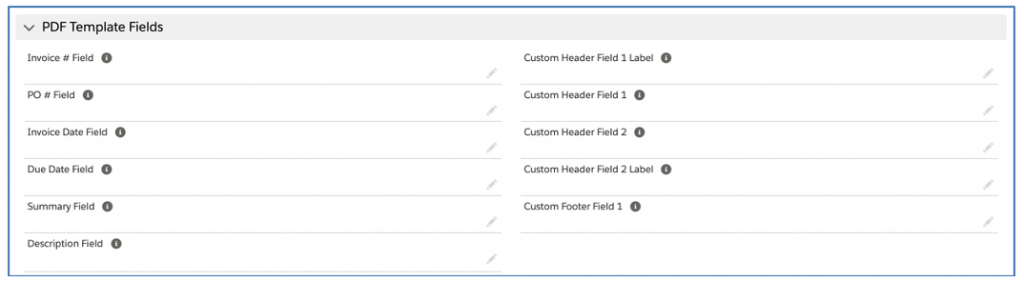
To hide a field, you need to enter Hidden into the field you wish to remove from the Invoice PDF. To replace a field, you need to enter the API Name of the field you wish to display on the Invoice PDF.
The Periodic Billing feature allows you to automate your invoicing process by automatically generating invoices for your projects at set timeframes. Periodic billing is currently available for time & materials based projects only. Follow the steps below to set your projects up for periodic billing:
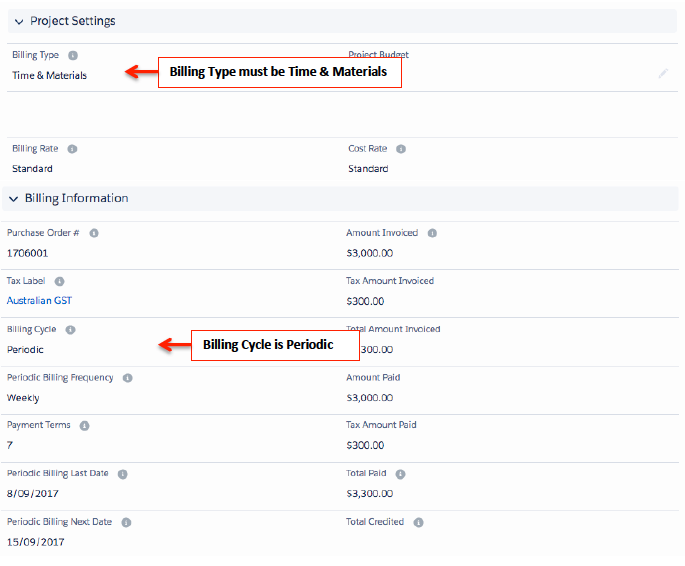
The Periodic Billing feature will create a billing event item, each period, for the Hours Completed Value (Billable) value of all time logs approved, and all approved billable up to, but not including the next billing date, excluding any that have already been invoiced. These will be included in one signed billing event record, with a separate billing event item for the expenses and time logs, which will be listed as spate lines on the invoice. You can view the invoice by clicking the view PDF button, and then print or download as required.
The individual Billing Event Items appear as follows with either the time logs or expenses related in lists at the bottom of the page.
The billing event item descriptions will be populated with the following text:
[Project Name] – Progress Payment
Times Logs to [Billing Date]
Or
[Project Name] – Progress Payment
Expenses to [Billing Date]
An invoice for a period billing event will look something like this:

Note: The periodic billing process will not automatically run if either of the following conditions apply:
The Milestone Billing feature allows you to automate your invoicing process by automatically generating invoices for your Projects when Milestones are completed. Milestone billing is available for both Fixed Price and Time & Materials based Projects and provides the flexibility of allowing you to specify which Milestones within the Project should be included in billing.
Fixed Price Milestone Billing
Follow these steps to set your Projects up for Fixed Price Milestone Billing
When the Milestone ‘Status’ is set to Complete and the ‘Invoice on Completion’ checkbox is True, the Billing Event record will then be created. The amount of the Billing Event record will be the ‘Invoice Amount’, or if this is null or 0, the ‘Milestone Budget’, or if this is null or 0, then the ‘Hours Scheduled Billable Value’ will be used. The Billing Event will be created with a single Billing Event Item for the completed Milestone.
The description of the Billing Event Item will be populated as follows:
[Project Name] – Progress Payment
[Milestone Name] – Completion
An example of an invoice for a fixed price Milestone Project is as follows:

Fixed Price + Expenses Milestone Billing
Follow these steps to set your Projects up for Fixed Price + Expenses Milestone Billing
When the Milestone ‘Status’ is set to Complete and the ‘Invoice on Completion’ checkbox is True, the Billing Event record will then be created. The amount of the Billing Event record will be the ‘Invoice Amount’, or if this is null or 0, the ‘Milestone Budget’, or if this is null or 0, then the ‘Hours Scheduled Billable Value’ will be used. The Billing Event will be created with a single Billing Event Item for the completed Milestone.
The description of the Billing Event Item will be populated as follows:
[Project Name] – Progress Payment
[Milestone Name] – Completion
An additional Billing Event Item will be generated if there are approved Expenses relating to the Milestone that have not been invoiced.
An example of an invoice for a fixed price Milestone Project is as follows:

Time & Materials Milestone Billing
Follow these steps to set your Projects up for Time & Materials Milestone Billing:
When the Milestone ‘Status’ is set to Complete and the ‘Invoice on Completion’ checkbox is True,, the Billing Event record will then be created, with the amount being based on the Hours Completed Billable Value.
The Billing Event will be created with a single Billing Event Item for the completed Milestone.
The description of the Billing Event Item will be as follows:
[Project Name] – Progress Payment
[Milestone Name] – Completion
An example of an invoice for a Time and Materials Milestone billing Project is as follows:

Manual billing will remove the automation of the billing process by Mission Control. With this option you will need to create your own Billing Events and Billing Event Items against your Projects. This option is good for customers who do not have specific billing processes, or whose processes cannot be handled with the existing automation. Manual billing is available for all Projects and provides you with full control over your billing.
Follow these steps to set your Projects up for Manual Billing:
Based on your requirements, you can then create a Billing Event for the Project by clicking the New Billing Event button in the Billing Events related list of the Project.
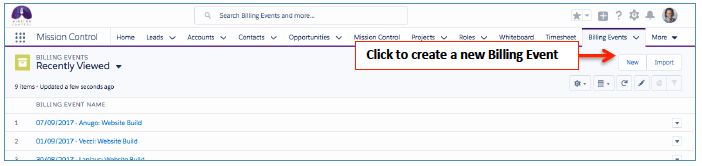
Complete the details for the Billing Event such as Type Status, Summary, Invoice Date & Due Date and then click save. Note the amount will be calculated based on the individual Billing Event items that you add to the Billing Event.
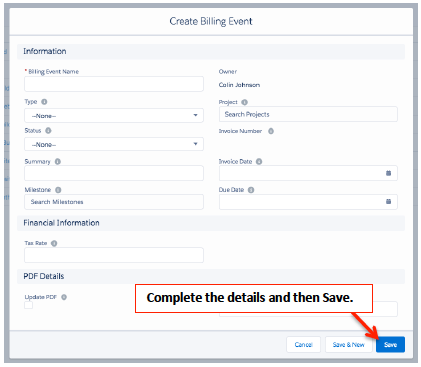
Once saved you can click the “New Billing Event Item” button in the Billing Event Items related list to add lines to your Billing Event.

Enter the details of the Billing Event Item such as Description, Amount and whether Tax is applicable and then Save.
The Tax Amount is calculated based on your selection to include it, and the Tax Label associated to the Project.
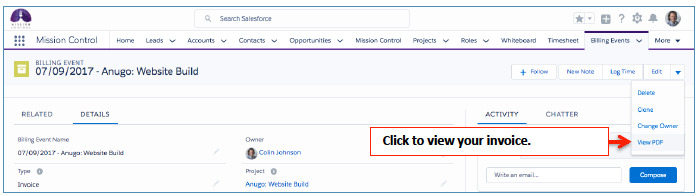
The amounts from the Billing Event Items then roll up to the Billing Event record and an Invoice can then be generated using the ‘View PDF’ button.
Two fields on the Billing Event Object allow you to automatically add Time Logs and Expenses to a Billing Event. The two fields will need to be added to the page layout and are called:
When generating a new Billing Event, a User will be able to set these to Checkbox fields to be TRUE and once the Billing Event is saved, two new Billing Event Item records will automatically be created, including all billable Time Logs and Expenses that have not yet been invoiced.
These fields can only be used when the Project Billing Cycle field is set to ‘Manual’. To enforce this a Validation Rule called ‘Ensure_Billing_Cycle_Manual’ is available on the Billing Event Object.
Two additional fields can be populated on the Billing Event record:
If these fields contain values, Time Logs and / or Expenses will only be included in the Billing Event Items if the Approval Date falls within the Start Date and End Date values.
The Retainer Billing Cycle enables you to raise fixed fee periodic Billing Events. An ideal use case for this feature would be where you’re charging a customer a fixed fee on a retainer-based agreement.
The Retainer Billing Cycle can be used in conjunction with these Billing Type values:
An example of using this feature might be a Marketing Agency on an annual retainer with their customer, where they are charging a fixed fee of $10,000 per month. The fields on the Project would be set as follows:
| Field | Field Value |
| Billing Type | Fixed Price |
| Billing Cycle | Retainer |
| Periodic Billing Frequency | Monthly |
| Retainer Amount | 10,000 |
| Periodic Billing Next Date | 31/1/2019 |
The Billing Event Generator enables you to manually generate a Billing Event based on your Project settings. Specifically, the Billing Event Generator includes 3 tabs, each of which are available under specific scenarios:
T&M Wizard: Available when the Billing Type = ‘Time & Materials’ and Billing Cycle = ‘Manual’
Manual: Available when the Billing Cycle = ‘Manual’
Controlled on Milestones: Available when the Billing Type = ‘Controlled on Milestones’
T&M Wizard
The ‘T&M Wizard’ Tab on the Billing Event Generator enables you to create a Billing Event invoice based on the Time Logs & Expenses that are not yet invoiced. Whilst the periodic feature within Mission Control will generate the Billing Event automatically for you, customers may choose to use the T&M Wizard. This method provides you with the ability to review and select which Time Logs and Expenses should be included in the invoice.
To generate a Billing Event in this manner, you will need to access the Billing Event Generator by clicking the ‘Generate’ button the Billing Tab of the Project Overview.

The T&M Wizard Tab will be visible if the following criteria on the Project is met:
There are four steps to generating a Billing Event using the T&M Wizard:
Create Draft Billing Event
The first step is to create the Billing Event record. As shown in the image below, the ‘Draft Billing Event’ section enables you to populate the fields required for the Billing Event. Note: The Due Date will automatically be set to Invoice Date + Payment Terms (if the Payment Terms field on the Project contains a value).

Once you have completed the fields, click ‘Next’ to proceed to the next step.
Add Time Logs
The second step is to review and select which Time Logs should be included in the Billing Event. As shown in the image below, there are 3 fields to help identify which Time Logs you want to include:

Date Source
The Date Source determines which Date field on the Time Log will be used to identify the Time Logs you want to review:
Date Range
The Date Range determines the period of time you want to use to identify the Time Logs you want to review:
When you select ‘Specify Date Range’, the Start Date and End Date fields will be displayed, as shown below.

Billing Event Item Grouping
The Billing Event Item Grouping determines how many Billing Event Item records will be created, based on the Time Logs being included:
Once you have specified the required settings, click the ‘Review Time Logs’ button to generate the list of Time Logs matching the criteria.

You are able to review and select the Time Logs you wish to include in the Billing Event by clicking the Checkbox against the applicable Time Logs.
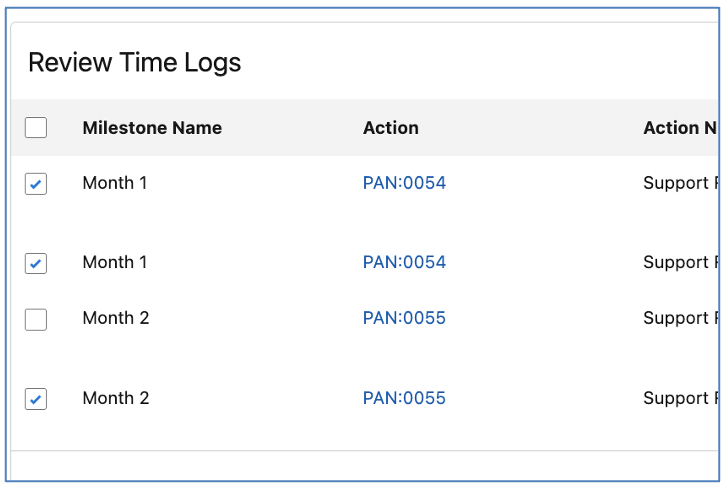
Note: If the ‘Include Non Billable Expenses’ field on the Project is FALSE, Time Logs will only be included where the ‘Non Billable Indicator’ field is FALSE. If the ‘Include Non Billable Expenses’ field on the Project is TRUE, Time Logs will be included where the ‘Non Billable Indicator’ field is TRUE or FALSE.
Once you have selected the required Time Logs, click ‘Next’ to proceed to the next step.
Add Expenses
The third step is to review and select which Expenses should be included in the Billing Event. As shown in the image below, there are 3 fields to help identify which Expenses you want to include:

Date Source
The Date Source determines which Date field on the Expense will be used to identify the Expenses you want to review:
Date Range
The Date Range determines the period of time you want to use to identify the Expenses you want to review:
When you select ‘Specify Date Range’, the Start Date and End Date fields will be displayed, as shown below.

Billing Event Item Grouping
The Billing Event Item Grouping determines how many Billing Event Item records will be created, based on the Expenses being included:
Once you have specified the required settings, click the ‘Review Expenses’ button to generate the list of Expenses matching the criteria.

You are able to review and select the Expenses you wish to include in the Billing Event by clicking the Checkbox against the applicable Expenses.
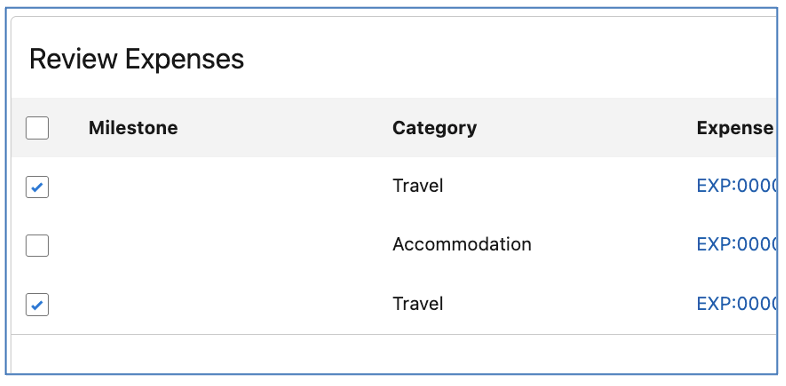
Once you have selected the required Expenses, click ‘Next’ to proceed to the next step.
Review & Save
The fourth step is to review the Billing Event and Billing Event Items. In the image below, you can see the Billing Event information you entered in Step 1 and beneath that in the ‘Billing Event Items Preview’ section, you can see the Billing Event Items that have been compiled based on your Time Log & Expense settings and selections.

You can add values to fields such as Description, Ledger Code, etc. prior to clicking Save. Once you have reviewed everything, if you wish to create the Billing Event and related Billing Event Items, click Save.
T&M Wizard Tab Configuration Settings
There are a number of Field Sets that enable you to customise the fields displayed on specific sections across the T&M Wizard Tab of the Billing Event Generator. A list of all applicable Field Sets is included below.
Billing Event
Billing Event T&M Wizard Generator – controls the fields displayed on the ‘Draft Billing Event’ Tab and ‘Review & Save’ Tab
Billing Event Item
Billing Event T&M Wizard Generator – controls the fields displayed on the ‘Review & Save’ Tab
Time Log
Billing Event T&M Wizard Generator – controls the fields displayed on the ‘Add Time Logs’ Tab
Expense
Billing Event T&M Wizard Generator – controls the fields displayed on the ‘Add Expenses’ Tab
Manual Wizard
The ‘Manual’ Tab on the Billing Event Generator enables you to create a Billing Event and Billing Event Items within a single interface.
To generate a Billing Event in this manner, you will need to access the Billing Event Generator by clicking the ‘Generate’ button the Billing Tab of the Project Overview.

The Manual Tab will be visible if the following criteria on the Project is met:
From the Manual Tab on the Billing Generator, you are able to create the Billing Event and multiple Billing Event Items.

First, enter the details for the Billing Event, such as Billing Event Name, Type, Status, etc. Note: The Due Date will automatically be set to Invoice Date + Payment Terms (if the Payment Terms field on the Project contains a value).

Second, you will need to enter at least one Billing Event Item within the ‘Billing Event Items Preview’ section.

Additional rows can be added by clicking the ‘Add Rows’ button, enabling you to include multiple Billing Event Items.
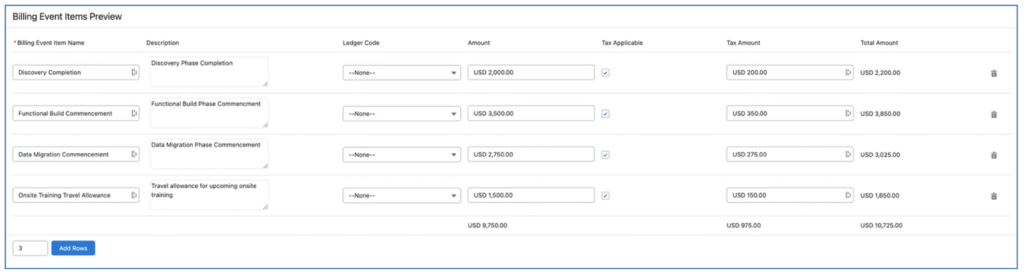
Once you have reviewed everything, if you wish to create the Billing Event and related Billing Event Items, click Save.
Manual Tab Configuration Settings
There are a number of Field Sets that enable you to customise the fields displayed on specific sections across the Manual Tab of the Billing Event Generator. A list of all applicable Field Sets is included below.
Billing Event
Billing Event Manual Generator – controls the fields displayed on the Manual Tab
Billing Event Item
Billing Event Manual Generator – controls the fields displayed on the Manual Tab
Controlled on Milestones
You are able to control the Billing Type for individual Milestones within a Project. This means you will be able to set each Milestone within a Project to one of the following ‘Milestone Billing Type’ options:
This also requires the Project ‘Billing Type’ field to be set to ‘Controlled on Milestones’, which is a new picklist value that you will need to manually add to the field.
When using the ‘Controlled on Milestones’ Project Billing Type, the Project Billing Cycle will need to be set to ‘Manual’ and the Billing Event will need to be generated manually using the Billing Event Generator component.
The Billing Event ‘Generator’ is a component that enables you to generate a Billing Event and multiple Billing Event Items, for each Milestone that is eligible to be billed.
When the Project Billing Type is set to ‘Controlled on Milestones’, you will have access to the ‘Generate’ button on the Billing Tab of the Project Overview, as shown below.

When you click the Generate button, the Billing Event Generator component will load up a draft Billing Event and Billing Event Items based on which Milestones have been configured for billing. Below is an example of the Billing Event Generator with multiple Billing Event Items for various Milestones related to the Project.
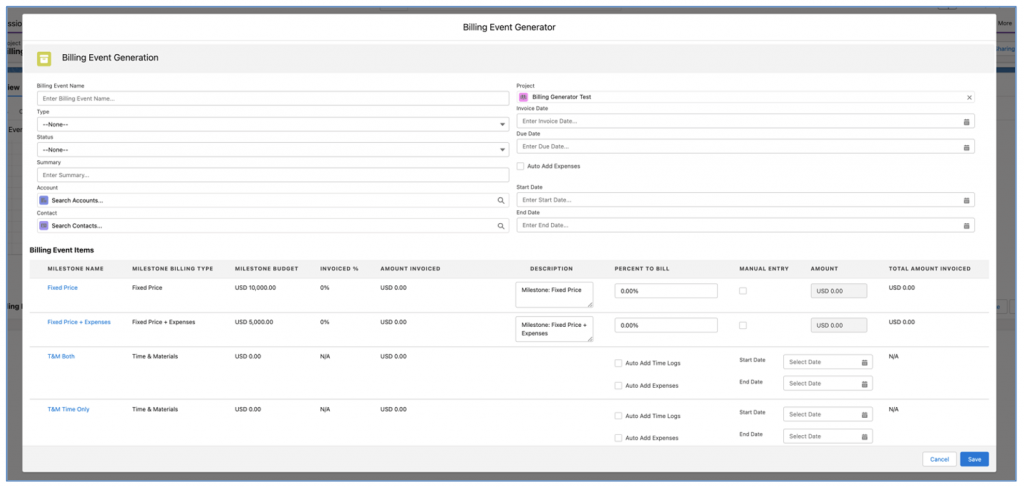
Draft Billing Event Item records will be displayed for each Milestone based on the ‘Milestone Billing Type’ as outlined in the table below.
Milestone Billing Type | Criteria |
Fixed Price | Milestone Budget > 0 |
Fixed Price + Expenses | Milestone Budget > 0 |
Time & Materials | Related Time Logs where Invoiced is not equal to TRUE and Approval Status = Approved OR Related Expenses where Invoiced is not equal to TRUE and Approval Status = Approved |
Depending on the Milestone Billing Type, the Billing Event Item record(s) will be created based on the following scenarios.
Fixed Price
Amount specified on the page, by either entering the ‘Percent to Bill’ or by using the ‘Manual Entry’ checkbox to enter the ‘Amount’ value manually. There will be 1 Billing Event Item record created for Fixed Price Milestones.
Fixed Price + Expenses
Amount specified on the page, by either entering the ‘Percent to Bill’ or by using the ‘Manual Entry’ checkbox to enter the ‘Amount’ value manually. There will be 1 Billing Event Item record created for Fixed Price + Expenses Milestones progress payment and potentially another Billing Event Item will be created for any approved, but not yet invoiced Expenses that relate to the Milestone.
Time & Materials
There will be 2 Billing Event Item records created for Time & Materials Milestones, based on whether the User selects the ‘Auto Add Time Logs’ and ‘Auto Add Expenses’ checkboxes for the Billing Event Item. One Billing Event Item record will be for the Time Logs that are approved, but not yet invoiced that relate to Actions related to this Milestone, and the other Billing Event Item record will be for the Expenses that are approved, but not yet invoiced that relate to this Milestone.
The User can optionally choose to apply a date range filter to specify a Start Date and End Date that will be factored in when identifying the Time Logs and Expenses that should be invoiced.
Project Expenses
The User has the option to add an additional Billing Event Item record for any Expenses that relate to the Project, but are not related to a specific Milestone. This is done by setting the ‘Auto Add Expenses’ checkbox within the Billing Event section of the page. The User can optionally choose to apply a date range filter to specify a Start Date and End Date that will be factored in when identifying the Expenses that should be invoiced.
Billing Event Field Set
To enable customers to add additional fields to the Billing Event section of the Generator page, a Field Set called ‘Billing Event Generator Fields’ is available on the Billing Event Object.
Summary of Detailed Invoice PDF
When using the ‘Controlled on Milestones’ Billing Type, Users will be able to choose between the ‘Summary’ or the ‘Detail’ Invoice PDF. This is controlled by the ‘Invoice Template’ on the Billing Event record. By default, it will be set to Summary.
The Summary PDF is shown below.
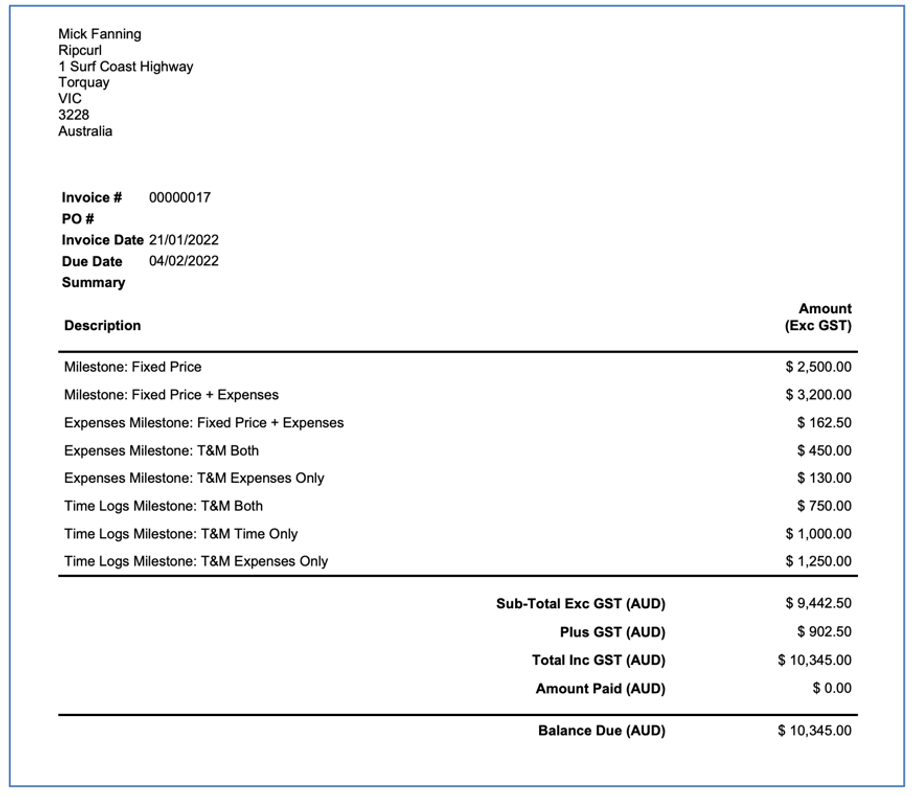
The Detail PDF is shown below.
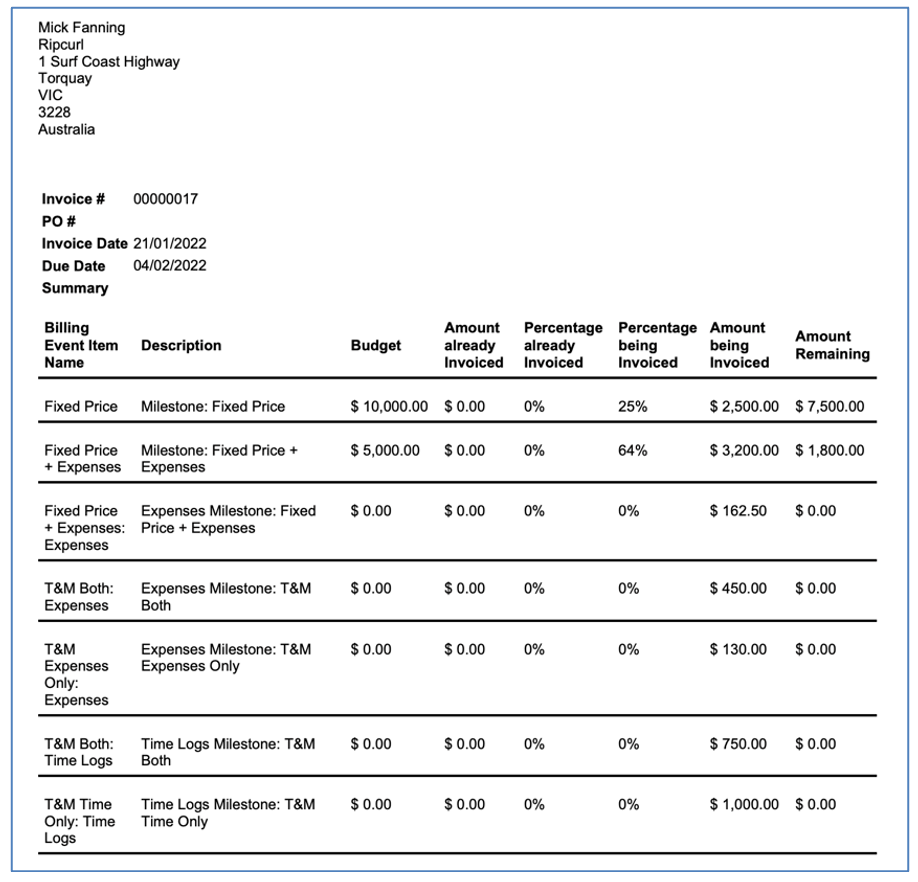
The Time Log and Expense Appendices can be added to both the Summary and Detail PDFs.
The ‘Deposit to T&M’ Billing Type enables customers to manually raise deposit invoices and once that amount has been used, T&M invoices will be generated periodically. To use this Billing Type, the following fields will need to be set on the Project:
Billing Type: Deposit to T&M
Billing Cycle: Periodic
Periodic Billing Frequency: Set to your preference
Periodic Billing Next Date: Set to your required date
Deposit Invoices
To create a Deposit Invoice, you will need to manually create the Billing Event and Billing Event Item records. The ‘Deposit’ field on the Billing Event will need to be set to TRUE in order to be recognised as a Deposit Invoice.
Note: You can have multiple Billing Events marked as a Deposit for 1 Project. However, Billing Events that have the Deposit field set to TRUE can only have 1 related Billing Event Item.
T&M Invoices
The T&M Invoices that are created as part of the ‘Deposit to T&M’ Billing Type will be created automatically as part of the periodic billing process that is scheduled via the Control Pad of the Mission Control Console.
When users log Expenses against the Project and/or log Time against the Actions on the Project, if there is sufficient balance on the amount that has been invoiced as part of a ‘Deposit’ Billing Event, then the Time Log or Expense will be related to the existing Billing Event and marked as Invoiced. Once there is no balance remaining on the Billing Event, any subsequent Time Logs or Expenses will be invoiced as part of the periodic T&M schedule.
Expenses
When an Expense is created and is related to a Project using the ‘Deposit to T&M’ Billing Type, the following calculation is performed to determine if the Expense can be related to the Deposit Invoice or if it should be flagged to be invoiced in the next periodic T&M Invoice.
Billing Event ‘Amount’ – (‘Hours Completed Value (Billable)’ of all related Time Logs + ‘Amount Claimed’ of all related Expenses) = Balance Remaining
Based on the above ‘Balance Remaining’ formula, one of the following actions will be carried out.
Time Logs
When a Time Log is created and is related to an Action on a Project using the ‘Deposit to T&M’ Billing Type, the following calculation is performed to determine if the Time Log can be related to the Deposit Invoice, if it should be split between the Deposit Invoice and the next periodic T&M Invoice, or if it should be flagged to be invoiced in the next periodic T&M Invoice.
Billing Event ‘Amount’ – (‘Hours Completed Value (Billable)’ of all related Time Logs + ‘Amount Claimed’ of all related Expenses) = Balance Remaining
Based on the above ‘Balance Remaining’ formula, one of the following actions will be carried out.
Note: Expenses will not be split across multiple Billing Events. However, Time Logs can be split to ensure the full amount of the Deposit Invoiced is used.
A new Billing Type has been included for customers to manage an invoicing scenario that was not supported by existing Billing Types. To take advantage of this feature, you will need to add ‘Retainer to T&M’ as a new Picklist value in the Billing Type field on the Project Object.
The ‘Retainer to T&M’ Billing Type enables customers to automatically raise retainer invoices on a periodic basis and once that amount has been used, T&M invoices will be generated periodically. To use this Billing Type, the following fields will need to be set on the Project:
Billing Type: Retainer to T&M
Billing Cycle: Retainer
Retainer Amount: Set to your required Retainer amount per period
Periodic Billing Frequency: Set to your preference
Periodic Billing Next Date: Set to your required date
Retainer Invoices
The Retainer Invoices will be created automatically via the ‘Periodic Billing’ process that is scheduled to run daily within the Billing Event Settings section of the Control Pad on the Mission Control Console.
This process will create a Billing Event and Billing Event Item for the ‘Retainer Amount’ specified on the Project. The ‘Retainer’ field on the Billing Event will be set to TRUE automatically for these Billing Events, in order for them to be recognised as Retainer Invoices.
Note: You can have multiple Billing Events marked as a Retainer for 1 Project. However, Billing Events that have the Deposit field set to TRUE can only have 1 related Billing Event Item.
T&M Invoices
The T&M Invoices that are created as part of the ‘Retainer to T&M’ Billing Type will be created automatically as part of the periodic billing process that is scheduled via the Control Pad of the Mission Control Console.
When users log Expenses against the Project and/or log Time against the Actions on the Project, if there is sufficient balance on the amount that has been invoiced as part of a ‘Retainer’ Billing Event, then the Time Log or Expense will be related to the existing Billing Event and marked as Invoiced. Once there is no balance remaining on the Billing Event, any subsequent Time Logs or Expenses will be invoiced as part of the periodic T&M schedule.
Expenses
When an Expense is created and is related to a Project using the ‘Retainer to T&M’ Billing Type, the following calculation is performed to determine if the Expense can be related to the Retainer Invoice or if it should be flagged to be invoiced in the next periodic T&M Invoice.
Billing Event ‘Amount’ – (‘Hours Completed Value (Billable)’ of all related Time Logs + ‘Amount Claimed’ of all related Expenses) = Balance Remaining
Based on the above ‘Balance Remaining’ formula, one of the following actions will be carried out.
Time Logs
When a Time Log is created and is related to an Action on a Project using the ‘Retainer to T&M’ Billing Type, the following calculation is performed to determine if the Time Log can be related to the Retainer Invoice, if it should be split between the Retainer Invoice and the next periodic T&M Invoice, or if it should be flagged to be invoiced in the next periodic T&M Invoice.
Billing Event ‘Amount’ – (‘Hours Completed Value (Billable)’ of all related Time Logs + ‘Amount Claimed’ of all related Expenses) = Balance Remaining
Based on the above ‘Balance Remaining’ formula, one of the following actions will be carried out.
Note: Expenses will not be split across multiple Billing Events. However, Time Logs can be split to ensure the full amount of the Retainer Invoiced is used.
If you are generating Time & Materials invoices, you’re able to include appendices to the invoice PDF that show the Time Logs and Expenses included in the invoice.
There are two fields on the Project Object called:
If these fields are set to TRUE, the appendices will be automatically included in the PDF. The Time Log appendix shows the Action the Time Logs relate to, the date, notes and hours of the Time Log. The Expense appendix shows the Expense ID, Category, Date, Notes and Amount Claimed. See below for examples of the two appendices.
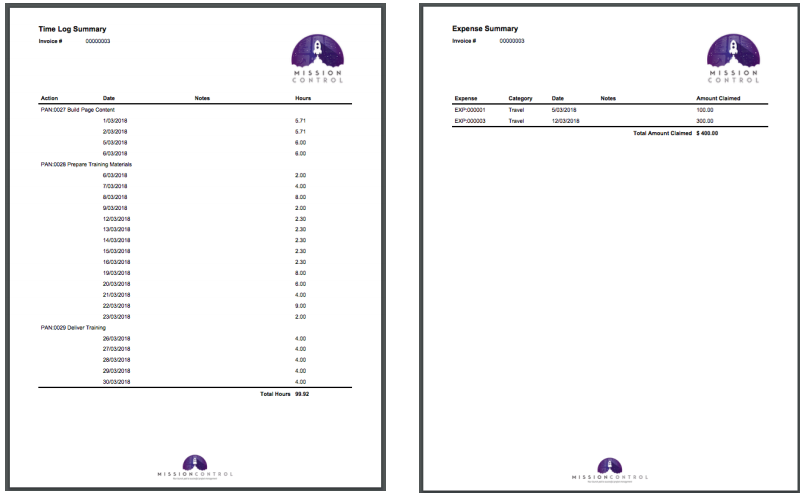
Time Log Appendix Custom Fields
You are able to control which fields are displayed in the Time Log Appendix that is visible on the Billing Event PDF.
By default, the following fields are included in the appendix:
Below is an example of the default layout.
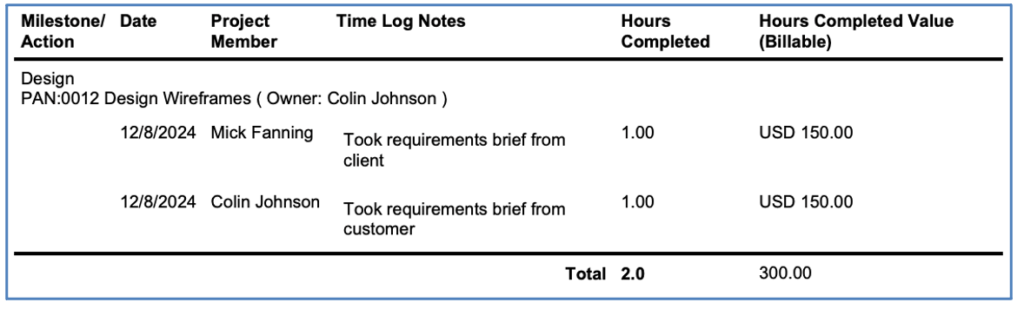
The first column (Milestone/Action) will always be displayed, however you are able to control which fields are displayed across the rest of the appendix. This is controlled by the ‘Billing Event Time Log Appendix’ Field Set on the Time Log Object.
The appendix table will show the Milestone/Action column and additional 7 columns. If more than 7 fields are added to the field set, the first 7 fields will be displayed.
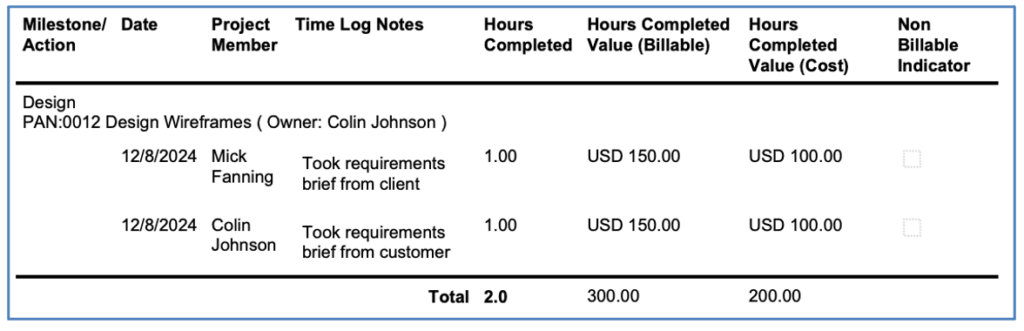
Only the ‘Hours Completed’, ‘Hours Completed Value (Billable)’ and ‘Hours Completed Value (Cost)’ fields will display a summary at the bottom.
Expense Appendix Custom Fields
You are able to control which fields are displayed in the Expense Appendix that is visible on the Billing Event PDF.
By default, the following fields are included in the appendix:
Below is an example of the default layout.

You are able to control which fields are displayed within the appendix. This is controlled by the ‘Billing Event Expense Appendix’ Field Set on the Expense Object.
The appendix table will show a maximum of 8 columns. If more than 8 fields are added to the field set, the first 8 fields will be displayed.

Only the ‘Amount Claimed’, ‘ex-Tax Amount’ and ‘Tax Amount’ fields will display a summary at the bottom.
To enable Customers to void a Billing Event, the Status field contains a ‘Void’ value. This can be used to void a Billing Event that has been raised and no longer required.
When a Billing Event is updated to have a Status value of Void, The ‘Total Amount’ field will default to 0 and the ‘Tax Amount Outstanding’ field will default to 0.
A Validation Rule will prevent the Status being set to Void if ‘Total Paid’ is greater than 0.
Billing Event records can be created for Invoices or Credits, simply be selecting the relevant option in the Billing Event ‘Type’ field. Credits can only be created via the manual process. Invoices and Credits total up separately on the related Project record.
When a credit note or invoice has been created, you generate a PDF of the event using the ‘View PDF’ button on the Billing Event record. If you have set Mission Control up for automatic invoice creation, then invoices will be created for all billing event items every 5 minutes and will be instantly displayed when you click the view PDF button.
If you are not automatically creating invoices, or a change has been made to the Billing Event and needs updating, you will be prompted to generate the PDF.

The only difference to the PDF for the Billing Event types of Invoice and Credit is the document name, which appears in the top left hand corner.
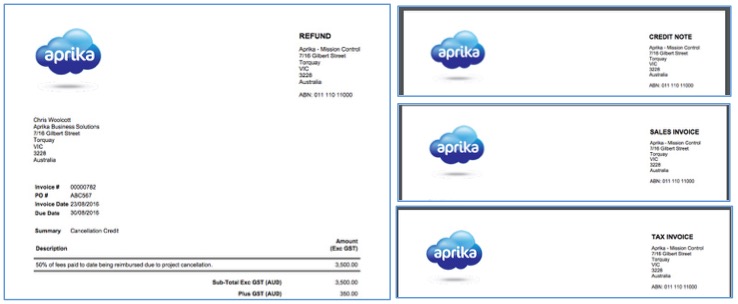
You can specify the wording for each type (Invoice or Credit) on the billing setup section of the Mission Control console page as follows.

When an Invoice or Credit Note PDF is generated, a chatter post will be created on the billing Event record notifying the record owner that the billing event has been raised and linking to the invoice/credit note document with a chatter @mention to the owner as follows:
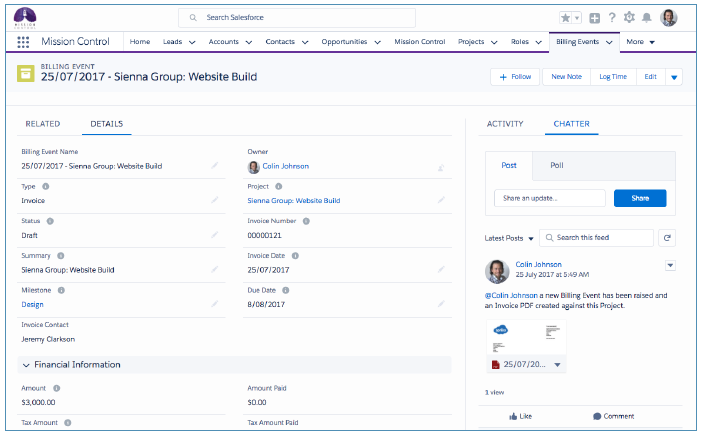
Mission Control also allows you to record details of payments made against invoices or credits for each individual Billing Event. This information is then totalled up and included on the Invoice or Credit Note as the Amount Paid.
To record a payment, go to the Billing Event record and click the ‘New Billing Payment’ button in the Billing Payments related list.

Enter the payment details such as Name, Amount & Date and then Save.
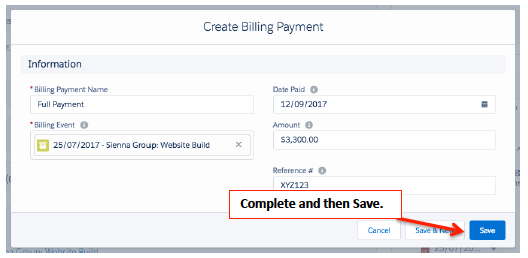
The payment amount rolls up to the Billing Event and the Total Outstanding is updated. When the Total Outstanding is equal or less than 0, the ‘Status’ will be updated to “Paid”.
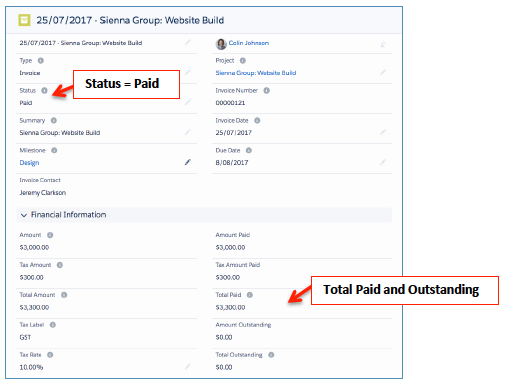
An example of a Sales Invoice that has been paid in full is as follows:
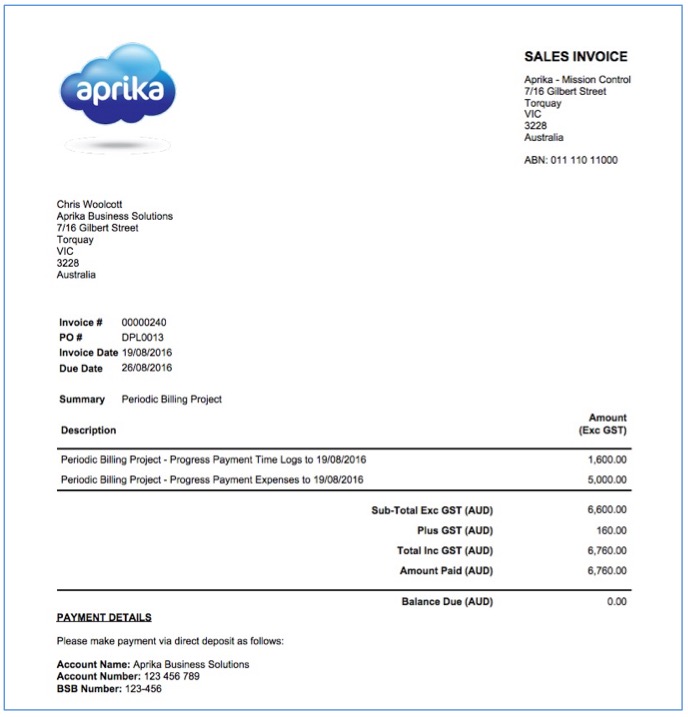
