Mission Control Version 1.58 Release Notification
12 June 2021
A new version of Mission Control (version 1.58) will be released on the AppExchange on Saturday 12th June 2021. This notification has been issued to existing Mission Control users. It contains an overview of the new features available with this release, along with instructions on how to upgrade to the new version.
This release includes a number of new features, along with some enhancements to existing functionality, including:
Let’s get stuck into the detail…
To enable customers to track changes in Billable and Cost Rates across different periods, a new Object has been added to Mission Control called ‘Rate Adjustment’. This can be used to manage a more granular level of financial tracking by creating different Rate Adjustments. For example, on a Project that spans 2-3 years, the rates may increase across the duration of the project (e.g. your 2022 billable rate increases from your 2021 rates, your staff receive pay increases that come into effect mid-way through a Project, etc.).
The Rate Adjustment feature allows you to create a set of rates (e.g. Billable and Cost Rates) for a specified time period. These Rate Adjustment records are created via the ‘Manage Rates’ page, which is accessible from either the Project or Role record. There are 5 types of Rate Adjustment scenarios, as outlined in the table below:
| Rate Adjustment Type | Accessed From | Scenario |
| Project | Project | When using the ‘Standard’ Billing Rate or Cost Rate, this would allow you to adjust the rates used on a specific Project. For example, you may have a Billing Rate of $2,000 per day during 2021 and that might increase to $2,200 in 2022 and further increase to $2,500 in 2023 |
| Role-based | Role | When using the ‘Role-based’ Billing Rate or Cost Rate, this would allow you to adjust the rates for an individual Role. For example, Mick Fanning may have a Cost Rate of $150 per hour in 2021 and that might increase to $175 in 2022 |
| Role-based Override | Project | When using the ‘Role-based’ Billing Rate or Cost Rate, this would allow you to override the rates for an individual Role on a specific Project. For example, Mick Fanning’s Role-based Cost Hourly Rate may be $150 but for one particular Project, you may need to reduce this to $125. You can also use this to account for changes in the overridden rates during different periods of time |
| Skill-based | Role | When using the ‘Skill-based’ Billing Rate or Cost Rate, this would allow you to adjust the rates for an Individual Role when using a specific Skill. For example, Mick Fanning using the Skill of HTML Coding may have a Billing Hourly Rate of $175 in 2021 and that might increase to $200 in 2022 |
| Skill-based Override | Project | When using the ‘Skill-based’ Billing Rate or Cost Rate, this would allow you to override the rates for an individual Role for a specific Skill being used on a specific Project. For example, Mick Fanning’s Skill Assignment Billable Hourly Rate for HTML Coding may be $175, but for one particular Project, you may need to adjust it to $200. You can also use this to account for changes in the overridden rates during different time periods |
The Manage Rates page comprises of 5 x Tabs, for each of the Rate Adjustment Types outlined in the Table above. Depending on where you access the Manage Rates page from will determine which Tabs you see on the page. The Table below defines which Tabs you’ll see when you view the Manage Rates page from the Project record or from the Role record.
| Project | Role |
| Project
Role-based Override Skill-based Override |
Role-based
Skill-based |
When viewing the Manage Rates page from the Project record, you will only see the Tabs that apply to the Billing Rate and Cost Rate values selected on the Project. For example, if my Project has a Billing Rate of Standard and a Cost Rate of Role-based, the Skill-based Override Tab will not be visible.
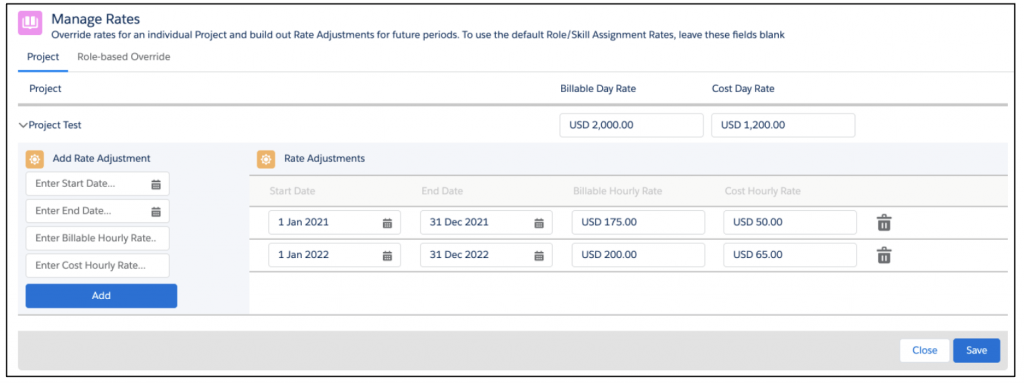
Project: Project Tab
Below is an example of the Manage Rates page being used to create Rate Adjustment record for a Project using the Project Tab.
Project: Role-based Override Tab
Below is an example of the Manage Rates page being used to create Rate Adjustment records for a Project using the Role-based Override Tab.
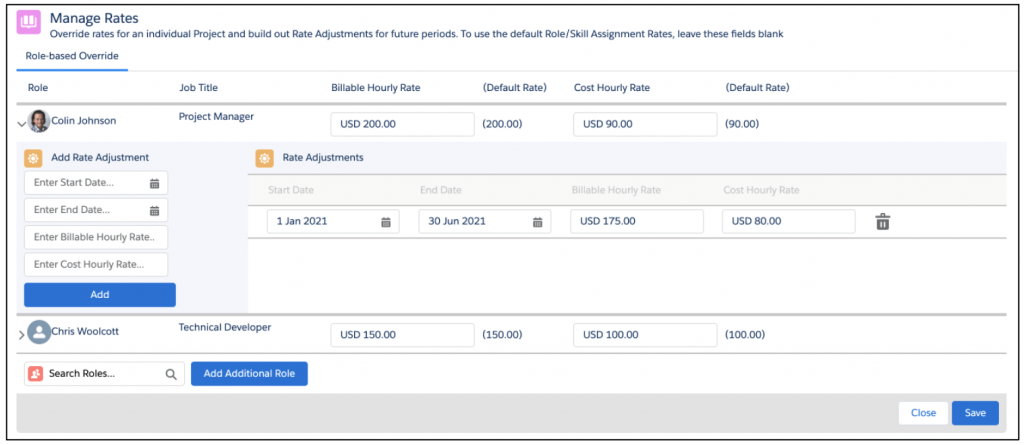
The Role-based Override Tab will automatically load any Role that is assigned to the Project as an Action Owner, Contributor and Checklist Item Owner. You will also be able to add additional Roles manually as required.
Project: Skill-based Override Tab
Below is an example of the Manage Rates page being used to create Rate Adjustment records for a Project using the Skill-based Override Tab.
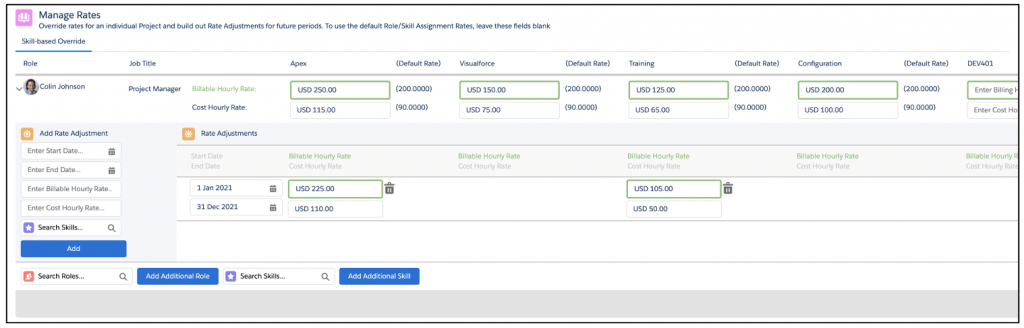
The Skill-based Override Tab will automatically load any Role that is assigned to the Project as an Action Owner, Contributor or Checklist Item Owner. You will also be able to add additional Roles manually as required.
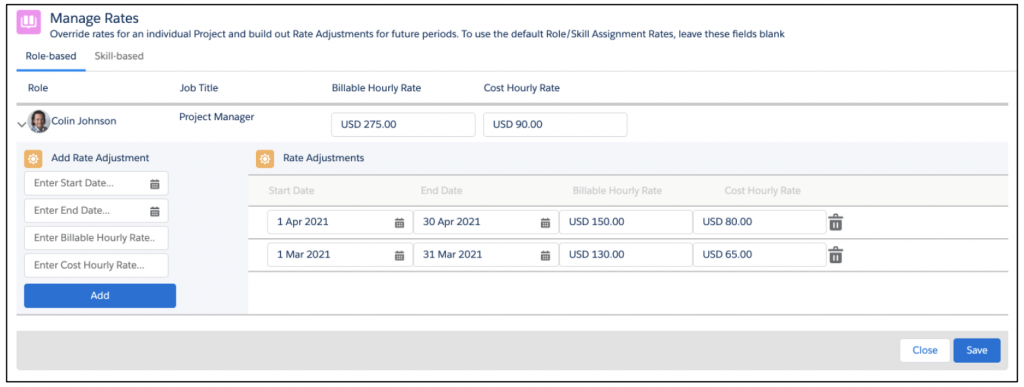
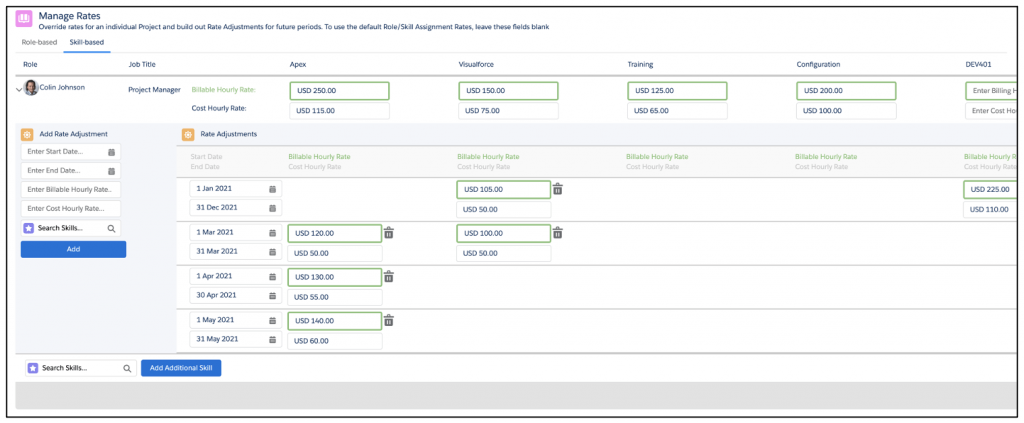
Role: Role-based Tab
Below is an example of the Manage Rates page being used to create Rate Adjustment records for an individual Role using the Role-based Tab.
Role: Skill-based Tab
Below is an example of the Manage Rates page being used to create Rate Adjustment records for an individual Role’s Skill Assignment records using the Skill-based Tab.
The Manage Rates page will prevent you from creating two Rate Adjustment records that cover an overlapping time period. For example, you will not be able to have one Rate Adjustment covering 1st March 21 to 10th April 21 and another Rate Adjustment covering 1st April to 30th April.
The Manage Rates page will support Multi Currency if you have that feature enabled within Salesforce. When creating Rate Adjustments, they will automatically assume the same Currency as the parent record they apply to (e.g. Project, Role or Skill Assignment).
This Rate Adjustment Object will replace the existing JSON files that are created when currently using the Manage Rates page. Whilst the JSON files will still be supported within the existing logic, when you load the Manage Rates page on a Project with an existing JSON file, the rates will be loaded and once you click Save, Rate Adjustment records will be created and used moving forward.
For full details of the Rate Adjustment Object, including all of the fields please refer to the New Field Overview section of this document.
Budget Items allow you to breakdown and track the Project Budget at a granular level across multiple budget line items. For example, if you have a Project that is developing a new software application you may choose to break your budget into three areas:
Whilst you have an overall ‘Project Budget’ field on the Project, the Budget Items will allow you to track the budget allocation and performance for each of these individual areas of the Project.
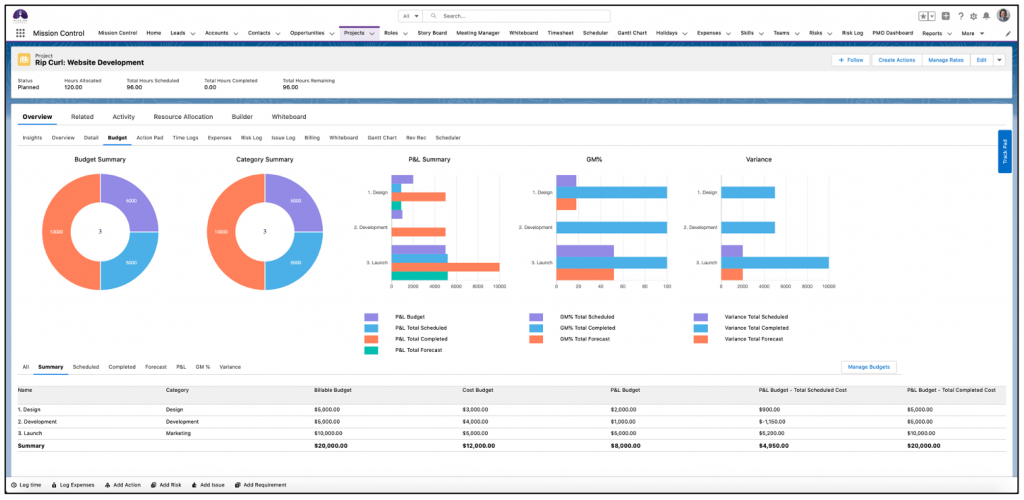
From the Project Overview page, you can access the ‘Budget’ Tab. This comprises of summary charts with a Data Table below where you can view the Budget Items. Within the Budget Tab, there are a series of Tabs that allow you to get to key information relating to your Budget Items, including:
Below is an illustration of the Budget Tab with the Summary Data Table being displayed.
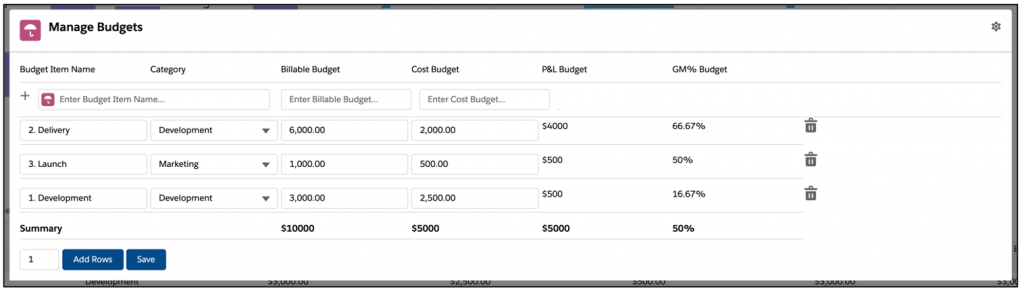
You can create new, and edit existing Budget Item records using the ‘Manage Budgets’ page. This is accessible from the Budget Tab on the Project Overview page by clicking the ‘Manage Budgets’ button.
To track the performance of your Budget Items, you will need to relate your Actions and Expenses to Budget Items. The Hours and Material Cost financials from the Action, along with Expenses will be summarized on the Budget Item record they relate to.
Note: Budget Items do not update the ‘Project Budget’ field on the Project.
For full details of the Budget Item Object, including all of the fields please refer to the New Field Overview section of this document.
To support the new Budget Items feature mentioned above, the Expense Management feature within Mission Control has been enhanced to provide customers with the ability to add a ‘Mark Up’ to their Project Expenses.
To apply a Mark Up to your Project Expenses, you can specify the ‘Expenses Mark Up %’ on the Project. For example, a Marketing Agency running a Launch Event for a customer may choose to apply a 10% mark up on Expenses incurred as part of the Project.
When logging Expenses against a Project, the User is able to specify whether or not to apply the mark up. If mark up is required, the User will need to ensure the ‘Mark Up Required’ field is set to TRUE. By default, the mark up will be calculated based on the ‘Expenses Mark Up %’ field on the Project. However, if a different percentage of mark up is required, the User can enter a value in the ‘Custom Mark Up %’ field of the individual Expense.
When logging an Expense, the User will enter values into the ‘Cost Amount’ and ‘Cost Tax Amount’ fields. The ‘Amount’ and ‘Tax Amount’ fields will automatically be calculated factoring in any mark up that may be required.
For full details of the new fields added to the Project and Expense Objects to support this enhancement, please refer to the New Field Overview section of this document.
Customer ‘Read-Only’ Page
NOTE: This Feature is not available for customers on the Professional Edition of Salesforce. This is due to requiring features within Salesforce that are only available with Enterprise Edition and upwards.
The ‘Read-Only’ page allows you to provide your customers with a unique link that can be used to access a read-only, real-time view of the Project.
The page can be configured on a per-Project basis to include any of the following Tabs:
For any of the Tabs, records will only be displayed if the ‘Exclude from Client Page’ field is FALSE. This field can be found on each of the following Objects:
The Action, Checklist Item and Time Log Objects also have an additional field called ‘Exclude from Client Page Indicator’. If the parent record has been marked to be excluded, then the child record will automatically be marked to be excluded as well. For example, if I mark an Action to be excluded, then any Time Log or Checklist Item that relates to that Action will also automatically be excluded.
Overview Tab
Below is an example of the Overview Tab. By default it shows the Project, Milestone, Action and Checklist Item records.
By default, the following fields will be visible:
However, you can also add additional fields for any of the records as explained below.
Include Project Custom Fields
You can include up to 5 x Custom Fields from the Project record on the Project Summary and Project Detail pages of the Status Report.
These fields need to be added to a Field Set on the Project Object called ‘Project: Status Report Fields’. Whilst you can add more than 5 Fields to this Field Set, only the Top 5 Fields will be displayed within the Status Report.
You can access the Field Set by going to Setup > Object Manager > Project > Field Sets > Project: Status Report Fields.
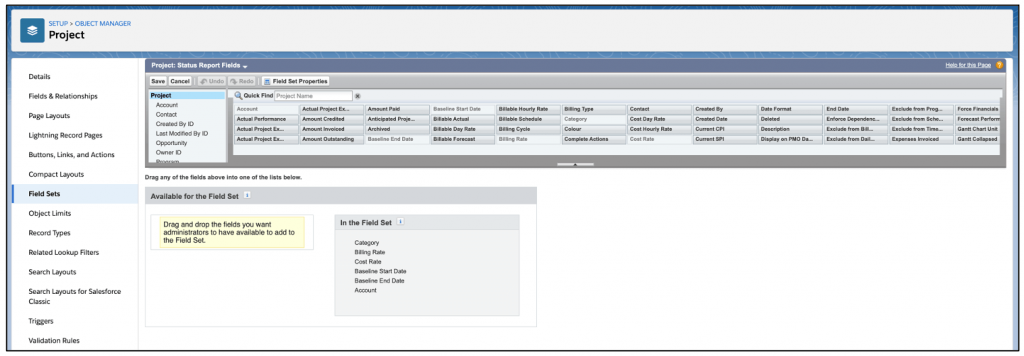
Once you have added your Fields, click Save.
Include Milestone Custom Fields
You can include up to 5 x Custom Fields from the Milestone record on the Project Detail page of the Status Report.
These fields need to be added to a Field Set on the Milestone Object called ‘Milestone: Status Report Fields’. Whilst you can add more than 5 Fields to this Field Set, only the Top 5 Fields will be displayed within the Status Report.
You can access the Field Set by going to Setup > Object Manager > Milestone > Field Sets > Project: Status Report Fields.
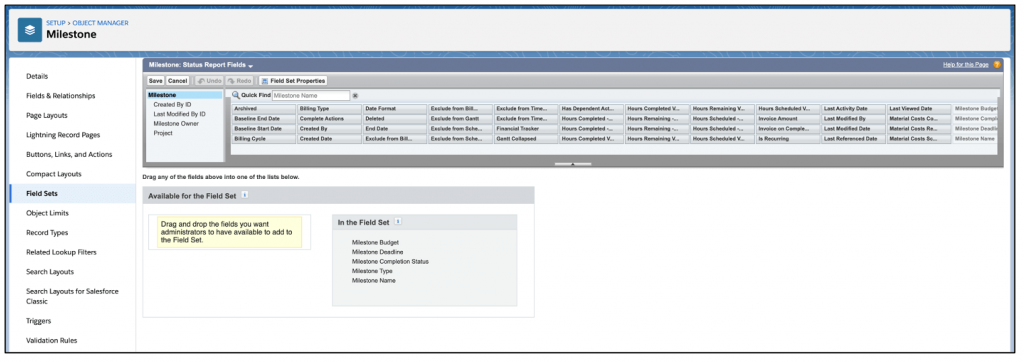
Once you have added your Fields, click Save.
Include Action Custom Fields
You can include up to 5 x Custom Fields from the Action record on the Project Detail page of the Status Report.
These fields need to be added to a Field Set on the Action Object called ‘Action: Status Report Fields’. Whilst you can add more than 5 Fields to this Field Set, only the Top 5 Fields will be displayed within the Status Report.
You can access the Field Set by going to Setup > Object Manager > Action > Field Sets > Project: Status Report Fields.
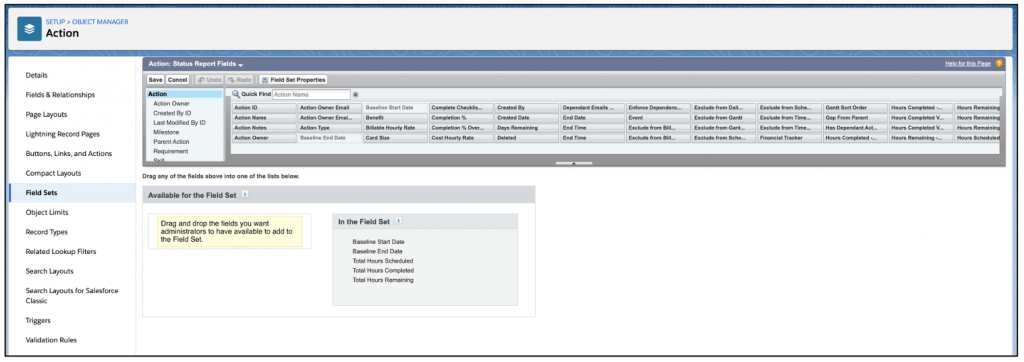
Once you have added your Fields, click Save.
Include Checklist Item Custom Fields
You can include up to 5 x Custom Fields from the Checklist Item record on the Project Detail page of the Status Report.
These fields need to be added to a Field Set on the Checklist Item Object called ‘Checklist Item: Status Report Fields’. Whilst you can add more than 5 Fields to this Field Set, only the Top 5 Fields will be displayed within the Status Report.
You can access the Field Set by going to Setup > Object Manager > Checklist Item > Field Sets > Project: Status Report Fields.
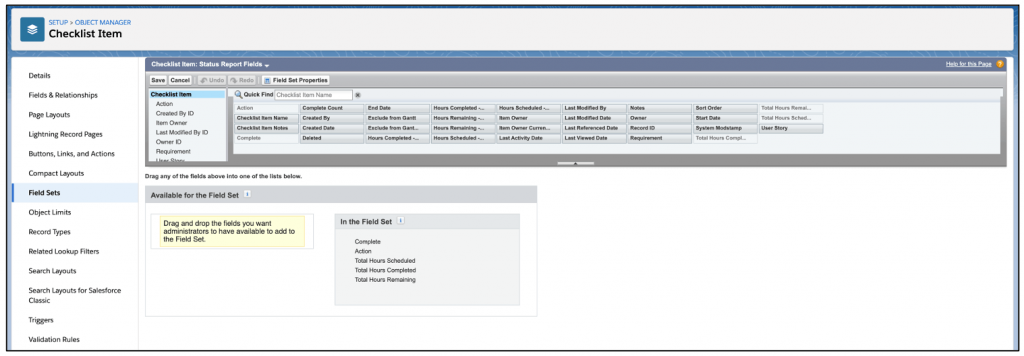
Once you have added your Fields, click Save.
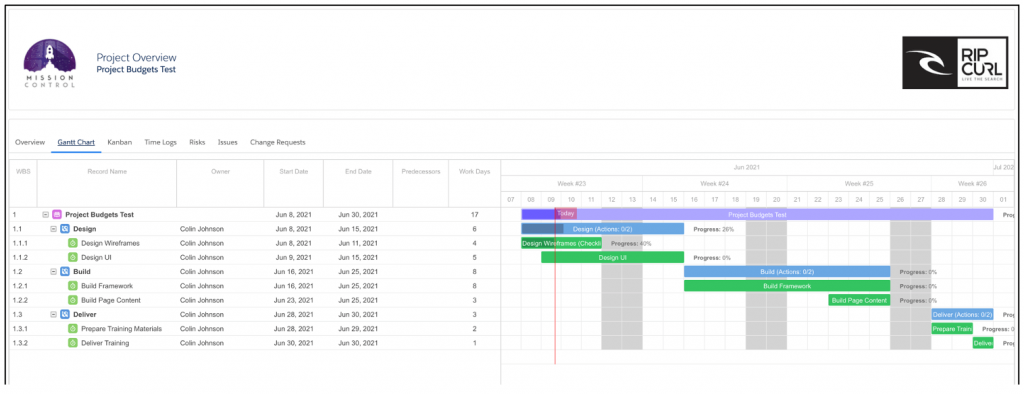
Gantt Chart Tab
Below is an example of the Gantt Chart Tab.
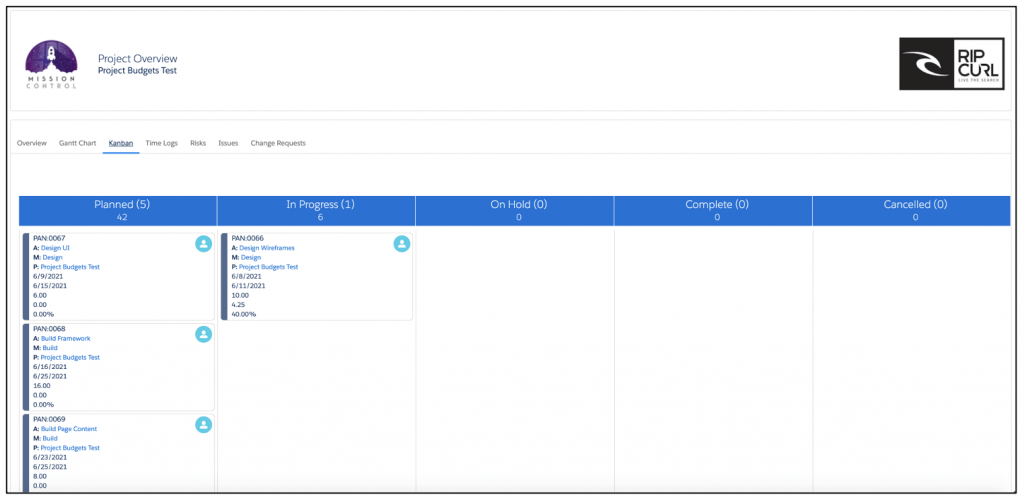
Kanban Tab
Below is an example of the Kanban Board Tab.
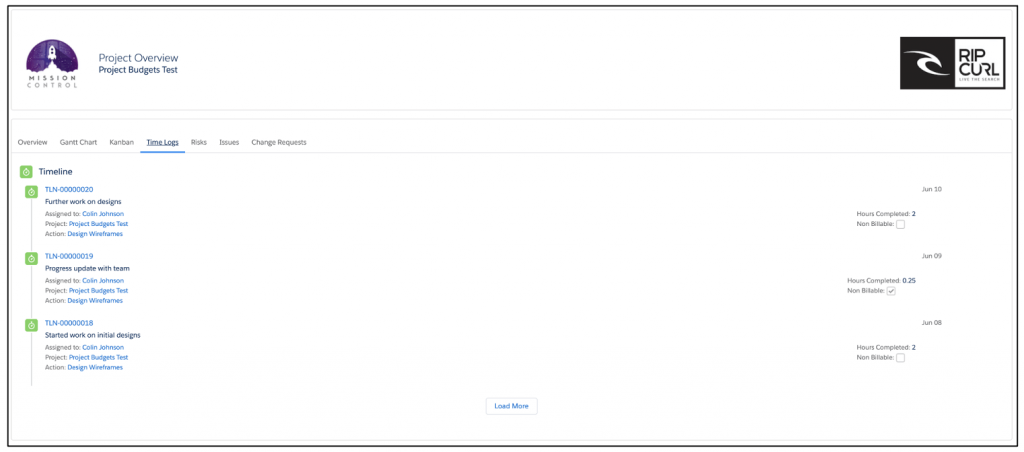
Time Logs Tab
Below is an example of the Time Logs Tab.
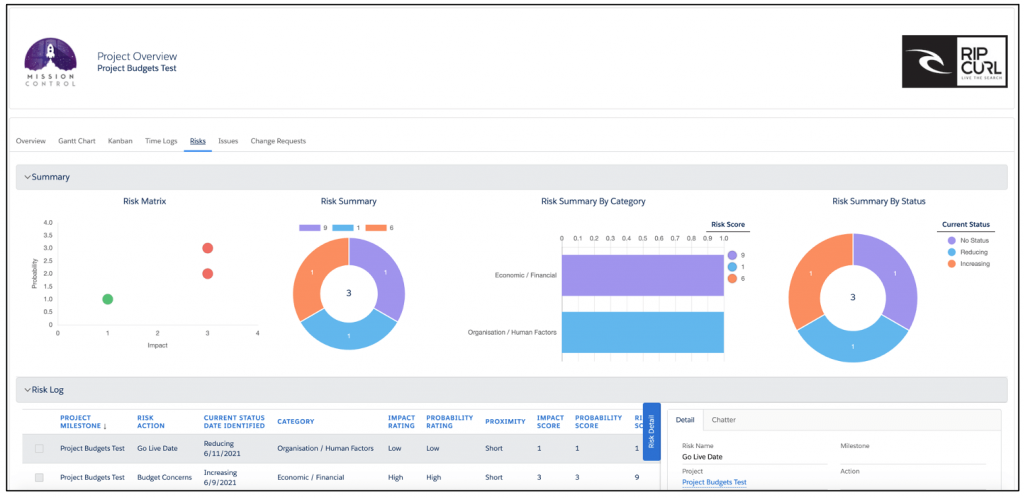
Risks Tab
Below is an example of the Risk Log Tab.
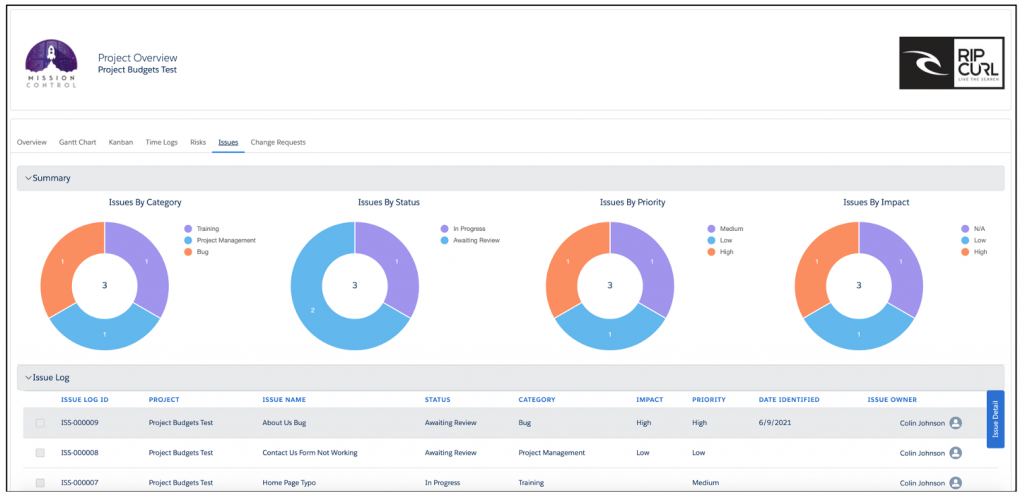
Issues Tab
Below is an example of the Issue Log Tab.
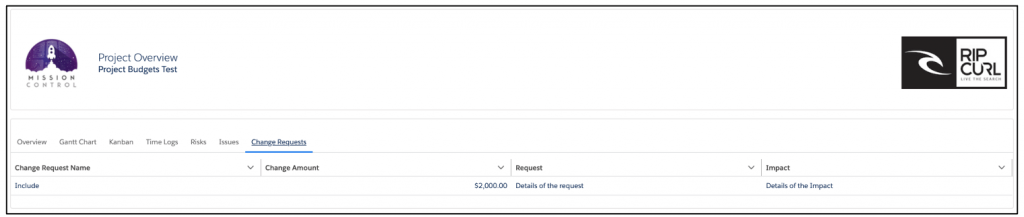
Change Requests Tab
Below is an example of the Change Requests Tab.
Each Tab can be included on the read-only page by ensuring the appropriate field from the list below is set to TRUE on the Project record.
| Field Name | Comments |
| Display Overview Tab | Set this field to TRUE if you wish to include the Overview Tab on the read-only page |
| Display Gantt Tab | Set this field to TRUE if you wish to include the Gantt Chart Tab on the read-only page |
| Display Kanban Tab | Set this field to TRUE if you wish to include the Kanban Tab on the read-only page |
| Display Time Logs Tab | Set this field to TRUE if you wish to include the Time Logs Tab on the read-only page |
| Display Risks Tab | Set this field to TRUE if you wish to include the Risks Tab on the read-only page |
| Display Issues Tab | Set this field to TRUE if you wish to include the Issues Tab on the read-only page |
| Display Change Requests Tab | Set this field to TRUE if you wish to include the Change Requests Tab on the read-only page |
Page Branding
The page can display your logo and your customers logo. By default, it will display the Mission Control logo in the top-left corner of the header section.

You are able to configure the settings to display your logo on the top-left of the header. To do this, you need to ensure the following setting within the Gantt Chart Settings section of the Control Pad on the Console is set to reference your logo.
![]()
You are able to configure the settings to display your client’s logo in the top-right of the header. To do this, you need to populate the ‘Logo’ field on the Project record. The Customer Logo will be visible if you have populated the ‘Logo URL’ field on the Project record. Note, this URL must be a ‘Document’ that you add to Salesforce Documents, ensuring the ‘Externally Available Image’ Checkbox field is set to TRUE.
![]()
Below is an example displaying both custom logos.

Site Setup
In order to use the read-only page feature, you will need to configure a Force.com Site. As part of configuring a Force.com Site, a Site Guest User will be created. This Site Guest User will require a Mission Control license.
Configuring Force.com Site
The steps to complete this configuration are outlined below.
Navigate to Setup > User Interface > Sites and Domains > Sites
Register a Force.com Domain
Note: This step only applies if you do not already have a Force.com Domain. To register a Force.com Domain, enter [Your Company Name] into the text box and click ‘Check Availability’.
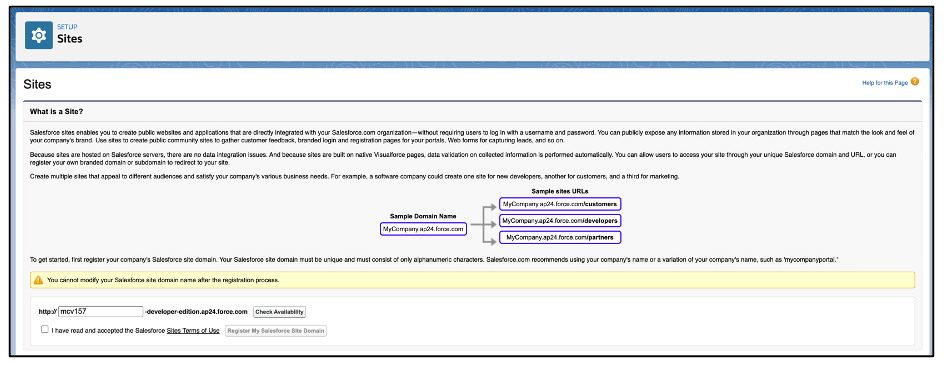
If the Force.com Domain Name is available, accept the Terms of Use checkbox and click ‘Register My Force.com Domain’. If it’s not available, choose another name for your Domain, such as an abbreviated or extended version of your business name.

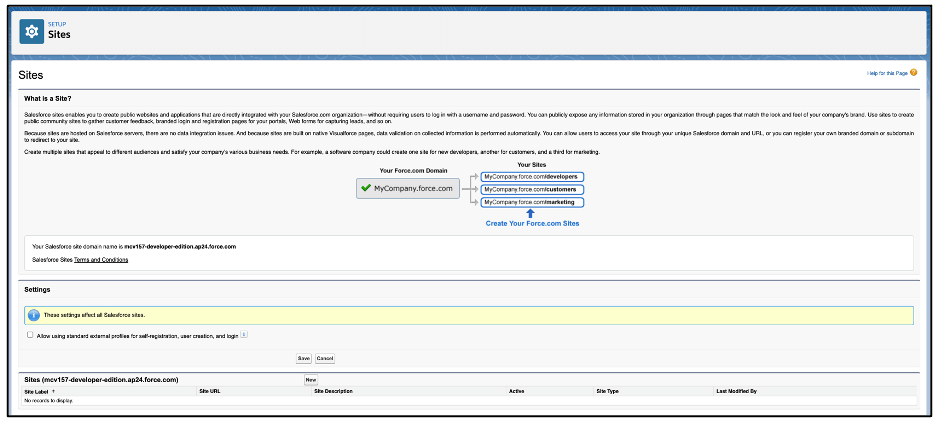
Once you have a registered Domain, you will be able to create a new Force.com Site.
Create a Force.com Site
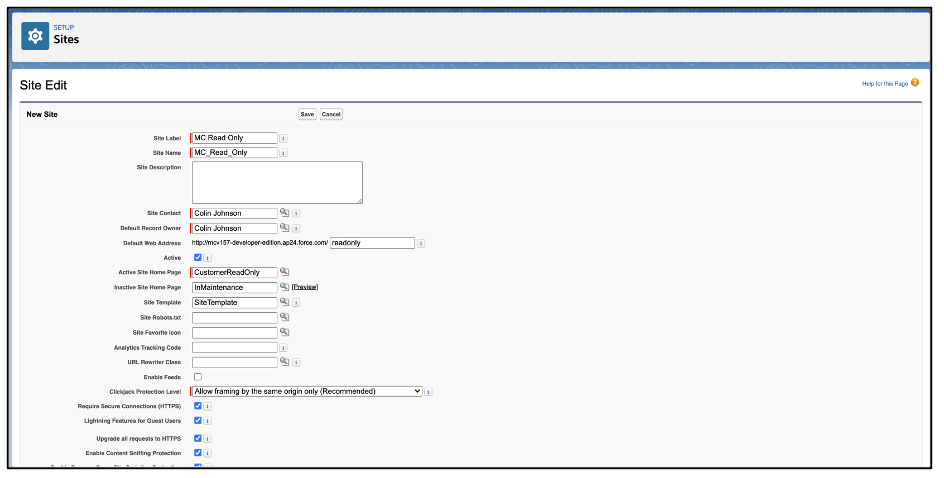
Click the ‘New’ button to create a new Site.
Configure your Site as shown below and click ‘Save’.
Granting Site Guest User Access
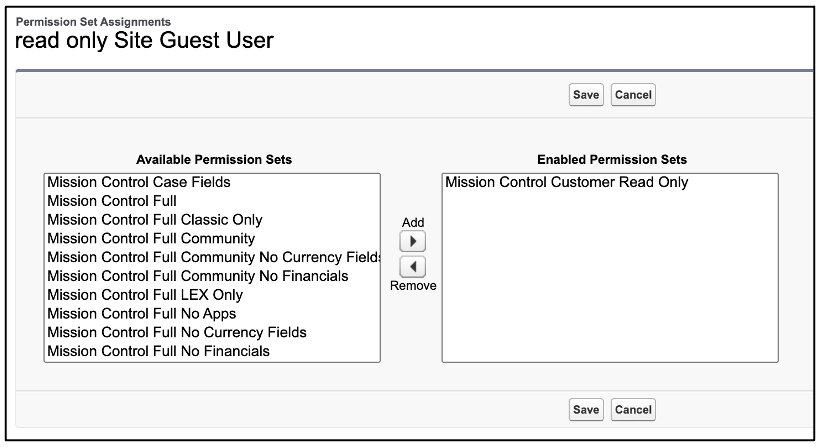
From the Site Details page click on the ‘Public Access Settings’ button. Next click on the ‘View Users’ button. Next click the ‘Full Name’ of the User displayed.
Scroll down to the Permission Set Assignments Related List and click the ‘Edit Assignments’ button. Move the ‘Mission Control Customer Read Only’ Permission Set from the Available Permission Sets column to the Enabled Permission Sets column and click ‘Save’.
Scroll down to the Managed Packages Related List and click the ‘Manage Assignments’ button. Select Mission Control from the ‘Unassigned Packages’ so it appears in the ‘Selected Packages’ and click the ‘Add’ button.
Configure Sharing Rules
By default the Organization-Wide Defaults Sharing Settings for Default External Access are Private. In order for your customers to be able to view the information on the read-only page, we recommend the following Objects have Sharing Rules configured as outlined below.
| Object | Step 1 | Step 2 | Step 3 | Step 4 | Step 5 |
| Project | Read Only Page | Guest user access, based on criteria | Archived
Equals FALSE |
Share with Read Only Site Guest User | Read Only |
| Checklist Item | Read Only Page | Guest user access, based on criteria | Exclude from Client Page
Equals FALSE |
Share with Read Only Site Guest User | Read Only |
| Change Request | Read Only Page | Guest user access, based on criteria | Exclude from Client Page
Equals FALSE |
Share with Read Only Site Guest User | Read Only |
| Issue | Read Only Page | Guest user access, based on criteria | Exclude from Client Page
Equals FALSE |
Share with Read Only Site Guest User | Read Only |
| Dependency | Read Only Page | Guest user access, based on criteria | Created By ID
Not Equal to . |
Share with Read Only Site Guest User | Read Only |
Control Pad Setting
Once you have completed all of the above configuration steps, you will need to go to the Control Pad on the Mission Control Console. Within the ‘Customer Read Only Page’ Tile, select the URL of the Force.com Site you have configured and click ‘Save’. This URL will be referenced in the Unique URL for each Project.

Unique URL
For each Project, a unique Id will be generated and stored within the ‘External Project Id’ field. This unique Id, along with the Force.com Site URL will form the Unique URL for the Project that will be stored in the ‘Client Overview Page URL’ field.

To provide your customer with access to the read-only page for a Project, you will need to supply them with the URL contained within the ‘Client Overview Page URL’ field.
For an existing Project that does not have an External Project Id, simply click Edit, then click Save and the field will be populated. Likewise, if you need to refresh the field value, simply Edit, remove the field value, click Save and a new value will be populated.
A number of new fields have been added to various Objects to support this feature. For full details of the new fields added to the Project, Milestone, Action, Time Log, Checklist Item, Risk, Issue and Change Request Objects to support this enhancement, please refer to the New Field Overview section of this document.
A number of enhancements have been applied to the Project Status Report including:
Further information on each of these features is included below.
Report Design
The Project Status Report design has had a major overhaul. It now comprises of the following sections:
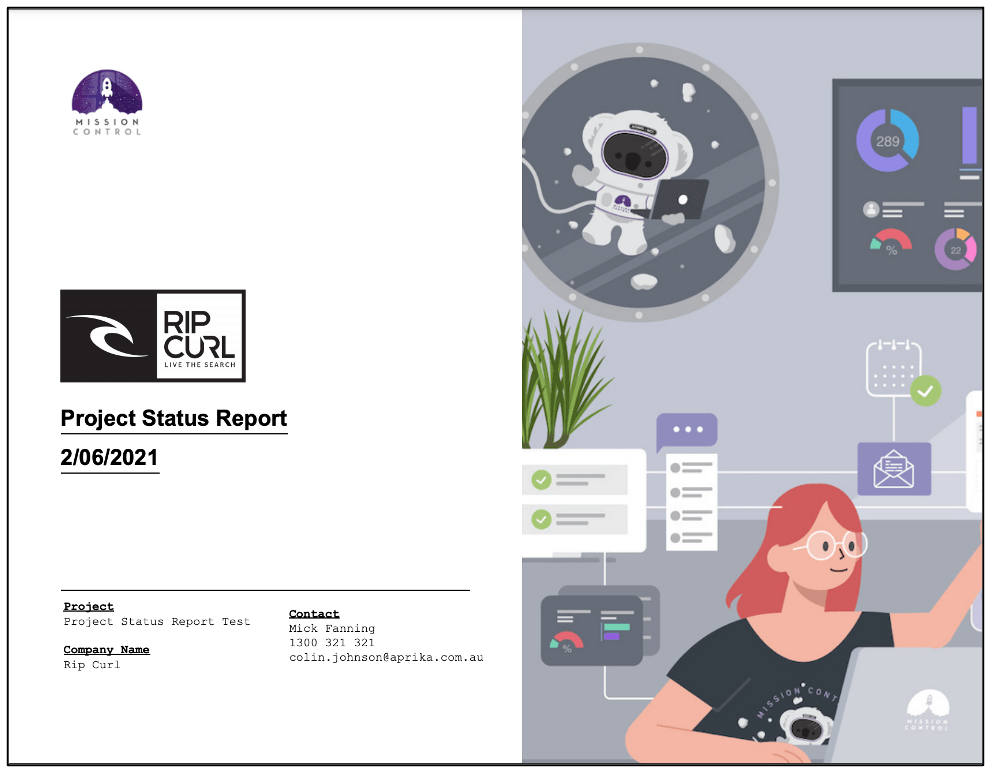
Cover Page
The Cover Page includes key details such as the Project Name, along with the Account & Contact information for the customer. You can also include the customer’s logo and a ‘Hero’ image.
Below is an illustration of the Cover Page.
The elements that can be branded within the report include:
Your Logo will be visible in the top left of the page if you have specified a logo within the Gantt Chart Settings section of the Control Pad on the Mission Control Console.
The Customer Logo will be visible if you have populated the ‘Logo URL’ field on the Project record. Note, this URL must be a ‘Document’ that you add to Salesforce Documents, ensuring the ‘Externally Available Image’ Checkbox field is set to TRUE.
![]()
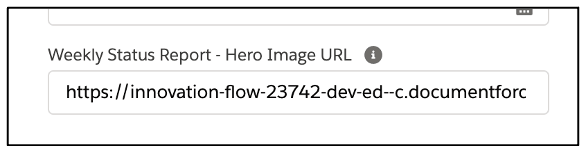
By default, the Hero Image will be the generic Mission Control image as illustrated in the example above. However, you are able to personalize the Hero Image with your own branding, or customize it appropriately for the individual project/customer. To override the generic Hero Image, you can populate the ‘Weekly Status Report – Hero Image URL’ field on the Project record. Note, this URL must be a ‘Document’ that you add to Salesforce Documents, ensuring the ‘Externally Available Image’ Checkbox field is set to TRUE.
Below is an example of the Cover Page with the Hero Image overridden with a custom image.
Project Summary
The Project Summary page provides a quick overview of the progress that has been made to date on the Project.
The following sections of this page will only be visible if the applicable Appendix has been selected to be included in the report:
Below is an example of the Project Summary page.
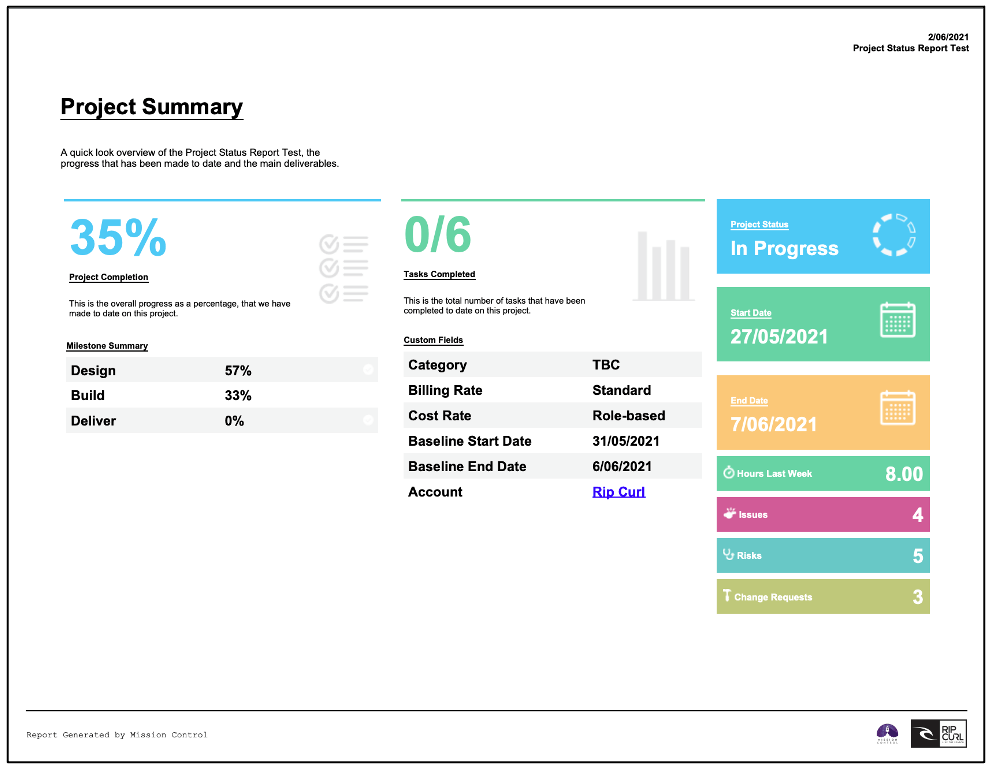
You can include up to 5 x Additional Fields from the Project Object on the Project Summary page. Please refer to the ‘Include Project Custom Fields’ section below for instructions on how to do this.
Project Detail
The Project Detail page(s) will provide a full breakdown of the project, including the following records:
By default, the following information will be displayed on the report:
Below is an example of the Project Detail page.
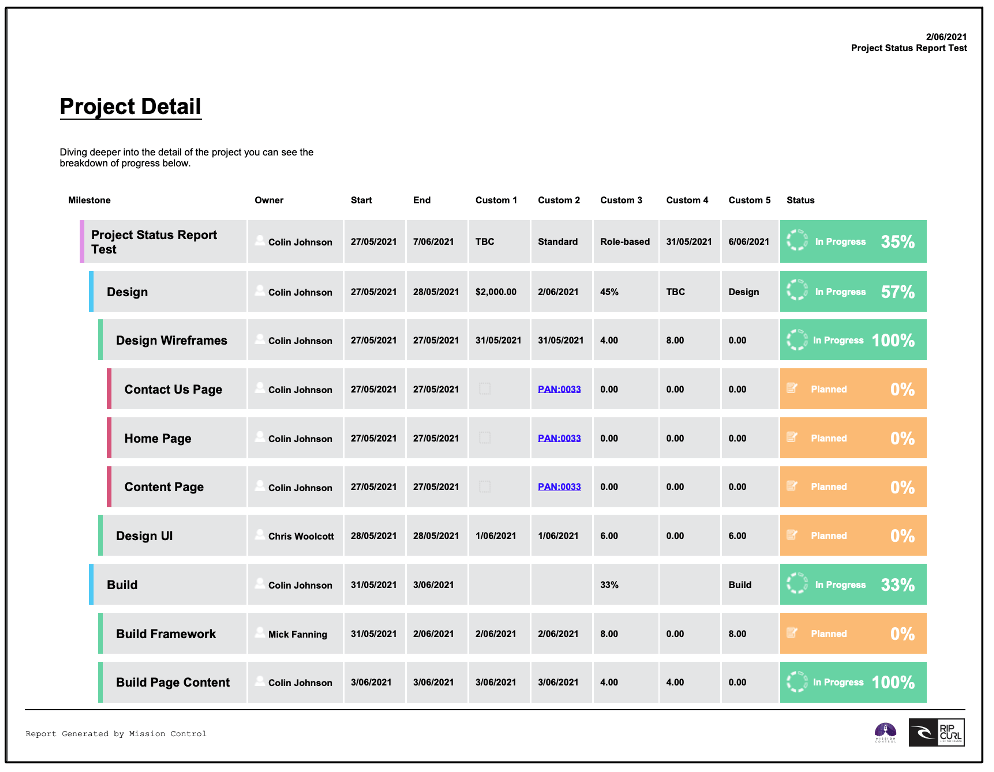
You can include up to 5 x Additional Fields from the Project, Milestone, Action and Checklist Item Objects on the Project Detail page. Please refer to the appropriate section below for instructions on how to do this.
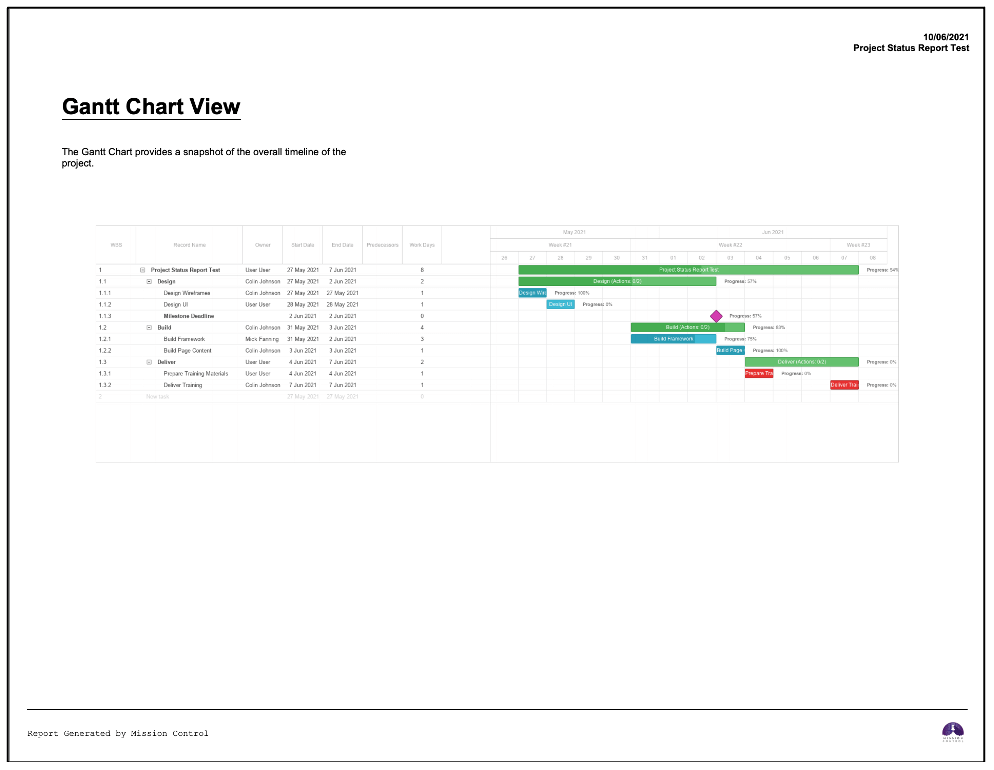
Gantt Chart
You can choose to include a copy of the Gantt Chart within the report. This can be done by setting the ‘Weekly Status Report – Include Gantt Chart’ field to TRUE. To include the Gantt Chart, you must ensure you go to the Gantt Chart Tab of the Project Overview page and click the ‘PNG Export’ button prior to the Project Status Report being generated. This will store an up to date PNG file of the Gantt Chart so it can be included in the Report.
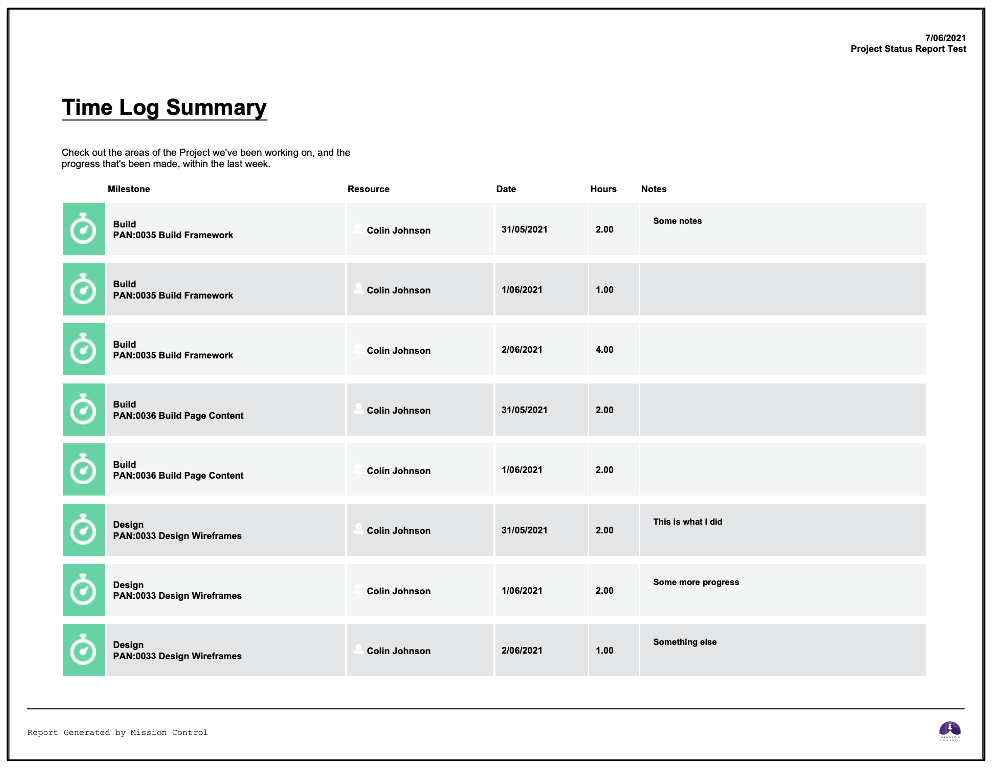
Time Log Appendix
The Time Log Appendix can be optionally included in the Status Report by setting the ‘Weekly Status Report – Include Time Logs’ field to TRUE on the Project record. This Appendix includes Time Logs with a Date of Last Week.
Below is an example of the Time Log Appendix.
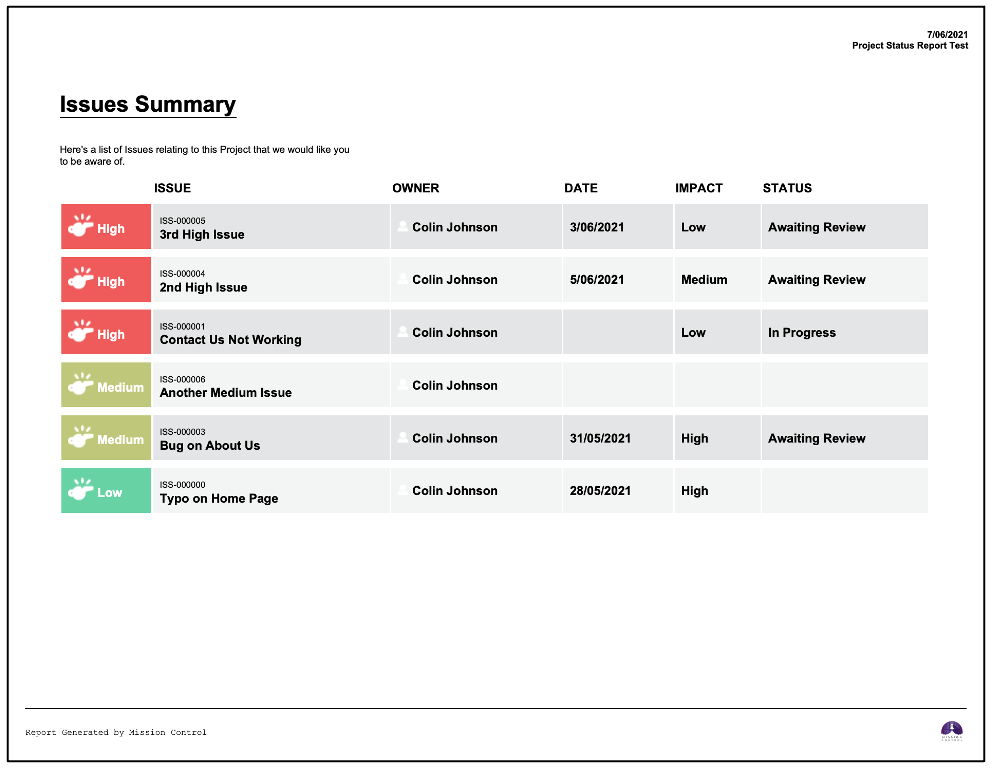
Issue Log Appendix
The Issue Log Appendix can be optionally included in the Status Report by setting the ‘Weekly Status Report – Include Issues’ field to TRUE on the Project record. This Appendix includes Issues where the ‘Include in Weekly Status Report’ field on the Issue record is TRUE.
Below is an example of the Issue Log Appendix.
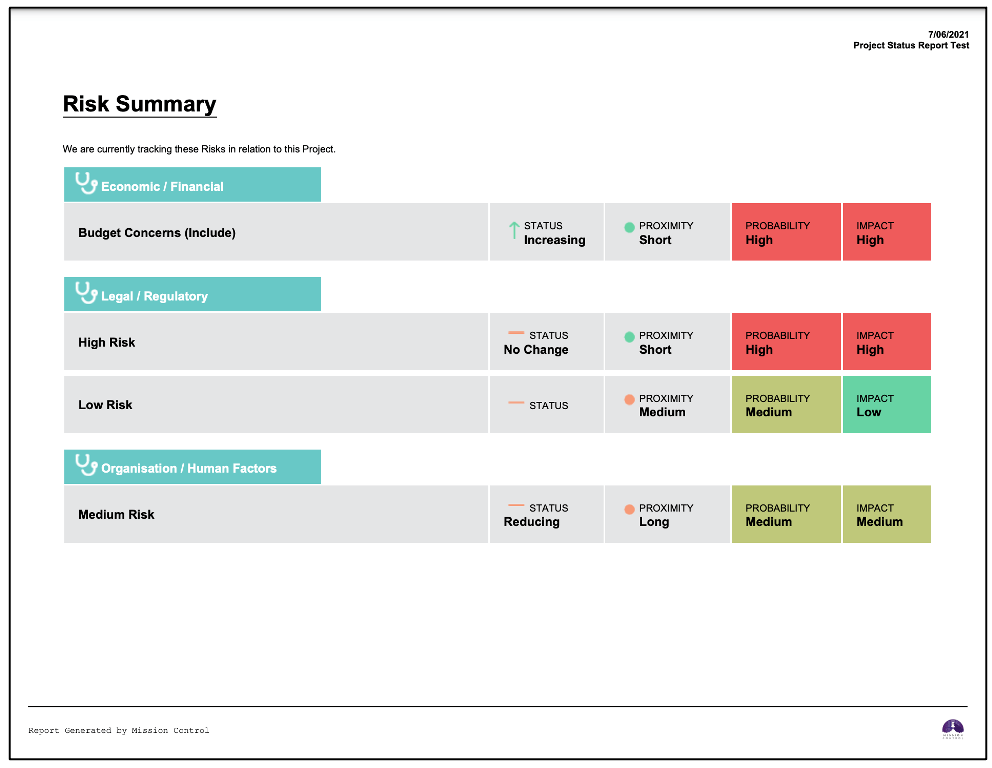
Risk Log Appendix
The Risk Log Appendix can be optionally included in the Status Report by setting the ‘Weekly Status Report – Include Risks’ field to TRUE on the Project record. This Appendix includes Risks where the ‘Include in Weekly Status Report’ field on the Risk record is TRUE.
Below is an example of the Risk Log Appendix.
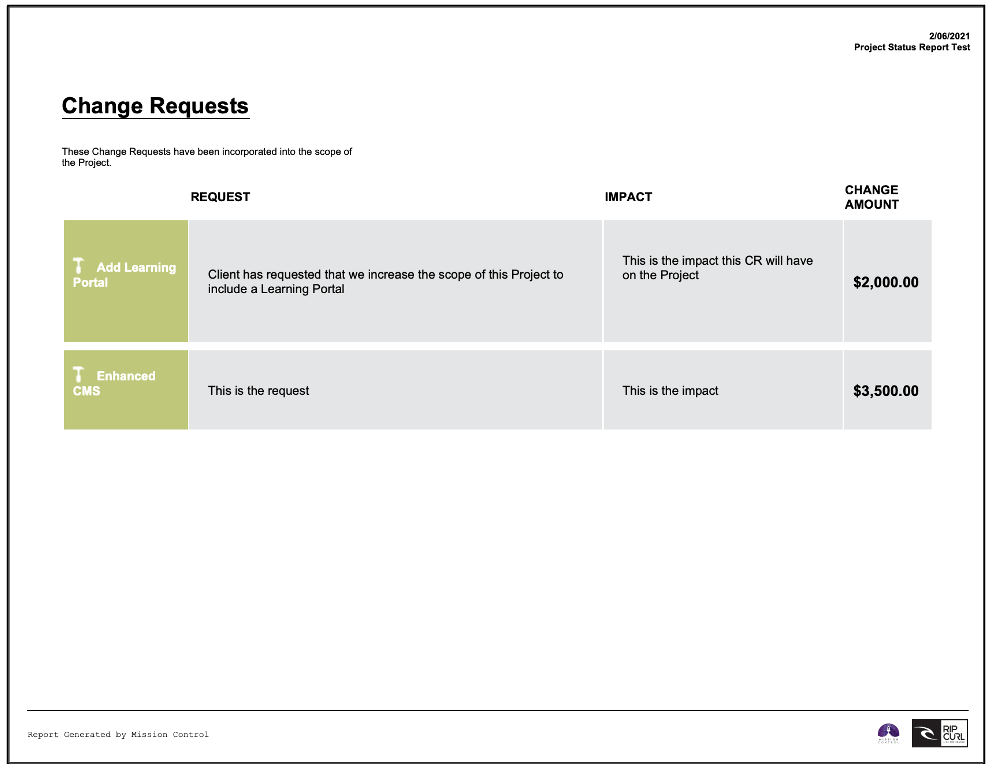
Change Request Appendix
The Change Request Appendix can be optionally included in the Status Report by setting the ‘Weekly Status Report – Include CRs’ field to TRUE on the Project record. This Appendix includes Change Requests where the ‘Include in Weekly Status Report’ field on the Change Request record is TRUE.
Below is an example of the Change Request Appendix.
Back Page
The Back Page provides your Company Name, Phone Number and the email address of the Project Owner.
Below is an example of the Back Page.

Include Project Custom Fields
You can include up to 5 x Custom Fields from the Project record on the Project Summary and Project Detail pages of the Status Report.
These fields need to be added to a Field Set on the Project Object called ‘Project: Status Report Fields’. Whilst you can add more than 5 Fields to this Field Set, only the Top 5 Fields will be displayed within the Status Report.
You can access the Field Set by going to Setup > Object Manager > Project > Field Sets > Project: Status Report Fields.
Once you have added your Fields, click Save.
Include Milestone Custom Fields
You can include up to 5 x Custom Fields from the Milestone record on the Project Detail page of the Status Report.
These fields need to be added to a Field Set on the Milestone Object called ‘Milestone: Status Report Fields’. Whilst you can add more than 5 Fields to this Field Set, only the Top 5 Fields will be displayed within the Status Report.
You can access the Field Set by going to Setup > Object Manager > Milestone > Field Sets > Project: Status Report Fields.
Once you have added your Fields, click Save.
Include Action Custom Fields
You can include up to 5 x Custom Fields from the Action record on the Project Detail page of the Status Report.
These fields need to be added to a Field Set on the Action Object called ‘Action: Status Report Fields’. Whilst you can add more than 5 Fields to this Field Set, only the Top 5 Fields will be displayed within the Status Report.
You can access the Field Set by going to Setup > Object Manager > Action > Field Sets > Project: Status Report Fields.
Once you have added your Fields, click Save.
Include Checklist Item Custom Fields
You can include up to 5 x Custom Fields from the Checklist Item record on the Project Detail page of the Status Report.
These fields need to be added to a Field Set on the Checklist Item Object called ‘Checklist Item: Status Report Fields’. Whilst you can add more than 5 Fields to this Field Set, only the Top 5 Fields will be displayed within the Status Report.
You can access the Field Set by going to Setup > Object Manager > Checklist Item > Field Sets > Project: Status Report Fields.
Once you have added your Fields, click Save.
Apply Date Range Filters
You can choose to apply a Date Range filter to the ‘Project Detail’ section of the Status Report. This is controlled by the following fields on the Project record:
These dates need to be manually entered and will only apply to the information displayed in the Project Detail page.
A number of enhancements have been made to the distribution of the Daily Digest to provide you with greater flexibility of when and if the Daily Digest is distributed.
Timezone Delivery
You specify the time of day that you would like the Daily Digest to be sent out from the ‘Daily Digest’ Tile on the Control Pad of the Mission Control Console. The Daily Digest was previously sent out at the time specified based on the Timezone of the User that activated the Daily Digest Schedule.
This logic has now been changed so the Daily Digest will now be distributed at the specified time, but it will be based on the Timezone of the individual digest recipients.
For example, we have two employees called Mick and Kelly. Mick is based in Melbourne, Australia and Kelly is based in San Francisco, USA. We have scheduled our Daily Digest to be distributed at 5am. Mick will receive his email at 5am AEST and Kelly will receive his email at 5am PST.
ACTION REQUIRED: To take advantage of this Timezone based distribution feature, existing customers will need to go to the Control Pad of the Mission Control Console. Within the Daily Digest Tile, set the ‘Active’ field to FALSE, click Save. Then you will need to reset it to TRUE and click Save again.
Specify Days
To accommodate Users that do not work every day, a number of new fields have been added to the Role Object. These fields allow you to specify at an individual Role level, which days of the week they will receive the Daily Digest. The new fields are as follows:
To ensure each Role receives the Daily Digest on the days they wish to receive it, each field must be set to TRUE on their Role record.
For full details of the new fields please refer to the New Field Overview section of this document.
Do Not Send on Holidays
The Daily Digest will not be distributed to any Role that is on Holiday that day, based on any of the following Holiday types:
Meeting Manager Enhancements
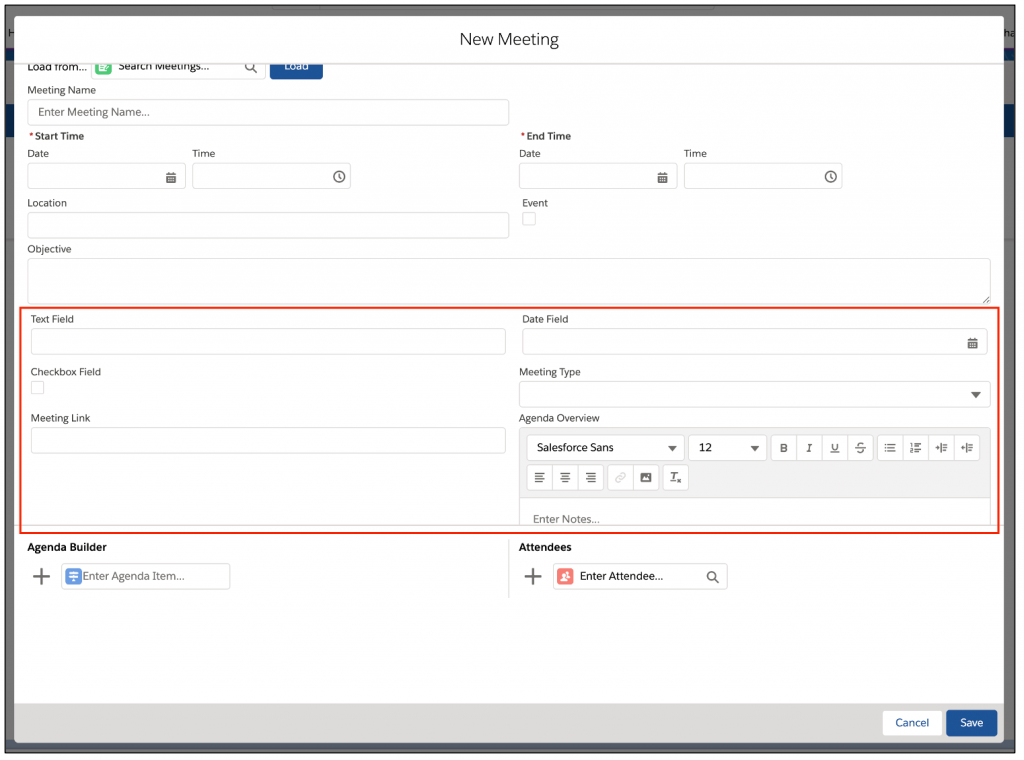
To enable customers to be able to view Custom Fields they may have added to the ‘Meeting’ Object, the Meeting Builder Component will now display Custom Fields that have been included in the ‘Meeting Builder Additional Fields’ Field Set.
You can access the Field Set by going to Setup > Object Manager > Meeting> Field Sets > Meeting Builder Additional Fields.
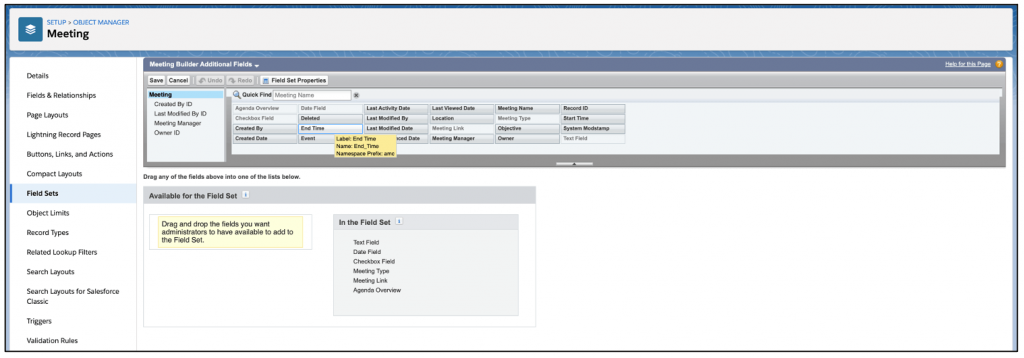
The fields added to this Field Set will be displayed on the Meeting Builder in the section highlighted below.
Scheduler Enhancements
Some minor enhancements have been made to the Scheduler, which are detailed below.
Colour Setting
A new Setting has been added to the Scheduler Settings, which will enable you to specify whether the colour of the Actions on the Scheduler is driven by the Project ‘Colour’ field, or alternatively the colours specified in the ‘Gantt Chart Status Value Settings’.
This Setting can be adjusted on a per User basis by clicking into the Scheduler Settings Modal and changing the ‘Colour Reference’ Setting.
By default, it will use the ‘Project Colour Field’.
Second Custom Field Filter
Customers requested the ability to have a second Custom Field Filter option on the Scheduler Filters.
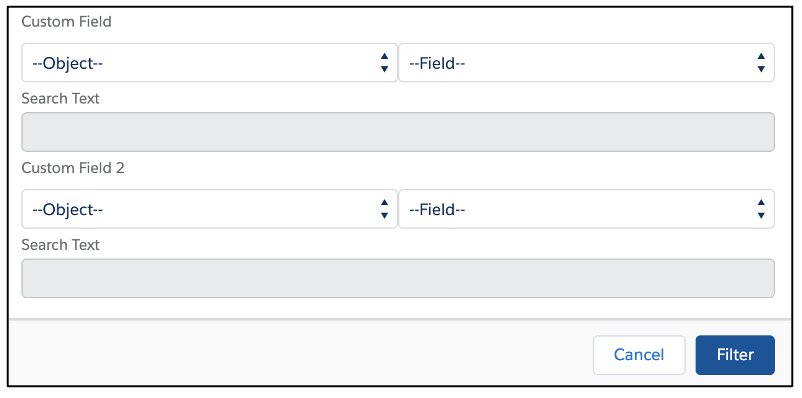
As shown in the above example, you can now apply filters from two different Custom Fields.
Project Overview Component
You are now able to specify the Height of the Project Overview component when adding it to a Lightning Page, as shown below.
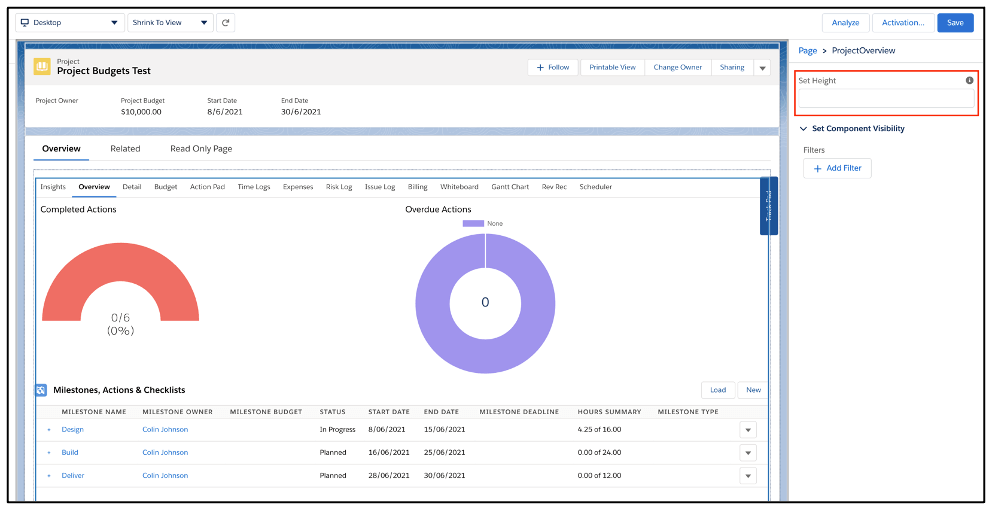
This parameter can be left blank if required.
Project Colour Hex Field
The ‘Colour’ Field on the Project Object allows you to specify a colour that will be used when viewing Actions related to the Project on pages such as the Kanban Whiteboard, Project Builder, Scheduler, Daily Digest and Story Board. This Colour field provides 11 options to choose from.
To provide you with more flexibility beyond these existing options, a new Custom Field has been added to the Project Object called ‘Colour Hex’. This Field can be used to enter a Hex Reference for a colour you would like to use for a particular Project.
If this ‘Colour Hex’ field is populated, then it will take precedence over the ‘Colour’ field.
A number of new fields have been added to the solution as part of this release. We recommend you add these fields to your Page Layouts. If you are not using the Permission Sets included with Mission Control, we recommend you check the Field Level Security for all of these fields to ensure all appropriate Profiles have the required access.
Rate Adjustment
| Field | Field Type | Comments |
| Rate Adjustment ID | Auto Number | Identifies the unique reference for the Rate Adjustment |
| Project | Lookup (Project) | Identifies the Project this Rate Adjustment relates to |
| Role | Lookup (Role) | Identifies the Role this Rate Adjustment relates to |
| Skill | Lookup (Skill) | Identifies the Skill this Rate Adjustment relates to |
| Rate Type | Picklist | Identifies the type of Billing Rate & Cost Rate method this Rate Adjustment will be applied to |
| Billable Hourly Rate | Currency (14, 4) | Identifies the Billable Hourly Rate used for this Rate Adjustment |
| Cost Hourly Rate | Currency (14, 4) | Identifies the Cost Hourly Rate used for this Rate Adjustment |
| Start Date | Date | Identifies the Start Date the Rate Adjustment applies from |
| End Date | Date | Identifies the End Date the Rate Adjustment will no longer apply from |
Project
| Field | Field Type | Comments |
| Colour Hex | Text (6) | Enter the 6 digit Hexadecimal reference that should be applied to this Project. This will take precedence over the ‘Colour’ field |
| Expenses Mark Up % | Percent (14, 4) | Identifies the markup % applied to Expenses on this Project |
| Display Overview Tab | Checkbox | Identifies if this Tab should be available on the Client Overview Page |
| Display Gantt Tab | Checkbox | Identifies if this Tab should be available on the Client Overview Page |
| Display Kanban Tab | Checkbox | Identifies if this Tab should be available on the Client Overview Page |
| Display Time Logs Tab | Checkbox | Identifies if this Tab should be available on the Client Overview Page |
| Display Risks Tab | Checkbox | Identifies if this Tab should be available on the Client Overview Page |
| Display Issues Tab | Checkbox | Identifies if this Tab should be available on the Client Overview Page |
| Display Change Requests Tab | Checkbox | Identifies if this Tab should be available on the Client Overview Page |
| External Project Id | Text (255) | Identifies the unique code for the Project that is used by the Client Overview Page URL field |
| Client Overview Page URL | Formula (Text) | Formula Field: Identifies the URL to provide customer read-only access |
| Weekly Status Report – Start Date | Date | Identifies the Start Date that will be applied as a filter for the weekly status report. Only Actions with a Start Date or End Date greater than this date will be included |
| Weekly Status Report – End Date | Date | Identifies the End Date that will be applied as a filter for the weekly status report. Only Actions with a Start Date or End Date less than this date will be included |
| Weekly Status Report – Hero Image URL | URL | Identifies the URL that will be used for the Hero Image on the Status Report Title Page |
| Weekly Status Report – Include Gantt | Checkbox | Include the Gantt Chart in the Weekly Status Report? |
| Weekly Status Report – Include Change Requests | Checkbox | Include the Change Request records in the Weekly Status Report? |
Role
| Field | Field Type | Comments |
| Daily Digest – Monday | Checkbox | Identifies if the Role wishes to receive the Daily Digest on a Monday |
| Daily Digest – Tuesday | Checkbox | Identifies if the Role wishes to receive the Daily Digest on a Tuesday |
| Daily Digest – Wednesday | Checkbox | Identifies if the Role wishes to receive the Daily Digest on a Wednesday |
| Daily Digest – Thursday | Checkbox | Identifies if the Role wishes to receive the Daily Digest on a Thursday |
| Daily Digest – Friday | Checkbox | Identifies if the Role wishes to receive the Daily Digest on a Friday |
| Daily Digest – Saturday | Checkbox | Identifies if the Role wishes to receive the Daily Digest on a Saturday |
| Daily Digest – Sunday | Checkbox | Identifies if the Role wishes to receive the Daily Digest on a Sunday |
| View Budget Tab | Checkbox | Identifies whether the User linked to this Role has the ability to view the Project Overview Budget Tab |
| Project Overview Default Tab | Picklist | You will need to add the following value:
Budget |
Budget Item
| Field | Field Type | Comments |
| Name | Text (80) | Identifies the name of the Budget Item record |
| Project | Master-Detail (Project) | Identifies the Project this Budget Item relates to |
| Category | Picklist | Identifies the Category this Budget Item relates to
Values: Development; Marketing; Sales; Design; Support |
| Billable Budget | Currency (16, 2) | Identifies the Billable Budget for this Budget Item |
| Cost Budget | Currency (16, 2) | Identifies the Cost Budget for this Budget Item |
| Hours Scheduled (Billable) | Currency (16, 2) | Sum value of Hours Scheduled (Billable) field from Actions associated to this Budget Item |
| Hours Scheduled (Cost) | Currency (16, 2) | Sum value of Hours Scheduled (Cost) field from Actions associated to this Budget Item |
| Scheduled Expenses (Billable) | Currency (16, 2) | Sum value of Amount field from all Expenses associated to this Budget Item |
| Scheduled Expenses (Cost) | Currency (16, 2) | Sum value of Cost Amount field from all Expenses associated to this Budget Item |
| Material Costs (Scheduled) Billable | Currency (16, 2) | Sum value of Material Costs Scheduled (Billable) field from Actions associated to this Budget Item |
| Material Costs Scheduled (Cost) | Currency (16, 2) | Sum value of Material Costs Scheduled (Cost) field from Actions associated to this Budget Item |
| Hours Completed (Billable) | Currency (16, 2) | Sum value of Hours Completed (Billable) field from Actions associated to this Budget Item |
| Hours Completed (Cost) | Currency (16, 2) | Sum value of Hours Completed (Cost) field from Actions associated to this Budget Item |
| Completed Expenses (Billable) | Currency (16, 2) | Sum value of Amount field from all Expenses associated to this Budget Item where Approval Status = Approved |
| Completed Expenses (Cost) | Currency (16, 2) | Sum value of Cost Amount field from all Expenses associated to this Budget Item where Approval Status = Approved |
| Material Costs Completed (Billable) | Currency (16, 2) | Sum value of Material Costs Completed (Billable) field from Actions associated to this Budget Item |
| Material Costs Completed (Cost) | Currency (16, 2) | Sum value of Material Costs Completed (Cost) field from Actions associated to this Budget Item |
| Hours Remaining (Billable) | Currency (16, 2) | Sum value of Hours Remaining (Billable) field from Actions associated to this Budget Item |
| Hours Remaining (Cost) | Currency (16, 2) | Sum value of Hours Remaining (Cost) field from Actions associated to this Budget Item |
| Remaining Expenses (Billable) | Currency (16, 2) | Sum value of Amount field from all Expenses associated to this Budget Item where Approval Status != Approved |
| Remaining Expenses (Cost) | Currency (16, 2) | Sum value of Cost Amount field from all Expenses associated to this Budget Item where Approval Status != Approved |
| Material Costs Remaining (Billable) | Currency (16, 2) | Sum value of Material Costs Remaining (Billable) field from Actions associated to this Budget Item |
| Material Costs Remaining (Cost) | Currency (16, 2) | Sum value of Material Costs Remaining (Cost) field from Actions associated to this Budget Item |
| Total Scheduled Billable | Formula (Currency (16, 2)) | Formula: Sum of Hours Scheduled (Billable) + Scheduled Expenses (Billable) + Material Costs Scheduled (Billable) |
| Total Scheduled Cost | Formula (Currency (16, 2)) | Formula: Sum of Hours Scheduled (Cost) + Scheduled Expenses (Cost) + Material Costs Scheduled (Cost) |
| Total Completed Billable | Formula (Currency (16, 2)) | Formula: Sum of Hours Completed (Billable) + Completed Expenses (Billable) + Material Costs Completed (Billable) |
| Total Completed Cost | Formula (Currency (16, 2)) | Formula: Sum of Hours Completed (Cost) + Completed Expenses (Cost) + Material Costs Completed (Cost) |
| Total Remaining Billable | Formula (Currency (16, 2)) | Formula: Sum of Hours Remaining (Billable) + Remaining Expenses (Billable) + Material Costs Remaining (Billable) |
| Total Remaining Cost | Formula (Currency (16, 2)) | Formula: Sum of Hours Remaining (Cost) + Remaining Expenses (Cost) + Material Costs Remaining (Cost) |
| Total Forecast Billable | Formula (Currency (16, 2)) | Formula: Sum of Total Completed Billable + Total Remaining Billable |
| Total Forecast Cost | Formula (Currency (16, 2)) | Formula: Sum of Total Completed Cost + Total Remaining Cost |
| P&L Budget | Formula (Currency (16, 2)) | Formula: Sum of Billable Budget – Cost Budget |
| P&L Budget – Total Scheduled Cost | Formula (Currency (16, 2)) | Formula: Sum of Billable Budget – Total Scheduled Cost |
| P&L Budget – Total Completed Cost | Formula (Currency (16, 2)) | Formula: Sum of Billable Budget – Total Completed Cost |
| P&L Budget – Total Forecast Cost | Formula (Currency (16, 2)) | Formula: Sum of Billable Budget – Total Forecast Cost |
| GM% Budget | Formula (Percent (16, 2)) | Formula: (Billable Budget – Cost Budget) / Billable Budget |
| GM% Budget – Total Scheduled Cost | Formula (Percent (16, 2)) | Formula: (Billable Budget – Total Scheduled Cost) / Billable Budget |
| GM% Budget – Total Completed Cost | Formula (Percent (16, 2)) | Formula: (Billable Budget – Total Completed Cost) / Billable Budget |
| GM% Budget – Total Forecast Cost | Formula (Percent (16, 2)) | Formula: (Billable Budget – Total Forecast Cost) / Billable Budget |
| VAR Budget – Total Scheduled Billable | Formula (Currency (16, 2)) | Formula: Billable Budget – Total Scheduled Billable |
| VAR Budget – Total Completed Billable | Formula (Currency (16, 2)) | Formula: Billable Budget – Total Completed Billable |
| VAR Budget – Total Forecast Billable | Formula (Currency (16, 2)) | Formula: Billable Budget – Total Forecast Billable |
Expense
| Field | Field Type | Comments |
| Budget Item | Lookup (Budget Item) | Identifies the Budget Item this record relates to |
| Cost Amount | Currency (16, 2) | Identifies the cost amount being claimed (if not mileage) |
| Cost Tax Amount | Currency (16, 2) | Identifies the cost tax amount of the Expense |
| Cost ex-Tax Amount | Formula (Currency, (16, 2)) | Formula: Calculates the Cost ex-Tax Amount based on ‘Cost Amount’ – ‘Cost Tax Amount’ |
| Converted Cost Amount | Number (16, 2) | If the Project currency is different from the Expense currency, this field will contain the converted value |
| Converted Cost Tax Amount | Number (16, 2) | If the Project currency is different from the Expense currency, this field will contain the converted value |
| Converted Cost ex-Tax Amount | Number (16, 2) | If the Project currency is different from the Expense currency, this field will contain the converted value |
| Mileage Amount | Formula (Currency, (16, 2)) | Existing Field Modified
Current Formula: New Formula:
|
| Mark Up Required | Checkbox | Identifies if this Expense should have Mark Up applied |
| Custom Mark Up % | Percent (14, 4) | This Percent can be used to override the Project Mark UP % |
| Mark Up % | Formula (Percent, (14, 4)) | Formula: Identifies the Mark Up % applied to this Expense |
Milestone
| Field | Field Type | Comments |
| Exclude from Client Page | Checkbox | Identifies if this Milestone should be excluded from the Client Overview Page |
Action
| Field | Field Type | Comments |
| Budget Item | Lookup (Budget Item) | Identifies the Budget Item this record relates to |
| Material Costs Scheduled | Currency (16, 2) | Existing Field Modified
Label Changed To: Material Costs Scheduled (Billable)
Help Text Changed To: Identifies the billable value of any Scheduled Material Costs related to this Action |
| Material Costs Scheduled (Cost) | Currency (16, 2) | Identifies the cost value of any Scheduled Material Costs related to this Action |
| Material Costs Completed | Rollup (Currency, (16, 2)) | Existing Field Modified
Label Changed To: Material Costs Completed (Billable)
Help Text Changed To: Rollup Sum of the Material Cost (Billable) field on all related Time Log records |
| Material Costs Completed (Cost) | Rollup (Currency, (16, 2)) | Rollup Sum of the Material Cost (Cost) field on all related Time Log records |
| Material Costs Remaining | Formula (Currency, (16, 2)) | Existing Field Modified
Label Changed To: Material Costs Remaining (Billable)
Help Text Changed To: Formula: Calculates Material Costs Scheduled (Billable) – Material Costs Completed (Billable) |
| Material Costs Remaining (Cost) | Formula (Currency, (16, 2)) | Formula: Calculates Material Costs Scheduled (Cost) – Material Costs Completed (Cost) |
| P&L (Scheduled) | Formula (Currency, (16, 2)) | Existing Field Modified
Current Formula: (Hours_Scheduled_Cost__c + Material_Costs_Scheduled__c) – (Hours_Scheduled_Value_Cost__c + Material_Costs_Scheduled__c) New Formula: (Hours_Scheduled_Cost__c + Material_Costs_Scheduled__c) – (Hours_Scheduled_Value_Cost__c + Material_Costs_Scheduled _Cost__c)
|
| P&L Actual | Formula (Currency, (16,2)) | Existing Field Modified
IF(ISPICKVAL( Milestone__r.Project__r.Billing_Type__c , “Fixed Price”), (Hours_Scheduled_Cost__c + Material_Costs_Scheduled__c) – (Hours_Completed_Value_Cost__c + Expense_Summary__c), (Hours_Completed_Cost__c + Material_Costs_Scheduled__c) – (Hours_Completed_Value_Cost__c + Expense_Summary__c)) New Formula: IF(OR(ISPICKVAL( Milestone__r.Project__r.Billing_Type__c , “Fixed Price”), ISPICKVAL(Milestone__r.Project__r.Billing_Type__c , “Fixed Price + Expenses”)), (Hours_Scheduled_Cost__c + Material_Costs_Scheduled__c) – (Hours_Completed_Value_Cost__c + Material_Costs_Completed_Cost__c), (Hours_Completed_Cost__c + Expense_Summary__c) – (Hours_Completed_Value_Cost__c + Material_Costs_Completed_Cost__c))
|
| P&L (Forecast) | Formula (Currency, (16, 2)) | Existing Field Modified
IF( ISPICKVAL( Milestone__r.Project__r.Billing_Type__c , “Fixed Price”), (Hours_Scheduled_Cost__c + Material_Costs_Scheduled__c) – ( Hours_Completed_Value_Cost__c + Hours_Remaining_Value_Cost__c + Expense_Summary__c + Material_Costs_Remaining__c) New Formula: IF( OR(ISPICKVAL( Milestone__r.Project__r.Billing_Type__c , “Fixed Price”), ISPICKVAL( Milestone__r.Project__r.Billing_Type__c , “Fixed Price + Expenses”)), (Hours_Scheduled_Cost__c + Material_Costs_Scheduled__c) – ( Hours_Completed_Value_Cost__c + Hours_Remaining_Value_Cost__c + Material_Costs_Completed_Cost__c + Material_Costs_Remaining_Cost__c)
|
| Projected P&L | Formula (Currency, (16, 2)) | Existing Field Modified
IF(ISPICKVAL(Milestone__r.Project__r.Billing_Type__c, “Fixed Price”), Hours_Scheduled_Cost__c -Projected_Value_Cost__c , Projected_Value_Billable__c – Projected_Value_Cost__c ) New Formula: IF(OR(ISPICKVAL(Milestone__r.Project__r.Billing_Type__c, “Fixed Price”), ISPICKVAL(Milestone__r.Project__r.Billing_Type__c, “Fixed Price + Expenses”)), (Hours_Scheduled_Cost__c + Material_Costs_Scheduled__c) -(Projected_Value_Cost__c + Material_Costs_Completed_Cost__c + Material_Costs_Remaining_Cost__c) , (Projected_Value_Billable__c + Expense_Summary__c + Material_Costs_Remaining__c) – (Projected_Value_Cost__c + Material_Costs_Completed_Cost__c + Material_Costs_Remaining_Cost__c) )
|
| Exclude from Client Page | Checkbox | Identifies if this Action should be excluded from the Client Overview Page |
| Exclude from Client Page Indicator | Formula (Checkbox) | Formula: Identifies if this Action should be excluded from the Client Overview Page
Formula: OR(amc__Exclude_from_Client_Page__c, amc__Milestone__r.amc__Exclude_from_Client_Page__c)
|
Time Log
| Field | Field Type | Comments |
| Material Cost (Cost) | Currency (16, 2) | Identifies the cost value of any Material Costs related to the Action |
| Material Cost | Currency (16, 2) | Existing Field Modified
Label Changed To: Material Cost (Billable)
Help Text Changed To: Identifies the billable value of any Material Costs related to the Action |
| Exclude from Client Page | Checkbox | Identifies if this Time Log should be excluded from the Client Overview Page |
| Exclude from Client Page Indicator | Formula (Checkbox) | Formula: Identifies if this Time Log should be excluded from the Client Overview Page
Formula: OR( amc__Exclude_from_Client_Page__c, amc__Action__r.amc__Exclude_from_Client_Page_Indicator__c ) |
Checklist Item
| Field | Field Type | Comments |
| Exclude from Client Page | Checkbox | Identifies if this Checklist Item should be excluded from the Client Overview Page |
| Exclude from Client Page Indicator | Formula (Checkbox) | Formula: Identifies if this Checklist Item should be excluded from the Client Overview Page
Formula: OR( amc__Exclude_from_Client_Page__c, amc__Action__r.amc__Exclude_from_Client_Page_Indicator__c ) |
Risk
| Field | Field Type | Comments |
| Exclude from Client Page | Checkbox | Identifies if this Riskshould be excluded from the Client Overview Page |
Issue
| Field | Field Type | Comments |
| Exclude from Client Page | Checkbox | Identifies if this Issue should be excluded from the Client Overview Page |
Change Request
| Field | Field Type | Comments |
| Exclude from Client Page | Checkbox | Identifies if this Change Request should be excluded from the Client Overview Page |
| Include in Weekly Status Report | Checkbox | Identifies if this record should be included in the Weekly Status Report PDF |
Mission Control will be made available based on the following release schedule.
12th June 2021 – Available for manual upgrade from the AppExchange
19th June 2021 – Automatic upgrade to all Sandbox Orgs
26th June 2021 – Automatic upgrade to all Production Orgs
To manually upgrade to the new version of Mission Control in your organisation, please follow the steps below:
We have pre-recorded the ‘What’s New’ webinar to provide further information on how to get the best out of the new features. To access this webinar, please view the ‘Release Notes’ section of the Mission Control Support Centre – www.aprika.com/mc-support
Some of the new features included in this release of Mission Control have come from ideas submitted from existing clients. If you have an idea for enhancing Mission Control, you can submit it via email to [email protected].
If you have any questions regarding this release notification, please do not hesitate to contact us at [email protected].
