Salesforce Project Management Software by Aprika
Release Notes, Version - 1.40
Mission Control Version 1.40
Release Notification – 31 May 2017
A new version of Mission Control (version 1.40) will be released on the AppExchange on Thursday 1st June 2017. This notification has been issued to existing Mission Control users. It contains an overview of the new features available with this release, along with instructions on how to upgrade to the new version.
What’s New?
Whilst the list of new features is smaller than some of our recent releases, it includes some pretty awesome stuff that’s been keeping us really busy. At a glance, this release includes:
- Project Overview Page
- Track Pad
- Lightning Experience ‘Utility Bar’
- Task Trigger
- Locker Service Compliance
Let’s get stuck in to the detail…
Project Overview Page
We’re super excited to be delivering the brand new ‘Project Overview’ page. It’s been a long time coming and we hope you’ll agree, it’s been worth the wait.
We were very fond of the original project overview page. It was actually one of the first features we ever added into Mission Control, and it really brought the project to life on one page. However, as we’ve introduced new functionality to the system, it was struggling to keep pace.
So, we spent quite some time considering what was required of a new page, taking into account both customer feedback and the opportunities the Lightning Experience framework offers us.
The result, we believe is an extremely flexible page that provides you with the same 360-degree view of a particular project, but in bite-sized chunks.
The new Project Overview page has a number of Tabs, each one providing you with detailed information relating to a specific area of the Project. Each of the Tabs are explained below.
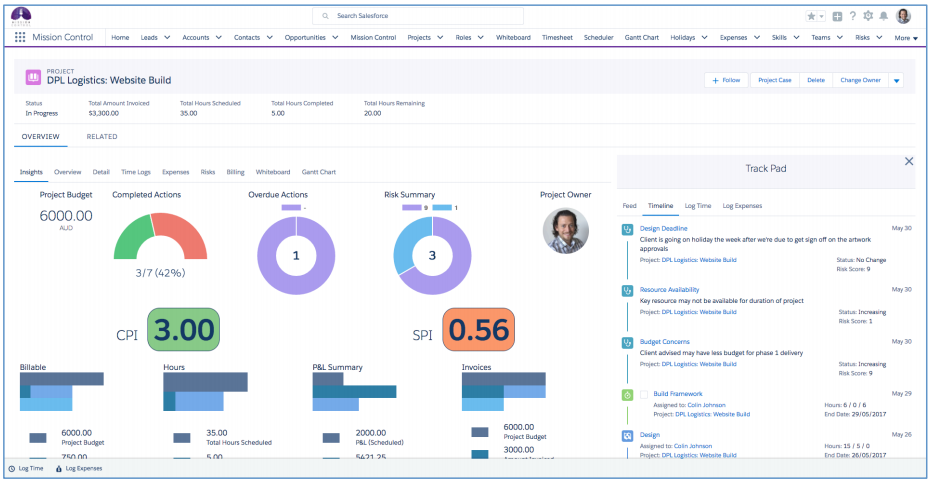
There is also a ‘Track Pad’ that you will see situated on the right-hand side of the screenshots of the Project Overview below. This is embedded on to the Project Overview, but is a stand-alone component that we will provide further information on later in these release notes.
Insights
This tab provides various charted information showing the current state of play for the project.
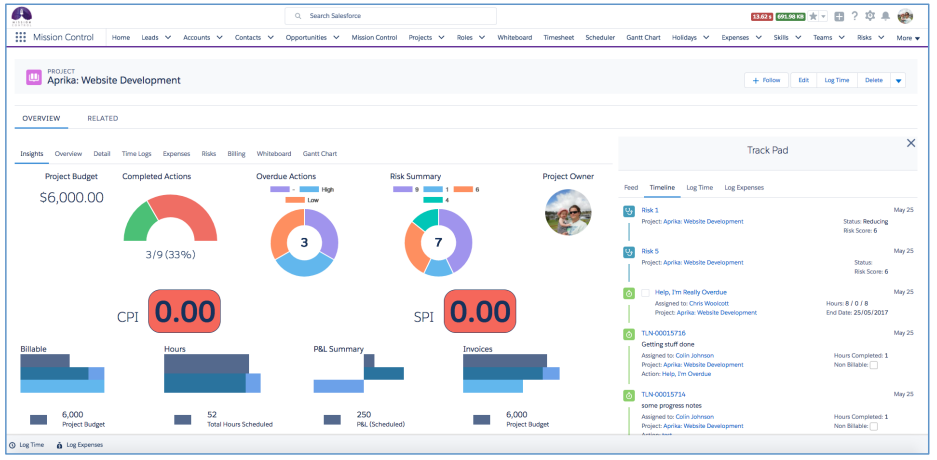
The aim of the Insights Tab is to provide you with a high level, graphical view of how the project is performing. The key information represented on the Insights Tab includes:
- Project Budget
- Completed Actions
- Overdue Actions
- Risk Summary
- Project Owner
- Cost Performance Index
- Scheduled Performance Index
- ‘Billable’ Revenue Summary
- Hours Summary
- P&L Summary
- Invoice Summary
Overview
This tab provide some charts relating to the status of the project and a tree-structure of Milestones > Actions > Checklist Items
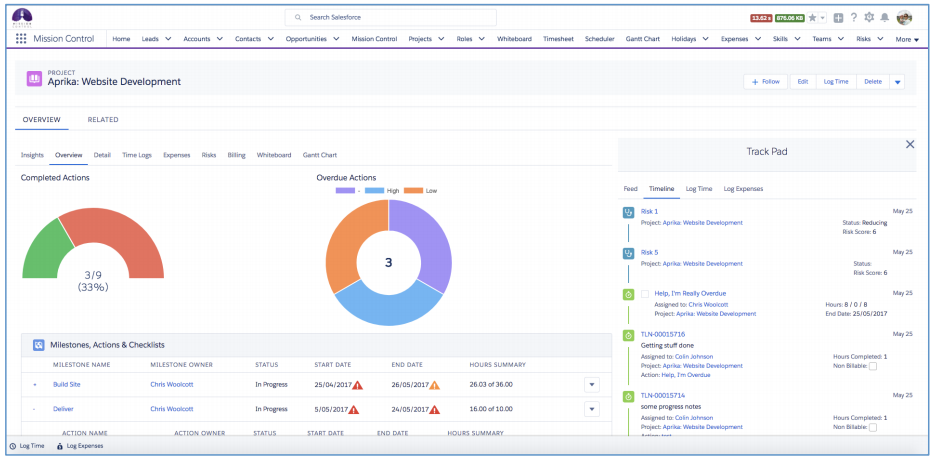
You have a number of other features available within this Tab, including the following:
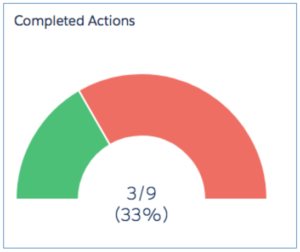
Completed Actions Chart
The Completed Actions gauge chart provides you with an overview of how many Actions have been completed on the Project.
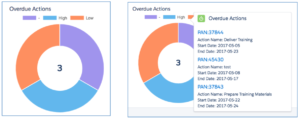
Overdue Actions Chart
The Overdue Actions donut chart provides you with insight into any Actions that are overdue and groups them based on their ‘Priority’ value. When you hover over this chart, you’ll see a list of the Actions that are overdue, so you can quickly jump to the detail if required.
Expand / Collapse Actions & Checklist Items
By default, the Overview Page table will show a list of Milestones. Where a Milestone has child Actions, there will be a + sign to the left of the Milestone Name. Clicking this + sign will expand the table to show the Actions.

Similarly, where an Action has child Checklist Items, there will be a + sign that can be clicked to expand the table to show the Checklist Items.

Expanded records will have a – sign that can be clicked to collapse the related records.
Start/End Date Warnings
Where Start Date and End Date values are either overdue or approaching, you will see a Red or Yellow warning sign as illustrated below.

The table below outlines the rules that control which warning sign is displayed.

Edit/Delete Milestones
You’re able to Edit or Delete a Milestone directly from the Overview Tab by clicking the drop down arrow on the right-hand side.
Click Edit

Edit Milestone and Save

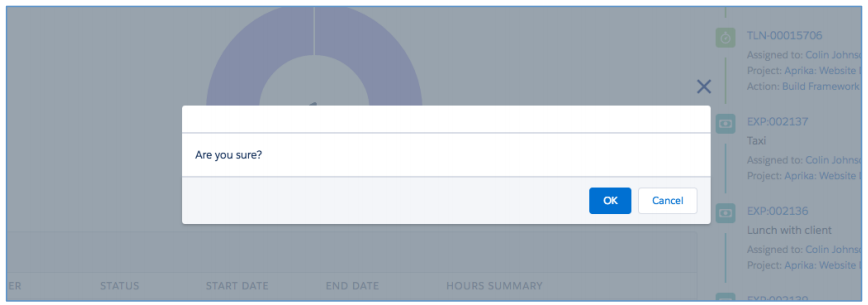
Click Delete

Confirm you wish to Delete
Edit/Delete Actions
You’re also able to Edit or Delete an Action directly from the Overview Tab by clicking on the drop down arrow on the right-hand side in the same manner as illustrated above for the Milestones.
Resource Assignment Wizard
You’re able to access the Resource Assignment Wizard by clicking the ![]() icon on the relevant Action. The
icon on the relevant Action. The ![]() icon will display if an Action has Contributors assigned to it.
icon will display if an Action has Contributors assigned to it.

Managing Checklist Items
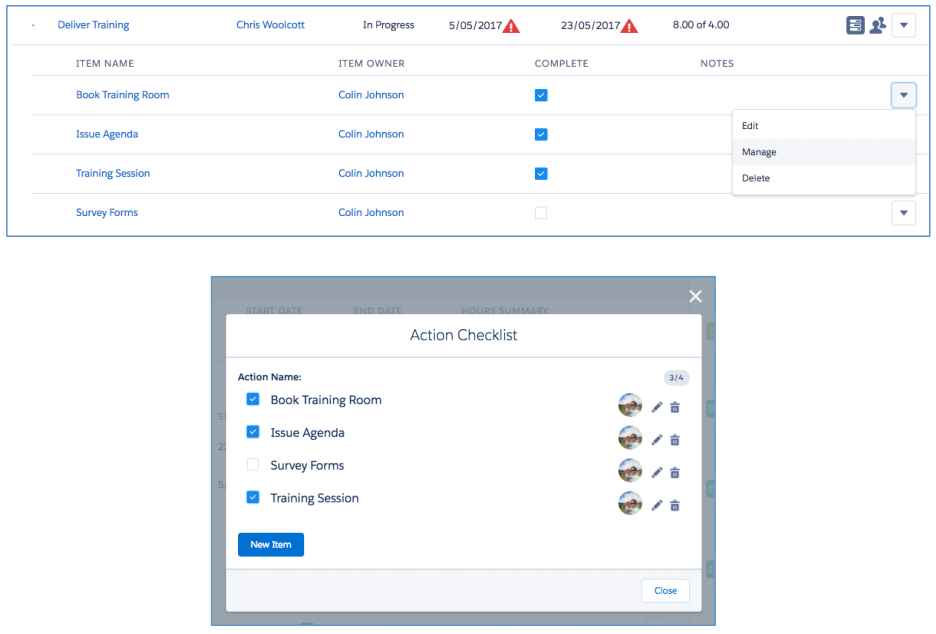
You’re able to Edit or Delete individual Checklist Items directly from the Overview Tab by clicking on the drop down arrow on the right-hand side in the same manner as illustrated above for the Milestones.
In addition to this, you’re able to click the ‘Manage’ link to open up the Checklist Item component where you can manage all of your Checklist Items related to the particular Action the same way as you can from the Whiteboard.
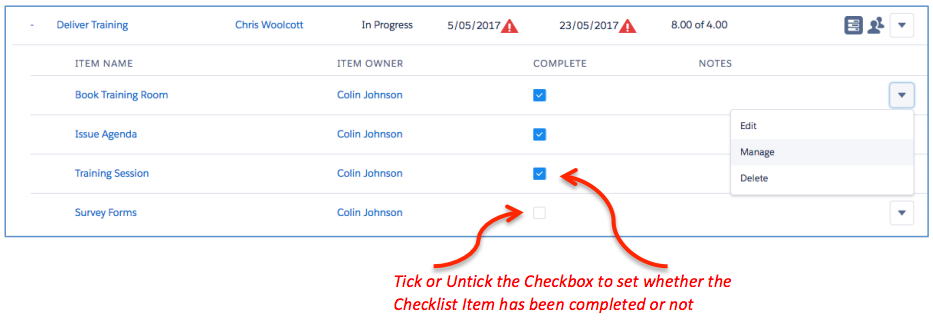
You’re also able to perform an ‘inline edit’ of the Complete Checkbox for individual Checklist Items.
Detail
This tab gives you access to the standard detail page layout based on the Project record’s record type / user’s page layout assignment
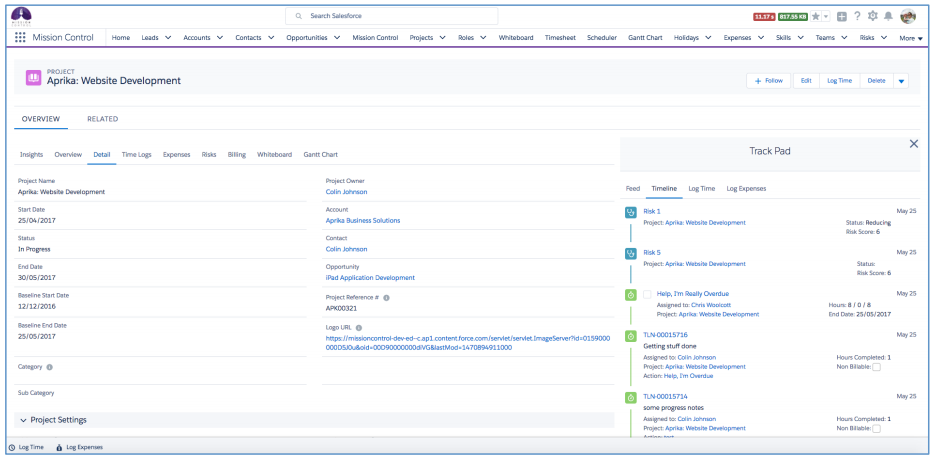
The benefit of this page is that you can control which fields you present to individual Users/Profiles, which is something the previous Project Overview page didn’t offer.
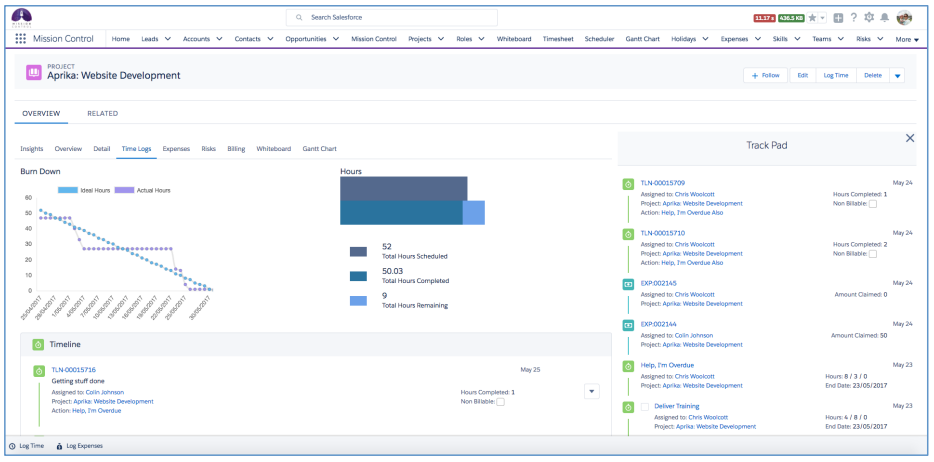
Time Logs
This tab includes the burn down chart, hours summary chart and ‘Timeline’ of all time Logs
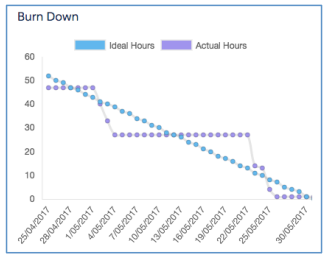
Burn Down Chart
The Burn Down Chart illustrates the ‘ideal’ and ‘actual’ delivery of hours throughout the project.
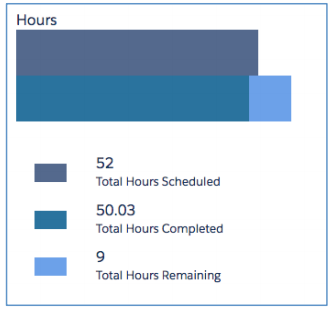
Hours Summary
The Hours Summary chart provides you with an overview of the ‘Total Hours Scheduled’ in comparison to the ‘Total Hours Completed’ + ‘Total Hours Remaining’, giving insight to whether the project is likely to be delivered in less or more hours than were scheduled.
Timeline
The Timeline shows a list of all Time Logs in descending order as they’ve logged against the Project’s Actions.
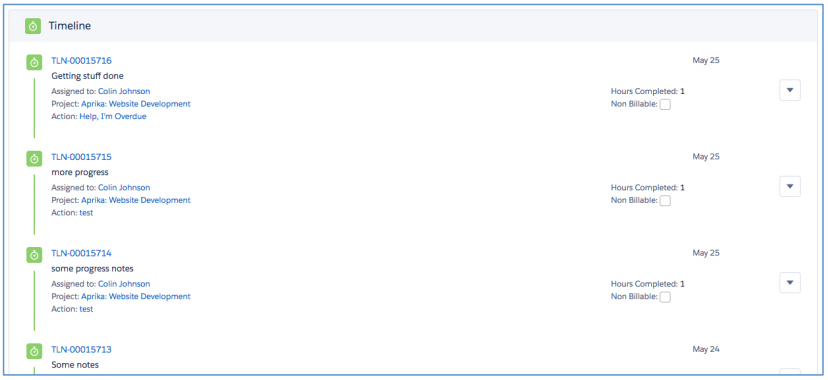
You’re able to Editor Delete any Time Log directly from the Timeline by clicking the arrow on the right-hand side and selecting ‘Edit’ or ‘Delete’.

Expenses
This tab provides you with access to some expense summary charts and a list of all expenses related to the project
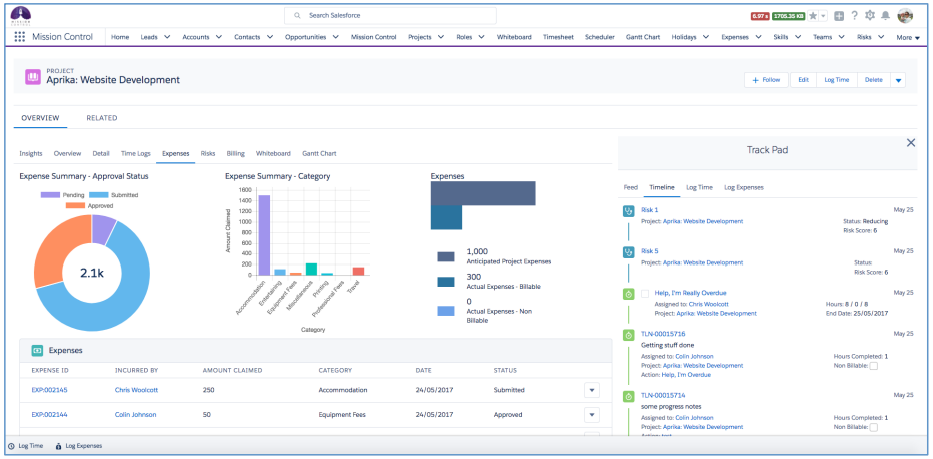
Expense Summary – Approval Status
This donut chart provides a summary of all expenses grouped by the Approval Status value.
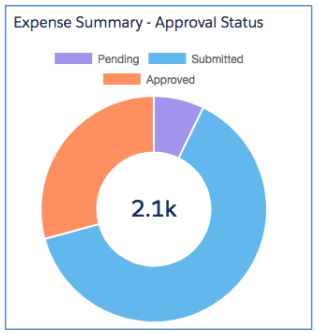
Expense Summary – Category
This bar chart provides a summary of all Expenses grouped by the Category.
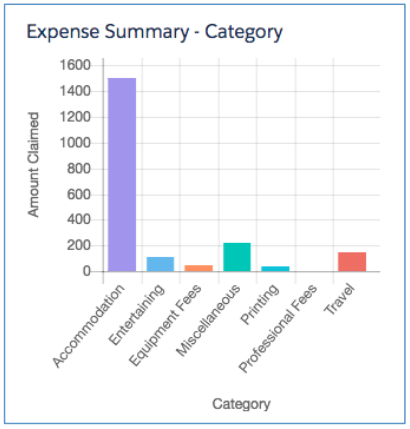
Expense Summary
This bar chart provides a summary of Anticipated Expenses versus Actual Expenses.
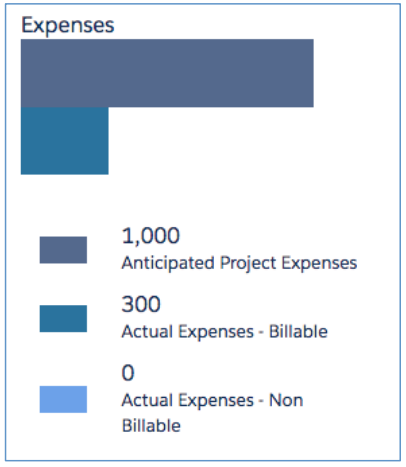
Expenses List
You’re able to view all Expenses logged against the project including key fields such as Category, Amount Claimed and Approval Status. The Expenses are displayed in descending Date order.
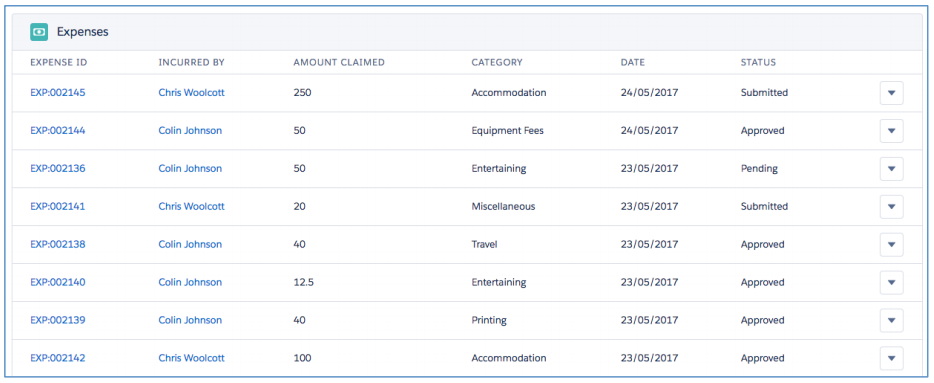
You’re able to Edit or Delete any Expense directly from the list by clicking the arrow on the right-hand side and selecting ‘Edit’ or ‘Delete’.

Risks
This tab includes the Risk Matrix and a Risk Summary chart as well as a list view of all Risks.
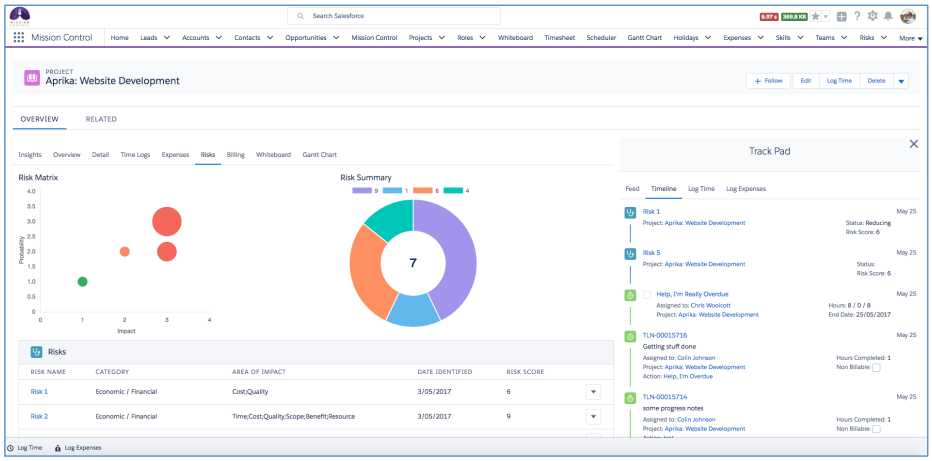
Risk Matrix
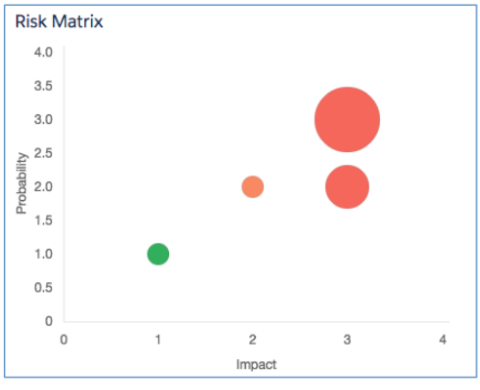
The Risk Matrix is a bubble chart representing all of the Risks based on their probability and impact rating. The bubbles increase in size based on the number of Risks with that rating.
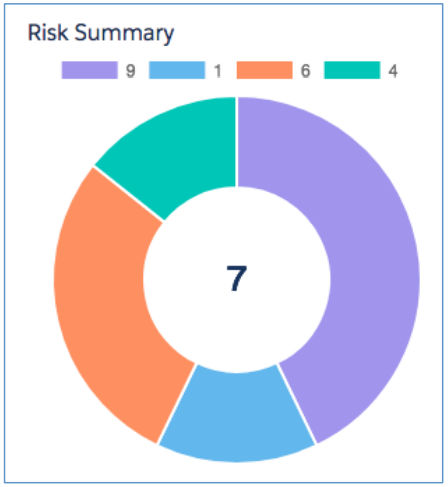
Risk Summary
The Risk Summary donut chart provides insight into the Risk Score of each Risk related to the Project.
Risks List
You’re able to view all Risks logged against the project including key fields such as Category, Area of Impact and Risk Score.

You’re able to Edit or Delete any Risk directly from the list by clicking the arrow on the right-hand side and selecting ‘Edit’ or ‘Delete’.

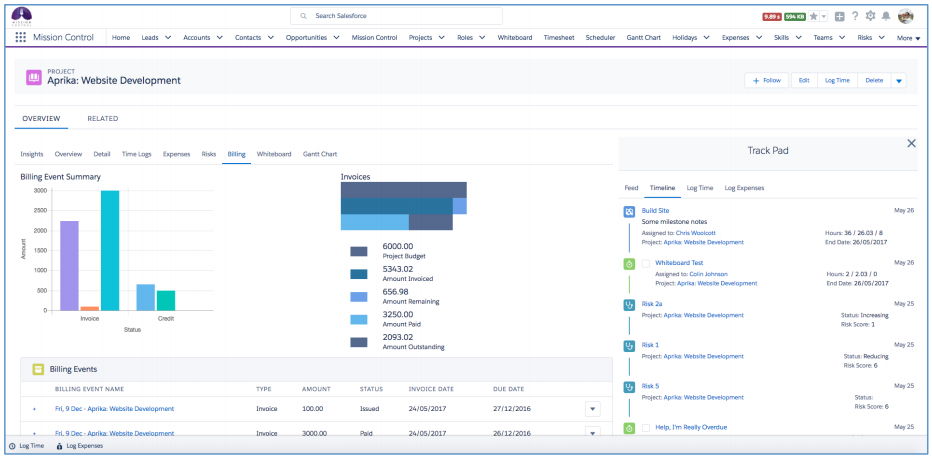
Billing
This tab includes some financial charts and a tree-structure of Billing Events > Billing Event Items and Billing Payments
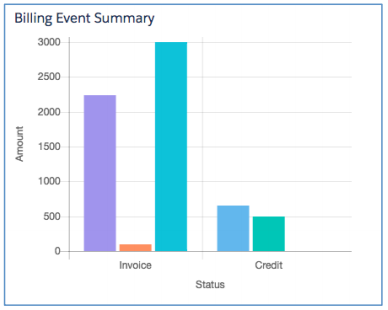
Billing Event Summary
This bar chart provides a summary of all Invoices and Credits that have been raised against the Project and summarised based on the ‘Status’.
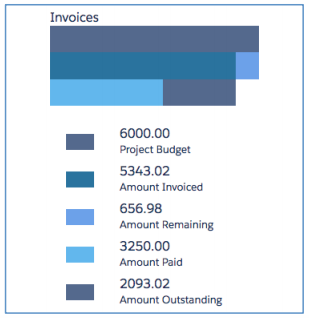
Invoices Summary
This bar chart provides a summary of the project budget and the amounts invoiced, remaining, paid and outstanding.
Billing Events List
This tab provides you with visibility of all Billing Events, Billing Event Items and Billing Payments logged against the project. The Billing Events are displayed in descending ‘Invoice Date’ order.

The list displays the Billing Events by default and can be expanded to display any related Billing Event Items and Billing Payments. To expand any individual Billing Event, simply click the + sign next to the Billing Event Name.

To collapse any of the Billing Event records, click the – button and the Billing Event Items and Billing Payments will be hidden again.
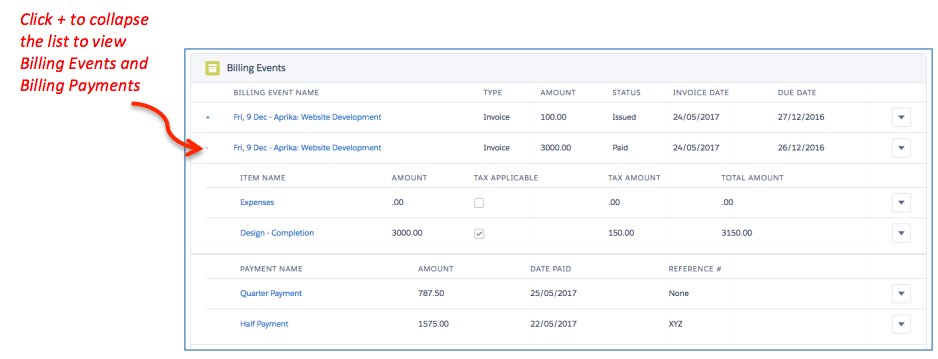
You’re able to Edit or Delete any Billing Event, Billing Event Item or Billing Payment directly from the list by clicking the arrow on the right-hand side and selecting ‘Edit’ or ‘Delete’.

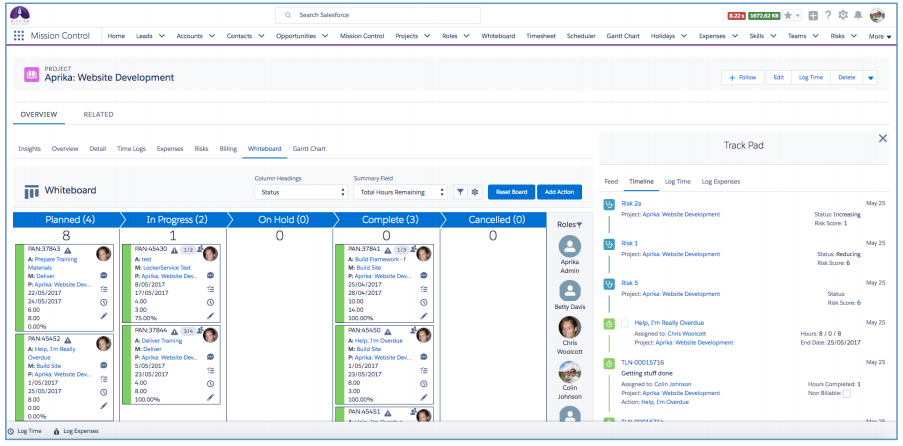
Whiteboard
This tab provides you with access to the Whiteboard, filtered for the single Project. All of the main Whiteboard functionality is available here.
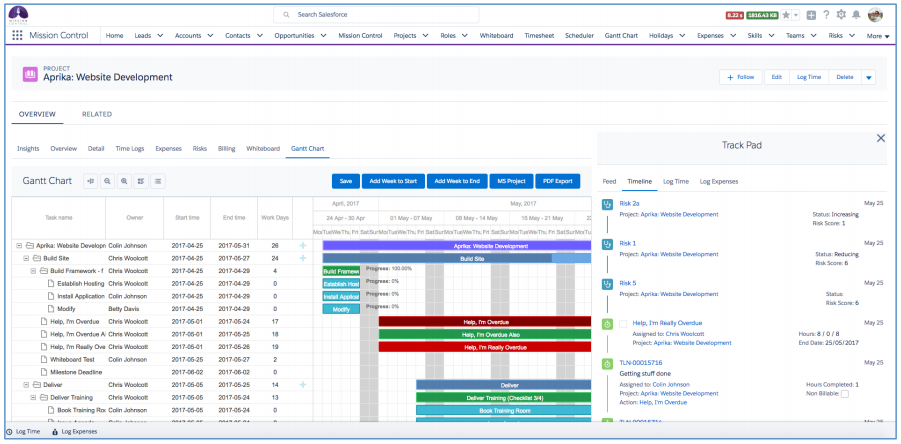
Gantt Chart
This provides you with access to standard Gantt Chart, filtered for the single Project. All of the main Gantt Chart functionality is available here.
Field Level Security / Object Access
Please note that all records displayed on the Project Overview Page have Field Level Security, Object Access and Sharing Rules enforced. However, whilst the Charts enforce Object Access and Sharing Rules, the Field Level Security is not enforced. For example, if a User does not have the permission to view the Expense Field ‘Amount Claimed’ they would still see the figures in the Expense Charts. Therefore, we recommend you review the contents of each chart to ensure you set User visibility accordingly.
Tab / Chart Access
We’ve focused on providing you as much flexibility as possible with regards to how you use the Project Overview. You can control access to each Tab, and the Charts on the Tab for each Individual Role. A number of new fields have been added to the Role Object to enable you to set the access to each Tab. The new fields are summarised below.
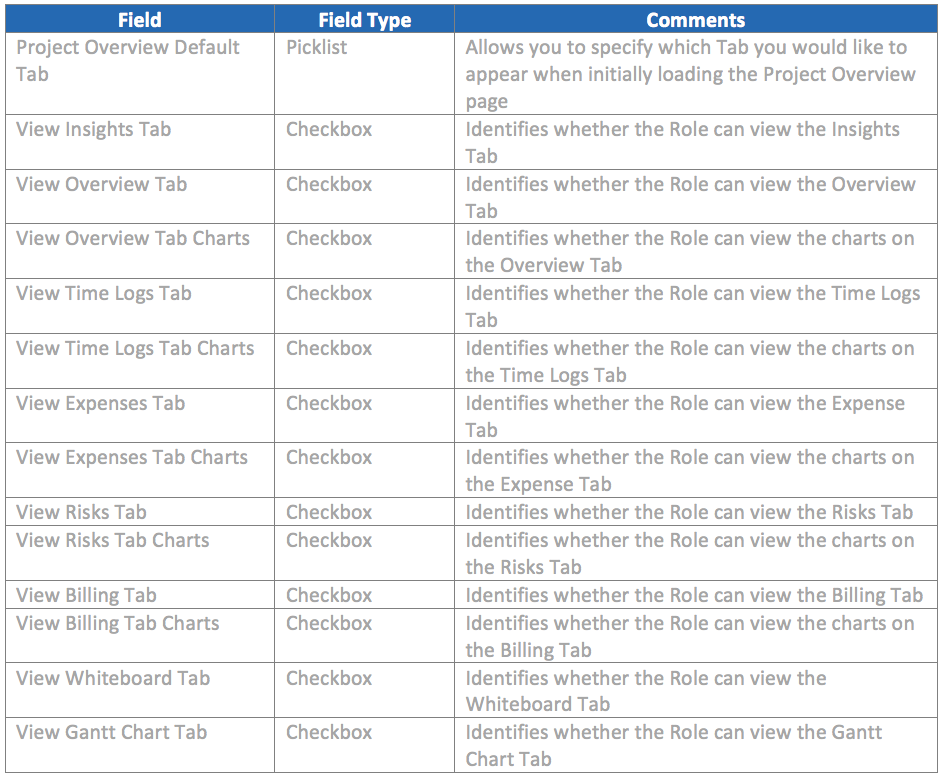
You can set these field values for an individual Role record by editing the record and updating the fields in the ‘Project Overview Settings’ section.

You can also manage these settings for all of your Role records from a new List View that has been included called ‘Role Permissions – Project Overview Page’
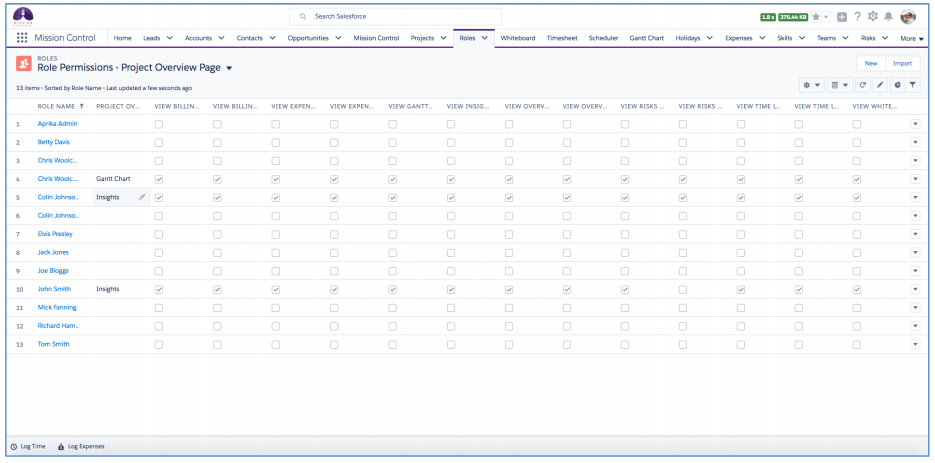
To ensure all of your Roles have access to the Project Overview upon initial upgrade to this version, an Install Script will run as part of the upgrade that will set all of the fields to TRUE. You will then be able to adjust the settings for each Role as required.
LEX Configuration
For customers using Salesforce Classic, you will not need to take any action to begin using the Project Overview Page. However, for Lightning Experience customers, you will have to make a small modification to the Page Layout.
Please Note: You will need to have already configured ‘My Domain’ within Salesforce to be able to use the Project Overview Page within Lightning Experience. Please refer to the Salesforce Help Documentation on how to configure ‘My Domain’.
To access the Project Overview Page in Lightning Experience, please navigate to a Project, where you will see a page similar to the one shown below.
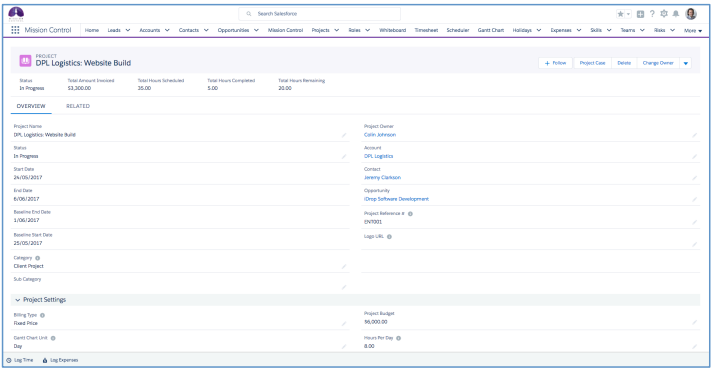
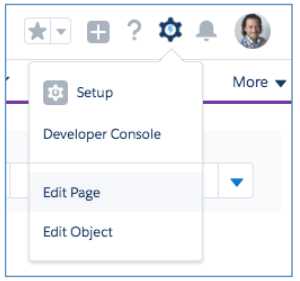
Then click the Settings Icon in the top right hand corner of the screen and click ‘Edit Page’
This will open up the Lightning App Builder and show you a screen like the one below.
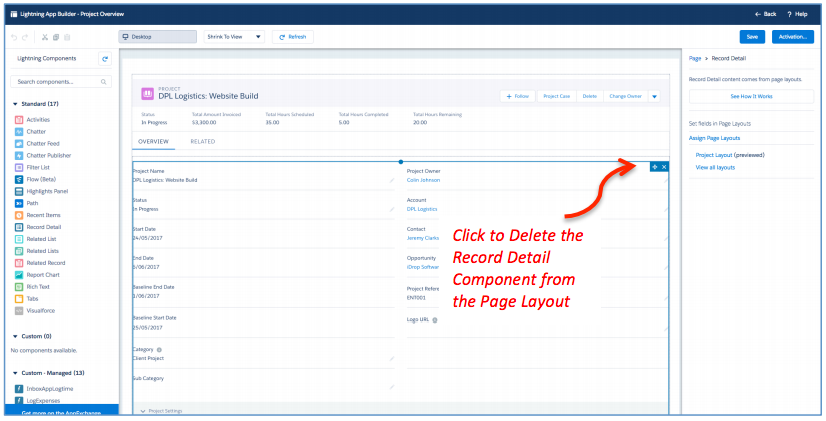
Click on the ‘Record Detail’ Component that is in the Overview Tab and delete it, as shown above. This will then result in your page looking like this:

Using the left-hand menu, navigate to the Custom Components and drag the ‘ProjectOverview’ Component into the position where you have just removed the Record Detail Component from. This will result in the page now looking like this:
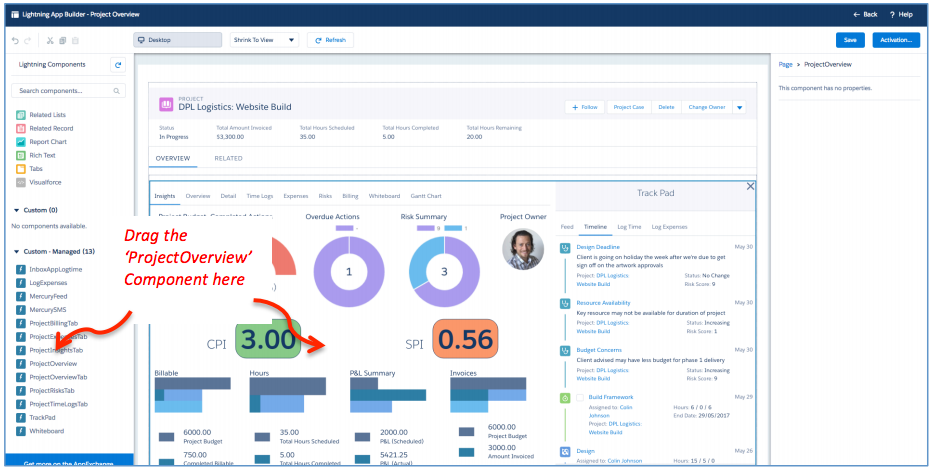
Then click ‘Save’ and ensure you follow the instructions as outlined below to set the page to be your org wide default.
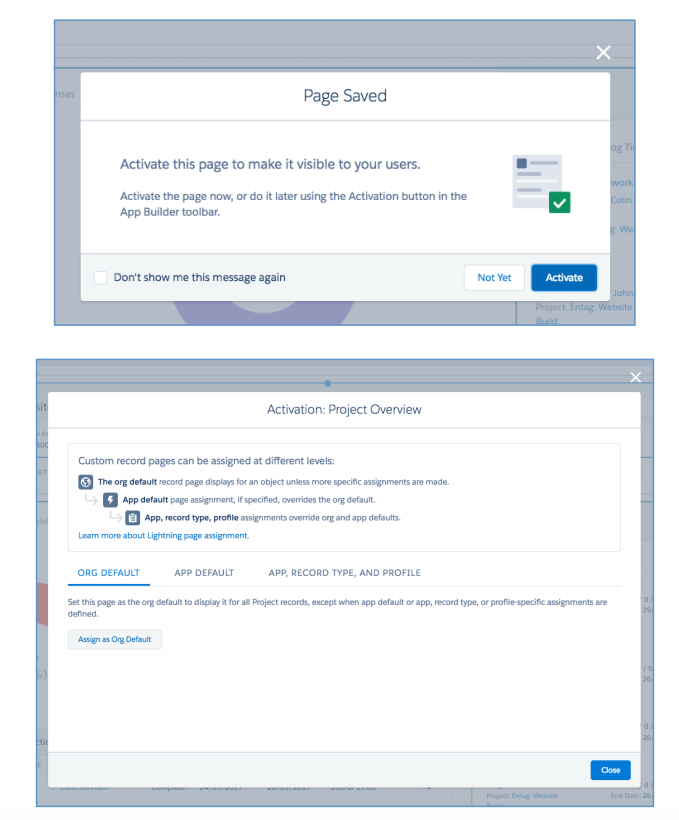
Then when you navigate back to the Project record, you’ll see the Project Overview Page now looks something like this:
Track Pad
The other really cool feature included in this release, which compliments the Project Overview Page is the ‘Track Pad’. The Track Pad provides you with quick access to the following features:
- Project Chatter Feed
- Project Timeline
- Time Logger
- Expense Logger
The Track Pad is accessible on the right-hand side of the Project Overview Page. However, as it is a stand-alone component, you can also add it to other pages within Lightning Experience. For example, you could add it to the Home Page so you can quickly see everything that’s going on across all of your projects.
When using the Track Pad on a Project Overview page, the Tabs will show records relative to the context Project. If you are using it elsewhere, for example, on the Home page, it will show you records for all Projects.
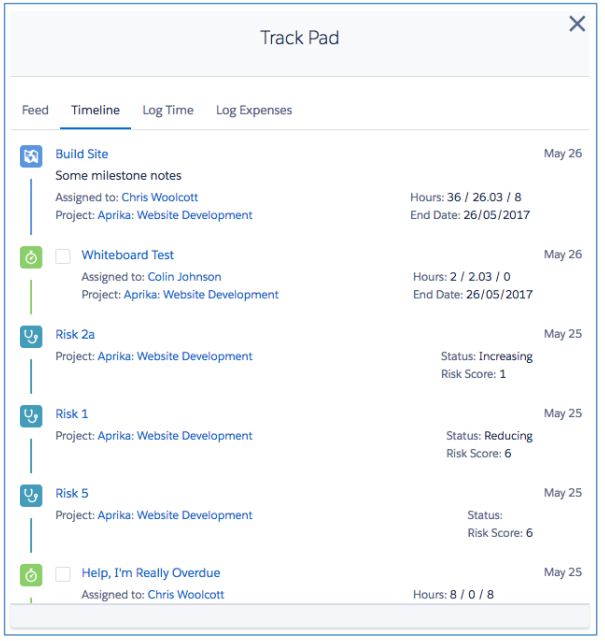
You will notice that whilst viewing the Track Pad in context of the Project Overview Page, you’ll see a X in the top-right hand corner. This enables you to collapse the Track Pad so you can use the full width of the screen for your Project Overview. Whilst the Track Pad is collapsed, you’ll see an arrow icon at the bottom-right hand corner. If you click this arrow, the Track Pad will be expanded again.

Feed
The Feed Tab provides you with access to the Chatter Feed for the Project.
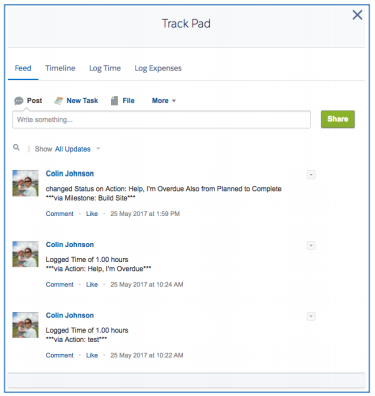
Timeline
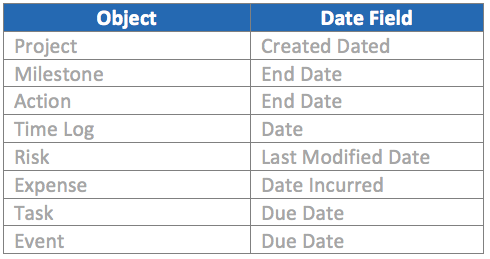
The Timeline Tab pulls together a Timeline for your Project, brining together all of the key records onto one time line. The Objects that are included in the Timeline are listed in the table below with the date from that record that is used for the Timeline.
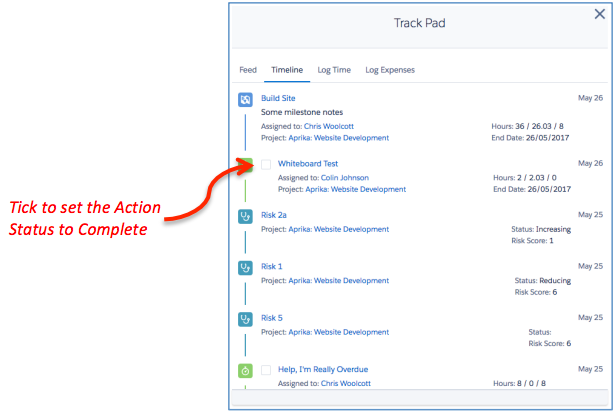
For Actions and Tasks that are displayed in the Timeline that are not yet complete, a Checkbox will be displayed to the left of the record name. To complete the Action or Task, simply set the Checkbox to TRUE.
Log Time
The Log Time Tab provides you with access to the Time Logger Component. From here, you will be able to log your time or start/stop your time recording against any Action.
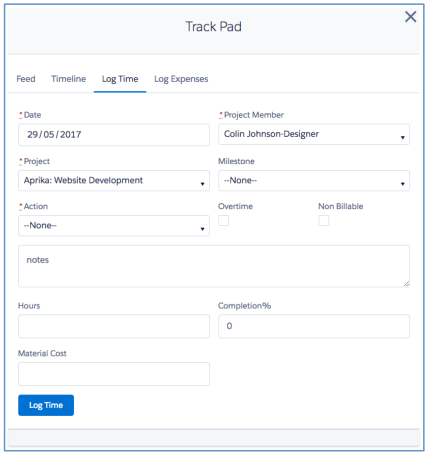
Whilst using the Track Pad on the Project Overview Page, the Project Member and Project fields will be pre-populated. If you’re using the Track Pad elsewhere, for example, on the Home page, the Project Member field will be pre-populated, but not the Project field.
Log Expenses
The Log Expenses Tab provides you with access to the Expense Logger Component. From here, you will be able to log your expenses against any project, as well as uploading a copy of the receipt if applicable.
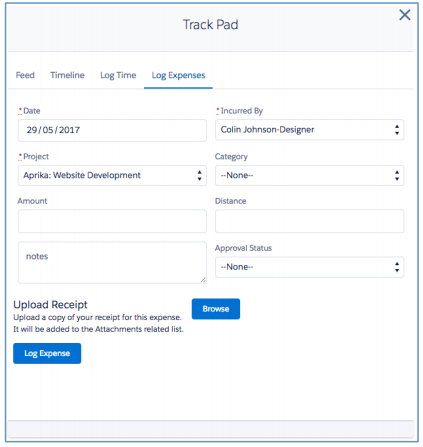
Whilst using the Track Pad on the Project Overview Page, the Incurred By and Project fields will be pre-populated. If you’re using the Track Pad elsewhere, for example, on the Home page, the Incurred By field will be pre-populated, but not the Project field.
Tab / Chart Access
We’ve also aimed to provide you with as much flexibility as possible with regards to how you use the Track Pad. You can control whether a specific Role has access to the Track Pad, and whether they can have access to each Tab. A number of new fields have been added to the Role Object to enable you to set the access to each Tab. The new fields are summarised below.

You can set these field values for an individual Role record by editing the record and updating the fields in the ‘Track Pad Settings’ section.

You can also manage these settings for all of your Role records from a new List View that has been included called ‘Role Permissions – Track Pad’
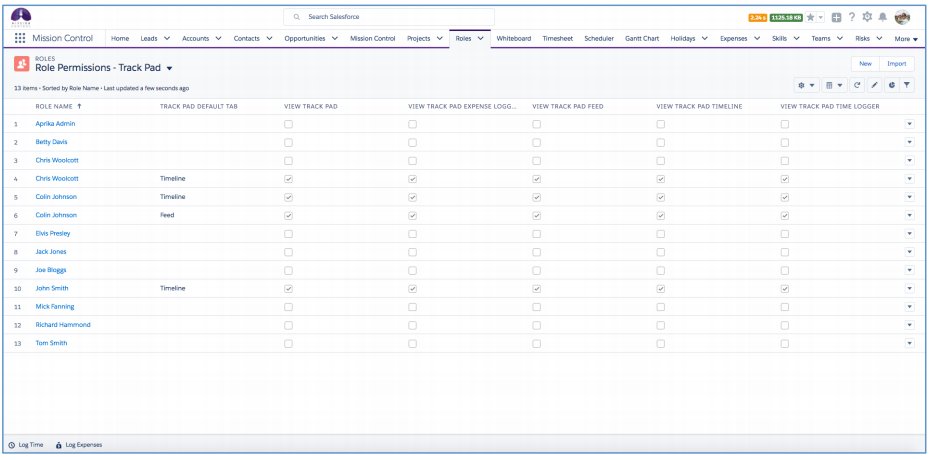
To ensure all of your Roles have access to the Project Overview upon initial upgrade to this version, an Install Script will run as part of the upgrade that will set all of the fields to TRUE. You will then be able to adjust the settings for each Role as required.
Lightning Experience ‘Utility Bar’
For customers using Lightning Experience, you will now be able to take advantage of the ‘Utility Bar’, which will provide you with the ability to access the ‘Log Time’ and ‘Log Expense’ Components from anywhere in Lightning Experience.
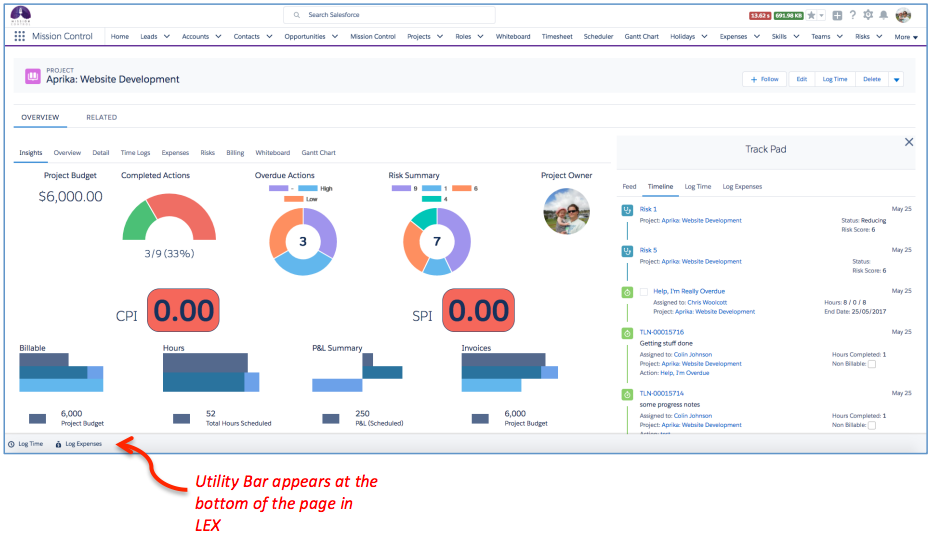
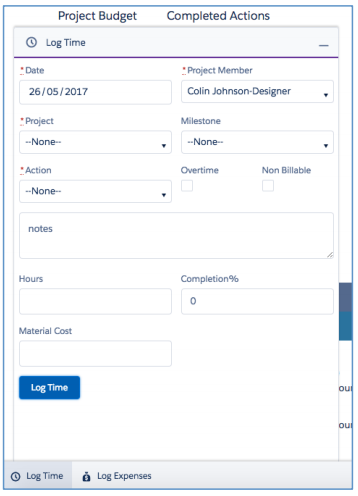
Log Time
To log time from the Utility Bar, simply click the ‘Log Time’ icon in the bottom left corner of the screen. This will open up the Time Logger Component. From here, you will be able to log your time or start/stop your time recording against any Action.
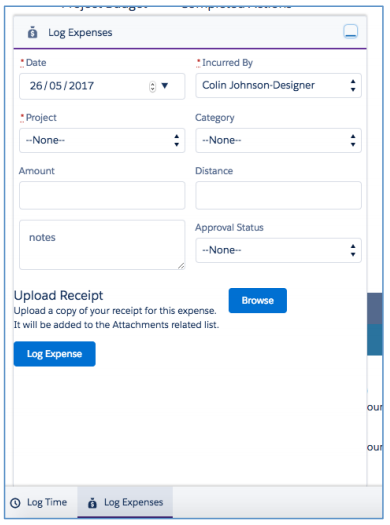
Log Expenses
To log expenses from the Utility Bar, simply click the ‘Log Expenses’ icon in the bottom left of the screen. This will open up the Expense Logger Component. From here, you will be able to log your expenses against any project, as well as uploading a copy of the receipt if applicable.
Configuration
A Lightning App has been included in the release. However, Salesforce does not currently allow customers to modify the apps that come as part of a Managed Package such as Mission Control. You will therefore need to configure a Lightning App in order to be able to use the Utility Bar in the footer of the Lightning Experience User Interface. Follow the instructions below:
Click Setup, then navigate to Apps > App Manager
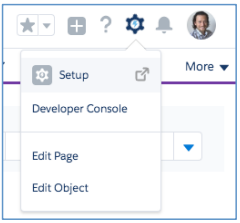
Click the ‘New Lightning App’ Button in the top-right section of the page. This will take you to a step-by-step wizard page as shown below.
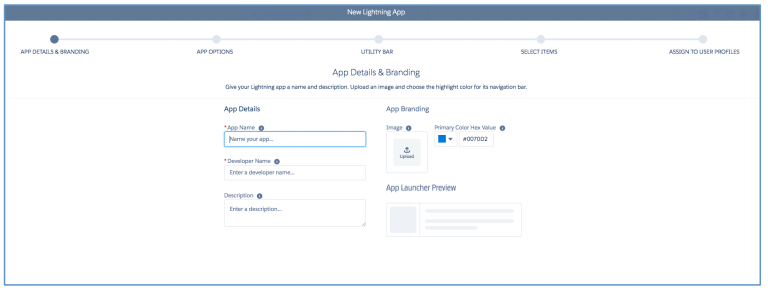
Complete the ‘App Details & Branding’ section as below:
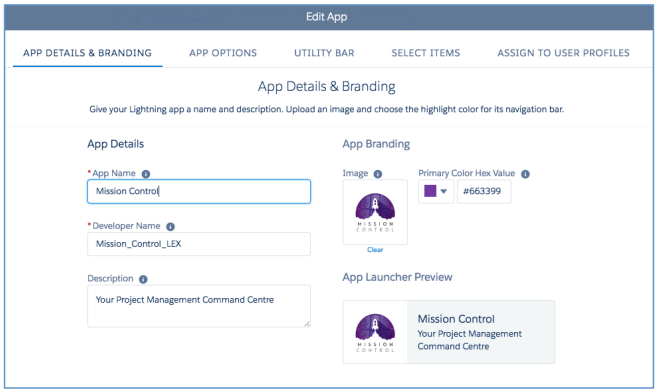 The Mission Control Logo can be sourced here: resources.aprika.com.au/logos/mc_logo_lex_app.png
Click Next and then select ‘Standard Navigation’ for the App Options Tab and then Click Next again.
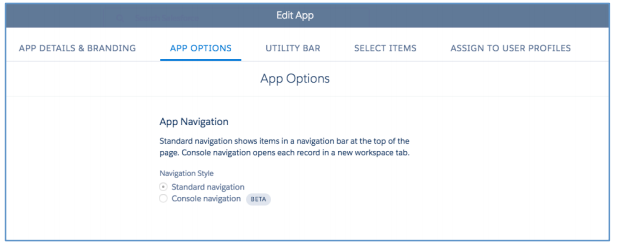
In the Utility Bar Tab, click on the ‘Add’ button.
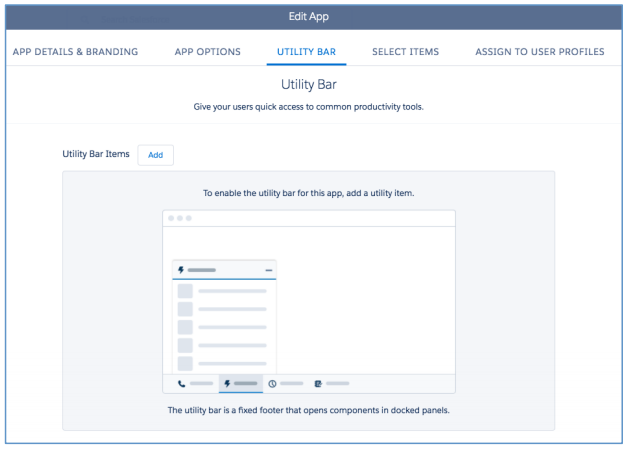
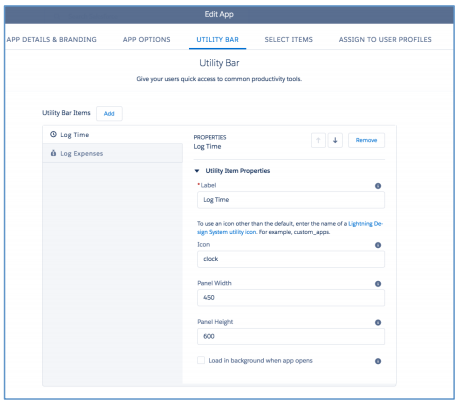
Add the ‘InboxAppLogTime’ Component and configure as shown below.
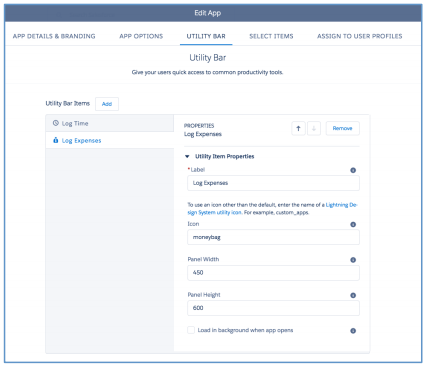
Add the ‘LogExpense’ Component and configure as shown below.
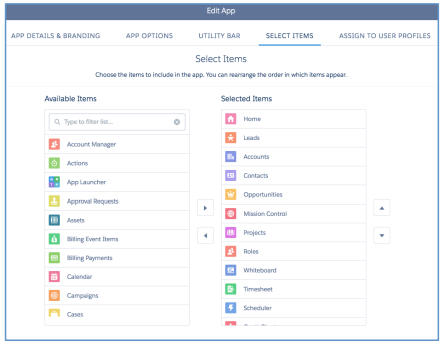
Click Next and then select the Tabs you want to appear in the ‘Selected Items’ section. Once you’re finished, Click Next.
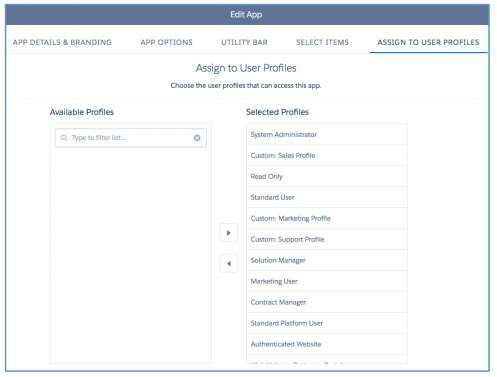
Then add the Profiles to the ‘Selected Profiles’ list that you wish to assign access to for this Lightning App and Click Done.
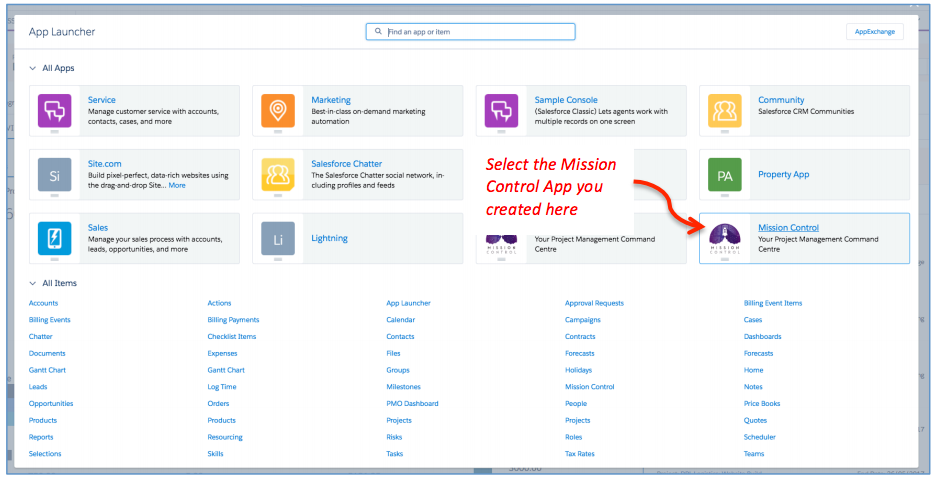
Your new Lightning App will now be available to select from the ‘App Launcher’ as shown below:
LockerService Compliance
All Mission Control Lightning Components are now LockerService compliant. Salesforce had planned to enable LockerService in all orgs starting with the Summer ’17 release. However, they recently stated (28th April 2017) that the roll-out plan has been revised.
They will now only be enforcing LockerService for a Lightning Component set to the API Version 40.0. Therefore, whilst Salesforce is still developing LockerService, we will be keeping all Mission Control Lightning Components set to API Version 39.0, so LockerService will not be enabled.
Action & Task Enhancements
When creating an Action, there is the option to select the ‘Task’ Checkbox. This also creates a Salesforce Task as well as the Action. When completing the Action, you previously had to also complete the Task separately, or vice-versa.
The Action Trigger has been enhanced to now set the Task to Completed if the Action Status is set to Complete. A Trigger has been added to the Task Object that will update the Action Status to Complete, if the Task is set to Completed. This will only apply where the ‘Action ID’ on the Task record contains the Action ID.
Completion % Enhancements
Previously the Completion % on the Milestone and Project Objects were calculated based on the Hours Completed / Hours Scheduled. To support customers that are not logging time, we have enhanced these formula fields to now enable you to measure the Completion % based on the number of completed actions / total actions.
To support this enhancement, two new ‘Roll Up Summary’ fields have been added to the Milestone and Project Objects:
- Total Actions (Count of all related Actions)
- Complete Actions (Count of all Actions where Status = Complete)
The Completion % Formula Field on the Milestone and Project Objects have been modified. If no time has been logged against the Project, the formula will return a percentage based on:
Complete Actions / Total Actions
Once Time Logs have been added to the Project, the formula will return a percentage based on:
Hours Completed / (Hours Completed + Hours Remaining)
Once the Milestone or Project Status field is set to Complete, the formula will return 100%.
Project Cost Enhancements
The following three formula fields have been adjusted:
- Total Project Cost (Scheduled)
- Total Project Cost (Actual)
- Total Project Cost (Forecast)
The formula fields have been enhanced to take into account the Hours Cost, Material Cost and Expenses.
New Field Overview
A number of new fields have been added to the solution as part of this release. We recommend you add these fields to your Page Layouts.
Project
| Field Name | Field Type | Comments | New / Existing |
| Complete Actions | Roll Up Summary | Sums the Complete Actions field on the Milestone Object | New |
| Total Actions | Roll Up Summary | Sums the Total Actions field on the Milestone Object | New |
| Project Completion Status | Formula (Percent) | Modified formula to:If(ISPICKVAL(amc__Status__c, “Complete”) , 1, If(amc__Hours_Completed__c = 0, If(amc__Total_Actions__c > 0, amc__Complete_Actions__c / amc__Total_Actions__c, 0), amc__Hours_Completed__c / ( amc__Hours_Completed__c + amc__Hours_Remaining__c ))) | Existing |
| Total Project Cost (Scheduled) | Formula (Currency) | Modified formula to:amc__Hours_Scheduled_Value_Cost__c + amc__Material_Costs_Scheduled__c + amc__Anticipated_Project_Expenses__c | Existing |
| Total Project Cost (Actual) | Formula (Currency) | Modified formula to:amc__Hours_Completed_Value_Cost__c + amc__Expense_Summary__c + amc__Actual_Project_Expenses__c | Existing |
| Total Project Cost (Forecast) | Formula (Currency) | Modified formula to:amc__Hours_Completed_Value_Cost__c + amc__Hours_Remaining_Value_Cost__c + amc__Material_Costs_Forecast__c + IF(amc__Anticipated_Project_Expenses__c > amc__Actual_Project_Expenses__c, amc__Anticipated_Project_Expenses__c, amc__Actual_Project_Expenses__c) | Existing |
| Amount Paid | Currency | Identifies the value of Billing Events that have been paid excluding Tax | New |
| Tax Amount Paid | Currency | Identifies the value of the Tax paid as part of all Billing Events | New |
| Amount Outstanding | Currency | Identifies the value of Billing Events outstanding excluding Tax | New |
| Tax Amount Outstanding | Currency | Identifies the value of the Tax of all outstanding Billing Events | New |
Milestone
| Field Name | Field Type | Comments | New / Existing |
| Complete Actions | Roll Up Summary | Count all Actions where Status = Complete | New |
| Total Actions | Roll Up Summary | Count all Actions | New |
Role
| Field Name | Field Type | Comments | New / Existing |
| Track Pad Default Tab | Picklist | Identifies which Tab is displayed by Default on the Track Pad | New |
| View Track Pad | Checkbox | Identifies if the Role has the permission to view the Track Pad | New |
| View Track Pad Feed | Checkbox | Identifies if the Role has the permission to view the Feed Tab on the Track Pad | New |
| View Track Pad Timeline | Checkbox | Identifies if the Role has the permission to view the Timeline Tab on the Track Pad | New |
| View Track Pad Time Logger | Checkbox | Identifies if the Role has the permission to view the Log Expenses Tab on the Track Pad | New |
| View Track Pad Expense Logger | Checkbox | Identifies if the Role has the permission to view the Log Expenses Tab on the Track Pad | New |
| Project Overview Default Tab | Picklist | Identifies which Tab is displayed by Default on the Project Overview | New |
| View Insights Tab | Checkbox | Identifies if the Role has the permission to view the Insights Tab on the Project Overview Page | New |
| View Overview Tab | Checkbox | Identifies if the Role has the permission to view the Overview Tab on the Project Overview Page | New |
| View Overview Tab Charts | Checkbox | Identifies if the Role has the permission to view the Overview Tab Charts on the Project Overview Page | New |
| View Time Logs Tab | Checkbox | Identifies if the Role has the permission to view the Time Logs Tab on the Project Overview Page | New |
| View Time Logs Tab Charts | Checkbox | Identifies if the Role has the permission to view the Time Logs Tab Charts on the Project Overview Page | New |
| View Expenses Tab | Checkbox | Identifies if the Role has the permission to view the Expenses Tab on the Project Overview Page | New |
| View Expenses Tab Charts | Checkbox | Identifies if the Role has the permission to view the Expenses Tab Charts on the Project Overview Page | New |
| View Risks Tab | Checkbox | Identifies if the Role has the permission to view the Risks Tab on the Project Overview Page | New |
| View Risks Tab Charts | Checkbox | Identifies if the Role has the permission to view the Risks Tab Charts on the Project Overview Page | New |
| View Billing Tab | Checkbox | Identifies if the Role has the permission to view the Billing Tab on the Project Overview Page | New |
| View Billing Tab Charts | Checkbox | Identifies if the Role has the permission to view the Billing Tab Charts on the Project Overview Page | New |
| View Whiteboard Tab | Checkbox | Identifies if the Role has the permission to view the Whiteboard Tab on the Project Overview Page | New |
| View Gantt Chart Tab | Checkbox | Identifies if the Role has the permission to view the Gantt Chart Tab on the Project Overview Page | New |
Billing Event
| Field Name | Field Type | Comments | New / Existing |
| Amount Paid | Formula (Currency) | Identifies the net amount paid | New |
| Tax Amount Paid | Formula (Currency) | Identifies the tax amount paid | New |
| Amount Outstanding | Formula (Currency) | Identifies the net amount outstanding | New |
| Tax Amount Outstanding | Formula (Currency) | Identifies the tax amount outstanding | New |
It is recommended that you add these new fields to your Page Layouts.
How do I upgrade?
To upgrade to the new version of Mission Control in your organisation, please follow the steps below:
- Click aprika.com.au/mc-app
- Click the ‘Get it Now’ button
- Enter your login details (if required)
- Click ‘Install in Production’
- Click ‘Confirm and Install’ (you may need to login again at this stage)
- Select which users you want to install for (‘Install for All Users’ is recommended)
- Click ‘Upgrade’
- Click Next (on step 1. Approve Package API Access)
- Select who you want to grant access to (on Step 2. Choose Security Level)
- Click Next
- Click Install
- Add new fields to project, milestone and action page layouts as required.
What’s New Webinar
We have pre-recorded the ‘What’s New’ webinar to provide further information on how to get the best out of the new features. To access this webinar, please view the ‘Release Notes’ section of the Mission Control Support Centre – www.aprika.com.au/mc-support
Feedback
Some of the new features included in this release of Mission Control have come from ideas submitted from existing clients. If you have an idea for enhancing Mission Control, you can submit it via email to [email protected].
Questions?
If you have any questions regarding this release notification, please do not hesitate to contact us at [email protected].
