Release Notification – 20 April 2018
A new version of Mission Control (version 1.46) will be released on the AppExchange on Friday 20th April 2018. This notification has been issued to existing Mission Control users. It contains an overview of the new features available with this release, along with instructions on how to upgrade to the new version.
What’s New?
This release sees a number of really cool new features being made available as well as some amazing enhancements to some existing functionality, including:
Let’s get stuck in to the detail…
Timesheet
In our opinion, this is a well-overdue upgrade to the existing Timesheet and we hope you’ll agree, it is going to be worth the wait. We’ve taken into account a lot of feedback from customers and we are super excited to see what you think of the new Timesheet.
The Timesheet now features three tabs, which are:
Timesheet
The Timesheet is the main way of entering Time Logs against your Actions. The new Timesheet is illustrated below.
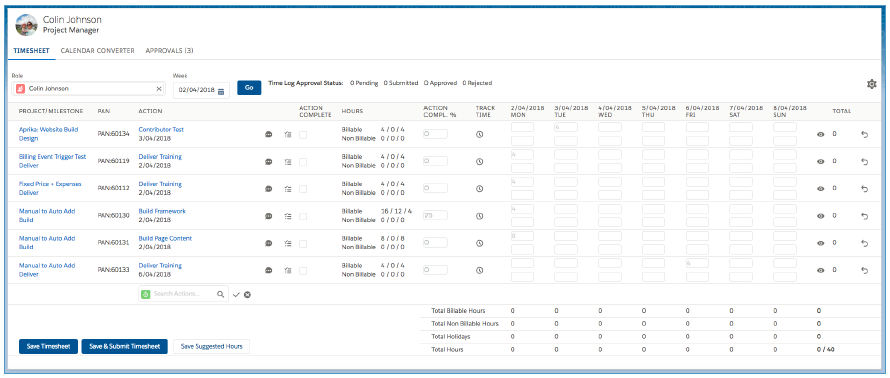
All existing functionality still exists, but there are a host of new features included, each of which have been detailed below.
Edit existing Time Logs
You’re now able to edit existing Time Log entries directly from the Timesheet. If you click the ![]() icon, you’ll access the ‘Time Log Summary’ component, as shown below.
icon, you’ll access the ‘Time Log Summary’ component, as shown below.

From here, you’re able to edit or delete individual Time Log records. You can edit the Hours Completed, Non Billable, Overtime and Exclude from Billable Capacity checkboxes, edit the Notes as well as view the Approval Status.
Chatter Feed
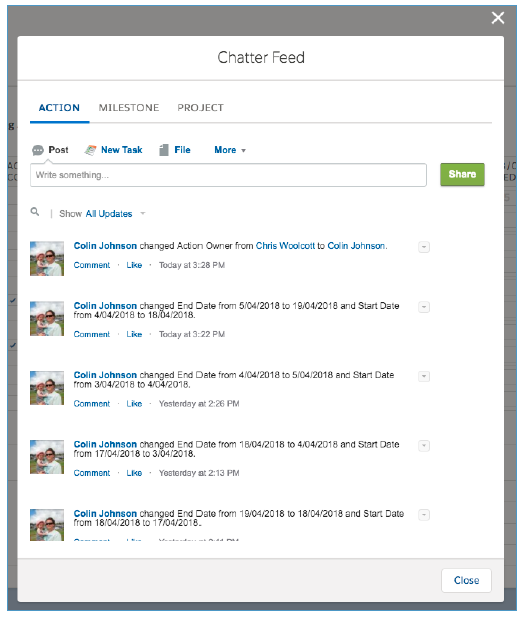
If you need to collaborate with colleagues whilst on the Timesheet, you’re able to click the ![]() icon to open up the Chatter component where you’re able to post on to the Action, Milestone or Project Chatter Feeds.
icon to open up the Chatter component where you’re able to post on to the Action, Milestone or Project Chatter Feeds.
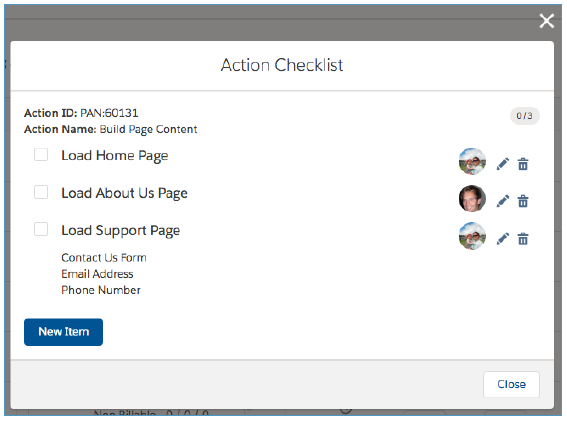
Checklist Items
You can access the Checklist Items relating to each Action displayed on the Timesheet by clicking on the ![]() icon.
icon.
Hours
The Hours column now only shows the hours allocated to you as the Action Owner or a Contributor, rather than the total hours allocated to the Action.
Suggested Hours
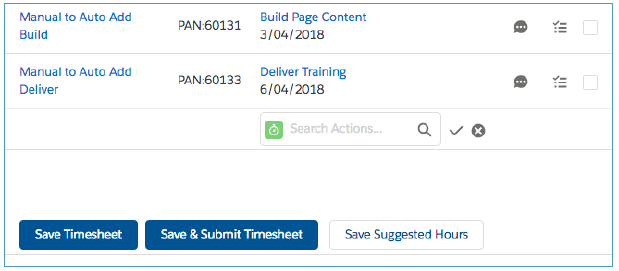
The ‘Suggested Hours’ feature divides the Hours Scheduled across the working days between the Start Date and End Date of an Action. The Suggested Hours are displayed on the Timesheet as grey numbers, as illustrated below:
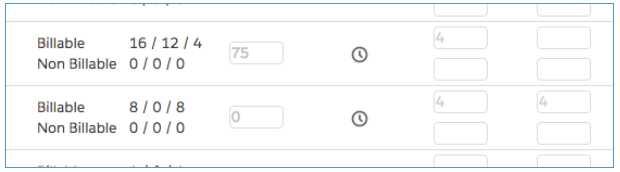
If you would like to convert the Suggested Hours into actual Time Logs, simply click the ‘Save Suggested Hours’ button at the bottom left of the page and it will create Time Logs for each individual Suggested Hours entry.
Daily & Weekly Summary
The Daily & Weekly Summary figures have now been expanded so you’re able to see the Total Hours as well as a breakdown of Billable, Non Billable and Holidays.

You’re also able to view a total of the hours logged per Action.
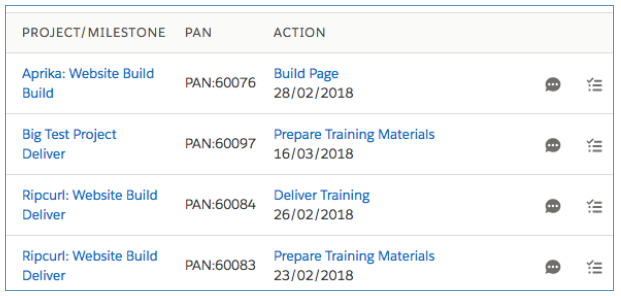
Quick Search Actions
If you need to add an Action to the Timesheet in order to log time against it that week, you’re able to do so using the quick search feature:
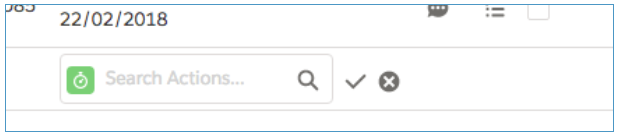
You can type in a string of text and the results will filter to show any Actions where the search string has been found in the Project, Milestone or Action.
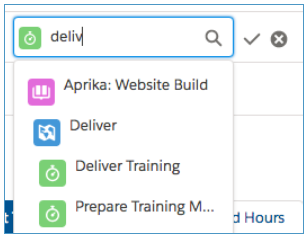
Once you’ve found the Action you would like to add, click the ![]() icon and that Action will be loaded into the Timesheet.
icon and that Action will be loaded into the Timesheet.
Customisation Options
To provide you with as much customisation as possible, the Timesheet has a Settings section that you can access by clicking the ![]() icon.
icon.
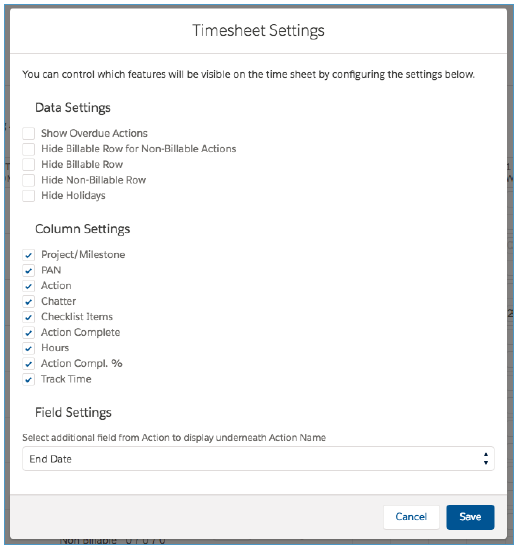
Within the Settings section, you’re able to configure your own personal preferences, based on the following:
Data Settings
Column Settings
The Column Settings provide you with the ability to choose which columns you have visible on the Timesheet. For example, if you don’t want to see the ‘PAN’ column set the checkbox to FALSE and that Column will no longer appear on the Timesheet.
Field Settings
There is a provision for you to be able to include one additional field from the Action Object to be visible on the Timesheet. The field you select here will be displayed directly underneath the Action Name, as shown below:
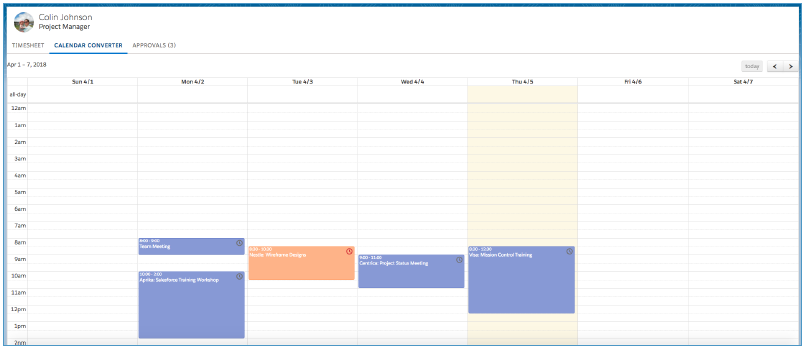
Calendar Converter
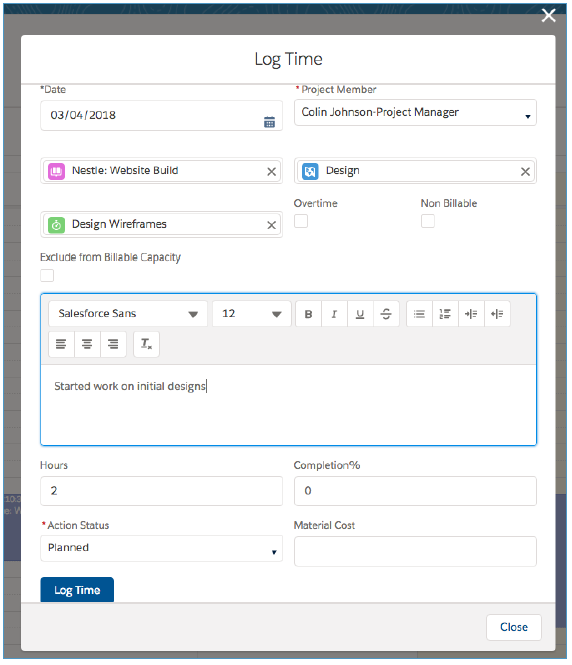
The Calendar Converter provides you with an alternative way of logging time based on Salesforce ‘Events’ you may have in your Salesforce Calendar. For example, if you’re entering events into your Google or Outlook Calendar to capture your project work, and syncing your Google or Outlook Calendar to Salesforce, these Salesforce ‘Events’ will be displayed on the Calendar Converter tab on the Timesheet, as shown below.

To create a Time Log from any of these Event records, you simply need to click the ![]() icon. This will open up the Time Log component that lets you select the Project / Milestone / Action, enter your Notes and then click the ‘Log Time’ button.
icon. This will open up the Time Log component that lets you select the Project / Milestone / Action, enter your Notes and then click the ‘Log Time’ button.
Once the Time Log has been created, the Event on the Calendar Converter will be displayed in the Colour relative to the Project, so you’re able to identify that the Event has already been converted to a Time Log.
Approvals
The Approvals tab provides you with an efficient way of approving any Time Logs that are submitted for your approval.
Note, the Approvals tab will only be visible on the Timesheet if you have Time Logs to approve.
When you click on the Approvals tab, you’ll see a list of the people that you need to review / approve Time Logs for on the left-hand side of the page.

Clicking on to one of the Roles listed will then display the Time Logs that require your approval, as shown below:
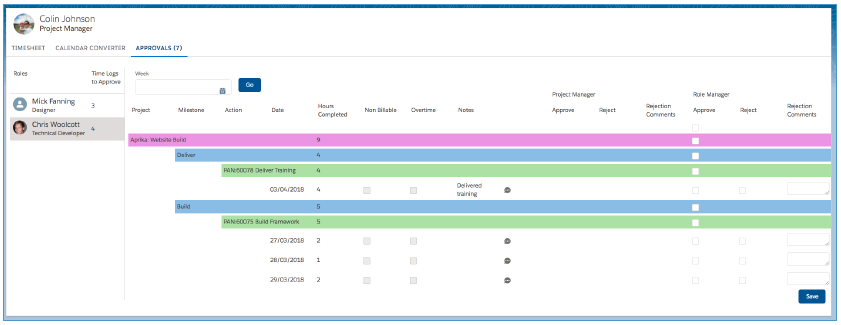
The main section of the page will show you all of the Time Logs that require your approval. The Time logs are grouped by Project > Milestone > Action. The Date, Hours, Non-Billable, Overtime and Notes fields are visible for each Time Log. You also have access to the Time Log Chatter Feed should you need to collaborate with colleagues to clarify anything.
There are sections for approval that is required as the ‘Project Manager’ or the ‘Role Manager’. You will only have the ability to approve as either of these, if you are specified as that approver. For example, if I’m not the Project Manager, but I’m the person’s Role Manager, I will only be able to approve the Time Logs as the Role Manager.
There are Checkboxes to ‘Approve’ or ‘Reject’ the Time Logs, as well as a field for entering ‘Rejection Comments’
Role Utilisation Report
There is a custom report included in Mission Control called ‘Role Utilisation – Last 3 Mth’ which lets you view the utilisation of each Role based on the sum of their Time Logs logged per week vs the ‘Hours per Week’ on their Role record. This report was unable to take into account full utilisation of each person given the Holidays are stored in a separate Object.
A new page called the ‘Role Utilisation Report’ has been included in this release that will let you take into account Time Logs and Holidays, so you’re able to get a full picture of the utilisation for each Role.
In addition to reporting on the ‘Utilisation’ of each Role, it will also allow you to report on the ‘Billable Performance’ as well. To support this, a new field has been added to the Role Object called ‘Billable Target %’, which is used to calculate the target number of ‘Billable’ hours each Role should achieve. For example, if Mick Fanning has an ‘Hours per Week’ value of 40 and a ‘Billable Target %’ value of 80%, then his Billable Target Hours would be 32.
In some situations, a customer may wish to have the flexibility of reducing the Billable Target Hours from one week to another, based on whether the Role has been assigned to specific Actions that fall outside of their usual target. For example, working on a support issue as part of an ongoing contract, or working on an RFP that the business is responding to.
To provide customers with the ability to identify certain Actions that should be excluded from the Billable Hours Target, a new feature referred to as ‘Exclude from Billable Capacity’ has been added to the Project, Milestone, Action and Time Log Objects. This ‘Exclude from Billable Capacity’ Checkbox has been added to key pages throughout the system such as:
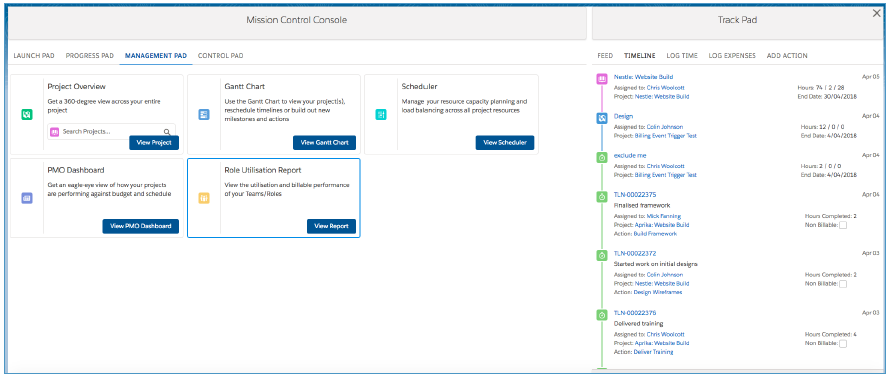
You can access the Role Utilisation Report from the ‘Management Pad’ of the Console (see below). It can also be added to the main navigation menu.
When you initially load the Role Utilisation Report, you will be required to select who you’re wanting to view details for. This selection can be made by selecting Team(s) or individual Role(s). You’re also able to specify the timeframe and whether you’d like to group the data weekly or monthly.

Once you’ve made your selections, the data will load for each Role, as shown below.
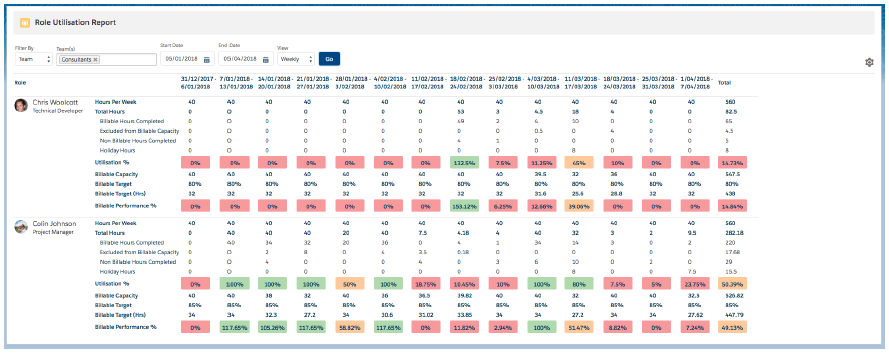
The individual figures displayed are explained below.
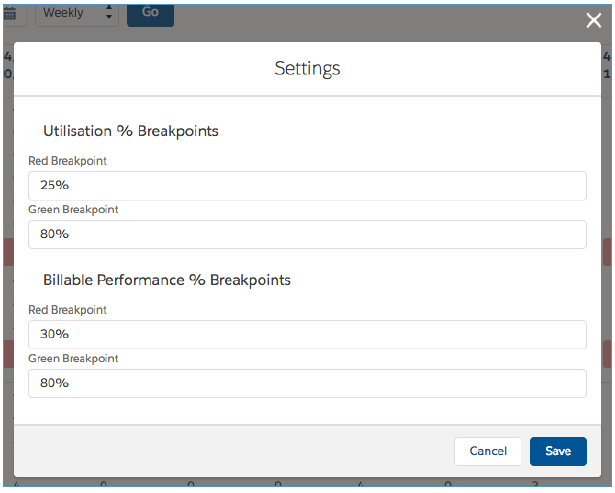
Page Settings
You’re able to set the breakpoints for the Utilisation % and Billable Performance % figures by clicking on the ![]() icon.
icon.
Invoice Appendices
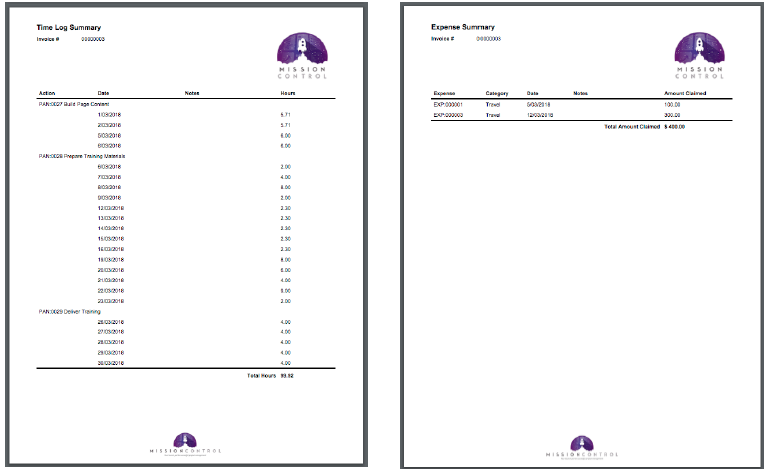
If you are generating Time & Materials invoices, you will be pleased to hear that you’re now able to include appendices to the invoice PDF that show the Time Logs and Expenses included in the invoice.
Two new fields have been included on the Project Object called:
If these fields are set to TRUE, the appendices will be automatically included in the PDF. The Time Log appendix shows the Action the Time Logs relate to, the date, notes and hours of the Time Log. The Expense appendix shows the Expense ID, Category, Date, Notes and Amount Claimed. See below for examples of the two appendices.
Billing Event Enhancements
A number of enhancements have been added to the Billing Event feature within Mission Control. Each feature enhancement is explained below.
Fixed Price + Expenses
Currently, Mission Control lets you specify the ‘Billing Type’ as:
We’ve had numerous customers advise they often have a situation where they’re charging their customers a Fixed Price, but invoice for expenses over and above the fixed price fee.
To accommodate this situation, a new billing type value of ‘Fixed Price + Expenses’ has been added. Please note, due to limitations in the automatic upgrade process, you will need to manually add this value to the ‘Billing Type’ Picklist field.
To do this, please follow the instructions below:
Click Setup > Object Manager > Project > Fields > Billing Type > Add the following value:
Fixed Price + Expenses
This new option will reflect the existing ‘Fixed Price’ logic, but will also include any approved, billable Expense records that have not yet been associated to a Billing Event Item.
To enable Expenses to be included when using the Milestone ‘Billing Cycle’, a new field has been added to the Expense Object allowing you to relate an Expense to a specific Milestone. When using the ‘Fixed Price + Expenses’ Billing Type in conjunction with the ‘Milestone’ Billing Cycle’, only Expenses relating to the Milestone will be included on the Billing Event.
Invoice different business entities
We received requests from some customers to have the ability to invoice different businesses on one Project. Until now, the Billing Event would reference the Account and Contact specified on the Project.
To provide the ability to invoice a different business, or contact, two new fields have been added to the Billing Event:
If these fields are populated on the Billing Event, the invoice will be addressed to the Account / Contact specified on the Billing Event. If they are left blank, the invoice will be addressed to the Account / Contact specified on the Project.
Manual Billing ‘Auto Add’
Two new fields have been added to the Billing Event Object that will allow you to automatically add Time Logs and Expenses to a Billing Event. The two fields will need to be added to the page layout and are called:
When generating a new Billing Event, a User will now be able to set these to Checkbox fields to be TRUE and once the Billing Event is saved, two new Billing Event Item records will automatically be created, including all billable Time Logs and Expenses that have not yet been invoiced.
These new fields can only be used when the Project Billing Cycle field is set to ‘Manual’. To enforce this a new Validation Rule called ‘Ensure_Billing_Cycle_Manual’ has been added to the Billing Event Object.
Project Field Updates
Previously, when a new Billing Event with a Type of ‘Invoice’ was created, the ‘Amount Invoiced’ field on the Project would automatically be updated to incorporate the value of the newly created Billing Event.
This logic has now been changed so it will no longer be updated until the Status of the Billing Event is set to ‘Issued’.
Four Weekly Billing Frequency
An additional ‘Periodic Billing Frequency’ has been added in called ‘4 Weekly’. Selecting this option will allow you to generate Time & Materials, Periodic Billing Events on a four weekly cycle.
Please note, due to limitations in the automatic upgrade process, you will need to manually add this value to the ‘Periodic Billing Frequency’ Picklist field.
To do this, please follow the instructions below:
Click Setup > Object Manager > Project > Fields > Periodic Billing Frequency > Add the following value:
4 Weekly
Reset Baseline Dates
A new Checkbox field has been added to the Project record called ‘Set Baseline Dates’. When this field is set to TRUE, all of the Baseline Start Date and Baseline End Date values on the Actions will be updated to match the existing Start Date and End Date.
This will allow customers to create Projects, adjust the scheduling of the Project and then once it’s ready to go live, they can commit the Baseline Dates.
Chatter Feed Component
The Chatter Feed component that is available on the Whiteboard and the Timesheet has been updated to provide you with the Chatter Feeds of the Action, Milestone and Project.
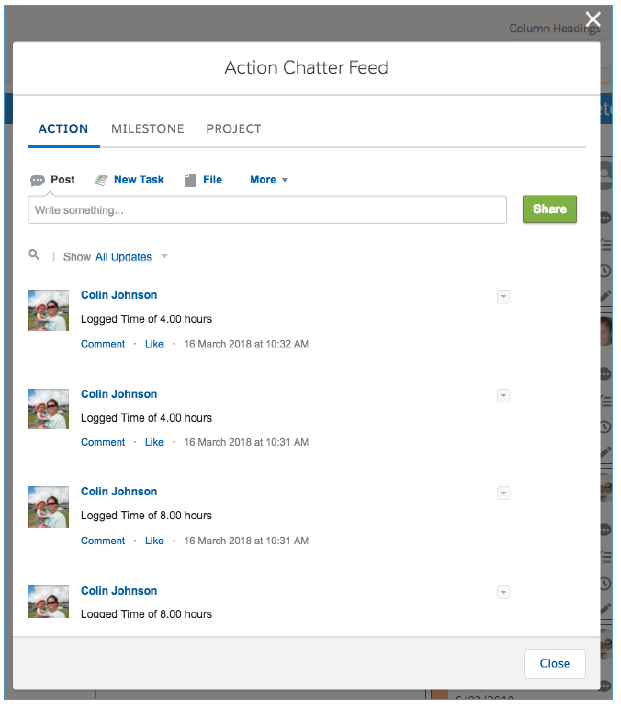
This will allow Users to quickly access the appropriate Chatter Feed so they can collaborate in context of the appropriate record.
Dependencies
To date, the only dependency supported within Mission Control was a ‘Finish to Start’ relationship between two Actions. An Action could be a parent of multiple children, but a child could only have one parent.
A new Custom Object called ‘Dependency’ has been added to the system that will provide far greater flexibility in creating dependency relationships.
This means that a child can now be associated to multiple parents. In addition, a variety of dependency types are now supported:
| Parent | Child | Type |
| Action | Action | Finish to Start |
| Action | Action | Start to Start |
| Milestone | Action | Finish to Start |
| Milestone | Action | Start to Start |
To support these new options, the ‘Dependency Email Notifications’ have been enhanced so those Roles involved with the child Action get notified at the appropriate time, as follows:
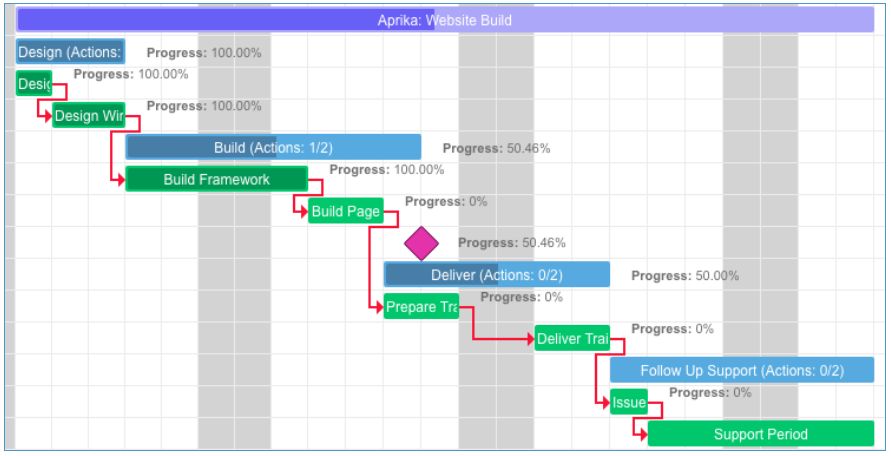
The illustration below shows the various dependency relationships you’re now able to create.
Gantt Chart Enhancements
A number of minor enhancements have been added to the Gantt Chart, including:
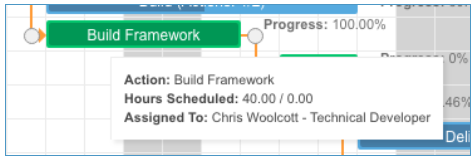
Hover Box Tooltips
You are now able to turn off the hover box (see illustration below) that displays various field values.
This can be turned off by navigating to the ‘Control Pad’ on the Console. Within the ‘Gantt Chart Settings’ section, set the ‘Disable Gantt Tooltips’ to be TRUE and click Save.
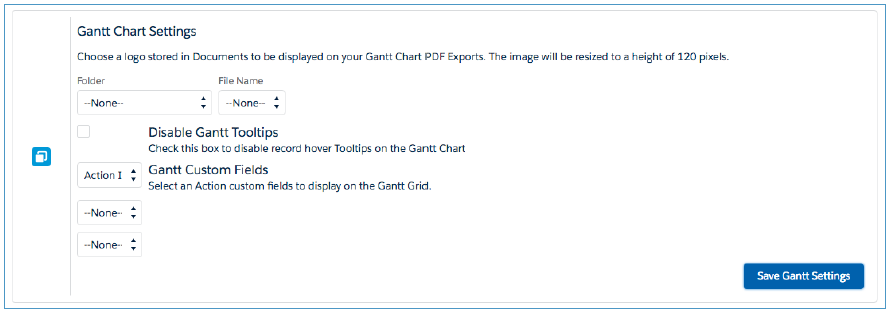
Note: This is an org-wide setting, so if it is turned off, it will be turned off for all Users.
Milestone Sort Order
A new field has been added to the Milestone Object allowing you to specify the order of the Milestones. This will primarily be visualized on the Gantt Chart, but will also drive the ordering of Milestones on the Project Overview ‘Overview’ Tab.
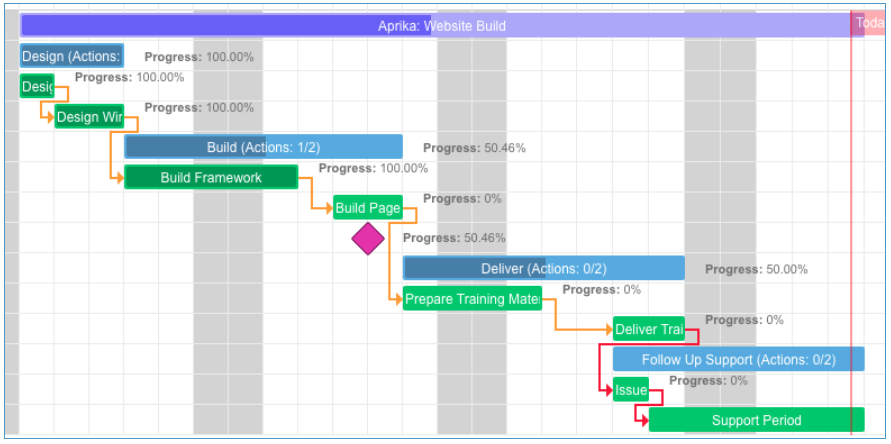
The example below shows a Gantt Chart where the Milestone Sort Order field has been left blank on all Milestones.
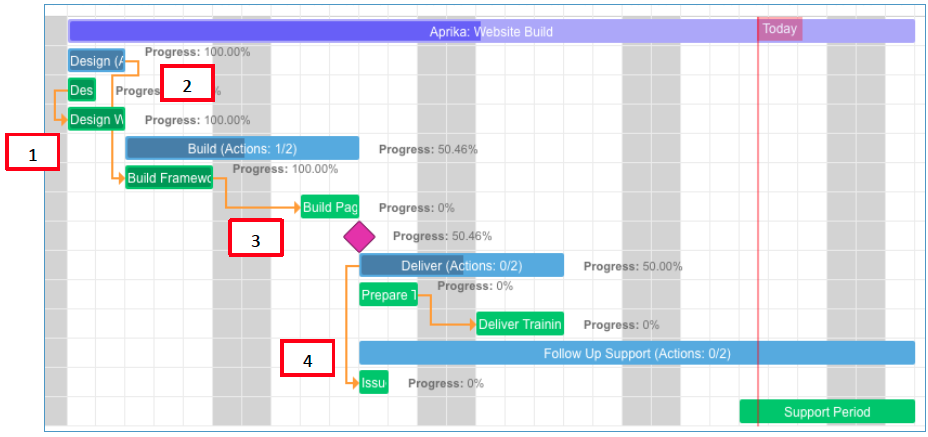
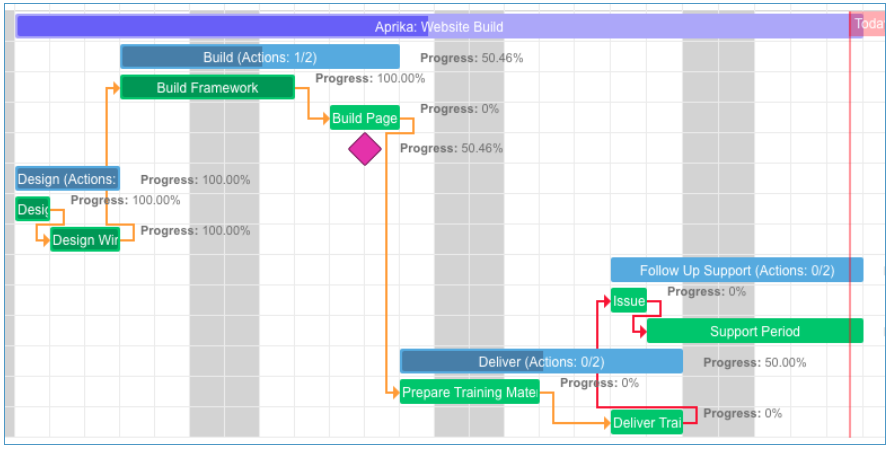
The example below shows a Gantt Chart where the Milestone Sort Order has been set as follows:
Design = 2
Build = 1
Follow Up Support = 3
Deliver = 4
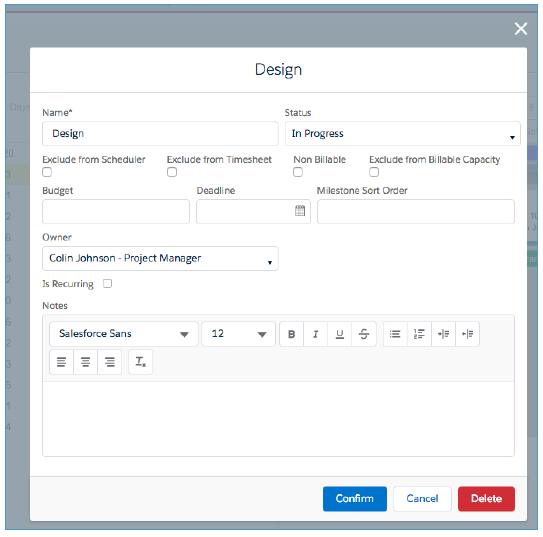
The Milestone Sort Order field is accessible from the Milestone Edit Modal Window on the Gantt Chart, as illustrated below.
Milestone Deadline Rescheduling
You are now able to drag and drop the Milestone Deadline ‘Diamond’ to adjust the date. Previously, you had to double click the Milestone in order to open the edit modal window and adjust the date from there.
You are now also able to double click on the Milestone Deadline Diamond to open the edit modal window.
Collapse Gantt Chart
A new button has been added to the Gantt Chart that enables you to hide the Gantt Chart so you’re able to view just the Data Table.

Clicking this button will remove the Gantt Chart, leaving only the Data Table in view, as illustrated below.
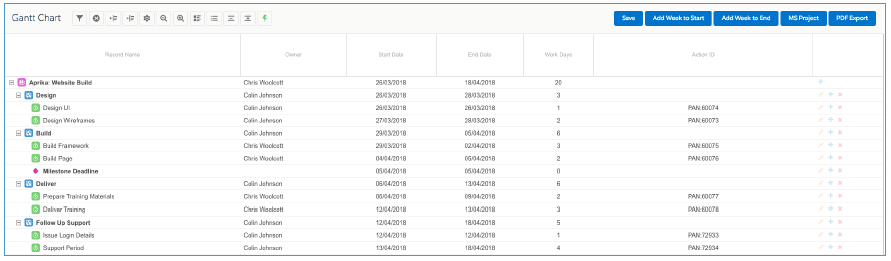
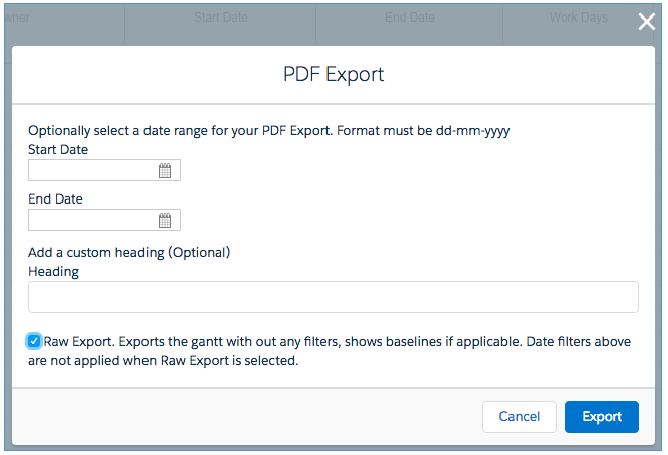
Note: If you wish to export the Data Table as a PDF, you must ensure the ‘Raw Export’ Checkbox is set to TRUE.
Display Custom Fields
You can now add 3 additional fields in the Data Table. From the ‘Control Pad’ on the Console, within the Gantt Chart Settings section, you can specify up to 3 fields to add, as shown below.
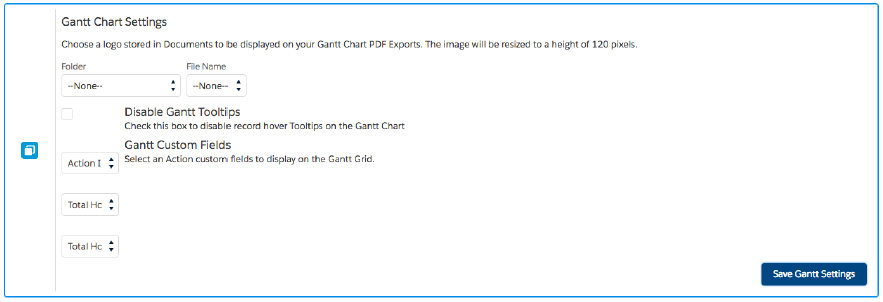
The 3 additional fields will appear on the right-hand side of the Data Table, as shown below.

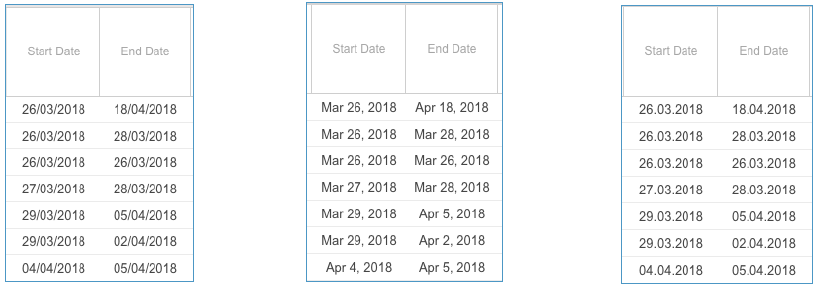
Date Formatting
Previously the format of the Date fields on the Gantt Chart was fixed as YYYY-MM-DD. Now, the format will be determined based on the User ‘Locale’ setting. For example, depending on your Locale setting, you will see the dates displayed in a different format, as shown in some different examples below.
Locale: English (Australia) Locale: English (United States) Locale: German
Edit / Add / Delete Buttons
Previously, there was a + sign against each row on the Gantt Chart that let you add a child record beneath it. To edit or delete a record, you had to double-click on the record to open the modal window.
Additional buttons have been added to the row based on the type of record, allowing you to edit, add or delete records. The new buttons are as shown below.

Note: you are still able to open the modal window by double-clicking on the record
Auto Scheduling
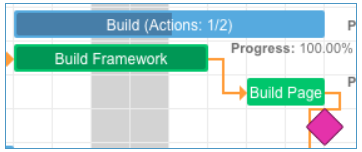
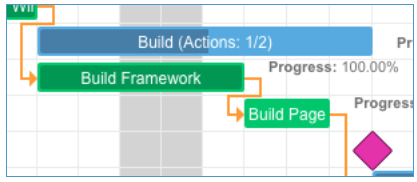
A new ‘Auto Scheduling’ feature has been added to the Gantt Chart that will automatically reschedule records when dependencies are created. For example, in the illustration below, there are one day of lag between the Build Framework and Build Page Content Actions.
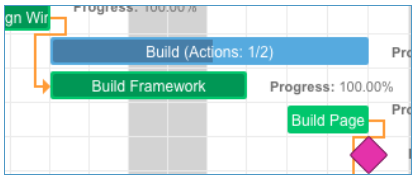
Once I create a dependency between the two Actions, in this instance a ‘Finish to Start’, the Auto Scheduling feature will automatically snap the child Action to start on the day following the completion of the parent Action, as shown below.
To ‘fine tune’ the scheduling of your Projects, you can turn off the Auto Scheduling feature. There is a new button available on the Gantt Chart, as shown below.

When Auto Scheduling is on, it will be displayed in green, when it is off, it will be displayed in red.

Critical Path
A long-awaited feature that is now available on the Gantt Chart is the ‘Critical Path’. The Critical Path is the path within the project that has the least amount of slack. Therefore, if any of those Actions within the Critical Path are delayed, the overall Project is likely to be delayed.
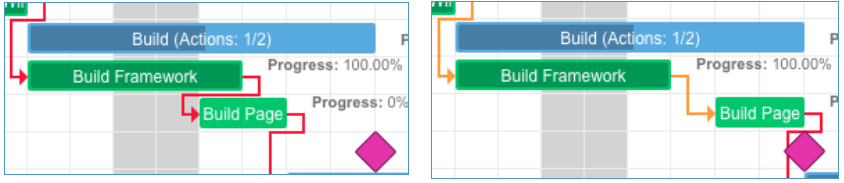
If an Action / Milestone falls within the Critical Path, through it’s relationships with other Actions / Milestones from it’s dependencies, the relationship will be highlighted red, as shown below.
Note: Critical Path will support Lead between Actions, but not Lag. Lead is where the child Action starts prior to the parent Action finishing, whereas Lag is where there is a gap between the parent Action finishing and the child Action starting. See below for examples of Lead and Lag.
Lead Lag
Program & Requirements
We’re already planning some really cool new features for the next release of Mission Control. In preparation for that release, we’re including a number of new Custom Objects in this release, including:
We will be introducing some new pages in the subsequent release to enable you to efficiently build out your requirements, map them to Projects and convert them to Actions. We’re including the Objects in this release so you can start to familiarize yourselves with them.
New Field Overview
A number of new fields have been added to the solution as part of this release. We recommend you add these fields to your Page Layouts. You will also need to check the Field Level Security for all of these fields to ensure all appropriate Profiles have the required access.
Role
| Field | Field Type | Comments |
| Billable Target | Percent (16, 2) | Identifies the percentage of billable work per week this Role should achieve |
Project
| Field | Field Type | Comments |
| Exclude from Billable Capacity | Checkbox | Identifies if the Actions related to this Project should be excluded from Billable Capacity |
| Include Time Log Appendix | Checkbox | Identifies whether the Time Log Appendix should be added to the Billing Event PDF. Note: Only applies to Time & Materials Projects |
| Include Expense Appendix | Checkbox | Identifies whether the Expense Appendix should be added to the Billing Event PDF. Note: Only applies to Time & Materials or Fixed Price + Expenses Projects |
| Billing Type (existing field) | Picklist | Add the following value:Fixed Price + Expenses |
| Periodic Billing Frequency (existing field) | Picklist | Add the following value:4 Weekly |
| Set Baseline Dates | Checkbox | Identifies whether the Baseline Dates should be updated to reflect the current actual dates. This will update the Project, Milestone and Action Baseline Start Date and Baseline End Date |
| Program | Lookup (Program) | Links to the Program record this Project relates to |
Milestone
| Field | Field Type | Comments |
| Exclude from Billable Capacity | Checkbox | Identifies if the Actions related to this Milestone should be excluded from Billable Capacity |
| Exclude from Billable Capacity Indicator | Formula (Checkbox) | Identifies if the Actions related to this Milestone should be excluded from Billable Capacity. References the Project field if the Milestone field is Blank. |
Action
| Field | Field Type | Comments |
| Exclude from Billable Capacity | Checkbox | Identifies if this Action should be excluded from Billable Capacity |
| Exclude from Billable Capacity Indicator | Formula (Checkbox) | Identifies if this Action should be excluded from Billable Capacity. References the Milestone field if the Action field is Blank. |
Contributor
| Field | Field Type | Comments |
| Exclude from Billable Capacity | Checkbox | Identifies if this Contributor should be excluded from Billable Capacity |
| Exclude from Billable Capacity Indicator | Formula (Checkbox) | Identifies if this Contributor should be excluded from Billable Capacity. References the Action field if the Contributor field is Blank. |
Time Log
| Field | Field Type | Comments |
| Exclude from Billable Capacity | Checkbox | Identifies if this Time Log should be excluded from Billable Capacity |
| Exclude from Billable Capacity Indicator | Formula (Checkbox) | Identifies if this Time Log should be excluded from Billable Capacity. References the Action field if the Time Log field is Blank. |
Billing Event
| Field | Field Type | Comments |
| Account | Lookup (Account) | Identifies the Account the Billing Event should be linked to, if it is not the Account specified on the Project |
| Contact | Lookup (Contact) | Identifies the Contact the Billing Event should be linked to, if it is not the Contact specified on the Project |
| Auto Add Time Logs | Checkbox | When set to TRUE, any approved billable Time Logs not yet invoiced will be added to this Billing Event. Note: Only applies where Billing Cycle is Manual |
| Auto Add Expenses | Checkbox | When set to TRUE, any approved billable Expenses not yet invoiced will be added to this Billing Event. Note: Only applies where Billing Cycle is Manual |
Checklist Item
| Field | Field Type | Comments |
| Requirement | Lookup (Requirement) | Links to the Requirement record this Checklist Item relates to |
Program
| Field | Field Type | Comments |
| Program Name | Text (80) | Identifies the name of the Program |
| Program Owner | Lookup (Role) | Identifies the person responsible for the Program |
| Status | Picklist | Identifies the Status of the ProgramValues: Planned; In Progress; On Hold; Complete; Cancelled |
| Program Reference # | Text (255) | Internal reference number for the Program |
| Priority | Picklist | Identifies the Priority of the ProgramValues: High; Medium; Low |
| Objectives | Rich Text | Details of the Objectives this Program is looking to achieve |
| Program Notes | Rich Text | Detailed notes on the Program |
Requirement
| Field | Field Type | Comments |
| Requirement ID | Auto Number | Unique Identifier of the RequirementFormat: REQ:{000000} |
| Requirement Name | Text (255) | Identifies the name of the Requirement |
| Pain Point Notes | Rich Text | Detailed notes on the current pain point that is driving this Requirement |
| Requirement Notes | Rich Text | Detailed notes on the Requirement |
| Recommendations | Rich Text | Detailed notes on the recommended solution |
| Total Effort | Roll Up Summary (SUM) | Summarises the effort across all related User Stories |
| Program | Master Detail (Program) | Links to the Program record that this Requirement relates to |
| Status | Picklist | Identifies the Status this Requirement is currently allocated toValues: Backlog; Priority Backlog; Assigned to Project |
| Project | Lookup (Project) | Links to the Project this Requirement is assigned to |
| Action | Lookup (Action) | Links to the Action this Requirement is assigned to |
| Priority | Picklist | Identifies the Priority of this RequirementValues: High; Medium; Low |
| Required By | Date | Identifies the date this Requirement needs to be delivered by |
| Total User Stories | Roll up Summary (COUNT) | Identifies how many User Stories are related to this Requirement |
| Category | Picklist | Identifies the Category this Requirement relates to |
| Benefit | Rich Text | Detailed notes on the benefits that will be gained by delivering this Requirement |
User Story
| Field | Field Type | Comments |
| User Story ID | Auto Number | Unique Identifier of the User StoryFormat: USID:{000000} |
| Summary | Text Area (255) | A summary description of the User Story |
| As a | Lookup (Persona) | Links to the Persona record this User Story relates to |
| I want to | Rich Text | A description of what the Persona would like to be able to do |
| So that I can | Rich Text | A description of what the Persona is trying to achieve |
| Acceptance Criteria | Rich Text | Detailed notes on how this User Story will be evaluated |
| Status | Picklist | Identifies the Status of the User StoryValues: Identified; Approved; Deferred; Rejected; Delivered |
| Effort | Number (1, 0) | Identifies the effort required to deliver this User Story |
| Requirement | Master Detail (Requirement) | Links to the Requirement record this User Story relates to |
Persona
| Field | Field Type | Comments |
| Persona Name | Text (80) | The name of the Persona |
| Persona Overview | Rich Text | A detailed overview of the Persona |
| Persona Goals | Rich Text | A description of the Goals this Persona is trying to achieve |
| Program | Lookup (Program) | Links to the Program record this Persona relates to |
How do I upgrade?
Mission Control will be made available based on the following release schedule.
20th April 2018 – Available for manual upgrade from the AppExchange
28th April 2018 – Automatic upgrade to all Sandbox Orgs
5th May 2018 – Automatic upgrade to all Production Orgs
To manually upgrade to the new version of Mission Control in your organisation, please follow the steps below:
What’s New Webinar
We have pre-recorded the ‘What’s New’ webinar to provide further information on how to get the best out of the new features. To access this webinar, please view the ‘Release Notes’ section of the Mission Control Support Centre – www.aprika.com.au/mc-support
Feedback
Some of the new features included in this release of Mission Control have come from ideas submitted from existing clients. If you have an idea for enhancing Mission Control, you can submit it via email to [email protected].
Questions?
If you have any questions regarding this release notification, please do not hesitate to contact us at [email protected].
