Mission Control Version 1.61 Release Notification
17 June 2022
A new version of Mission Control (version 1.61) will be released on the AppExchange on Friday 17th June 2022. This notification has been issued to existing Mission Control users. It contains an overview of the new features available with this release, along with instructions on how to upgrade to the new version.
This release includes a number of new features, along with some enhancements to existing functionality, including:
Let’s get stuck into the detail…
A number of new features and enhancements have been added to the Gantt Chart. Each feature is detailed below.
When creating Actions within the Gantt Chart, rather than specifying the Start Date and End Date, you are able to specify the Start Date and the Working Days.
Whether creating the Action via the inline edit feature or by clicking the + icon and creating via the Action Modal, you are able to specify the Start Date and you can choose to either specify the End Date or the Work Days. Whichever field you specify, the other will automatically update to reflect the value of the other.
The slider feature on the Action bar within the Gantt Chart enables you to adjust the Completion % field on the Action record. When you use the slider, it will update the Completion % field and the Action will be considered to be manually overridden. Therefore, if Time Logs are created for this Action they will not automatically increase the Completion %, it will continue to need manual adjustment.
The Completion % slider is a triangular button accessible at the bottom of the Action bar, as shown below.

You are able to drag that forwards and backwards to increase or decrease the Action ‘Completion %’ field value as required.

This slider feature can be turned on / off as required via the Gantt Chart settings controlled by the individual User or centrally via the Control Pad of the Mission Control Console.
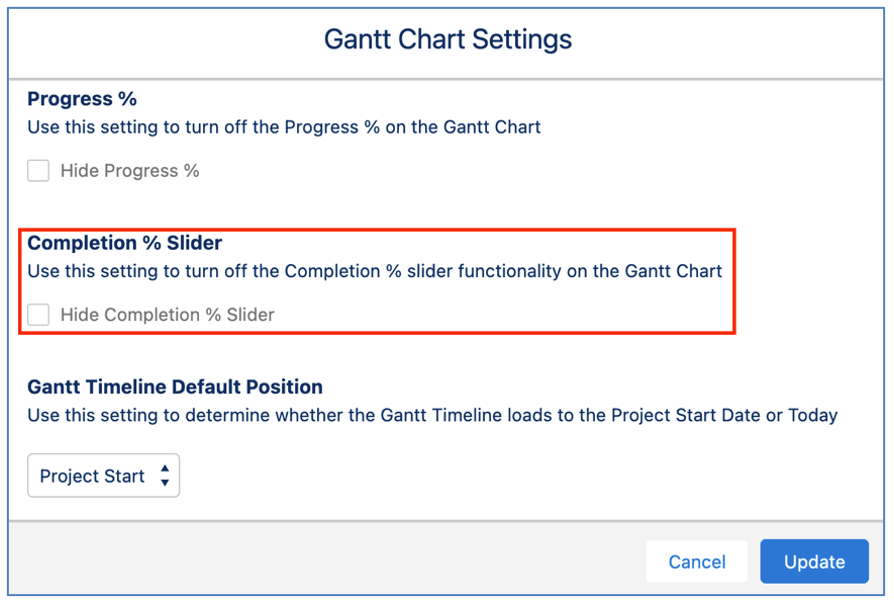
When this setting is set to FALSE, the triangular slider will not be accessible.
By default, the Gantt Chart loads to the first day of the Project. There is a custom setting that enables you to choose the default loading action from the following options:
This setting can be controlled via the Gantt Chart settings controlled by the individual User or centrally via the Control Pad of the Mission Control Console.
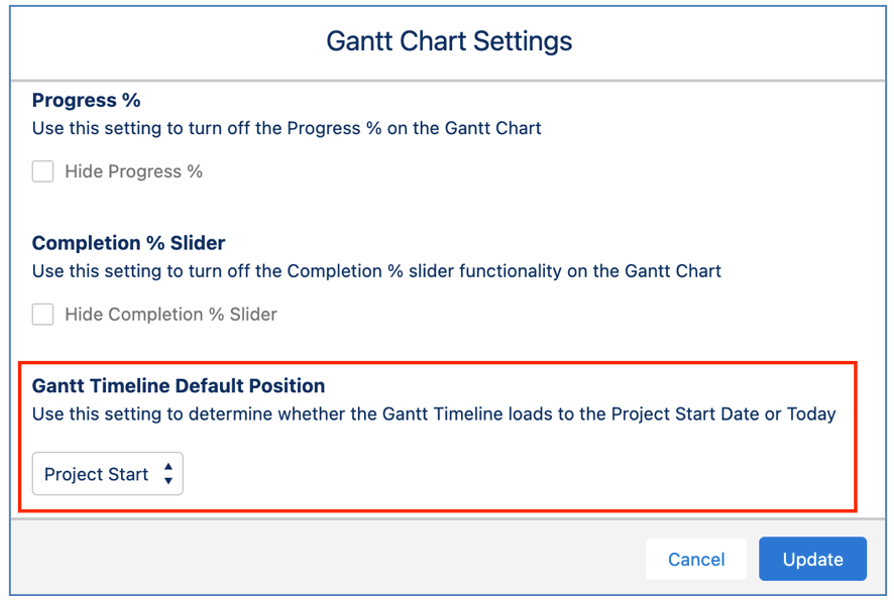
This setting controls the initial load behaviour. You are also able to quickly jump from the Project Start Date to Today, and vice versa by clicking the ![]() button.
button.
A number of customers were experiencing intermittent issues with the Gantt Chart that were being caused by Lightning Experience caching duplicate instances of the Gantt component during one browser session. This would result in a variety of errors, such as the Gantt not loading after editing the Project, the dependency logic within the library not being fully loaded, etc.
To provide a more stable environment for the Gantt Chart, it has been completely redeveloped within the Visualforce framework, removing the need for a Lightning Component. Therefore removing the caching issue.
There is no action required to take advantage of this enhancement.
When creating Actions within any of the components listed below, rather than specifying the Start Date and End Date, you are able to specify the Start Date and the Working Days.
You are able to specify the Start Date and you can choose to either specify the End Date or the Work Days. Whichever field you specify, the other will automatically update to reflect the value of the other.
Business Hours Settings, Holidays (individual, Team and Global) as well as non working days specified on the Role’s ‘Role Hours’ records are all taken into account when calculating Working Days and End Date.
A number of additional Dependency options have been added to provide greater flexibility in managing predecessor relationships.
Previously you were able to create ‘Finish to Start’ or ‘Start to Start’ relationships. The parent in the relationship could be the Milestone or the Action and the child always had to be an Action.
The enhancements included in this release provide additional relationship types as well as greater flexibility in which records can be the parent and the child.
Dependencies are displayed on the Gantt Chart with orange connecting lines. Note, if the dependency forms part of the ‘Critical Path’, then the line will be red.
You are able to create any of the following relationship types:
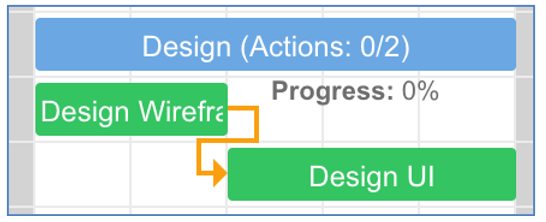
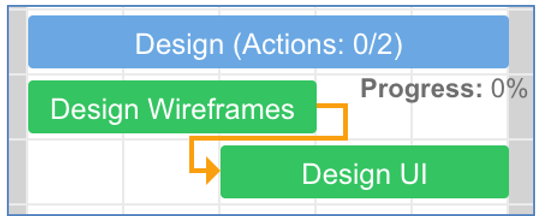
A Finish to Start (FS) dependency means the child record in the relationship cannot start until the parent record is finished. If the End Date of the parent record is adjusted, the FS relationship will ensure the child record is rescheduled accordingly to ensure it starts once the parent is completed. Below is an example of a Finish to Start dependency.
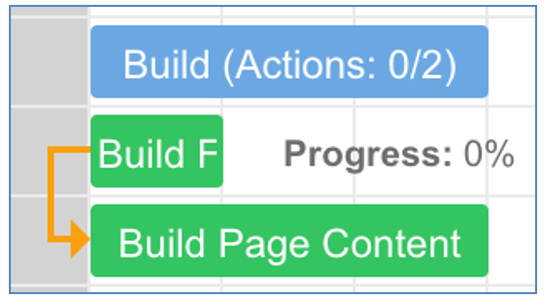
A Start to Start (SS) dependency means the child record in the relationship should start once the parent record has started. If the Start Date of the parent record is adjusted, the SS relationship will ensure the child record is rescheduled accordingly to ensure it starts on the same day as the parent. Below is an example of a Start to Start dependency.
A Finish to Finish (FF) dependency means the child record in the relationship can only be marked as complete once the parent record has been completed. If the End Date of the parent record is rescheduled to extend beyond the End Date of the child record, then the child record’s End Date will also be rescheduled. Below is an example of a Finish to Finish dependency.

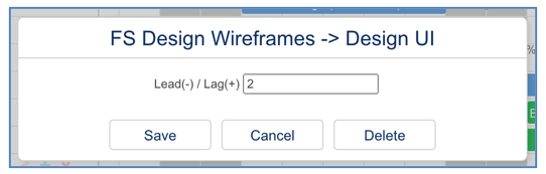
You can specify Lead or Lag on a Dependency. Lead indicates the child can start x days before the relationship trigger point. Lag indicates the child can start x days after the relationship trigger point. For example, the parent Action below has a duration of 3 days. There is a Finish to Start dependency between the two Actions. The dependency has 1 day of Lead applied to it. This means the child record can start 1 day before the parent record is completed.
In the example below, there is 2 days of Lag applied. This means the child record will start 2 days after the parent record is completed.
You can add Lead / Lag to a dependency by double-clicking on the dependency line. This will open up a pop up where you can set the Lead or Lag value.
You have the ability to specify both the parent and the child from the following records:
Certain relationships are not supported due to the roll up of dates between Milestones, Actions and Checklist Items. For example, you are unable to create a Finish to Start relationship between a Milestone and one of the Actions contained within that Milestone. The reason behind this is that the End Date of the Milestone is driven by the latest of the End Dates of all related Actions. Another example is where you are unable to add Lead to the child record in a Start to Start relationship between a Milestone and one of the Actions contained within that Milestone. The reason behind this is that the Start Date of the Milestone is driven by the earliest of the Start Dates of all related Actions.
The table below provides an overview of all supported dependencies, indicating whether they are possible within the same family tree structure and across different family tree structures. The term Family Tree is used in context of identifying whether the child record relates directly to the parent record. For example, Action A relates to Milestone A, and is therefore in the same family tree structure. Therefore certain dependencies will not be available. However, Action B relates to Milestone B so a dependency between Milestone A and Action B would be crossing between two different family tree structures and therefore would be possible.
| Dependency Type | Parent | Child | Same Family | Different Family |
| Finish to Start | Milestone | Milestone | N/A | Yes |
| Finish to Start | Milestone | Action | No | Yes |
| Finish to Start | Milestone | Checklist Item | No | Yes |
| Finish to Start | Action | Milestone | No | Yes |
| Finish to Start | Action | Action | Yes | Yes |
| Finish to Start | Action | Checklist Item | No | Yes |
| Finish to Start | Checklist Item | Milestone | No | Yes |
| Finish to Start | Checklist Item | Action | No | Yes |
| Finish to Start | Checklist Item | Checklist Item | Yes | Yes |
| Start to Start | Milestone | Milestone | N/A | Yes |
| Start to Start | Milestone | Action | Yes – No Lead | Yes |
| Start to Start | Milestone | Checklist Item | Yes – No Lead | Yes |
| Start to Start | Action | Milestone | N/A | Yes |
| Start to Start | Action | Action | Yes | Yes |
| Start to Start | Action | Checklist Item | Yes – No Lead | Yes |
| Start to Start | Checklist Item | Milestone | N/A | Yes |
| Start to Start | Checklist Item | Action | N/A | Yes |
| Start to Start | Checklist Item | Checklist Item | Yes | Yes |
| Finish to Finish | Milestone | Milestone | N/A | Yes |
| Finish to Finish | Milestone | Action | No | Yes |
| Finish to Finish | Milestone | Checklist Item | No | Yes |
| Finish to Finish | Action | Milestone | Yes | Yes |
| Finish to Finish | Action | Action | Yes | Yes |
| Finish to Finish | Action | Checklist Item | No | Yes |
| Finish to Finish | Checklist Item | Milestone | Yes | Yes |
| Finish to Finish | Checklist Item | Action | Yes | Yes |
| Finish to Finish | Checklist Item | Checklist Item | Yes | Yes |
You are able to create dependencies from within the Gantt Chart Data Table or within the Gantt Chart Timeline.
Data Table
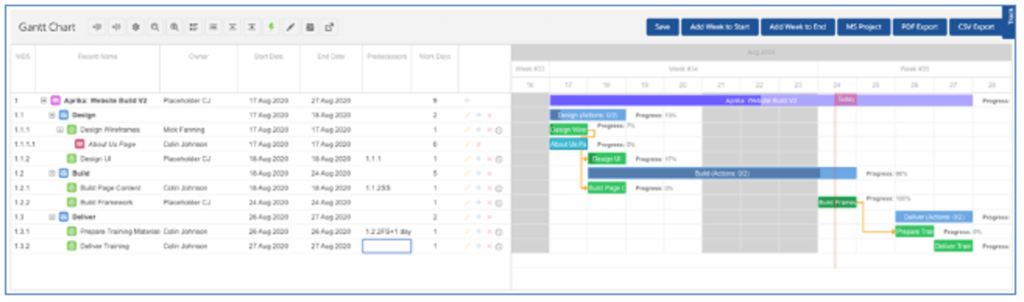
To add a dependency within the Data Table, you can view two Columns, ‘WBS’ and ‘Predecessors’. These two columns can be toggled on / off within the Gantt Chart settings, as shown below:

When this setting is true, the WBS and Predecessor columns will be visible within the Gantt Chart Data Table, as shown below:
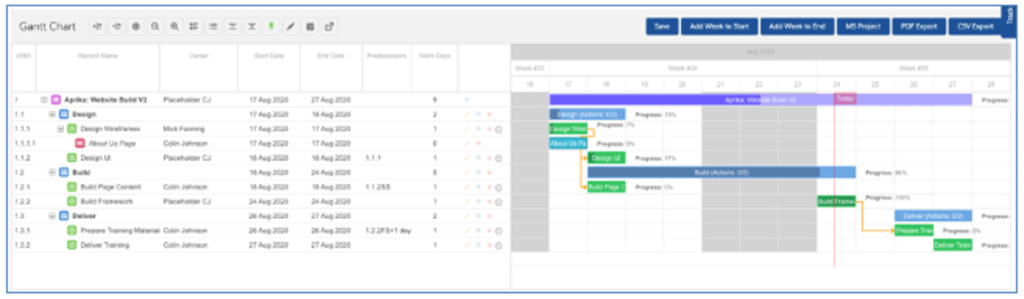
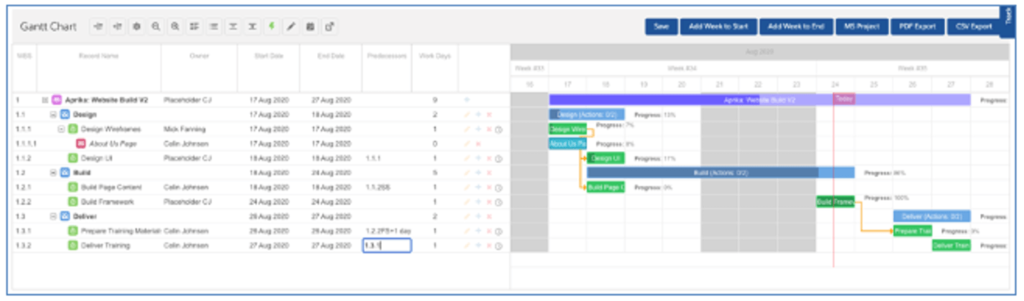
The real power of this feature is the ability to create ‘Dependencies’ directly within the Data Table. To create a Dependency, click into the Predecessor cell for the child Action, as shown below:
Enter the WBS number for the parent record (e.g. Action or Milestone). In the example above, we are making the ‘Deliver Training’ Action a child to the ‘Prepare Training Materials’ Action in a Finish to Start relationship. So we enter 1.3.1 into the Predecessor field.
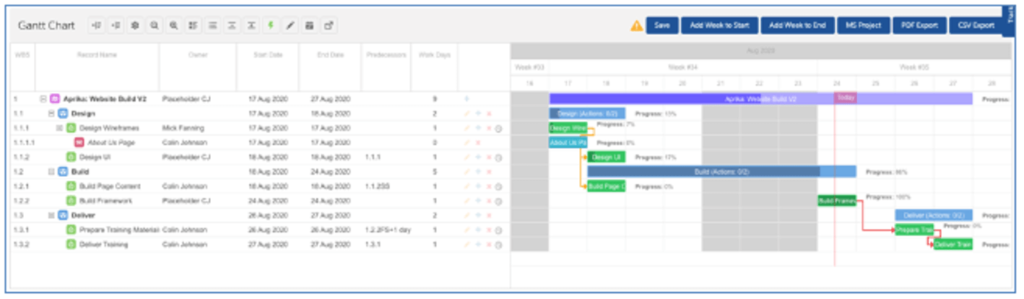
Once the WBS number has been populated, press the Enter key and the Dependency relationship will appear within the Gantt Chart, as shown below:
If you wish to create a Start to Start relationship, you must enter SS after the WBS number (e.g. 1.3.1SS). If you wish to create a Finish to Finish relationship, you must enter FF after the WBS number (e.g. 1.3.1FF).
If you wish to add Lead or Lag to the relationship, you must enter -n or +n after the WBS number (e.g. to add a 2 day Lead, enter 1.3.1+2).
Timeline
To add a dependency, click on the circle that appears at the start or end of the bar for the parent record when hovered over, and then drag to see a dotted line appear. Drag the dotted line to the circle that appears at the start or end of the bar for the child record. Once you let go it should appear as a solid orange line, indicating the dependency has been added.
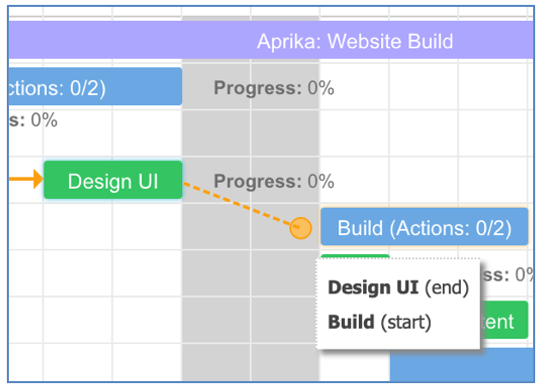
Remember, you will still need to save the Gantt Chart to save this dependency. If a line does not appear, it likely means the type of dependency you are trying to create is not supported and you will see a notification in the top right of the Gantt indicating ‘Link Type Not Supported’.
You can delete the dependency by double-clicking on the relationship line and clicking the Delete button. Alternatively, you can delete the value in the Predecessor column of the Data Table.
Dependency enforcement logic is available for dependencies. This logic is controlled by a field on the Project Object called ‘Enforce Dependency Validation’. If this field is set to TRUE, the following logic will be applied:
If the field is set to TRUE and the parent records fall outside of this criteria, the User will receive an on-screen notification advising why the child Action is unable to be progressed.
Previously dependency email notifications were issued based on the following criteria:
Each email notification was sent independently of any other dependencies tied to the same child record. For example, if Action C is a successor in Finish to Start relationships with Action A and Action B, an email would be sent when Action A was marked as Complete and another email would be sent when Action B was marked as Complete.
The distribution of these email notifications has been adjusted to only send one email once all predecessors has reached the correct trigger point.
The ‘Dependency Email Notification’ will be issued to those Roles involved in the child record to be notified that all predecessors have reached the correct Status value in order for work to commence on the child Action.
If a record is updated and is a predecessor (parent) in a dependency relationship to any successor (child) and all other predecessor records have already reached their trigger point, the email will be sent:
Below is an example of the Dependent Email Notification:
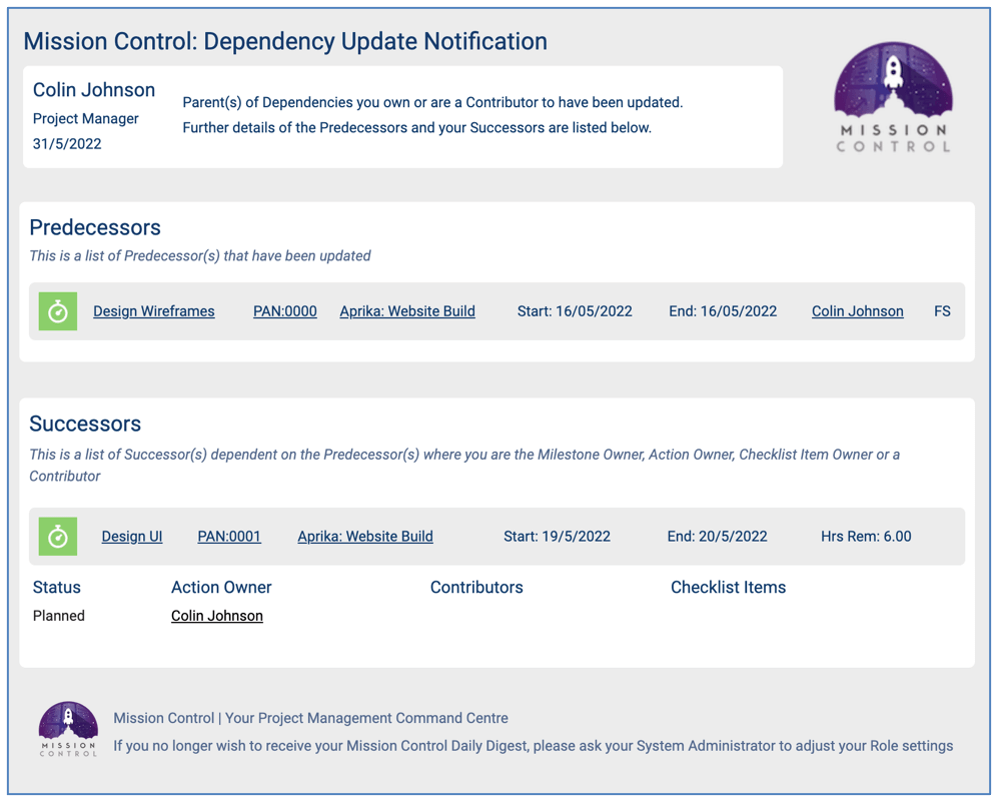
Note: In order for a Role to receive these email notifications, the ‘Receive Dependency Notifications’ field on their Role record should be set to TRUE.
A number of enhancements have been applied to the Timesheet. The details of each enhancement is included below.
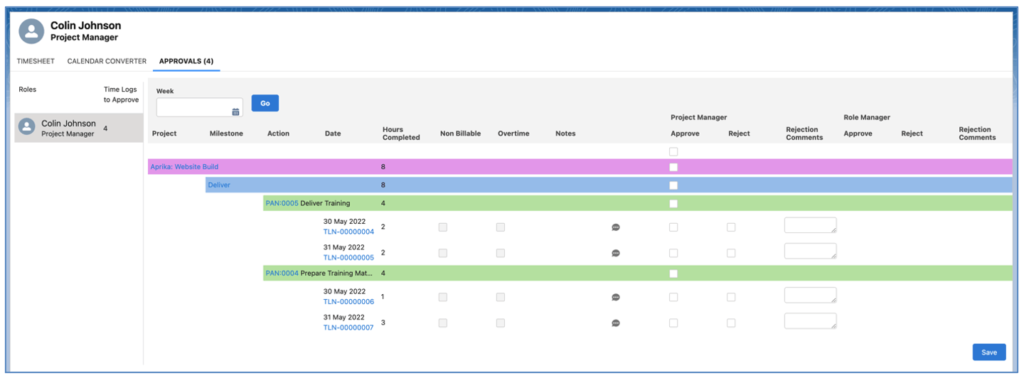
You are able to select which fields are visible on the Approvals Tab of the Timesheet. By default, the following fields will all be displayed:
Within the Timesheet Settings, you are able to select specific fields to be hidden, as shown below.
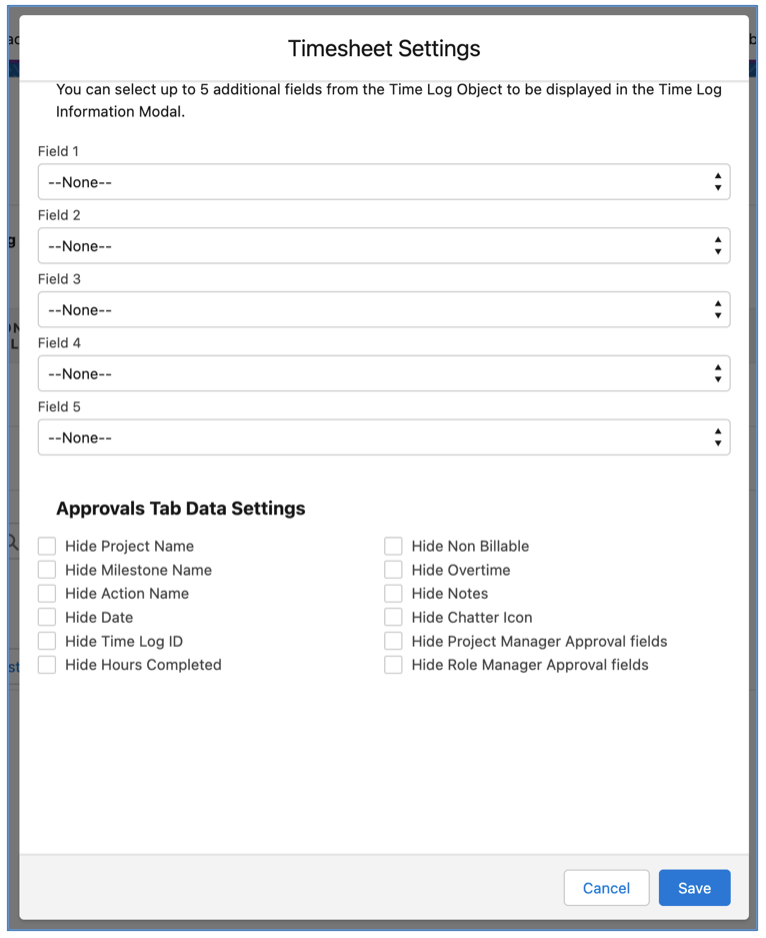
This can be controlled by individual Users by modifying their own Timesheet Settings directly on the Timesheet. Alternatively, if you are using the Timesheet Settings on the Control Pad to override individual User preferences, it can be managed there as well.
The query logic for the Timesheet has been adjusted so that Actions with a Status of ‘Cancelled’ will not be included in the list of displayed Actions. These Actions are also excluded from the manual lookup section at the bottom of the Timesheet.
You can choose to hide standard fields from the Time Log Information Modal. By default, the Modal provides Users with access to the following fields:
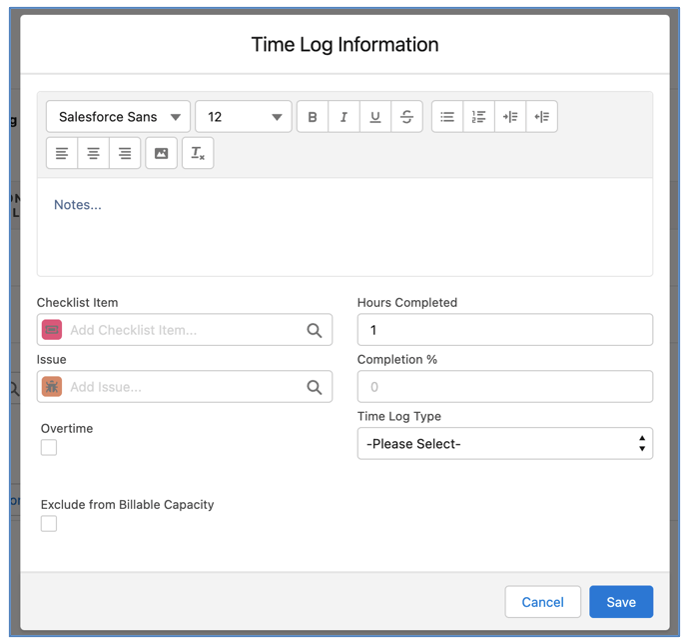
Within the Timesheet Settings, you are able to select specific fields to be hidden, as shown below.
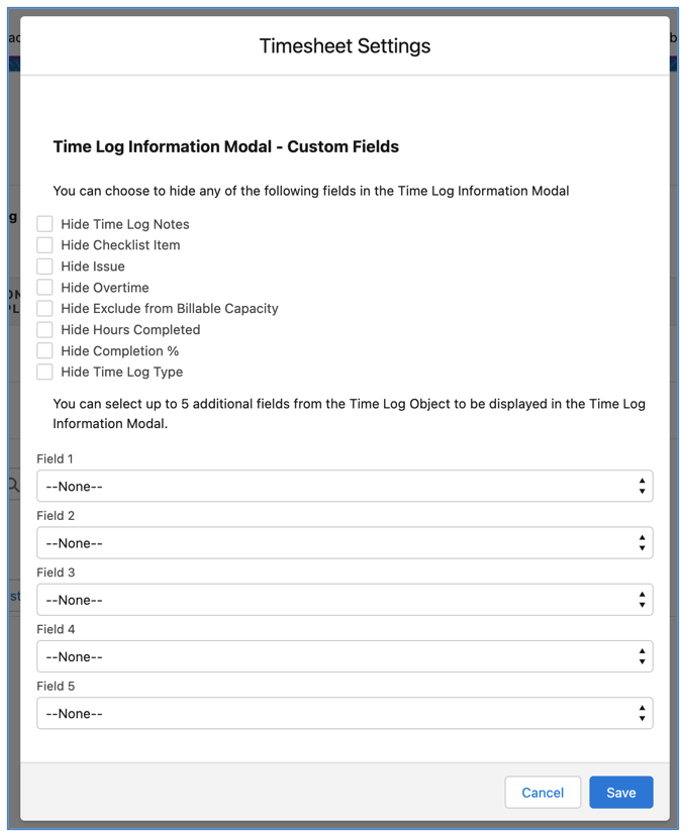
This can be controlled by individual Users by modifying their own Timesheet Settings directly on the Timesheet. Alternatively, if you are using the Timesheet Settings on the Control Pad to override individual User preferences, it can be managed there as well.
You are able to exclude specific Roles from the Lookup on the Timesheet, so when you’re searching for a Role, you can choose to exclude specific Roles (e.g. Placeholders, Clients, etc.).
This is controlled by the following field on the Role record:
This field can be found in the ‘Permission/Notification Settings’ section of the Role page.
If this field is set to TRUE, the Role will not be accessible in the Lookup for the Timesheet or the Log Time component.
A number of enhancements have been applied to the Scheduler. The details of each enhancement is included below.
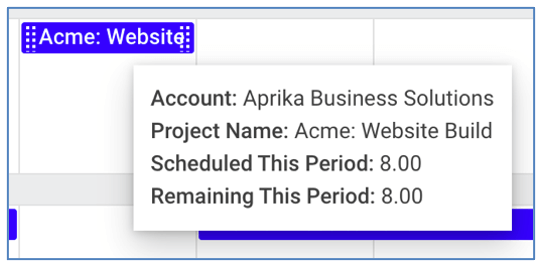
The Hover Box that appears when you hover over a bar on the Scheduler when on the Project View Tab displays the following information by default.

You are able to replace these default values by adding fields into the ‘Project Scheduler Hover’ Field Set, which is available on the Project Object within Salesforce Setup.
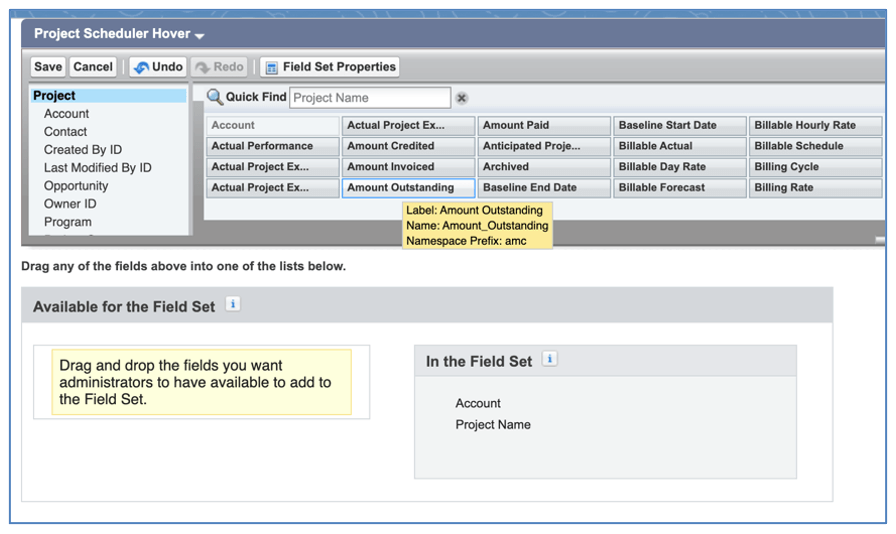
Once you’ve added your required fields to the Field Set, they will be visible in the Hover Box, along with the ‘Scheduled This Period’ and ‘Remaining This Period’ information.
To reset to the default values, you need to remove all fields from the Field Set.
To provide flexibility for customers to choose whether they view all Holidays or only approved Holidays on the Scheduler, there is a setting within the Scheduler Settings that enables you to choose whether you view:
If this setting is null, only Approved Holidays will be displayed on the Scheduler.

When viewing Holidays on the Scheduler, Approved Holidays will display in Red and any other Holidays will display in Amber.
To provide flexibility for customers when using the Scheduler, to choose whether they view all Roles or only Roles assigned as Action Owners or Contributors, there is a ‘Display Roles’ filter within the Scheduler Filters that enables you to choose whether you view:
When viewing the Scheduler via the Project Overview or the Scheduler Anywhere component, this Filter will be set to ‘Assigned Roles’ by default. Therefore, you will only see a list of Roles that are assigned as either an Action Owner or a Contributor.

When viewing the main Scheduler, Users will be able to select whether they view ‘All Roles’ or ‘Assigned Roles’.
By default, the main Scheduler loads up with the first day being Today. When viewing the Scheduler via the Project Overview or the Scheduler Anywhere component, the Scheduler will load the first day of the Timeline to be the first day of the Project(s) displayed.
The Scheduler Filters has been updated to provide the ability to search based on Project ‘Status’.

The Project Status filter is located below the Categories filter.
A number of enhancements have been applied to the Whiteboard. The details of each enhancement is included below.
The Whiteboard Filters feature has had a number of enhancements, which include the following.
Previously, the filter logic between the various Role Filter options was OR. For example, if you apply a Filter on Team and Skill, the logic applied to the search is Team = X OR Skill = X.
A master AND/OR toggle has been added to the Role Filters section. This enables Users to search for Roles where Team = X AND Skill = X.
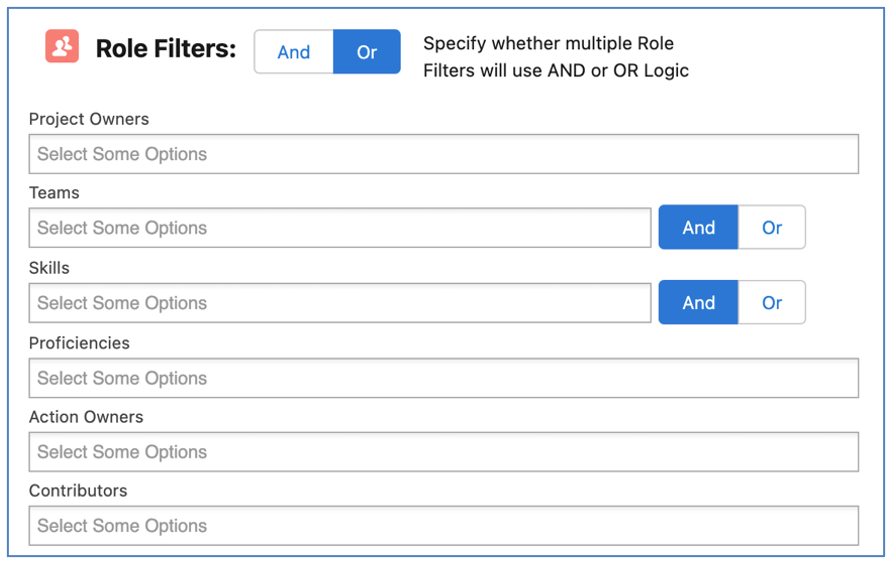
The master toggle allows you to apply AND or OR logic across the following Filter Options:
The User’s preference will be persistently remembered in the same way the existing AND/OR toggles work.
You are able to apply up to 2 Custom Field Filters as part of your Whiteboard Filter Options.
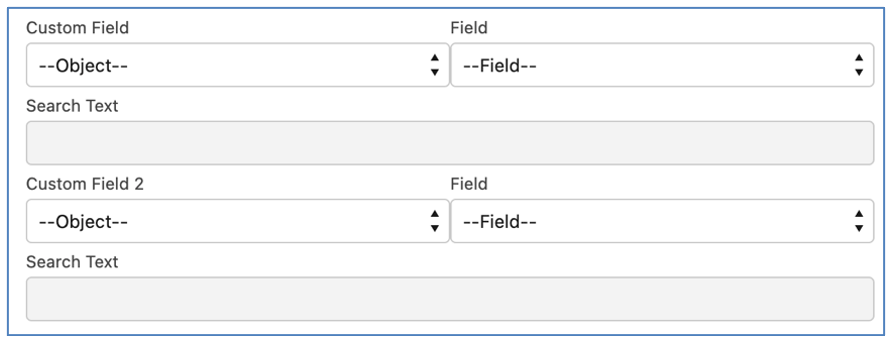
The filter logic between these 2 Custom Fields is AND.
If you have Actions that you wish to exclude from the Whiteboard, you are able to set the ‘Exclude from Whiteboard’ field to TRUE. This field is available to be applied at the Project, Milestone or individual Action levels.
If you apply it at the Project, all Actions on that Project will be excluded from the Whiteboard. If you apply it at the Milestone level, all Actions relating to the Milestone will be excluded from the Whiteboard.
Any Action that has the ‘Exclude from Whiteboard Indicator’ field set to TRUE will be excluded from the Whiteboard.
A new button has been added to the Whiteboard header, enabling you to add a new Milestone to an existing Project.

When you click the ‘Add Milestone’ button, it will open the standard Milestone Page Layout. Once you click Save within the Modal, the Milestone will be created and will be available for you to reference from the Whiteboard.
The ‘Column Heading’ setting on the Whiteboard is persistently remembered when you visit the Whiteboard each time. If you filter the main Whiteboard down to view only 1 Project, you are able to set the Column Heading to ‘Milestone’. However, this will not be persistently remembered.
You can set a separate persistent value for the ‘Column Heading’ for when you are viewing the Whiteboard via the Project Overview.

This enables Users to set the persistent ‘Column Heading’ to be Milestone in context of the Project Overview if required.
A number of enhancements have been applied to the Role Utilisation Report. The details of each enhancement is included below.
If you have Actions that you wish to exclude from the Role Utilisation Report, you are able to set the ‘Exclude from Utilisation’ field to TRUE. This field is available to be applied at the Project, Milestone or individual Action levels.
If you apply it at the Project, all Actions on that Project will be excluded from the Role Utilisation Report. If you apply it at the Milestone level, all Actions relating to the Milestone will be excluded from the Role Utilisation Report.
Any Action that has the ‘Exclude from Utilisation Indicator’ field set to TRUE will be excluded from the Role Utilisation Report.
Previously all Active Roles included in the Role Utilisation Report would display as having been available throughout the entire reporting period, setting the ‘Hours per Week’ as the value currently set on their Role record.
This would inaccurately report that a Role had not met their utilisation targets, even if they were not yet an available Role to be assigned to Projects.
For example, let’s say I was running a Role Utilisation Report from 1st Jan to 31st Mar and I have included Mick, Kelly and Joel on the report. If Mick only started with the company on the 1st Mar, the report would have shown that he had achieved 0% of his Utilisation / Billable Target for the period 1st Jan to 28th Feb.
With the introduction of Role Availability records, which can be created via the Manage Availability page on the Role record, the ‘Hours per Week’ could vary for different weeks / months within the reporting period. These Role Availability records are taken into account for the reporting periods they cover.
The Hours per Week field will display 0 if both of the following criteria apply:
The Role Utilisation Report will reference the applicable Role Availability record(s). If no Role Availability records exist, the Role ‘Hours per Week’ field will be referenced instead.
For customers using the Resource Forecasting functionality, the Role Allocation & Role Actual data will be used within the Role Utilisation Reporting. The table below outlines the report values that will reference data from these Objects.
| Report Value | Data Source |
| Holiday Hours | Role Actuals relating to the Holidays applicable to the reporting period for the week/month |
| Total Hours Scheduled | Role Allocations relating to the Actions applicable to the reporting period for that week/month |
For customers not using the Resource Forecasting functionality, the figures will be taken directly from the Actions, Time Logs & Holidays.
A number of enhancements have been applied to the Resource Assignment Wizard. The details of each enhancement is included below.
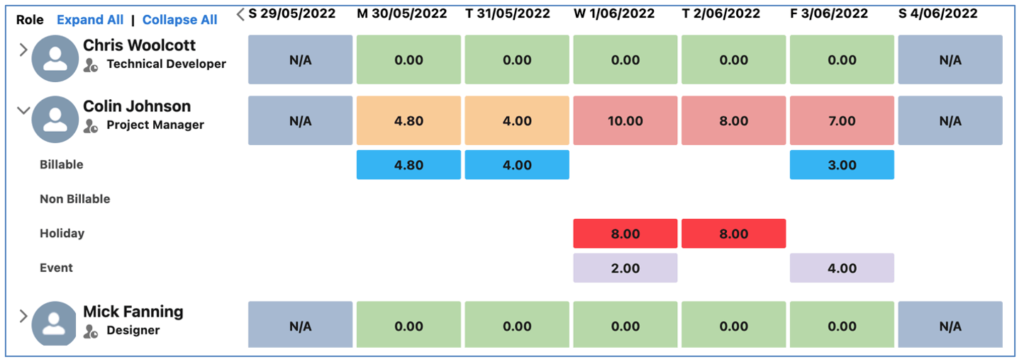
You are able to include hours from Salesforce Event records within the figures that show a Role’s availability. Users can choose whether to factor in these Event hours based on a setting within the Custom Settings within the Resource Assignment Wizard.
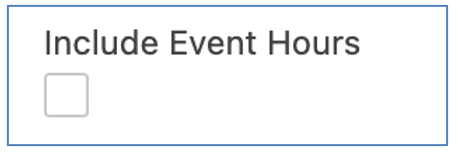
When this setting is TRUE, the Hours Summary will incorporate Salesforce Event hours and you will see an additional row for ‘Event’ hours in the Hours Breakdown section.
When this setting is FALSE, the Salesforce Event hours will not be included. This setting is controlled by each individual User within the Resource Assignment Wizard Custom Settings.
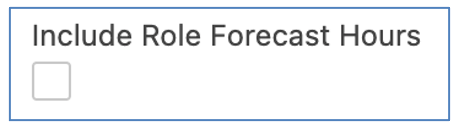
You are able to include hours from Role Forecast records within the figures that show a Role’s availability. Users can choose whether to include Role Forecast hours based on a setting within the Custom Settings within the Resource Assignment Wizard.
When this setting is TRUE, the calculations for the hours / percentage figures within the ‘Potential Resources’ section of the Resource Assignment Wizard will include the hours from Role Allocation records related to Role Forecast records. These hours will be included in the Hours Summary and incorporated within the Billable and Non Billable values on the Hours Breakdown.
When the Include Forecast Hours setting is TRUE, the User will need to specify the source of hours in the ‘Action / Role Forecast Hours Source’ setting, selecting from the following options:
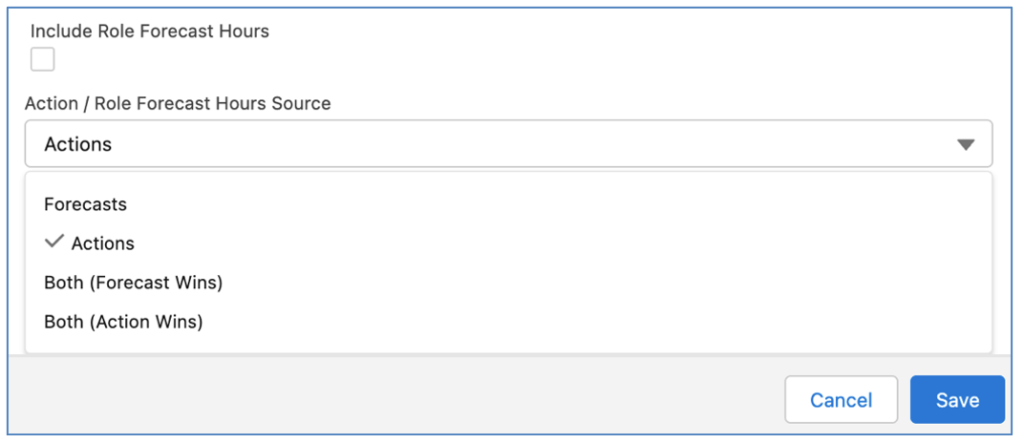
When the Include Forecast Hours setting is FALSE, the Role Forecast hours won’t be included (e.g. it will be considered the same as Actions only).
For customers using the Resource Forecasting functionality, the Role Allocation data will be used within the Resource Assignment Wizard. The order in which data will be referenced for the hours is as follows:
Where no Role Allocation or JSON files exist, the hours from the Actions & Holidays will be divided evenly across the working days between the Start Date and End Date.
A number of minor enhancements have been made to various features. Each enhancement is detailed below.
The Force Financials Recalculation process has been enhanced to also update Role Actual records that relate to Time Logs that are being amended.
The Role Trigger logic has been enhanced to carry out the following processes:
A persistent setting has been added to the Checklist Board to enable customers to utilise the sub-selection feature of the Column Heading.

When a User selects options to be displayed / hidden in the sub-section, they will be persistently remembered the next time they load the page.
A persistent setting has been added to the Role Forecast component enabling Users to set their preference value for the Days/Weeks and number days/weeks view options.

Previously, these values would need to be set each time the User loaded the Role Forecast Component. They will now be persistently remembered the next time they load the page.
A number of new fields have been added to the solution as part of this release. We recommend you add these fields to your Page Layouts. If you are not using the Permission Sets included with Mission Control, we recommend you check the Field Level Security for all of these fields to ensure all appropriate Profiles have the required access.
| Field | Field Type | Comments |
| Exclude from Whiteboard | Checkbox | Identifies if Actions relating to this Project should be excluded from the Whiteboard |
| Exclude from Utilisation | Checkbox | Identifies if Actions relating to this Project should be excluded from the Role Utilisation Report |
| Field | Field Type | Comments |
| Exclude from Whiteboard | Checkbox | Identifies if Actions relating to this Milestone should be excluded from the Whiteboard |
| Exclude from Whiteboard Indicator | Formula (Checkbox) | Indicates if Actions relating to this Milestone should be excluded from the Whiteboard. If ‘Exclude from Whiteboard Field is set to TRUE, it takes this value, otherwise it takes the value from the Project ‘Exclude from Whiteboard’ field |
| Exclude from Utilisation | Checkbox | Identifies if Actions relating to this Milestone should be excluded from the Role Utilisation Report |
| Exclude from Utilisation Indicator | Formula (Checkbox) | Indicates if Actions relating to this Milestone should be excluded from the Role Utilisation Report. If the Milestone ‘Exclude from Utilisation’ field is set to TRUE, it takes this value. Otherwise it takes the value from the Project ‘Exclude from Utilisation’ field |
| Field | Field Type | Comments |
| Exclude from Whiteboard | Checkbox | Identifies if this Action should be excluded from the Whiteboard |
| Exclude from Whiteboard Indicator | Formula (Checkbox) | Indicates if this Action should be excluded from the Whiteboard. If the Action ‘Exclude from Whiteboard’ field is set to TRUE, it takes this value. Otherwise it takes the value from the Milestone ‘Exclude from Whiteboard Indicator’ field |
| Exclude from Utilisation | Checkbox | Identifies if this Action should be excluded from the Role Utilisation Report |
| Exclude from Utilisation Indicator | Formula (Checkbox) | Indicates if this Action should be excluded from the Role Utilisation Report. If the Action ‘Exclude from Utilisation’ field is set to TRUE, it takes this value. Otherwise, it takes the value from the Milestone ‘Exclude from Utilisation Indicator’ field |
| Field | Field Type | Comments |
| Exclude from Timesheet | Checkbox | Identifies this Role should be excluded from the Lookup fields on the Timesheet & Log Time Modal |
Mission Control will be made available based on the following release schedule.
17th June 2022 – Available for manual upgrade from the AppExchange
25th June 2022 – Automatic upgrade to all Sandbox Orgs
2nd July 2022 – Automatic upgrade to all Production Orgs
To manually upgrade to the new version of Mission Control in your organisation, please follow the steps below:
We have pre-recorded the ‘What’s New’ webinar to provide further information on how to get the best out of the new features. To access this webinar, please view the ‘Release Notes’ section of the Mission Control Support Centre – www.aprika.com/mc-support
Some of the new features included in this release of Mission Control have come from ideas submitted from existing clients. If you have an idea for enhancing Mission Control, you can submit it via email to [email protected].
If you have any questions regarding this release notification, please do not hesitate to contact us at [email protected].
