IntelliMail is a native application that runs on the Salesforce Platform. It is a utility tool that enables you to distribute Salesforce Reports & Dashboards via email to recipients (e.g. staff, board members, customers, etc.) that do not have a Salesforce user license.
IntelliMail allows you to extend the deliverability of already scheduled Reports & Dashboards to non-Salesforce users.
IntelliMail emails will be delivered at the same time as your regular scheduled Reports & Dashboards.
IntelliMail is available for the following editions of Salesforce.com:
If you are using any other edition, please speak to your Salesforce.com Account Executive about upgrading.
IntelliMail uses the Salesforce ‘BCC Compliance’ feature. Enabling this feature removes the ability for users to use the bcc field in emails they send from Salesforce. For more information on this and the impact to your business, please search BCC Compliance in the Salesforce Help & Training.
IntelliMail emails count towards your outbound daily limit set ty Salesforce. Reaching this daily limit may cause delay or deliverability problems of your IntelliMail emails.
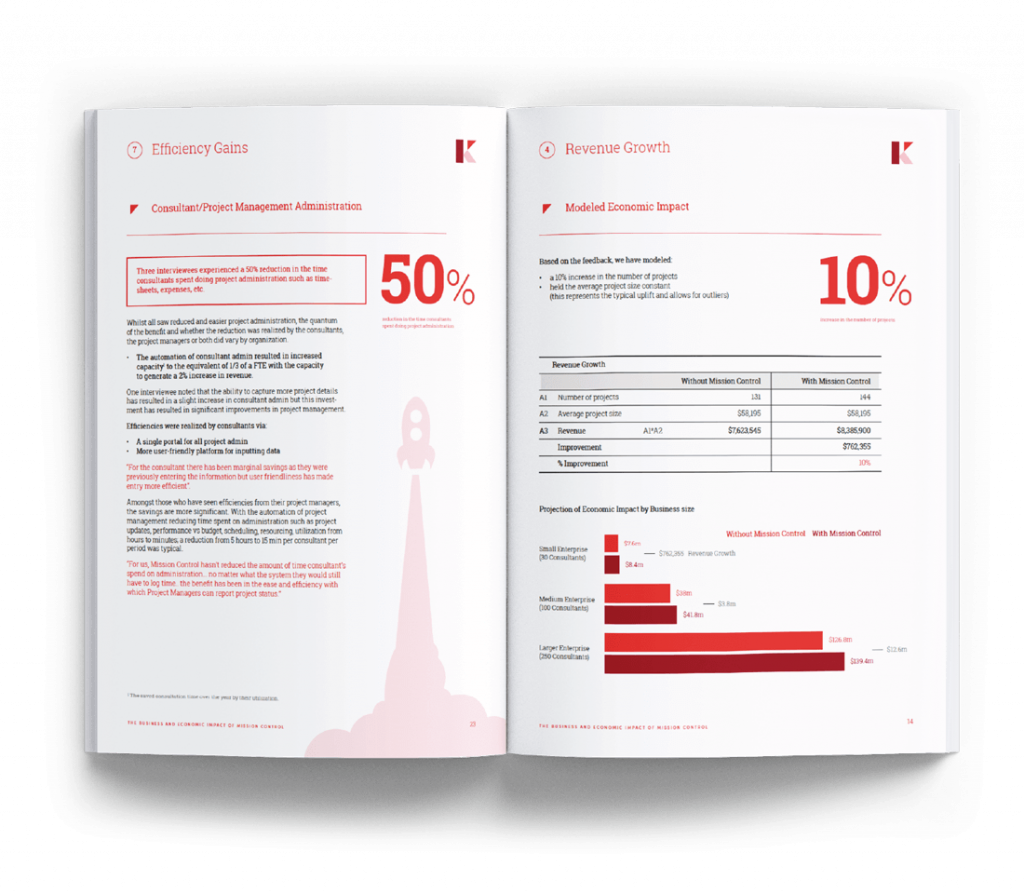
To install IntelliMail, click the Get It Now link on the AppExchange.
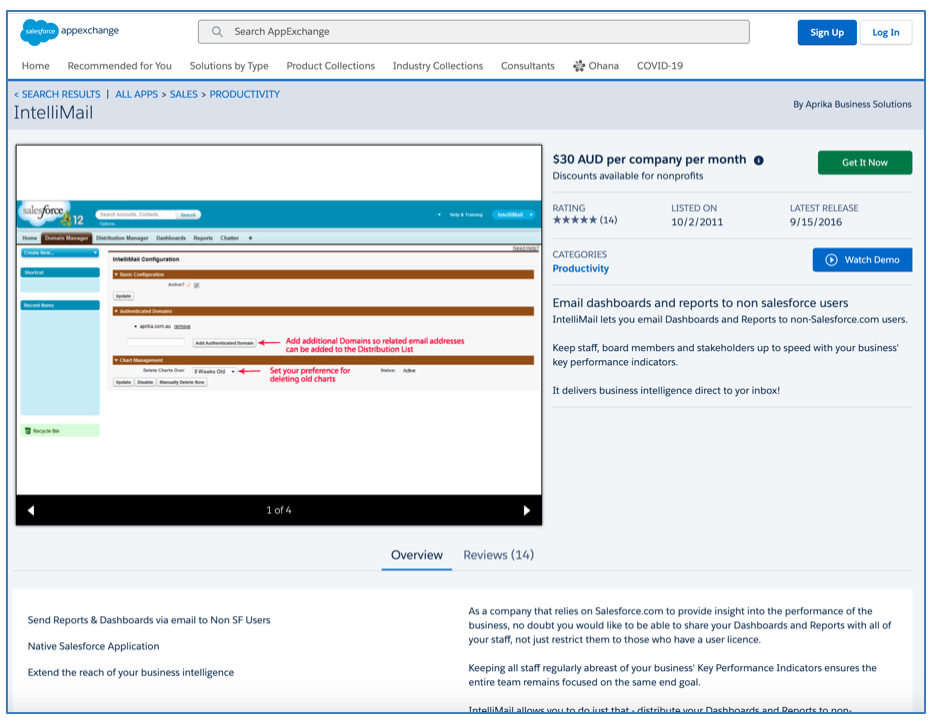
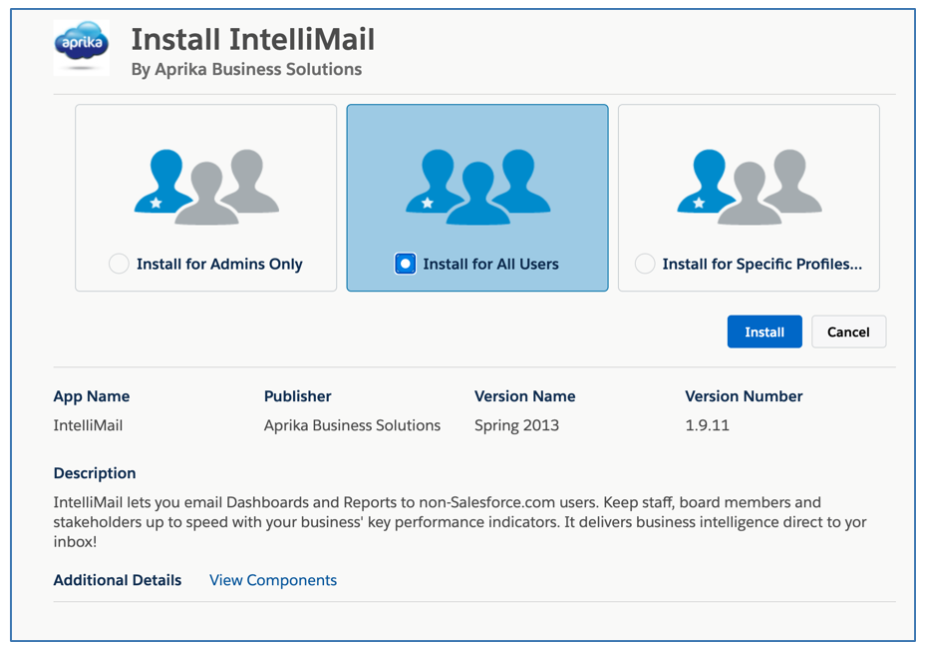
Choose the appropriate settings to install IntelliMail into your Salesforce Org.
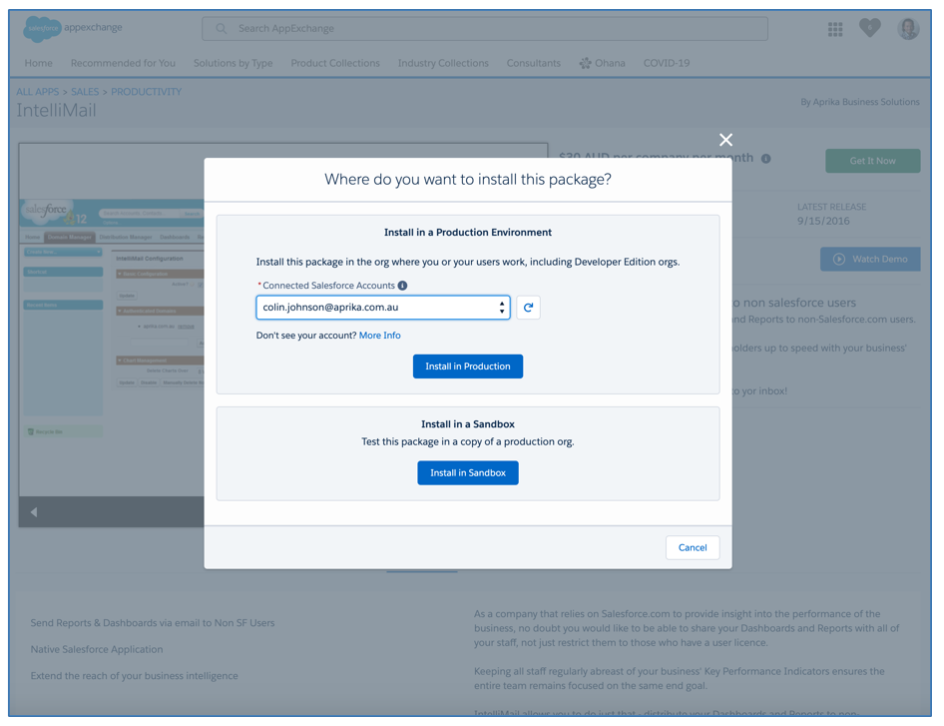
Confirm you agree to the terms and conditions and install the application.
Enter your Salesforce User Name and Password and click Log In.
Choose which Users you wish to assign permissions to and click Install.
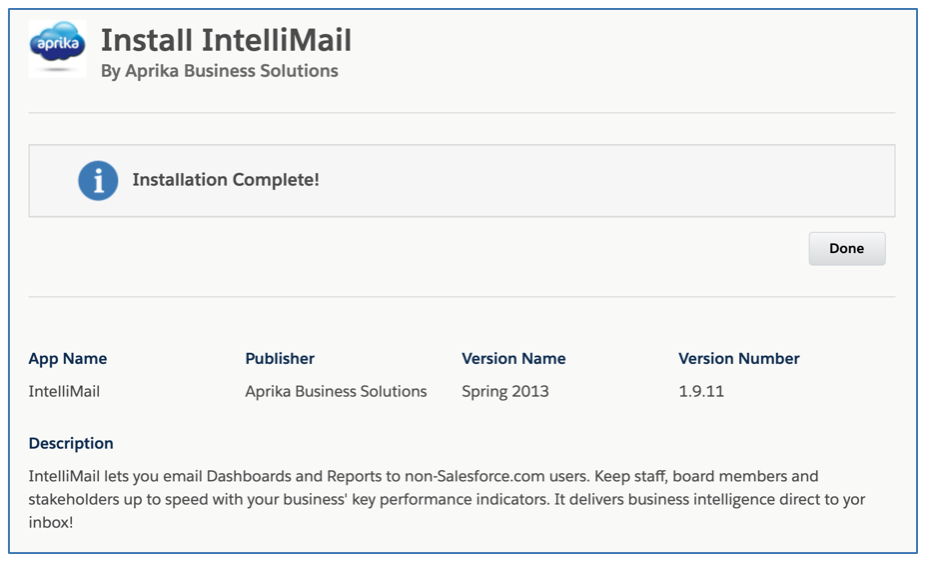
You will now get a message that states your installation is complete and IntelliMail will show on your application list within Salesforce Setup.
Congratulations! Your IntelliMail application has been installed correctly. You are now ready to move on to Configuration.
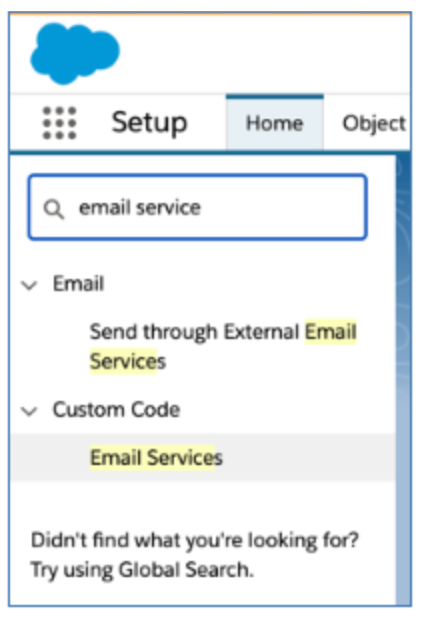
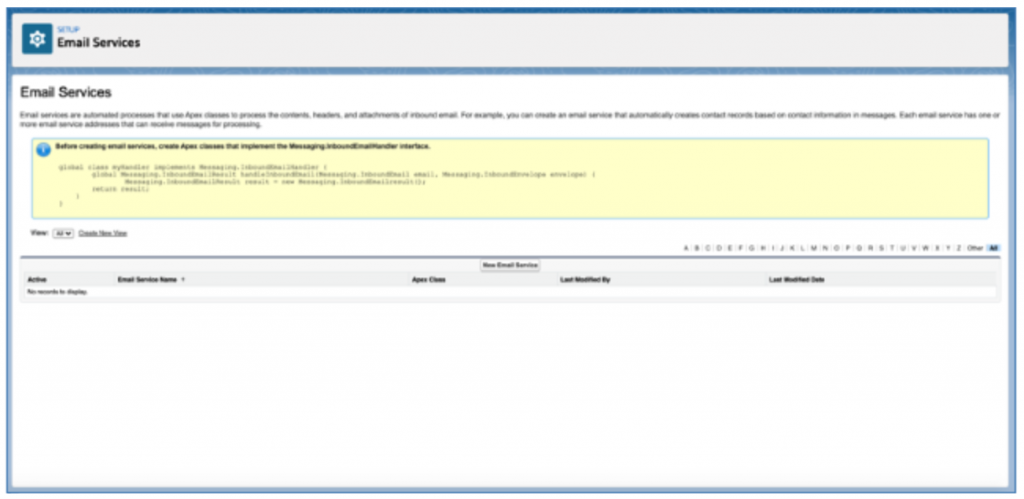
Go to Setup and search for ‘Email Service’ in the Quick Find search box on the left. Then click ‘Email Services’.
Click New Email Service.
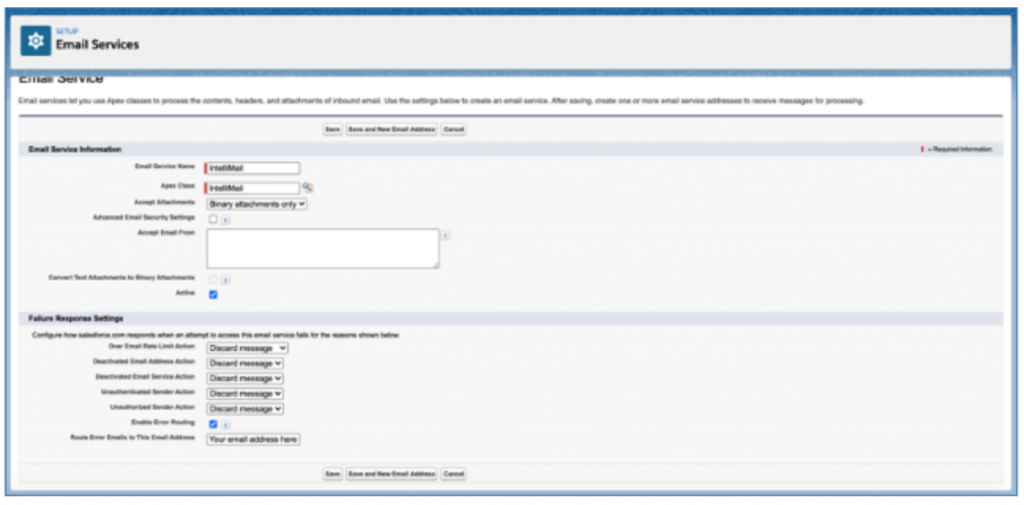
Configure your Email Service as shown below. This is very important to the successful operation of IntelliMail. Note: Enable Error Routing is optional, but recommended. Please enter the email address for your Salesforce System Administrator. Any problems with your IntelliMail service will be sent to this address. Once finished, click ‘Save and New Email Address’.
Next, you need to create the Email Address associated with your Email Service. This should be pre-filled for you, just make sure the ‘Accept Email From’ is blank. Then click ‘Save’.
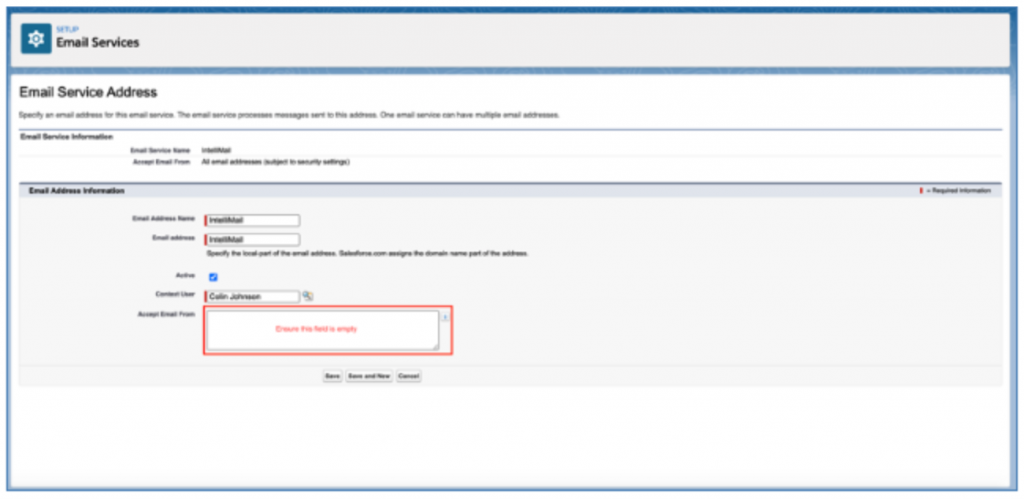
Now your Email Service and Email Address are saved, make a note of the Email Address, as you will need it in the next step.
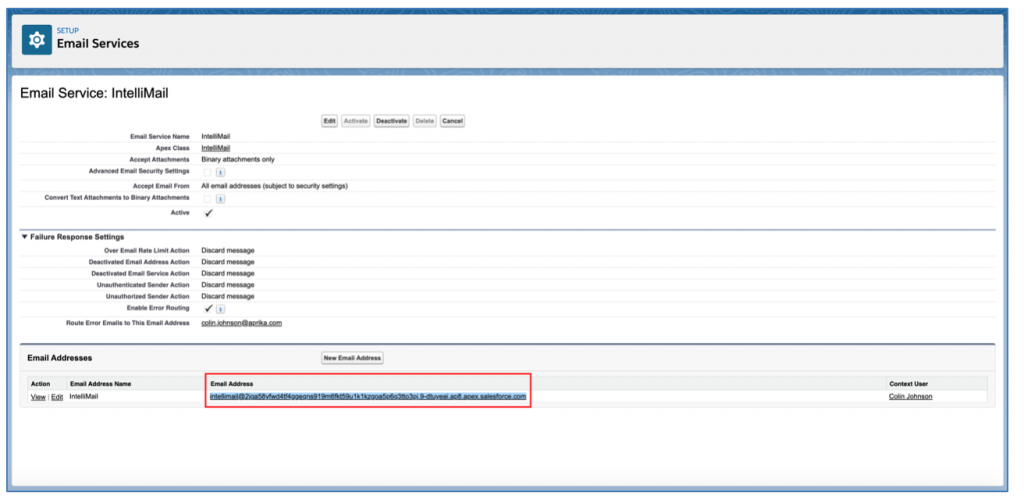
Having taken note of the Email Address you created in the previous step, within Setup, search for ‘Compliance’ in the Quick Find search box on the left. Then click ‘Compliance BCC Email’.

Enter the Email Address into the ‘Compliance BCC Email field, set ‘Enable’ to true and click ‘Save’.

You have now completed the Setup & Configuration of IntelliMail. Next, you will need to activate IntelliMail using the Domain Manager.
The Domain Manager is where you can activate IntelliMail, manage your whitelabel settings, add Authenticated Domains and control when historical chart images will be deleted.
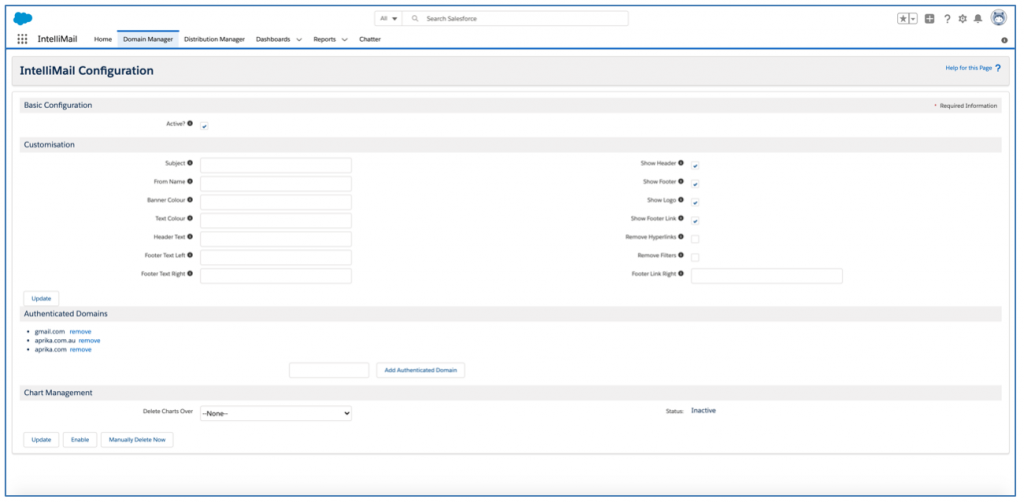
Before any emails are distributed via IntelliMail, you will need to set the ‘Active’ field to true on the Domain Manager, as illustrated below.
The steps to do this are to set the field to true, and click the ‘Update’ button within the Customisation Section.
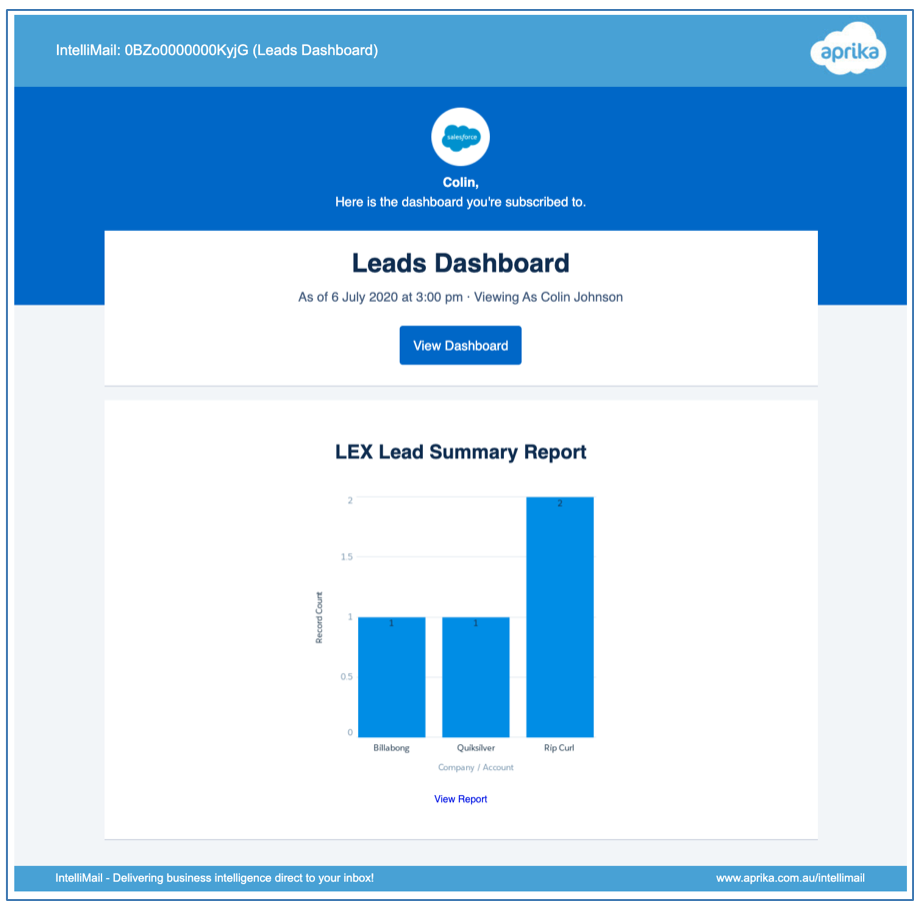
IntelliMail comes with some ‘out of the box’ branding elements built into the email template that is used to distribute Reports & Dashboards to non-user recipients. The illustration below shows these pre-set elements.
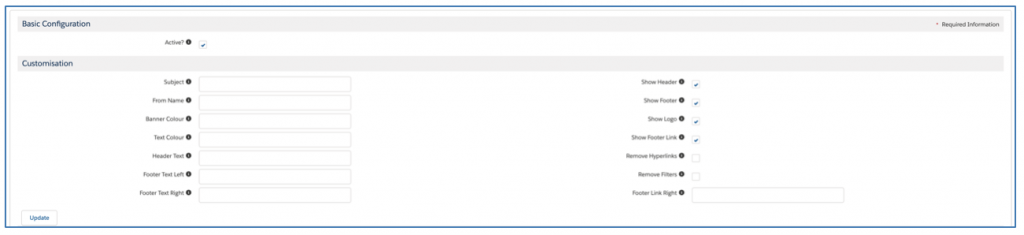
Each of these elements can be ‘Whitelabeled’ with your own branding. The elements that can be edited include:
You can also choose to switch all of the branding elements off (excluding the Subject string). To switch off the branding elements, simply uncheck the following checkboxes and click the ‘Update’ button:
You can also choose to remove Hyperlinks from the email, such as the links that are available when you click on a Chart) and the filters of a report. To do this, you need to set the following fields to true and click the Update button:
To change the logo, you need go to the ‘Documents’ Tab within Salesforce Classic, select the ‘IntelliMail Assets’ folder and then replace the file associated with the ‘aprikalogo’ Document.
To customise the remaining branding elements to your own requirements, you need to complete the ‘Customisation’ section of the Domain Manager, as shown below:

To make sure your Reports & Dashboards are emailed to recipients, you need to add the domain component of their email address to the ‘Authenticated Domains’ list within the Domain Manager.
To add a domain, enter the domain in the field and click the ‘Add Authenticated Domain’ button. You may add up to 1,000 authenticated domains.

Note: ensure the domain is entered in the following format: aprika.com (e.g. everything after the @ symbol).
For every Dashboard that IntelliMail distributes, the chart images are stored within the IntelliMail Documents Folder. This is where IntelliMail references the images that need to be displayed in the email.
To ensure IntelliMail does not utilise too much of your storage space, you can enable Chart Management to periodically delete old images.
Within the Chart Management section of the Domain Manager page, select a date range from the ‘Delete Charts Over’ drop down and click ‘Enable’. The ‘Status’ field will then be set to Active.

IntelliMail is now fully configured and you are ready to start scheduling your Reports & Dashboards for delivery to your non-Salesforce recipients. You do this via the Distribution Manager.
The Distribution Manager is where you select the Reports & Dashboards you want to distribute via IntelliMail. However, in order for IntelliMail to be able to distribute the analytic, the source Report or Dashboard needs to be configured within Salesforce to either be on a ‘Scheduled Refresh’ (Salesforce Classic) or Subscription (Lightning Experience). Details of how to schedule a refresh in Salesforce Classic and subscribe in Lightning Experience are included below, following the instructions on using the Distribution Manager.
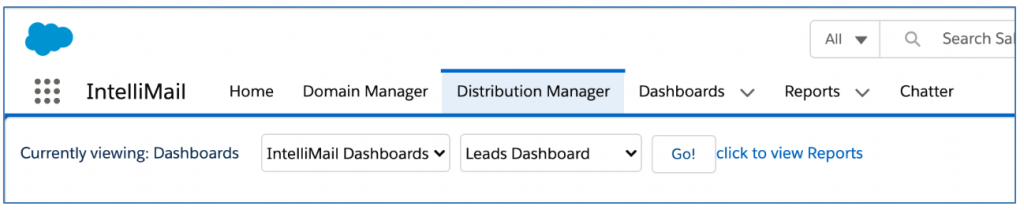
To setup an analytic for distribution via IntelliMail, you first of all need to click the ‘Distribution Manager’ Tab.
By default, the Distribution Manager shows Dashboards. Select the Folder where your Dashboard is saved, then select the Dashboard and click Go! If you wish to distribute a Report instead, please click the ‘click to view Reports’ link.
For Reports & Dashboards that have not yet been set up within the Distribution Manager, you’ll need to click the ‘Save Analytic’ button.

After saving the analytic, you will see a range of buttons allowing you to:

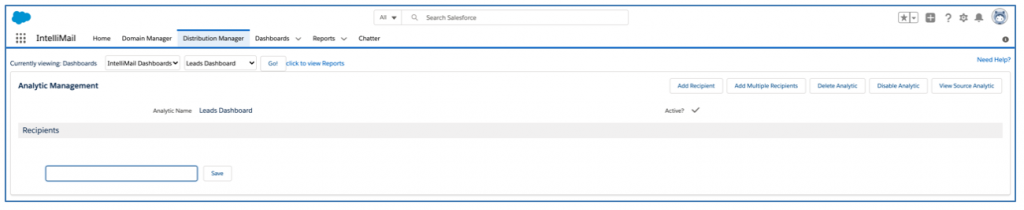
Note: You can add up to 100 Recipients to each Analytic.
This option can be used to add one Recipient at a time. Click the ‘Add Recipient’ button and a text box will appear, as shown below:
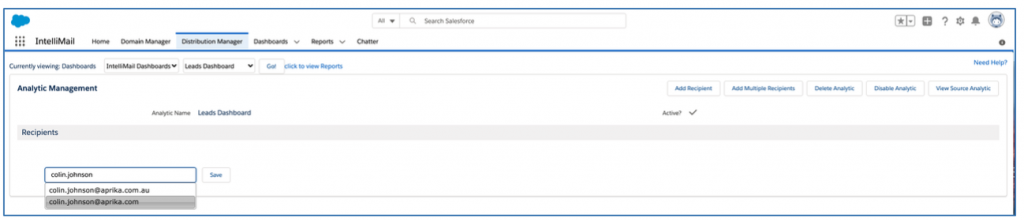
Add the email address into the field and click ‘Save’.
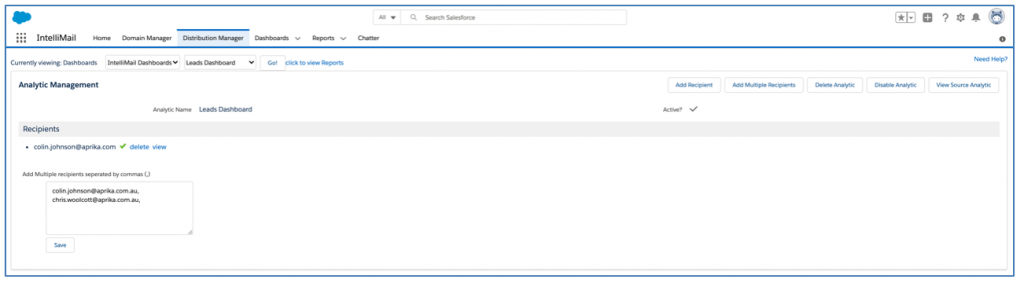
The Recipient has now been added, and you will see the email address in the list of Recipients.

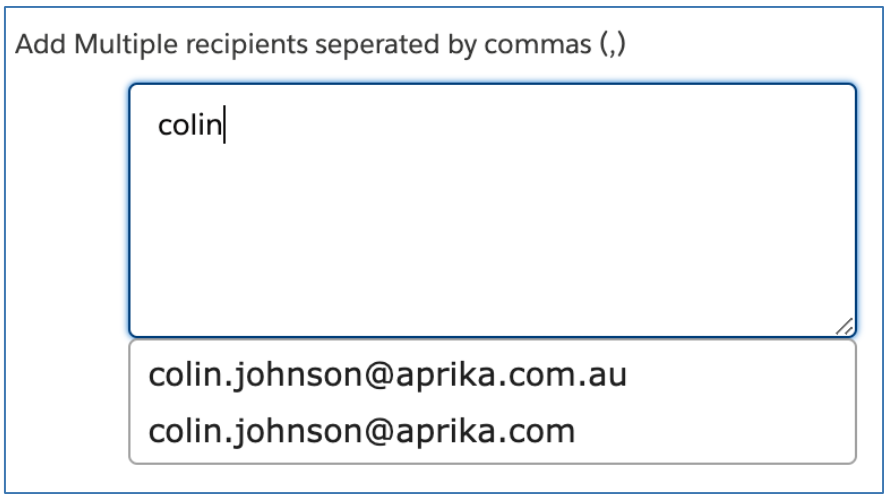
You can add multiple Recipients to the distribution list at once. Click the ‘Add Multiple Recipients’ button and enter each email address separated by a comma (,).
When entering a Recipient, whether individually or via the ‘Add Multiple Recipients’ option, an auto-search feature will show a list of potential email matches that are already in the system.
If you no longer wish to distribute a Report or Dashboard via IntelliMail, you can click the ‘Delete Analytic’ button to completely remove the Analytic and Recipient records.
If you would like to temporarily stop distributing a Report or Dashboard via IntelliMail, you can click the ‘Disable Analytic’ button. This will change the ‘Active?’ checkbox to false.

If you need to restart distributing the Analytic via IntelliMail, you can click the ‘Enable Analytic’ button. This will change the ‘Active?’ checkbox to true.

You can click the ‘View Source Analytic’ button to go directly to the Salesforce Report or Dashboard that the Analytic relates to.
Salesforce Classic Schedule Refresh Feature
From your Dashboard or Report, click the dropdown next to ‘Refresh’ and click ‘Schedule Refresh’.

When you schedule a Dashboard or Report for automated delivery, you need to specify at least one Salesforce User. Best Practice is to check the ‘To Me’ box.
As a System Administrator, you can then monitor which Reports & Dashboards are being delivered by Salesforce. Set your preferred Start and End Date options and Preferred Start Time. When you are happy with the settings, click ‘Save’.
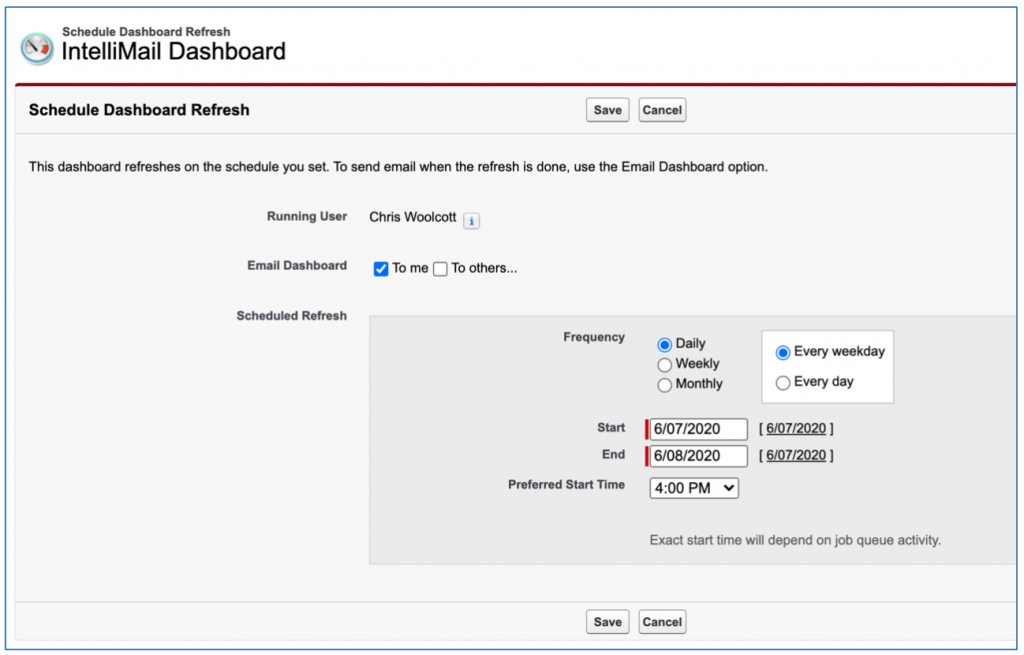
Now that your Salesforce Classic Report or Dashboard has a Scheduled Refresh configured, and you have set up the Analytic within the Distribution Manager, IntelliMail will deliver it to the Recipients associated with the Analytic.
Lightning Experience Subscribe Feature
From your Report or Dashboard, click the ‘Subscribe’ button.
Configure your subscription options, including Frequency, Days and Time. Best practice is to ensure the ‘Send Email To’ has Me selected as a minimum. Once you’ve finished with your preference settings, click ‘Save’.
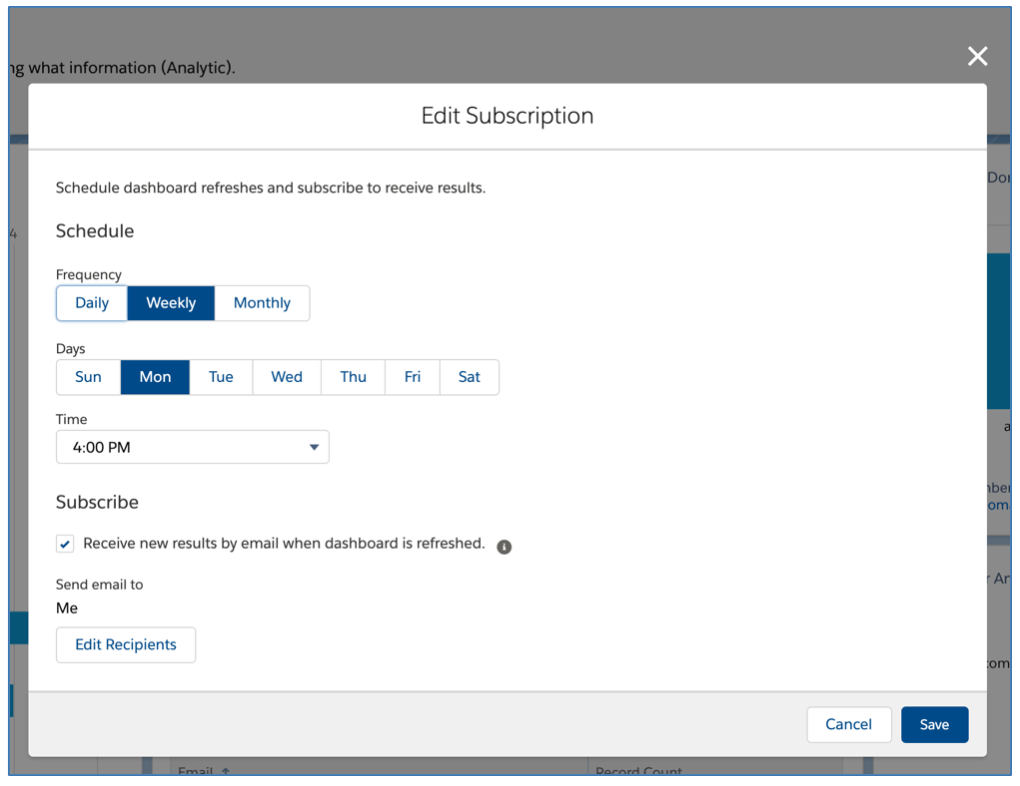
Now that your Lightning Experience Report or Dashboard has a Subscription configured, and you have set up the Analytic within the Distribution Manager, IntelliMail will deliver it to the Recipients associated with the Analytic.
To assist in providing the System Administrator with an overview of distribution activity, IntelliMail comes with a Dashboard and set of Reports. The dashboard provides an overview of the following:
To access the IntelliMail Dashboard, click the Dashboards tab and select IntelliMail Dashboard from the drop down, which is contained in the IntelliMail Dashboards folder.
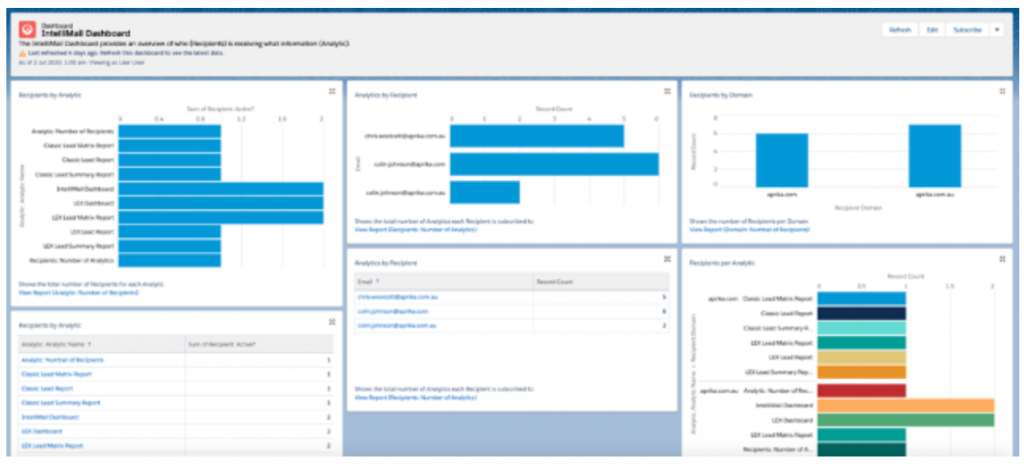
The underlying reports that feed the IntelliMail dashboard can all be located in the IntelliMail Reports folder within the Reports tab. The reports supplied with IntelliMail are listed below:
| Report Name | Description |
| Analytic: Number of Recipients | Shows the total number of Recipients per Analytic |
| Authenticated Domains | Lists the domains that have been authenticated for IntelliMail distribution |
| Domain: Number of Recipients | Shows the number of Recipients by Domain who are subscribed to receive Analytics |
| Domain: Recipients by Analytic | Shows the number of Recipients per Domain subscribed to each Analytic |
| Recipients: Number of Analytics | Shows the number of Analytics each Recipient is subscribed to receive |