Release Notification – 12 October 2018
A new version of Mission Control (version 1.48) will be released on the AppExchange on Friday 12th October 2018. This notification has been issued to existing Mission Control users. It contains an overview of the new features available with this release, along with instructions on how to upgrade to the new version.
What’s New?
This release includes a number of new features, along with some enhancements to existing functionality, including:
Let’s get stuck in to the detail…
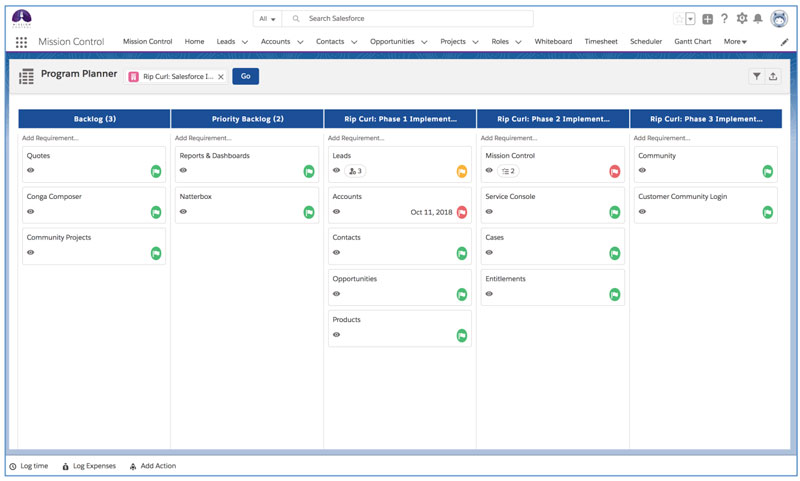
Program Planner
In the May 2018 release, we included some new Objects that enabled you to group Projects together into a Program and document Requirements relating to the Program. Building on those new Objects, we’re pleased to be introducing a new page called the ‘Program Planner’.
The Program Planner will enable you to quickly capture new Requirements relating to a Program. They can be allocated to the Program ‘Backlog’ or assigned to a Project. Within each Program, you’re able to document User Stories and build out Checklist Items so they’re ready for when you convert the Requirement to an Action (more to come on that in a moment).
We envisage the Program Planner being used to manage the higher-level requirements for a program of works that will be delivered across a number of related projects. Examples of such complex programs could include a major implementation of Salesforce for a customer, where you will be delivering the work in multiple projects or managing the requirements of a product roadmap.
The Program Planner is illustrated in the wireframe below.
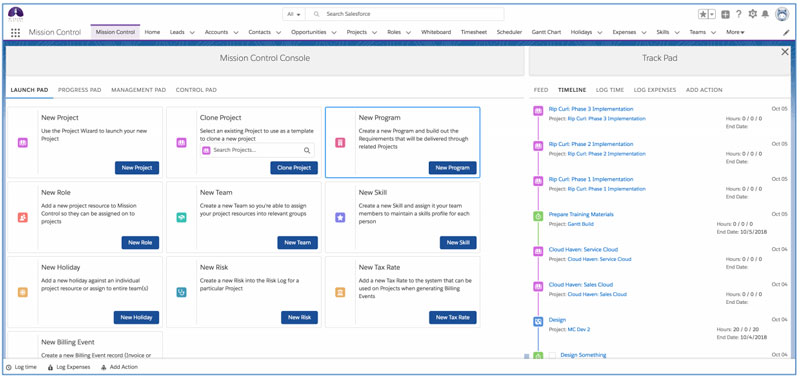
To use the Program Planner, you first of all need to create a Program. You can do this via the Program Tab in the navigation menu, or from the Launch Pad of the Mission Control Console.
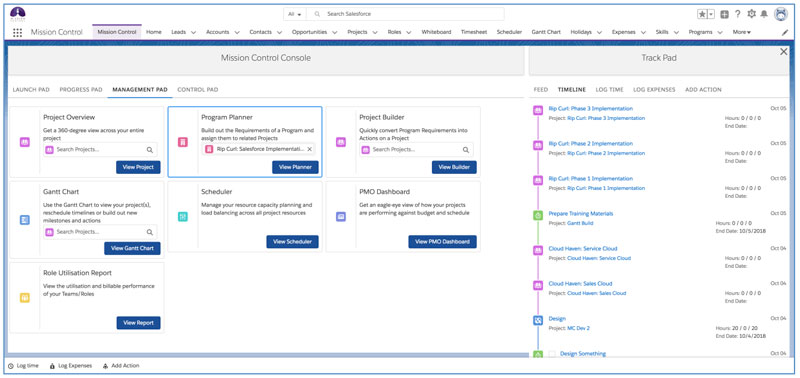
Once you’ve created your Program, you’ll be able to access the Program Planner from the ‘Management Pad’ on the Mission Control Console.
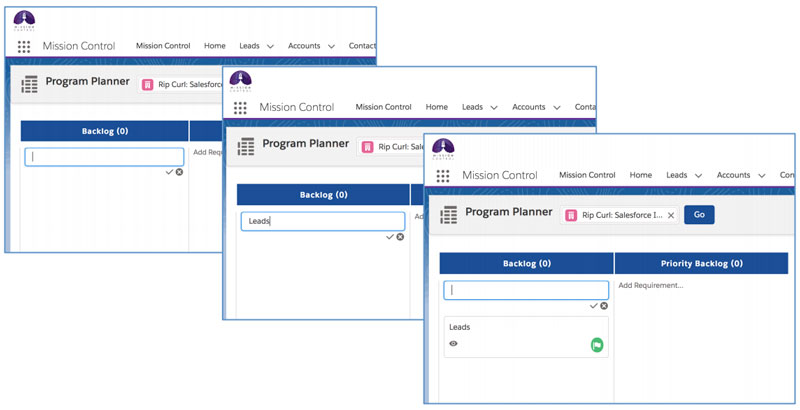
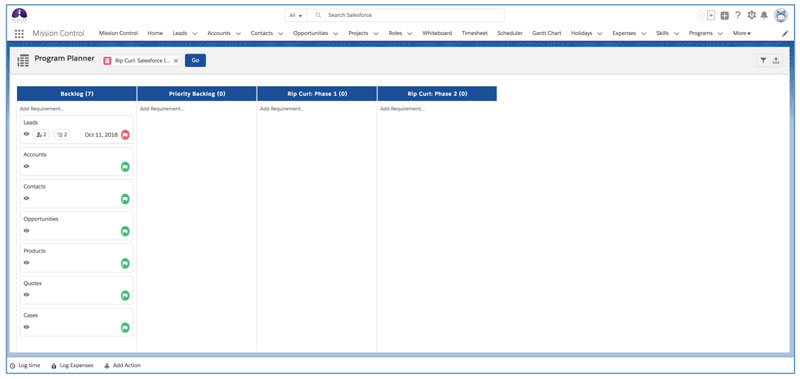
Unless you’ve already related Projects to your Program, when you first view the Program Planner for a new Program, you will see it has two columns for ‘Backlog’ and ‘Priority Backlog’:
![]()
There are a number of tasks the Program Planner enables you to do, including:
Let’s take a closer look at how to do each of these tasks.
Create Requirements
You can begin creating Requirements quickly by clicking on the ‘Add Requirement…’ link at the top of any of the columns. That will open the quick create field as shown below. Simply enter the name of the Requirement, hit enter and you’ll see the Requirement appear on the Planner and you’ll be able to then go on to crate another Requirement if needed.
You can continue creating Requirements in the Backlog and then dragging them to the Priority Backlog, or you can create them directly in the Priority Backlog column using the ‘Add Requirement…’ feature.
Edit Requirements
If you click on the ![]() icon for an individual Requirement, the Requirement modal will open, which will give you access to:
icon for an individual Requirement, the Requirement modal will open, which will give you access to:
![]()

On the Requirement Tab, you’re able to edit the details of the Requirement record by clicking the ![]() icon or deleting it by clicking the
icon or deleting it by clicking the ![]() icon.
icon.
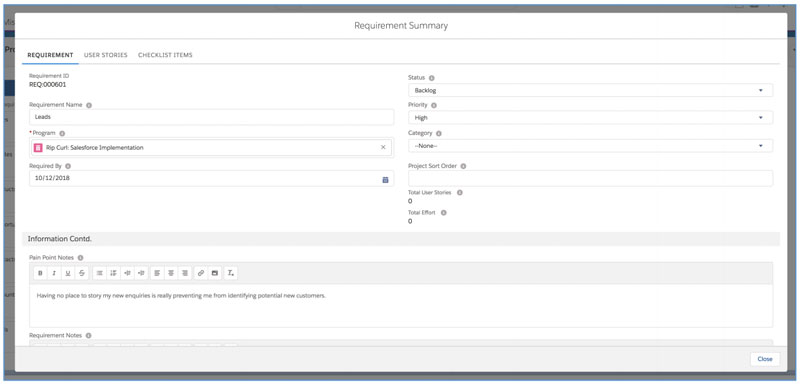
When editing the record, you can make changes to any of the fields and then scroll to the bottom of the page and click Save.
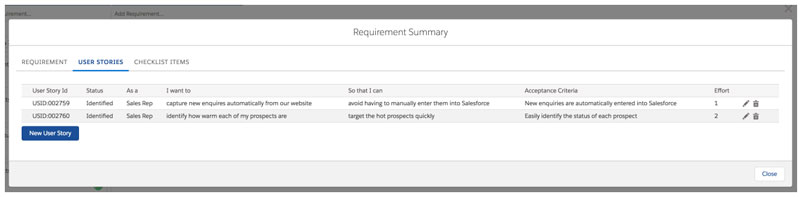
Add User Stories
User Stories are the detailed scenarios that need to be delivered as part of the Requirement. To add new User Stories relating to a Requirement, click the ‘User Stories’ Tab in the Requirement Modal and then click the ‘New Story’ button.
![]()
This will open a new draft User Story for you to create. Fill in the relevant fields and you can click the ![]() to save and close, or the
to save and close, or the ![]() to save and open a new User Story ready to create.
to save and open a new User Story ready to create.
All User Stories relating to the Requirement will be listed in the User Stories tab of the Requirement Modal.
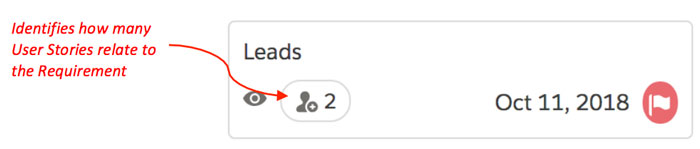
When you look at the Requirement card on the Program Planner, you’ll be able to identify how many User Stories are related to the Requirement.
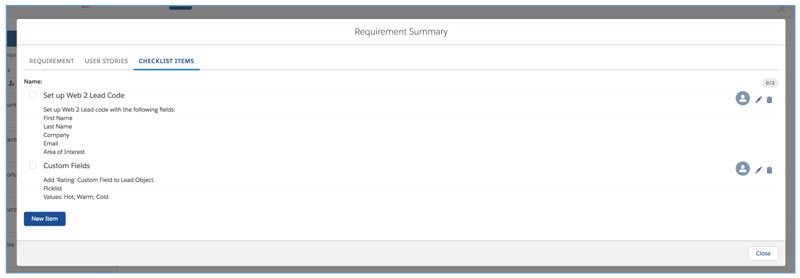
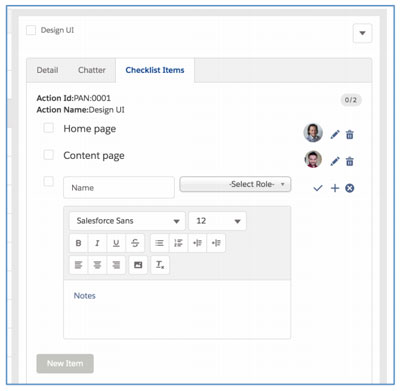
Add Checklist Items
Checklist Items are the sub-tasks that sit underneath an Action on a Project. You’re able to create Checklist Items under the Requirement, and when you convert the Requirement to an Action on a Project, the Checklist Items will be related to the new Action.
To add Checklist Items relating to a Requirement, click the ‘Checklist Items’ Tab in the Requirement Modal and then click the ‘New Item’ button.
![]()
This will open a new draft Checklist Item for you to create. Fill in the relevant fields and you can click the ![]() to save and close, or the
to save and close, or the ![]() to save and open a new Checklist Item ready to create.
to save and open a new Checklist Item ready to create.
All Checklist Items relating to the Requirement will be listed in the Checklist Items tab of the Requirement Modal.
When you look at the Requirement card on the Program Planner, you’ll be able to identify how many Checklist Items are related to the Requirement.
Add Projects
You can relate Projects to your Program, so you can drag and drop the Requirements to a Project, in essence, assigning the Requirement to be delivered as part of that Project. You can relate existing Projects or create new Projects by clicking on the ![]() button. This will open the following modal window:
button. This will open the following modal window:
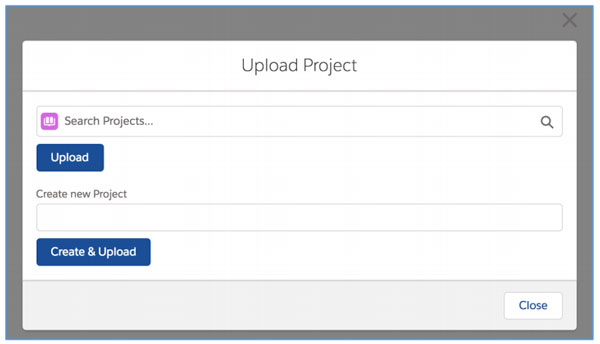
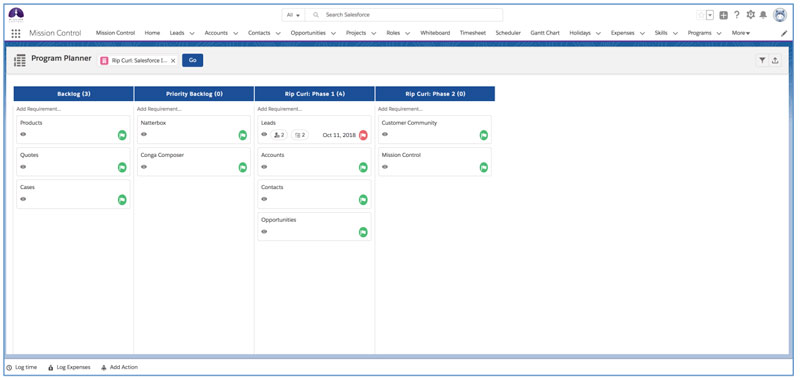
Once you’ve added your Projects to your Program, they’ll automatically appear to the right of the ‘Priority Backlog’ column.
Note: You’re able to drag and drop the Project columns to re-order them, but the Backlog and Priority Backlog will always be positioned on the left.
Now you have Projects on your Program Planner, you’re able to drag and drop your Requirements, assigning them to individual Projects. You’re also able to create new Requirements directly on any of the Project columns.
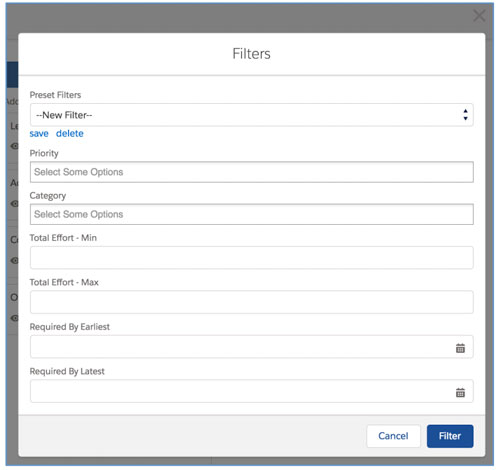
You can apply a filter to your Program Planner by clicking the ![]() button. You can save any of your filters for ongoing use.
button. You can save any of your filters for ongoing use.
If you want to hide a Project from the Planner without removing the relationship to the Program, you can set the ‘Exclude from Program Planner’ to TRUE on the Project record.
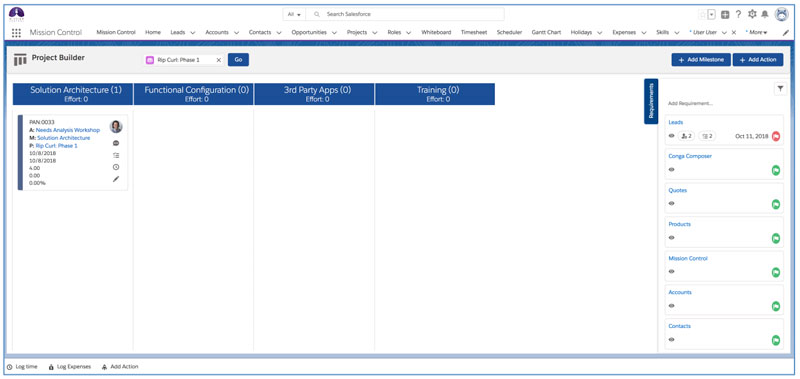
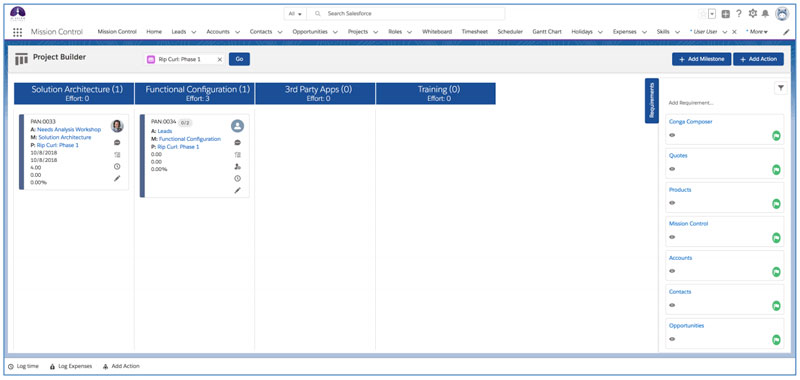
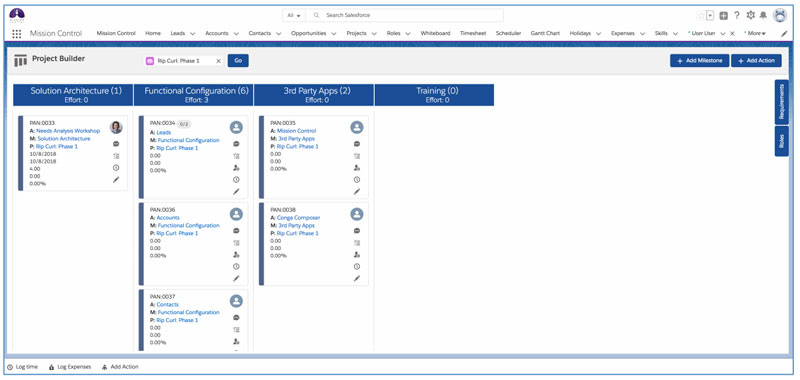
Project Builder
The ‘Project Builder’ is another new page that’s being introduced to assist with building the detail of a Project. You’re able to:
If you haven’t created any Milestones underneath your Project, when you load the Project Builder, you’ll get a screen that looks like this:
![]()
From here, you’re able to click the ‘Add Milestone’ button to create new Milestones.
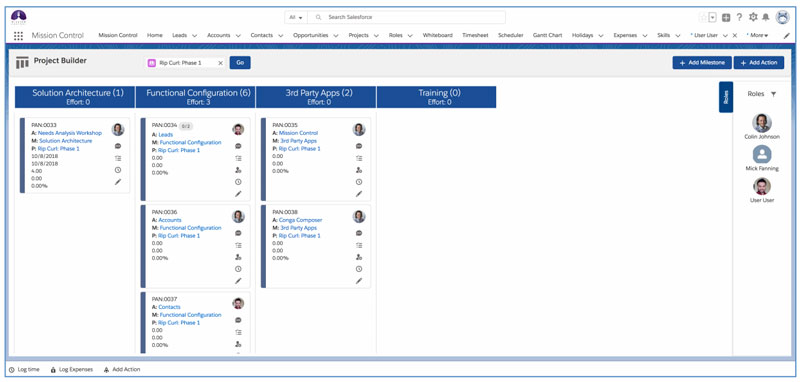
In the example below, the Project already has some Milestones created, and we’re ready to start building out the detail by adding Actions. We have two options here:
![]()
To create an Action manually, simply click the ‘Add Action’ button and enter the appropriate field values and click Save. The new Action will automatically appear in the relevant Milestone column.
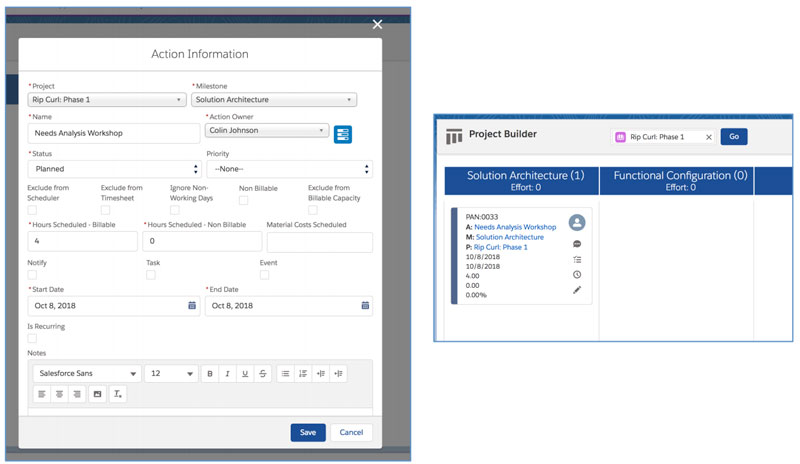
You’re also able to convert Requirements into Actions. To do this, you need to click on the ‘Requirements’ Tab on the right-hand side of the Project Builder. This will expand a section that will display all of the Requirements that are related to the Project, that have not yet been converted to an Action.
The Requirement card here gives you the same functionality as the Program Planner, where you can access the Requirement modal, User Stories and Checklist Items.
To convert a Requirement to an Action, simply drag and drop the Requirement into a Milestone Column and it will create the Action.
You can continue to convert the Requirements in to Actions and once you’ve completed that, you can close the Requirements Tab by clicking on it again.
You’re also able to assign an Action Owner by clicking on the Roles Tab on the right-hand side. You’ll see a list of Roles and you can then drag and drop the appropriate Role on to the Action to assign them as the Action Owner
To edit the Action further, or to assign Contributors, you can click the ![]() icon on the individual Action, where you’ll be able to edit key fields such as Hours Scheduled, Start Date, End Date, and access the Resource Assignment Wizard to manage Contributors.
icon on the individual Action, where you’ll be able to edit key fields such as Hours Scheduled, Start Date, End Date, and access the Resource Assignment Wizard to manage Contributors.
Program / Project Charts
We have included a number of individual Lightning Components that can be added to the Program or Project Pages. Each component provides you with a specific analytic insight into the Program / Project. The components include:
Using the Lightning App Builder, you can add any of these charts to your Lightning Experience page. You’re also able to add all 10 charts to your Salesforce Classic page layout by adding the ‘programCharts’ or ‘projectCharts’ Visualforce Page to a single column section on the respective Object page layout.
Below is an illustration of how you could display these charts using a 3-column page design in Lightning App Builder.
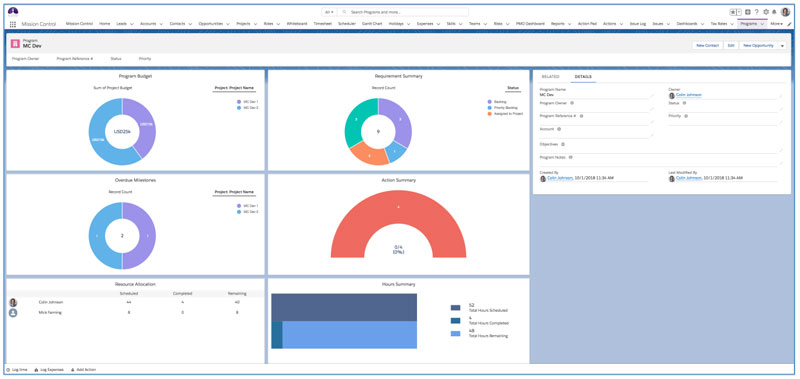
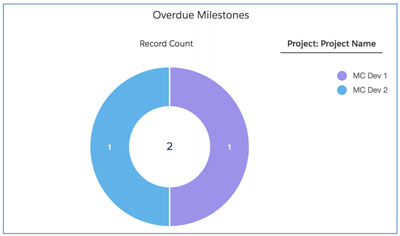
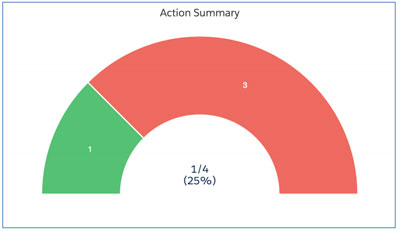
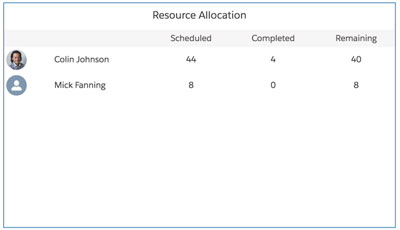
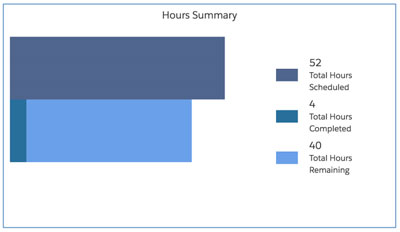
Below is an example of each chart for your reference.
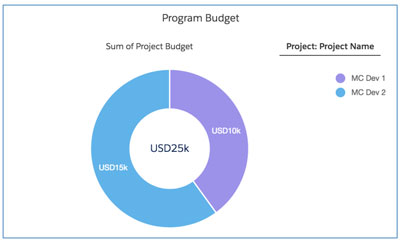
Budget Summary
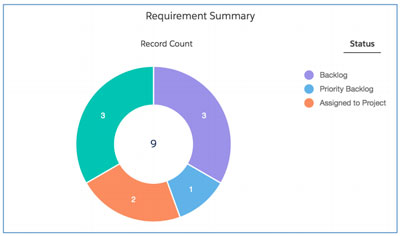
Requirements Summary
Overdue Milestones
Action Summary
Resource Allocation
Hours Summary
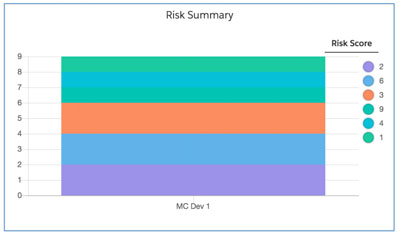
Risk Summary
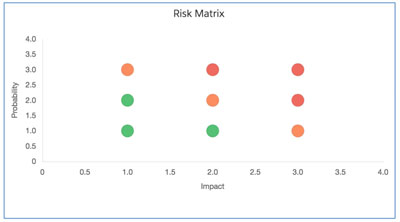
Risk Matrix
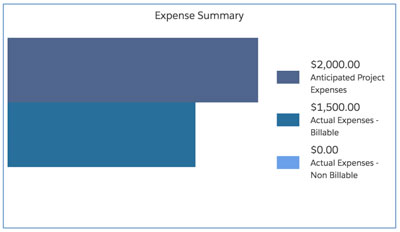
Expense Summary
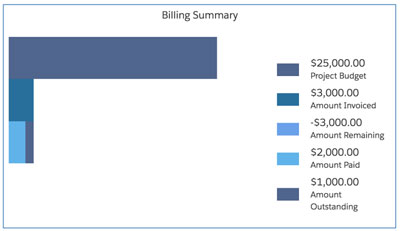
Billing Summary
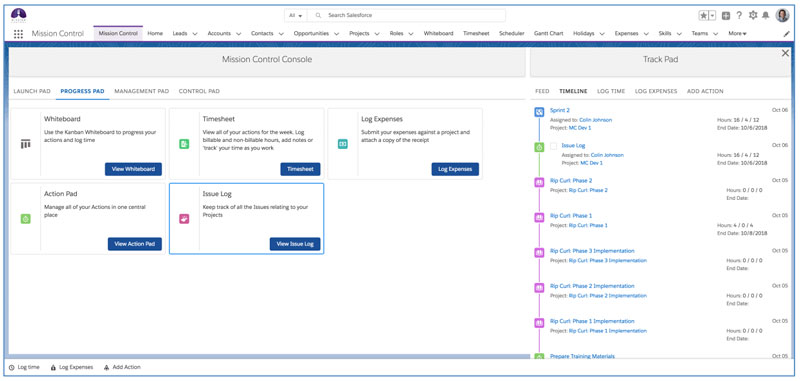
Action Pad
We often get asked by customers “Where can my team members go to view all of their Actions in one place?”. The answer is, quite a few places…including the Whiteboard, the Scheduler, Timesheet. However, we’re really excited to be introducing a new page called the Action Pad. This will be your one-stop shop if you’re looking to see a list of all your Actions across all of your Projects.
The Action Pad is accessible as a stand-alone page, which you can access via the ‘Progress Pad’ on the Mission Control Console.
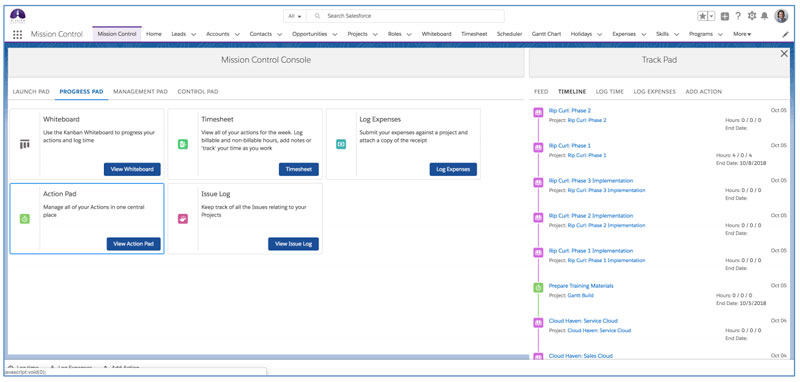
You can also access it on the Project Overview as a new sub-tab. This can be controlled via the Project Overview permissions on the Role record, like all other Project Overview Tabs.
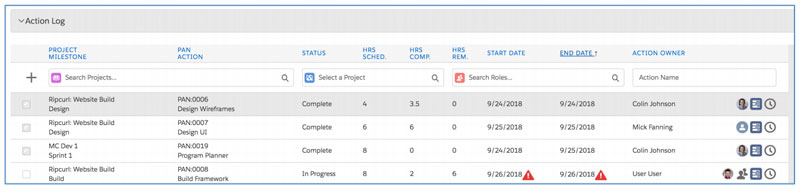
Below is an example of the Action Pad being viewed as a stand-alone page.
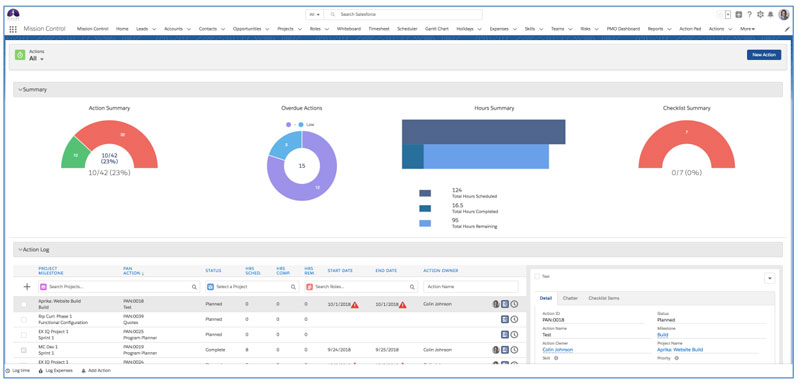
It comprises of two main sections – Summary and Action Log. Each can be collapsed to allow you to focus on the area of interest.
When using the Action Pad on the Project Overview page, it’s filtered to show all of the Actions related to that Project. On the stand-alone page, you will be able to determine which Actions are displayed, by selecting a ‘List View’ filter on the Action Object.
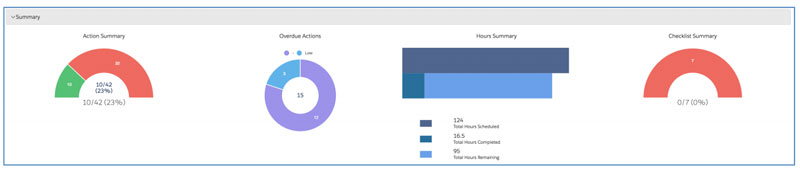
Summary Section
The Summary section includes 4 charts, providing you with a high level overview of the following:
Action Log Section
The Action Log section provides you with a working ‘pad’ where you can do numerous tasks, including:
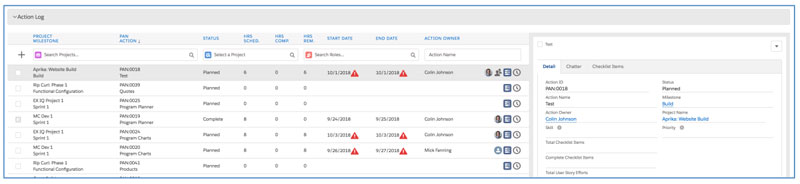
Quick Create Actions
You’re able to quickly create new Actions using the quick create feature located at the top of the Action Log – see below.

Providing you don’t have any Validation Rules or mandatory field requirements preventing an Action from being created with just the Action Name, Milestone and Action Owner populated, you’ll be able to rapidly create new Actions using this feature.
If a Validation Rule or field requirement does prevent the Action from being created, a new Action page will open up where you can complete the required fields and save the record.
Using the quick create feature, new Actions will appear at the top of the list in your Action Log and you can then click on any of them to go into them and edit further information.
Sort by any Column
Within the Action Log, you’re able to sort the data by any of the columns. Just click on the column you would like to sort by and the data will be re-organised accordingly. You can identify which column is being used for sorting by the directional arrow – in the example below, the End Date is being used.
Log Time
You can click on the ![]() icon to log time. This will open up the same component you can access from the Whiteboard. This will allow you to log time already completed, or use the start/stop time tracking feature.
icon to log time. This will open up the same component you can access from the Whiteboard. This will allow you to log time already completed, or use the start/stop time tracking feature.
View Contributors
Where an Action has Contributors assigned to it, the ![]() icon will appear. Nothing new here you say…well, now if you hover over the icon, you’ll see a table showing the allocation of hours scheduled / completed / remaining to each Role – see below for an example.
icon will appear. Nothing new here you say…well, now if you hover over the icon, you’ll see a table showing the allocation of hours scheduled / completed / remaining to each Role – see below for an example.
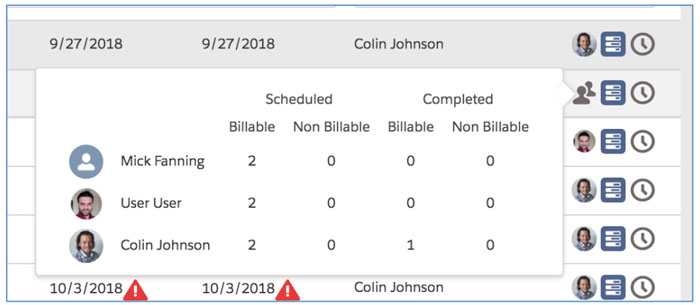
This component is also now available on the Whiteboard, Gantt Chart and Project Overview page where the Contributors icon is visible.
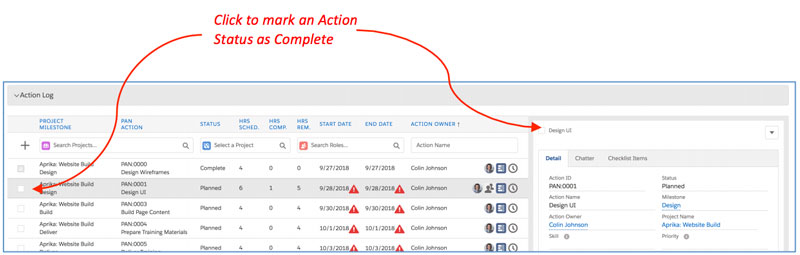
Complete Actions
You can quickly mark an Action’s Status as Complete by ticking the box on the left-hand side of the table, or at the top of the work pad.
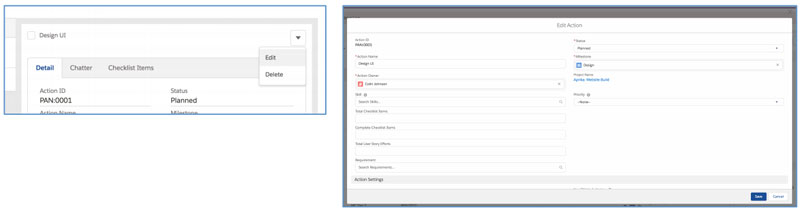
Edit Actions
If you need to edit any of the field information on the individual Action records, select Edit from the drop down list located in the top-right corner of the work pad. This will open the Action edit modal, where you’ll be able to make changes and click Save.
Collaborate via Chatter
If you need to collaborate with colleagues on an Action, you can click on the ‘Chatter’ tab within the work pad to access the Chatter Feed for the individual Action.

Manage Checklist Items
You’re also able to manage your Action’s Checklist Items from the work pad. Simply click on the Checklist Items tab and you’ll be able to mark existing Checklist Items as complete and add new records.
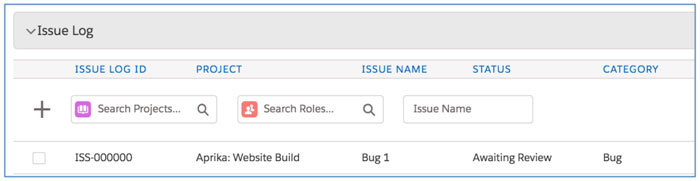
Issue Log
A new Custom Object has been included in Mission Control as part of this release that will enable you to track ‘Issues’ relating to your Project. The fields included in this Custom Object are detailed later in these release notes.
To help you easily manage your Issues, we have also included a new ‘Issue Log’ page. The Issue Log is accessible as a stand-alone page, which is accessible from the ‘Progress Pad’ on the Mission Control Console.
You can also access it on the Project Overview as a new sub-tab. This can be controlled via the Project Overview permissions on the Role record, like all other Project Overview Tabs.
Below is an example of the Issue Log being viewed as a stand-alone page.

It comprises of two main sections – Summary and Issue Log. Each can be collapsed to allow you to focus on the area of interest.
When using the Issue Log on the Project Overview page, it’s filtered to show all of the Issues related to that Project. On the stand-alone page, you will be able to determine which Issues are displayed, by selecting a ‘List View’ filter on the Issue Object.
Summary Section
The Summary section includes 4 charts, providing you with a high level overview of the following:

Issue Log Section
The Issue Log section provides you with a working ‘pad’ where you can do numerous tasks, including:

Quick Create Issues
You’re able to quickly create new Issues using the quick create feature located at the top of the Issue Log – see below.
Providing you don’t have any Validation Rules or mandatory field requirements preventing an Issue from being created with just the Issue Name populated, you’ll be able to rapidly create new Issues using this feature.
If a Validation Rule or field requirement does prevent the Issue from being created, a new Issue page will open up where you can complete the required fields and save the record.
Using the quick create feature, new Issues will appear at the top of the list in your Issue Log and you can then click on any of them to go into them and edit further information.
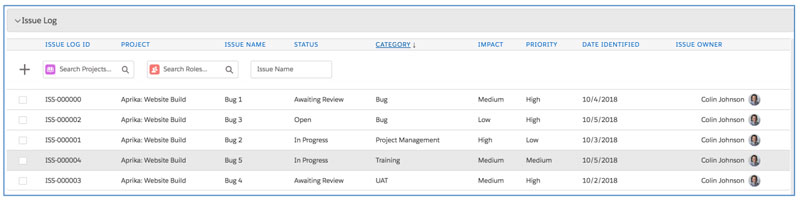
Sort by any Column
Within the Issue Log, you’re able to sort the data by any of the columns. Just click on the column you would like to sort by and the data will be re-organised accordingly. You can identify which column is being used for sorting by the directional arrow – in the example below, the Category is being used.
Complete Issues
You can quickly mark an Issue’s Status as Complete by ticking the box on the left-hand side of the table, or at the top of the work pad.
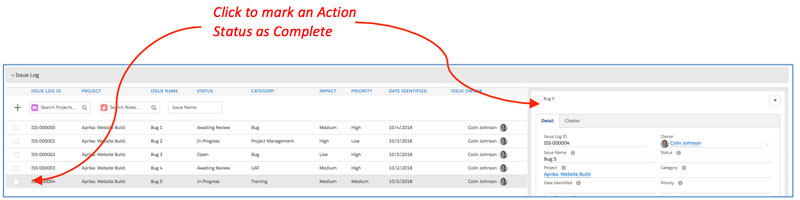
Note: when you mark an Issue as Complete, a Trigger will automatically populate the ‘Date Resolved’ to Today, if it’s not already populated.
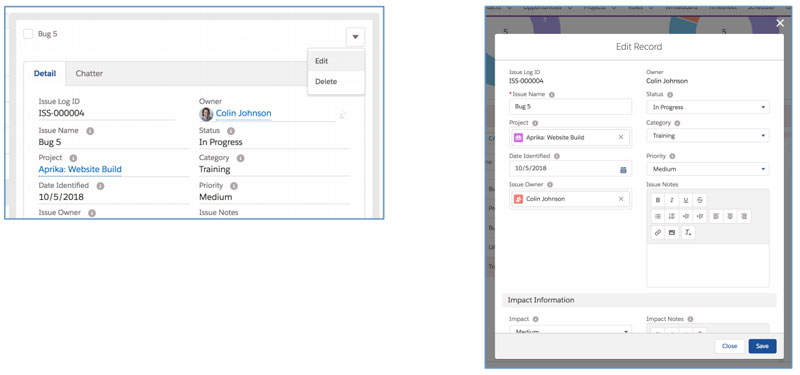
Edit Issues
If you need to edit any of the field information on the individual Issue records, select Edit from the drop down list located in the top-right corner of the work pad. This will open the Issue edit modal, where you’ll be able to make changes and click Save.
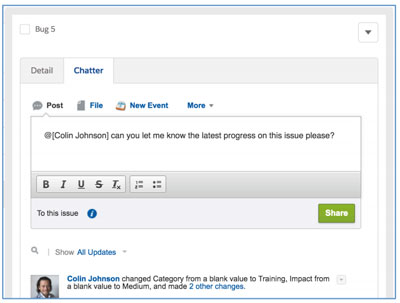
Collaborate via Chatter
If you need to collaborate with colleagues on an Issue, you can click on the ‘Chatter’ tab within the work pad to access the Chatter Feed for the individual Issue.
Change Requests
A new Custom Object has been added to Mission Control called ‘Change Request’. The Change Request Object will enable you to track Change Requests relating to a Project. The main reasons a Change Request occurs are:
Depending on when the Change Request is received, and the impact the request will have on the Project, the changes may be associated to an existing Opportunity, or a new Opportunity. There will also be four potential outcomes of the Change Request, including:
The Change Request record is a child to the Project and the Opportunity. You can therefore create a Change Request from the Change Request related list on either on the Project or the Opportunity.
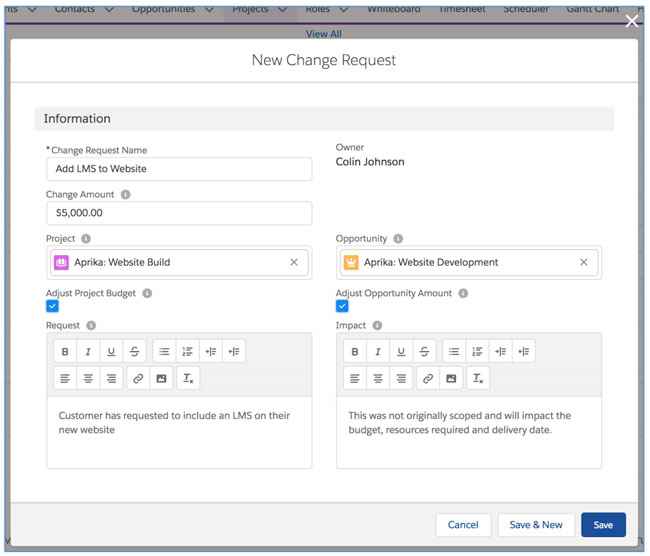
If you set the ‘Adjust Project Budget’ or the ‘Adjust Opportunity Amount’ fields to TRUE, the respective fields will be adjusted based on the value entered in the ‘Change Amount’ field.
Timesheet Enhancements
Timesheet Settings
In the last release, we introduced the new Timesheet. The Timesheet features a number of configurable settings, which enable Users to customise the Timesheet data and columns. Any customisation required had to be done by each individual User.
We have now included a new section on the Control Pad of the Mission Control Console that enables you to centrally manage these settings.
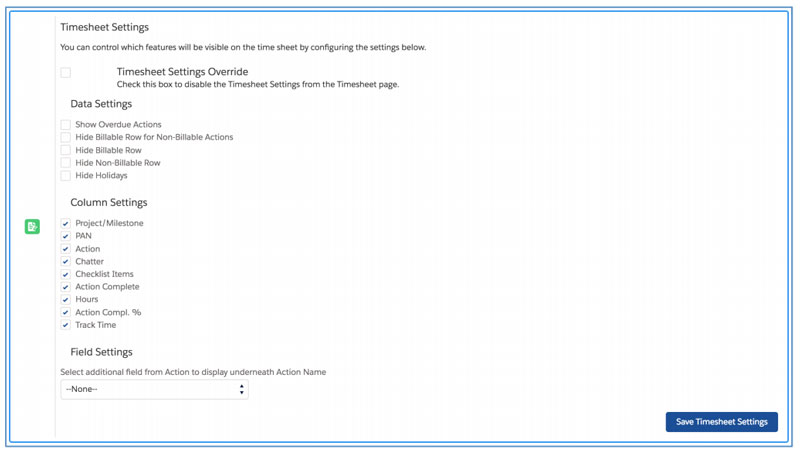
These centralised settings can be used to update the Timesheet settings for all Users. To apply these centralised settings and hide the Settings icon on the Timesheet, you need to ensure the ‘Timesheet Settings Override’ field is set to TRUE.
View Timesheet for Subordinates
There is an existing field on the Role Object called ‘Manage Timesheets’. If this field is set to TRUE, a User is able to look at another person’s Timesheet.
We received some requests from Customers to have the ability to let people look at the Timesheets for certain people, not everyone. To support this requirement, we have added a new field on the Role Object called ‘Manage Subordinates Timesheets’. If this field is TRUE, but the ‘Manage Timesheets’ field is FALSE, then the User will only be able to view the Timesheet for other Roles where the person is specified as the ‘Timesheet Approver’.
Gantt Chart Enhancements
We have added a persistent setting to the ‘Auto-Schedule’ button on the Gantt Chart. Previously, even if you had disabled the Auto Schedule feature on your last visit to the Gantt Chart, it would always be turned on by default, which is identifiable when the button looks like this ![]() .
.
This new setting means if you wish to keep this turned off, you can set the button to off, so it looks like this ![]() . The persistent setting will keep it turned off even if you navigate away from the Gantt Chart, so the next time you visit the page, it will remain turned off.
. The persistent setting will keep it turned off even if you navigate away from the Gantt Chart, so the next time you visit the page, it will remain turned off.
Permission Sets
We have added some additional Permission Sets to the package to help customers quickly assign the appropriate permissions to their Users. In addition to the existing ‘Mission Control Full’ Permission Set, 8 additional Permission Sets are now available. Each Permission Set is explained below.
| Permission Set | Description |
| Mission Control Full | Full Access to the Mission Control Application |
| Mission Control Full Classic Only | Full Access to the Mission Control Application. Access to Classic App and VF Tabs, but not LEX App and Components |
| Mission Control Full LEX Only | Full Access to the Mission Control Application. Access to Lightning App and Components, but not Classic App and Visualforce Tabs |
| Mission Control Full No Apps | Full Access to the Mission Control Application, but does not have any Apps assigned. |
| Mission Control Full No Financials | Full Access to the Mission Control Application with no visibility of Financial Fields (e.g. Billing or Cost) on the Role, Project, Milestone, Action, Time Log or Skill Assignment Objects |
| Mission Control Full No Financials Classic Only | Full Access to the Mission Control Application with no visibility of Financial Fields (e.g. Billing or Cost) on the Role, Project, Milestone, Action, Time Log or Skill Assignment Objects. Access to Classic App and VF Tabs, but not LEX App and Components |
| Mission Control Full No Financials LEX Only | Full Access to the Mission Control Application with no visibility of Financial Fields (e.g. Billing or Cost) on the Role, Project, Milestone, Action, Time Log or Skill Assignment Objects. Access to LEX App and Components, but not Classic App and VF Tabs |
| Mission Control Full No Financials Read Only | Full Access to the Mission Control Application with no visibility of Financial Fields (e.g. Billing or Cost) on the Role, Project, Milestone, Action, Time Log or Skill Assignment Objects. Read-Only Field Level Security. |
| Mission Control Full Read Only | Full Access to the Mission Control Application. Read-Only Field Level Security. |
Please ensure you review any of these Permission Sets in detail to ensure they are providing the appropriate level of access to your Users. If you wish to create a variation on any of the above Permission Sets, you can do so by clicking the ‘Clone’ button and making the required adjustments.
Minor Enhancements
The following minor enhancements have been included within this release.
Project Trigger
The Project Trigger logic has been enhanced to incorporate the following features:
If you would prefer to disable these features, you can do so in the Project Automation Settings section of the Control Pad on the Mission Control Console. To do so, please set the Checkbox to TRUE for “Disable Auto Project to Milestone Status” and click Save.
Whiteboard Add Action Component
The ‘Add Action’ Component on the Whiteboard will now display the context User’s Role record in the ‘Action Owner’ field by default.
The Whiteboard Lightning Component has been updated to enable it to be added to the Project page as a standalone component.
CPI / SPI Fields
We have included 2 new fields on to the Project Object called:
These fields will be updated automatically during the weekly ‘Action Progress Tracking’ process. The will contain the current CPI and SPI figures for the Project. This will enable you to include the CPI / SPI figures in reports.
Billing Event Chatter Notifications
When a Billing Event PDF is automatically generated, a Chatter Notification is created, alerting the appropriate User. Some customers found they did not want these Chatter Notifications to be generated, so we have included the ability to disable this feature via the Project Automation Settings section of the Control Pad on the Mission Control Console. To do so, please set the Checkbox to TRUE for “Disable Billing Event Notifications” and click Save.
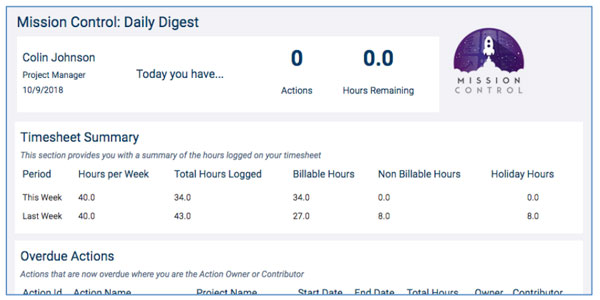
Daily Digest
A new section has been added to the Daily Digest, showing a summary of the hours logged for this week and last week. See below for an example.
Install Script
To ensure all of your Roles have access to the Action Pad and Issue Log within the Project Overview upon initial upgrade to this version, an Install Script will run as part of the upgrade that will set the new Role fields ‘View Action Pad Tab’ and ‘View Issue Log Tab’ to TRUE. You will then be able to adjust the settings for each Role as required.
New Field Overview
A number of new fields have been added to the solution as part of this release. We recommend you add these fields to your Page Layouts. If you are not using the Permission Sets included with Mission Control, we recommend you to check the Field Level Security for all of these fields to ensure all appropriate Profiles have the required access.
Role
| Field | Field Type | Comments |
| View Action Pad Tab | Checkbox | Identifies if the Role has the permission to view the Action Pad on the Project Overview Page |
| View Issue Log Tab | Checkbox | Identifies if the Role has the permission to view the Issue Log on the Project Overview Page |
| Project Overview Default Tab | Picklist | Existing field. You are required to add the following values:
Action Pad Issue Log |
| Manage Subordinate Timesheets | Checkbox | Identifies if this Role has the permission to view the Timesheets of those Roles that he/she is set as the Timesheet Approver for |
Project
| Field | Field Type | Comments |
| Current CPI | Number (16, 2) | Identifies the most recent CPI value for this Project |
| Current SPI | Number (16, 2) | Identifies the most recent SPI value for this Project |
| Program Sort Order | Number (3, 0) | Identifies the column order that the Project should appear on the Program Planner |
| Exclude from Program Planner | Checkbox | Identifies whether the Project should appear on the Program Planner |
Issue
| Field | Field Type | Comments |
| Issue Log ID | Auto Number | Identifies the unique number for this Issue. Format: ISS:{000000} |
| Issue Owner | Lookup (Role) | Identifies the person that will be responsible for resolving this Issue |
| Issue Name | Text (255) | A descriptive name of the Issue |
| Issue Notes | Rich Text | Identifies the detailed notes regarding this Issue |
| Category | Picklist | Identifies the Issue Category this Issue relates to. Values: General; Project Management; UAT; Bug; Training; Other |
| Status | Picklist | Identifies the current Status of the IssueValues: Open; In Progress; Awaiting Review; Closed |
| Priority | Picklist | Identifies the Priority rating for this IssueValues: High; Medium; Low |
| Date Identified | Date | Identifies the date the Issue was first raised |
| Impact | Picklist | Identifies the impact this Issue is having on the Project: High; Medium; Low |
| Impact Notes | Rich Text | Identifies the detailed notes on the impact |
| Resolution Notes | Rich Text | Identifies the detailed notes on how this Issue was resolved |
| Date Resolved | Date | Identifies the date the Issue was resolved |
| Project | Lookup (Project) | Identifies the Project this Issue relates to |
Action
| Field | Field Type | Comments |
| Requirement | Lookup (Requirement) | Links to the Requirement this Action was converted from |
Change Request
| Field | Field Type | Comments |
| Change Request Name | Text (80) | Identifies the name of the Change Request |
| Project | Lookup (Project) | Links to the Project this Change Request relates to |
| Opportunity | Lookup (Opportunity) | Links to the Opportunity this Change Request relates to |
| Request | Rich Text | Identifies the details of the request |
| Impact | Rich Text | Identifies the expected impact on the Project |
| Change Amount | Currency (16, 2) | Identifies the amount the Project Budget will be changed by |
| Adjust Project Budget | Checkbox | Set to TRUE if you wish the Project Budget to be amended by the value of the Change Amount |
| Adjust Opportunity Amount | Checkbox | Set to TRUE if you wish the Opportunity Amount to be amended by the value of the Change Amount |
User Story
| Field | Field Type | Comments |
| Action | Lookup (Action) | Links to the Action this User Story relates to |
How do I upgrade?
Mission Control will be made available based on the following release schedule.
12th October 2018 – Available for manual upgrade from the AppExchange
20th October 2018 – Automatic upgrade to all Sandbox Orgs
27th October 2018 – Automatic upgrade to all Production Orgs
To manually upgrade to the new version of Mission Control in your organisation, please follow the steps below:
What’s New Webinar
We have pre-recorded the ‘What’s New’ webinar to provide further information on how to get the best out of the new features. To access this webinar, please view the ‘Release Notes’ section of the Mission Control Support Centre – www.aprika.com/mc-support
Feedback
Some of the new features included in this release of Mission Control have come from ideas submitted from existing clients. If you have an idea for enhancing Mission Control, you can submit it via email to [email protected].
Questions?
If you have any questions regarding this release notification, please do not hesitate to contact us at [email protected].