Salesforce Project Management Software by Aprika
Mission Control Version 1.29
Release Notification 7 August 2015
A new version of Mission Control (version 1.29) will be released on the AppExchange on Monday 10th August 2015. This notification has been issued to existing Mission Control users. It contains an overview of the new features available with this release, along with instructions on how to upgrade to the new version.
What’s New?
We are very excited with the new features being introduced to Mission Control. This is by far the largest release since Mission Control was initially launched.
Profit & Loss Management
Up until now, Mission Control has only had the ability to track the revenue for a Project. You were able to identify the value of an hour’s effort on the Project. Mission Control now has the ability to track both revenue and cost, and in turn, the Profit & Loss at the Action, Milestone and Project levels.
As part of the P&L Management update, a number of enhancements have been made, which are detailed below.
Hours Per Day
You now have the ability to specify how many hours per day you work. Previously, this was hard-coded to 8 hours per day. You can change the default value for all projects, but you can also specify the value for individual Projects if they vary from your standard working day.
To set the default value for your business, you can update the ‘Default Hours Per Day’ field in the Project Automation section of the Mission Control Console – see the screenshot below:
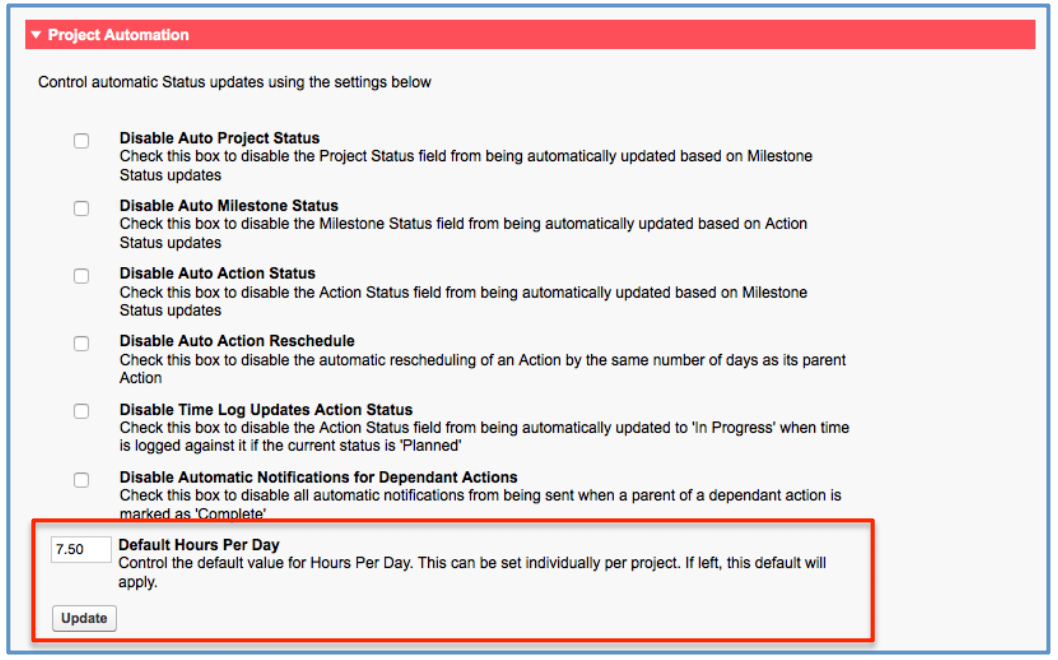
If you have a project that needs to be based on a different value, you can modify the ‘Hours per Day’ field on the individual Project.
Note, where no value is specified calculations will be based on an 8-hour day.
Billable & Cost Rates
Mission Control now allows you to track the revenue and costs of a Project. This enables you to track the Profit & Loss for individual Actions, Milestones and Projects.
You’re able to specify the Billing Rate and Cost Rate for each Project – the options are ‘Standard’ and ‘Role-based’.
Standard – This option will use the ‘Billing Hourly Rate’ and ‘Cost Hourly Rate’ on the Project. These are calculated based on the ‘Billing Day Rate’ and ‘Cost Day Rate’ values that you specify on the Project, which are divided by the ‘Hours per Day’ value.
Role-based – This option will use the ‘Billing Hourly Rate’ and ‘Cost Hourly Rate’ specified on the individual Role records.
When logging hours against a Project, the ‘Hours Completed – Billable’ will accrue when the ‘Non Billable Indicator’ on the Time Log is FALSE. Where it is TRUE, the time will be attributed to the ‘Hours Completed – Non Billable’.
There are now currency fields that track the ‘Billable’ and ‘Cost’ values for the Project. Hours will be taken into account for the ‘Cost’ calculation regardless of whether they are billable or non-billable. Only hours that are considered billable will be calculated into the ‘Billable’ value. The example below aims to illustrate how this new functionality will work.
Scenario: Mick Fanning works for Rip Curl and has been assigned as the Action Owner of an Action on a Project to build a new website. The Action will require Mick to carry out both billable and non-billable work to deliver the Action. The following parameters will be used for the Project.
These parameters illustrate that Rip Curl will earn $150 revenue for every billable hour that Mick works on this Project. For every hour works on the Project, Rip Curl will incur $100 cost (e.g. salary, overheads, etc).
Mick logs 2 hours of billable time and 1 hour of non-billable time on the Action. The net result is as follows:
Hours Completed – Billable: 3
Hours Completed – Non Billable: 1
Total Hours Completed: 4
Hours Completed Value (Billable): $450 (3 hours (billable) x $150 (the Billable Hourly Rate))
Hours Completed Value (Cost): $400 (4 hours (billable & non billable) x $100 (the Cost Hourly Rate))
P&L (Actual): $50
These calculations are available for the Scheduled Hours, Completed Hours and Remaining Hours.
A new Validation Rule has been included that will prevent users from entering a number greater than 0 in the Hours Scheduled – Billable field if the Non Billable Indicator = TRUE.
Out of the box, this Validation Rule is inactive. If you would like to active the rule, please carry out the following steps:
Fixed Price / Time & Materials
You now have the ability to specify whether a Project is being measured on a ‘Fixed Price’ or ‘Time & Materials’ basis. There is no fundamental difference to the way the calculations will work. However, on a Fixed Price project, you may want to restrict the number of ‘Billable’ hours completed to ensure it does not exceed the scheduled billable hours.
To assist with this, Mission Control now includes a Validation Rule that will prevent the User from logging time if it will push the completed billable hours over the scheduled billable hours.
Out of the box, this Validation Rule is inactive. If you would like to activate the rule, please carry out the following steps:
Overtime
You can now specify on an individual Project basis whether overtime can be calculated into the billable and cost values. On the Project record, you now have the following fields:
When logging time, the User will be able to specify whether or not the time they’re logging is ‘Overtime’. If the above fields have been set, the billable and cost values for the Project will calculate the Hours x Overtime Ratio x Hourly Rate.
Manage Rates per Project
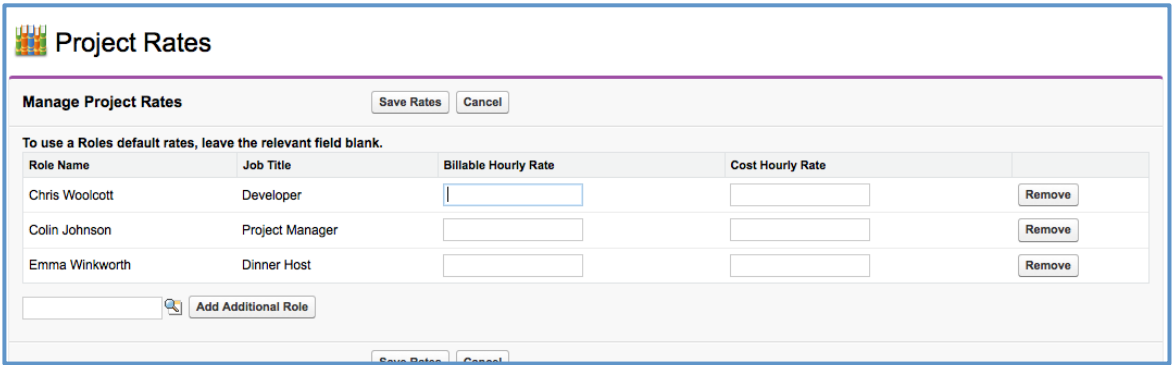
You will now be able to specify hourly rates per Role, per Project using the Manage Rates feature. This means you can specify different hourly rates (billable and cost) for Roles that may be working across different Projects.
For Example, when working on the project to develop a website for Billabong, the Hourly Rates for Mick Fanning may be $150 (billable) and $100 (cost). However, for a similar project to develop a website for Quiksilver, we may have needed to offer a discount in order to secure the deal, which means Mick Fanning’s billable rate may only be $120 for this project.
To use this feature, you need to set the rates prior to creating any Actions. After creating the Project & Milestones, navigate to the Project Detail page and click the ‘Manage Rates’ button. This will take you to the following page, where you’ll be able to add the required Roles and specify the Billable and Cost Hourly Rates where applicable.
Expense Management
A new Object has been added to Mission Control that will enable Users to submit expenses against a Project. Previously, the only method of logging expenses was on a Time Log record against a specific Action. Several clients have requested the ability to be able to log expenses at the Project level.
A new field has been added to the Role Object called ‘Mileage Rate’ that will be used to calculate the value of an Expense record that relates to a mileage claim.
To support expense approvals, a new field has been added to the Role Object called ‘Expense Approver’, which allows you to reference the Role record of the person that will approve the expenses being incurred by each person.
In addition, a dynamic list view called ‘Expenses Requiring My Approval’ has been included. This will display all Expense records where the User viewing the list is the ‘Expense Approver’ and the Status of the Expense record equals ‘Submitted’. This will allow the approver to review and approve Expense records using the inline edit functionality within the List View.
Only once an Expense has been set to ‘Approved’, will the amount be attributed to the Project. Expenses do not have to relate to a Project, so you may wish to consider using this Object for all of your staff expenses, not just those related to project work. You can also use the ‘Notes & Attachments’ related list to upload supporting documentation such as receipts.
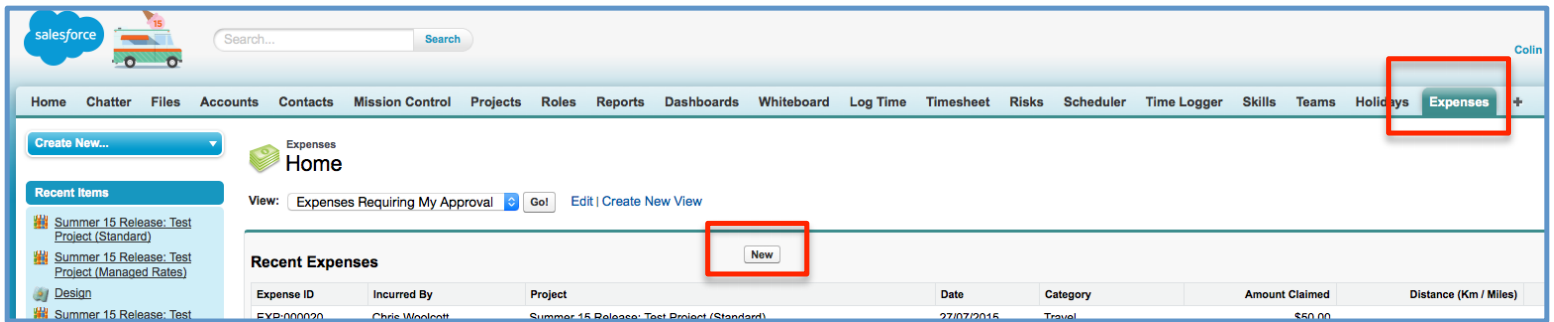
You can submit Expenses via the web browser by navigating to the Expenses Tab or via the Expenses related list on the Project Detail page, as per the illustrations below.

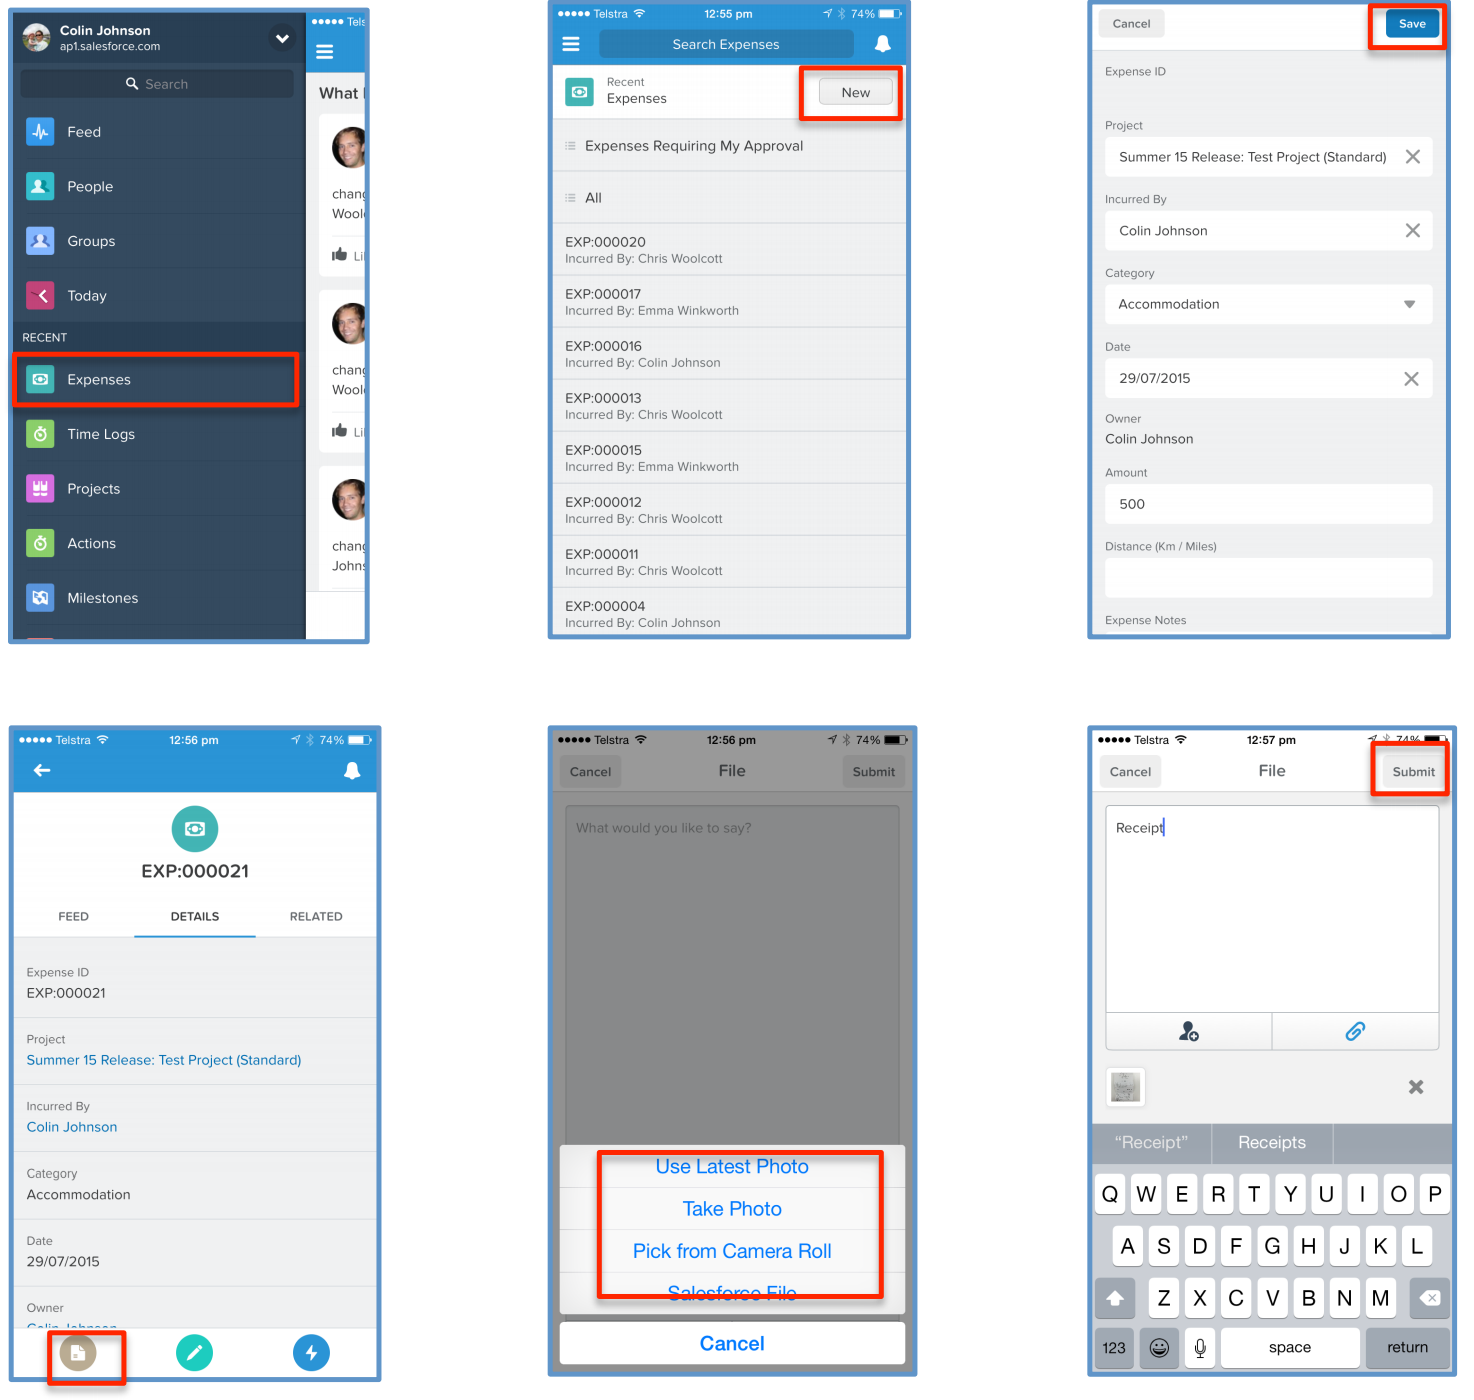
You can also log expenses (and upload supporting receipts) directly from the Salesforce1 Mobile App as per the screenshots below.
Scheduler Enhancements
A number of enhancements have been added to the Scheduler to make it an even more valuable tool for your resource capacity planning. Below is a summary of the key enhancements.
Timeline View – You can now extend the two-week timeline view out to a maximum of 12 weeks. You can use the slider (see screenshot below) to specify how many weeks you want to view from 1 through to 12. This is a persistent setting, so if you have it set to 6 weeks and then navigate away and come back, it will still be set to 6 weeks.
Task & Event Visibility – Standard Salesforce.com Task and Event records can be displayed in read-only format. They do not impact the Role’s allocation, but being able to view Tasks & Events in line with Mission Control Actions will provide you with a fuller insight into each person’s capacity. To load Tasks and/or Events into the Scheduler, you simply set the checkboxes to TRUE as per the screenshot below. Again, these are persistent settings.
Enhanced Filtering – You are now able to perform a keyword search or select specific Roles.
Action Hover – The Action Hover Box now has the Project Status included as per a client request.
Increased Space – To maximise page space, we have wrapped all of the Scheduler settings into a collapsible tab. If you click on the ‘Scheduler Settings’ Tab, this box will collapse, giving you more room to view your Scheduler.

Timesheet Enhancements
A number of enhancements have been added to the Timesheet to accommodate the new billable and non-billable functionality, along with some additional client requests. Below is a summary of the key enhancements.
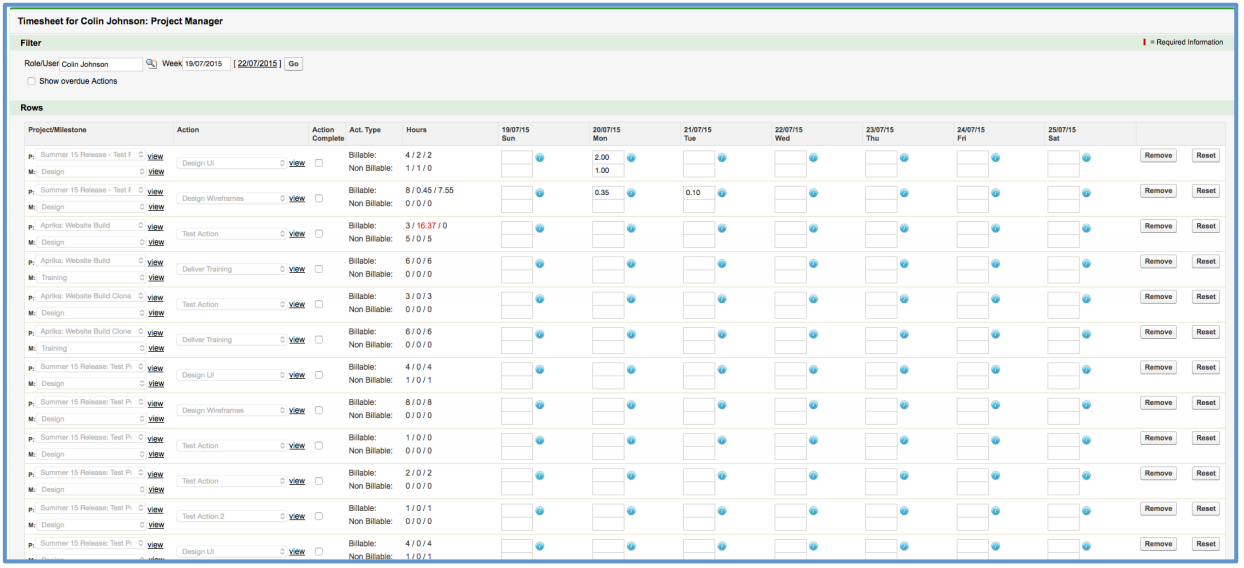
Enhanced Layout – The layout has been changed to bring more valuable information on to the page. The Milestone column has been moved beneath the Project to provide more space. This space has been used to bring in the Hours Scheduled / Hours Completed / Hours Remaining for both billable and non-billable values. The Project, Milestone and Action fields have been extended to provide greater visibility as well as including a ‘view’ link to open up the relevant record in a new tab.
Billable / Non Billable Hours – You can now easily log both billable and non-billable hours for any Action appearing on your Timesheet. Each Action now represents two rows on the Timesheet, with the top row relating to billable hours and the bottom row being non-billable.
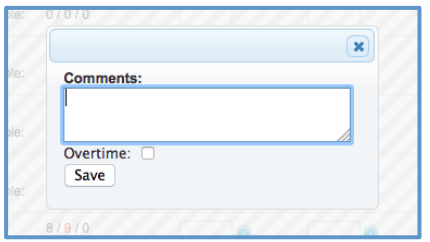
Overtime – You can allocate time you’re logging via the Timesheet as ‘Overtime’ by double clicking in the relevant input box and ticking the Overtime checkbox.
Load Overdue Actions – Previously the Timesheet loaded Actions that were assigned to you for this week. We have now included the ability to also load in any Actions that are overdue. You can set the persistent setting on the Timesheet by clicking the ‘Show overdue Actions’ checkbox.
Exclude from Timesheet – You can now choose to exclude entire Projects, Milestones or individual Actions from being displayed on the Timesheet by setting the ‘Exclude from Timesheet’ Checkbox to TRUE on the appropriate record.
Time Logger Enhancements
A number of enhancements have been added to the Time Logger that is available via Salesforce1 and the Side Bar within the Browser. Below is a summary of the key enhancements.
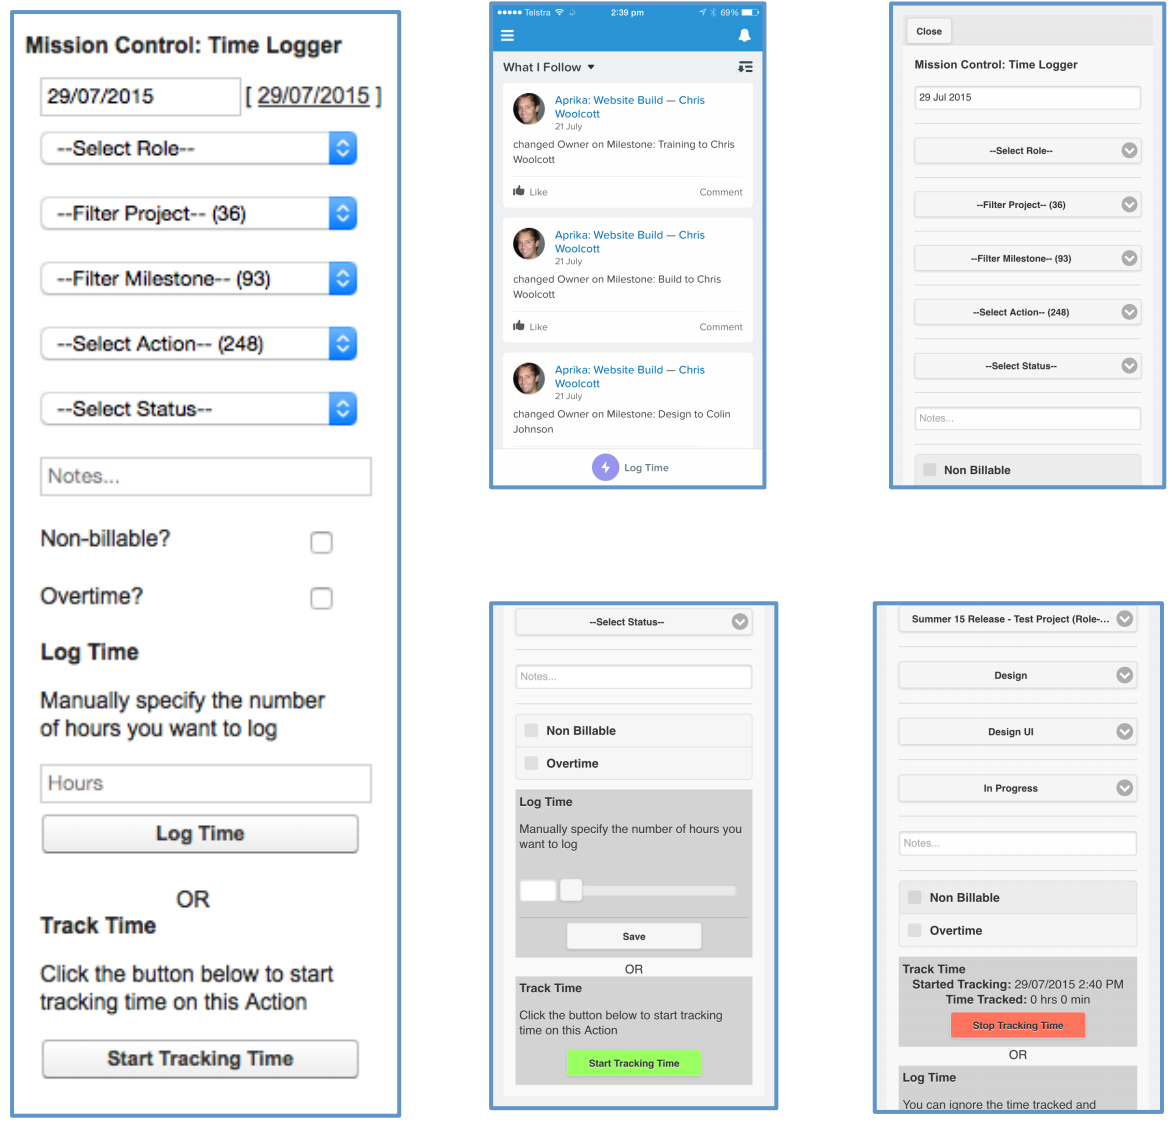
Track Time – Coming at the request of several clients, we are pleased to announce that you can now ‘track’ time via the Time Logger. Until now, you’ve simply been able to use the Time Logger to log time that has been done historically. This feature still exists, but now you can also track time using a start/stop timer. Simply select the Project, Milestone and Action, click ‘Start Tracking Time’ and you can then head off to carry out work on the Action. Once you’re finished, you can come back to the Time Logger, select the same Project, Milestone and Action again and it will show you how many hours / minutes have currently been tracked. As soon as you hit the ‘Stop Tracking Time’ button, your exact hours and minutes will be logged.
Overtime – You can now identify that the time you are submitting is overtime by clicking the Overtime Checkbox.
New Access Point on Salesforce1 – You will now access the Time Logger on Salesforce1 by clicking the ‘Log Time’ button at the bottom of your Feed window. This ensures you have quick access to the Time Logger when you load up SF1.
Gantt Chart Enhancements
A number of enhancements have been added to the Gantt Chart to enhance the user experience. Below is a summary of the key enhancements.
Gantt Chart Display – Various enhancements have been made to the chart, including making the chart ‘blocks’ smaller, as well as adding in the Owner and End Date values.
Display Unit – You can now specify the unit in which you want to display the Gantt Chart for individual Projects. You manage this using the ‘Gantt Chart Unit’ field on the Project record. You can choose from Day, Week and Month, which provide the following display results.

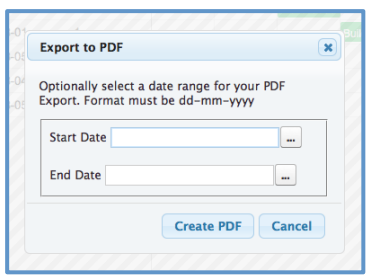
Filtered Export – The ‘Export to PDF’ feature now includes the ability to filter the period for which the PDF is generated. This will be useful for clients who have projects running over a longer period of time. You are now able to specify a Start Date and End Date if required and the PDF will only display the results within this time period.
Lightbox Rescheduling – a Known Issue has been fixed where dependent Actions were not rescheduling when the parent Action was being rescheduled via the Lightbox.
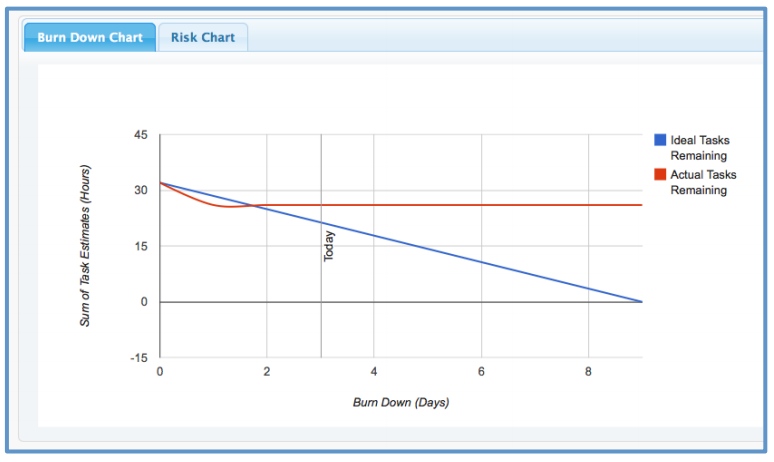
Burn Down Chart Enhancements
The Burn Down Chart now has a ‘Today’ indicator to identify whether or not your burn down is on schedule or not. An example of the burn down chart is as follows:
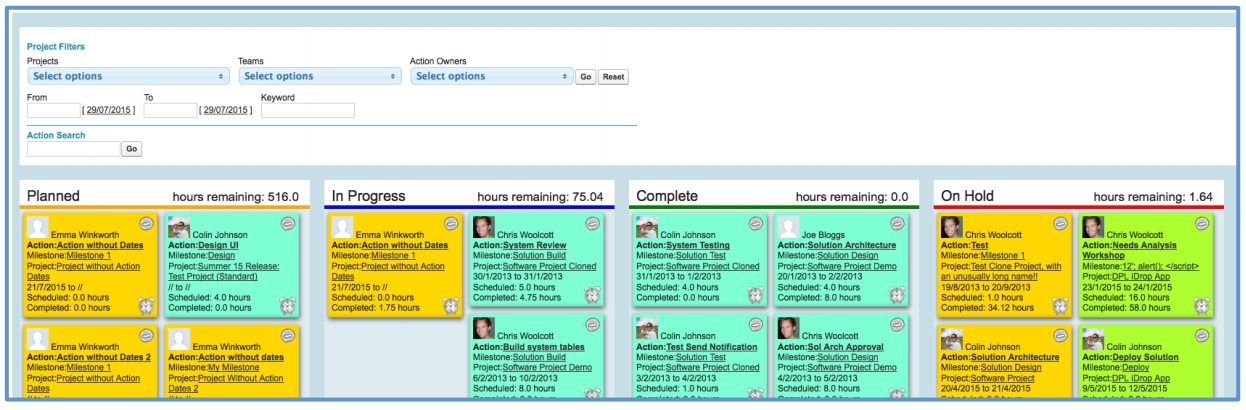
Whiteboard Enhancements
A number of enhancements have been added to the Whiteboard to enhance the user experience. Below is a summary of the key enhancements.
Keyword Filter – You now have the ability to perform a Keyword search across all Actions being displayed on the Whiteboard.
Hours Remaining Totals – Each column (e.g. Planned, In Progress, Complete, etc.) now has a total ‘Hours Remaining’ value. This will allow you to see the total number of hours remaining across all Actions within each Status value.
Log Time – The Log Time functionality now includes the ability to specify if the time being submitted is overtime.
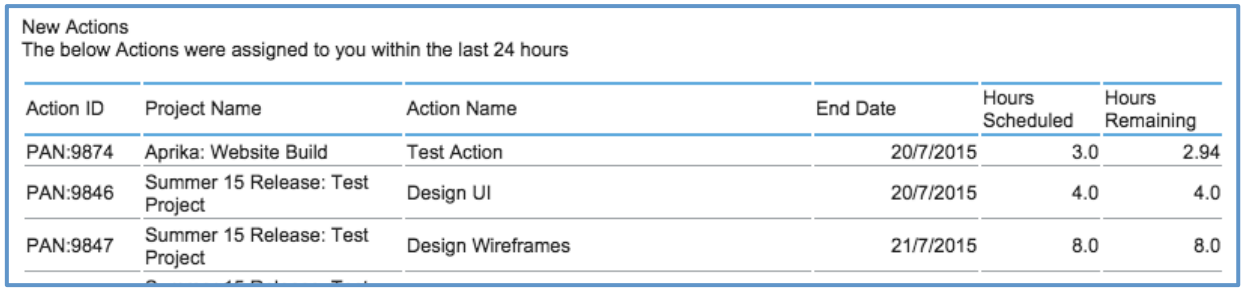
Daily Digest Enhancements
The Daily Digest Email Template has been updated to include the PAN# as the first column. This has been added at the request of a client who uses these as key identifiers within their projects. Below is an example of the revised table layout within the Daily Digest.
How do I upgrade?
To upgrade to the new version of Mission Control in your organisation, please follow the steps below:
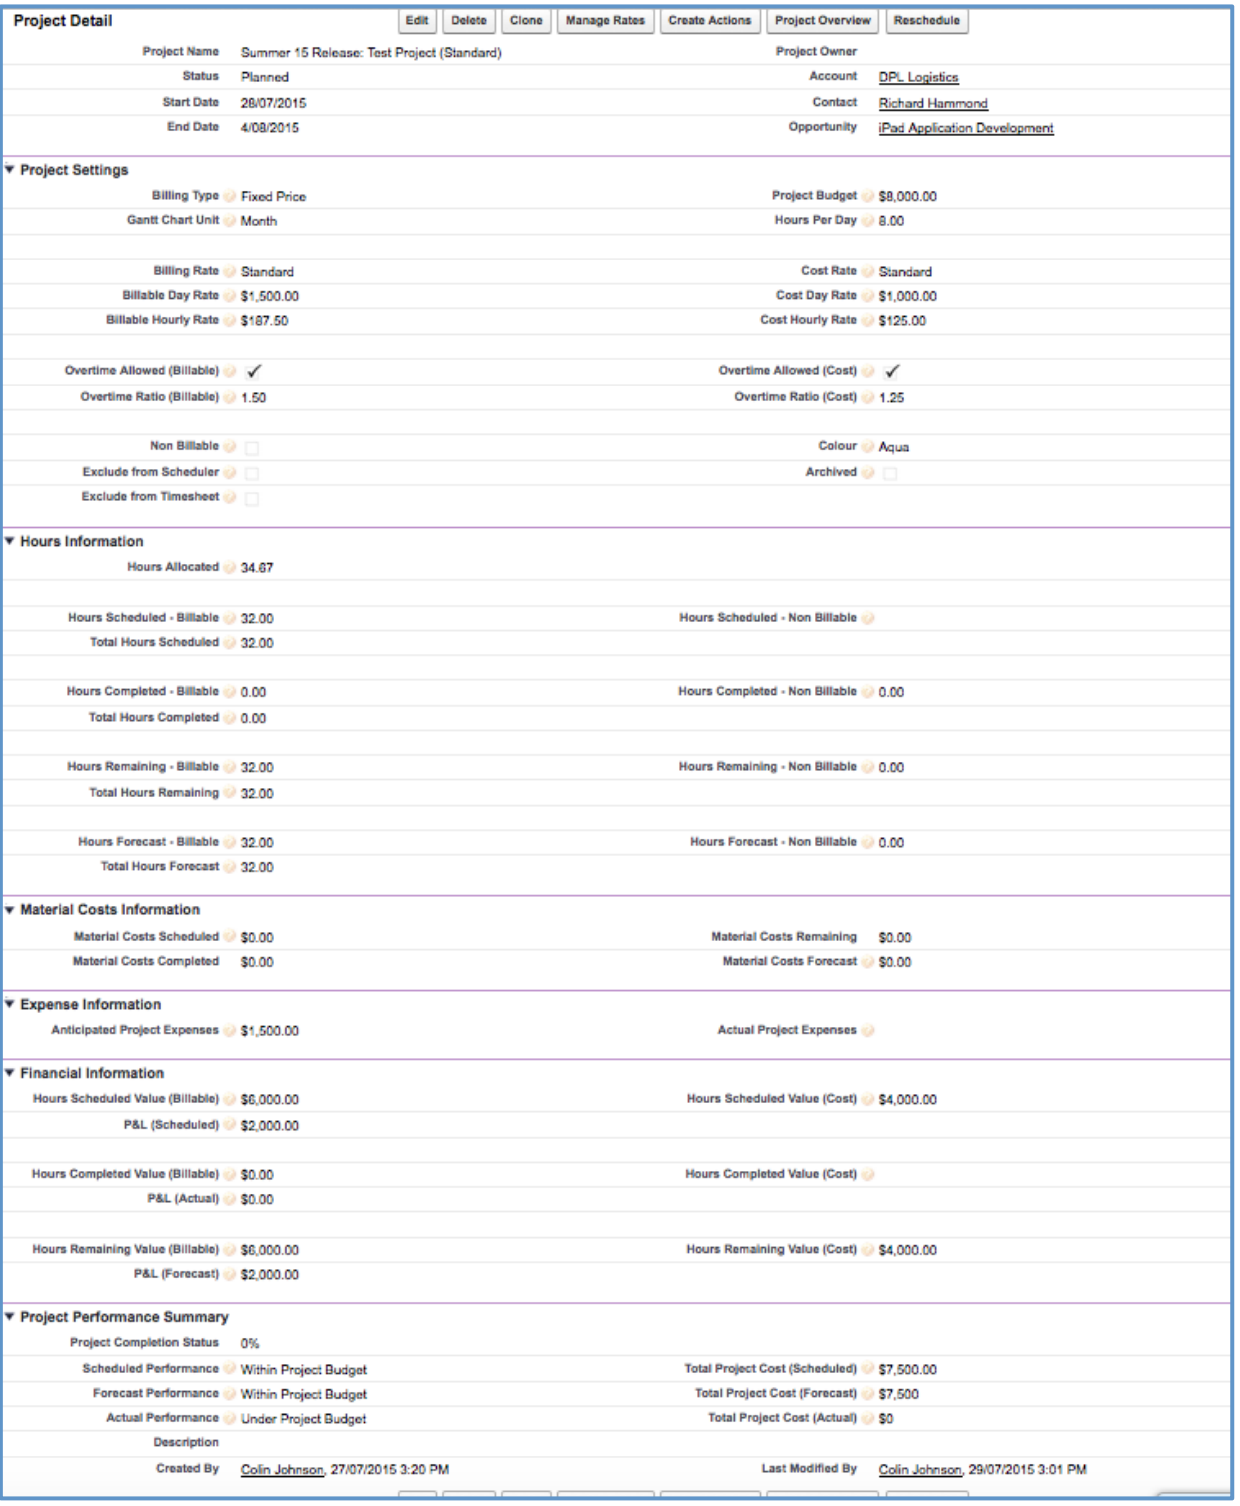
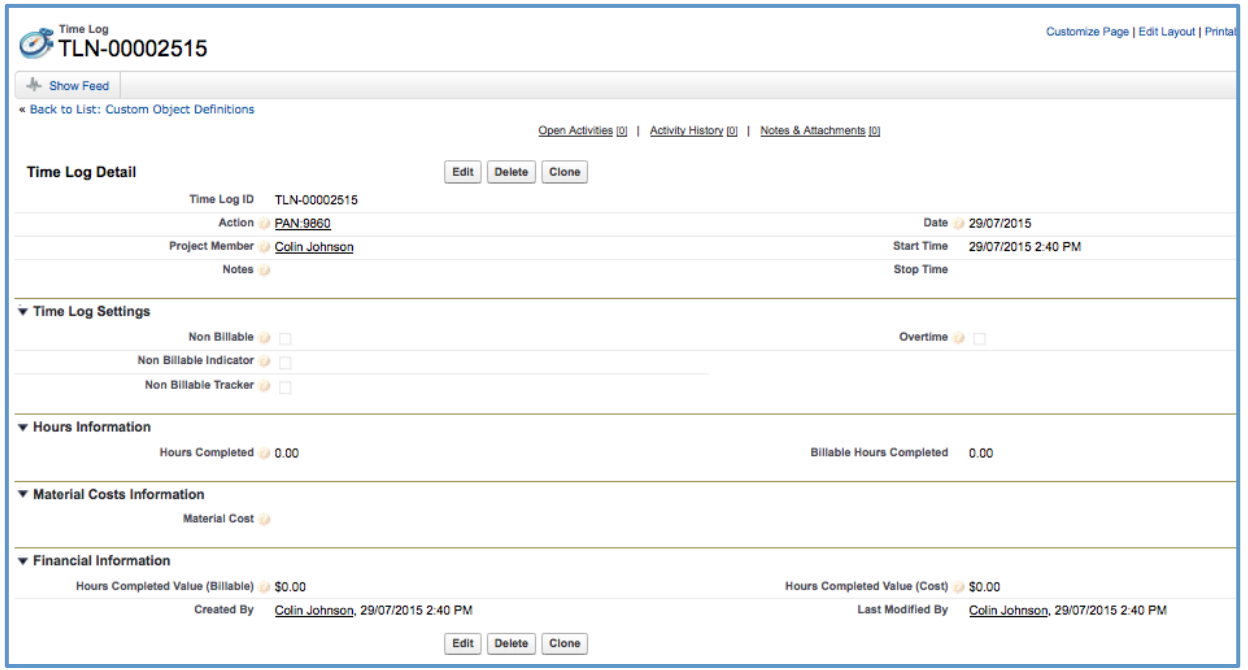
The Project Overview page has been updated to accommodate the additional fields. However, you may wish to update the Project Detail, Milestone Detail, Action Detail and Time Log Detail page layouts. The following screenshots provide our recommended layout.
Recommended Page Layouts
Project
Milestone

Action

Time Log
What’s New Webinar
We have pre-recorded the ‘What’s New’ webinar to provide further information on how to get the best out of the new features. The webinar is accessible in the section above on this page.
Feedback
Some of the new features included in this release of Mission Control have come from ideas submitted from existing clients. If you have an idea for enhancing Mission Control, you can submit it via email to [email protected].
Questions?
If you have any questions regarding this release notification, please do not hesitate to contact us at [email protected].