Mission Control Version 1.39
Release Notification – 16 December 2016
A new version of Mission Control (version 1.39) will be released on the AppExchange on Friday 16th December 2016. This notification has been issued to existing Mission Control users. It contains an overview of the new features available with this release, along with instructions on how to upgrade to the new version.
What’s New?
You’ll hopefully agree that this release is full of goodies, just in time for Christmas! Even if we say it ourselves, there are some awesome new features included in this release. At a glance, this release includes:
Let’s get stuck in to the detail…
Action Checklists
A new ‘Checklist Item’ Object has been added to Mission Control as a child to Action Object. It will enable you to keep a track of key items that need to be completed as part of an Action. It will serve as a simple ‘Checklist’ of items that can be ticked off as they’re completed.
For example, if I have an Action to deliver training for a client, my Checklist Items might include:
You can add notes to any Checklist Item as well as identify the person that will be responsible for it and whether it has been completed or not. You can create Checklist Items directly on the Action Detail Page using the Related List.

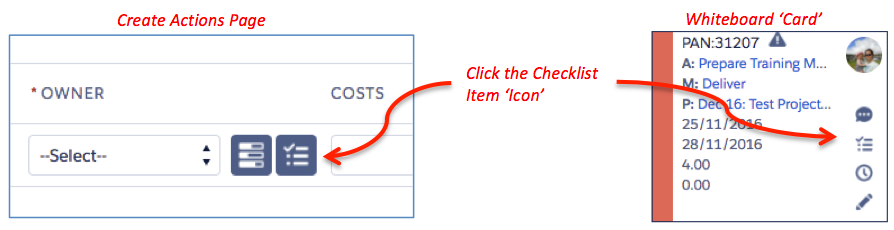
You can also create Checklist Items when using the ‘Create Actions’ page and on the Whiteboard (more on that later). To create Checklist Items you need to click the Checklist Item icon as per the below illustrations.
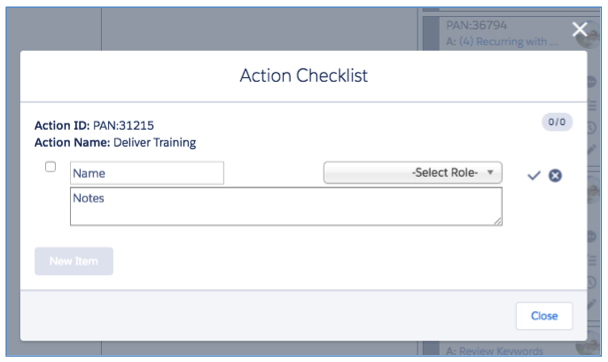
You will then be presented with the ability to add a new Checklist Item as per the screenshot below. You can fill in the Name, Owner and Notes and click the tick sign to confirm.
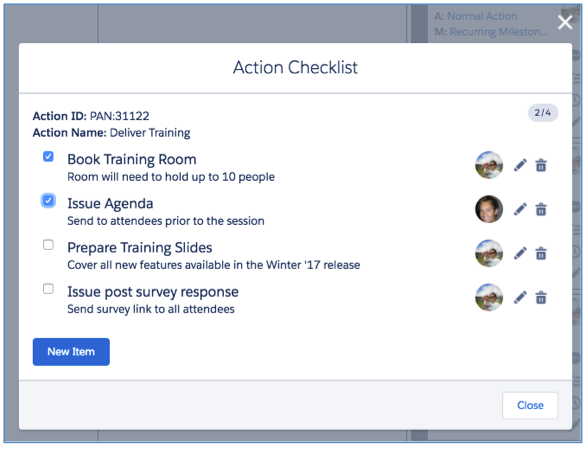
The below screenshot provides an illustration of how the Checklist Item will be utilised on an existing Action. There are four Checklist Items, you can see which of them have been completed along with any notes and who is responsible for completing the item.
You are also able to add the ‘Checklist Item’ Tab to your menu navigation to access the Object’s home page. This will enable you to access List Views of your Checklist Items and manage them all from one place.

Whiteboard
We hope you’re as excited as we are to see the release of the new Whiteboard. It’s jam-packed with some amazing features. So, first things first, let’s take a glimpse at it before jumping in and investigating all of the cool new things we’ve now got available.
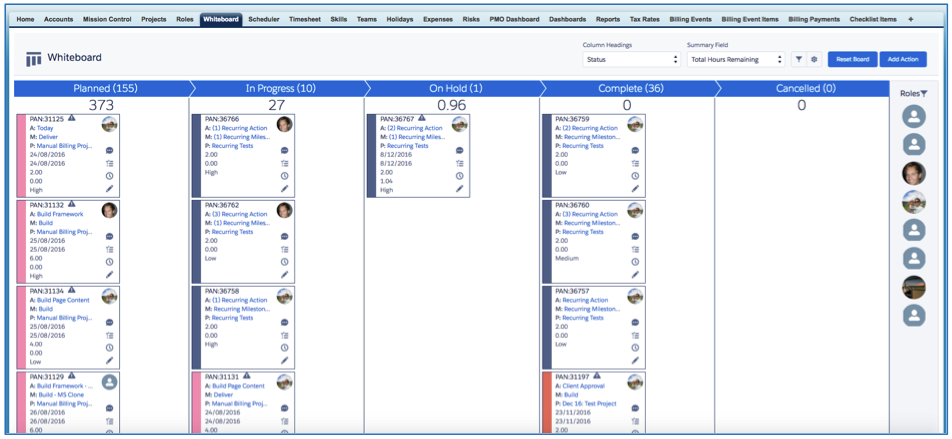
There’s a bunch of stuff you’re now going to be able to do from the Whiteboard. Heck, we reckon you could actually spend all day here now!
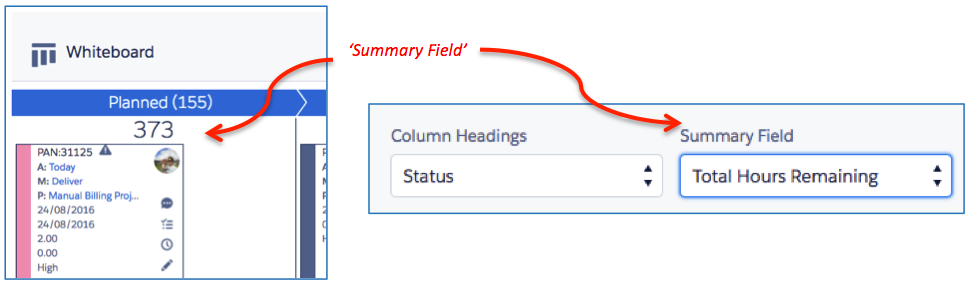
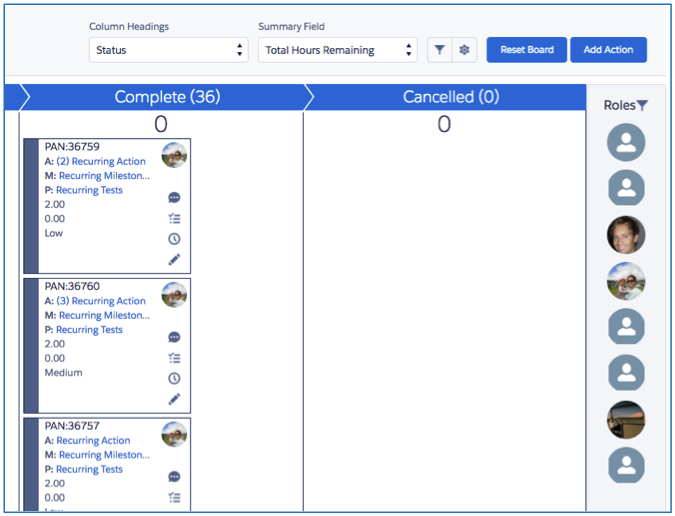
Column Headings
You’re now able to dynamically adjust the Column Headings. So if you want to switch from viewing columns for ‘Status’ to ‘Priority’, you just need to select the Picklist in the ‘Column Heading’ field as below.

This will dynamically switch the column headings on the Whiteboard and rearrange all of the Actions based on their ‘Priority’ value.

So, now you’ll be able to drag and drop your ‘Cards’ to re-organise their priority rating!
You’re also able to organise the column headings based on any of the following Action Object fields:
Summary Field
By default, the ‘Summary Field’ will be set to Total Hours Remaining. You have the option to change this to a range of other Number of Percent fields on the Action Object.
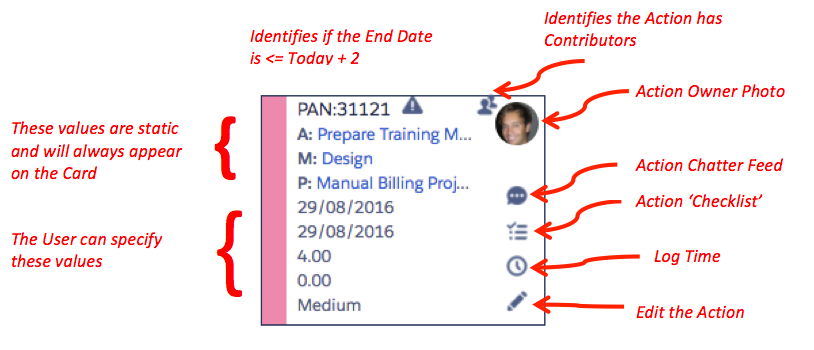
Action ‘Card’
The new Action Card now offers you a lot more functionality, so let’s take a look at that now.
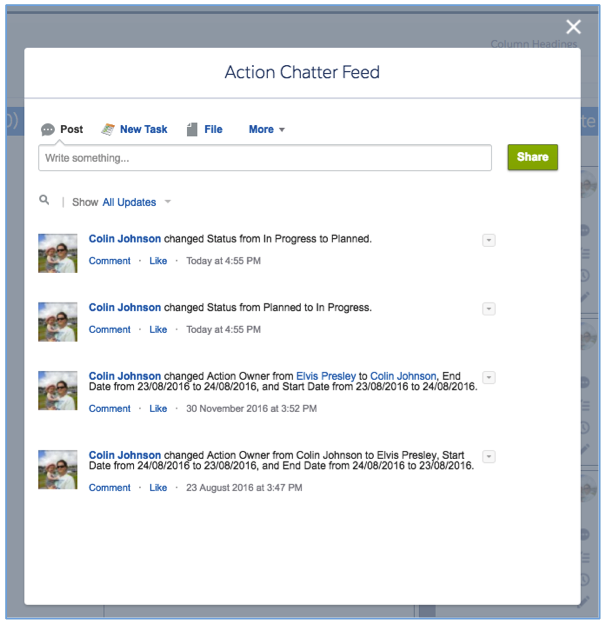
Action Chatter Feed
Clicking the ![]() Icon on the Action Card will open up the Action Chatter Feed. You can view the Chatter Feed and Post a new comment.
Icon on the Action Card will open up the Action Chatter Feed. You can view the Chatter Feed and Post a new comment.
Action Checklist
Clicking the ![]() Icon will open up the Action Checklist. You can view the Checklist Items, tick them off as completed and add new Items to the list. You can also edit and delete existing Checklist Items.
Icon will open up the Action Checklist. You can view the Checklist Items, tick them off as completed and add new Items to the list. You can also edit and delete existing Checklist Items.

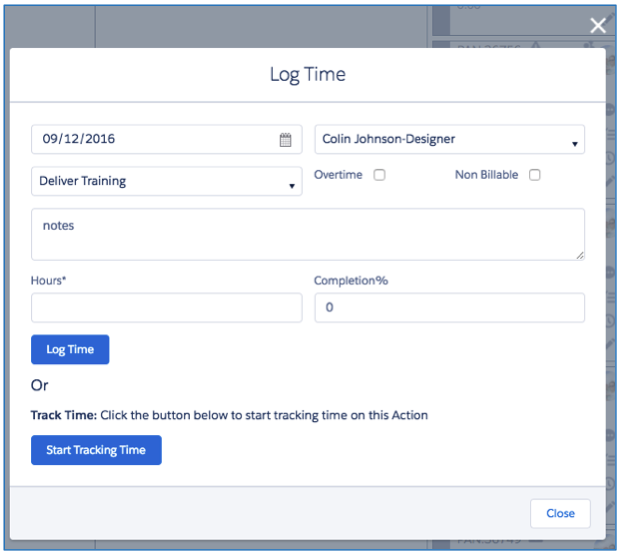
Log Time
By clicking the ![]() Icon, you can open the Log Time modal window that will let you log time or start ‘tracking’ time.
Icon, you can open the Log Time modal window that will let you log time or start ‘tracking’ time.
Edit Action
By clicking the ![]() Icon, you will be able to open up the ‘Edit’ modal window that will allow you to edit the Action directly from the Whiteboard. You’re also able to quickly identify if the Action has Contributors.
Icon, you will be able to open up the ‘Edit’ modal window that will allow you to edit the Action directly from the Whiteboard. You’re also able to quickly identify if the Action has Contributors.
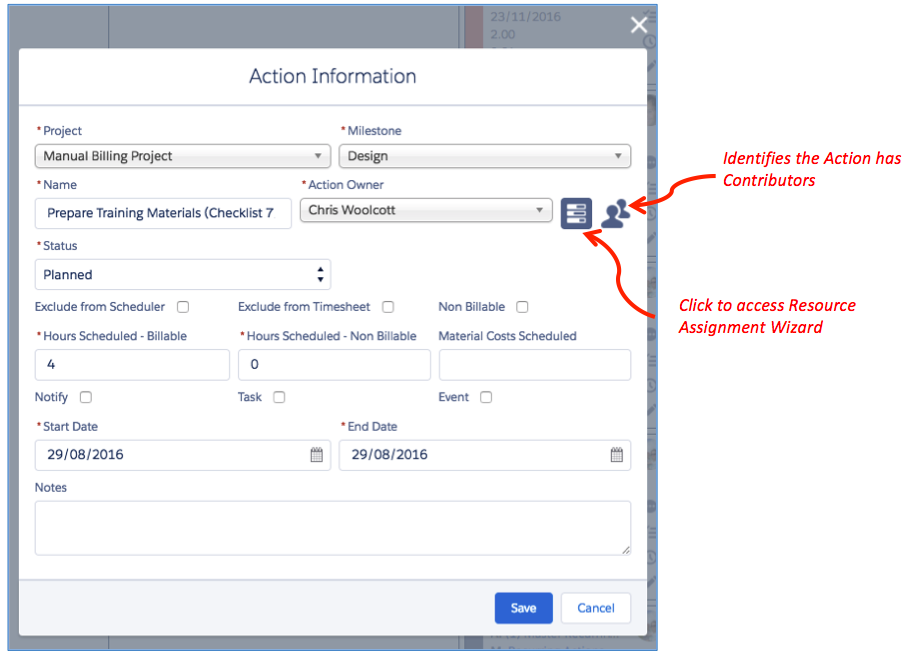
You can also open up the ‘Resource Assignment Wizard’ if you want to make changes to Contributors.
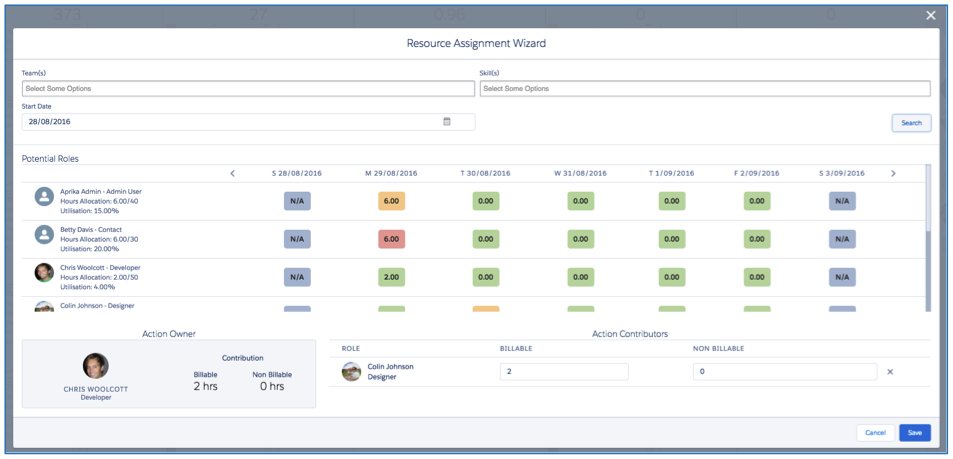
Reassigning Action Owners
If you need to re-assign an Action from one owner to another, you can now do this directly from the Whiteboard. On the right-hand side, you’ll see a list of all your project resources (Roles).
You can click the filter button ![]() and search for the right person based on Skill / Team.
and search for the right person based on Skill / Team.
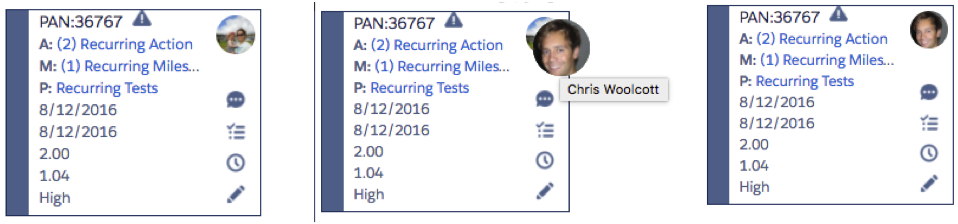
When you find the right person, simply click on their photo and drag them on top of the photo of the existing Action Owner on the Action Card to transfer ownership.
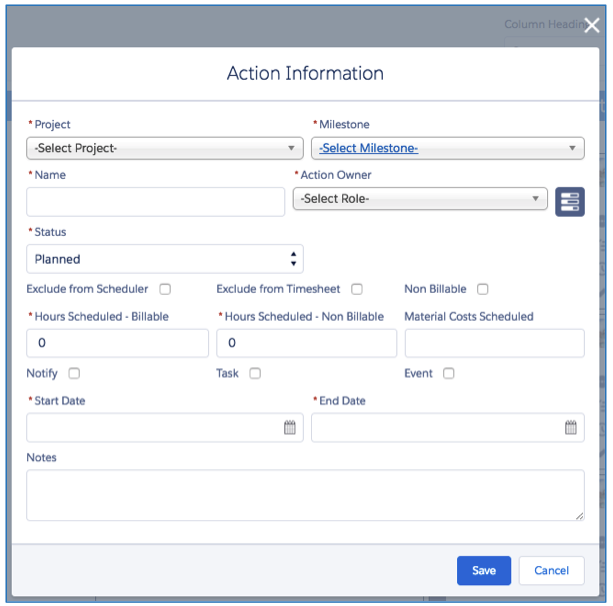
Adding New Actions
If you need to add a new Action to an existing Project, you no longer need to leave the comfort of the Whiteboard – you’re able to add a new Action simply by clicking the ‘Add Action’ button.

This will open up the modal window to allow you to enter the details for your new Action and then click Save. You’re also able to access the Resource Assignment Wizard if you need to search for the right person, or add Contributors.
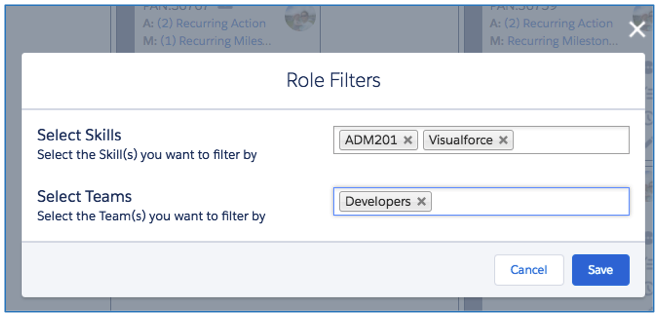
Whiteboard Filters
You can apply any combination of filters to make sure you’re viewing the Actions that are most important to you. Simply click on the Filter icon to open up the Filters modal and apply the filters as required.

Clicking the ‘Reset Board’ button will quickly remove all of your current filters and reload all Actions to the board.
Whiteboard Settings
The Whiteboard Settings modal enables you to specify which Action fields are displayed on the ‘Card’. The top four values of the Card are static (e.g. PAN, Action Name, Milestone Name and Project Name). However, you’re able to specify which Action fields are displayed in the bottom five places. By default, these places are set to the following fields:
By clicking the Settings icon, you access the Whiteboard Settings and you can change these field values.
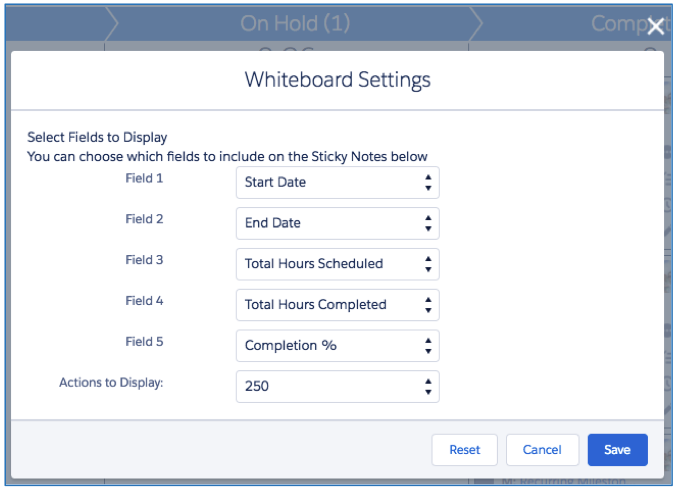
You’re also able to specify the number of Actions you’d like to load onto the board by default.
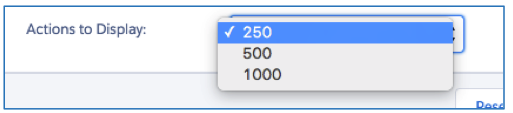
If there are more Actions than the display amount, you will see an icon on the Whiteboard header to enable you to load more Actions.
Recurring Milestones & Actions
You can now set Milestones and their Actions, or just individual Actions to be recurring. The process is slightly different for each option, so let’s explore each one in a bit more detail.
Recurring Milestones & Actions
A Milestone can now be set to be recurring. This will recur the Milestones and its Actions and their Checklist Items & Contributors. To set a Milestone as recurring, you need to specify the following field values on the Milestone record:
When the Milestone Status is set to Complete, the next instance of the Milestone (and Actions & Checklist Items) will be created with the Milestone Deadline and the Action Start Date, End Date, Baseline Start Date and Baseline End Date all adjusted based on the ‘Recurring Frequency’ using the following adjustment rules.

The Milestone created as part of the recurring process will have the same field values as the original Milestone. The Milestone Name will have a number in brackets at the start of the string, indicating which recurrence it is. For example, a Milestone that has been configured to recur 3 times will result in the following:

Note: Where the Milestone’s Name is using all 80 characters of the field string, the final four characters will be dropped from the string for the subsequent recurrences to make room for the number.
Each Action created as part of the recurring process will have the same field values as the original Action, except for the Status field, which will be set to ‘Planned’.
Each new recurrence of the Milestone is used to recur the subsequent Milestone. Therefore, any new Actions added to the current Milestone will be created as part of the next recurrence. To support the recurring process, each recurrence of the Milestone will have a ‘Recurrences Remaining’ field identifying how many more recurrences are required. Once the final Milestone has been recurred, it will have a ‘Recurrences Remaining’ value of 0 and therefore, when the Status is set to Complete, no further recurrences will be created. The below table illustrates how this will function.

Note: If you want to continue recurring the Milestone, you’ll need to adjust the ‘Remaining Recurrences’ value of the last Milestone.
Recurring Actions
An Action can be set to be recurring. This will recur the Action and its Checklist Items & Contributors and parent the new Actions to the same Milestone. To set an Action as recurring, you need to specify the following field values on the Action record:
When the Action is created, or updated and has been set to ‘Is Recurring’, the relevant number of additional Actions will immediately be created, changing the Start Date, End Date, Baseline Start Date and Baseline End Date based on the ‘Recurring Frequency’ using the following adjustment rules.

Each Action created as part of the recurring process will have the same field values as the original Action, except for the Name and the Status. The Status will default to ‘Planned’ for all recurrences. The Name will have a number in brackets at the start of the string indicating which recurrence it is. For example, an Action that has been configured to recur 3 times, will result in the following:

Where the original Action Name is using all 255 characters of the field string, the final four characters will be dropped from the string for subsequent recurrences to make room for the number.
Validation Rules have been added to the Milestone and Action Objects to ensure the ‘Number of Recurrences’ and ‘Recurring Frequency’ fields contain a value if ‘Is Recurring’ is set to TRUE.
Note: An Action that was set to be recurring within a recurring Milestone will not be recurred when the Milestone is recurred to prevent doubling up the required Actions within the new Milestone.
Gantt Chart Enhancements
A number of enhancements have been made to the Gantt Chart, including:
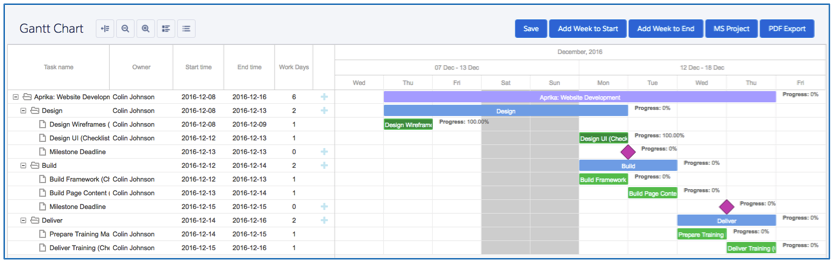
Milestone Deadline
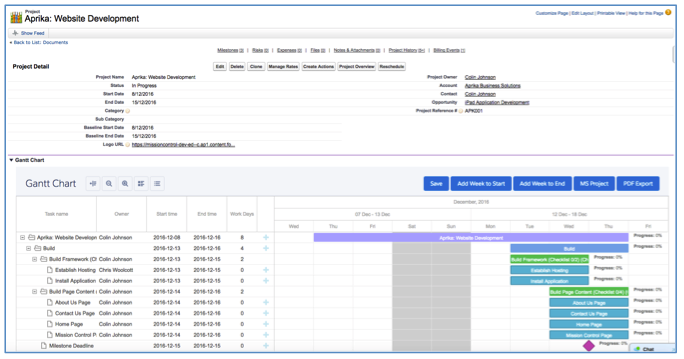
If a Milestone has a value in the Milestone Deadline field, this will now be visible on the Gantt Chart via a pink diamond as shown in the illustration below.
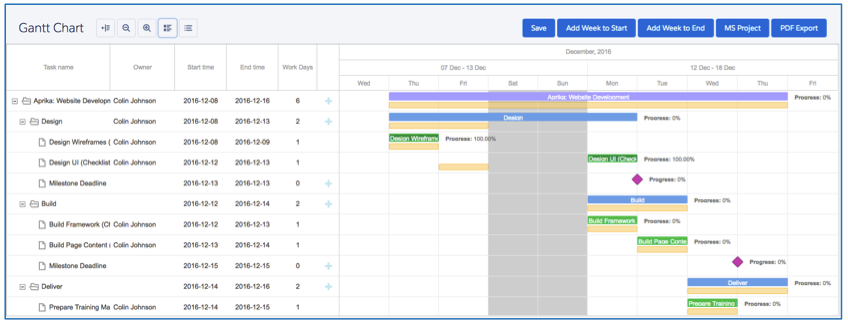
Baseline Dates
The Gantt Chart now provides you with the ability view the Baseline Dates as well as the actual Dates. The Baseline Dates can be toggled on/off by clicking the Baseline button.

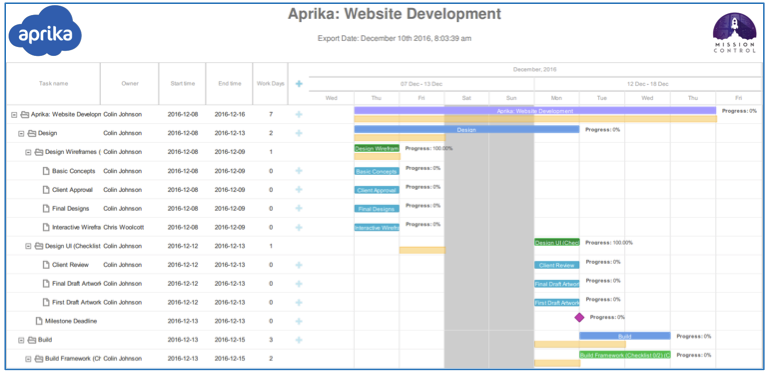
When you toggle the Baseline Dates on, they will appear as a secondary line for each Action, Milestone or Project as shown in the illustration below.
Checklist Items
With the introduction of the Checklist Items, we thought you might like to be able to view those on the Gantt Chart too! The Checklist Items can be toggled on/off by clicking the Checklist button.

When you toggle the Checklist Items on, they will appear as child items to the Action as per the illustration below. Note: Checklist Items cannot be rescheduled independently of the Action, but if you reschedule the Action, the Checklist Items will automatically reschedule to remain with the Action.

PDF Branding
A number of branding enhancements have been applied to the Gantt Chart PDF, including:
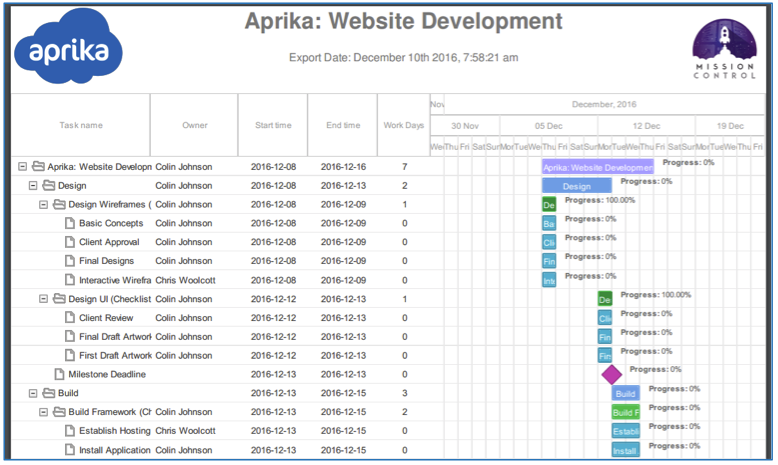
Display your Logo
If you want to include your own logo on the Gantt Chart PDF, you can specify the logo you would like to include from the Console as per the illustration below.

The logo selected here will appear at the top left of the Gantt Chart PDF.
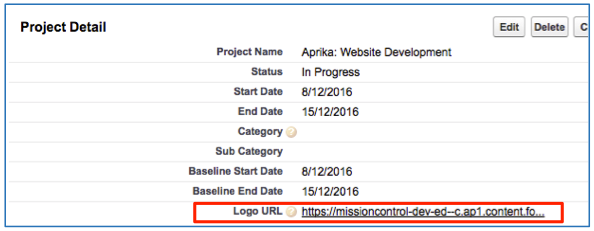
Display Secondary Logo
You can also include a second logo on the Gantt Chart PDF that will appear at the top right. We anticipate this could be used to display your customer’s logo, but if you love your own logo that much, you could include it twice.
To add a secondary logo to the Gantt Chart, this is done on an individual project basis. To add the logo to a specific project, you first need to upload the logo as a ‘Document’ and then add the URL for that Document into the ‘Logo URL’ field on the Project record as shown below.
Display Custom Title
Previously, the Gantt Chart ‘Title’ was displayed as Mission Control Gantt Chart, this has now been changed to display the Project Name by default. However, you can also adjust the Title using the custom heading section at the time of generating the PDF, as shown below.

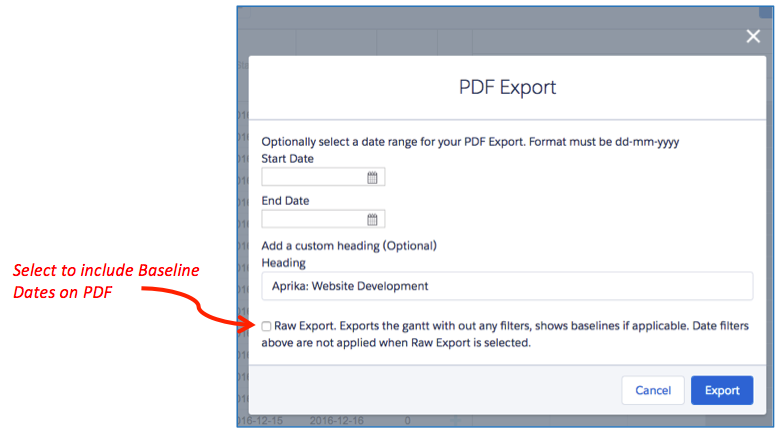
Display Baseline Dates
If you wish to export the Baseline Dates on the Gantt Chart PDF, you will need to select the ‘Raw Export’ option at the bottom of the Export
Standard Page Layout
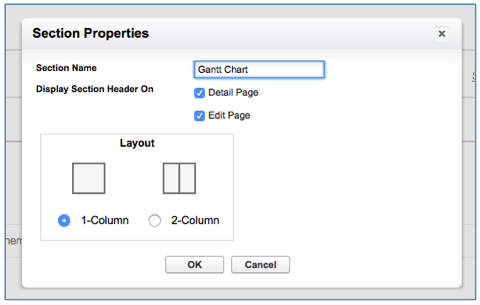
You’re now able to embed the Gantt Chart into a section on the standard Detail Page. Simply edit the Page Layout and add a Section to the layout as shown below.
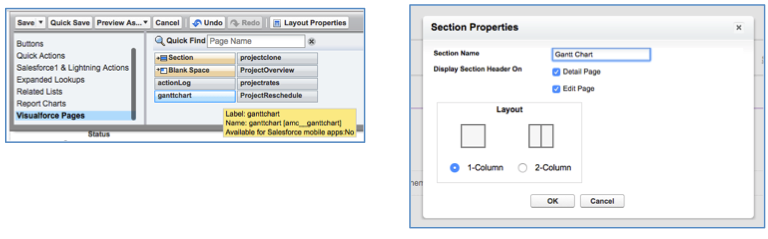
Then, add the ‘ganttchart’ Visualforce Page to the new section and set the height as shown below.
You’ll then be able to view the Gantt Chart on the standard Detail Page Layout.
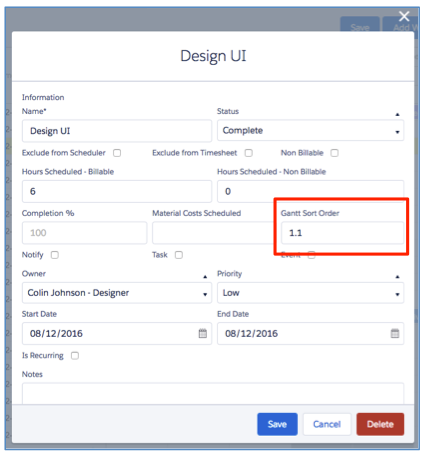
Action Sort Order
You’re now able to manually set the order that Actions within a Milestone appear on the Gantt Chart. Previously, if you had multiple Actions all with the same Start Date, they would be listed in ascending order based on their PAN No.
Some clients have requested the ability to manually organise the order in which they are displayed. Therefore, you will now be able to specify the ‘Gantt Sort Order’ value for each Action.
Billing Event Enhancements
We’ve received some great feedback from clients that are using the Billing Event functionality that was released as part of Version 1.36. Part of that feedback was the need for different business entities to generate the invoices and for our international clients to be able to ‘override’ the template labels into different languages.
We’re pleased to announce both of these features are now available. Using the ‘Tax Rate’ Object, you’re now able to:
Note: If you operate as a single business entity and do not wish to override any of the template labels, then you do not need to utilise these features. If you do not override any of the values, all of the existing settings will be applied to the invoice PDF.
Override Business Entity
There are a number of new fields now available on the Tax Rate Object that enable you to override the Company Name, address, logo and invoice footer notes. If you have two separate business entities using the same instance of Mission Control, you can set up separate Tax Rate labels for each company and apply the override field values as shown below.

Note: These fields will need to be added to your Tax Rate Page Layout.
Override Template Labels
There are a number of new fields now available on the Tax Rate Object that enable you to override the various labels on the Invoice / Credit Note PDF templates. These can be used should you wish to translate any of the labels to another language.

Note: These fields will need to be added to your Tax Rate Page Layout.
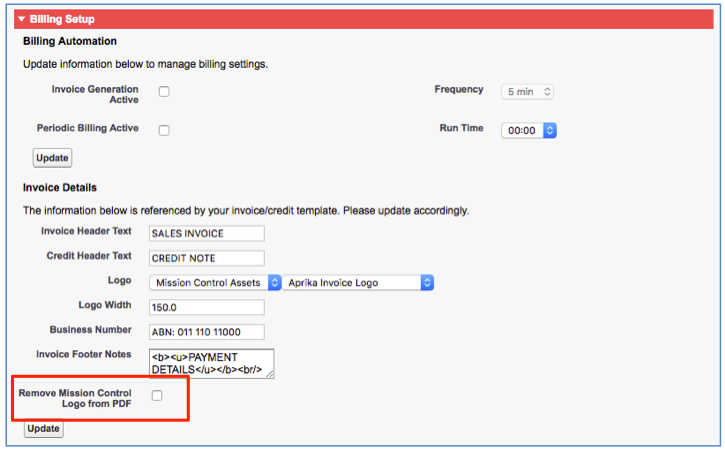
Remove Mission Control Logo from PDF Footer
We have included a new setting on the Console within the ‘Billing Setup’ section that enables users to control whether the Mission Control logo is hidden/displayed in the Footer of the PDF template.
Additional Enhancements / Known Issues
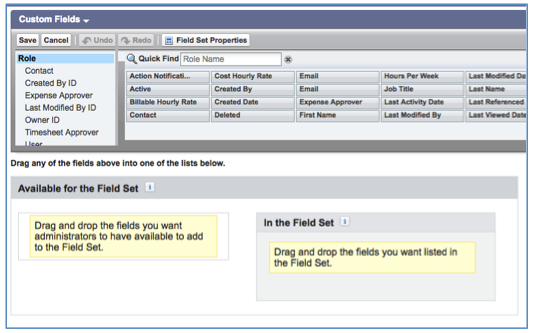
Role Page – Field Set
Previously, if you had added your own Custom Fields to the Role Object, the only way of adding values to these fields was via a List View inline edit. To enable you to add them to the Role Edit Visualforce Page, a Custom Field Set has been included on the page.
To add your own Custom Fields to the Field Set, navigate to Setup > Create > Objects > Roles > Field Sets and click Edit.

Drag the fields you require into the Field Set and click Save.
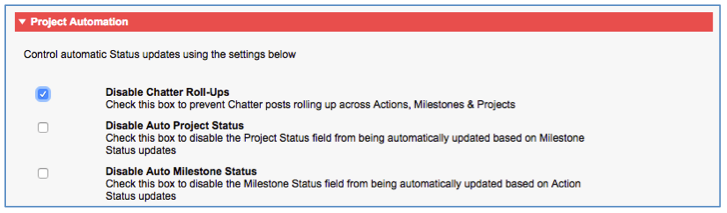
Chatter Feed Roll Up Disablement
We have had a request from some clients to provide the ability to disable the Chatter Feed Roll Up feature as they have found too much activity is clogging up their team collaboration. We have therefore included a setting to disable this feature within the ‘Project Automation’ section on the Console. To disable this feature, simply check the box and click the Update button.
Event Trigger Enhancement
The Event Trigger has been enhanced to enable you to update the End Date of the Action, if the End Date of the Event is changed. Note: This does not impact the Hours Scheduled values.
Side Bar Time Logger
A known issue on the Side Bar Time Logger has been fixed. Previously, when trying to update the Action Status whilst using the ‘Log Time’ button, the Status was not updating.
PMO Dashboard Filters
A filter has been removed from the PMO Dashboard logic that was removing Projects with a Status of ‘Complete’. Now, a Project will only be removed from the PMO Dashboard when the Archived field is set to TRUE or if the Display on PMO Dashboard field is set to FALSE.
New Field Overview
A number of new fields have been added to the solution as part of this release. We recommend you add these fields to your Page Layouts.
Project
| Field Name | Field Type | Comments | New / Existing |
| Logo URL | URL(255) | Contains the URL for the secondary Gantt Chart logo | New |
| Baseline Start Date | Roll Up (MIN Milestone) | Identifies the earliest Baseline Start Date from child Milestone records | New |
| Baseline End Date | Roll Up (MAX Milestone) | Identifies the latest Baseline End Date from child Milestone records | New |
Milestone
| Field Name | Field Type | Comments | New / Existing |
| Is Recurring | Checkbox | Identifies if this Milestone will be recurring | New |
| Number of Recurrences | Number (18, 0) | Identifies the number of times this Milestone should be recurred | New |
| Recurring Frequency | Picklist | Identifies the frequency of the recurring schedule for this ActionValues: Daily; Weekly; Monthly, Quarterly; Annually | New |
| Recurrences Remaining | Number (18, 0) | Identifies how many more recurrences are remaining | New |
| Baseline Start Date | Roll Up (MIN Action) | Identifies the earliest Baseline Start Date from child Action records | New |
| Baseline End Date | Roll Up (MAX Action) | Identifies the latest Baseline End Date from child Action records | New |
Action
| Field Name | Field Type | Comments | New / Existing |
| Gantt Sort Order | Number (16, 2) | Identifies the order in which the Action should be displayed on the Gantt Chart | New |
| Is Recurring | Checkbox | Identifies if this Action will be recurring | New |
| Milestone Is Recurring | Formula (Checkbox) | Identifies if the parent Milestone is recurring | New |
| Recurring Frequency | Picklist | Identifies if the frequency of the recurring schedule for this ActionValues: Daily; Weekly; Monthly; Quarterly; Annually | New |
| Number of Recurrences | Number (18, 0) | Identifies the number of times this Milestone should be removed | New |
Checklist Item
| Field Name | Field Type | Comments | New / Existing |
| Name | Text (80) | The name of the Checklist Item record | New |
| Action | Lookup (Action) | Links to the Action record that this Checklist Item relates to | New |
| Complete | Checkbox | Identifies the Checklist Item has been completed | New |
| Notes | Long Text (4000) | Identifies the detailed notes explaining what needs to be achieved as part of this Checklist Item | New |
| Item Owner | Lookup (Role) | Links to the Role record of the person responsible for this Checklist Item | New |
Tax Rate
| Field Name | Field Type | Comments | New / Existing |
| Company Name | Text (255) | Identifies the name of the business unit that will raise this invoice / credit note | New |
| Street | Text Area | Identifies the Street address of the business unit that will raise this invoice / credit note | New |
| City | Text (255) | Identifies the City of the business unit that will raise this invoice / credit note | New |
| State | Text (255) | Identifies the State of the business unit that will raise this invoice / credit note | New |
| Postcode | Text (255) | Identifies the Postcode of the business unit that will raise this invoice / credit note | New |
| Country | Text (255) | Identifies the Country of the business unit that will raise this invoice / credit note | New |
| Business Number | Text (255) | Identifies the Business Number of the business unit that will raise this invoice / credit note | New |
| Invoice Header Text | Text (255) | Identifies the title of the PDF for an Invoice | New |
| Credit Header Text | Text (255) | Identifies the title of the PDF for a Credit Note | New |
| Logo URL | Text (255) | Identifies the URL of the Logo (stored in SFDC Documents) that will be used for this business unit | New |
| Invoice Footer Notes | Text Area | Identifies the text to be included in the footer notes for invoices / credit notes raised by this business unit | New |
| Invoice # Label | Text (255) | Can be used to override the ‘Invoice #’ label on the PDF Template | New |
| PO # Label | Text (255) | Can be used to override the ‘PO #’ label on the PDF Template | New |
| Invoice Date Label | Text (255) | Can be used to override the ‘Invoice Date’ label on the PDF Template | New |
| Due Date Label | Text (255) | Can be used to override the ‘Due Date’ label on the PDF Template | New |
| Summary Label | Text (255) | Can be used to override the ‘Summary’ label on the PDF Template | New |
| Description Label | Text (255) | Can be used to override the ‘Description’ label on the PDF Template | New |
| Amount Label | Text (255) | Can be used to override the ‘Amount’ label at the top of the detail section on the PDF Template | New |
| Exc Label | Text (255) | Can be used to override the ‘Exc’ label at the top of the detail section on the PDF Template | New |
| Sub-Total Exc Label | Text (255) | Can be used to override the ‘Sub-Total Exc label on the PDF Template | New |
| Plus Label | Text (255) | Can be used to override the ‘Plus’ label on the PDF Template | New |
| Total Inc Label | Text (255) | Can be used to override the ‘Total Inc’ label on the PDF Template | New |
| Amount Paid Label | Text (255) | Can be used to override the ‘Amount Paid’ label on the PDF Template | New |
| Balance Due Label | Text (255) | Can be used to override the ‘Balance Due’ label on the PDF Template | New |
It is recommended that you add these new fields / related lists to your Page Layouts.
How do I upgrade?
To upgrade to the new version of Mission Control in your organisation, please follow the steps below:
What’s New Webinar
We have pre-recorded the ‘What’s New’ webinar to provide further information on how to get the best out of the new features. To access this webinar, please view the ‘Release Notes’ section of the Mission Control Support Centre – www.aprika.com.au/mc-support
Feedback
Some of the new features included in this release of Mission Control have come from ideas submitted from existing clients. If you have an idea for enhancing Mission Control, you can submit it via email to [email protected].
Questions?
If you have any questions regarding this release notification, please do not hesitate to contact us at [email protected].
