Salesforce Project Management Software by Aprika
Mission Control Version 1.41
Release Notification – 8 September 2017
A new version of Mission Control (version 1.41) will be released on the AppExchange on Monday 11th September 2017. This notification has been issued to existing Mission Control users. It contains an overview of the new features available with this release, along with instructions on how to upgrade to the new version.
What’s New?
This is a bumper release, with a host of new features and enhancements being included. At a glance, this release includes:
Let’s get stuck in to the detail…
Mission Control Console
Whilst not bringing a great deal of new functionality to the solution, we’re super excited to announce that the Mission Control Console has had a major facelift. It now offers consistent functionality across both Salesforce Classic and Lightning Experience. The major new benefit to be gained from the updated Console is the flexibility it offers in terms of providing different levels of access based on the individual Role’s permissions.
In a similar manner to the Project Overview Page, the Console now comprises of a number of Tabs, as well as the Track Pad. Each Tab can be hidden from each Role if required. The main reason behind this was we found many customers were not providing access to the Console to their users because they had access to settings that the System Administrators did not want to give them access to. With the content of the Console now being broken up into separate Tabs, System Administrators now have the flexibility to provide their end users with access to certain Tabs, whilst hiding others. The four Tabs available on the Console include:
Let’s take a look at each Tab in a bit more detail.
Launch Pad
The Launch Pad is where you need to go if you’re looking to crate a new record within Mission Control, such as a Role, Holiday, Skill, Risk, etc. It also provides you with the ability to launch a new Project, whether that’s through the Project Clone feature, or via the new ‘Project Launcher’, which we’ll cover off later in the release notes. It provides you with the ability to create any of the following records:
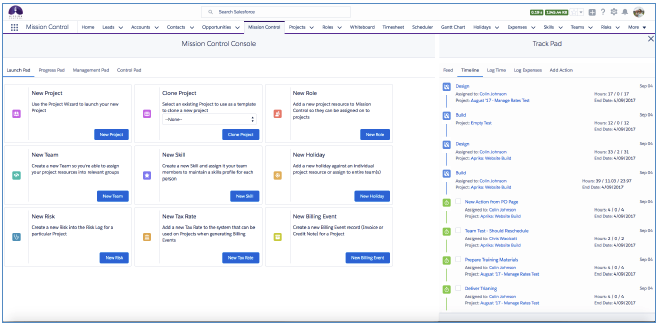
The Profile Permissions associated to the User will be applied. For example, if the User does not have the permission to create a Skill record, the Skill ‘Tile’ will not be visible on the Launch Pad.
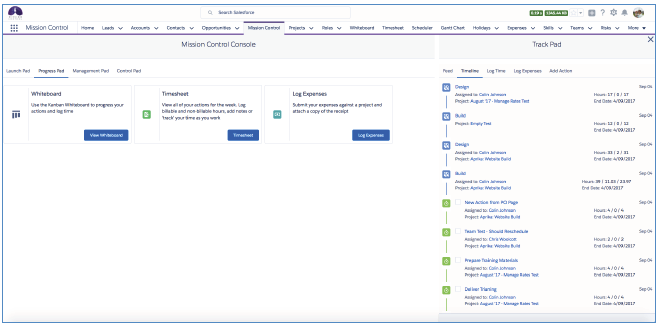
Progress Pad
The Progress Pad is where you’d go if you’re looking to log progress against a Project you’re working on. From here, you’ll be able to access the following tools within Mission Control:
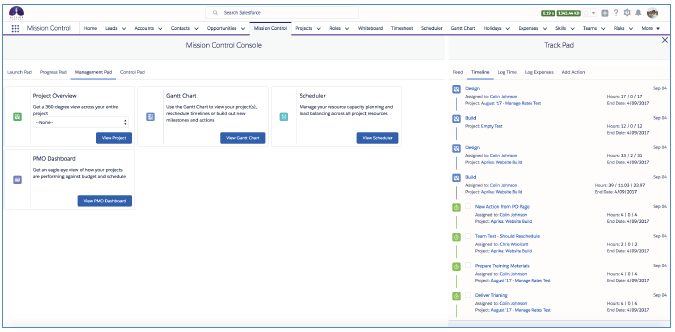
Management Pad
The Management Pad provides you with access to all of the tools within Mission Control that help you keep on top of the management of your projects, including:
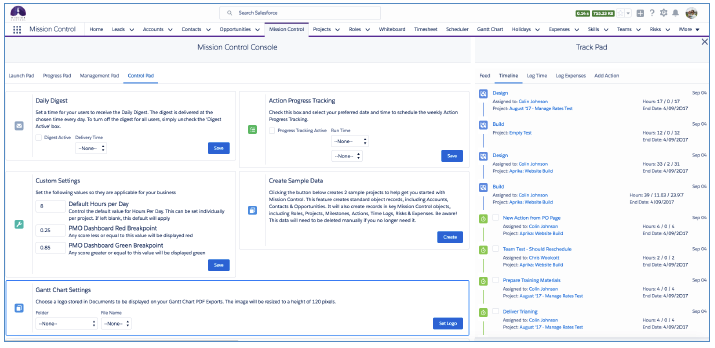
Control Pad
The Control Pad provides you with access to all of the administration settings within Mission Control. We expect you’ll want to restrict access to this Tab to your System Administrators and potentially your Project Managers.
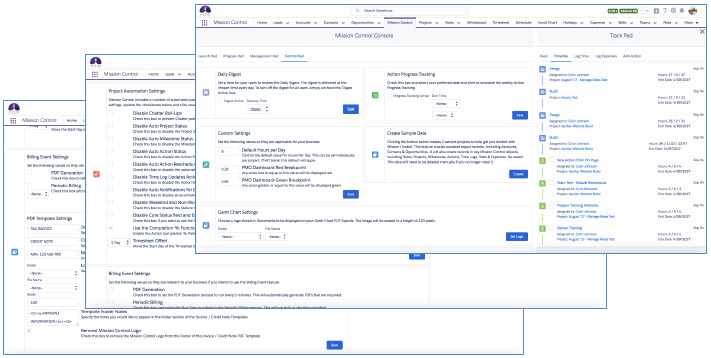
From the Control Pad, you’ll be able to complete the following administrative functions:
Tab Access
We’ve focused on providing you as much flexibility as possible with regards to how much access you provide each User with on the Console. You can control access to each Tab for each individual Role record within Mission Control. A number of new fields have been added to the Role Object to enable you to set the access to each Tab. The new fields are summarised below.
| Field | Field Type | Comments |
| Console Default Tab | Picklist | Allows you to specify which Tab you would like to appear when initially loading the Console |
| View Launch Pad | Checkbox | Identifies whether the Role can view the Launch Pad Tab |
| View Progress Pad | Checkbox | Identifies whether the Role can view the Progress Pad Tab |
| View Management Pad | Checkbox | Identifies whether the Role can view the Management Pad Tab |
| View Control Pad | Checkbox | Identifies whether the Role can view the Control Pad Tab |
You can set these field values for an individual Role record by editing the record and updating the fields in the ‘Console Settings’ section.

You can also manage these settings for all of your Role records from a new List View that has been included called ‘Role Permissions – Console’.
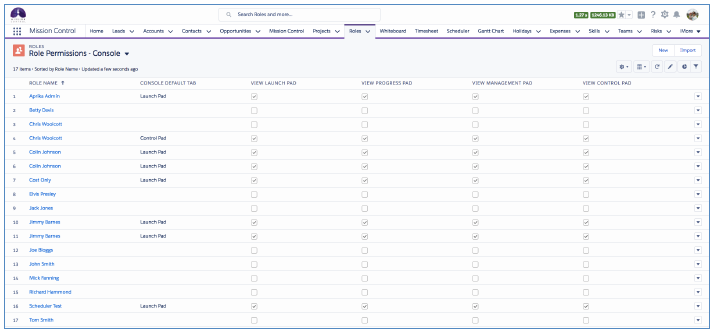
To ensure all of your Roles have access to the Console upon initial upgrade to this version, an Install Script will run as part of the upgrade that will set all of these fields to TRUE. You will then be able to adjust the settings for each Role as required.
Email Templates
The three email templates within Mission Control have all received a major facelift. The main purpose of updating these templates was to pull in additional information to the templates to reflect newer functionality such as the Checklist Items and Contributors, as well as providing our customers with the ability to brand the templates with their own logo.
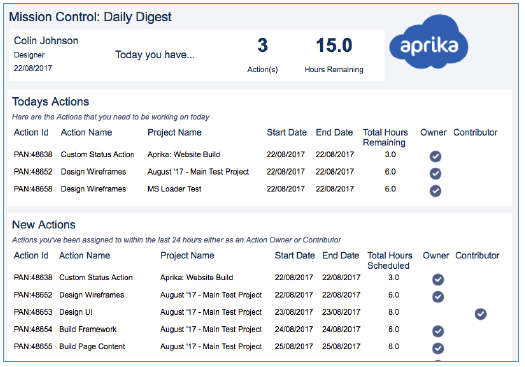
Daily Digest
The Daily Digest is the email that gets set to each individual Role on a daily basis that provides them with full insight into what is going on within Mission Control from their perspective. The old template used to provide them with three lists – New Actions, Pending Actions and Overdue Actions. We’ve made a number of enhancements to the template, which is illustrated below.
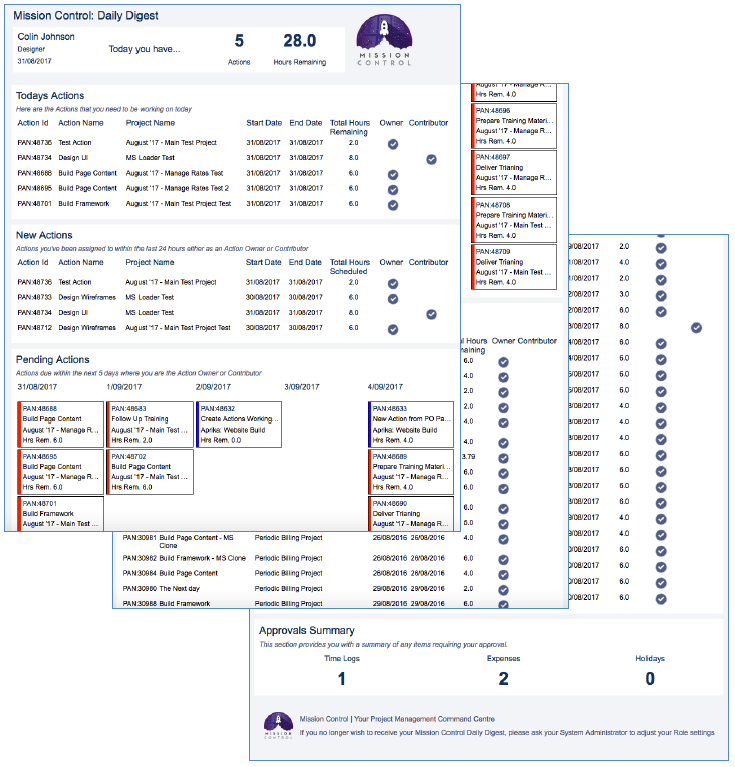
The new Daily Digest provides a much more detailed insight into what’s going on for a particular Role, including:
New Action Notification Template
The New Action Notification Template was previously a text-based email that was only sent to the Action Owner. The new template provides much more information, including billable and non-billable hours scheduled, who the Action Owner is, details of any Contributors and a list of Checklist Items.
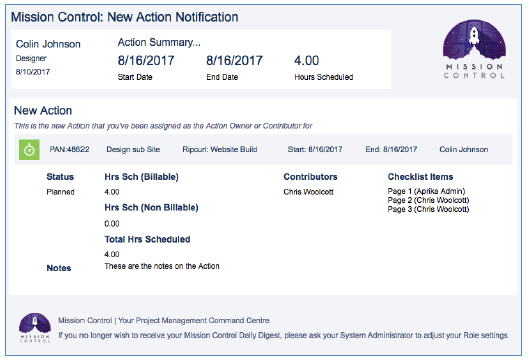
The other enhancement to this template is that it will now be issued to all Contributors, as well as the Action Owner.
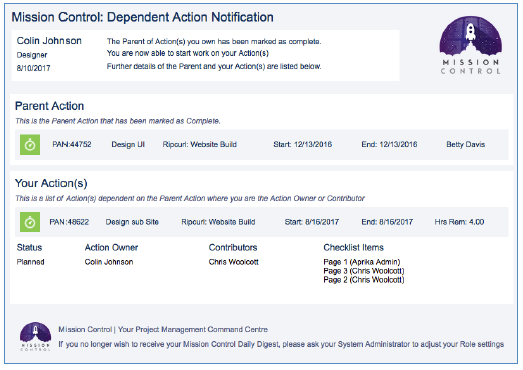
Dependant Action Notification Template
The Dependant Action Notification Template is sent out to the Action Owner and Contributors of an Action that is dependant on another Action when the parent Action is marked as Complete.
Custom Branding
You’re able to replace the logo that appears in the top-right corner of the new email templates. Below is an illustration of how you can override the logo on these email templates.
If you have already added your own logo to appear on the Gantt Chart PDFs, then you won’t need to do anything. The email templates reference the same file. If you do want to change the logo and haven’t already done so, you will need to go to the Control Pad on the Console. Within the
Select the Folder where your file is located, then select the File Name and click ‘Set Logo’. Note: these Folders / Files are your Salesforce ‘Documents’ Object.
Non Working Day / Holiday Enhancements
We have made a number of enhancements to the Holiday Object and the Non-Working Day logic within the system, to better support customers that offer staff flexible working hours, or where they may need to assign the odd Action on to a weekend.
Recurring Holidays
To support staff that operate on flexi-hours, we have included the ability to set up recurring Holidays. For example, if Mick Fanning only works 4 hours every Tuesday, he is able to create a recurring Holiday record that shows he’s on holiday for 4 hours each Tuesday. To do this, Mick can simply create 1 new Holiday record and set recurring information on the record using the following fields:
This will allow you to now quickly create a series of Holiday records for a particular Role, or a Team.
When the Holiday is created, or updated and has been set to ‘Is Recurring’, the relevant number of additional Holiday records will immediately be created, changing the Start Date and End Date based on the ‘Recurring Frequency’ using the following adjustment rules.
| Recurring Frequency | Date Adjustment |
| Daily | +1 Day |
| Weekly | +7 Days |
| Monthly | +1 Month |
| Quarterly | +3 Months |
| Annually | +1 Year |
Each Holiday created as part of the recurring process will have the same field value as the original Holiday, except for the Name. The Name will have a number in Brackets at the start of the string indicating which recurrence it is. For example, a Holiday that has been configured to recur 3 times, will result in the following:
| Holiday | Name |
| Original Holiday | Flexi Tuesday |
| Recurrence 1 | (1) Flexi Tuesday |
| Recurrence 2 | (2) Flexi Tuesday |
| Recurrence 3 | (3) Flexi Tuesday |
Where the original Holiday Name is using all 80 characters of the field string, the final four characters will be dropped from the string for subsequent recurrences to make room for the number.
Allocating Actions to a day that has a Holiday
In addition to the recurring Holidays feature, we’ve also enhanced the logic around assigning Actions to days that already have a Holiday assigned to the Role. Previously, if a Role already had a Holiday for a particular day, then the Action would automatically be rescheduled to the next available working day.
Now, it will identify whether the Holiday equates to less hours than the ‘Hours per Day’ setting. If this is the case, then the Action will be added to the same day. Therefore, in our example above where Mick Fanning has taken a half-day holiday on Tuesday, we would still be able to assign an Action to him on that day.
Allocating Actions to a Non Working Days
We have also made an enhancement to the logic that prevents you from scheduling Actions on to a day that you’ve got configured within your Salesforce Business Hours settings as a ‘Non Working Day’. Previously, if my Organization Business Hours had Saturday and Sunday specified as non-working days, I would not be able to assign an Action to either of those days.
To support staff who may need to work sporadically on the weekend, we have introduced a new field to the Action Object called ‘Ignore Non-Working Days’. If this Checkbox field is set to TRUE, then an Action can be scheduled on to a non-working day.
For example, if Mick Fanning is starting a new Project next week with an interstate client, he may need to travel on Sunday. He will now be able to create an Action scheduled for Sunday, providing he ticks the ‘Ignore Non-Working Days’ Checkbox field.
Custom Status Values
The Status field on the Action Object contains the following picklist values:
There is an automated function within Mission Control that will keep the Milestone and Project up to date based on the Status values of the Actions. We have found some customers want to replace some of these values or add additional values. In some instances, amending these values meant the automated functions would not operate correctly.
Therefore, in order to support customers with a requirement to have different picklist values in their Action Status field, we have introduced a new ‘Custom Status’ feature. This is a completely separate field that will allow you to create your own set of Status values.
In order to maintain the automated functions to keep the Milestone and Project up to date, you will be able to ‘map’ your Custom Status values to the Core Status values on the Action. Whenever you update the Custom Status value, the Core Status value will be updated as well based on your mapping. Then in turn, the Milestone and Project will continue to be updated automatically based on the Core Status values.
To use the Custom Status feature within Mission Control, you need to go to the Control Pad on the Console. Then scroll to the ‘Project Automation Settings’ section and click the ‘Disable Core Status field and Enable Custom Status field’ Checkbox.
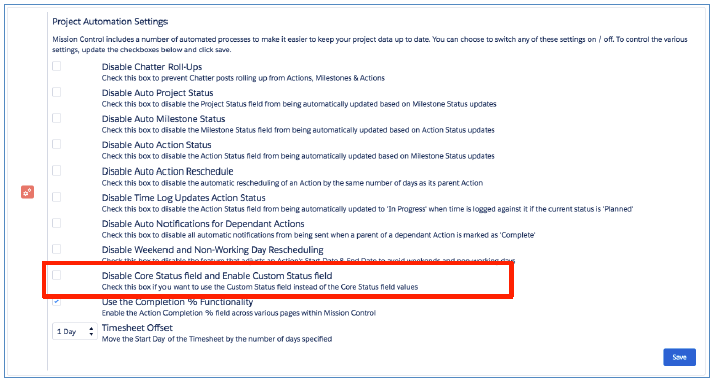
Once you tick the Checkbox, you’ll see a ‘Map Values’ button appear, as illustrated below.
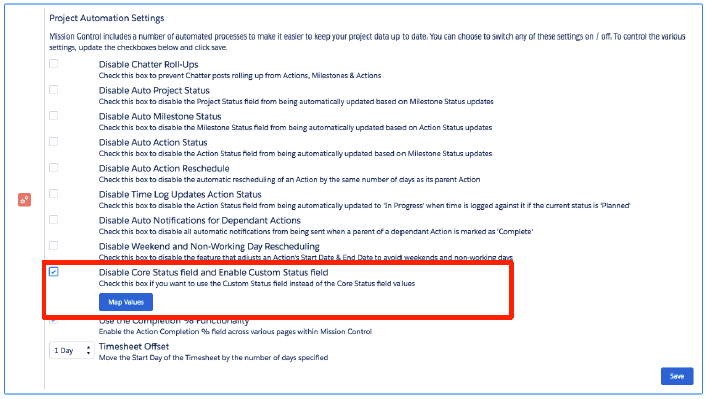
You will need to click this button to access the ‘Map Status Field Values’ page. This page will list all of your Custom Status values on the left hand side and you will be able to map each value to one of the Core Status values.
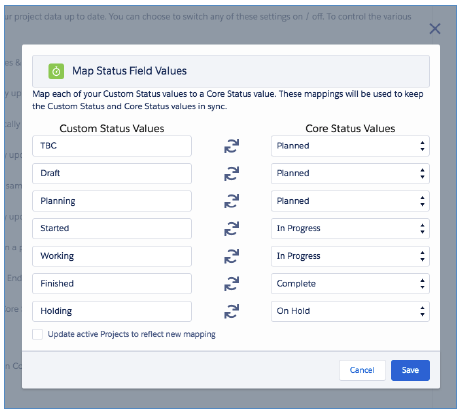
Once you have completed your mapping, click Save and then click Save within the Project Automation Settings section on the Console.
Now, whenever you’re looking at a Status field on any of the key tools such as the Project Overview, Scheduler, Whiteboard, Time Logger, etc., you will see your Custom Status field rather than the Core Status field.
Note: the new Custom Status field has a Field Label of ‘Status’ and an API Name of ‘amc__Custom_Status__c’.
Force Financials Recalculations
Previously it was not an easy task to recalculate the financials of a project if you wanted to change the ‘Billing Rate’ or ‘Cost Rate’ once the entire Project has been built out. For example, say I had created my Project with a Billing Rate and Cost Rate of ‘Standard’ and then proceeded to create all of my Milestones and Actions, only to realise I should have set the Billing Rate to ‘Role-based’. I would have needed to go through every single Action and force a recalculation by changing a value, such as the Hours Scheduled – Billable field. It was even more laborious if there were Time Logs already entered, as they would have all required the same process too.
To support this requirement, a new Checkbox has been added to the Project Object called ‘Force Financials Recalculation’. When you click this Checkbox and save the record, all Actions and Time Logs will be recalculated. So, you will be able to switch between rates as and when you need to.
Note: the recalculation process runs asynchronously, which means it will run in the background after you have saved the record. You will know when the process has completed when you refresh the Project page and see that the Force Financials Recalculation field has been set back to FALSE. If for some reason the recalculation process fails, you will receive an email explaining what caused the failure.
Project Launcher / Milestone Loader
To help you quickly launch and build new Projects, two new features have been included that will be known as the ‘Project Launcher’ and the ‘Milestone Loader’.
Project Launcher
The Project Launcher allows you to build out the framework for a new Project by entering high-level details for the Project and Milestones.
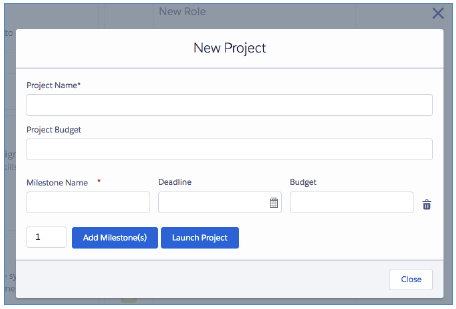
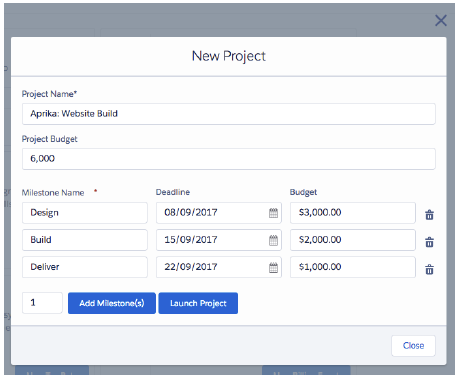
From the Project Launcher, you’re able to specify the Project Name and Project Budget for the Project record, as well as adding the number of Milestones you require. For each Milestone, you’re able to enter the Milestone Name, Deadline and Budget (if applicable). Once you’ve entered the required information as per the below example, you’re able to click the ‘Launch Project’ button, which will generate the records for you.
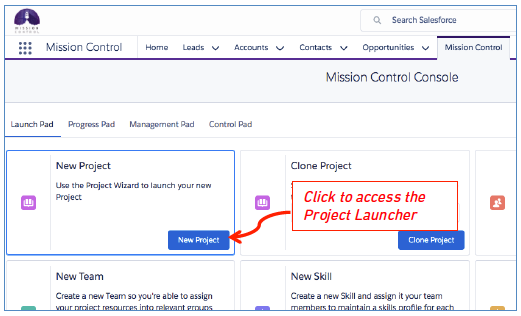
You’re able to access the Project Launcher from the Launch Pad on the Console or via a Global Action in Lightning Experience.
Console
From the Console, navigate to the ‘Launch Pad’ and then click on the ‘New Project’ button as shown below.
Global Action
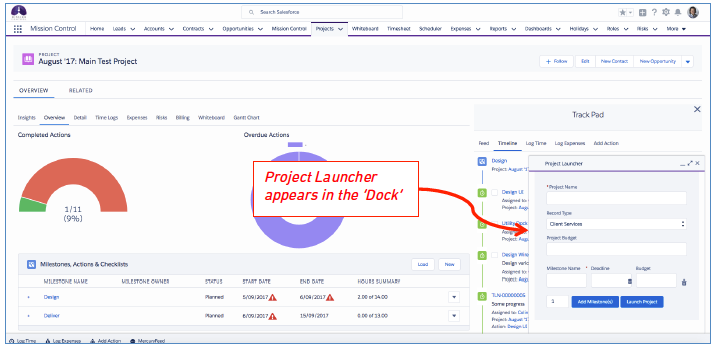
You can also access the Project Launcher from the Global Action feature within Lightning Experience. Simply click on the Global Action + sign in the top right corner of your screen and select the ‘Project Launcher.
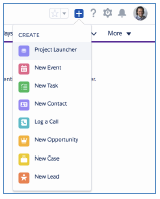
This will open up the Project Launcher component in a ‘Dock’ at the bottom right hand side of the window, as shown below.
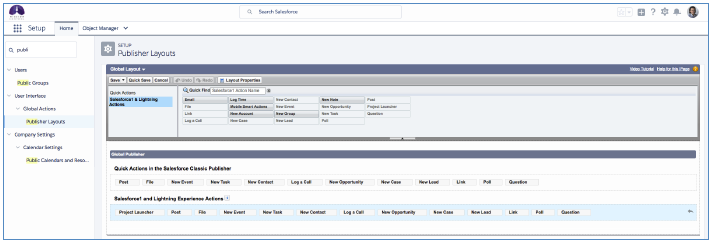
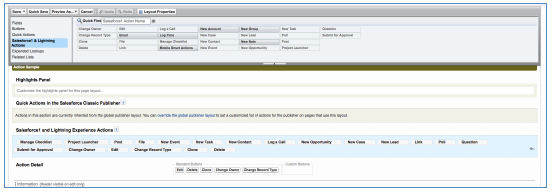
Note: you will need to add the Project Launcher to your ‘Publisher Layout’ for it to appear in your Global Actions list. To do this, click Setup, search for Publisher Layouts in the quick find search box, click ‘Edit’ for the ‘Global Layout’ and add Project Launcher to the Salesforce1 & Lightning Experience Actions section, as illustrated below.
Milestone Loader
The Milestone Loader is a new tool that takes the existing Milestone Clone feature to a new level. You’re able to select and load in multiple Milestones in one go, including all of their Actions, Contributors and Checklist Items.
So for example, I may have created a Project record, but not yet created any Milestones, Actions, etc. I may have two other Projects that between them already contain the detail of what is required on this new Project. Therefore, I can use the Milestone Loader to go and grab a copy of the relevant records from each of the other two Projects.
You access the Milestone Loader from the Overview Tab on the Project Overview page, as shown in the screenshot below.
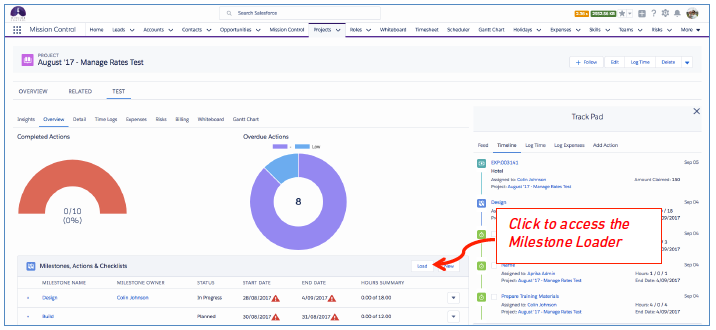
The Milestone Loader will initially load as shown below:
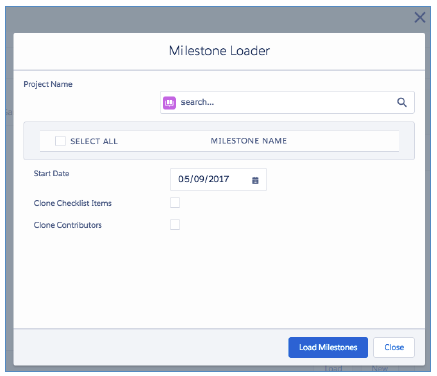
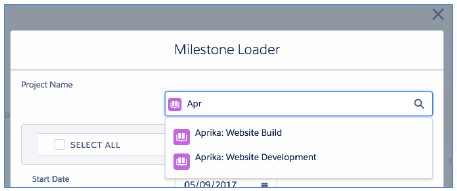
You’re able to search for the Project that you want to load the Milestones from. As you start typing the Project Name, the search list will automatically begin to filter the list of Projects you can choose from.
Once you have selected the Project you’re looking for, a list of Milestones will appear. You can then choose the Milestones you’re looking to load in to your new Project.
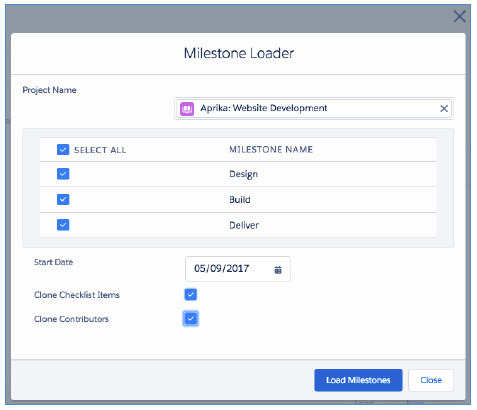
You’re able to select all, or as many of the Milestones as you require. You can also choose to specify the Start Date for the first most Action being loaded in to the new Project, along with whether you want to clone the Checklist Items and Contributors.
The Milestone Loader lets you load in multiple Milestones from one Project at a time, if you require Milestones from more than one Project, you’ll need to perform this process for each Project.
Scheduler Enhancements
A number of minor enhancements have been applied to the Scheduler, each of which is detailed below.
Event Hours
If you are viewing standard Salesforce Events on the Scheduler, the duration of these Event records will now be factored in to the allocation / utilisation calculations.
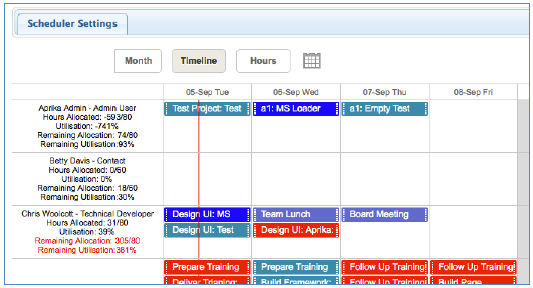
The below example shows the Scheduler where Events are not being displayed.
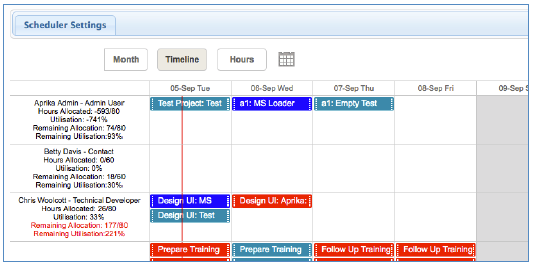
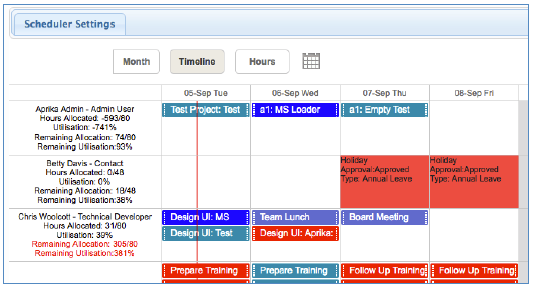
The example below has the Event records displayed. Looking at the row for Chris Woolcott, he has 2 Event records on his Scheduler and the Hours Allocated / Remaining Allocated have increased to reflect the duration of these Events.
Cancelled Actions Excluded
To ensure the capacity calculations are truly reflective of actual work allocated, the Scheduler will no longer display Actions with a Status of Cancelled.
Holiday Information
We have added additional information relating to holidays so you’re able to see the type and approval status. This was requested by a client that was looking to be able to understand more about the holiday without having to leave the Scheduler. The example below shows the additional information for a two-day holiday for Betty Davis.
Custom Filters
You’re now able to save your custom filter selections on the Scheduler! We had a number of clients saying that they always apply the same filters to the Scheduler and it would be great if they could save these filters to avoid having to apply them every time they use the Scheduler. Well, guess what…now you can!
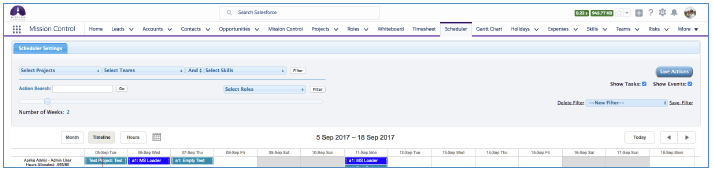
You’re able to apply the filters in the same manner in which you have done previously, but now you’ve got the ability to click the ‘Save Filter’ link on the right hand-side. This will let you specify a name for your Custom Filter.
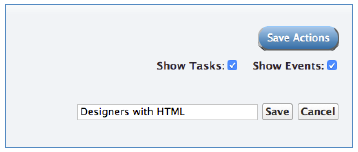
Once you’ve saved your Custom Filer, it will be available in the list of your Custom Filters that you can quickly apply to the Scheduler.
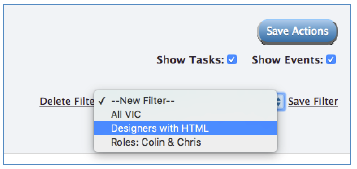
What’s even better is that the Custom Filter you were viewing the last time you visited the Scheduler will be remembered the next time you come back to it, so you won’t need to apply it manually.
You’re also able to delete any of your Custom Filters by selecting it from the Picklist and clicking the ‘Delete Filter’ link.
Note: Custom Filters are specific to an individual User.
Hover Fields
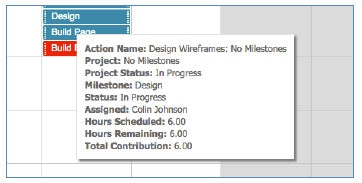
A Custom Field Set has been included on the Action Object that will enable you to override the fields that are visible in the ‘Hover Box’ on the Scheduler. Below is an example of the standard fields that are included in the hover box.
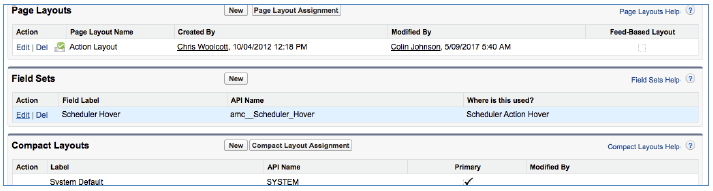
Using the ‘Scheduler Hover’ Field Set, you can select the fields you’d like to appear in the Hover Box. Note: Field Sets need to be administered from Salesforce Classic. To administer the Field Set, follow the click path below:
Setup > Create > Objects > Action > Scroll to Field Sets > Edit for ‘Scheduler Hover’
You can then drag and drop the required fields into the ‘In the Field Set’ section as shown below and click Save.
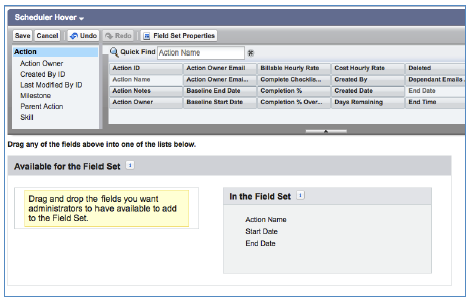
Once you’ve completed this process, your Hover Box on the Scheduler will now look like this.

To revert back to the default values, you simply need to remove all fields from the ‘In the Field Set’ section of the Field Set.
Remaining Allocation
The utilisation figures displayed on the Timeline view of the Scheduler for each individual Role have been enhanced to provide two sets of utilisation figures. Previously, you were provided with the following information:
Colin Johnson – Project Manager
Hours Allocated: 75/80
Utilisation: 94%
These calculations only took into account the Hours Scheduled for the Actions that were contained within the Timeline view. We have added a second set of utilisation calculations at the request of a client (thanks Jason, great idea :-)).
The second set of figures take the ‘Hours Remaining’ across any Action that is scheduled before the last day of the current view on the Timeline. For example, If I’m looking at a two week timeline from 11th July to 24th July, it would include the Hours Remaining across all Actions scheduled to be worked on during that two week period, plus any overdue Actions prior to the 24th July. The result of this second set of calculations means you will be able to see the following information for each Role.
Colin Johnson – Project Manager
Scheduled Allocation: 75/80
Scheduled Utilisation: 94%
Remaining Allocation: 120/80
Remaining Utilisation: 150%
Whiteboard Enhancements
A number of minor enhancements have been made to the Whiteboard to provide a better experience based on client feedback we have received.
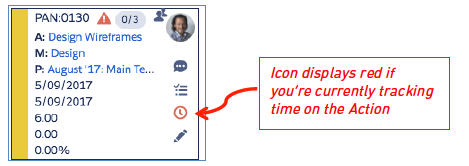
Time Log Clock Icon
The Time Log icon on the Action sticky-note will now display red if you are currently tracking time on that Action via the Start/Stop time tracking feature, as shown below.
End Date Warning Icon
A number of small enhancements have been made to the End Date Warning icon that is displayed on the Action sticky-note. Previously it always displayed in a grey format as shown below.
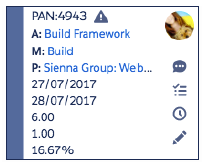
The following changes to the End Date Warning icon are included in this release:
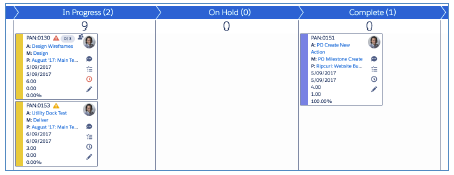
Additional Filter Options
You are now able to filter the Whiteboard on two additional parameters – Project Category and Action Skill, as shown in the illustration below.
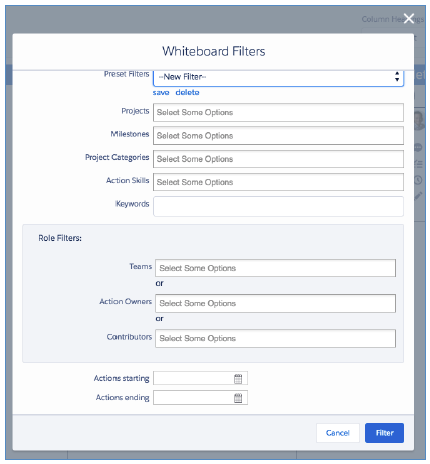
Custom Filters
You’re now able to save your custom filter selections on the Whiteboard! Similarly to the new Custom Filters on the Scheduler, we found clients saying that they very often apply the same filters to the Whiteboard and it would be great if they could save these filters to avoid having to apply them every time they use the Whiteboard. So you’re now able to do just that!
You’re able to apply the filters in the same manner in which you have done previously, but now you’ve got the ability to click the ‘Save’ link at the top of the filter window. This will let you specify a name for your Custom Filter.
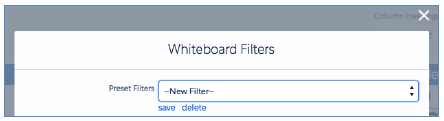
Once you’ve saved your Custom Filter, it will be available in the list of your Preset Filters that you can quickly apply to the Whiteboard.
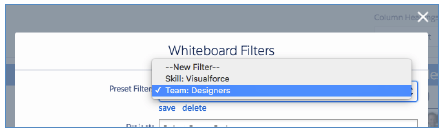
What’s even better is that the Custom Filter you were viewing the last time you visited the Whiteboard will be remembered the next time you come back to it, so you won’t need to apply it manually. You’ll know that a filter is applied as the Filter icon will be displaying green.

You’re also able to delete any of your Custom Filters by selecting it from the Picklist and clicking the ‘Delete’ link.
Note: Custom Filters are specific to an individual User.
Gantt Chart Enhancements
A number of enhancements have been applied to the Gantt Chart, each of these enhancements is explained in more detail below. A number of these have come from customer feedback, so again, thanks Chris  It’s always great to have customers putting their suggestions forward!
Record Prefix Icons
To allow for easier identification between the rows on the Gantt Chart, each record will now be prefixed with the Object icon that it relates to. The example below shows the icons for the Project, Milestone, Action, Checklist Item and Milestone Deadline.
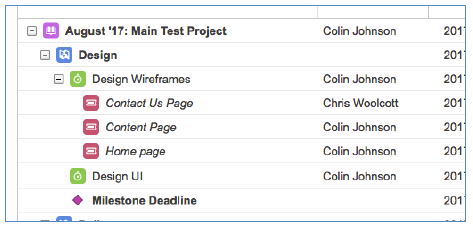
In addition, you’ll notice that the Project Name and Milestone Name have been set to bold to assist in identifying them more easily as you scan down the data table.
Add / Edit Checklist Items
Previously you were able to view your Checklist Items on the Gantt Chart, but you weren’t able to create new, or edit existing Checklist Items. You’re now able to do both of these functions directly from the Gantt Chart.
Creating a new Checklist Item
To add a new Checklist Item to your Project, simply click on the ![]() icon on the Action that you want to create the Checklist Item against. This will open up a ‘Lightbox’ where you can complete the details of your Checklist Item, as shown below.
icon on the Action that you want to create the Checklist Item against. This will open up a ‘Lightbox’ where you can complete the details of your Checklist Item, as shown below.
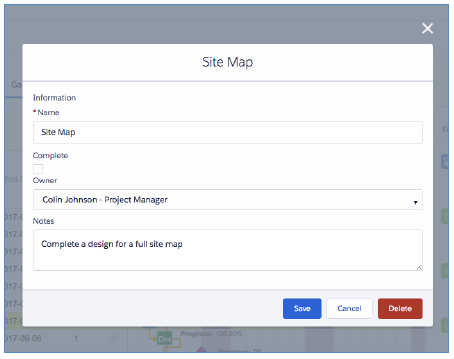
Once you click Save, the Lightbox will close and you’ll be able to see the new Checklist Item on the Gantt Chart.
Don’t forget to click the master ‘Save’ button on the Gantt Chart!
Editing an existing Checklist Item
You’re able to edit any existing Checklist Item in the same way you can edit Milestones and Actions. Simply double click on the appropriate Checklist Item and the Lightbox will open, allowing you to make your changes.
Additional Filter Options
We’ve introduced some additional filter options on the standalone Gantt Chart that will provide you with greater flexibility to define which projects you want to view. The new filter options include:
This should be super helpful in quickly being able to load in all of the projects that you may be the PM for, or to quickly get a view of all the projects you’ve got running for one particular customer.
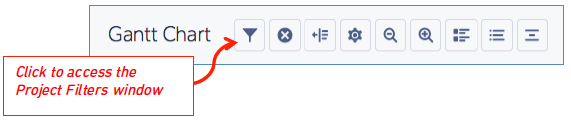
To access the Filter Options, simply click the Funnel button on the Gantt Chart as shown below.
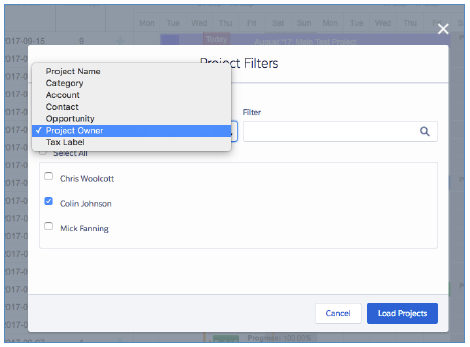
This will open up the Filter Options window where you’ll be able to choose which field you want to use as a filter. In the example below, we’re filtering on Project Owner and selecting all of the Projects where Colin Johnson is the Project Owner.
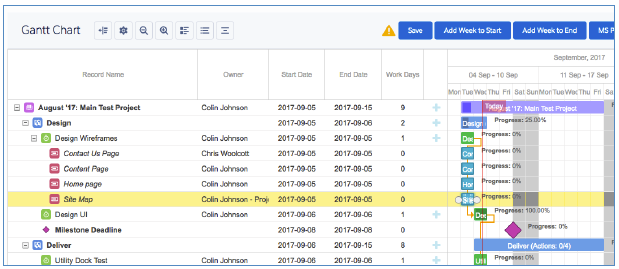
Unsaved Records Warning Icon
A small, but hopefully very effective enhancement is the new warning icon that will appear by the master ‘Save’ button on the Gantt Chart if you have edited any records but not yet saved the Gantt Chart. We know this has caught a few people out, so hopefully this will help to avoid that happening again
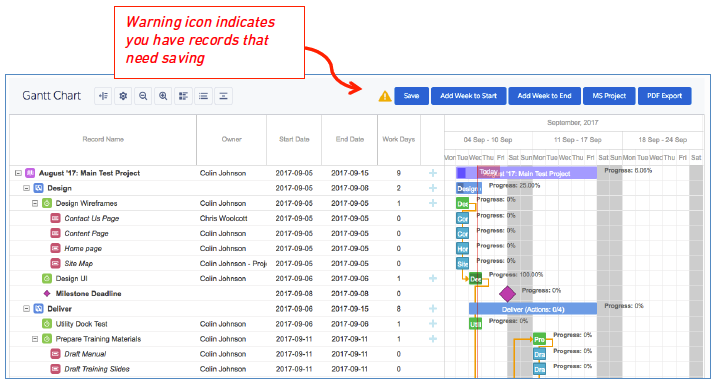
In the example above you can see the amber warning icon is being displayed indicating that there are records that have been created or edited that have not yet ben saved.
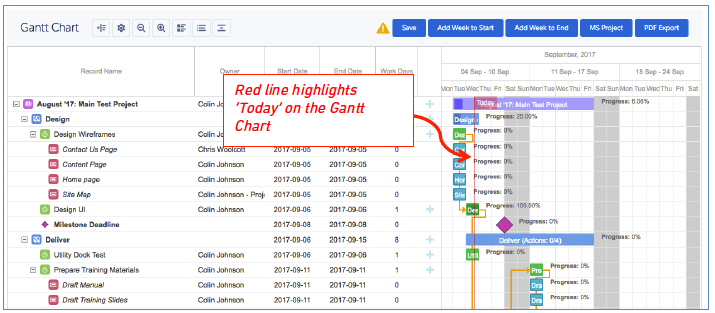
Today Timeline Identifier
To help you quickly identify where ‘Today’ sits on the Gantt Chart, we have added in a red ‘Today’ line that will appear as shown below.
Data Table Columns
A number of enhancements have been applied to the Data Table section of the Gantt Chart, including:
You were always able to drag each column to extend the width of it. However, as soon as you navigated away from the Gantt Chart, the next time you returned, the width would have reset to the default. You’re now able to drag the column widths to your desired preference and will be persistently remembered. So every time you return to the Gantt Chart the column widths will display based on your preference.
You’re also able to select which fields you display in the Data Table. Simply click on the ![]() icon to open up the ‘Column Settings’ window.
icon to open up the ‘Column Settings’ window.
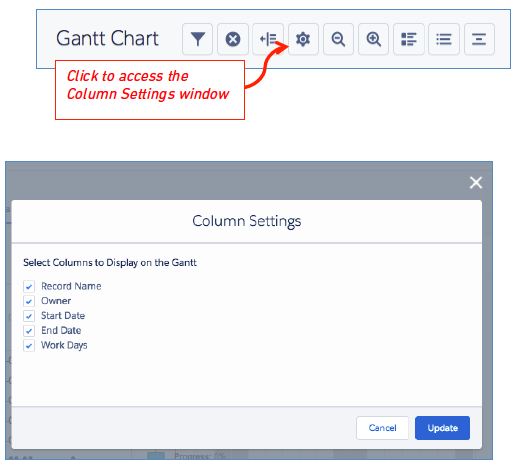
From here you’re able to select / deselect each individual field to determine whether that column will be displayed on the Gantt Chart.
Action Lightbox – Resource Assignment Wizard
You’re now able to access the Resource Assignment Wizard from the Action Lightbox on the Gantt Chart. This will enable you to add / view the Contributors that may be assisting the Action Owner on the Action, without having to leave the Gantt Chart.
To access the Resource Assignment Wizard, simply double click on the relevant Action and then click the ![]() icon. This will open up the wizard.
icon. This will open up the wizard.
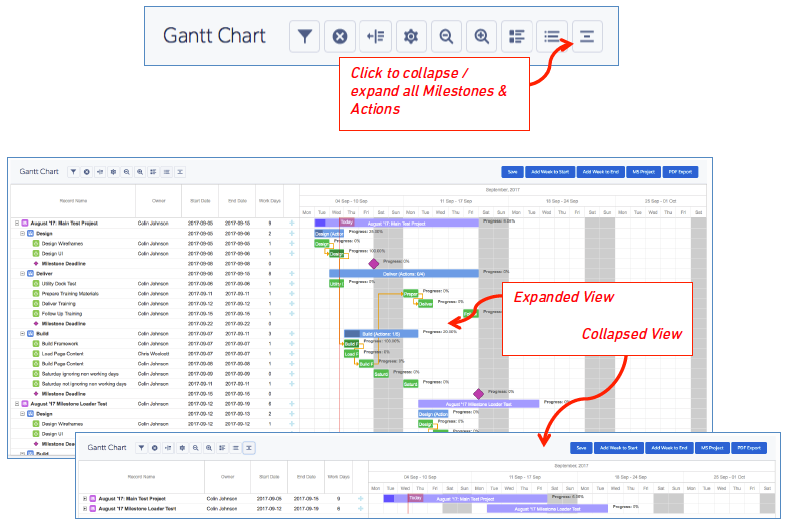
Quick Collapse All
Another small request from a customer that we hope will make a big difference. You’re now able to quickly collapse all Milestones and Actions on the Gantt Chart. This will be particularly handy when viewing multiple projects on the stand alone Gantt Chart. To do this, simply click the ![]() button on the Gantt Chart and you’ll see that the Milestones and Actions can quickly be collapsed or expanded, allowing you to see just the projects and a high level.
button on the Gantt Chart and you’ll see that the Milestones and Actions can quickly be collapsed or expanded, allowing you to see just the projects and a high level.
Milestone Archiving
The ability to ‘Archive’ an entire Project already exists within Mission Control, but we’ve had a request from clients (again, thanks Patrick & Michael) to have the ability to archive a Milestone within a Project. To support this requirement a new field has been added to the Milestone Object that you will need to add to your Page Layout.
If you set the ‘Archived’ Checkbox Field to TRUE on the Milestone record, the Milestone and related Actions & Checklist Items will be removed from the following pages within Mission Control:
All of the records will still be accessible via the standard page layouts.
Checklist Item Enhancements
To enable you to keep track at an Action level of how many Checklist Items you have in total and how many have been completed, two new fields have been added to the Action Object:
We recommend you add these fields to your Action Page Layout. These fields will be kept up to date automatically.
In addition, if an Action has a Status of ‘Planned’ when a Checklist Item is marked as Complete, it will be automatically updated to ‘In Progress’. Note: this will not occur if you’ve opted to use the Custom Status feature.
You’re now also able to access the ‘Manage Checklist Items’ component from Salesforce1. To access the component, navigate to an Action record and you’ll see the ‘Manage Checklists’ Action at the bottom of the page.
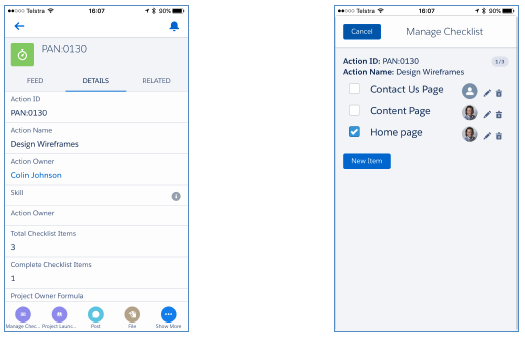
You will need to add the ‘Manage Checklists’ Action to your Salesforce1 and Lightning Experience Actions section of the Action Page Layout, as illustrated below.
Minor Enhancements / Known Issues
A number of small enhancements and known issue fixes have also been included in this release, details of which are included below.
Project Overview Page: Create New Records
We have added a ‘New’ button to each of the Tabs on the Project Overview Page, allowing you to create the following records:
Note: this feature is only available within Lightning Experience due to a Salesforce limitation. However, we will monitor this feature to see if we can offer this functionality within Salesforce Classic going forward.
Cirrus Insight Inbox App
Previously, when adding a context email via the Mission Control ‘Inbox App’, you were only able to add it to the Activity History of the Action record. You’re now able to choose from the Project, Milestone or Action.
Track Pad: Add Action Component
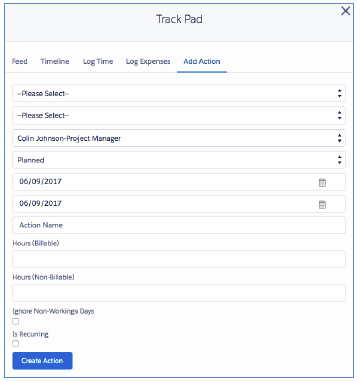
A new Tab has been added to the Track Pad enabling you to quickly create a new Action on a Project. Simply complete each field on the form as required and click the ‘Create Action’ button.
Note: You can control access to the ‘Add Action’ Tab via the Track Pad Permission Settings on the Role record in the same manner that you control access to all of the other Tabs. To ensure all of your Roles have access to the Add Action Tab upon initial upgrade to this version, an Install Script will run as part of the upgrade that will set the field to TRUE. You will then be able to adjust the settings for each Role as required.
Time Logger: Action Status
The Action Status field has been added to the Time Logger to enable you to update the Status of the Action whilst logging against it. For example, if the time you’re about to log means you have now finished working on the Action, you can update the Status to Complete at the same time as logging the time.
Chatter Feed Post Roll Up
We have addressed a Known Issue where the Chatter Feed Post from an Action or a Milestone was being rolled up to a Project resulted in html tags being applied to the Post. For example, the following post on an Action:
Just to let you know, I’ve finished doing this work
Would result in a post on the Project feed like this:
<p>Just to let you know, I’ve finished doing this work</p>
This roll up process has been updated to remove these html tags.
New Field Overview
A number of new fields have been added to the solution as part of this release. We recommend you add these fields to your Page Layouts.
Action
| Field | Field Type | Comments |
| Ignore Non Working Days | Checklist | Identifies if the Action can be scheduled on a Non Working Day |
| Total Checklist Items | Number (18, 0) | Identifies the total number of related Checklist Items |
| Completed Checklist Items | Number (18, 0) | Identifies the number of completed related Checklist Items |
| Status | Picklist | Contains the values for the Custom Status field (only applicable if you’re using the Custom Status feature) |
Milestone
| Field | Field Type | Comments |
| Archived | Checkbox | Identifies whether this Milestone should is Archived |
Project
| Field | Field Type | Comments |
| Force Financials Recalculation | Checkbox | When set to TRUE forces a recalculation of the $ figures across all Actions & Time Logs. This is to provide clients with the ability to adjust rates on the project and do a mass recalculation. |
Role
| Field | Field Type | Comments |
| Console Default Tab | Picklist | Allows you to specify which Tab you would like to appear when initially loading the Console |
| View Launch Pad | Checkbox | Identifies whether the Role can view the Launch Pad Tab |
| View Progress Pad | Checkbox | Identifies whether the Role can view the Progress Pad Tab |
| View Management Pad | Checkbox | Identifies whether the Role can view the Management Pad Tab |
| View Control Pad | Checkbox | Identifies whether the Role can view the Control Pad Tab |
Holiday
| Field | Field Type | Comments |
| Is Recurring | Checkbox | Identifies whether the Holiday should be recurring |
| Frequency | Picklist | Identifies how frequently the recurrences should happen |
| Number of Recurrences | Number (2, 0) | Identifies the number of times this holiday should be recurred |
How do I upgrade?
Mission Control will be made available based on the following release schedule.
11th September 2017 – Available for manual upgrade from the AppExchange
16th September 2017 – Automatic upgrade to all Sandbox Orgs
23rd September 2017 – Automatic upgrade to all Production Orgs
To manually upgrade to the new version of Mission Control in your organisation, please follow the steps below:
What’s New Webinar
We have pre-recorded the ‘What’s New’ webinar to provide further information on how to get the best out of the new features. To access this webinar, please view the ‘Release Notes’ section of the Mission Control Support Centre – www.aprika.com.au/mc-support
Feedback
Some of the new features included in this release of Mission Control have come from ideas submitted from existing clients. If you have an idea for enhancing Mission Control, you can submit it via email to [email protected].
Questions?
If you have any questions regarding this release notification, please do not hesitate to contact us at [email protected].
