Release Notes, Version - 1.50
Mission Control Version 1.50 Release Notification
7 June 2019
A new version of Mission Control (version 1.50) will be released on the AppExchange on Friday 7th June 2019. This notification has been issued to existing Mission Control users. It contains an overview of the new features available with this release, along with instructions on how to upgrade to the new version.
What’s New?
This release includes a number of new features, along with some enhancements to existing functionality, including:
- Action Hours Distributor
- Role Enhancements
- Scheduler
- Project Stakeholders & Weekly Status Report
- Risk Log
- Billing Event Enhancements
- Opportunity Auto-generate Projects
- Minor Enhancements
- Project Overview – Overview Tab
- Project ‘Hours Allocated’ Field
- Milestone ‘Type’ Field
- Time Log ‘Type’ Field
Let’s get stuck in to the detail…
Action ‘Hours Distributor’
The ‘Hours Distributor’ feature enables you to manually control how the hours in the ‘Hours Scheduled – Billable’ and ‘Hours Scheduled – Non Billable’ fields are distributed between the working days of the Action. By default, these hours fields are distributed evenly between the Start Date and End Date. For example, if an Action has a Start Date of Monday 3rd June and an End Date of Wednesday 5th June, and there are 12 hours scheduled to be done on the Action, then it will be assumed that 4 hours of work will be done on Monday, Tuesday and Wednesday.
Using the ‘Hours Distributor’ you are able to specify how many hours will be allocated to each day. The ‘Hours Distributor’ is accessible from the Resource Assignment Wizard, as shown below:

In this example, you can see how the hours have been unevenly distributed between the days. To support this manual distribution, the ‘Scheduled Hours Breakdown’ Long Text Field on the Action Object will contain a JSON String of the manual distribution. The information captured for each person assigned to work on the Action includes:
- Role ID
- Role Name
- Working Day
- Hours Scheduled – Billable
- Hours Scheduled – Non Billable
If the Action’s Start Date or End Date are changed, then the ‘Scheduled Hours Breakdown’ field value will be deleted, and the hours distribution will revert back to the automatic, even distribution.
Role Enhancements
A number of enhancements have been applied to the Role, as outlined below.
Lightning Experience Styling
The Role Visualforce ‘Edit’ page has been enhanced to match the styling of the User Interface that you’re using. If you’re using Salesforce Classic, it will remain unchanged. However, if you’re using Lightning Experience, you will notice a style change. The function of the page remains unchanged.
Asset Roles
Currently, a Role must be linked to a User or a Contact. A third option of ‘Asset’ has been added, to provide you with the ability to create records for assets, such as rooms, machines, etc. or for placeholders, such as ‘Developer’ or ‘Consultant’ so they can assign an Action to the type of Role that will be required, without having to allocate it to a named person.
To create an ‘Asset’ Role, you select the ‘Asset’ in the ‘Role Source’ field, enter a Name for the Role and then complete the remainder of the fields as required.
Master Team
The Team Assignment Object enables you to associate multiple Roles to multiple Teams. A ‘Master Team’ Checkbox field has been added to the Team Assignment Object. Whilst a Role can have multiple Team Assignment relations, only one of them can be identified as the ‘Master Team’. This field will enable you to group Roles by their Master Team on the new Scheduler.
Scheduler
The Scheduler has had a major overhaul, and whilst all of the original features remain, it will now provide you with much greater flexibility for managing your resource capacity. Below is a screenshot of the new Scheduler.
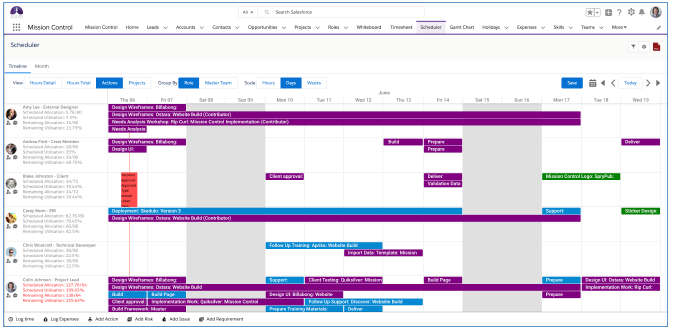
The Scheduler features two Tabs, giving you a different view:
- Timeline
- Month
Timeline
Within the Timeline Tab, you have options to control the View, Group By and Scale values, as outlined in below.
View
The View options allow you to determine what information is being displayed within the Timeline, including:
- Hours Detail
- Hours Total
- Actions
- Projects
Hours Detail
The Hours Detail View will show you a breakdown of the hours assigned to each Role, categorised into the following areas:
- Billable Hours
- Non Billable Hours
- Salesforce Events
- Holidays
Below is an example of the Hours Detail View:
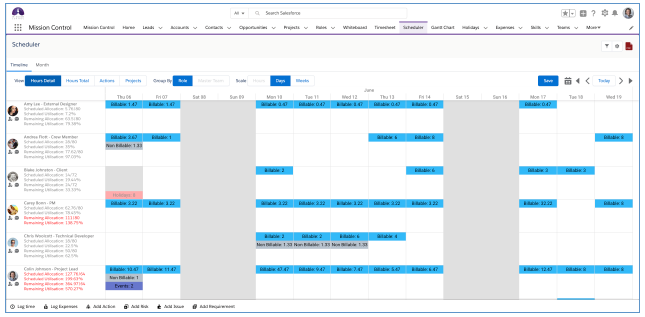
Note: The Hours Detail View can only be used with the Role Group By and Days and Weeks Scale values.
Hours Total
The Hours Total View will show you a summary of the hours assigned to each Role. Below is an example of the Hours Total View:
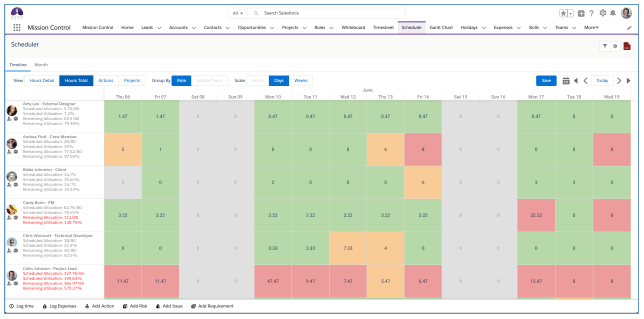
Note: The Hours Total View can only be used with the Role Group By and Days and Weeks Scale values.
Actions
The Actions View will show you the separate ‘bars’ for the individual Actions assigned to the Action Owner / Contributor. Below is an example of the Actions View:
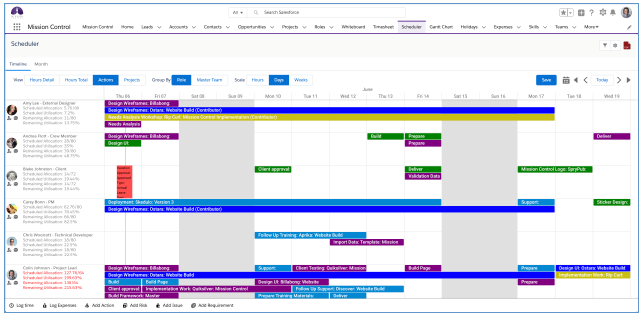
Note: The Action View is the only view that will support edits being made to the records.
Projects
The Projects View will provide a high level summary view of work scheduled. In this View, Actions within the same Project that are scheduled to occur on the same day or consecutive days will be grouped into a single ‘bar’. Below is an example of the Projects View:
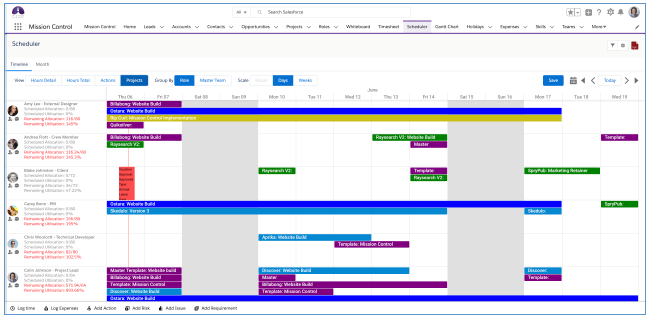
Note: The Projects View can only be used with the Days and Weeks Scale values.
Group By
The Group By options allow you to determine how the Rows are organised, including:
- Role
- Master Team
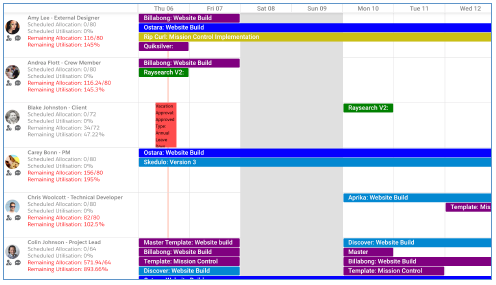
Role
The Role Group By option will display each Role in alphabetical order, based on the Role’s First Name. Below is an example of the Role Group By view:
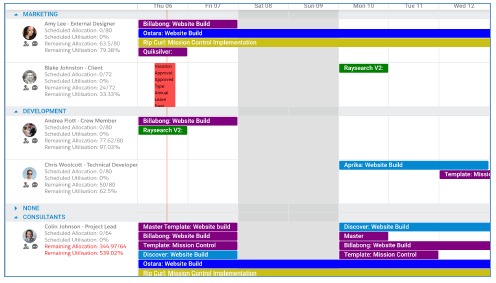
Master Team
The Master Team Group By option will display each Role in alphabetical order, based on the Role’s First Name, grouped within their ‘Master Team’. Below is an example of the Master Team Group By view:
Scale
The Scale options allow you to determine the scale used across the Timeline, including:
- Hours
- Days
- Weeks
Hours
The Hours Scale will display the Timeline scale per hour, based on the number of hours and days you’ve selected in the Scheduler Settings. Below is an example of the Hours Scale showing 8am to 6pm over a 3-day period.

Note: The Hours Scale can only be used with the Actions View.
Days
The Days Scale will display the Timeline scale per day, based on the number of weeks you’ve selected in the Scheduler Settings. Below is an example of the Days Scale showing a 4-week period.

Weeks
The Weeks scale will display the Timeline scale per week, based on the number of weeks you’ve selected in the Scheduler Settings. Below is an example of the Weeks Scale showing a 52-week period.

Month
The Month Tab provides a month in view calendar display. All Actions across all Projects will be displayed. Below is an example of the Month View:
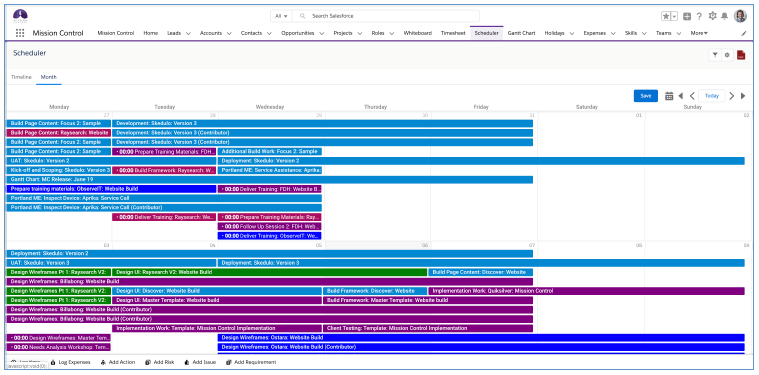
Note: If you use the Scheduler Filters to filter to an individual Role, any Holidays assigned to that Role will also be displayed on the Month View.
Scheduler Features
There is a range of features that the Scheduler provides to help you manage your resource capacity, each feature is explained in further detail below.
Scheduler Settings
The Scheduler Settings are accessible by clicking the ![]() icon, located in the top-right corner of the Scheduler. Note: These Settings are persistently remembered, and controlled at the individual User level.
icon, located in the top-right corner of the Scheduler. Note: These Settings are persistently remembered, and controlled at the individual User level.
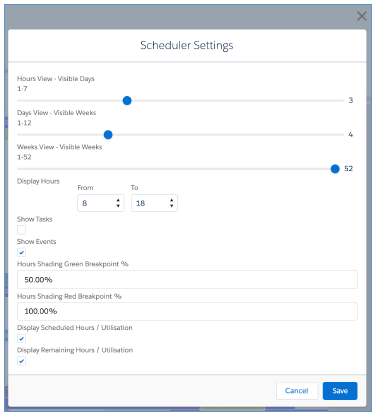
Hours View – Visible Days
This Slider allows you to specify how many days will be displayed when using the Hours View. The maximum value for this Slider is 7 days.
Days View – Visible Weeks
This Slider allows you to specify how many weeks will be displayed when using the Days View. The maximum value for this Slider is 12 weeks.
Weeks View – Visible Weeks
This Slider allows you to specific how many weeks will be displayed when using the Weeks View. The maximum value for this Slider is 52 weeks.
Display Hours
The From and To fields allow you to specify the hours that will be displayed on the Timeline when using the Hours View.
Show Tasks
This Checkbox enables you to toggle on / off the ability to display Salesforce Tasks on the Scheduler.
Show Events
This Checkbox enables you to toggle on / off the ability to display Salesforce Events on the Scheduler.
Hours Shading Green Breakpoint %
This percentage value will be used on the Hours Total View. If the sum of hours scheduled for a Role is less or equal to this value, the cell will be shaded Green.
Hours Shading Red Breakpoint %
This percentage value will be used on the Hours Total View. If the sum of hours scheduled for a Role is greater or equal to this value, the cell will be shaded Red.
Display Scheduled Hours / Utilisation
This Checkbox enables you to toggle on / off the ability to view the Scheduled Allocation and Scheduled Utilisation figures for each Role.
Display Remaining Hours / Utilisation
This Checkbox enables you to toggle on / off the ability to view the Remaining Allocation / Remaining Utilisation figures for each Role.
Scheduler Filters
The Scheduler Filters are accessible by clicking the ![]() icon, located in the top-right corner of the Scheduler. Note: These Filters can be saved and persistently remembered, and are controlled at the individual User level.
icon, located in the top-right corner of the Scheduler. Note: These Filters can be saved and persistently remembered, and are controlled at the individual User level.
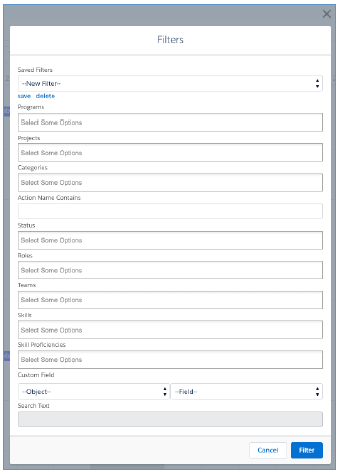
You are able to filter based on a combination of the following records / fields:
- Program
- Project
- Project ‘Categories’
- Action Name ‘Contains’
- Action ‘Status’
- Roles
- Teams
- Skills
- Skill Proficiencies
- Any Custom Field on the Project, Milestone or Action
To save a Filter selection, click the ‘save’ and enter a ‘Filter Name’ and then click save.
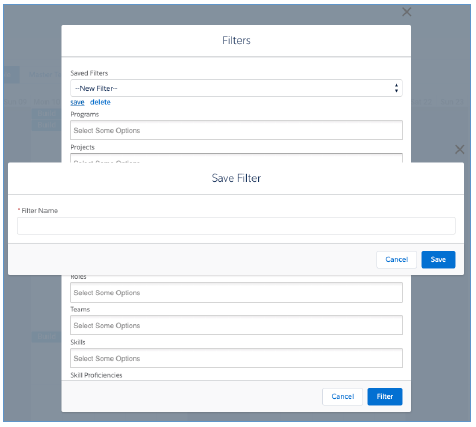
The Filter will then be available for the individual User to access within their ‘Saved Filters’ picklist. When a Saved Filter is applied, it will be persistently remembered each time you visit the Scheduler.
PDF Export
You are able to export the Scheduler as a PDF using the ![]() icon located in the top-right corner. When you click the icon, you will be able to specify the File Name, Header Text and Footer Text prior to generating the PDF, as shown below:
icon located in the top-right corner. When you click the icon, you will be able to specify the File Name, Header Text and Footer Text prior to generating the PDF, as shown below:
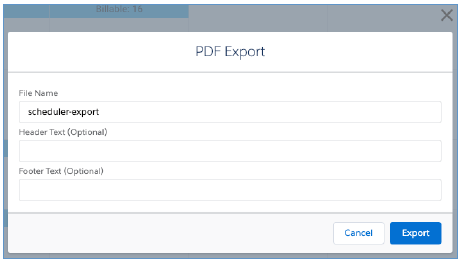
Once you’ve completed these (optional) details, you can click Export and the PDF will be generated.
Date Navigation
There are a number of ways to navigate the period displayed on the Scheduler, as shown below.
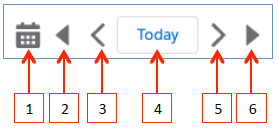
- This Date Picker lets you select a specific point in time to quickly jump to
- Enables you to move back by 7 days
- Enables you to move back by 1 day
- Enables you to jump back to today
- Enables you to move forward by 1 day
- Enables you to move forward by 7 days
Saving Changes
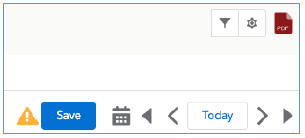
Any adjustments you make to the Scheduler will not be saved until you click the ‘Save’ button, which is located in the top-right corner of the Scheduler. If there are unsaved changes, a warning icon will be displayed, as shown below.
Timeline Settings
When you have the Timeline Tab selected, you will see the View, Group By and Scale settings as outlined below.

Each of these features are explained earlier in this document.
Editing Actions
Rescheduling
From the Actions View of the Scheduler, you’re able to drag and drop Actions to reschedule to a different point in time, and / or to adjust the number of days.
The example below illustrates how an Action is rescheduled from Monday and Tuesday to Thursday and Friday.

The example below illustrates how an Action’s End Date has been extended from Tuesday to Thursday.

Editing
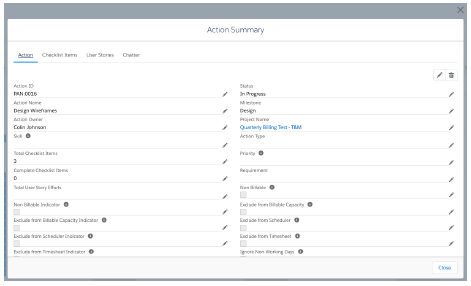
By double-clicking on an Action within the Scheduler, you will open the ‘Action Summary’ component, which will give you access to:
- Action Detail Page
- Related Checklist Items
- Related User Stories
- Chatter
The example below illustrates the Action component with all of the various tabs.
Adding Actions
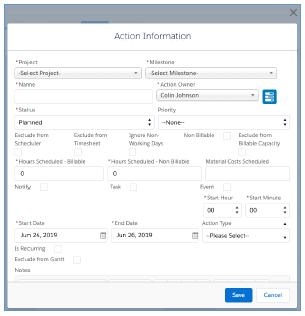
You can create new Actions directly on the Scheduler by dragging on the day/days you wish to schedule the Action for, on the row for the Role that will be the Action Owner. This will then open the following component where you’re able to create the Action details, as well as accessing the Resource Assignment Wizard to include Contributors.
Reassigning Actions
You can drag an Action from one Role to another if you need to reassign ownership. You can do this for the Action Owner, or for a Contributor.
Role Access
When on the Timeline Tab, you will have a row for each Role. Within each row, you’re able to access the Role Profile and Role Chatter components.

Role Profile
You’re able to click the ![]() icon to open the ‘Role Profile’ component, that will give you access to the Teams and Skills this Role is associated with. Within either of the Teams or Skills tabs, you can view / edit / add to their profile.
icon to open the ‘Role Profile’ component, that will give you access to the Teams and Skills this Role is associated with. Within either of the Teams or Skills tabs, you can view / edit / add to their profile.

Role Chatter
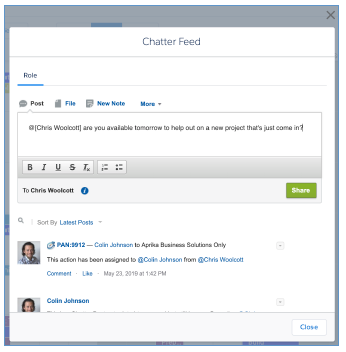
You’re able to click the ![]() icon to open the ‘Role Chatter’ component, that will enable you to post to the Chatter Feed for that individual Role.
icon to open the ‘Role Chatter’ component, that will enable you to post to the Chatter Feed for that individual Role.
Project Stakeholders & Weekly Status Report
The Project Stakeholders Object enables you to associate Contacts, Users or Roles to a Project, identifying their Stakeholder position, including:
- Internal
- Client
- External
Project Stakeholders can added to a Project by going to the Project record, selecting the Project Stakeholders Related List and clicking the ‘New’ button.
When adding a Project Stakeholder, you will associate it to a User, Contact or Role. Note: An individual Project Stakeholder can only be associated to one of these records. You can also choose to set the Project Stakeholder to follow the Project on Chatter (if they are a User or a Role related to a User). You an also choose to subscribe the Project Stakeholder to receive the Project Status Report.
Note: existing customers will need to manually update their Page Layout to include the Project Stakeholders Related List.
Project Status Report
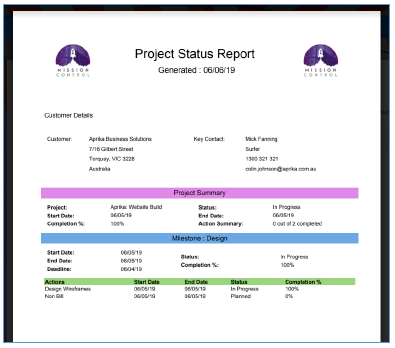
The Project Status Report is a PDF that can be emailed to Project Stakeholders on a weekly basis. Below is an example of the Project Status Report.
Setting up the Project Status Report
On the Control Pad of the Mission Control Console, there is a ‘Project Status Report’ Tile, as illustrated below.
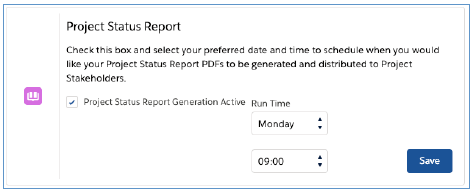
To activate the Project Status Report, you will need to set the Checkbox to true and select the day and time you would like your reports to be generated and distributed.
On the Project, you will need to set the ‘Generate Weekly Project Status Report’ field to true. If this field is false, a report will not be distributed, even if there are Project Stakeholders.
Risk Log
By popular demand, after having seen Action Pad and Issue Log that have been included in recent releases, we received several requests from customers to enhance the Risk Log to provide similar functionality. We’re pleased to advise this is included in this release.
The Risk Log is accessible as a stand-alone page, which you can access via the ‘Progress Pad’ on the Mission Control Console.
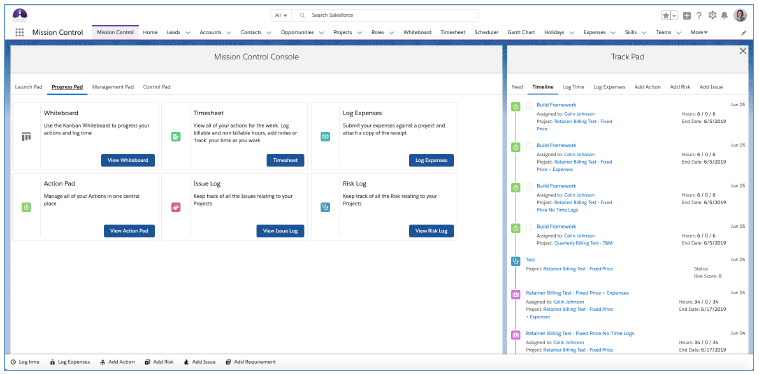
You can also access it on the Project Overview from the Risks sub-tab. Access via the Project Overview page can be controlled via the Project Overview permissions on the Role record, like all other Project Overview Tabs.
Below is an example of the Risk Log being viewed as a stand-alone page.
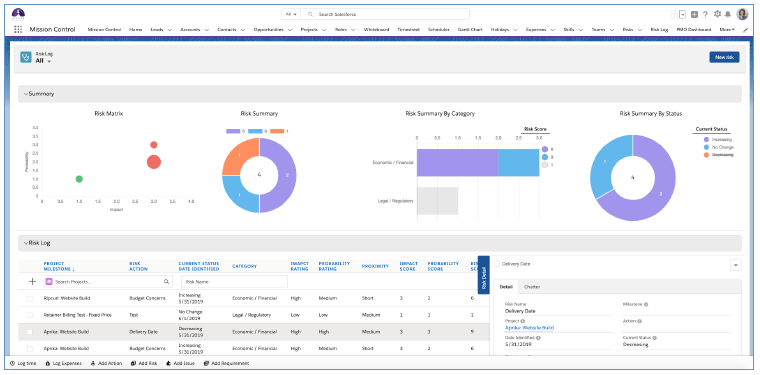
It comprises of two main sections – Summary and Risk Log. Each can be collapsed to allow you to focus on the area of interest.
When using the Risk Log on the Project Overview page, it’s filtered to show all of the Actions related to that Project. On the stand-alone page, you will be able to determine which Risks are displayed, by selecting a ‘List View’ filter on the Risk Object.
Summary Section
The Summary Section includes 4 charts, providing you with a high level overview of the following:
- Risk Matrix
- Risk Score Summary
- Risks by Category
- Risks by Status

Risk Log Section
The Risk Log section provides you with a working ‘pad’ where you can do numerous tasks, including:
- Quickly create new Risks
- Sort by any column
- Set Risks to Closed
- View / Edit Risks
- Collaborate via Chatter

Quick Create Risks
You’re able to quickly create new Risks using the quick create feature located at the top of the Risk Log – see below.

Providing you don’t have any Validation Rules or mandatory field requirements preventing a Risk from being created with just the Risk Name, you’ll be able to rapidly create new Risks using the feature.
If a Validation Rule or mandatory field requirement does prevent the Risk from being created, a new Risk page will open up where you can complete the required fields and save the record.
Using the quick create feature, new Risks will appear at the top of the list in your Risk Log and you can then click on any of them to view them in the Risk Detail on the right-hand side, or double click to edit further information.
Sort by any Column
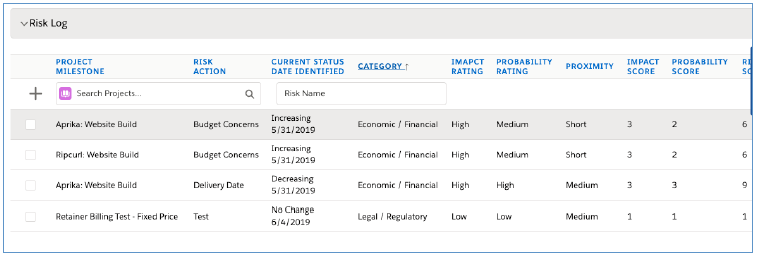
Within the Risk Log, you’re able to sort the data by any of the columns. Just click on the column you would like to sort by and the data will be re-organised accordingly. You can identify which column is being used for sorting by the directional arrow – in the example below, the Category is being used.
Close Risks
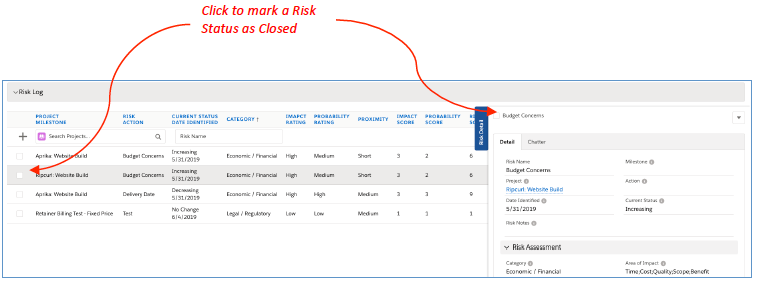
You can quickly mark a Risk’s Status as Closed by ticking the box on the left-hand side of the table, or at the top of the Risk Detail Tab.
View / Edit Risks
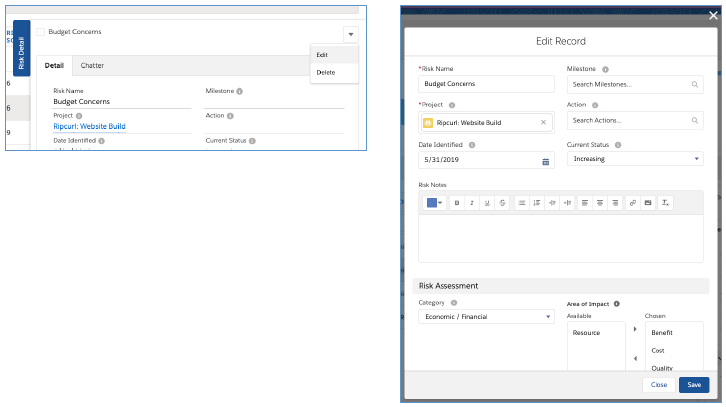
If you need to view further information relating to an individual Risk, you can click on to the Risk within the Risk Log table, and that will populate the ‘Risk Detail’ Tab on the right-hand side.
If you need to edit the record, you can select the drop-down arrow and click Edit, or you can double-click on the record within the table and the Risk Edit page will open, where you’ll be able to make changes and click Save.
Collaborate via Chatter
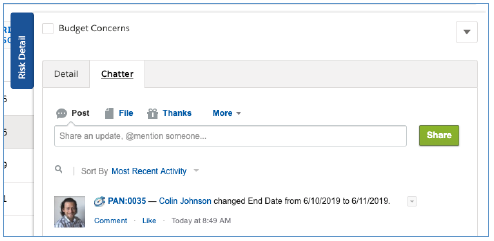
If you need to collaborate with colleagues on a Risk, you can click on the ‘Chatter’ tab within the Risk Detail section to access the Chatter Feed for the individual Risk.
Billing Event Enhancements
A number of enhancements have been added to the Billing Event feature set within Mission Control, including:
- Quarterly Periodic Billing
- Retainer / Fixed Fee Periodic Billing
- Auto-Add Date Range
Quarterly Periodic Billing
You will now have the ability to generate your periodic Billing Events on a quarterly basis.
Note: Existing Customers will need to manually add the ‘Quarterly’ value to the Project field ‘Periodic Billing Frequency’.
Retainer Periodic Billing
A new Billing Cycle has been added to the Billing Event functionality that will enable you to raise fixed fee periodic Billing Events. An ideal use case for this feature would be where you’re charging a customer a fixed fee on a retainer-based agreement.
Note: Existing Customers will need to manually add the ‘Retainer’ value to the Project field ‘Billing Cycle’.
To support this feature, a new field called ‘Retainer Amount’ has been added to the Project Object. This field will be used to identify the fixed fee value that will be invoiced every period.
The Retainer Billing Cycle can be used in conjunction with these Billing Type values:
- Fixed Price – in this scenario, a Billing Event will have one Billing Event Item, for the Retainer Amount.
- Fixed Price + Expenses – in this scenario, a Billing Event will have two Billing Event Items. One for the Retainer Amount, and another for any Expenses that are approved, but not yet invoice, that have been approved during the period.
An example of using this feature might be a Marketing Agency on an annual retainer with their customer, where they are charging a fixed fee of $10,000 per month. The fields on the Project would be set as follows:
| Field | Field Value |
| Billing Type | Fixed Price |
| Billing Cycle | Retainer |
| Periodic Billing Frequency | Monthly |
| Retainer Amount | 10,000 |
| Periodic Billing Next Date | 31/1/2019 |
Auto-Add Date Range
An enhancement has been included for the ‘Auto Add’ feature of manually creating a Billing Event. Previously if you manually created a Billing Event and ticked the ‘Auto Add Time Logs’ and/or ‘Auto Add Expenses’ checkbox fields, upon saving the Billing Event, Billing Event Items would be generated that captured all approved, but not yet invoiced Time Logs / Expenses.
To provide greater flexibility around which Time Logs / Expenses get included in the Billing Event Items, two new fields have been added to the Billing Event Object:
- Start Date
- End Date
If these fields contain values, Time Logs and / or Expenses will only be included in the Billing Event Items if the Approval Date falls within the Start Date and End Date values.
Note: Existing Customers will need to add these fields to the Billing Event Page Layout.
Opportunity Auto-generate Projects
You are now able to automatically generate a Project Plan (Project, Milestones, Actions, Checklist Items, Contributors and Dependencies) from an Opportunity. There are two methods for auto-generation of Projects, including:
- Opportunity
- Products
A number of Custom Fields have been included on the Opportunity and Product Objects, as outlined below:
| Opportunity | Product |
| Generation Method (Picklist)
Project Template (Lookup) Project Start Date (Date) Generate Project (Checkbox) |
Milestone Template (Lookup)
Project Unit (Picklist) |
Note: Existing Users will need to add these fields to the Opportunity and Product Page Layouts. A Permission Set called ‘Mission Control Opportunity & Product Fields’ is available so you can quickly provide Users with permission to access those fields.
Opportunity Method
The Opportunity ‘Generation Method’ provides you with the ability to clone and entire Project Plan based on the Project that is specified in the ‘Project Template’ field on the Opportunity.
This will clone the entire project plan exactly as it exists on the template, with the first Action in the Project being scheduled to occur on the ‘Project Start Date’, specified on the Opportunity.
Products Method
The Products ‘Generation Method’ provides you with the ability to build up a Project Plan based on the Products associated to the Opportunity.
The Project record will be cloned based on the ‘Project Template’ specified on the Opportunity. However, the rest of the project plan (e.g. Milestones, Actions, Checklist Items, Contributors and Dependencies) will be added only if the Product has been associated to a ‘Milestone Template’.
The Products ‘Generation Method’ will be useful for customers who sell their professional services as part of a larger sale. For example, imagine a software company is selling licenses and implementation support, they can have an Opportunity with multiple Opportunity Product lines. Only those that have a ‘Milestone Template’ specified on the parent Product record will be generated into the project plan.
The fields on the Product record allow you to specify whether or not a Product will require a Milestone, along with related Actions, Checklist Items, Contributors and Dependencies to be created.
You identify this by completing the following two fields on the Product record:
Milestone Template
The ‘Milestone Template’ field on the Product lets you reference a Milestone you’ve created on a Project Template. This is a filtered field that will only return Milestones associated to Projects where the ‘Template’ field is set to true.
Project Unit
The ‘Project Unit’ field on the Product lets you specify the unit of measure for calculating the total hours required on the Actions related to the Milestone. This is a Picklist field with values for ‘Day’ and ‘Hour’.
When using the Products ‘Generation Method’, the Project will be cloned from the Project specified as the ‘Project Template’ on the Opportunity. Each Opportunity Product that relates to a Product with a value in the ‘Milestone Template’ field will be cloned from that Milestone and the first Action within each cloned Milestone will be scheduled on the ‘Project Start Date’, specified on the Opportunity.
Using this Generation Method, the ‘Hours Scheduled – Billable’ and ‘Hours Scheduled – Non Billable’ fields on the Actions within the Milestone will be calculated as follows:
The Opportunity Product ‘Quantity’ and Product ‘Project Unit’ will be used to determine the number of ‘Hours Scheduled – Billable’ and ‘Hours Scheduled – Non Billable’ on each Action. The calculation will identify the total number of hours required for the Milestone by multiplying the Opportunity ‘Quantity’ by 1 if the Product ‘Project Unit’ is set to Hour or by the Custom Setting ‘Hours per Day’ (accessible from the Control Pad of the Mission Control Console), if the Product ‘Project Unit’ is set to Day.
The total hours for the Milestone will be divided across related Actions, retaining the percentage split between the Actions from the Milestone Template. The Table below illustrates an example of how these calculations work:
| Project Unit | Quantity | Total Hours | Template Milestone | New Milestone |
| Day | 3 | 24
(e.g. 3 * 8) |
Action A: 4 hours (50% of total)
Action B: 2 hours (25% of total) Action C: 1 hour (12.5% of total) Action D: 1 hour (12.5% of total) |
Action A: 12 hours
Action B: 6 hours Action C: 3 hours Action D: 3 hours |
| Hour | 4 | 4
(e.g. 4 * 1) |
Action A: 6 hours (66.6% of total)
Action B: 3 hours (33.3% of total) Action C: 3 hours |
Action A: 2 hours
Action B: 1 hour Action C: 1 hour |
Auto-Generation
To auto-generate a Project from the Opportunity, you need to set the ‘Generate Project’ field to true. This can be done manually, or via a Workflow Rule / Process Builder based on your own criteria, such as when the Stage is set to ‘Closed Won’.
To support this functionality, a new Checkbox field has been added to the Project object called ‘Template’. This will identify if the Project can be used as a template for cloning.
Only Projects with the Template field set to true will be able to be referenced in the ‘Project Template’ field on the Opportunity. The same applies to the ‘Project Clone’ tile on the Launch Pad of the Mission Control Console. If you wish to clone a Project that is not considered a template, you can still do so by going to the Project Detail page and clicking the ‘Clone’ button.
Note: Existing Customers will need to add this field to the Project Page Layout.
Opportunity Field Mapping
When auto-generating a Project, the following fields will be set by default:
| Project Field | Default Value |
| Project Name | Opportunity Name |
| Opportunity | Opportunity Id |
| Account | Opportunity > Account Id |
| Project Budget | Opportunity Amount |
| Archived | FALSE |
| Template | FALSE |
| Status | Planned |
Should you wish to override any of these default mappings, or if you would like to map additional fields from the Opportunity to fields on the Project, you can manage your own custom field mapping using the ‘Opportunity Field Mapping’ Tile on the Control Pad of the Mission Control Console, as shown below:
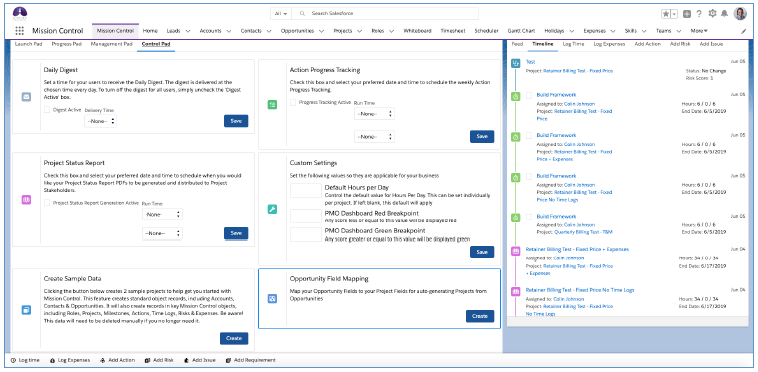
Clicking the ‘Create’ button will open up the Field Mapping component, as shown below:
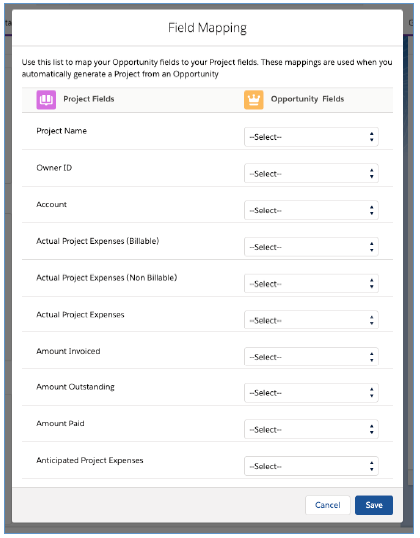
From here, you are able to map a Project field to an Opportunity field. This mapping will then ensure that the Opportunity field gets populated into the Project field as part of the auto-generation project.
Project Templates
Any Project that has the ‘Template’ field set to true, will be excluded from the following pages:
- Whiteboard
- Scheduler
- Timesheet
- Whiteboard Add Action
- Track Pad Time Logger
- Trad Pad Expense Logger
- Log Expenses
Minor Enhancements
A number of minor enhancements have been applied to various features within the solution as part of this release. Details of each minor enhancement are included below.
Security Updates
As part of the annual security review process we undertake with salesforce.com, a number of security updates have been included in this release. These updates ensure users have the relevant permissions for all data being queried or saved to the database via Visualforce pages and/or Lightning Components. In the event a user doesn’t have the correct level of access, they will receive an error message as follows:
‘You do not have the relevant access to {Access/Create/Update/Delete} sObject(Project/Milestone/Action etc.) records. Please review your Profile’s CRUD & FLS’
The error message should alert the user as to what caused the error and also which Object was trying to be accessed.
We recommend Sys Admins & Users that require full access to the Mission Control Application apply the ‘Mission Control Full’ permission set to avoid errors mentioned above. Instructions on how to assign the permission set can be found in our knowledge base. For Users that do not require full access, there is a range of additional Permission Sets available. We recommend you review the Permission Sets and test thoroughly in a Sandbox. Please refer to this Knowledge Article for further information on the various Mission Control Permission Sets:
https://knowledge-mc.aprika.com/s/article/Permission-Sets
Milestone ‘Type’ Field
A Picklist field called ‘Milestone Type’ has been added to the Milestone Object. This will enable you to classify your Milestones into a type / category. The ‘Milestone Type’ is a Picklist field that you can add your own option values to, and this will be available on all pages where you can add a Milestone, enabling you to specify the type for each Milestone.
Time Log ‘Type’ Field
A Picklist field called ‘Time Log Type’ has been added to the Time Log Object. This will enable you to classify your Time Log into a type / category. The ‘Time Log Type’ is a Picklist field that you can add your own option values to, and this will be available on all pages where you can add a Time Log, enabling you to specify the type for each Time Log.
Project Overview – Overview Tab
The Milestone section of the ‘Overview’ Tab on the Project Overview page has had the following fields included:
- Milestone Budget
- Milestone Deadline
- Milestone Type

Project ‘Hours Allocated’ Field
The ‘Hours Allocated’ field on the Project Object has been slightly modified to reflect the ‘Materials Cost Scheduled’ value. This value will be deducted from the Project Budget prior to calculate the hours allocated.
Install Script
To ensure all of your Roles have access to the Scheduler tab within the Project Overview, upon initial upgrade to this version, an Install Script will run as part of the upgrade that will set the following Role field to TRUE:
- View Scheduler Tab
You will then be able to adjust the settings for each Role as required.
New Field Overview
A number of new fields have been added to the solution as part of this release. We recommend you add these fields to your Page Layouts. If you are not using the Permission Sets included with Mission Control, we recommend you to check the Field Level Security for all of these fields to ensure all appropriate Profiles have the required access.
Role
| Field | Field Type | Comments |
| View Scheduler Tab | Checkbox | Identifies if the Role has the permission to view the Scheduler Tab on the Project Overview page |
| Project Overview Default Tab (Existing Field) | Picklist | Please add ‘Scheduler’ as a value to the Picklist field |
Opportunity
| Field | Field Type | Comments |
| Generation Method | Picklist | Identifies whether the Project will be generated from the Opportunity Project Template or the Product Milestones
Values: Opportunity; Products |
| Project Template | Lookup (Project) | Links to the Project that will be used as a Template when auto-generating a new Project from the Opportunity |
| Project Start Date | Date | Identifies the date that will be used for scheduling the Project |
| Generate Project | Checkbox | Set this field to TRUE to auto-generate the Project |
Product
| Field | Field Type | Comments |
| Milestone Template | Lookup (Milestone) | Links to the Milestone that will be used as a Template when auto-generating a new Project from the Opportunity |
| Project Unit | Picklist | Identifies the unit of measure for calculating the total hours required on the Actions required for this Product |
Project
| Field | Field Type | Comments |
| Generate Weekly Project Status Report | Checkbox | Identifies if a weekly Project Status Report PDF is generated for this Project |
| Billing Cycle (Existing) | Picklist | Please add ‘Retainer’ as a new value to the Picklist |
| Periodic Billing Frequency (Existing) | Picklist | Please add ‘Quarterly’ as a new value to the Picklist |
| Retainer Amount | Currency (16, 2) | Identifies the Fixed Fee that will be charged periodically |
| Template | Checkbox | Identifies if this Project is a Template. It will be excluded from Whiteboard, Scheduler, Timesheet, etc. |
Project Stakeholder
| Field | Field Type | Comments |
| Stakeholder ID | Auto Number | Auto-generated Id for the record (format: PSID:{000000} |
| Project | Lookup (Project) | Links to the Project this Stakeholder relates to |
| User | Lookup (User) | Links to the User this Stakeholder relates to |
| Contact | Lookup (Contact) | Links to the Contact this Stakeholder relates to |
| Role | Lookup (Role) | Links to the Role this Stakeholder relates to |
| Stakeholder Position | Picklist | Identifies the position of the Stakeholder
Values: Internal; Client; External |
| Add to Chatter Followers | Checkbox | Identifies if this Stakeholder (Users or Roles linked to Users Only) should be added as a Chatter Follower on the Project |
| Receives Project Status Report | Checkbox | Identifies if this Stakeholder receives a copy of the Project Status Report PDF |
| First Name | Formula | Identifies the First Name of the Stakeholder |
| Last Name | Formula | Identifies the Last Name of the Stakeholder |
| Formula | Identifies the Email of the Stakeholder |
Milestone
| Field | Field Type | Comments |
| Milestone Type | Picklist | Identifies the type of Milestone |
Action
| Field | Field Type | Comments |
| Scheduled Hours Breakdown | Long Text (131,072) | Stores the JSON of the breakdown of scheduled hours for the Action Owner and Contributors for this Action |
Time Log
| Field | Field Type | Comments |
| Time Log Type | Picklist | Identifies the type of Time Log |
Team Assignment
| Field | Field Type | Comments |
| Master Team | Checkbox | Identifies whether this Team is the Master Team for this Role |
Billing Event
| Field | Field Type | Comments |
| Start Date | Date | Identifies the Start Date for Auto-Adding Time Logs and Expenses Manually |
| End Date | Date | Identifies the End Date for Auto-Adding Time Logs and Expenses Manually |
Holiday
| Field | Field Type | Comments |
| Start Time | Time | Identifies the Start Time of the Holiday |
| End Time | Time | Identifies the End Date of the Holiday |
New Validation Rules
A number of new Validation Rules have been added to the solution as part of this release. We recommend you review them to familiarise yourself with their intended purpose and deactivate if you do not require them.
| Object | VR Name | Overview |
| Project Stakeholder | Populate_Related_Field | Ensures you only populate one of the User, Contact or Role fields |
| Project | Retainer_Billing_Cycle_Required_Fields | Ensures you populate required fields if Billing Cycle = Retainer |
| Project | Retainer_Cannot_Be_Used_with_T_and_M | Ensures you don’t set Billing Type to Time & Materials if Billing Cycle = Retainer |
| Opportunity | Ensure_Project_Start_Date | Ensures Project Start Date contains a value if Generate Project = TRUE |
| Opportunity | Ensure_Project_Template_Specified | Ensures Project Template field contains a value if Generation Method contains a value |
How do I upgrade?
Mission Control will be made available based on the following release schedule.
7th June 2019 – Available for manual upgrade from the AppExchange
15th June 2019 – Automatic upgrade to all Sandbox Orgs
22nd June 2019 – Automatic upgrade to all Production Orgs
To manually upgrade to the new version of Mission Control in your organisation, please follow the steps below:
- Click aprika.com/mc-app
- Click the ‘Get it Now’ button
- Enter your login details (if required)
- Click ‘Install in Production’
- Click ‘Confirm and Install’ (you may need to login again at this stage)
- Select which users you want to install for (‘Install for All Users’ is recommended)
- Click ‘Upgrade’
- Click Next (on step 1. Approve Package API Access)
- Select who you want to grant access to (on Step 2. Choose Security Level)
- Click Next
- Click Install
- Add new fields to the page layouts as required.
What’s New Webinar
We have pre-recorded the ‘What’s New’ webinar to provide further information on how to get the best out of the new features. To access this webinar, please view the ‘Release Notes’ section of the Mission Control Support Centre – www.aprika.com/missioncontrol/release-notes
Feedback
Some of the new features included in this release of Mission Control have come from ideas submitted from existing clients. If you have an idea for enhancing Mission Control, you can submit it via email to [email protected].
Questions?
If you have any questions regarding this release notification, please do not hesitate to contact us at [email protected].
