Mission Control – Version 1.52 Release Notification
31 October 2019
A new version of Mission Control (version 1.52) will be released on the AppExchange on Friday 1st November 2019. This notification has been issued to existing Mission Control users. It contains an overview of the new features available with this release, along with instructions on how to upgrade to the new version.
What’s New?
This release includes a number of new features, along with some enhancements to existing functionality, including:
Let’s get stuck in to the detail…
Resource Re-assignment Wizard
The ‘Resource Re-assignment Wizard’ enables you to quickly re-assign ownership from one Role to another within a Project.
Below is an example of the Resource Re-assignment Wizard:
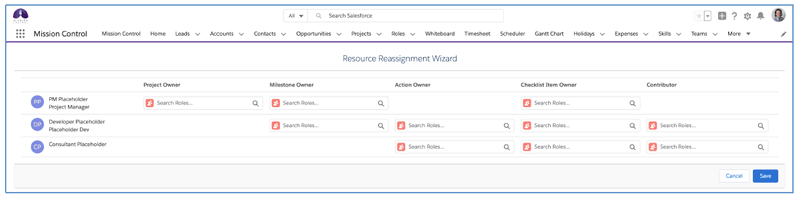
The page lists all Role records with involvement in the Project. Involvement is defined by being at least one of the following:
The Roles are listed alphabetically by First Name. For each instance where the Role has involvement in the Project, as outlined above, a Lookup field is displayed. These Lookup fields enable you to transfer the ownership of record(s) of that type to another Role.
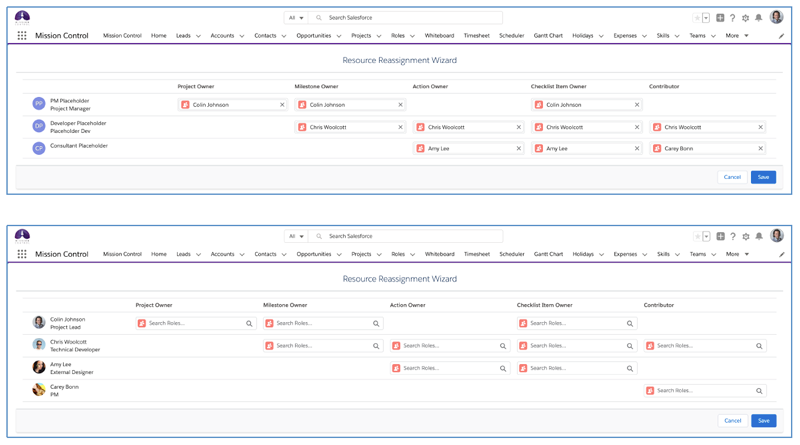
For example, looking at the wireframe above, Colin is a Project Owner, also owns some Milestones and Checklist Items. Therefore, those Lookup fields are visible, but as he doesn’t own any Actions, and isn’t a Contributor on any Actions, those fields are not visible.
Some example use cases for the Resource Re-assignment Wizard would include:
You access the Resource Re-assignment Wizard from the Project Page, by clicking the ‘Reassignment’ button as shown below.
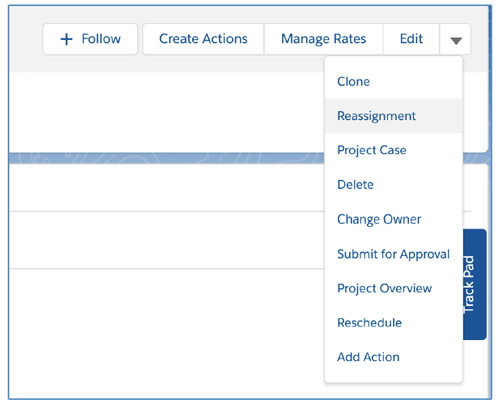
Note: You will need to add this Custom Button/Action to your Project Page Layout.
Gantt Chart Enhancements
A number of new enhancements have been added to the Gantt Chart, as outlined below.
Persistent Collapse / Expand Setting
When collapsing or expanding Milestones and Actions on the Gantt Chart, your preference will be persistently remembered between visits to the Gantt Chart. For example, if you collapse the Actions so they are not visible, that preference will be remembered the next time you visit the Gantt Chart.
These preferences are User specific and will be applied across all Projects and all pages where you view the Gantt Chart.
Custom Field Enhancement
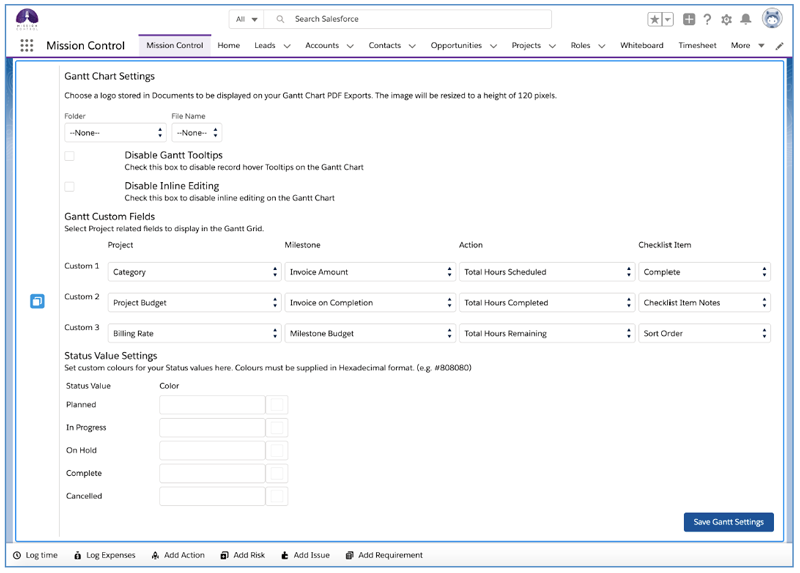
Previously you were able to add 3 x Custom Fields to the Gantt Chart at the Action level. This feature has been enhanced to allow you to also select 3 x Custom Fields at the Project, Milestone and Checklist Item level.
As illustrated by the screenshot below, the Custom Fields for all four Objects (e.g. Project, Milestone, Action and Checklist Item) are specified within the Gantt Chart settings on the Control Pad of the Mission Control Console.
These settings are org-wide and will apply to all Users. After you’ve specified the Custom Fields you want to display on the Gantt Chart, you will also need to click the ![]() icon on the Gantt Chart and select the Custom Fields to be visible, as illustrated below.
icon on the Gantt Chart and select the Custom Fields to be visible, as illustrated below.

Gantt Anywhere
The Gantt Chart Lightning Component has been enhanced to support being added to the Page Layout of any parent Object that a Project relates to. For example, out of the box the Project Object has Lookup fields to the Account, Contact, Opportunity and Program Objects. Therefore, you will be able to add the ‘LightningGantt’ Lightning Component to the Page Layout of any of these Objects, and it will display all related Projects. Setting a component height of approximately 1000 is recommended. Below is an example of the Gantt Chart being added to the Opportunity Page Layout.
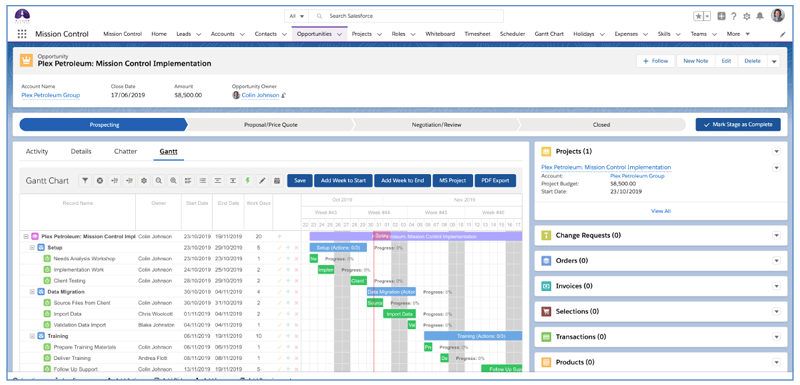
If you have created your own Custom Lookup Fields to other Objects, you will also be able to add the Lightning Component to the Page Layout for those Objects.
Note: This feature is only available in Lightning Experience.
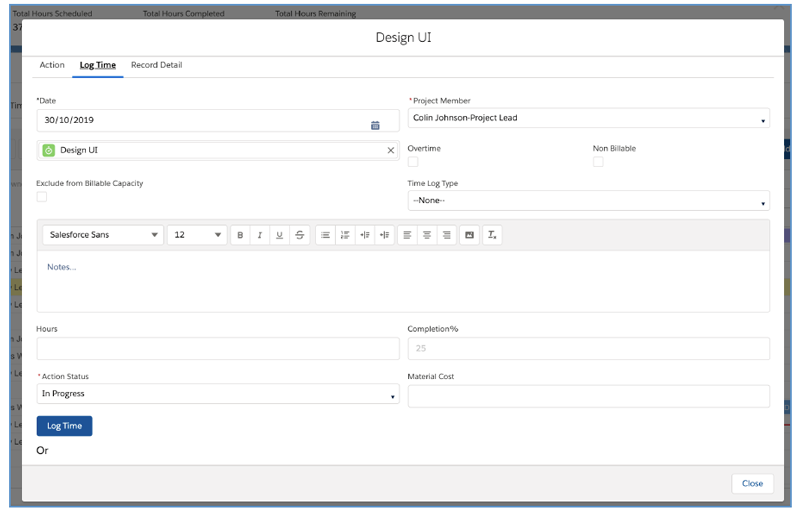
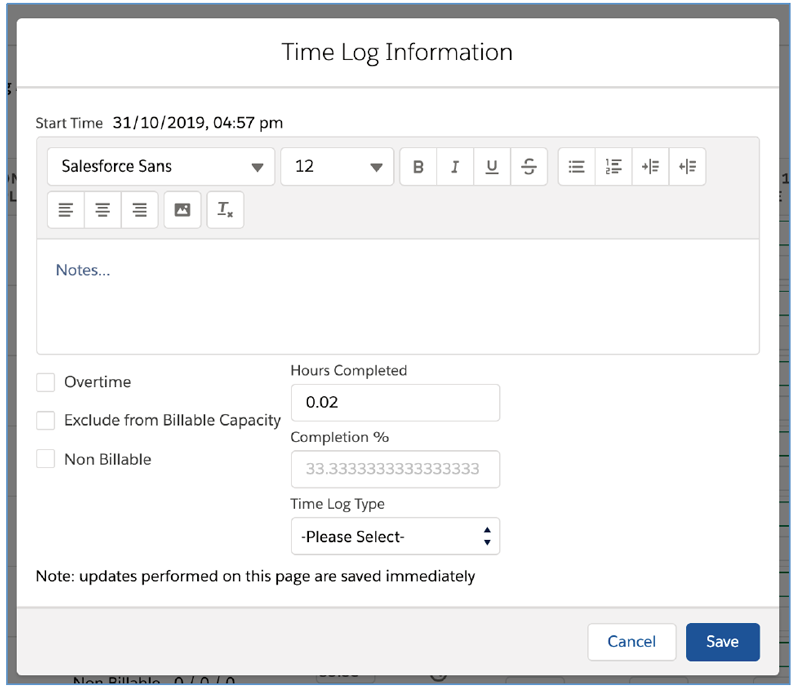
Log Time from Gantt Chart
You can log time against any Action directly from the Gantt Chart. To do so, open the Action Modal Component, which can be done by clicking the ![]() icon, or by double-clicking on the bar for that Action within the Gantt Chart.
icon, or by double-clicking on the bar for that Action within the Gantt Chart.
Click the ‘Log Time’ Tab and then complete the relevant fields and click the Log Time button, as shown below.
Floating Header
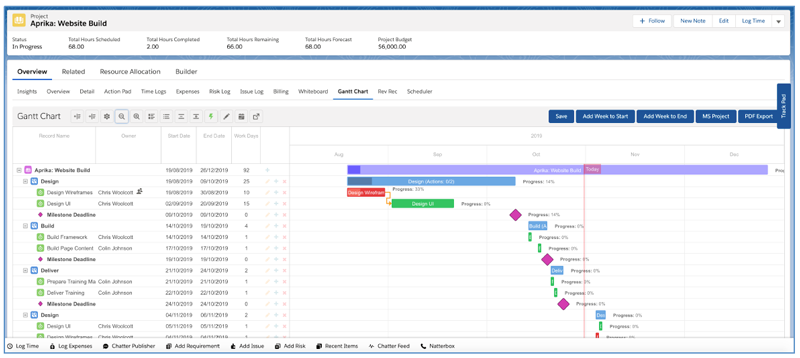
To provide an improved User experience when scrolling on larger projects, the Timeline Header now floats at the top of the Gantt Chart, so no matter how far you scroll down, the Timeline will remain visible.
Jump to Today
A new button has been added to the Gantt Chart buttons enabling you to ‘Jump to Today’. By default, a Project’s Gantt Chart will load showing the first day of the Project. For larger projects, to avoid scrolling to the right to get to the current point in the Project, you will now be able to click the ![]() button, which will automatically move the Gantt Chart to show today within the timeline.
button, which will automatically move the Gantt Chart to show today within the timeline.
Timeframe Scale Enhancement
The existing ‘Zoom In’ and ‘Zoom Out’ buttons have been enhanced to provide greater zooming capability. Previously, they retained the same scale, and made the columns wider or narrower. These buttons will now enable you to zoom the scale from days to weeks to months to years. This will enable you to zoom out and see a larger duration without needing to endlessly scroll. Below are some examples of the various scale views.
Day Scale
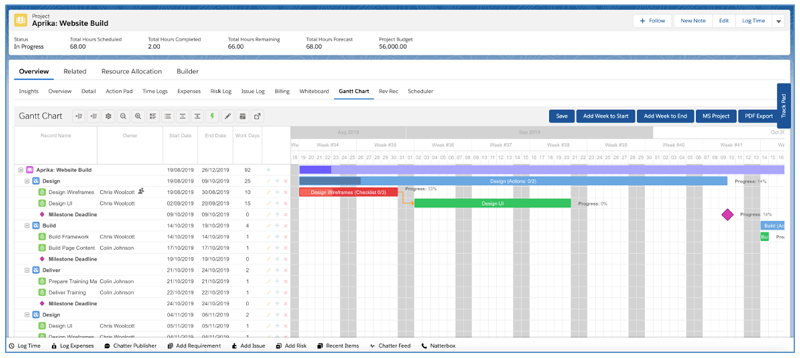
Week Scale
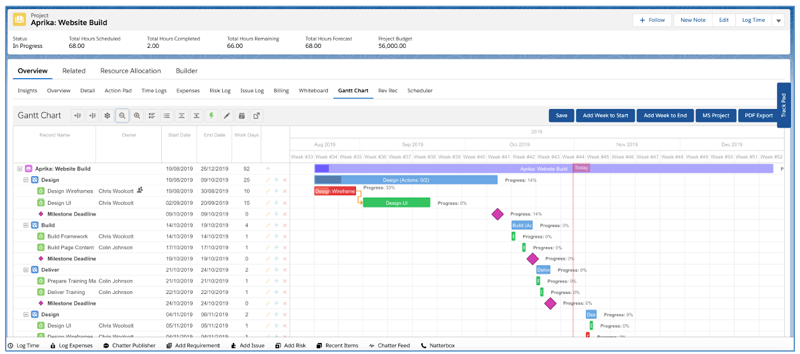
Month Scale
Year Scale
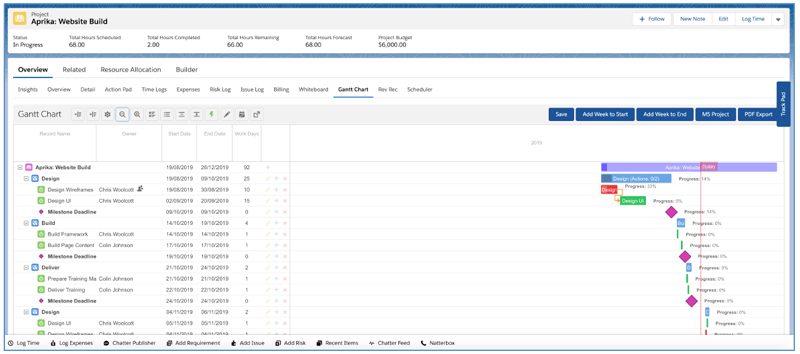
Note: It is recommended to be on the days scale when rescheduling Actions for more precise rescheduling.
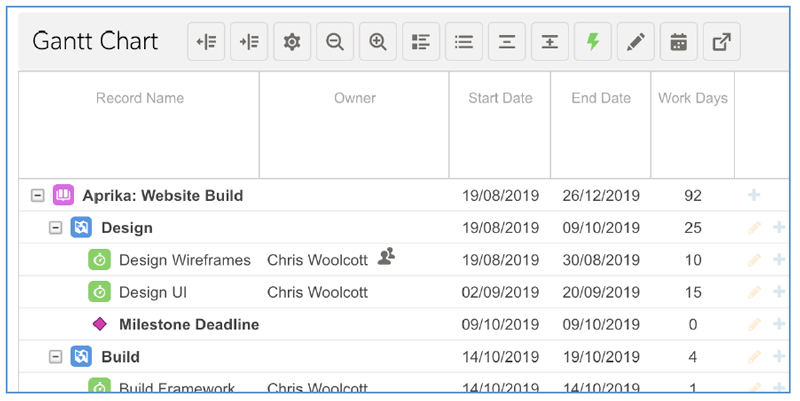
Identify Actions with Contributors
To quickly identify if an Action has Contributors assigned to it, the ![]() icon will be displayed next to the Action Owner, as shown below.
icon will be displayed next to the Action Owner, as shown below.
To view the details of those Contributors, open the Action Modal Component, which can be done by clicking the ![]() icon, or by double-clicking on the bar for that Action within the Gantt Chart, and then hover over the Contributors icon, as shown below.
icon, or by double-clicking on the bar for that Action within the Gantt Chart, and then hover over the Contributors icon, as shown below.

Record Sorting Enhancement
You can now drag and drop records within the Gantt Chart Data Table to adjust the ‘Sort Order’ field. To adjust the sort order, click and drag a record (e.g. Milestone, Action or Checklist Item) and drop it to the new location. Below is an illustration of the ‘Client Approval’ Action being moved to appear above the ‘Design UI’ Action.
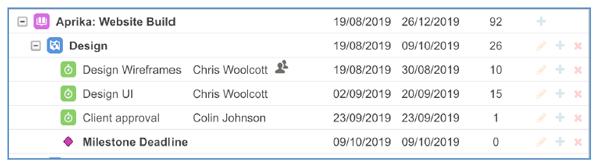
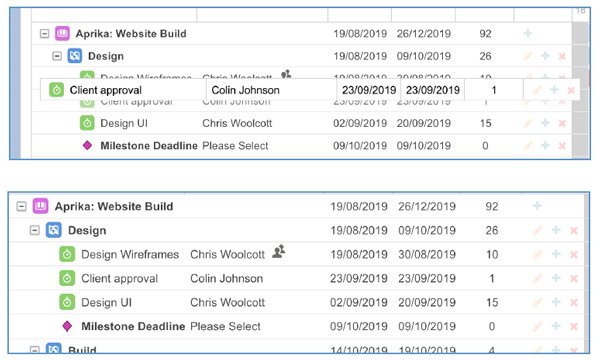
Once you have adjusted the sort order as required, please click the Save button on the Gantt Chart.
Note: This drag and drop functionality can also be used to re-parent child records from one parent to another (e.g. you can change an Action from relating to one Milestone and relate it to another.
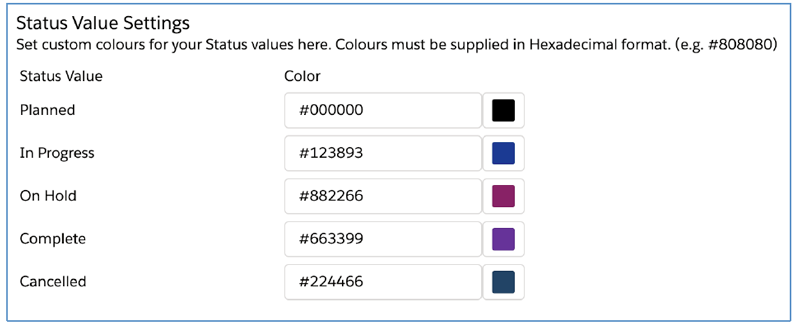
Custom Action Colours based on Status
By default, Actions are coloured Green on the Gantt Chart. If the Priority is set to High, the Action will be coloured Red, and if the Priority is Medium, it will be coloured Amber. You can now specify your own colours based on the Action Status field, which will override the default settings of the Gantt Chart.
You set the colours based on Action Status from the Gantt Chart Settings section of the Control Pad on the Mission Control Console. Below is an example where each Status has been provided it’s own Hex Colour Code.
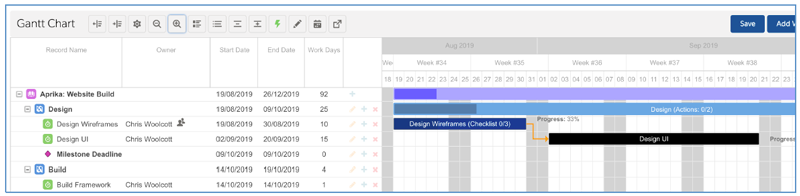
Once these settings have been saved, the Action bars on the Gantt Chart will be displayed with those colours, as illustrated below.
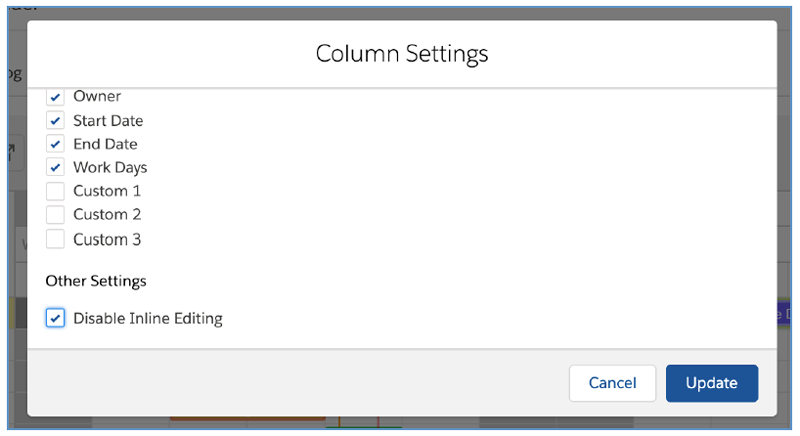
Hide Inline Edit Feature
If you prefer not to us the ‘Inline Edit’ feature on the Gantt Chart, you’re now able to disable that from within the Gantt Chart settings. This can be done centrally for all Users within the Gantt Chart Settings section of the Control Pad on the Mission Control Console, or at an individual User level within the settings section of the Gantt Chart, which you can access by clicking the ![]() button.
button.
Horizontal Scroll Enhancement
When viewing a Project on the Gantt Chart with a long duration, you may need to scroll to the left/right. For trackpad users, you’ve always been able to simply swipe left/right, but mouse users were required to scroll to the bottom of the Gantt Chart to access the horizontal scroll bar, then once in the correct position, scroll back up to the position they want to view. The horizontal scroll is now available by clicking + holding your mouse button or trackpad and dragging left/right.
Apply Multiple Filters
The Standalone Gantt Chart can now have multiple filters applied to provide you with greater ability to find the required Projects. To apply multiple filters, ensure you have ticked the ‘Apply Multiple Filters’ Checkbox at the top of the Filter Modal, as shown below.
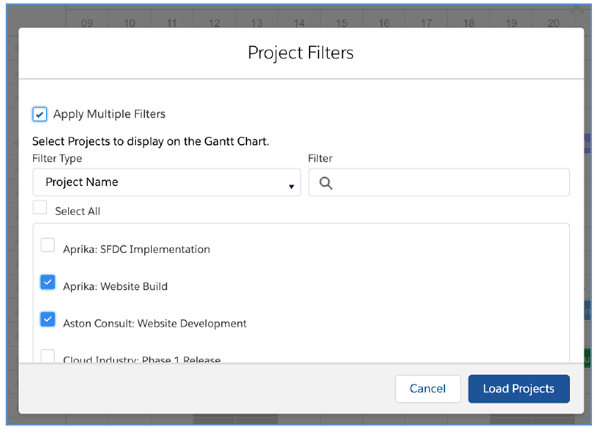
You will be able to select options from one Filter Type, then move to another Filter Type and make additional selections.
Note: The Persistent Filter setting does not support multiple filters. Therefore, if you applied multiple filters, the next time you return to the Standalone Gantt Chart, you will be required to enter your filters again.
Jump to Standalone Gantt Chart
When viewing the Gantt Chart tab of the Project Overview page, you can quickly open the Project in the Standalone Gantt Chart page by clicking the ![]() on the Gantt Chart.
on the Gantt Chart.
This will open the page, pre-filtered to display the chosen Project. This will be beneficial if you’re working on a larger project, and wish to have a larger portion of the screen to view the Gantt Chart.
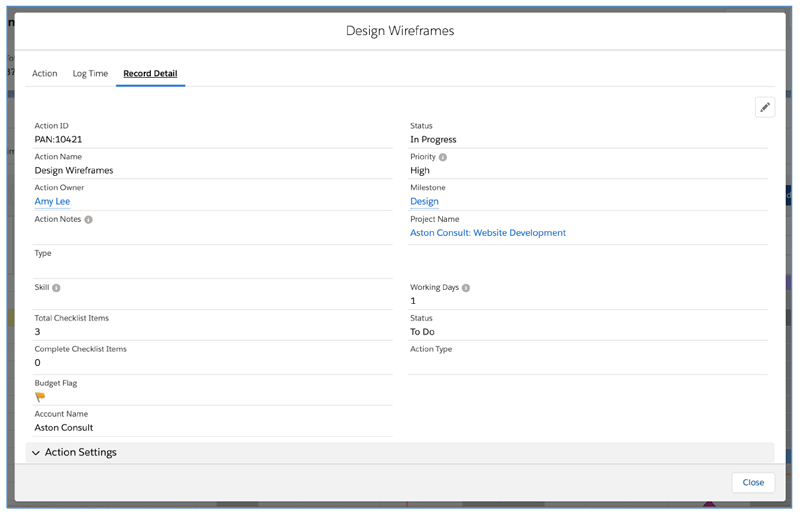
View / Edit full Record from Gantt Chart
You are now able to access the full record page for the Project, Milestone, Action and Checklist Item within the Gantt Chart Modal Window. This provides you with the ability to access all fields for the record, including any Custom Fields you have added.
To do so, open the record Modal Component, which can be done by clicking the ![]() icon, or by double-clicking on the bar for that Action within the Gantt Chart.
icon, or by double-clicking on the bar for that Action within the Gantt Chart.
Click the ‘Record Detail’ Tab and from there, you will be able to edit the record as required.
Dependency Enforcement
With the introduction of multiple dependencies, the legacy Validation Rule that prevented child Actions from starting if the parent Action is not yet complete ceased working. Dependency enforcement logic has been added in for both Start to Start and Finish to Start dependencies. This logic is controlled by a new field on the Project Object called ‘Enforce Dependency Validation’. If this field is set to TRUE, the following logic will be applied:
If the field is set to TRUE and the parent records fall outside of this criteria, the User will receive an on-screen notification advising why the child Action is unable to be progressed.
Expenses Enhancement
New fields have been added to the Expense Object enabling Users to record the ‘Tax Amount’ of the Expense. The ‘Amount’ field has always been deemed to be the total amount of the expense, and that will continue to be the case. The new fields are:
These new fields have been added to all Expense components. However, you will need to manually add them to the Expense Page Layout.
Relative Date Filters
To enable Users to have a flexible date range added to the Custom Filters they create for the Whiteboard and/or Action Pad, the existing date fields have been enhanced to provide the ability to toggle from a specified date to a ‘Relative Date’.
On the Action Pad or Whiteboard, click the Filter icon, scroll to the date filters and click the ‘Use Relative Date’ link. This will toggle off the calendar date picker and replace it with a text field where you can enter the required Relative Date Filter. See example below:

Below the ‘Use Relative Date’ link has been clicked for the ‘Actions Starting’ filter and the User is now able to enter a Relative Date Filter.
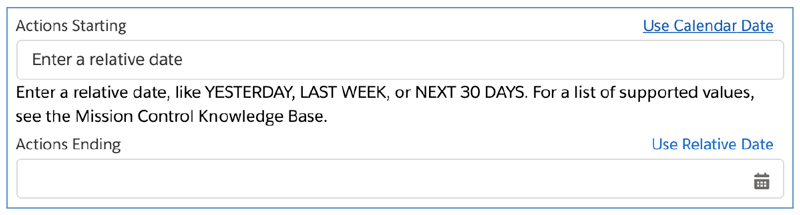
For a full list of supported filters, please refer to this Knowledge Article:
Minor Enhancements
A number of minor enhancements have been applied to various features within the solution as part of this release. Details of each minor enhancement are included below.
Timesheet Start / Stop Tracker
When using the Time Log Start/Stop feature, you will now see the Start Time when you click to stop the Timer, as shown below:
Program Planner
The Program Planner previously had the ‘Backlog’ and ‘Priority Backlog’ columns fixed on the page, regardless of whether or not they were active values in the Requirement ‘Status’ Picklist field. Therefore, if a customer removed these values from the Picklist field, they would still remain on the Program Planner.
These two values will now only be visible on the Program Planner if they are active Picklist values. If they are active, they will always appear in the first two columns of the Program Planner, all other Picklist values will be placed in order based on their order within the Picklist field.
Project Builder
New fields have been added to the Action Object that will automatically be populated with the contents from the same fields on the Requirement, when the Requirement is being converted to an Action on the Project Builder. These new fields are:
Note: You will need to add these fields to your Action page layout.
Billing Event Item
To reduce manual administration, if you now delete a Billing Event Item that has Time Logs or Expenses related to it, the ‘Invoiced’ Checkbox field on those related records will be reset to FALSE. This will enable them to be included in a future Billing Event, without having to manually set that field to FALSE.
New Field Overview
A number of new fields have been added to the solution as part of this release. We recommend you add these fields to your Page Layouts. If you are not using the Permission Sets included with Mission Control, we recommend you to check the Field Level Security for all of these fields to ensure all appropriate Profiles have the required access.
Expense
| Field | Field Type | Comments |
| Tax Amount | Currency (16, 2) | Identifies the Tax Amount of the Expense |
| ex-Tax Amount | Formula (Currency, 16, 2) | Formula: Calculates the ex-Tax Amount based on ‘Amount’ – ‘Tax Amount’ |
| Converted Tax Amount | Number (16, 2) | If the Project currency is different from the Expense currency, this field will contain the converted Tax Amount value |
| Converted ex-Tax Amount | Number (16, 2) | If the Project currency is different from the Expense currency, this field will contain the converted ex-Tax Amount value |
| Source | Picklist | Identifies the payment source used to pay for this Expense.
Values: Credit Card – Personal; Credit Card – Company; Cash; Purchase Order |
Action
| Field | Field Type | Comments |
| Paint Points | Rich Text Area | Detailed notes on the current pain point that is driving this Action |
| Recommendations | Rich Text Area | Detailed notes on the recommended solution |
| Benefit | Rich Text Area | Detailed notes on the benefits that will be gained by delivering this Action |
Project
| Field | Field Type | Comments |
| Enforce Dependency Validation | Checkbox | Dependency Trigger Logic will only be executed if this Field is TRUE |
How do I upgrade?
Mission Control will be made available based on the following release schedule.
1st November 2019 – Available for manual upgrade from the AppExchange
9th November 2019 – Automatic upgrade to all Sandbox Orgs
16th November 2019 – Automatic upgrade to all Production Orgs
To manually upgrade to the new version of Mission Control in your organisation, please follow the steps below:
What’s New Webinar
We have pre-recorded the ‘What’s New’ webinar to provide further information on how to get the best out of the new features. To access this webinar, please view the ‘Release Notes’ section of the Mission Control Support Centre – www.aprika.com/mc-support
Feedback
Some of the new features included in this release of Mission Control have come from ideas submitted from existing clients. If you have an idea for enhancing Mission Control, you can submit it via email to [email protected].
Questions?
If you have any questions regarding this release notification, please do not hesitate to contact us at [email protected].
