Mission Control – Version 1.55 Release Notification
28 August 2020
A new version of Mission Control (version 1.55) will be released on the AppExchange on Friday 28th August 2020. This notification has been issued to existing Mission Control users. It contains an overview of the new features available with this release, along with instructions on how to upgrade to the new version.
What’s New?
This release includes a number of new features, along with some enhancements to existing functionality, including:
Let’s get stuck into the detail…
Meeting Manager
The ‘Meeting Manager’ is an awesome new feature that enables you to collaborate as a team, keeping you on top of all the discussions across your projects. This new feature comprises of the following components:
Please refer to the ‘New Field Overview’ section of these Release Notes to see further detail on these Custom Objects.
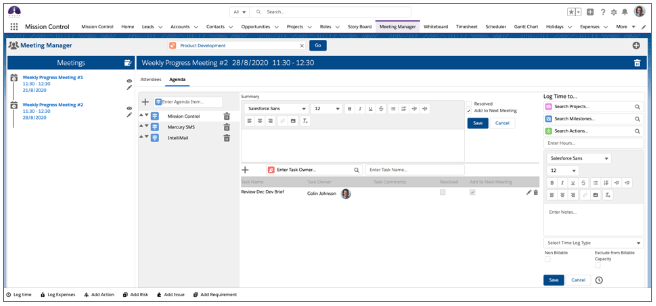
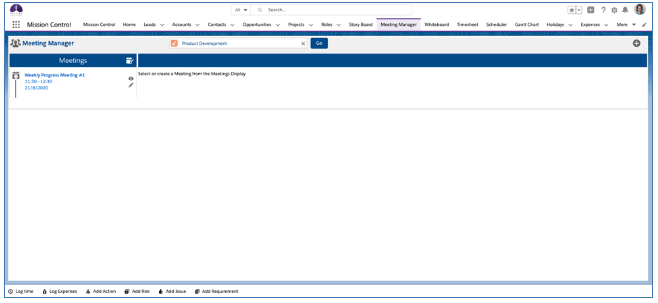
The ‘Meeting Manager’ lets you keep a track of your progress meetings. Whether that’s project specific, program specific or as a team, across number pieces of work, you’ll be able to record the meetings, who attended, what was discussed, what was resolved and what is still outstanding. You’re also able to effortlessly log time on behalf of all attendees.
Below is an illustration of the Meeting Manager.
Create a new Meeting Manager
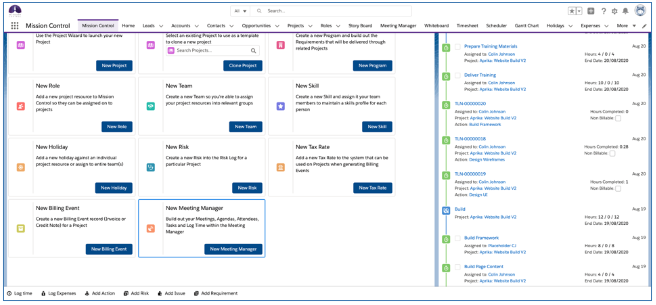
To create a new Meeting Manager, go to the Launch Pad on the Mission Control Console and click the ‘New Meeting Manager’ button within the New Meeting Manager Tile, as shown below.
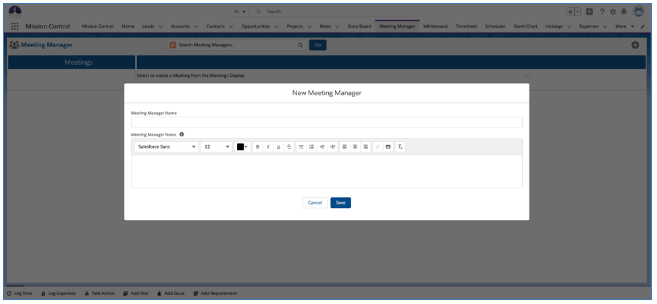
The Meeting Manager will open, and you will be required to enter a Meeting Manager Name, then click the Save button.
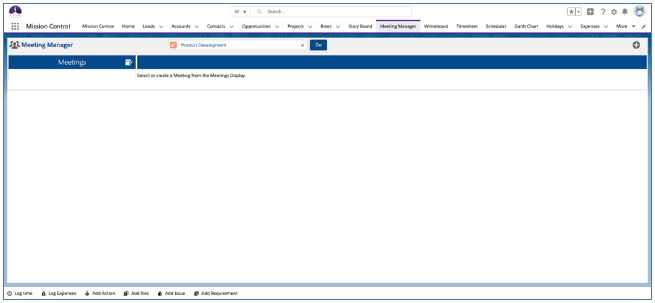
The new Meeting Manager will then be ready to start planning your meetings, as shown below.
Accessing the Meeting Manager
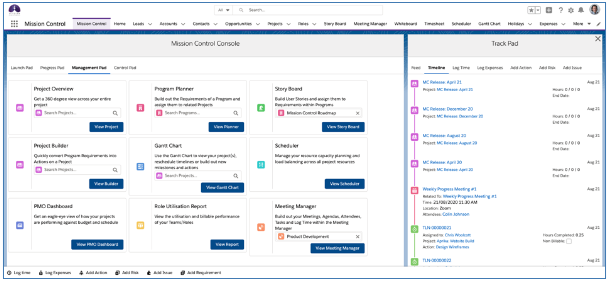
To load the Meeting Manager page for an existing Meeting Manager, go to the Management Pad on the Mission Control Console, and within the Meeting Manager tile, search for the required Meeting Manager, and click the ‘View Meeting Manager’ button.

Creating a Meeting
To create a new Meeting within the Meeting Manager, click the new meeting icon ![]() . This will open the New Meeting modal where you will be able to create a new Meeting from scratch, or load from an existing meeting.
. This will open the New Meeting modal where you will be able to create a new Meeting from scratch, or load from an existing meeting.
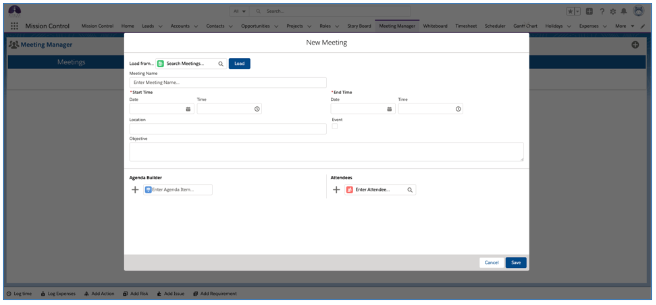
Create a new Meeting
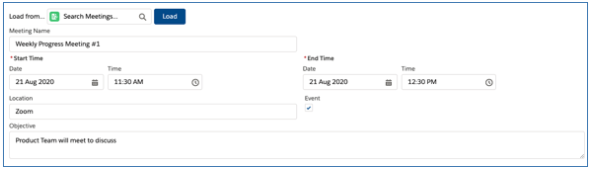
To create a new Meeting from scratch, you will need to enter values into the key fields, including:
Note: If you set the Event field to true, this will create a Salesforce Event record, and all Roles that are linked to User records, that are marked as Attendees will be added to this Event.
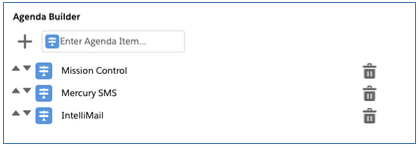
Next, you will need to add your Agenda Items, which can be done within the Agenda Builder section. To add an Agenda Item, enter the description of the Agenda Item and either click the + icon, or hit enter, and that Agenda Item will be added, as shown below:
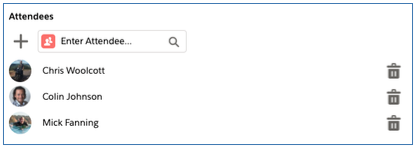
Next, you will need to add your Attendees – these are Roles within Mission Control. They can be added by searching for their name within the Enter Attendees field. Once you’ve found the required Role record, click the + icon to add them as an Attendees, as shown below:
Once you’ve entered the Meeting information, Agenda Items and Attendees, you will need to click Save.
The Meeting will then appear in the Meetings section of the Meeting Manager, as shown below:
Load from existing Meeting
Instead of creating a new Meeting from scratch every time, you can use the ‘Load from…’ feature, which lets you copy over the Meeting, Attendees along with Agenda Items and Agenda Tasks that are marked as ‘Add to Next Meeting’.
When creating a new Meeting, search for the existing Meeting in the ‘Load from…’ field, and click the Load button.

This will load in the previous Meeting information, allowing you to make changes. Once you’ve made the necessary changes, you can click Save and the new Meeting will be added to the Meetings section of the Meeting Manager.
Managing a Meeting
Within a Meeting, you’re able to perform a number of different actions, including:
To view the details of a Meeting, click the ![]() icon for the required Meeting within the Meetings timeline. This will load the Meeting into the main section of the Meeting Manager, as shown below:
icon for the required Meeting within the Meetings timeline. This will load the Meeting into the main section of the Meeting Manager, as shown below:
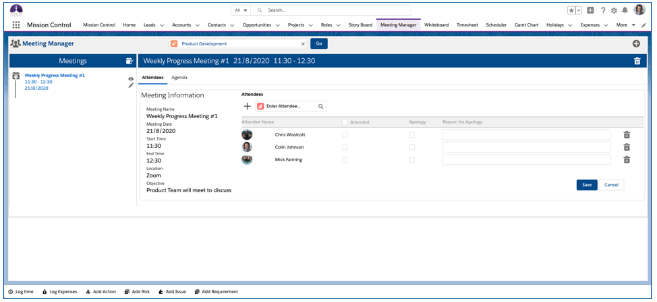
Within the Meeting, there are two Tabs for Attendees and Agenda.
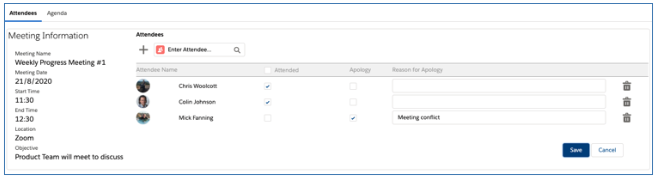
Attendees Tab
The Attendees section provides details of the Meeting, along with the Attendees. From here, you’re able to:
Agenda Tab
Once you’ve updated the Attendees, you can switch over to the Agenda Tab to begin the Meeting. Within this section, you’re able to:
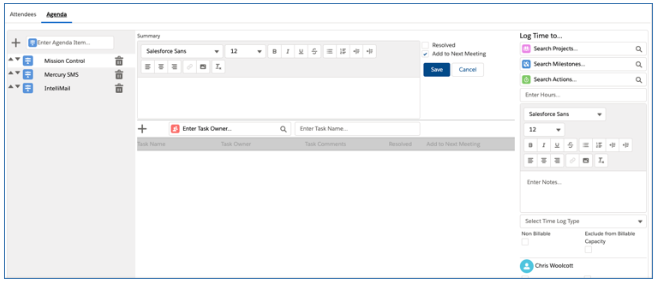
By default the ‘Add to Next Meeting’ checkbox is set to true. Any Agenda Item or Agenda Task that has this field as true will be included in the next Meeting when created via the ‘Load from’ feature. If you have resolved an Agenda Item, you will need to set the Add to Next Meeting checkbox to false and check the Resolved checkbox to true. Resolved Agenda Items and Agenda Tasks will not be included in the next Meeting.
Creating Agenda Tasks
To create an Agenda Task against an Agenda Item, enter a Task Owner and a Task Name and click the + icon, or hit enter. The Agenda Task will then be added to the Task List, as shown below:

Once an Agenda Task is created, you are able to edit to add notes/comments. By default the ‘Add to Next Meeting’ checkbox will be set to true. If an Agenda Task has been resolved and you do not wish it to be included in the next Meeting, you will need to edit the Agenda Task and set the Resolved checkbox to true.
Logging Time
A great productivity boosting feature of the Meeting Manager is the ability to log time for all Attendees. Within each Agenda Item, located on the right-hand-side is the Time Logger. From here, you’re able to select the Action that you wish to log time against when discussing this specific Agenda Item.
Within the Time Logger, you select the Project, Milestone & Action, and you have the option to manually enter the time, or click the clock to use the start/stop time tracking function.
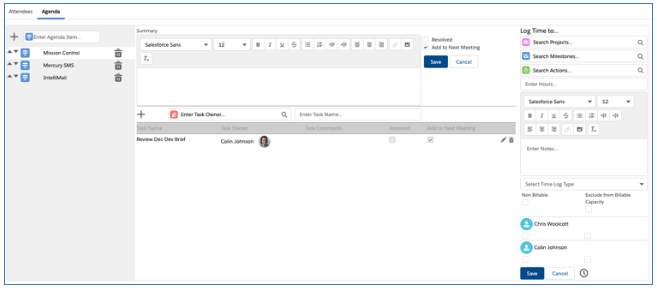
When entering time, a Time Log will be created for each Attendee. For example, if you enter 0.25 hours, and there are 4 Attendees, 4 individual Time Logs for 0.25 hours will be created. For each individual Attendee, you can mark the time to be Non Billable and/or Excluded from Billable Capacity.
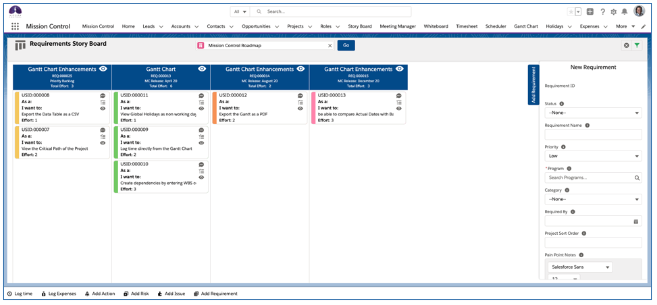
Story Board
The Story Board provides you with a Kanban interface to manage the User Stories related to Requirements, within context of a particular Program.
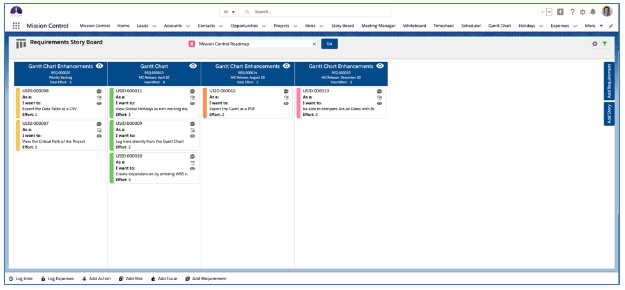
You’re able to use the Story Board to:
To access the Story Board, you go to the Management Pad of the Mission Control Console, and within the Story Board tile, search and select the required Program and click the ‘View Story Board’ button.
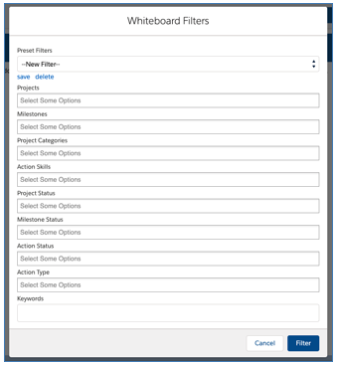
When you initially load the Story Board, you will be required to apply a Filter, to load in the Requirements & User Stories.
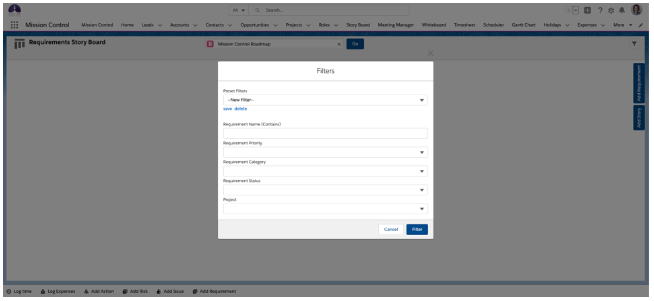
You are able to apply filters on a variety of fields, including:
You can save Filters and they will be available within the ‘Preset Filters’ section.
Note: When you switch from one Program to another, Preset Filters will persist, but manually applied filters will be removed and you will be presented with the Filters modal again.
Creating new Requirements
On the right-hand-side of the Story Board, there is an ‘Add Requirement’ Tab. Clicking this Tab will expand the tab and you will be able to enter the required information for the new Requirement record. Once saved, the Requirement will be visible on the Story Board.
Note: This Tab displays the standard Requirement Page Layout.
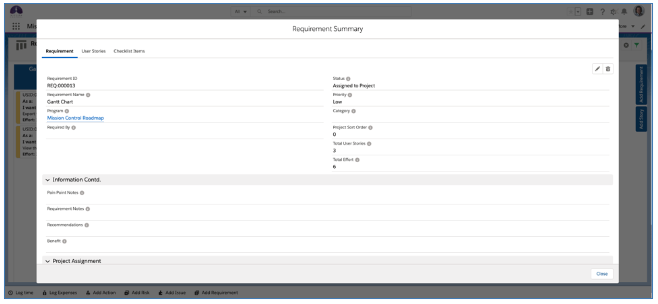
Editing / Deleting Requirements
You are able to open the Requirements modal by clicking the ![]() icon within the Requirement column header.
icon within the Requirement column header.

From this modal, you are able to edit the Requirement, delete the Requirement, manage User Stories and Checklist Items.
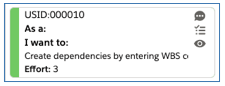
Creating new User Stories
On the right-hand-side of the Story Board, there is an ‘Add Story’ Tab. Clicking this Tab will expand the tab and you will be able to enter the required information for the new User Story record. Once saved, the User Story will be visible on the Story Board within the applicable Requirement column.
Note: This Tab displays the standard User Story Page Layout.

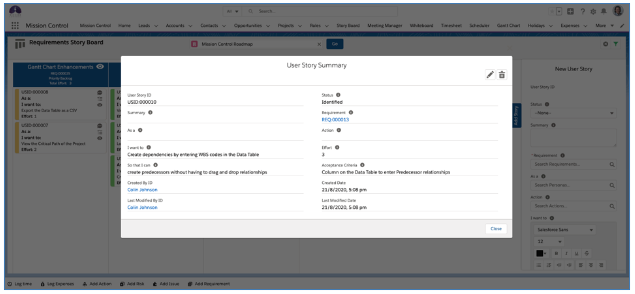
Editing / Deleting User Stories
You are able to open the User Story modal by clicking the ![]() icon within the User Story Card.
icon within the User Story Card.
From this modal, you are able to edit the User Story or delete the User Story.
Chatter Collaboration
You can access the Chatter feed for the User Story record by clicking on the ![]() icon within the User Story card.
icon within the User Story card.
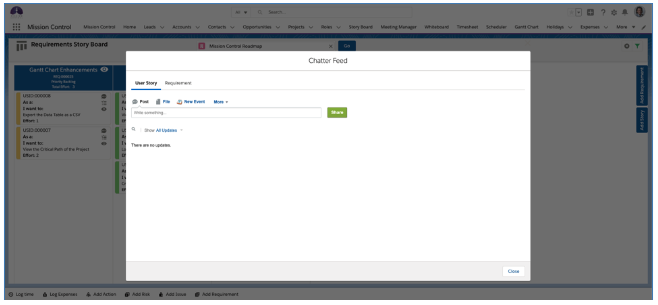
From this modal, you are able to collaborate on the User Story or Requirement Chatter feed.
Creating Checklist Items
You can access the Checklist Item Manager by clicking the ![]() icon within the User Story card.
icon within the User Story card.
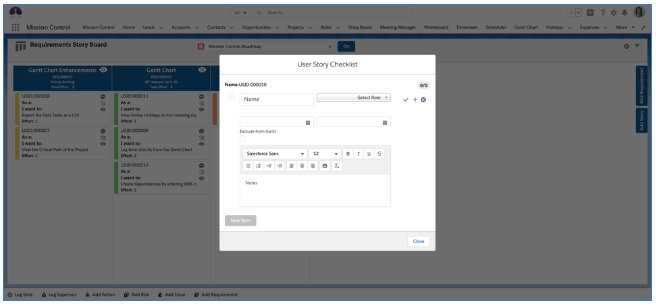
From this modal, you are able to create Checklist Items related to the User Story.
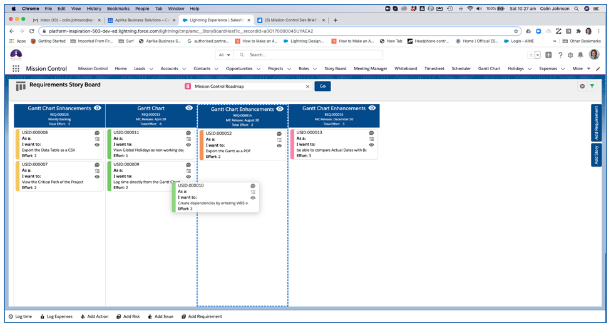
Reparenting User Stories
The Story Board enables you to drag and drop User Story cards from one Requirement to another. For example, if the Requirement included within one Project has too many User Stories for the capacity of the Project, you can drag to reparent to a different Requirement that will be delivered as part of a different Project.
Scheduler Enhancements
An additional ‘View’ option has been added to the Scheduler. You will now be able to select the ‘Financials’ View. This shows the sum value of the ‘Hours Scheduled Value (Billable)’ field across all Actions that are scheduled to be worked on during the timeline.
The shading of the cells reflects Hours Shading Breakpoint % values in the Scheduler Settings.
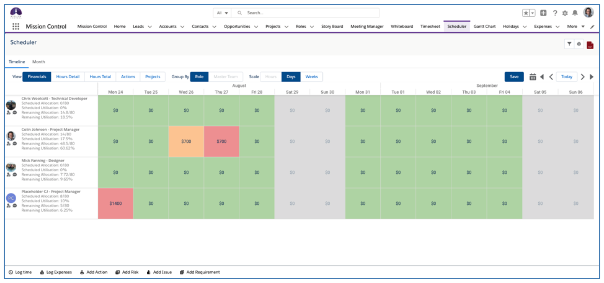
Note: If a User does not have Field Level Security access to the Hours Scheduled Value (Billable) field, they will not see any information on this View.
Gantt Chart Enhancements
A number of enhancements have been added to the Gantt Chart, including:
View & Create WBS & Predecessors
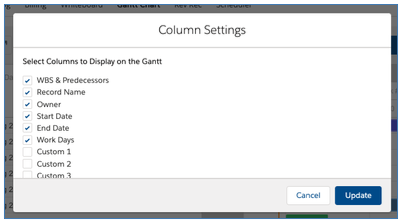
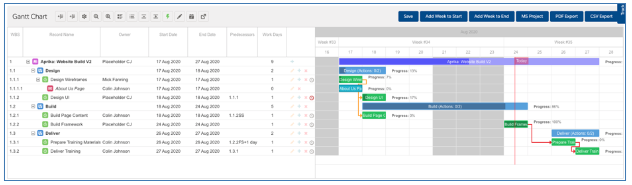
Within the Gantt Chart, you can view two Columns, ‘WBS’ and ‘Predecessors’. These two columns can be toggled on / off within the Gantt Chart settings, as shown below:
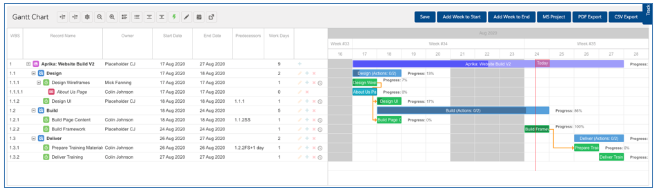
When this setting is true, the WBS and Predecessor columns will be visible within the Gantt Chart Data Table, as shown below:
The real power of this feature is the ability to create ‘Dependencies’ directly within the Data Table. To create a Dependency, click into the Predecessor cell for the child Action, as shown below:
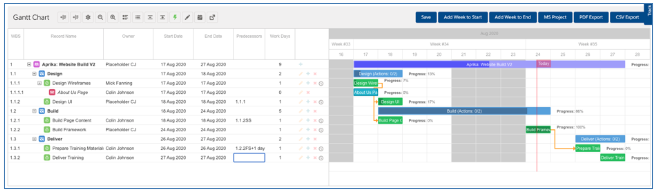
Enter the WBS number for the parent record (e.g. Action or Milestone). In the example above, we are making the ‘Deliver Training’ Action a child to the ‘Prepare Training Materials’ Action in a Finish to Start relationship. So we enter 1.3.1 into the Predecessor field.

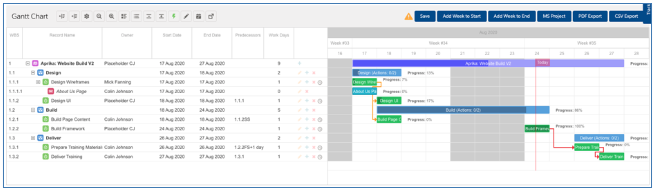
Once the WBS number has been populated, press the Enter key and the Dependency relationship will appear within the Gantt Chart, as shown below:
If you wish to create a Start to Start relationship, you must enter SS after the WBS number (e.g. 1.3.1SS).
If you wish to add Lead or Lag to the relationship, you must enter -n or +n after the WBS number (e.g. to add a 2 day Lead, enter 1.3.1+2).
Access Time Log Clock Icon
The Time Logging clock icon has been added to the Gantt Chart Data Table, as shown below:
![]()
Clicking the icon will open the Time Logger component, where you will be able to log time already completed, or use the Start/Stop time tracker. Where you are tracking time against an Action, the clock icon will be displayed red, as shown below:
Export Data Table CSV
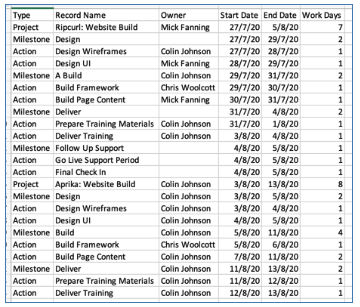
To export the Gantt Chart Data Table as a .csv file, click the ‘CSV Export’ button located on the top right-hand-side of the Gantt Chart, as shown below:

When you click the button, a .csv file will be downloaded with the File Name ‘Gantt Chart Export YYMMDD.csv’, and will contain the export of the Data Table, as shown below:
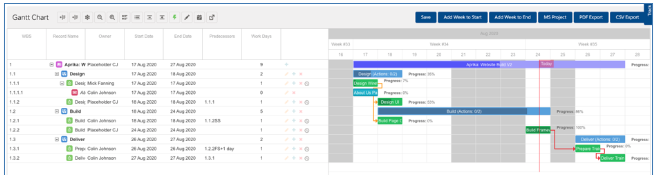
View Global Holidays
Global Holiday records will now be visualized on the Gantt Chart as a Non Working Day. A Holiday record is considered ‘Global’ if the Role field is empty, and there are no Holiday Assignment records linking the Holiday to Team(s).
In the example below, the Gantt Chart is showing Tuesday 25th August 2020 as a non-working day.
Role Utilisation Report Enhancements
The Role Utilisation Report has had an additional section of data added that will show the Role’s ‘Scheduled Performance %’. This will provide insight into how the hours worked compare to the hours that were scheduled to be worked for the particular period. The two new rows of data included in the report are ‘Total Hours Scheduled’ and ‘Scheduled Performance %’, as shown below:
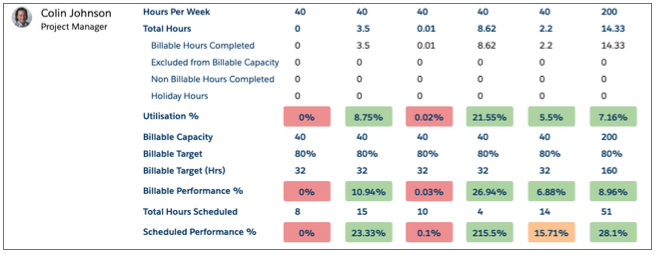
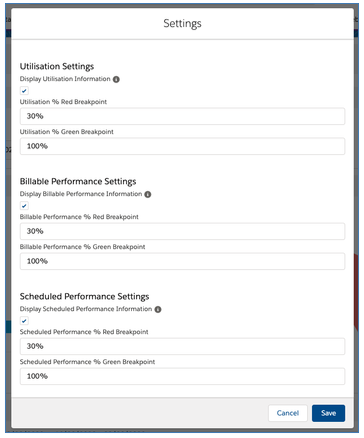
Furthermore, to provide flexibility around which data sets are included in the Role Utilisation Report, new settings have been included that let you control the visibility of the following 3 data sets:
Within the Settings, you can also set the breakpoint % values for Utilisation %, Billable Performance % and Scheduled Performance %.
Whiteboard Enhancements
There have been a number of enhancements made to the Whiteboard, as outlined below:
Sort Order Control
Users have the ability to control the Sort Order of cards should they not wish to use the default sort order. This can be controlled within the Whiteboard Settings modal, as shown below:

Users can disable the Whiteboard Priority Order field from being used as the initial sorting value. In addition, they can specify up to 5 fields to sort by, and the direction (e.g. ASC / DESC).
Additional Filter Options
Users will now have the ability to apply filters to the Whiteboard based on the ‘Project Status’ and ‘Milestone Status’ fields.
Whiteboard Priority Order Logic
Previously, the Whiteboard Priority Order field value would be adjusted when being dragged from one column to another and would result in the priority order of existing Actions within that column to be adjusted. This logic has been adjusted, so dragging an Action up / down within a column will adjust the Whiteboard Priority Order values, but if the Action is dragged left / right into another column, the values will not be adjusted.
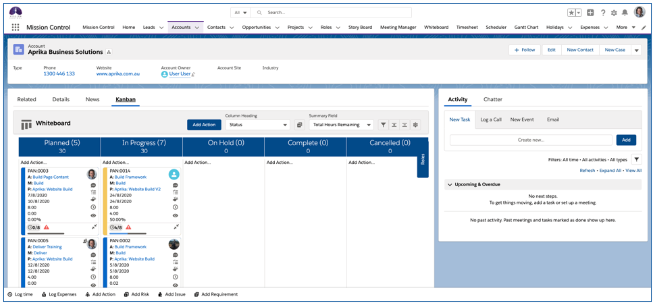
Whiteboard Anywhere
The Whiteboard Lightning Component can be added to the Page Layout of any parent Object that a Project relates to. For example, out of the box the Project Object has lookup fields to the Account, Contact, Opportunity and Program Objects. Therefore, you will be able to add the ‘Whiteboard’ Lightning Component to the Page Layout of any of these Objects, and it will display all related Actions. Setting a component height of approximately 1000 is recommended. Below is an example of the Whiteboard being added to the Account Page Layout.
If you have created your own Custom Lookup Fields to other Objects, you will also be able to add the Lightning Component to the Page Layout for those Objects.
Note: This feature is only available in Lightning Experience.
Reassignment Wizard Enhancements
The Reassignment Wizard has been enhanced to provider greater control over the records that are transferred from one Role to another by being able to specify the records to transfer based on Status. It can now also be used on the Role Object, enabling you to do a mass transfer of records from one Role to another.
Reassignment Filters
By default, when using the Reassignment Wizard, you will reassign all records. However, you can select which records to reassign based on their Status.
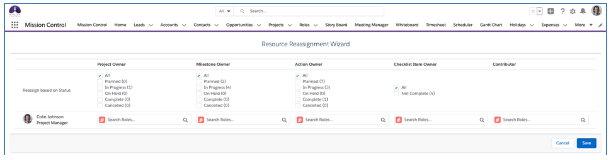
Role Reassignment
The Reassignment Wizard can also be used on the Role record. This for example, would enable you to do a mass transfer of records across multiple Projects if a team member left the organisation, or was temporarily unavailable.
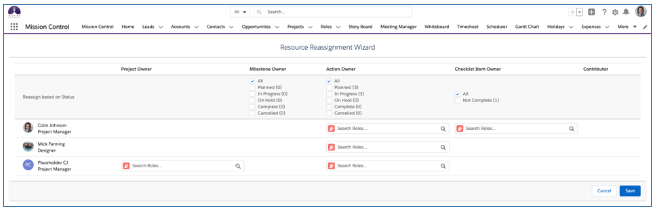
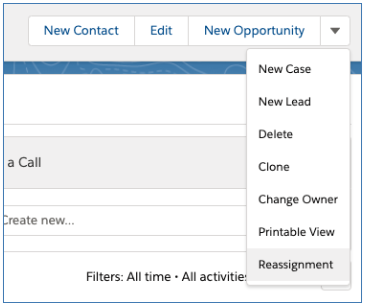
You access the Resource Reassignment Wizard from the Role Page, by clicking on the ‘Reassignment’ button as shown below.
This will show one line for the Role you will be transferring from. You will be able to choose to transfer all records, or select which records to transfer based on Status.
Note: You will need to add this Custom Button/Action to the Role Page Layout.
Install Script
For your convenience, an Install Script will execute as part of the upgrade process. This will populate the new Settings for the Role Utilisation Report as outlined below.
| Setting | Value |
| Display Utilisation Information | True |
| Display Billable Performance Information | True |
| Display Scheduled Performance Information | True |
| Scheduled Performance % Red Breakpoint | 30% |
| Scheduled Performance % Green Breakpoint | 100% |
New Field Overview
A number of new fields have been added to the solution as part of this release. We recommend you add these fields to your Page Layouts. If you are not using the Permission Sets included with Mission Control, we recommend you check the Field Level Security for all of these fields to ensure all appropriate Profiles have the required access.
Meeting Manager
| Field | Field Type | Comments |
| Meeting Manager Name | Text (80) | Identifies the name of the Meeting Manager |
| Meeting Manager Notes | Rich Text | Identifies any notes relating to this Meeting Manager record |
Meeting
| Field | Field Type | Comments |
| Meeting Name | Text (80) | Identifies the name of the Meeting |
| Meeting Manager | Lookup (Meeting Manager) | Lookup to the Meeting Manager this Meeting relates to |
| Start Time | Datetime | Identifies the Start Time of the Meeting |
| End Date | Datetime | Identifies the End Time of the Meeting |
| Location | Text (255) | Identifies the Location of the Meeting |
| Event | Checkbox | Check this field if you wish to create a Salesforce Event related to this Meeting |
| Objective | Long Text Field (32,000) | Identifies the high-level objectives for the meeting |
Attendee
| Field | Field Type | Comments |
| Attendee ID | Auto-Number | Auto-generated number identifying the unique Attendee record |
| Role | Lookup (Role) | Lookup to the Role record of the Attendee |
| Meeting | Lookup (Meeting) | Lookup to the Meeting that this Attendee will be attending |
| Attended | Checkbox | Check this field if the Attendee attended the meeting |
| Apology | Checkbox | Check this field if the Attendee was unable to attend the meeting |
| Reason for Apology | Text (255) | Identifies the reason the Attendee was unable to attend the meeting |
Agenda Item
| Field | Field Type | Comments |
| Agenda Item Name | Text (80) | Identifies the Name of the Agenda Item to be discussed |
| Summary | Rich Text Field | Identifies the details of the Agenda Item |
| Resolved | Checkbox | Check this field if this Agenda Item was resolved within this Meeting |
| Add to Next Meeting | Checkbox
Default: TRUE |
Check this field if this Agenda Item should be included in the next Meeting within this Meeting Manager |
| Action | Lookup (Action) | Lookup to the Action that time will be logged against when discussing this Agenda Item |
| Meeting | Lookup (Meeting) | Lookup to the Meeting this Agenda Item relates to |
| Sort Order | Number (18, 0) | Determines the Sort Order on the Meeting Manager |
Agenda Task
| Field | Field Type | Comments |
| Agenda Task Name | Text (80) | Identifies the Name of the Agenda Task relating to the Agenda Item |
| Task Owner | Lookup (Role) | Lookup to the Role record of the person assigned to this Agenda Task |
| Task Comments | Rich Text Field | Identifies the details of the Agenda Task |
| Resolved | Checkbox | Check this field if this Agenda Task was resolved within this Meeting |
| Add to Next Meeting | Checkbox
Default: TRUE |
Check this field if this Agenda Task should be included in the next Meeting within this Meeting Manager |
| Agenda Item | Lookup (Agenda Item) | Lookup to the Agenda Item this Agenda Task relates to |
How do I upgrade?
Mission Control will be made available based on the following release schedule.
28th August 2020 – Available for manual upgrade from the AppExchange
5th September 2020 – Automatic upgrade to all Sandbox Orgs
12th September 2020 – Automatic upgrade to all Production Orgs
To manually upgrade to the new version of Mission Control in your organisation, please follow the steps below:
What’s New Webinar
We have pre-recorded the ‘What’s New’ webinar to provide further information on how to get the best out of the new features. To access this webinar, please view the ‘Release Notes’ section of the Mission Control Support Centre – www.aprika.com/mc-support
Feedback
Some of the new features included in this release of Mission Control have come from ideas submitted from existing clients. If you have an idea for enhancing Mission Control, you can submit it via email to [email protected].
Questions?
If you have any questions regarding this release notification, please do not hesitate to contact us at [email protected].
