A new version of Mission Control (version 1.64) will be released on the AppExchange on Friday 19th May 2023. This notification has been issued to existing Mission Control users. It contains an overview of the new features available with this release, along with instructions on how to upgrade to the new version.
This release includes a number of new features, along with some enhancements to existing functionality, including:
Let’s get stuck into the detail…
You can create Development Plans in relation to an individual Role within Mission Control. Within a Development Plan, you’re able to create Assessments against each Skill that is assigned to them.
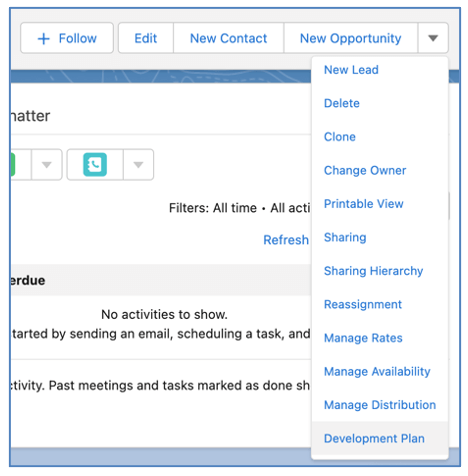
The ‘Role Development Plan’ page is accessed by clicking the ‘Development Plan’ button on the Role record.
The Role Development Plan has two Tabs:
The Assessment Tab provides you with the ability to carry out an assessment of each Skill that is assigned to the Role.
The Insights Tab provides you with the ability to compare results from up to 5 Development Plans to see how a person’s results have changed between reviews.
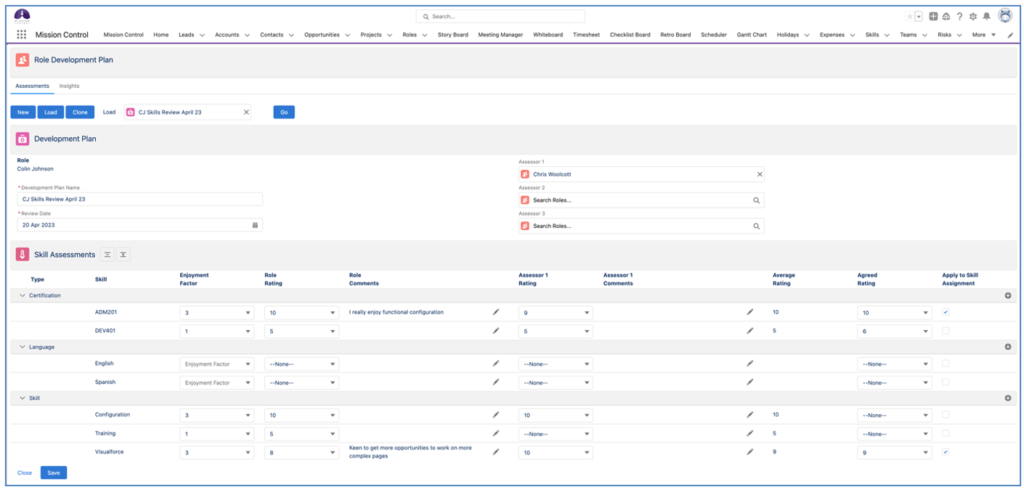
Assessments Tab
When you initially load the Role Development Plan page, the Assessments Tab will load by default and you will have the option to:

Create New Development Plan
To create a new Development Plan record, click the New button. This will load a draft Development Plan record enabling you to complete the various fields, along with draft Assessment records for each Skill that the Role has an active Skill Assignment for.

The assessment can be carried out by up to 4 people, including the person that the Role record relates to and 3 additional assessors.
The Role will have the ability to complete the following fields within each Assessment:
Each of the Assessors will have the ability to complete the following fields within each Assessment:
When reviewing all feedback, you have the ability to view the Average Rating across all assessors, specify an Agreed Rating and choose to have the Enjoyment Factor and Agreed Rating update the Skill Assignment record values.
If during the assessment it is agreed that the Role is interested in developing a new Skill that they’re not currently assigned to, you are able to click the + icon located on the right-hand side of the Skill Assessment section of the page.
This will open up the ‘New Skill Assignment’ Modal where you can specify the Skill, Billable Hourly Rate, Cost Hourly Rate, etc.
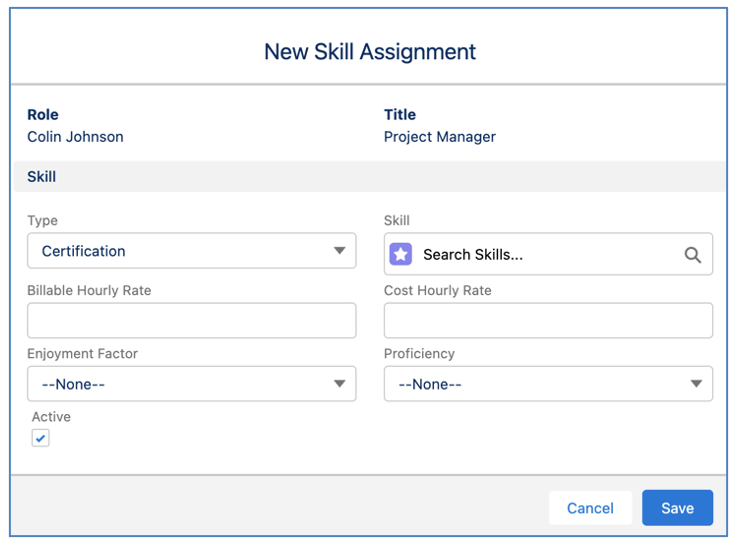
Once you click Save, the new Skill Assignment record will be related to the Role and added to the appropriate section of the Assessments.
Load Existing Development Plan
To load an existing Development Plan, you will need to click the Load button. This will display a search field where you can select from the Development Plans related to the Role that you are viewing the page in context of.
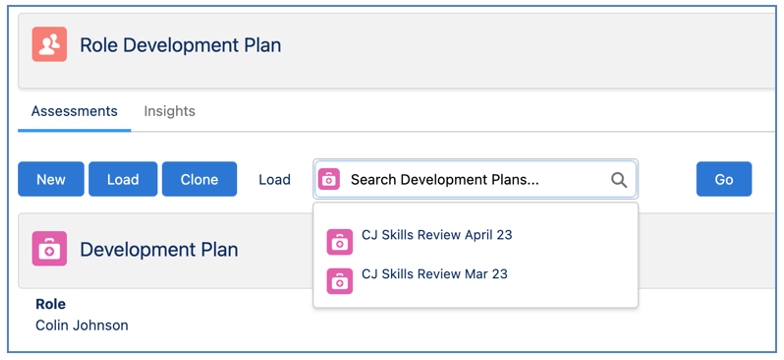
Once you have selected the required Development Plan, click the Go button and the Development Plan and Assessment records will be loaded.
Clone Existing Development Plan
To create a new Development Plan based on an existing Development Plan, you’re able to perform a ‘deep clone’ by clicking the Clone button. This will display a search field where you can select from the Development Plans related to the Role record that you are viewing the page in context of.
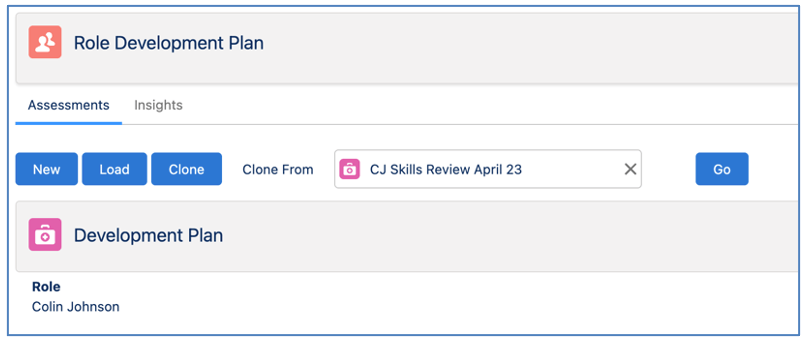
Once you have selected the required Development Plan, click the Go button and the deep clone process will create draft records for the Development Plan and Assessment records.
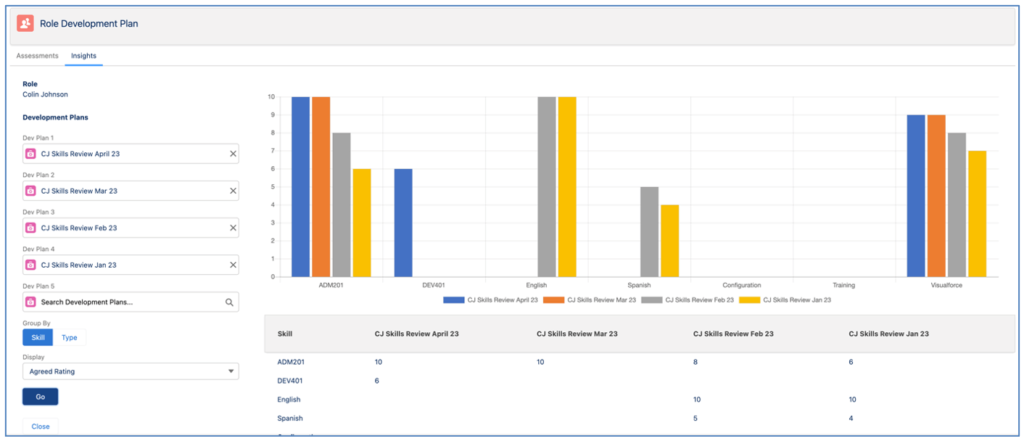
Insights Tab
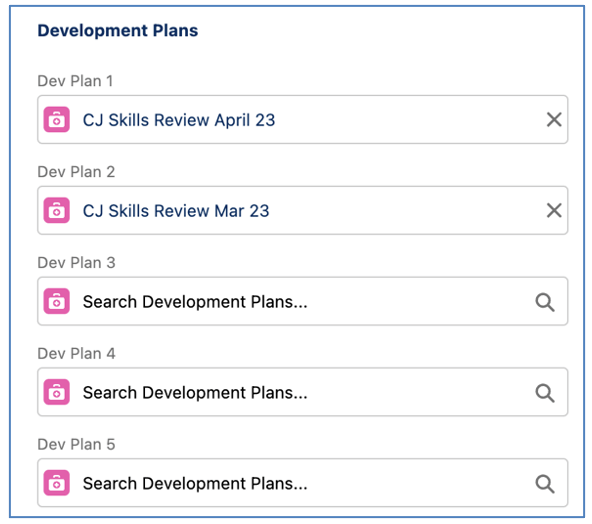
The Insights Tab provides you with the ability to view a variety of metrics from up to 5 Development Plans for an individual Role. This can help identify whether a person’s ability is improving or declining for particular Skills.
The 5 most recent Development Plans will automatically be loaded. This is based on the ‘Review Date’ on the Development Plan records. However, you are able to select the 5 Development Plans manually.
The settings enable you to choose whether to group the data by Skill or by Type. You can also choose what value from the Assessment records you view on the Insights Chart. The options are:
When grouping by Skill, the values from each Assessment will be displayed. When grouping by Type, the average values from all Assessments for Skills that have the same Type (e.g. Certification, Skill, Language, etc.) will be displayed.
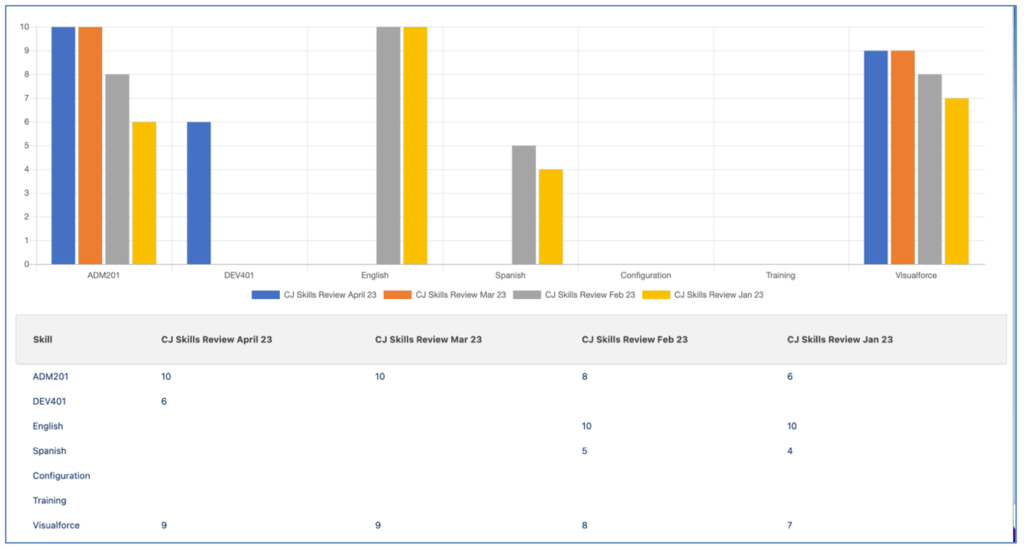
The Chart and Table provide the progressive insight into the movement in the metrics between each Development Plan being analysed.
The ‘Skills Matrix’ Report can be found within the ‘Mission Control Reports’ Folder in the Reports Tab. This report enables Customers to view a matrix of Skills assigned to Active Roles.
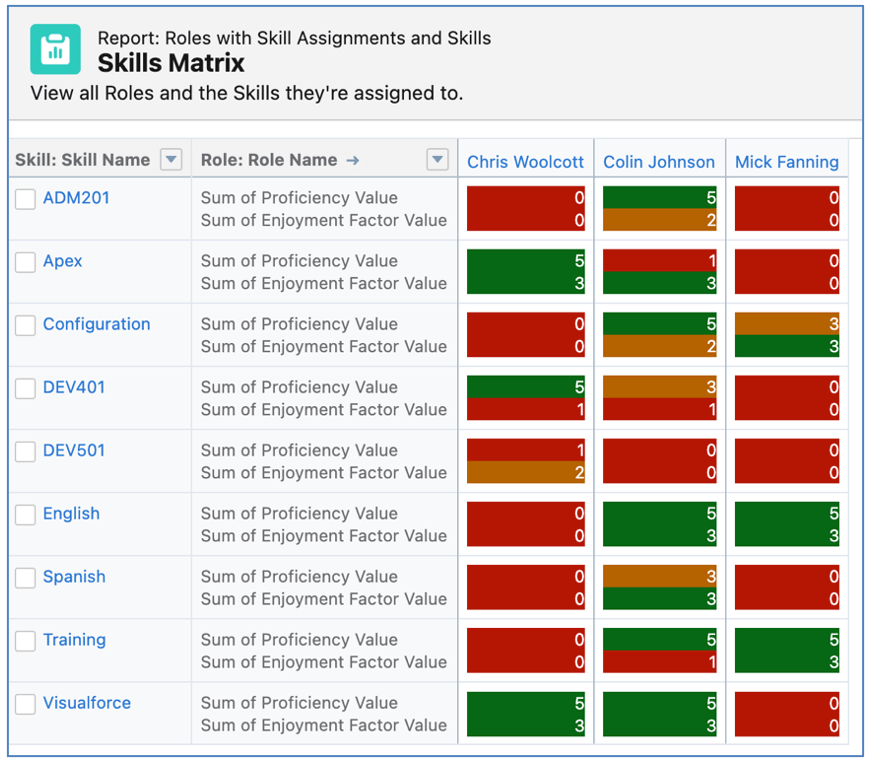
The report provides insight into the Proficiency and Enjoyment Factor of each Role for the Skills assigned to them.
The Proficiency value is conditionally highlighted based on the following scale:
The Enjoyment Factor value is conditionally highlighted based on the following scale:
Any Role that has not been assigned the Skill or has not been provided a value in the Proficiency or Enjoyment Factor fields of their Skill Assignment records will be displayed as 0 (Red).
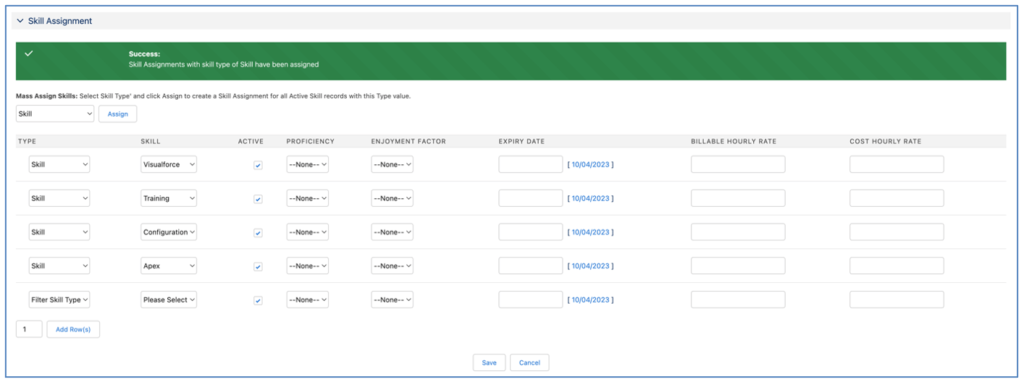
When managing the Skills an individual Role is assigned to, you are able to mass assign a group of Skills to the Role from their Role Edit Page. Within the Skill Assignment section of the Role Edit page, you can select a Skill ‘Type’ from the picklist and click the Assign button.

This will create a Skill Assignment record for each Active Skill that has the Type value selected.
When creating a new Skill from the Skills Tab, you can mass assign to all Active Roles by setting the ‘Mass Assign to Roles’ field to TRUE.
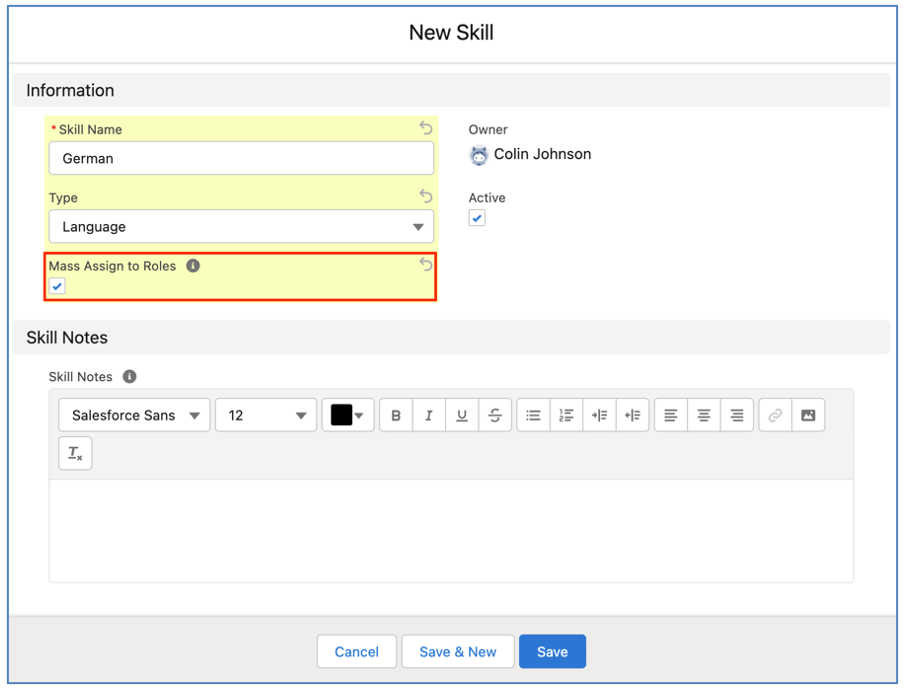
Setting this field to TRUE will create a Skill Assignment record for any Active Role where they already have a Skill Assignment for another Skill with the same Type value. For example, Mick Fanning and Kelly Slater both have a Skill Assignment for the Skill ‘English’, which has a Type value of Language. When creating a new Skill record for ‘French’, the User sets the ‘Mass Assign to Roles’ field to TRUE. When the record is saved, a Skill Assignment record will be automatically created for both Mick and Kelly.
You are also able to set this field to TRUE on existing Skills and it will perform the same function. For example, Mick Fanning has Skill Assignment records for ‘English’ and ‘French’. Kelly Slater has a Skill Assignment for ‘English’. The User edits the ‘French’ Skill record, sets the ‘Mass Assign to Roles’ field to TRUE and saves the record. A new Skill Assignment record will be automatically created for Kelly.
For Customers who need to apply more than one Overtime Rate to a Project, there are the ‘Overtime Card’ and ‘Overtime Rate’ Objects. For example, you may apply an Overtime Ratio of 1.5 for overtime carried out through the working week and a higher ratio of 2.0 for overtime carried out on the weekend.
To use multiple Overtime Rates on a Project, you need to set the following fields on the Project record:
A Validation Rule on the Project Object will prevent Users from setting the ‘Use Multiple Overtime Rates’ field to TRUE without specifying a value in the ‘Overtime Card’ field.
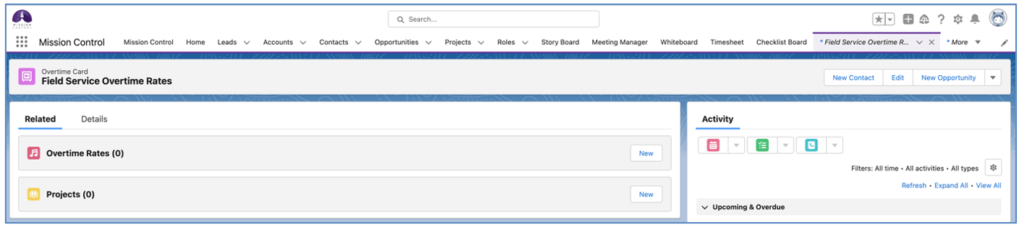
To create a set of Overtime Rates, you first need to create an Overtime Card. This will be the parent record that contains the various Overtime Rates. To create a new Overtime Card, click the New button from the Overtime Card Tab, as shown below.

Once you have completed all of the relevant fields, save the record. From there, you’ll be able to click the Related Tab to create the individual Overtime Rate records.
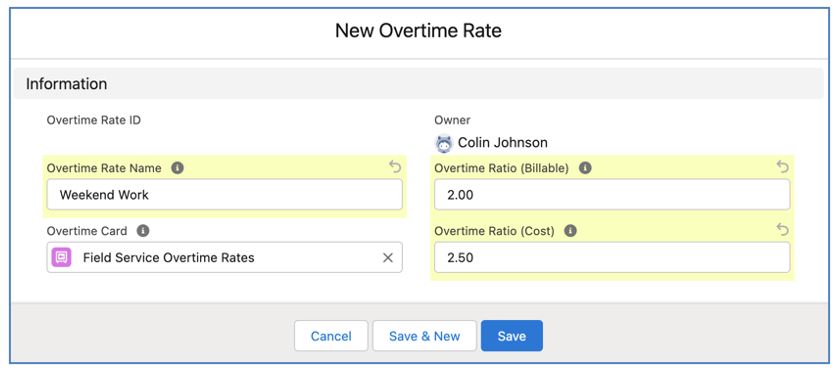
The Overtime Rate records contain the ratio values that will be used to calculate the Billable and Cost values. For example, a company may charge their customers 2.0 x the standard billable hourly rate for weekend work, but they pay their staff 2.5 x the standard cost hourly rate. In this example, they would need to create an Overtime Rate record as shown below.
When logging time against a Project that has the ‘Use Multiple Overtime Rates’ field set to TRUE, the User will need to specify which Overtime Rate needs to be applied to the Time Log, if they have set the Time Log ‘Overtime’ field to TRUE. The ‘Time Log Information’ Modal of the Timesheet and the Log Time Component available on pages such as the Whiteboard, Action Pad, etc. will display a Lookup Field in this situation to enable the User to select from the available Overtime Rate records.
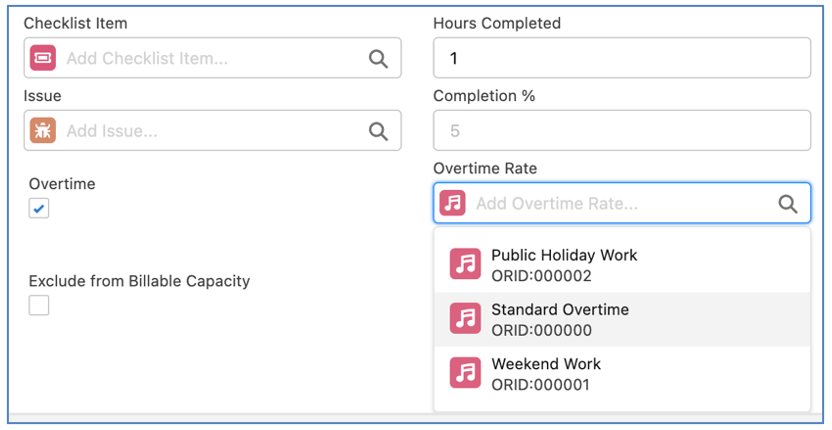
The Overtime Rates available in this Lookup Field are filtered to only those records that relate to the Overtime Card that has been specified on the Project.
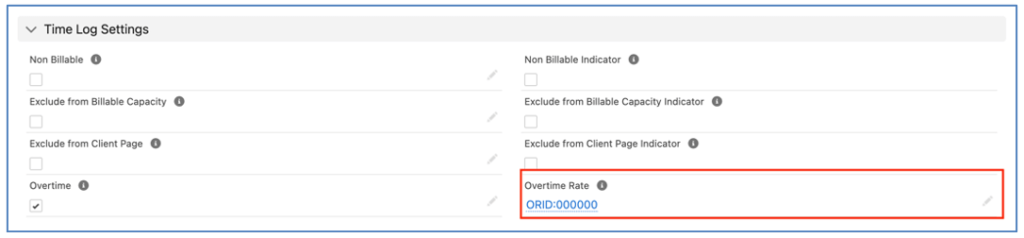
Time Logs relating to Projects using multiple overtime rates will have the Overtime Rate record specified on the Detail Page of the record to enable you to identify which Overtime Rate was used when calculating the financials of the Time Log.
A number of enhancements have been made to the Project Status Report, details of which are included below.
By default, the Time Log page within the Project Status Report will include Time Logs from ‘Last Week’. Customers can adjust this time period on a per Project basis by specifying a value in the ‘Weekly Status Report – Time Log Period’ field on the Project. The values within this field include:
If this field is null, the default ‘Last Week’ filter will be applied. If you specify ‘Last n Days’ you need to specify a value in the ‘Weekly Status Report – Time Log Days’ field, indicating how many days you want to report on.
A Validation Rule on the Project Object will prevent Users from setting the ‘Weekly Status Report – Time Log Period’ field to Last n Days without specifying a value in the ‘Weekly Status Report – Time Log Days’ field.
To add Custom Fields to the Issue page within the Project Status Report, Customers can add fields to the ‘Issue: Status Report’ Field Set, which is available on the Issue Object within Setup.
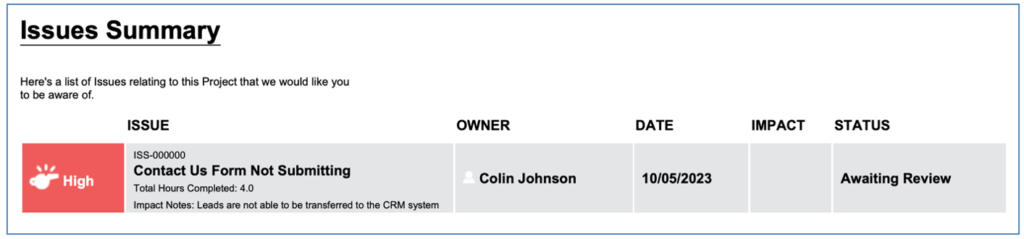
Any fields added to this Field Set will appear at the bottom of the ‘Issue’ cell of the Issues Summary Table, beneath the Issue Name.
To add Custom Fields to the Risks page within the Project Status Report, Customers can add fields to the ‘Risk: Status Report’ Field Set, which is available on the Risk Object within Setup.
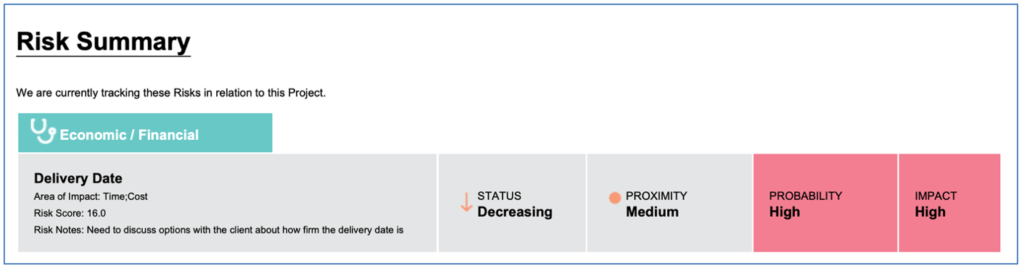
Any fields added to this Field Set will appear at the bottom of the ‘Risk’ cell of the Risk Summary Table, beneath the Risk Name.
To add Custom Fields to the Change Request page within the Project Status Report, Customers can add fields to the ‘Change Request: Status Report’ Field Set, which is available on the Risk Object within Setup.
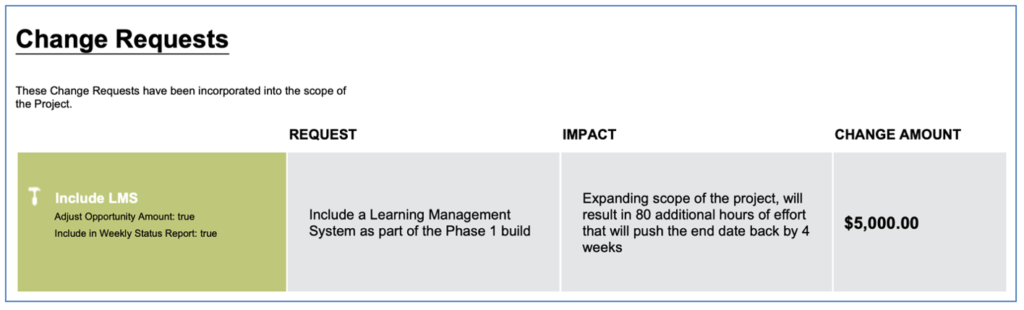
Any fields added to this Field Set will appear at the bottom of the ‘Change Request’ cell of the Change Requests Table, beneath the Change Request Name.
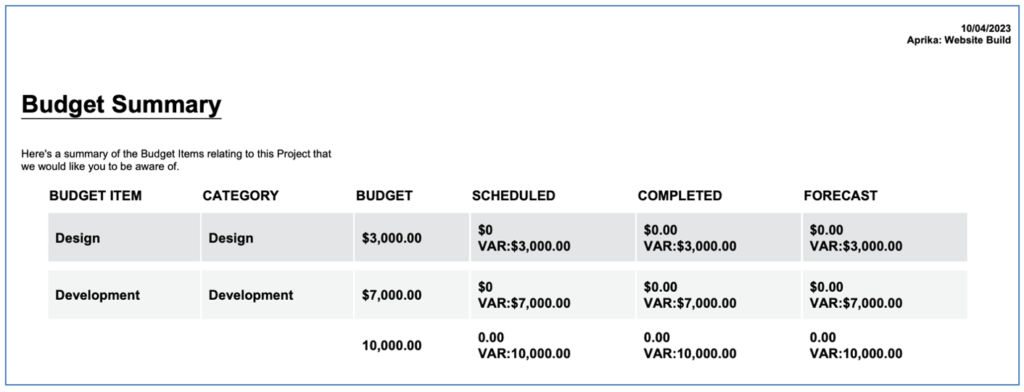
The Budget Item Appendix can be optionally included in the Status Report by setting the ‘Weekly Status Report – Inc Budget Items’ field to TRUE on the Project record. This Appendix includes Budget Items where the ‘Include in Weekly Status Report’ field on the Budget Item record is TRUE.
Below is an example of the Budget Item Appendix.
The Project Status Report PDF includes ‘Report Generated by Mission Control’ in the page footer, as shown below.

If Customers wish to remove this from the PDF footer, they are able to do so by setting the ‘Remove Report Generated by Mission Control Footer’ setting to TRUE on the Project Status Report setting tile on the Control Pad of the Mission Control Console.
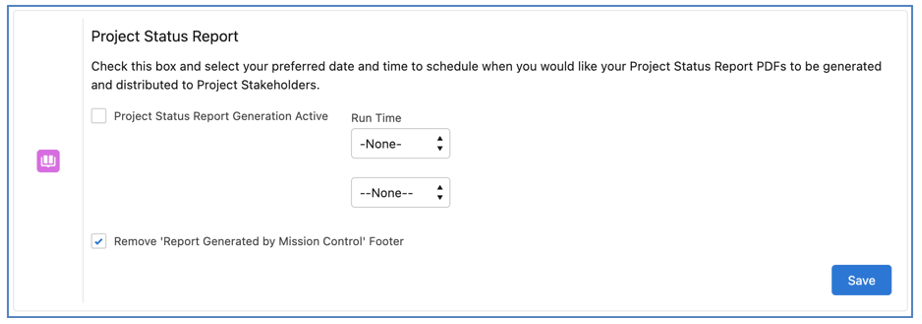
If this setting is FALSE, the text will be included in the Footer.
When a Project is updated to meet either of the following two conditions:
The ‘Generate Weekly Project Status Report’ field will be set to FALSE. This ensures the automatic distribution of a Project’s Status Report will stop.
A number of enhancements have been made to the Scheduler, details of which are included below.
By default, the bars representing Actions that appear on the Action and Project Tabs of the Scheduler display the following text:
These default values can be replaced by any field on the Action or Project Object. This is done by using the following custom settings within the Scheduler Settings Modal:
These settings can reference any field on the Object. Therefore, if a Customer wishes to compile a Formula Field that included multiple values, such as the Action ID, Action Name, Milestone Name and Project Name, they could create that Custom Field on the Action Object and then select that field to be displayed as the Action Bar Text setting.
The ‘Hours Total’ Tab of the Scheduler will now display the hours within a cell that is marked as a Holiday. Previously it would have been shaded Grey with a value of 0. It will now be shaded Grey and show the sum of hours from Actions and Holidays assigned to that period.
Previously the 2 x Custom Field filter options within the Scheduler Filters provided the ability to filter on fields within the Project, Milestone or Action Objects. You are now also able to select fields from the Role Object.
A number of enhancements have been made to the Resource Assignment Wizard, details of which are included below.
There is a custom setting available within the Resource Assignment Wizard Settings that enables the Team and Skill filter parameters to be automatically populated.
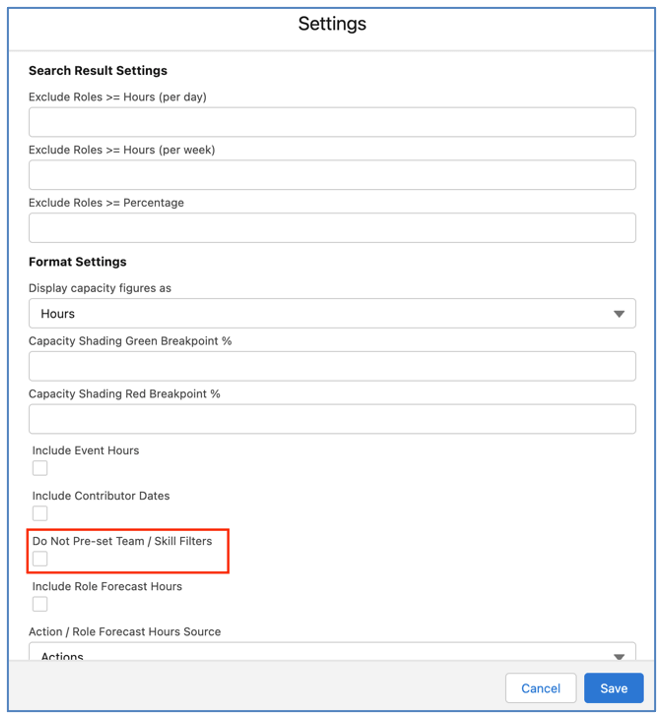
If this setting is FALSE, the Team and Skill filter parameters will be pre-populated with the following values:
Pre-populating these filter parameters enables Users to more rapidly search for Roles that have the attributes required to be assigned to the Action.
If this setting is TRUE, the Team and Skill search parameters will be left blank for the User to manually apply filters as required.
You can assign multiple Roles as Contributors via the Resource Assignment Wizard by using the select checkbox field next to each person’s Role record, as shown below.
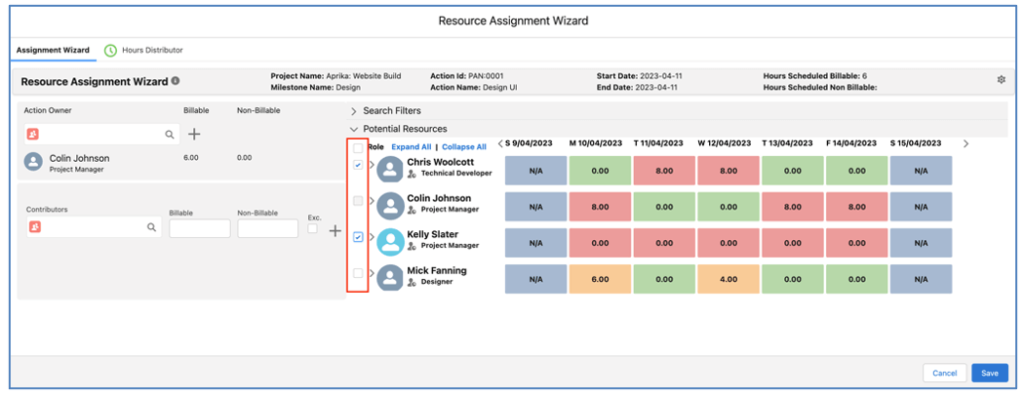
For example, if I want to assign both Chris and Kelly as Contributors on an Action, I don’t need to drag them both individually to the Contributors section. I can set their select checkbox field to TRUE and drag one of their Roles to the Contributors section.
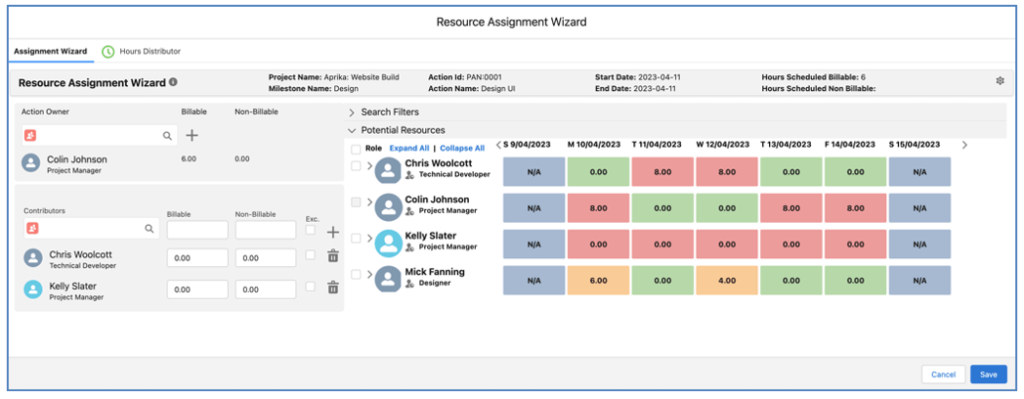
This will create Contributor records for each of the selected Roles, reducing the effort required to assign multiple Roles as Contributors.
The Timesheet by default displays one row per Action that is included in the list of records available for logging time against.
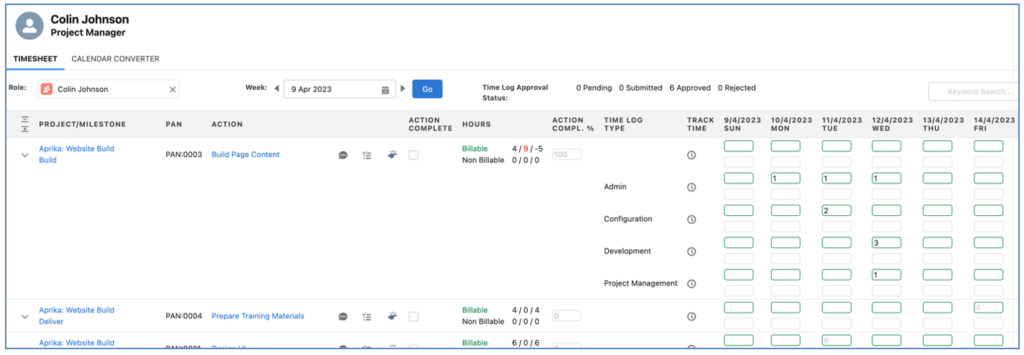
The ‘Group Time Logs by Time Log Type for each Action’ setting within the Timesheet Settings enables a feature that will display multiple rows per Action, grouping the Time Logs by the ‘Time Log Type’ field.
To enable this feature, set the following setting to TRUE within the Timesheet Settings:
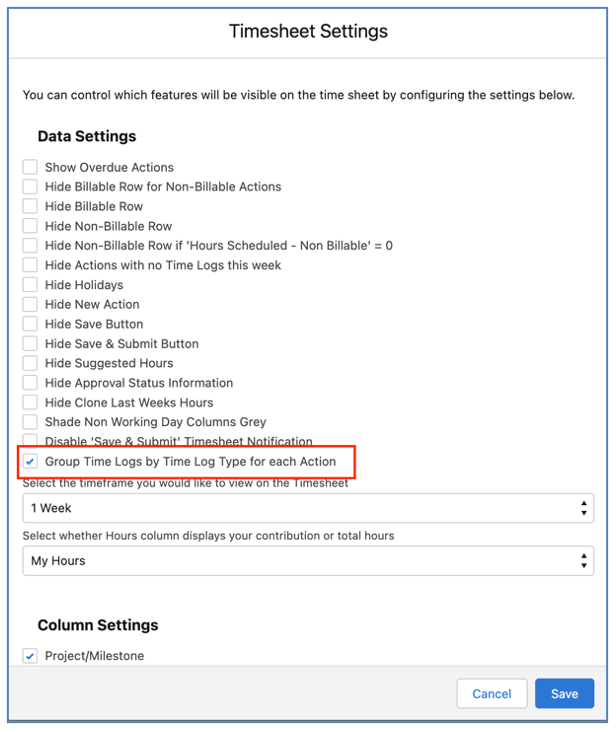
This setting can be controlled by individual Users within their Timesheet Settings Modal. Alternatively, it can be controlled centrally for all Users via Timesheet Settings on the Control Pad of the Mission Control Console.
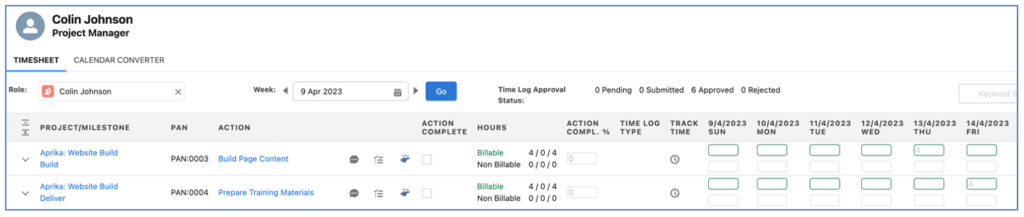
When this setting is FALSE, all Time Logs will be grouped into one single row on the Timesheet, as shown below.

When this setting is TRUE, each Time Log will be grouped into a row based on its Time Log Type field value, as shown below.
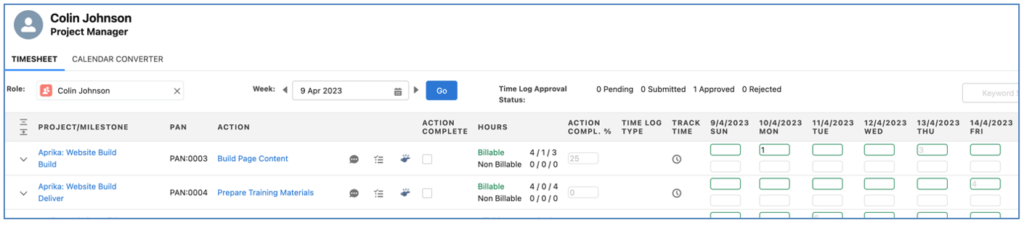
With this feature enabled, if a User has not yet logged any time against the Action this week, they will see one row for the Action.
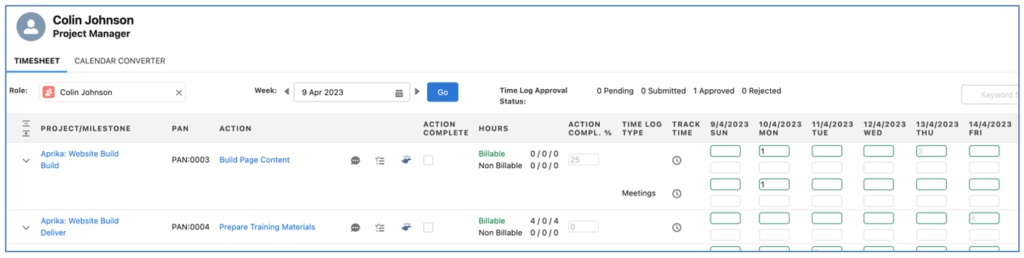
If the User logs time and does not specify a Time Log Type field value, that Time Log will appear in the first row for that Action.
Once the User creates a Time Log with a value specified in the Time Log Type field, a row will appear on the Timesheet for that Time Log Type value.
Once a row is displayed on the Timesheet for a Time Log Type for a specific Action, if the User needs to log additional time for that same Action for the same Time Log Type value, they can enter the hours directly on that row.
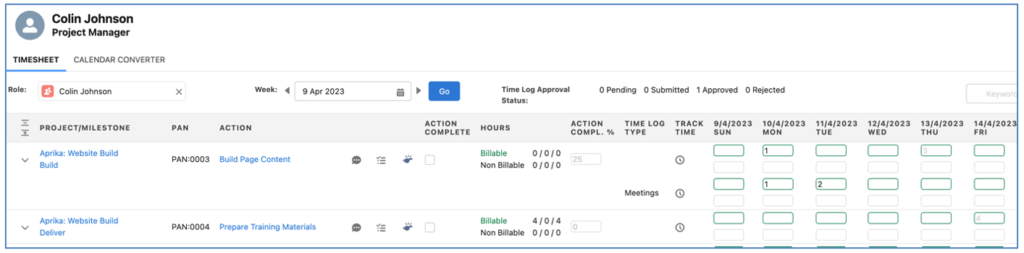
This removes the need to double-click into the hours field to open the ‘Time Log Information’ Modal in order to specify the Time Log Type value.
A number of enhancements have been made to Role Forecasting, each of which is detailed below.
When auto-generating a Project from an Opportunity, Role Forecast records will be created, relating to the Project based on the following order:
When cloning a Project, you are able to choose whether or not the related Role Forecast records are also cloned.
If you wish to clone the Role Forecast records, you will need to ensure the ‘Clone Role Forecasts’ checkbox is set to TRUE within the Clone Settings section of the Clone Page, as shown below.

When this field is TRUE, any Role Forecast records related to the source Project will be cloned. The Start Date of each Role Forecast record will be set to be the same value as the Project Start Date specified within the Clone Settings.
There is a Custom Setting within the Role Allocation Automation Settings section of the Control Pad on the Mission Control Console that enables the periodic deletion of Role Allocations and Role Actuals.

This Setting enables you to specify a number of months value (e.g. 6, 12, 24, etc.). When this Setting is activated, the months value will be used to determine when Role Allocation and Role Actual records will be deleted.
Role Allocation and Role Actual records relating to Actions will be automatically deleted when the Project ‘End Date’ is older than Today + the months value specified in the Setting. Role Allocations relating to Role Forecasts will be automatically deleted when the Role Forecast ‘End Date’ is older than Today + the months value specified in the Setting.
The table below provides examples of whether the records would qualify for deletion, where the months value has been set to 6 months.
| Parent Record | End Date | Today’s Date | Delete records | Reason |
| Project | 1/12/2022 | 16/1/2023 | No | Today – End Date is less than 6 months |
| Project | 10/7/2022 | 16/1/2023 | Yes | Today – End Date is greater than 6 months |
| Role Forecast | 17/7/2022 | 16/1/2023 | No | Today – End Date is less than 6 months |
| Role Forecast | 30/4/2022 | 16/1/2023 | Yes | Today – End Date is greater than 6 months |
This logic will run daily, at the ‘Run Time’ specified within the Setting.
When a Role Allocation record is created or edited with Total Hours Scheduled greater than zero, and it is before the existing Start Date of the Action or Role Forecast that it relates to, the Start Date and Working Days fields of the parent record (e.g. Action or Role Forecast) will be adjusted to be based on the date from the Role Allocation record.
When a Role Allocation record is created or edited with Total Hours Scheduled greater than zero, and it is after the existing End Date of the Action or Role Forecast that it relates to, the End Date and Working Days fields of the parent record (e.g. Action or Role Forecast) will be adjusted to be based on the date from the Role Allocation record.
When adding a new Role Forecast on the ‘Manage Forecast’ Component, you are able to specify the Start Date and Working Days or the Start Date and End Date.
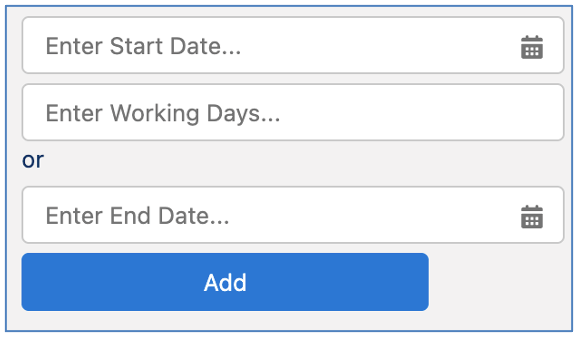
When the User enters the Start Date and Working Days, the End Date of the Role Forecast is automatically calculated when the Role Forecast record is added to the Forecast Tab.
When the User enters the Start Date and End Date, the Working Days field will be automatically calculated when the Role Forecast record is added to the Forecast Tab.
You are unable to add values in both the Working Days and End Date fields of the Add Role section. If you enter a value in Working Days and then enter a value in End Date, the value in Working Days will be automatically cleared.
You can apply filters to the Forecast and Allocation Tabs of the ‘Manage Forecast’ Component. These filters are accessible at the top of the Forecast Tab. When applied, they will filter the results of both Tabs.
![]()
These filters enable you to filter the data based on the following options:
To apply filters, make your selection and click the ‘Go’ button. To remove existing filters, click the ‘Clear’ button.
When distributing hours on the ‘Manage Forecast’ or ‘Manage Distribution’ Component, you can use the ![]() icon to clear all existing Role Allocation field entries.
icon to clear all existing Role Allocation field entries.
![]()
When you click this icon, it will reset all fields to 0 if they are currently greater than 0. This enables Users to restart the manual distribution and gradually build up the allocation as they enter values into the individual Role Allocation fields.
When distributing hours on the ‘Manage Distribution’ Component in relation to Actions, you can use the ![]() icon to redistribute hours from historical dates where the Role Actual does not match the Role Allocation.
icon to redistribute hours from historical dates where the Role Actual does not match the Role Allocation.
![]()
This function can be carried out for an individual row of data being displayed on the ‘Manage Distribution’ Component by clicking the icon within that row. Alternatively, if you wish to carry this function out for all rows being displayed, you can click the master icon located in the top right.
When you click the icon, the sum of hours remaining for any Role Allocation with a Date less than Today will be redistributed across the remaining Role Allocations between Today and the End Date. Specifically, the following functions will be carried out:
The ‘Quick Save’ button on the Manage Forecast and Manage Distribution components provides the same functionality as the Save button. However, when you click the Quick Save button, the component will remain loaded, enabling you to save your changes and continue working on the page.
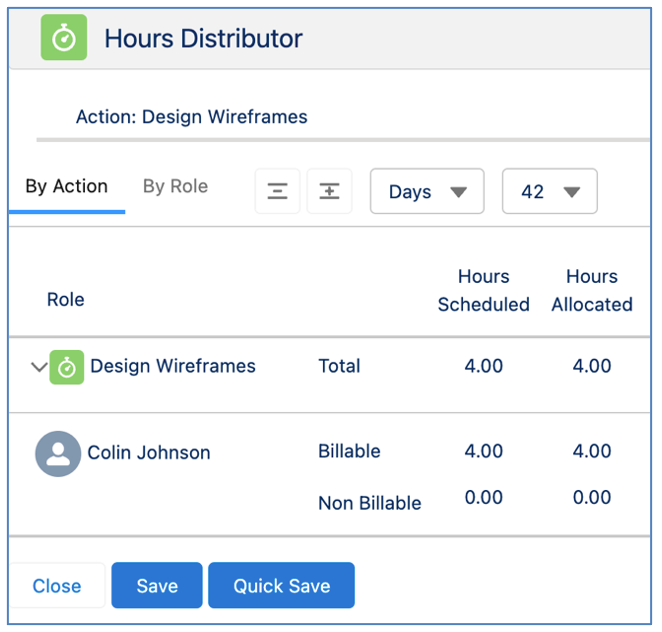
This will save time as you won’t need to reload the page after saving.
The ‘Delete Role Allocations’ component enables you to perform a mass deletion of all Role Allocations records related to the parent record. You can load the component from the following records:
Note: This Mass Delete function will also delete any Role Actual records that are related to the Role Allocation records being deleted.
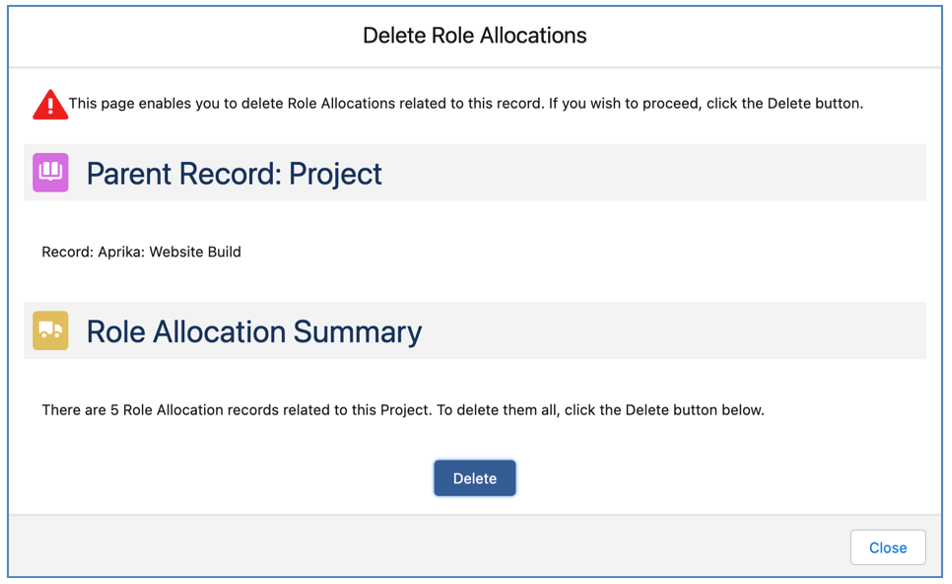
The component is accessed by clicking the ‘Delete Role Allocations’ button, as shown below.
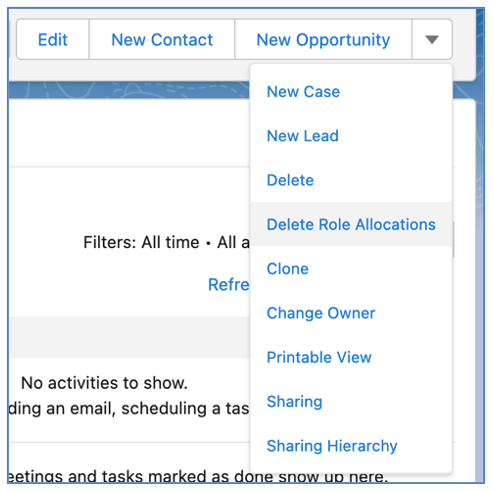
When you access the component, it will provide a summary of the parent record along with the number of Role Allocation records that will be deleted, as illustrated below.
Once you click the Delete button, you will be presented with a dialogue box asking you to confirm you wish to go ahead with the deletion of the records.
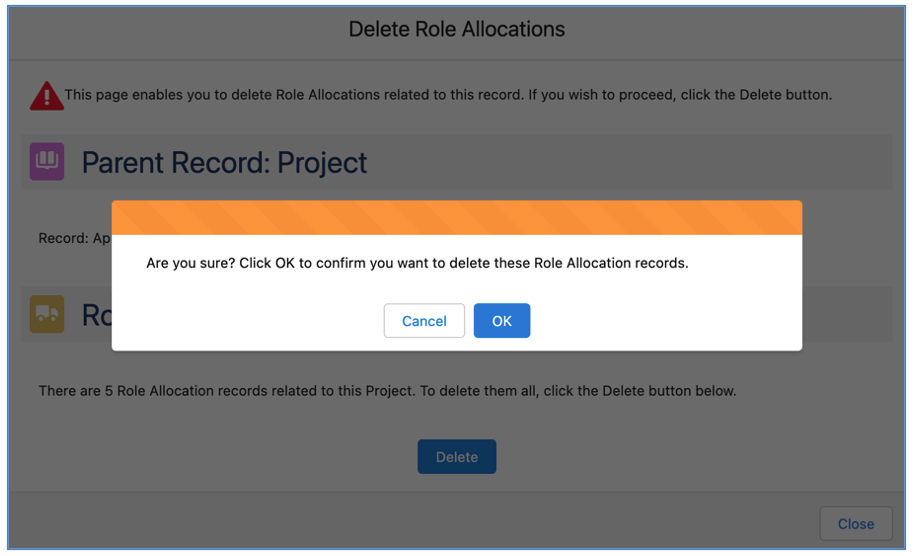
Once you click OK, you will receive a notification on screen that the records have been submitted for deletion.

You will also receive an email confirming the deletion was successful or unsuccessful.
Logic has been added to the Action and Checklist Item Objects to keep the Status fields of both records up to date based on what’s happening with the other record. This logic is controlled by two custom settings on the Control Pad of the Mission Control Console. Each of these features are detailed below.
There is an automated feature within Mission Control that will automatically update the Action Status based on what is happening with the related Checklist Items.
For example, if you have 4 Checklist Items relating to an Action and all of them currently have a Status of ‘Planned’, as soon as you move one of them to ‘In Progress’, the Action Status will automatically be updated to ‘In Progress’ too. As soon as all related Checklist Items have a Status of ‘Complete’, the Action Status will automatically be updated to ‘Complete’.
If you do not wish this feature to be enabled, you’re able to disable it from the Control Pad on the Mission Control Console, within the Project Automation Settings section. The setting is called ‘Disable Auto Checklist Item to Action Status’.
There is an automated feature within Mission Control that lets you automatically update the Status field of all Checklist Items related to an Action when the Status field of the Action is changed.
For example, if you have 4 Checklist Items related to an Action and you mark the Action Status as ‘Complete’, all of the related Checklist Items will also be updated to ‘Complete’.
If you do not wish this feature to be enabled, you’re able to disable it from the Control Pad on the Mission Control Console, within the Project Automation Settings section. The setting is called ‘Disable Auto Action to Checklist Item Status’.
To ensure Customers configure their Projects and Milestones correctly to achieve their required Billing Event generation, a number of Validation Rules, Reports and a Dashboard are included within Mission Control.
Mission Control provides a variety of flexible options to assist customers in generating their invoices (Billing Events). For each method of generating a Billing Event, key fields on the Project and Milestones are required.
The table below includes a list of the Validation Rules included within Mission Control that can be used by Customers to ensure all fields are configured correctly for the Billing Event generation method required.
| Object | Rule | Description | Active |
| Project | Enforce Day Rates for Standard | If Billing Rate = Standard, ensure a value is entered in Billable Day Rate. If Cost Rate = Standard, ensure a value is entered in Cost Day Rate | FALSE |
| Milestone | Field Req Milestone Billing Type | Ensure various supporting fields are populated correctly if ‘Milestone billing Type’ is populated | TRUE |
| Project | Field Req Billing Cycle | Ensure various supporting fields are populated correctly if ‘Billing Type’ is set to Periodic | TRUE |
| Project | Field Req Deposit to TM | Ensure various supporting fields are populated correctly if ‘Billing Type’ is set to Deposit to T&M | TRUE |
| Project | Field Req Fixed Price | Ensure various supporting fields are populated correctly if ‘Billing Type’ is set to Fixed Price | TRUE |
| Project | Field Req Fixed Price plus Expenses | Ensure various supporting fields are populated correctly if ‘Billing Type’ is set to Fixed Price + Expenses | TRUE |
| Project | Field Req Time and Materials | Ensure various supporting fields are populated correctly if ‘Billing Type’ is Time & Materials | TRUE |
| Project | Field Req Controlled on Milestones | Ensure various supporting fields are populated correctly if ‘Billing Type’ is Controlled on Milestones | TRUE |
If you are generating Billing Events within Mission Control, it is highly recommended that you activate all of these Validation Rules.
To provide Customers with the ability to easily identify any Projects that may not be correctly configured for the required Billing Event generation method, a Dashboard and a number of reports are included within Mission Control.
The Reports included to assist with Billing Event Exceptions are:
Time Logs with No Billable Value
Reports on Time Logs where the Non Billable Indicator field is set to FALSE and the Hours Completed Value (Billable) field is set to zero.
Time Logs Not Invoiced < Last Bill Date
Reports on Time Logs where Invoiced = FALSE and Approval Date is less than the Periodic Billing Last Date.
Time Logs Not Invoiced >= Last Bill Date
Reports on Time Logs where Invoiced = FALSE and Approval Date is greater or equal to the Periodic Billing Last Date.
Time Logs Not Approved w/ Billing Cycle
Reports on Time Logs that have not yet been approved that relate to a Project that has a value in the Billing Cycle field.
Projects set to Standard with No Rates
Reports on Projects where Billing Rate or Cost Rate are set to Standard and no Billing Day Rate or Cost Day Rate values have been supplied.
Projects with Next Billing Date Mismatch
Reports on Projects configured for Periodic or Retainer Billing where the Periodic Billing Next Date does not match what is expected.
Projects with no Invoice on Comp Mstones
Reports on Projects with a Billing Cycle of Milestone that have no Milestones with the ‘Invoice on Completion’ field set to TRUE.
The ‘Mission Control Billing Exceptions’ Dashboard
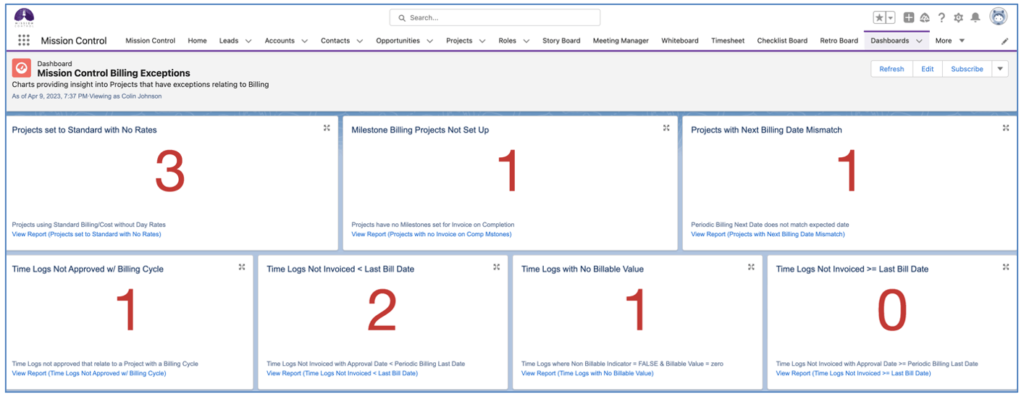
Customers can use the ‘Subscribe’ feature to receive this Dashboard via email.
A number of minor enhancements have been made to various features. Each enhancement is detailed below.
A number of new Tiles have been added to the Launch Pad and the Progress Pad of the Mission Control Console, as outlined below.
Launch Pad
Progress Pad
Within Mission Control, there are various Apex Triggers that execute when records are inserted, updated or deleted within Mission Control Custom Objects.
Customers may want to disable these Triggers from executing in certain situations, such as:
To disable all Mission Control Triggers from executing, you will need to set the following Custom Setting to TRUE.
‘Disable Mission Control Triggers’
This Custom Setting can be found within the ‘Project Automation Settings’ section of the Control Pad on the Mission Control Console.
A number of minor enhancements have been made to the Program Planner, as outlined below.
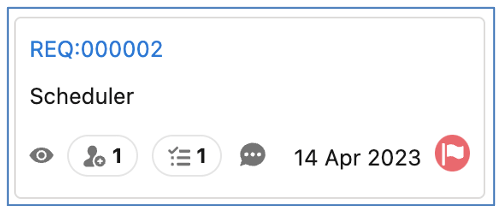
Requirement ID added to Card
The Requirement ID field has been added to the Requirement Card. This field appears above the Requirement Name as shown in the example below.

Custom Field Filters
The Filters Modal on the Program Planner now provides the ability to apply up to 2 Custom Field Fielders, as shown in the example below.
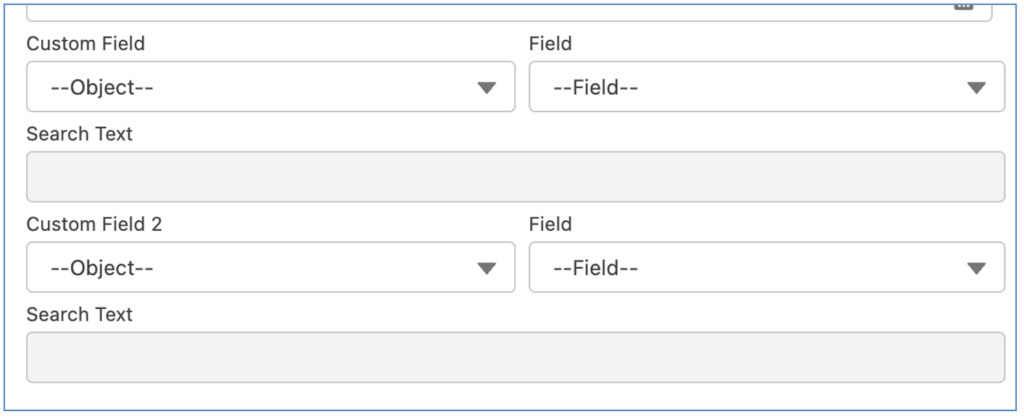
When applying a Custom Field Filter on the Program Planner, Users can select fields from the following Mission Control Custom Objects:
First select the Object, then you will see the fields available within that Object.
User Story ID Hyperlink
The User Story ID on the User Stories Tab of the Requirement Modal is now a Hyperlink enabling Users to quickly open the User Story record in a new Tab.

A number of minor enhancements have been made to the Project Builder, as outlined below.
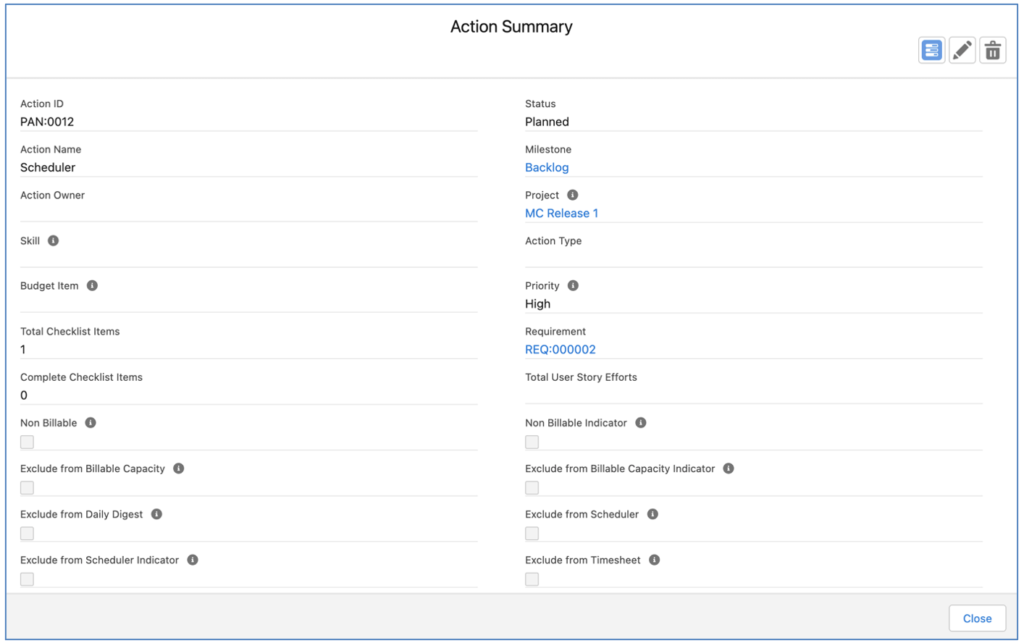
Delete Actions
To delete an existing Action from the Project Builder, Users need to click the eye icon on the Action Card. This will open the Action Summary Modal, and you will have the option to click the trash can icon to delete the record.
Requirement ID added to Card
The Requirement ID field has been added to the Requirement Card. This field appears above the Requirement Name as shown in the example below.
User Story ID Hyperlink
The User Story ID on the User Stories Tab of the Requirement Modal is now a Hyperlink enabling Users to quickly open the User Story record in a new Tab.

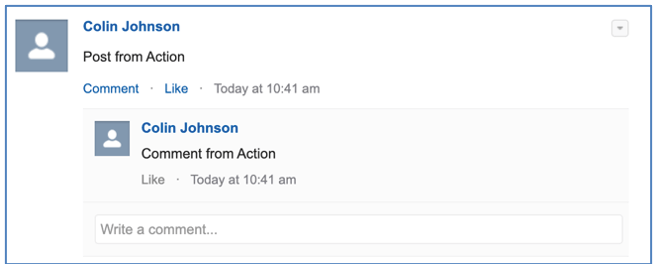
The Chatter Roll Up feature within Mission Control has been enhanced to include rolling up the Comments under Posts. Previously, only the original Post would be rolled up.
Below is an example of a Post and a related Comment on the Action.
In the example below, you can see the Action Post, Action Comment and another Comment created directly on the Milestone Feed.
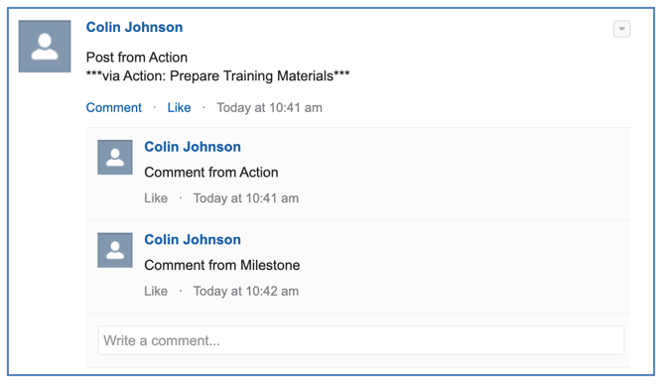
In the example below, you can see the Action Post, Action Comment, Milestone Comment and another Comment created directly on the Project Feed.

A number of minor enhancements have been made to the Action pad, as outlined below.
Collapse / Expand Persistent Settings
The ‘Summary’ and ‘Action Log’ sections of the Action Pad can be collapsed and expanded. Each User can choose whether these sections are expanded or collapsed and their preferences will be remembered as persistent settings.
This means that if you would prefer to have the Summary section collapsed, you can collapse it when you view the Action Pad and then each subsequent visit, that section will continue to be collapsed until you click to expand it.
Record Hyperlinks
The following field values on the Action Log table are now hyperlinks enabling users to click them to open the record in a new Tab.
Checklist Icon
The Checklist Item icon will display the number of Completed Checklist Items and the Total Checklist Items, as shown below.
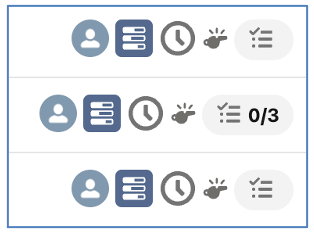
This enables Users to easily identify if an Action has related Checklist Items.
A number of minor enhancements have been made to the Issue Log, as outlined below.
Collapse / Expand Persistent Settings
The ‘Summary’ and ‘Issue Log’ sections of the Issue Log can be collapsed and expanded. Each User can choose whether these sections are expanded or collapsed and their preferences will be remembered as persistent settings.
This means that if you would prefer to have the Summary section collapsed, you can collapse it when you view the Issue Log and then each subsequent visit, that section will continue to be collapsed until you click to expand it.
Access Chatter from Issue Manager
You can access the Chatter Modal for the Issue record from within the Issue Manager. To do so, click the Chatter icon, which is located to the left of the Issue Name, as shown in the example below.
![]()
A number of minor enhancements have been made to the Risk Log, as outlined below.
Collapse / Expand Persistent Settings
The ‘Summary’ and ‘Risk Log’ sections of the Risk Log can be collapsed and expanded. Each User can choose whether these sections are expanded or collapsed and their preferences will be remembered as persistent settings.
This means that if you would prefer to have the Summary section collapsed, you can collapse it when you view the Risk Log and then each subsequent visit, that section will continue to be collapsed until you click to expand it.
Record Hyperlinks
The following field values on the Risk Log table are now hyperlinks enabling users to click them to open the record in a new Tab.
The ‘Status’ fields on the Project Milestone, Action and Checklist Item are updated automatically by default, based on changes made to the child record.
For example, if a Project has 3 Milestones and the Status of all of them is set to Complete, then the Project Status will automatically be updated to Complete.
For customers who want to prevent a record from being set to Complete if there are unresolved Risks or Issues related to that record, can choose to enable a Custom Setting.
The ‘Disable Status being set to Complete if unresolved Risks or Issues’ setting within the Project Automation Settings section of the Control pad on the Mission Control Console should be set to TRUE if you wish to utilise this feature.
With this Setting set to TRUE, a Project, Milestone, Action or Checklist Item will not be able to be set to Complete if it has related Risks or Issues that are considered unresolved.
A Risk is considered resolved if the ‘Current Status’ field is set to Closed. An Issue is considered resolved in the ‘Status’ is set to Closed.
If a User tries to set a record’s Status field to Complete and it does have unresolved Risks or Issues, they will be presented with the following notification:
This record has unresolved Risks / Issues. You are unable to set Status to Complete until they are closed.
To track whether your Users are creating new Projects from scratch manually or if they are creating the Project via the cloning or auto-generation process, there is a field on the Project Object.
The ‘Source Project’ field on the Project will be populated with the Project that was used as the source Project in the following scenarios:
Note: This is a new field that has been added to the Project Object and will need to be added to the Project Page Layout if required.
To provide greater accuracy in the P&L fields, a number of new fields have been added on the Milestone Object that will be used to track Expenses related to a Milestone. These fields include:
These new fields will be used within the formula logic that calculates the following P&L fields on the Milestone Object:
The formula logic has been adjusted to accommodate Projects with a Billing Cycle of ‘Fixed Price + Expenses’ and those with a Billing Type of ‘Controlled on Milestones’ for Milestones with a Milestone Billing Type of ‘Fixed Price’ and ‘Fixed Price + Expenses’.
To provide Customers with the flexibility to override the calculated ‘Milestone Completion Status’ formula field, a new ‘Milestone Completion % Override’ field has been added to the Milestone Object.
This override field can be used by customers to calculate the Completion % of their Milestones in their own way and populate the field with the result of the calculation.
When the ‘Milestone Completion % Override’ field is populated, the ‘Milestone Completion Status’ field will reference that field value.
To provide Customers with the flexibility to override the calculated ‘Project Completion Status’ formula field, a new ‘Project Completion % Override’ field has been added to the Project Object.
This override field can be used by customers to calculate the Completion % of their Projects in their own way and populate the field with the result of the calculation.
When the ‘Project Completion % Override’ field is populated, the ‘Project Completion Status’ field will reference that field value.
This section includes details of any changes to existing fields as well as any new fields that have been added to the solution as part of this release.
IMPORTANT: We recommend you add these fields to your Page Layouts. If you are not using the Permission Sets included with Mission Control, we recommend you check the Field Level Security for all of these fields to ensure all appropriate Profiles/Permission Sets have the required access.
Skill Assignment
| Field | Field Type | Comments |
| Enjoyment Factor | Picklist | Identifies the Role’s Enjoyment Factor when using this Skill
Picklist Values are taken from the ‘Enjoyment Factor’ Global Picklist Value Set |
| Proficiency | Picklist | Existing field, requires the following field values to be added:
6 7 8 9 10 |
| Enjoyment Factor Value | Formula (Number 18, 0) | Formula: Converts the Enjoyment Factor field value to a number for use on the Skills Matrix Report |
| Proficiency Value | Formula (Number 18, 0) | Formula: Converts the Proficiency field value to a number for use on the Skills Matrix Report |
Development Plan
| Field | Field Type | Comments |
| Name | Text (80) | Identifies the Name of the Development Plan |
| Role | Lookup (Role) | Identifies the Role record this Development Plan relates to |
| Review Date | Date | Identifies the Date this Review took place |
| Assessor 1 | Lookup (Role) | Identifies the Role that will be carrying out the assessment of this Role and their Skills |
| Assessor 2 | Lookup (Role) | Identifies the Role that will be carrying out the assessment of this Role and their Skills |
| Assessor 3 | Lookup (Role) | Identifies the Role that will be carrying out the assessment of this Role and their Skills |
Assessment
| Field | Field Type | Comments |
| Assessment ID | Auto-Number | Identifies the unique number for this Assessment record.
Format: ASM:XXXX |
| Development Plan | Lookup (Development Plan) | Identifies the Development Plan this Assessment relates to |
| Skill Assignment | Lookup (Skill Assignment) | Identifies the Skill Assignment this Assessment relates to |
| Enjoyment Factor | Picklist | Identifies the Role’s Enjoyment Factor when using this Skill
Picklist Values are taken from the ‘Enjoyment Factor’ Global Picklist Value Set |
| Role Rating | Picklist | Identifies the proficiency rating this person has provided the Role for this Skill |
| Role Comments | Rich Text | Identifies the comments from this person in relation to their assessment |
| Assessor 1 Rating | Picklist | Identifies the proficiency rating this person has provided the Role for this Skill |
| Assessor 1 Comments | Rich Text | Identifies the comments from this person in relation to their assessment |
| Assessor 2 Rating | Picklist | Identifies the proficiency rating this person has provided the Role for this Skill |
| Assessor 2 Comments | Rich Text | Identifies the comments from this person in relation to their assessment |
| Assessor 3 Rating | Picklist | Identifies the proficiency rating this person has provided the Role for this Skill |
| Assessor 3 Comments | Rich Text | Identifies the comments from this person in relation to their assessment |
| Average Rating | Formula (Number 18, 0) | Identifies the Average Rating across all proficiency assessment ratings |
| Agreed Rating | Picklist | Identifies the agreed rating that will be applied to the Skill Assignment Proficiency field |
| Apply to Skill Assignment | Checkbox | Identifies whether the Agreed Rating should update the Proficiency field on the Skill Assignment record for the Role/Skill |
| Development Plan | Rich Text | Identifies the agreed steps that will be taken to develop this Role’s enjoyment / proficiency in relation to this Skill |
Skill
| Field | Field Type | Comments |
| Mass Assign to Roles | Checkbox | Identifies if this Skill should be assigned to Active Roles who have Skills with the same Type value |
Project
| Field | Field Type | Comments |
| Weekly Status Report – Include Budget Item | Checkbox | Include the Budget Item records within the Weekly Status Report |
| Weekly Status Report – Time Log Period | Picklist | Identifies the reporting period that will be used for including Time Logs in the Weekly Status Report |
| Weekly Status Report – Time Log Days | Number (18, 0) | Identifies the number of days that will be used for including Time Logs in the Weekly Status Report in ‘Last n Days’ is selected in the ‘Weekly Status Report – Time Log Period’ field |
| Source Project | Lookup (Project) | Identifies the Project that was used when creating this Project (e.g. via Clone or Auto-Generation) |
| Use Multiple Overtime Rates | Checkbox | Identifies whether this Project will be using an Overtime Card with multiple overtime rates |
| Overtime Card | Lookup (Overtime Card) | Identifies which Overtime Card will be used to calculate the Overtime Rates on this Project |
| Project Completion % Override | Percent | Entering a value in this field overrides the calculated completion percentage within the Project Completion Status field |
| Project Completion Status | Formula (Percent) | Existing formula logic modified to accommodate the Project Completion % Override field |
| Expected Next Billing Date | Formula (Date) | Formula: Identifies the expected value for the Periodic Billing Next Date based on the Periodic Billing Last Date and Periodic Billing Frequency |
| Periodic Next Billing Date Mismatch | Formula (Text) | Formula: Displays Yes if the Periodic Billing Next Date does not match the Expected Next Billing Date, otherwise displays No |
| Invoice on Completion Milestones | Roll Up Summary (Count) | Roll Up Summary: Counts the number of Milestones where ‘Invoice on Completion’ = TRUE |
Budget Item
| Field | Field Type | Comments |
| Include in Weekly Status Report | Checkbox | Identifies the Budget Item should be included in the Weekly Status Report
Default value: Unchecked |
Time Log
| Field | Field Type | Comments |
| Overtime Rate | Lookup (Overtime Rate) | Identifies the Overtime Rate record that will be used to identify the Overtime Ratios for this Time Log |
Overtime Card
| Field | Field Type | Comments |
| Name | Text (80) | Identifies the Name of the Overtime Card |
Overtime Rate
| Field | Field Type | Comments |
| Overtime Rate ID | Auto-Number | Identifies the unique ID of the Overtime Rate
Format: ORID:XXXXXX |
| Overtime Rate Name | Text (255) | Identifies the name of the Overtime Rate |
| Overtime Card | Lookup (Overtime Card) | Identifies the Overtime Card this Overtime Rate relates to |
| Overtime Ratio (Billable) | Number (16, 2) | Identifies the Overtime Ratio that will be applied to the Billable Financials (e.g. 1.50, 2.0) |
| Overtime Ratio (Cost) | Number (16, 2) | Identifies the Overtime Ratio that will be applied to the Cost Financials (e.g. 1.50, 2.0) |
Milestone
| Field | Field Type | Comments |
| Anticipated Milestone Expenses | Currency (16, 2) | Identifies the anticipated value of expenses that will be incurred in relation to this Milestone |
| Actual Milestone Expenses (Billable) | Currency (16, 2) | Identifies the value of all billable expenses that are approved on this Milestone |
| Actual Milestone Expenses (Non Billable) | Currency (16, 2) | Identifies the value of all non billable expenses that are approved on this Milestone |
| Actual Milestone Expenses | Currency (16, 2) | Identifies the value of all expenses that are approved on this Milestone |
| P&L (Scheduled) | Formula (Currency) | Existing formula logic modified to accommodate various Project Billing Type scenarios |
| P&L (Actual) | Formula (Currency) | Existing formula logic modified to accommodate various Project Billing Type scenarios |
| P&L (Forecast) | Formula (Currency) | Existing formula logic modified to accommodate various Project Billing Type scenarios |
| Milestone Completion % Override | Percent | Entering a value in this field overrides the calculated completion percentage within the Milestone Completion Status field |
| Milestone Completion Status | Formula (Percent) | Existing formula logic modified to accommodate the Milestone Completion % Override field |
Validation Rules
The following Validation Rules have been included in this Release. It is recommended you review each Validation Rule and determine whether you wish for the rule(s) to be active or inactive.
| Object | Rule | Description | Active |
| Project | Ensure Time Log Days Specified | Ensures a value is entered in the ‘Weekly Status Report – Time Log Days’ field if the ‘Weekly Status Report – Time Log Period’ field is set to Last n Days | TRUE |
| Project | Ensure Overtime Allowed Fields are populated | Ensures the ‘Overtime Allowed (Billable)’ or ‘Overtime Allowed (Cost)’ is set to TRUE if ‘Use Multiple Overtime Rates’ is set to TRUE | TRUE |
| Project | Ensure Overtime Card Populated | Ensure ‘Overtime Card’ is populated if ‘Use Multiple Overtime Rates’ is set to TRUE | TRUE |
| Time Log | Ensure Overtime Rate Populated | Ensure ‘Overtime Rate’ is populated if ‘Use Multiple Overtime Rates’ is set to TRUE | TRUE |
| Milestone | Field Req Milestone Billing Type | Ensure various supporting fields are populated correctly if ‘Milestone billing Type’ is populated | TRUE |
| Project | Field Req Billing Cycle | Ensure various supporting fields are populated correctly if ‘Billing Type’ is set to Periodic | TRUE |
| Project | Field Req Deposit to TM | Ensure various supporting fields are populated correctly if ‘Billing Type’ is set to Deposit to T&M | TRUE |
| Project | Field Req Fixed Price | Ensure various supporting fields are populated correctly if ‘Billing Type’ is set to Fixed Price | TRUE |
| Project | Field Req Fixed Price plus Expenses | Ensure various supporting fields are populated correctly if ‘Billing Type’ is set to Fixed Price + Expenses | TRUE |
| Project | Field Req Time and Materials | Ensure various supporting fields are populated correctly if ‘Billing Type’ is Time & Materials | TRUE |
| Project | Field Req Controlled on Milestones | Ensure various supporting fields are populated correctly if ‘Billing Type’ is Controlled on Milestones | TRUE |
How do I upgrade?
Mission Control will be made available based on the following release schedule.
19th May 2023 – Available for manual upgrade from the AppExchange
27th May 2023 – Automatic upgrade to all Sandbox Orgs
3rd June 2023 – Automatic upgrade to all Production Orgs
To manually upgrade to the new version of Mission Control in your organisation, please follow the steps below:
What’s New Webinar
We have pre-recorded the ‘What’s New’ webinar to provide further information on how to get the best out of the new features. To access this webinar, please view the ‘Release Notes’ section of the Mission Control Support Centre – www.aprika.com/mc-support
Feedback
Some of the new features included in this release of Mission Control have come from ideas submitted from existing clients. If you have an idea for enhancing Mission Control, you can submit it via email to [email protected].
Questions?
If you have any questions regarding this release notification, please do not hesitate to contact us at [email protected].
