Salesforce Project Management Software by Aprika
A new version of Mission Control (version 1.67) will be released on the AppExchange on Friday 5th January 2024. This notification has been issued to existing Mission Control users. It contains an overview of the new features available with this release, along with instructions on how to upgrade to the new version.
This release includes a number of new features, along with some enhancements to existing functionality, including:
Let’s get stuck into the detail…
The Auto Assignment Wizard is a feature within Mission Control that enables you to easily identify and auto-assign the most appropriate Roles to a Project, based on defined criteria including Capacity, Team Membership and Skill set. In order to use the Auto Assignment Wizard, the Project’s Actions must have values in the Start Date and End Date fields.
The Auto Assignment Wizard is accessible from the Project record, by clicking the ‘Auto Assignment’ button, as shown below.
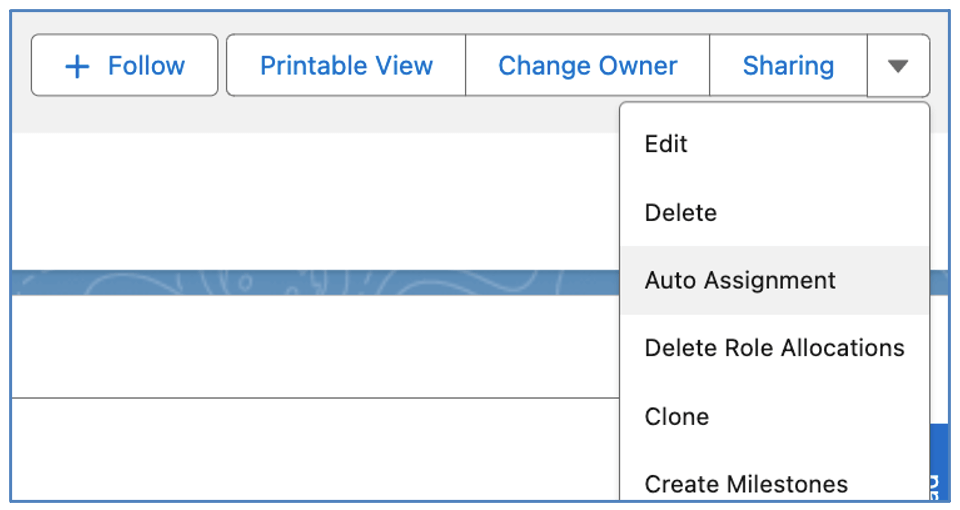
Note: If this button is not available on your Project records, please speak to your System Administrator.
When using the Auto Assignment Wizard, there are 3 steps to complete:
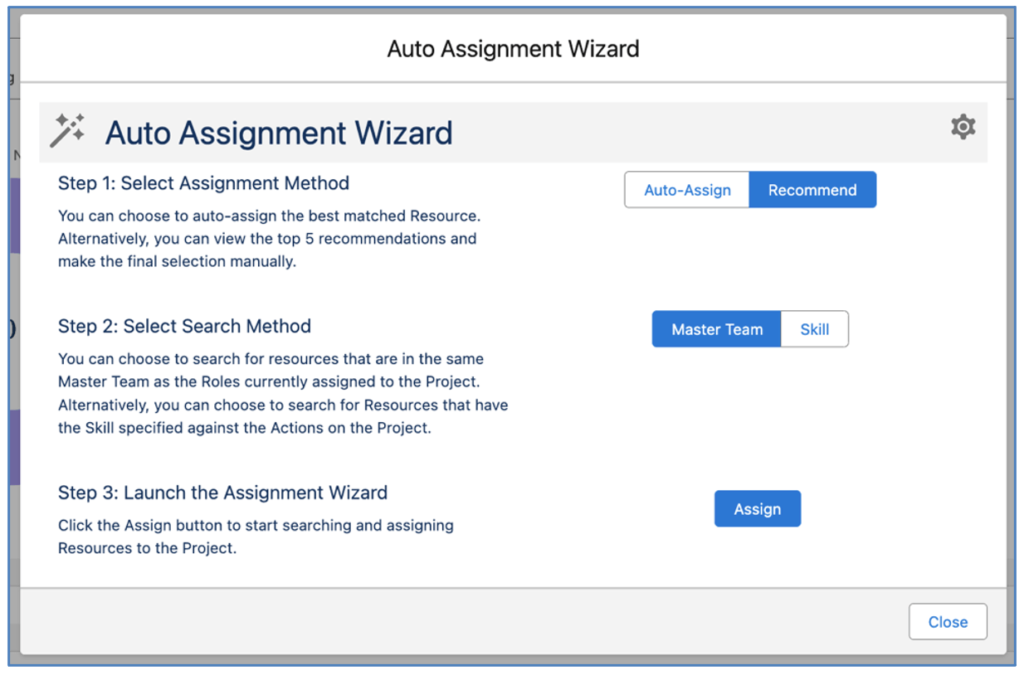
This step lets you choose whether you automatically assign the best matched resources, or view a list of the top recommendations, allowing you to manually choose the final selections. To automatically assign resources, you will need to select ‘Auto-Assign’. To view the list of recommended resources, you will need to select ‘Recommend’.
This step lets you choose the criteria that you will use to search for Roles. The options include:
The Master Team option will factor in how long each Role has been a member of the Team and their available capacity. The Skill option will factor in how long each Role has had the Skill, their proficiency in that Skill, their enjoyment factor of the Skill and their available capacity.
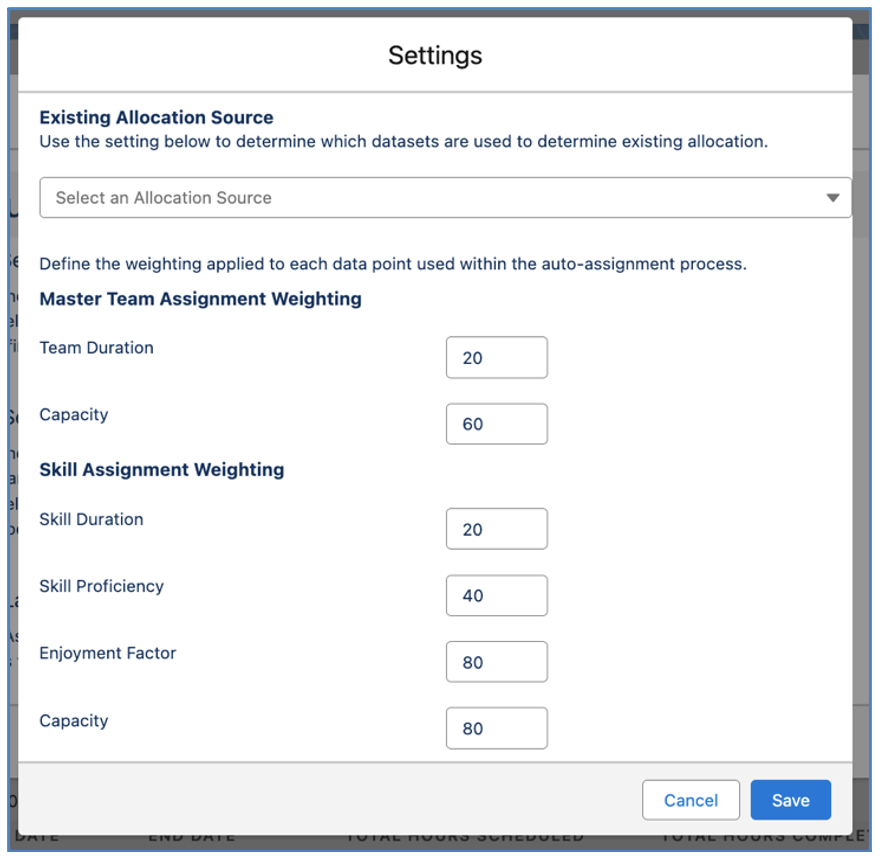
Within the Settings Modal of the Auto Assignment Wizard, you are able to control the weighting applied to each data point used in the auto-assignment process.
To use the ‘Master Team’ option, each Action, Contributor and Checklist Item on the Project needs to have a Role assigned. Each Role needs a value in the ‘Master Team’ field. To use the ‘Skill’ option, each Action, Contributor and Checklist Item on the Project needs to have a Role assigned. Each Action on the Project needs a Skill assigned.
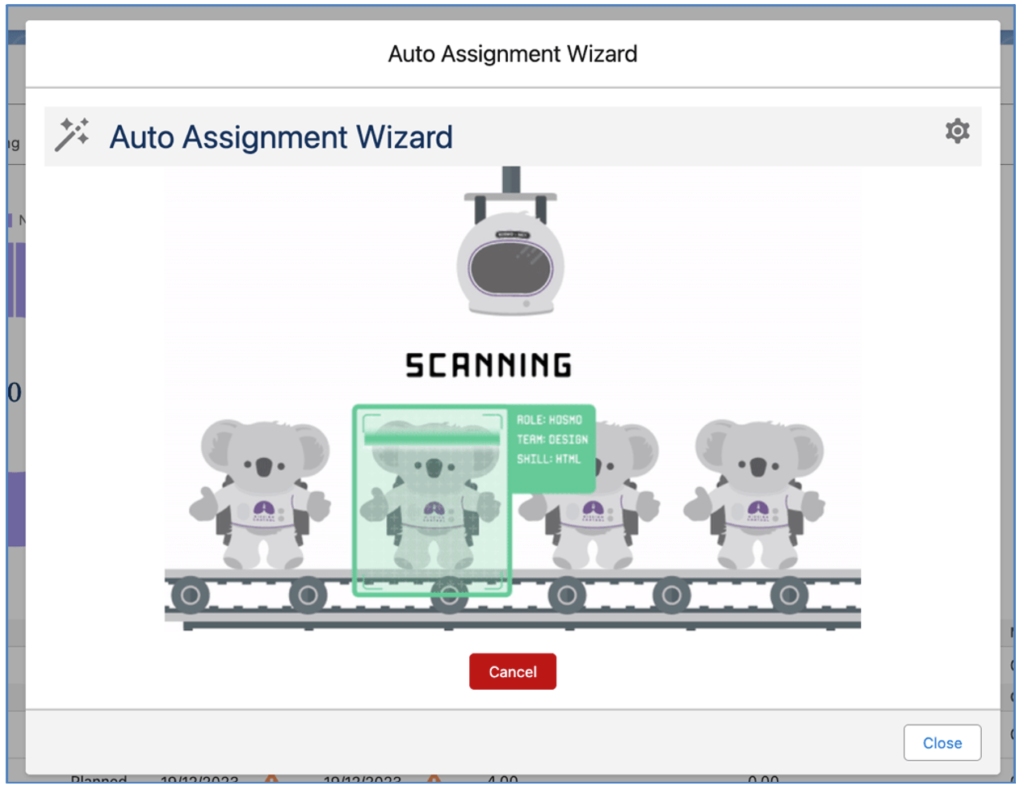
This step initiates the auto-assignment process. Whilst the process is running, you will see the screen below.
Once the auto-assignment process has completed, you will be presented with one of the following screens. This will be dependent on which option you selected during Step 1.
If you chose ‘Recommend’, you will be presented with a list of Recommendations. This will show you the Roles that most closely match the requirements for the Project. They are ranked based on their Match %. You are able to review the results and select a Role for each assignment. Once you have selected the Roles you want to be assigned, you will need to click the Assign button.
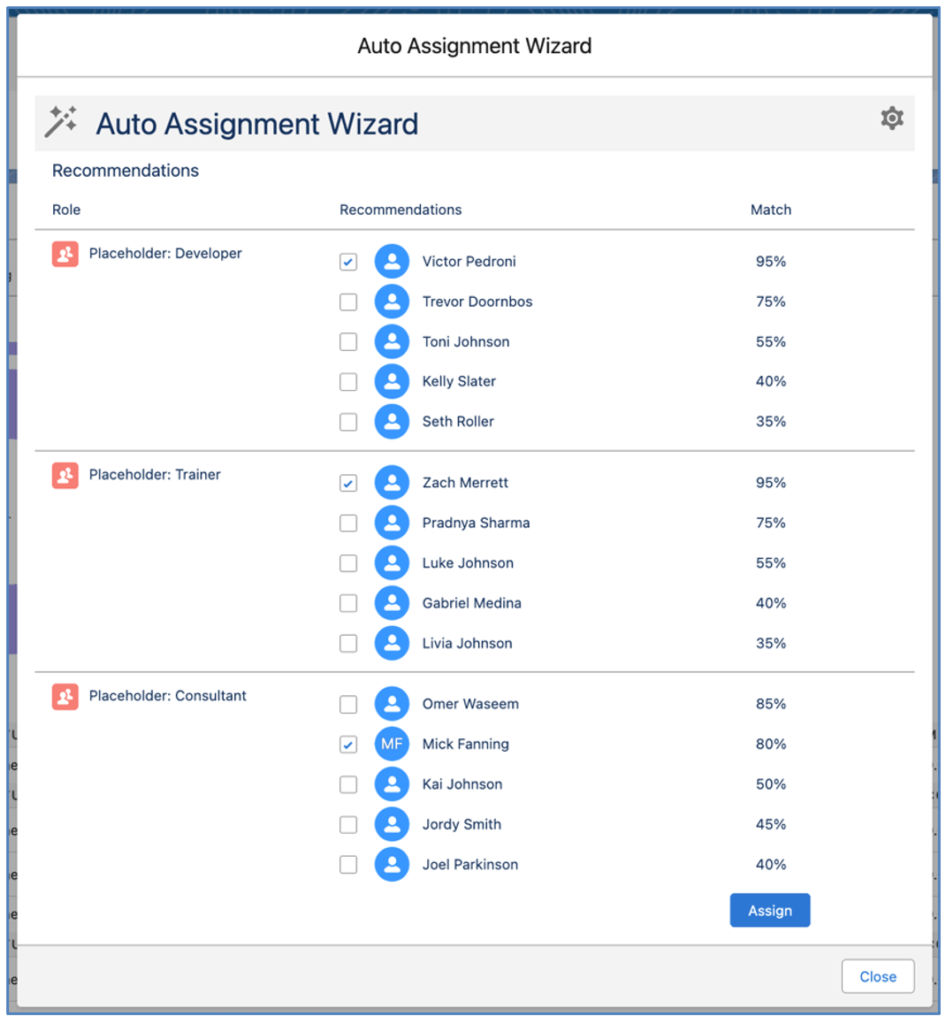
After clicking the Assign button having made your selections from the Recommendations, you will then get a confirmation screen showing the list of Roles assigned to the Project. When using the ‘Auto-Assign’ option, you will arrive on this screen without having to make any manual selection.
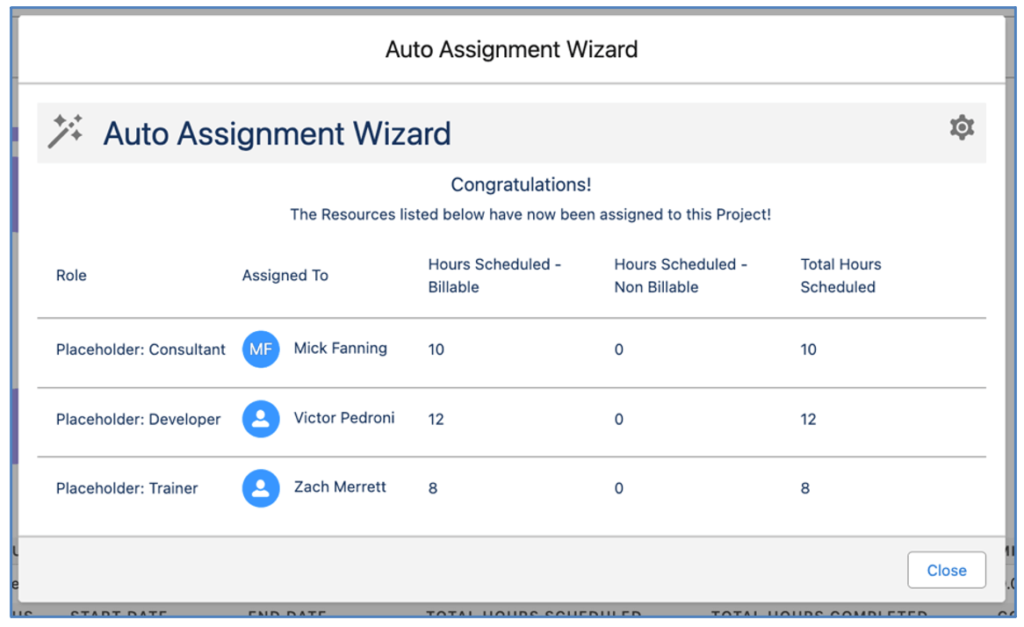
At this stage, the auto-assignment process is complete and these Roles have now been assigned to the Project.
Note: The auto-assignment process will assign Roles as Project Owners, Phase Owners, Milestone Owners, Action Owners, Contributors and Checklist Item Owners.
The Settings Modal within the Auto-Assignment Wizard provides you with access to the weighting values that are used for the ‘Master Team’ and ‘Skill’ assignment options. These Settings are Organization-wide settings, so all Users that are using the Auto Assignment Wizard will all use the same weighting values.
Note: In order to be able to edit the values within the Settings Modal, you will need to ensure the ‘Edit Auto Assignment Settings’ field on your Role record is set to TRUE.
To access the Settings Modal, click the ![]() icon in the top-right of the Auto Assignment Wizard component. This will open the Settings Modal.
icon in the top-right of the Auto Assignment Wizard component. This will open the Settings Modal.
This Setting will only be visible for Customers using Role Forecasting. Specifically, it will be displayed if the ‘Auto-generate Role Allocation records’ setting within the Role Allocation Automation Settings on the Control Pad is set to TRUE.
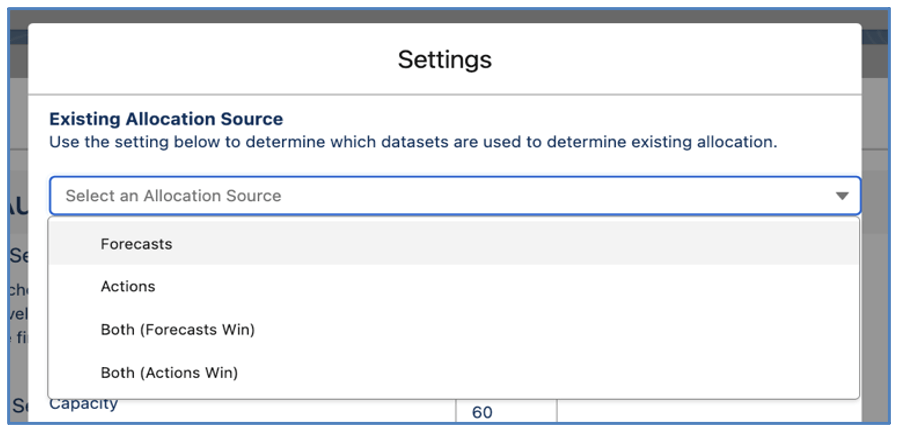
When the ‘Auto-generate Role Allocation records’ setting is TRUE, you will need to select a value for this Setting. This Setting enables you to determine which datasets will be factored in when calculating existing allocation towards capacity.
Note: allocations will always include Role Allocations relating to Holidays, regardless of which value is selected.
When the ‘Auto-generate Role Allocation records’ setting is FALSE, the following datasets will be used:
When a User selects the Master Team Option in Step 2, the following parameters will be considered to determine how well the Role matches the assignment requirement.
Example Master Team Weighting
In this scenario, we have set our Master Team Assignment weightings as per the table below.
| Setting | Value |
| Team Duration | 20 |
| Capacity | 60 |
This indicates that we are placing three times more importance on Capacity than how long the person has been a member of the team.
As each parameter will return a maximum of 5 Roles, the highest parameter score will be 5 and the lowest will be 1. The maximum score a Role could achieve in this scenario is 5 x the Team Duration Weighting and 5 x the Capacity Weighting. Based on these example weightings, the maximum score a Role could achieve is:
Team Duration: 5 x 20 = 100
Capacity: 5 x 60 = 300
Maximum Score: 400
| Role | Team Duration Ranking | Team Duration Weighting | Capacity Ranking | Capacity Weighting | Assignment Score | Match % |
| Colin | 5 | 100 | 2 | 120 | 220 | 55% |
| Chris | 4 | 80 | 3 | 180 | 260 | 65% |
| Mick | 3 | 60 | 1 | 60 | 120 | 30% |
| Kelly | 2 | 40 | 4 | 240 | 280 | 70% |
| Joel | 1 | 20 | 5 | 300 | 320 | 80% |
Based on these calculations, the Top 5 recommended Roles would be listed in the following order:
Joel: 80%
Kelly: 70%
Chris: 65%
Colin: 55%
Mick: 30%
When a User selects the Skill Option in Step 2, the following parameters will be considered to determine how well the Role matches the assignment requirement.
Example Skill Weighting
In this scenario, we have set our Skill Assignment weightings as per the table below.
| Setting | Value |
| Skill Duration | 20 |
| Skill Proficiency | 20 |
| Enjoyment Factor | 40 |
| Capacity | 80 |
This indicates that we are placing the most importance on Capacity, followed by Enjoyment Factor.
As each parameter will return a maximum of 5 Roles, the highest parameter score will be 5 and the lowest will be 1. The maximum score a Role could achieve in this scenario is 5 x the Skill Duration Weighting, 5 x the Skill Proficiency Weighting, 5 x the Enjoyment Factor Weighting and 5 x the Capacity Weighting. Based on these example weightings, the maximum score a Role could achieve is:
Skill Duration: 5 x 20 = 100
Skill Proficiency: 5 x 20 = 100
Enjoyment Factor: 5 x 40 = 200
Capacity: 5 x 80 = 400
Maximum Score: 800
| Role | Skill Dur. Rank | Skill Dur. Weight | Skill Prof. Rank | Skill Prof. Weight | Enjoy. Factor Rank | Enjoy. Factor Weight | Capacity Rank | Capacity Weight | Assign. Score | Match % |
| Colin | 5 | 100 | 2 | 40 | 2 | 80 | 2 | 160 | 380 | 47.5% |
| Chris | 4 | 80 | 3 | 60 | 3 | 120 | 3 | 240 | 500 | 62.5% |
| Mick | 3 | 60 | 1 | 20 | 3 | 120 | 1 | 80 | 280 | 35% |
| Kelly | 2 | 40 | 4 | 80 | 1 | 40 | 4 | 320 | 480 | 60% |
| Joel | 1 | 20 | 5 | 100 | 1 | 40 | 5 | 400 | 560 | 70% |
Based on these calculations, the Top 5 recommended Roles would be listed in the following order:
Joel: 70%
Chris: 62.5%
Kelly: 60%
Colin: 47.5%
Mick: 35%
You are able to automatically invoke the auto-assignment process via a Flow or Apex Trigger. For example, you may want to execute the auto-assignment process automatically after a Project has been auto-generated from an Opportunity. This can be done by calling an invokable Apex Class.
There are two separate invokable Apex Classes. Which one you use will depend on whether you want to use the ‘Master Team’ or ‘Skill’ assignment method.
If you want to use the ‘Master Team’ assignment method, you will need to call the ‘AutoAssignmentWizardTeamMethod’ Apex Class. If you want to use the ‘Skill’ assignment method, you will need to call the ‘AutoAssignmentWizardSkillMethod’ Apex Class.
When calling either Apex Class, you will need to supply it with a Project ID or a list of Project IDs.
Once the Apex Class has processed, the person that invoked the process will receive a confirmation or failure email notification.
You are able to convert Role Forecast records relating to a Project into Actions, so they can be considered a firm allocation of resources and people can log time against those Actions.
To convert Role Forecasts to Actions, you need to set the ‘Convert Role Forecasts to Actions’ field on the Project to TRUE. This will convert each individual Role Forecast into an Action. It will also clone the Role Allocations related to the Role Forecast. Therefore, if any manual adjustment has been made to the Role Allocations, this will be carried over to the Role Allocations related to the Actions.
As Actions need to be related to a parent Milestone, this conversion process also creates a Milestone. The name of the Milestone will be ‘Role Forecasts’ by default. However, you can define your own default Milestone Name using the ‘Role Forecast Conversion’ setting within the ‘Role Allocation Automation Settings’ Tile on the Control Pad of the Mission Control Console.

Once a Role Forecast is converted, the ‘Converted to an Action’ field will be set to TRUE. This will ensure the same Role Forecast will not be converted again if the User carries out the conversion process a subsequent time.
When an Action is converted from a Role Forecast record, the ‘Converted from Role Forecast’ field on the Action is populated, allowing you to identify which Role Forecast it was converted from.
The table below outlines which fields are populated on the Action when a Role Forecast is converted.
| Role Forecast Field | Action Field |
| Role Name – Skill Name e.g. Colin Johnson Colin Johnson – Training | Action Name |
| Role | Action Owner |
| Skill | Skill |
| Start Date | Start Date |
| End Date | End Date |
| Hours Forecast – Billable | Hours Scheduled – Billable |
| Hours Forecast – Non Billable | Hours Scheduled – Non Billable |
| Manual Allocation | Manual Allocation |
If any Role Forecast records are unable to be converted to Actions, the User that invoked the conversion process will receive an email notification. This email will contain a list of the Role Forecast records that were unable to be converted. The most likely reason the conversion process would fail is due to mandatory fields or validation rules a customer has configured within their own Org.
All custom components within Mission Control have been enhanced to support Record Types. Therefore, if a Customer configures Record Types on any Custom Object within Mission Control, the components will have the default Record Type selected, the User will be able to switch to another Record Type and any related Picklist Values will be updated to show values applicable to the selected Record Type. The components updated to support Record Types include:
No configuration is required. When Record Types are being used, they will automatically be displayed on these components.
A number of enhancements have been made to the creation of Salesforce Tasks and Events from Actions. Each enhancement is detailed below.
By default when the ‘Task’ or ‘Event’ fields on the Action are set to TRUE, the Task or Event record is created with ‘Mission Control: ‘ set as a Prefix followed by the Action Name with the Project Name in brackets within the Name field. For example, for the ‘Rip Curl: Website’ Project, if you set the Task field to TRUE on the ‘Design Wireframes’ Action, the Name of the Task will be as follows:
Mission Control: Design Wireframes (Rip Curl: Website)
To provide Customers with flexibility on the Prefix, there is a Setting within the ‘Project Automation Settings’ Tile on the Control Pad of the Mission Control Console called ‘Enable Task/Event Prefix Override’.

This Setting enables Customers to choose to override the Prefix with a Custom Prefix value or to remove the Prefix altogether.
To override with a Custom Prefix, set the Setting Checkbox to TRUE, select ‘Custom Prefix’ in the Override Option and specify a value in the Custom Prefix field, as shown below.

In this example, the Task Name would be:
Project Task: Design Wireframes (Rip Curl: Website)
To remove the Prefix, set the Setting Checkbox to TRUE and select ‘No Prefix’ in the Override Option, as shown below.

Leaving this Setting FALSE will mean Task and Event Names use the out of the box format.
When the ‘Event’ field on an Action is set to TRUE, it previously created an Event record assigned to the User associated to the Role record of the Action Owner.
This enhancement will also associate any Contributors that are assigned to the Action, if their Role record is linked to a User record.
If the Task or Event field on the Action is set to TRUE and is subsequently set to FALSE, the Task or Event record that was created when being set to TRUE will be deleted.
A number of enhancements have been made to the Gantt Chart. Each enhancement is detailed below.
Previously Customers were able to toggle Checklist Items on/off by using a button on the Gantt Chart. By default, Checklist Items were toggled off, so wouldn’t be displayed.
We have found Customers would prefer to have Checklist Items always displayed on the Gantt Chart, and being set to be toggled off was causing unnecessary confusion for Customers.
With the removal of this Toggle Button, Checklist Items will always be displayed on the Gantt Chart, unless the ‘Exclude from Gantt Indicator’ field is set to TRUE.
A long-awaited enhancement for several Customers, so we’re excited to deliver this feature request ☺
The Edit Modals on the Gantt Chart display certain fields out of the box. However, the fields displayed within these Modals can be customized using Field Sets on each Custom Object, as outlined below:
Each Field Set contains the default fields already selected. Customers can add or remove fields, and adjust the order in which they appear as required within each individual Field Set.
To enable the transfer of a Project Plan from one Salesforce Org to another, Customers can use the JSON Import/Export feature available on the Gantt Chart. For example, if you have created a Project Plan in a Sandbox Org and you want to transfer it to your Production Org, you can export the JSON file from the Sandbox Org and import it into the Production Org. This will be a more efficient process than using the Salesforce Data Loader to export/import each individual Custom Object at a time.
This process includes all fields from the following Objects within Mission Control:
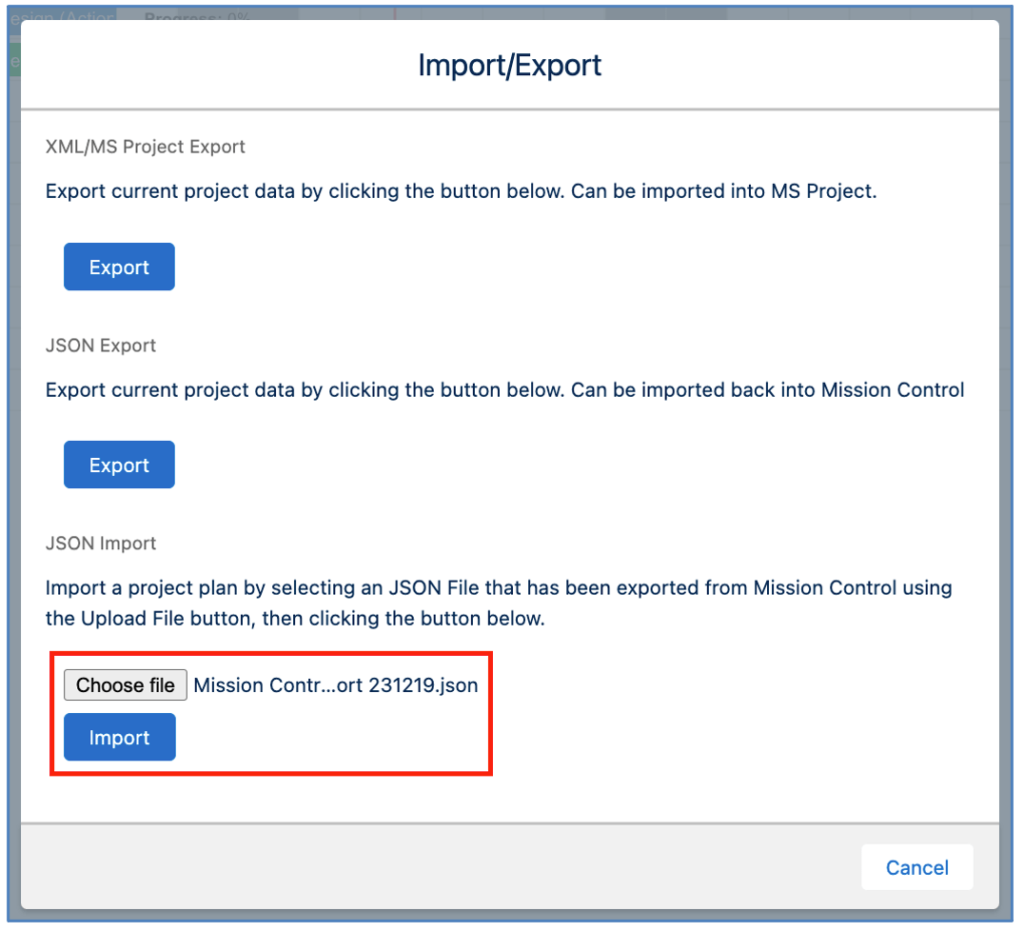
To export the JSON File of a Project, from the Gantt Chart, click the ‘Import/Export’ button. Click the ‘Export’ button within the JSON Export section of the Modal.
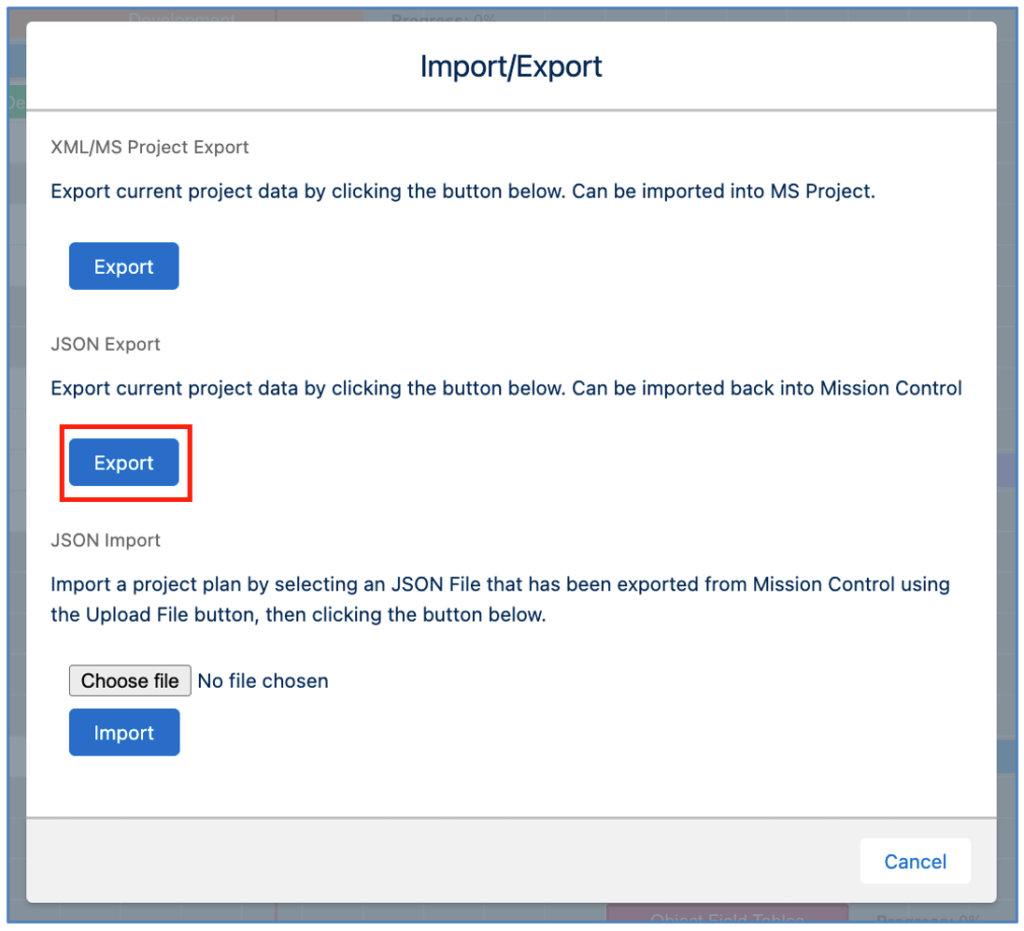
The JSON File will be downloaded to your computer. It will have a File Name format of ‘Mission Control Export YYMMDD.json’. This file can then be used to import the Project Plan into another Salesforce Org.
Note: To import a JSON File, you need to use the Standalone Gantt Chart. The Import button will not be accessible from the Gantt Chart on the Project Overview Page.
To import the JSON File of a Project, from the Gantt Chart, click the ‘Import/Export’ button. Click the ‘Choose file’ button and select the JSON File you want to use. Then click the ‘Import’ button within the JSON Import section of the Modal.
When the file has been uploaded, the Project Plans will be displayed on the Gantt Chart. You will not be able to make any edits until the master Save button has been clicked and the records have been created. The only exception is the values within the ‘Owner’ column in the Gantt Chart’s Data Table can be modified prior to clicking Save.
Whilst in draft mode, the Owners will appear with asterixis around the Owner’s Name, as shown below.
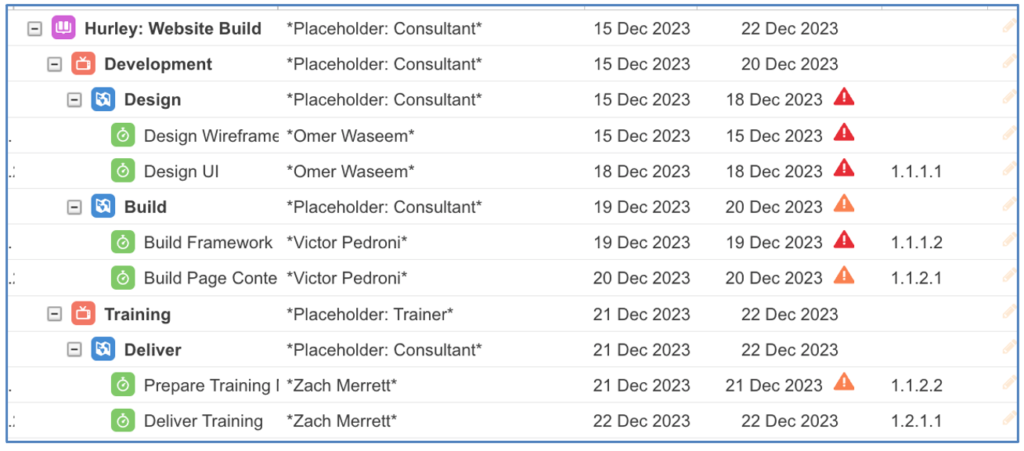
Once saved, if a Role can be found with a matching Name, it will be saved on the record. Any names of Owners that cannot be found within the target Org will be set to blank.
A number of enhancements have been made to the Project Status Report. Each enhancement is detailed below.
Customers have requested the ability to distribute their Weekly Status Reports on different days of the week. For example, you may have one client that wants to receive their report on a Monday, and another that wants to receive it on a Tuesday.
On the Control Pad, you specify the day of the week and the time of day that the Weekly Status Reports should be distributed. This day is now considered the ‘Default Distribution Day’.
If you have a Project that you would like to distribute the report on a different day to the ‘Default Distribution Day’, you can set the day of the week for that Project using the ‘Report Distributed On’ field.
Note: In order to take advantage of this feature, you will need to update your existing Project Status Report settings on the Control Pad. You will need to set the Setting to FALSE, click Save and then set it back to TRUE and click Save again.
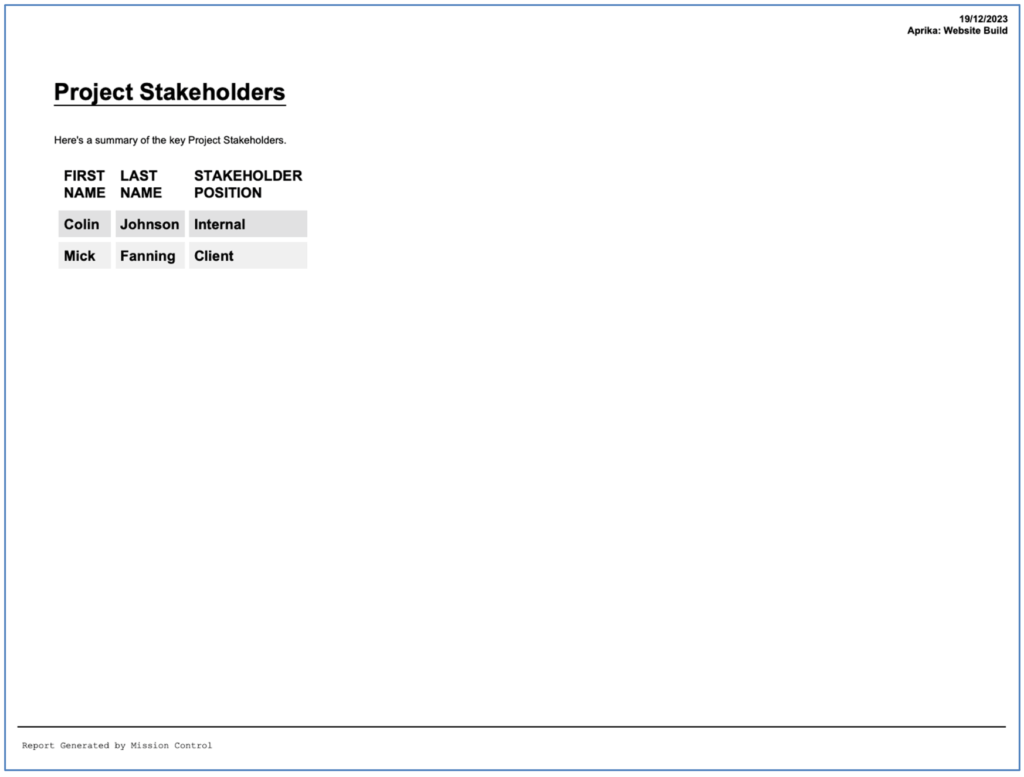
The Project Stakeholder Appendix can be optionally included in the Status Report by setting the ‘Weekly Status Report – Inc Stakeholders’ field to TRUE on the Project record. This Appendix includes Project Stakeholders where the ‘Include in Weekly Status Report’ field on the Project Stakeholder is TRUE.
Below is an example of the Project Stakeholder Appendix.
To add Custom Fields to the Project Stakeholder page within the Project Status Report, Customers can add fields to the ‘Project Stakeholder: Status Report Fields’ Field Set, which is available on the Project Stakeholder Object within Setup. Note: A maximum of 3 additional fields will be displayed on the Appendix.
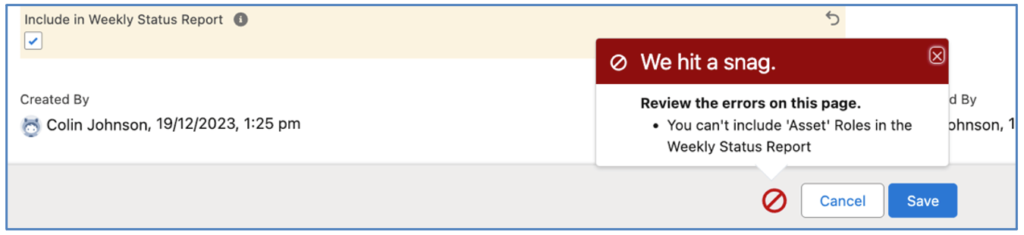
Note: A Validation Rule on the Project Stakeholder Object will prevent you from setting the ‘Include in Weekly Status Report’ field to TRUE if the Role it relates to is an ‘Asset’ Role.
A number of minor enhancements have been made to various features. Each enhancement is detailed below.
A number of enhancements have been made to the Role Object. Each enhancement is detailed below.
A ‘Save & New’ button has been added to the Role Edit page. This provides greater efficiency when creating multiple Roles. Rather than having to click Save, then click New, the User can click the ‘Save & New’ button and the existing record will be saved and immediately open an empty page to create another new record.
A number of List Views have been added to the Role Object, allowing Customers to update key settings for all Roles using the standard inline edit functionality. The List Views being added include:
Each List View provides access to the key fields on the Role record that control the behaviour of the Edit Modal on the Gantt Chart, including:
These List Views are visible by all Users that have access to the Role Object.
A number of enhancements have been made to the Manage Forecast Component. Each enhancement is detailed below.
The Manage Forecast component currently sources the Billing Rate and Cost Rate values for Role Forecast records from the Role record. A Lookup field has been added to the Opportunity Object, allowing Customers to reference a particular Rate Card from an Opportunity.
When this Rate Card field is populated, any Role Forecast records that are created in relation to the Opportunity will source the appropriate rates from the Rate Card Entries relating to the Rate Card. If a Role Forecast is created for a Role which results in no rates being sourced from the Rate Card Entries, the existing Role rate logic will be used instead.
If Role Forecast records exist prior to a Rate Card being specified on the Opportunity, or if the Rate Card is changed, the financial calculations of the Role Forecasts will be recalculated.
A new field called ‘Forecast Notes’ has been added to the Role Forecast Object, and is now accessible on the Manage Forecast Component.
Customers can add Custom Fields to the Role Forecast Object and add them to the ‘Manage Forecast Custom Fields’ Field Set, in order for them to display on the Manage Forecast Component.
Previously there was a field on the Role Availability Object called ‘Active’, which was used to determine which Role Availability record was currently active. This field was deemed to not be serving any core purpose to the Role Availability functionality and has been deprecated.
It has been removed from the Manage Availability page and the scheduled Apex Class setting has been removed from the ‘Role Allocation Automation Settings’ Tile on the Control Pad of the Mission Control Console.
The Role Availability records will no longer update the fields on the Role record. Instead, these will be updated manually and always be treated as the master source that will be used if there is not a Role Availability record covering the period.
To enable Customers to more accurately report on the invoice figures relating to individual Milestones when using the ‘Controlled on Milestones’ Billing Type on the Project, a new Custom Field has been added to the Milestone Object. The formula within the ‘Amount Remaining’ Milestone field has also been amended.
This Custom Field identifies the total value of Expenses included in the Billing Event Items relating to the Milestone. This field is populated with the sum of Expenses that relate to the Milestone where the ‘Invoiced’ field on the Expense = TRUE.
This Formula Field calculates ‘Milestone Budget’ – ‘Amount Invoiced’, unless the Milestone ‘Billing Type’ is set to ‘Fixed Price + Expenses’. In this instance, it calculates ‘Milestone Budget’ – (‘Amount Invoiced’ – ‘Expenses Invoiced’).
A new Validation Rule has been added to the Action Object. The ‘Ensure Fields Set for Task or Event’ Validation Rule ensures the appropriate fields are populated if the User is setting the ‘Task’ or ‘Event’ field to TRUE.
This section includes details of any component changes within the package. This includes changes to existing fields as well as any new fields, validation rules, buttons / actions, etc. that have been added to the solution as part of this release.
IMPORTANT: We recommend you thoroughly review all of these components. To take advantage of the enhancements within this release, you may need to:
If you are not using the Permission Sets included with Mission Control, we recommend you check the Field Level Security for all of these fields to ensure all appropriate Profiles/Permission Sets have the required access.
| Field | Field Type | Comments | New/Existing |
| Edit Auto Assignment Settings | Checkbox | Identifies if this Role can edit the Settings within the Auto Assignment Wizard | New |
| Field | Field Type | Comments | New/Existing |
| Convert Role Forecasts to Actions | Checkbox | Set this field to TRUE in order to create Actions from Role Forecasts | New |
| Weekly Status Report – Inc Stakeholders | Checkbox | Include the Project Stakeholder records within the Weekly Status Report | New |
| Report Distributed On | Picklist | Set which day of the week the Status Report should be distributed on. If this field is empty, the Default Distribution Day set on the Control Pad will be used | New |
| Field | Field Type | Comments | New/Existing |
| Converted to an Action | Checkbox | If this field is TRUE this Role Forecast has already been converted to an Action | New |
| Forecast Notes | Rich Text | Identifies notes relating to the Role Forecast | New |
| Field | Field Type | Comments | New/Existing |
| Converted from Role Forecast | Lookup (Role Forecast) | Identifies the Role Forecast this Action was converted from | New |
| Field | Field Type | Comments | New/Existing |
| Include in Weekly Status Report | Checkbox | Set this field to TRUE to include this Project Stakeholder within the Weekly Status Report | New |
| Field | Field Type | Comments | New/Existing |
| Rate Card | Lookup (Rate Card) | Identifies the Rate Card that will be used to source rates for Role Forecasts relating to this Opportunity | New |
| Field | Field Type | Comments | New/Existing |
| Expenses Invoiced | Currency (16, 2) | Identifies the total value of Expenses included in Billing Event Items on this Milestone | New |
| Amount Remaining | Formula (Currency) | Formula modified to calculate Milestone Budget – Amount Invoiced, excluding Expenses Invoiced | Existing |
The following Validation Rules have been included or updated in this Release. It is recommended you review each Validation Rule and determine whether you wish for the rule(s) to be active or inactive.
| Object | Rule | Description | Active |
| Project Stakeholder | Prevent Include in Weekly Status Report | Prevent the Project Stakeholder being included in the Weekly Status Report if associated to an Asset Role | TRUE |
| Action | Ensure Fields Set for Task or Event | Ensure the required fields are populated if the Task or Event Checkbox fields are set to TRUE | TRUE |
Mission Control will be made available based on the following release schedule.
5th January 2024 – Available for manual upgrade from the AppExchange
13th January 2024 – Automatic upgrade to all Sandbox Orgs
20th January 2024 – Automatic upgrade to all Production Orgs
To manually upgrade to the new version of Mission Control in your organisation, please follow the steps below:
We have pre-recorded the ‘What’s New’ webinar to provide further information on how to get the best out of the new features. To access this webinar, please view the ‘Release Notes’ section of the Mission Control Support Centre – www.aprika.com/mc-support
Some of the new features included in this release of Mission Control have come from ideas submitted from existing clients. If you have an idea for enhancing Mission Control, you can submit it via email to [email protected].
If you have any questions regarding this release notification, please do not hesitate to contact us at [email protected].
