A new version of Mission Control (version 1.68) will be released on the AppExchange on Friday 3rd May 2024. This notification has been issued to existing Mission Control users. It contains an overview of the new features available with this release, along with instructions on how to upgrade to the new version.
This release includes a number of new features, along with some enhancements to existing functionality, including:
Let’s get stuck into the detail…
When using the Log Time Component on the Salesforce Mobile App or via the Browser on a mobile device logged in as a Community User, the User will have access to the following mobile friendly Tabs:
The Action List Tab provides the ability to quickly log time for multiple Actions in one go. By default, the list will show Actions assigned to the Role related to the User for ‘This Week’. This Action list will include Actions where the Role is either the Action Owner or a Contributor.
There are four filter options:
Whichever option you have selected, it will be persistently remembered on subsequent visits to the Component. The following filter criteria is used to determine the Actions displayed in the List View:
Note: If the User’s Timesheet Setting or the Control Pad Override Timesheet Setting for ‘Show Overdue Actions’ is set to TRUE, any Overdue Actions for the Role will also be included.
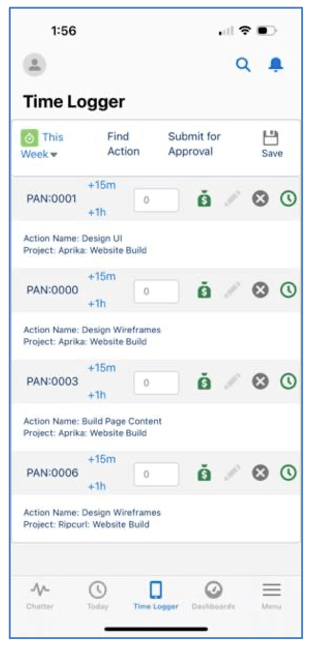
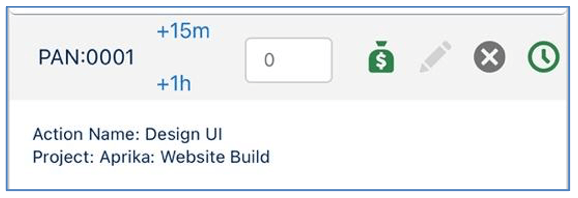
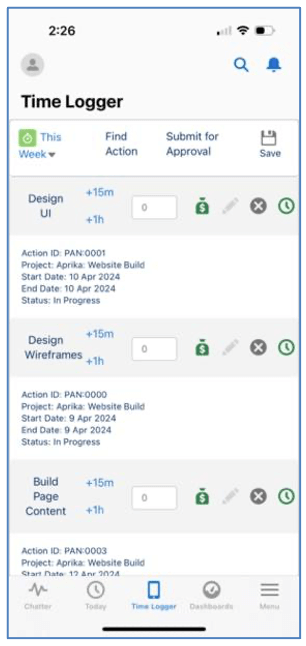
For each Action included in the List View, you will see a row as illustrated by the image below:

The Action ID will appear in the Grey section at the top along with all of the time logging actions, each of which are explained below:
| Button/Icon | Function |
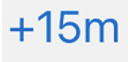 |
Clicking this +15m link will increase the Hours Completed box by 0.25 |
 |
Clicking this +1h link will increase the Hours Completed box by 1.00 |
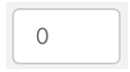 |
The Hours Completed box identifies the number of hours you want to log. This can be entered manually or you can use the +15m or +1h links to increment |
| The money bag icon indicates whether the Time Log will be created as Billable or Non Billable. If the icon is Green it will be Billable. Click the icon to toggle to a Red icon to make it Non Billable. If the Action ‘Non Billable Indicator’ field is TRUE, the icon will be Red by default and you will not be able to toggle to Green. | |
| The pencil icon allows you to open a modal to add more information relating to the Time Log, such as Time Long Notes, Time Log Type, etc. | |
| The cancel icon allows you to cancel the draft Time Log if you no longer want to submit it | |
 |
The clock icon allows you to use the Start/Stop time tracking function. If the Clock is Green, you can click it to start tracking time. If it’s Red (it will appear at the top of the list), you can click it to stop tracking time. |
Within the White section, you can view additional fields from the Action to provide more information to the User.
Saving Time Logs
To save your Time Logs, you will need to click the Save Icon, which is in the top right section of the Component, as shown below.
![]()
Start/Stop Time Tracking
When you click the Green Clock icon, it will start tracking time for that Action. The Action will appear at the top of the list with a Red Clock icon. This indicates that you are currently tracking time for that Action. You will also see the length of time that has been tracked.
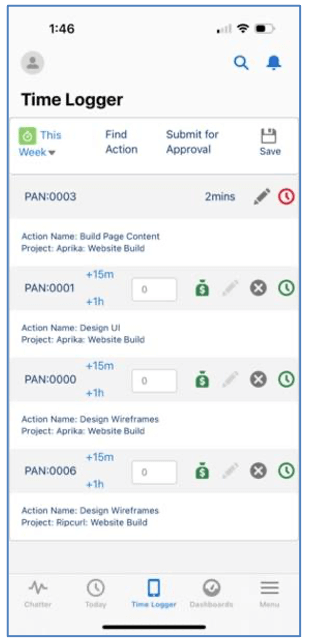
To stop the timer, you need to click the Red Clock icon. Once you’ve done this, you’ll receive a confirmation notification that the timer has been stopped.
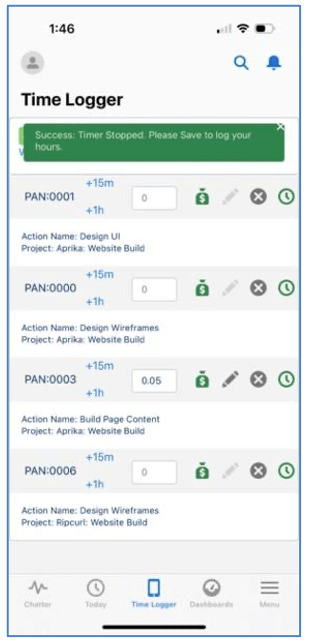
At this point, your Time Log has not been saved. You can now choose to toggle the Billable / Non Billable icon and/or click the pencil icon to add more information. To save the record, you need to click the Save icon in the top right.
Note: The fields displayed per Action are controlled by a Field Set. Please refer to the ‘Mobile Time Logger Field Sets’ section for further information on using this Field Set to customize your display.
If you are working on an Action that does not appear on your Action List, for example, you’ve been asked to assist on something that has not yet been assigned to you, you can click on the ‘Find Action’ Tab. This will load the time logger that enables you to manually search for an Action by selecting the Project, Milestone and Action you wish to log time against.

Once you’ve completed all of the relevant field information, you can click the Save button and your Time Log will be created.
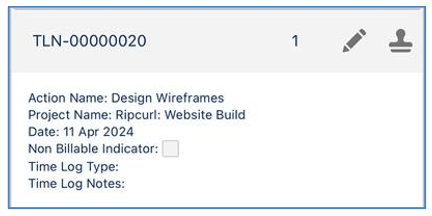
If your Time Logs need to be submitted for Approval, you can click on to the ‘Submit for Approval’ Tab and you will see a list of all the Time Logs you currently have with an Approval Status of ‘Pending’.
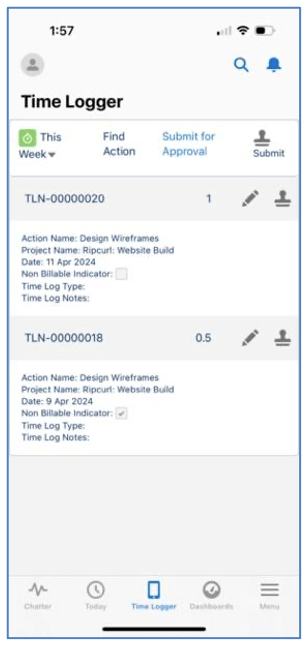
From this Tab, you’re able to click the pencil icon to edit information on the individual Time Logs. You can also click the Submit icon for individual Time Logs or click the Submit icon in the top-right section of the Component to submit all Time Logs.
![]()
Note: The fields displayed per Time Log are controlled by a Field Set. Please refer to the ‘Mobile Time Logger Field Sets’ section for further information on using this Field Set to customize your display.
To add the Time Logger to the Salesforce Mobile App, you will need to go to:
Setup > Apps > Mobile Apps > Salesforce > Navigation
Ensure ‘Time Logger’ is in the Selected Column and click Save.
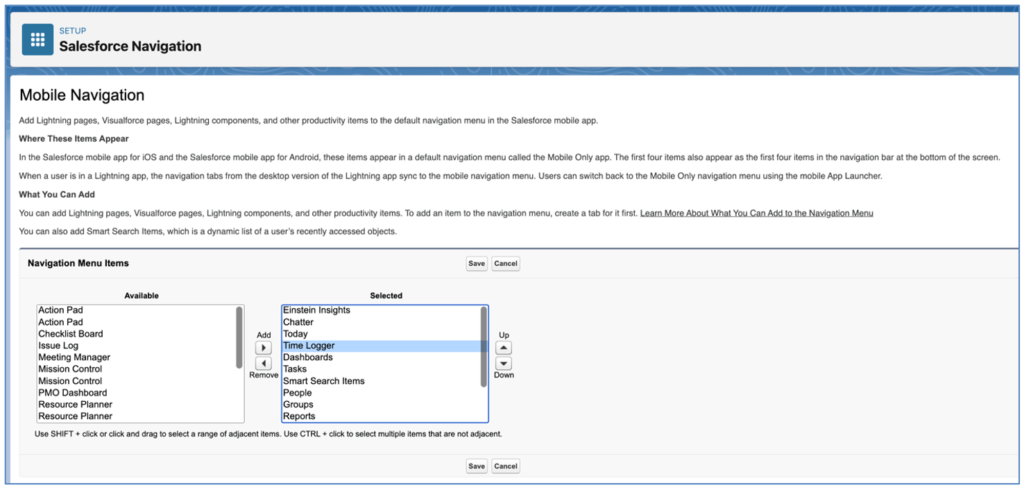
When you login to the Salesforce Mobile App, you will then see the Time Logger in the navigation menu.
You can control which fields are included in each of the Tabs within the Mobile Time Logger Component by updating the applicable Field Sets.
Action List
To specify the fields you want to appear for each Action included in the ‘Action List’ Tab, you will need to update the ‘Mobile Time Logger Fields’ Field Set on the Action Object.
The first field within the Field Set will be displayed in the Grey section and the remaining fields will be appear in the White section.
By default, the following fields are included in this Field Set:
Below is an example where the Action Name has been set as the first field within the Field Set and the Start Date, End Date and Status have been included.
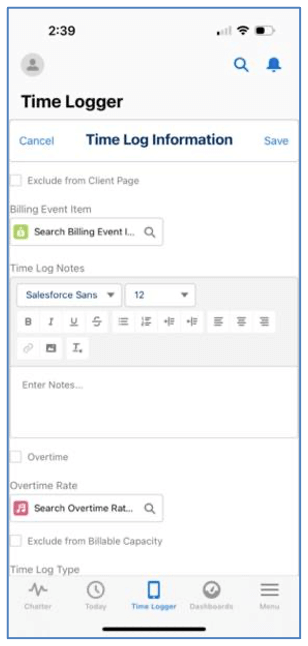
Add Time Log Information
To specify the fields you want to appear within the ‘Time Log Information’ Tab, which allows you to specify additional information when submitting a Time Log, you will need to update the ‘Mobile Time Logger Add Time Fields’ Field Set on the Time Log Object.
By default, the following fields are included in this Field Set:
Below is an example where the ‘Exclude from Client Page’ and ‘Billing Event Item’ fields have been included to appear at the top of the page.
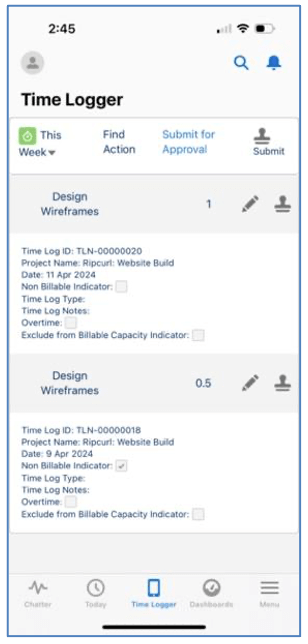
Submit for Approval
To specify the fields you want to appear for each Time Log included in the ‘Submit for Approval’ Tab, you will need to update the ‘Mobile Time Logger Time Log Fields’ Field Set on the Time Log Object.
The first field within the Field Set will be displayed in the Grey section and the remaining fields will be appear in the White section.
By default, the following fields are included in this Field Set:
Below is an example where the Action Name has been set as the first field within the Field Set and the Overtime and Exclude from Billable Capacity Indicator have been included.
A new Billing Type has been included for customers to manage an invoicing scenario that was not supported by existing Billing Types. To take advantage of this feature, you will need to add ‘Retainer to T&M’ as a new Picklist value in the Billing Type field on the Project Object.
The ‘Retainer to T&M’ Billing Type enables customers to automatically raise retainer invoices on a periodic basis and once that amount has been used, T&M invoices will be generated periodically. To use this Billing Type, the following fields will need to be set on the Project:
Billing Type: Retainer to T&M
Billing Cycle: Retainer
Retainer Amount: Set to your required Retainer amount per period
Periodic Billing Frequency: Set to your preference
Periodic Billing Next Date: Set to your required date
Retainer Invoices
The Retainer Invoices will be created automatically via the ‘Periodic Billing’ process that is scheduled to run daily within the Billing Event Settings section of the Control Pad on the Mission Control Console.
This process will create a Billing Event and Billing Event Item for the ‘Retainer Amount’ specified on the Project. The ‘Retainer’ field on the Billing Event will be set to TRUE automatically for these Billing Events, in order for them to be recognised as Retainer Invoices.
Note: You can have multiple Billing Events marked as a Retainer for 1 Project. However, Billing Events that have the Deposit field set to TRUE can only have 1 related Billing Event Item.
T&M Invoices
The T&M Invoices that are created as part of the ‘Retainer to T&M’ Billing Type will be created automatically as part of the periodic billing process that is scheduled via the Control Pad of the Mission Control Console.
When users log Expenses against the Project and/or log Time against the Actions on the Project, if there is sufficient balance on the amount that has been invoiced as part of a ‘Retainer’ Billing Event, then the Time Log or Expense will be related to the existing Billing Event and marked as Invoiced. Once there is no balance remaining on the Billing Event, any subsequent Time Logs or Expenses will be invoiced as part of the periodic T&M schedule.
Expenses
When an Expense is created and is related to a Project using the ‘Retainer to T&M’ Billing Type, the following calculation is performed to determine if the Expense can be related to the Retainer Invoice or if it should be flagged to be invoiced in the next periodic T&M Invoice.
Billing Event ‘Amount’ – (‘Hours Completed Value (Billable)’ of all related Time Logs + ‘Amount Claimed’ of all related Expenses) = Balance Remaining
Based on the above ‘Balance Remaining’ formula, one of the following actions will be carried out.
Time Logs
When a Time Log is created and is related to an Action on a Project using the ‘Retainer to T&M’ Billing Type, the following calculation is performed to determine if the Time Log can be related to the Retainer Invoice, if it should be split between the Retainer Invoice and the next periodic T&M Invoice, or if it should be flagged to be invoiced in the next periodic T&M Invoice.
Billing Event ‘Amount’ – (‘Hours Completed Value (Billable)’ of all related Time Logs + ‘Amount Claimed’ of all related Expenses) = Balance Remaining
Based on the above ‘Balance Remaining’ formula, one of the following actions will be carried out.
Note: Expenses will not be split across multiple Billing Events. However, Time Logs can be split to ensure the full amount of the Retainer Invoiced is used.
A number of enhancements have been made to the Role Allocation functionality. Details of each enhancement are included below.
Customers can choose to generate Role Allocation records based on Checklist Items, rather than Action Owner and Contributor assignments.
This feature can be turned on / off via the ‘Consider Checklist Item Hours / Dates’ setting within the Role Allocation Automation Settings section of the Control Pad on the Mission Control Console.
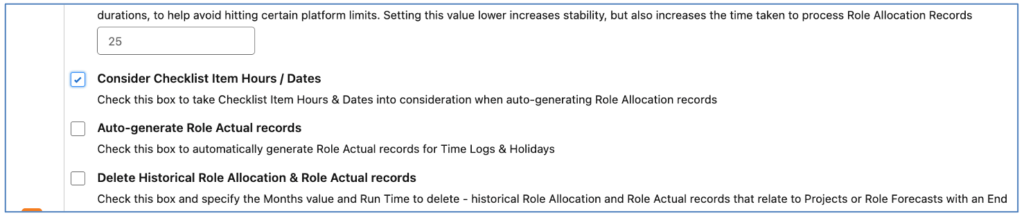
When this Setting is TRUE, Role Allocations will be generated based on the following order of priority:
| Checklist Item has Hours | Checklist Item has Dates | Role Allocation Generation |
| Yes | Yes | Generated based on Checklist Item Hours & Dates |
| Yes | No | Generated based on Checklist Item Hours & Action or Contributor Dates |
| No | Yes | Generated based on Action Owner / Contributor Hours and Action or Contributor Dates |
| No | No | Generated based on Action Owner / Contributor Hours and Action or Contributor Dates |
Note: If you manually distribute the hours via the Hours Distributor and you allocate hours to a date outside of the existing Checklist Item dates, the Checklist Item dates will not be updated.
Note: To utilise this feature, you will need to ensure the ‘Total Checklist Items’ field on the Action Object is configured for Field History Tracking.
If you are generating Role Allocations and Role Actuals, but you have Projects that you do not require these records to be generated for, you are able to prevent their generation. To do this, you need to ensure the ‘Do Not Generate Role Alloc/Actuals’ field on the Project is set to TRUE.
You may consider using this feature for an internal Project where you are not tracking time, or perhaps don’t intend scheduling hours at a granular level. By using this setting on such Projects, you will save using unnecessary data storage.
A number of enhancements have been made to the Timesheet. Details of each enhancement are included below.
The following enhancements have been made to the Clone Last Week’s Timesheet feature:
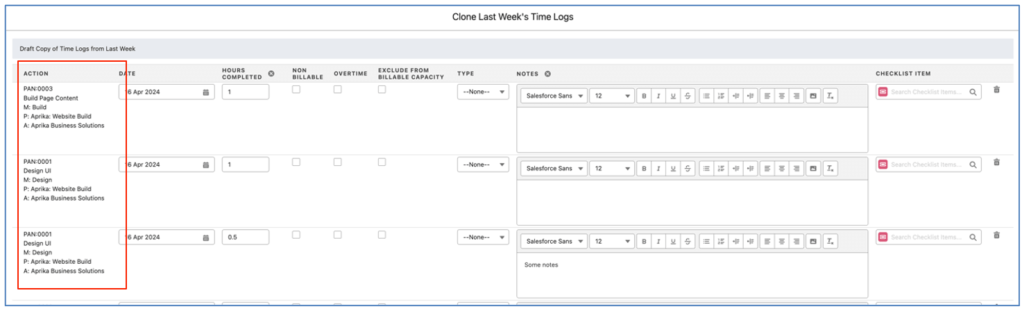
The wireframe below shows the Milestone Name (M), Project Name (P) and the Account Name (A) that each Action relates to.
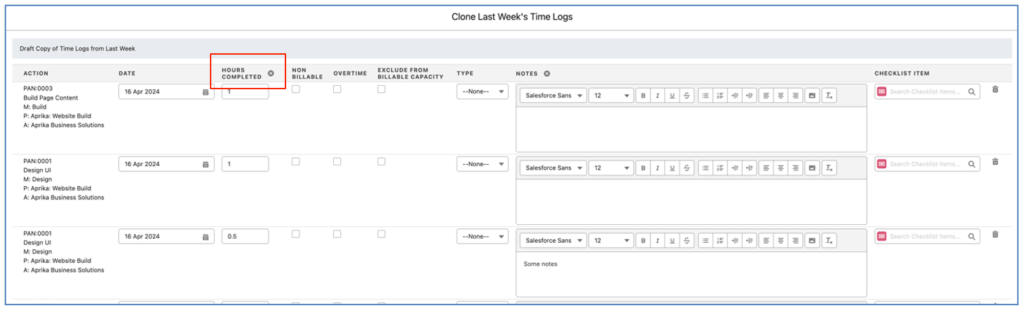
The wireframe below shows the ‘Clear All’ icon for the Hours Completed field. Clicking this icon enables you to clear all of the values in the ‘Hours Completed’ field for all rows loaded on the page.
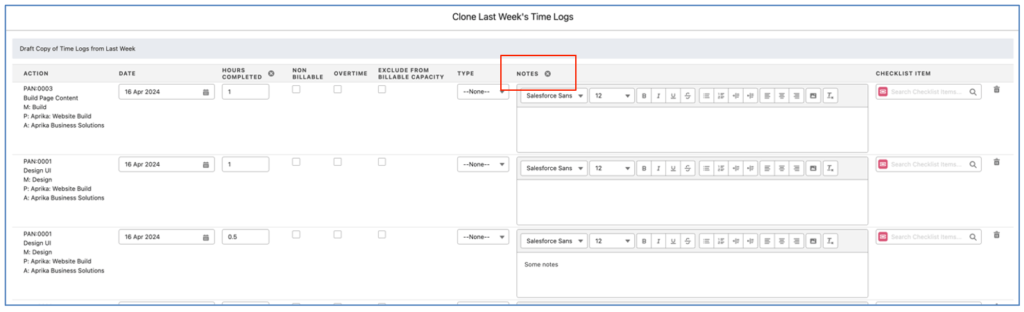
The wireframe below shows the ‘Clear All’ icon for the Notes field. Clicking this icon enables you to clear all of the values in the ‘Notes’ field for all rows loaded on the page.
The following new Settings have been added to the Timesheet Settings:
Hide New Action Account Filter
When adding an Action to the Timesheet that is not loaded by default, you can use filter fields for the Account and Project, as shown below:

For customers who don’t want to display the Account filter field, you can hide this by setting the ‘Hide New Action Account Filter’ setting to TRUE.
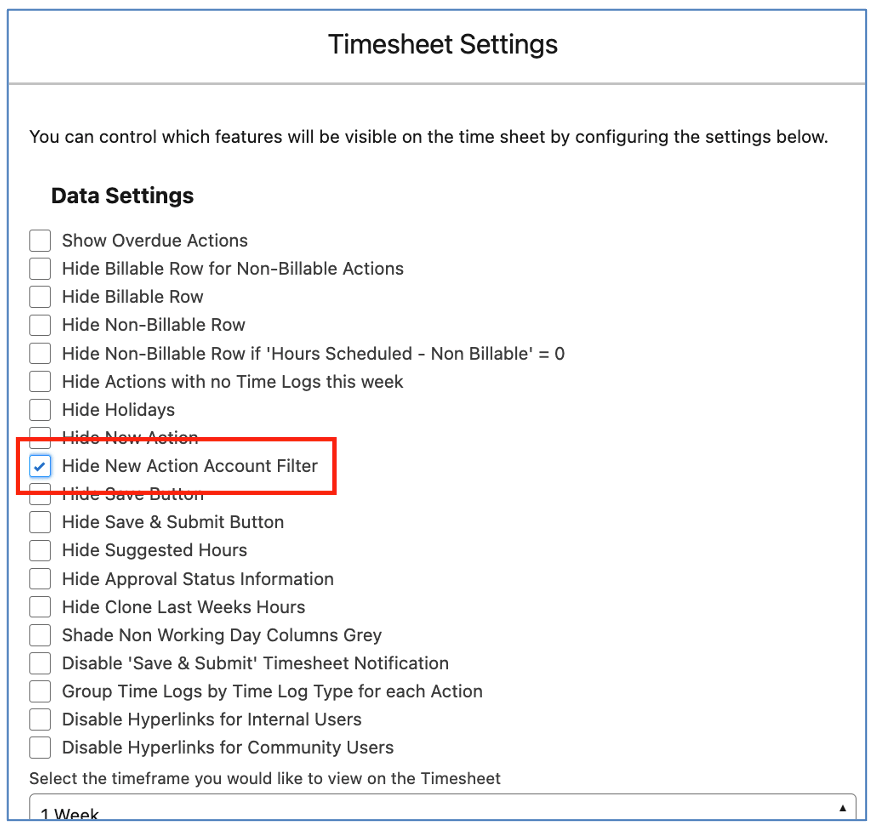
When this setting is TRUE, the Account filter will be hidden, but Users will still have access to the Project Filter and Add Action fields.

Disable Hyperlinks
On the Timesheet, the Project Name, Milestone Name and Action Name are hyperlinks. These hyperlinks allow Users to click through to the Detail Page of that record.
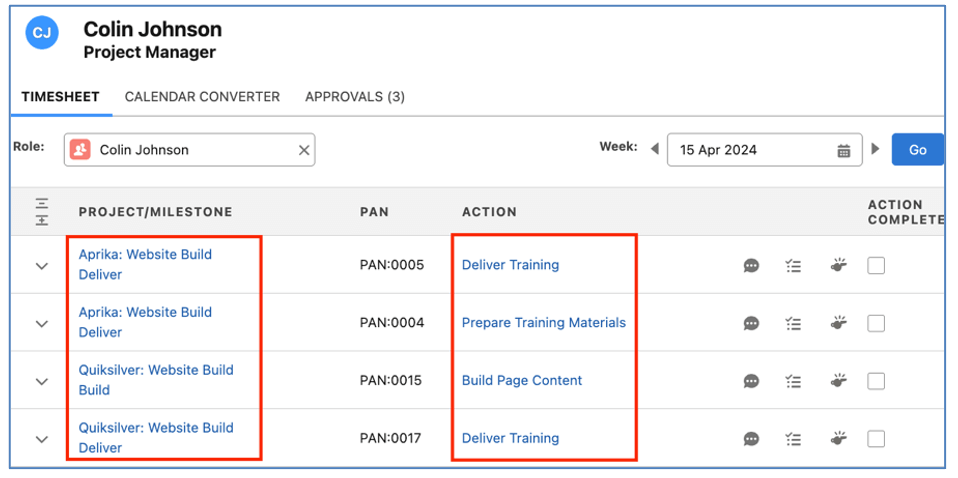
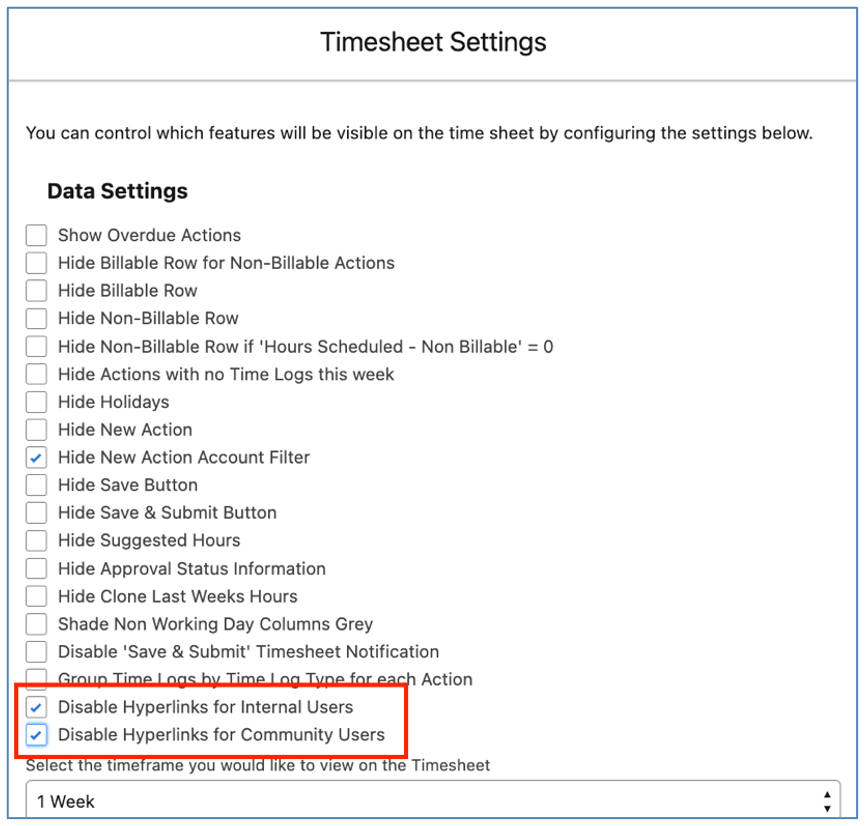
There are two settings within the Timesheet Settings that enable Customers to disable these hyperlinks for Internal User and/or Community Users.
To disable the hyperlinks, you will need to enable the setting for the appropriate group of users, as shown below.
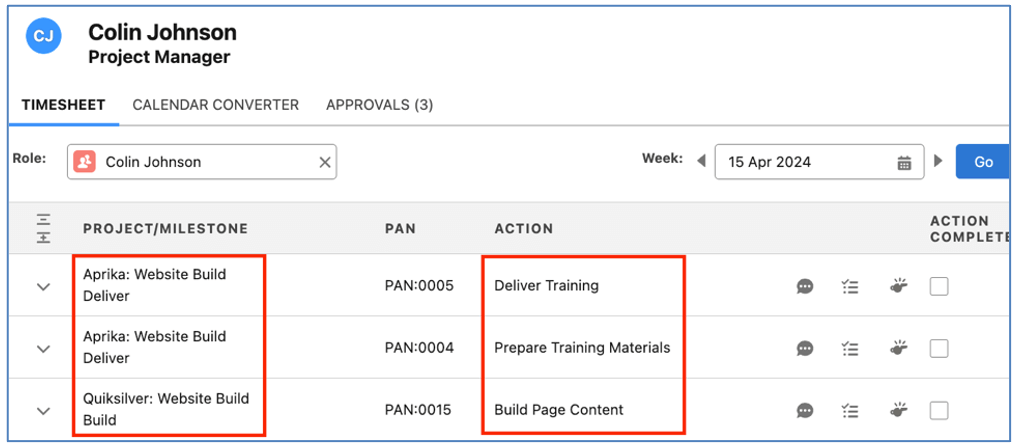
When the setting is TRUE, the values will still be visible, but they will no longer be hyperlinks, as shown below.
These Settings can be controlled at the individual User level, or org-wide via the Timesheet Settings on the Control Pad of the Mission Control Console.
A number of enhancements have been made to the Role Utilisation Report. Details of each enhancement are included below.
By default the X Axis on the ‘Role Utilisation’ Bar Chart is based on Hours. You can adjust this to display a percentage instead. This is controlled within the Settings of the Role Utilisation Report page.
Hours X Axis
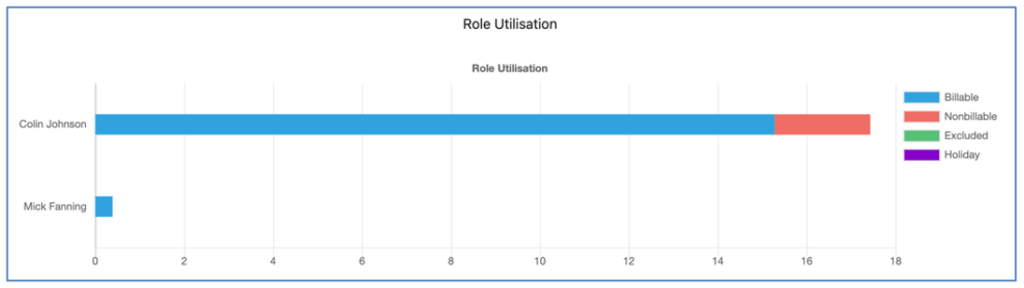
The image below illustrates the Role Utilisation Chart with an X Axis set to Hours.

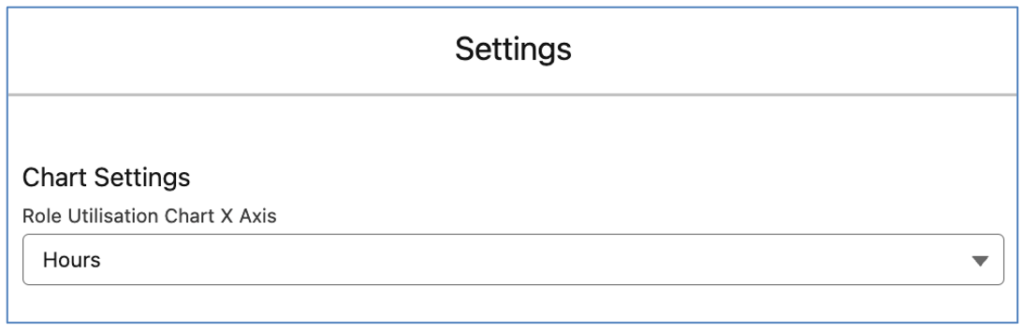
This is controlled by ensuring the ‘Chart Settings’ setting is set to Hours.
Percentage X Axis
The image below illustrates the Role Utilisation Chart with an X Axis set to Percentage.
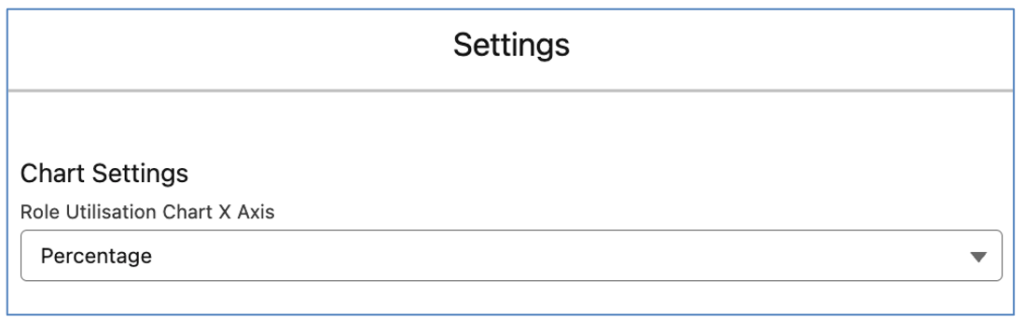
This is controlled by ensuring the ‘Chart Settings’ setting is set to Percentage.
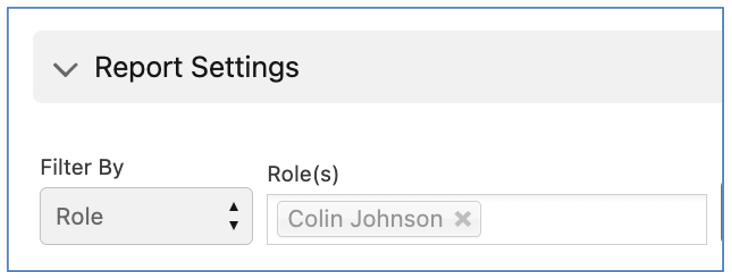
You can restrict a User’s access to the Role Utilisation Report, to only be able to view the results for their own Role record.
To do this, you will need to set the ‘Restrict Role Utilisation to My Role’ field on their Role record to TRUE. When this field is TRUE, the following rules will apply when the User views the Role Utilisation Report:
This enables the User to view their own Role Utilisation information without being able to view the data for other Roles.
Previously, you were able to view the results by ‘Week’ or ‘Month’. Additional options have now been added to allow you to view ‘Daily’ and ‘Quarterly’ figures.
A number of enhancements have been made to the Hours Distributor / Manage Forecast components. Details of each enhancement are included below.
The Start Date and End Date of the Action / Contributor / Role Forecast record are now visible for each row of Role Allocations being displayed on the Hours Distributor or Manage Forecast Component.
Hours Distributor
The Hours Distributor will show the Action’s Start Date and End Date. However, if the Start Date and End Date have been specified for the Contributor, they will be displayed for the Contributor record.
Manage Forecast
The Manage Forecast will show the Role Forecast’s Start Date and End Date.

When a Role Allocation record is created or edited with Total Hours Scheduled greater than zero, and it is before the existing Start Date of the Contributor that it relates to, the Start Date field of the Contributor record will be adjusted based on the date from the Role Allocation record.
When a Role Allocation record is created or edited with Total Hours Scheduled greater than zero, and it is after the existing End Date of the Contributor that it relates to, the End Date field of the Contributor record will be adjusted based on the date from the Role Allocation record.
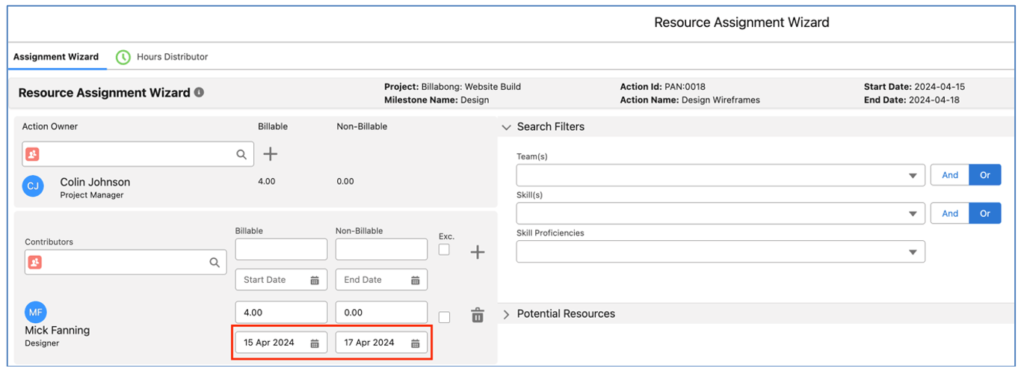
For example, the Resource Assignment Wizard below shows an Action that has a Start Date of the 15th April and an End Date of the 18th April. Mick’s Contributor record has a Start Date of the 15th and an End Date of the 16th.
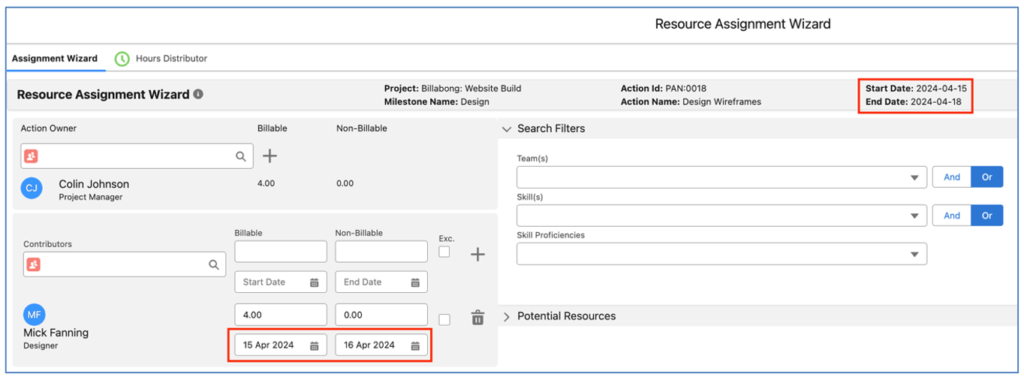
Therefore, Colin has 4 Role Allocation records and Mick has 2, as shown below.

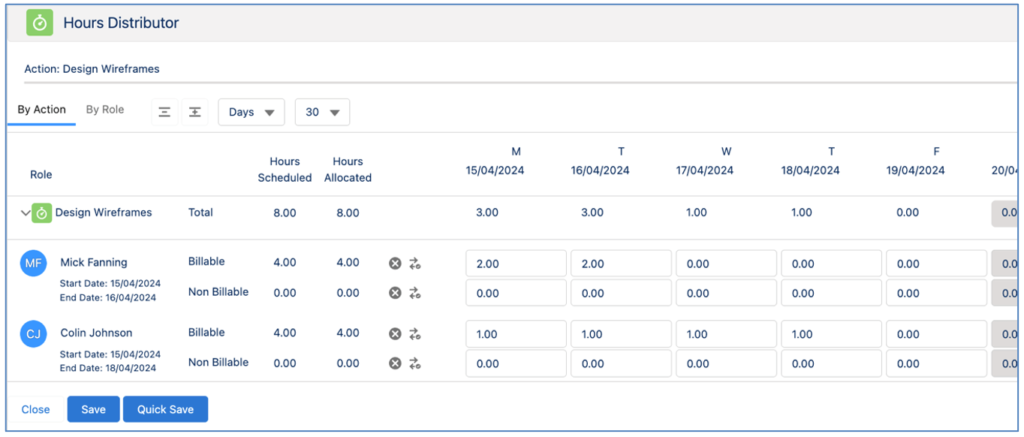
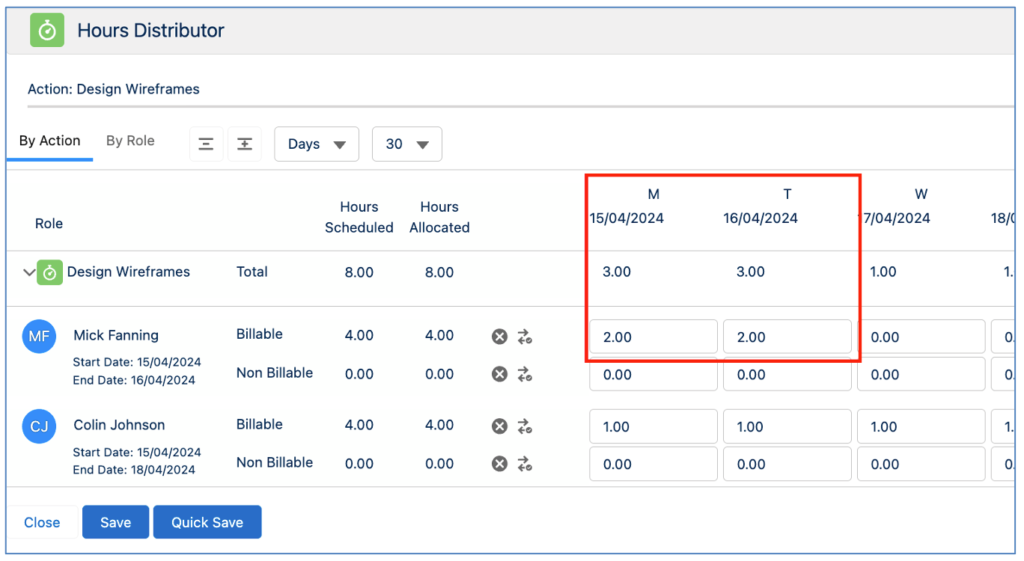
On the Hours Distributor, Mick currently has a Role Allocation of 2 hours for the 15th and another Role Allocation for 2 hours on the 16th.
The Project Manager has decided that instead of doing 2 hours on the 16th, they need Mick to do 1 hour on the 16th and 1 hour on the 17th, so they make the following changes on the Hours Distributor.
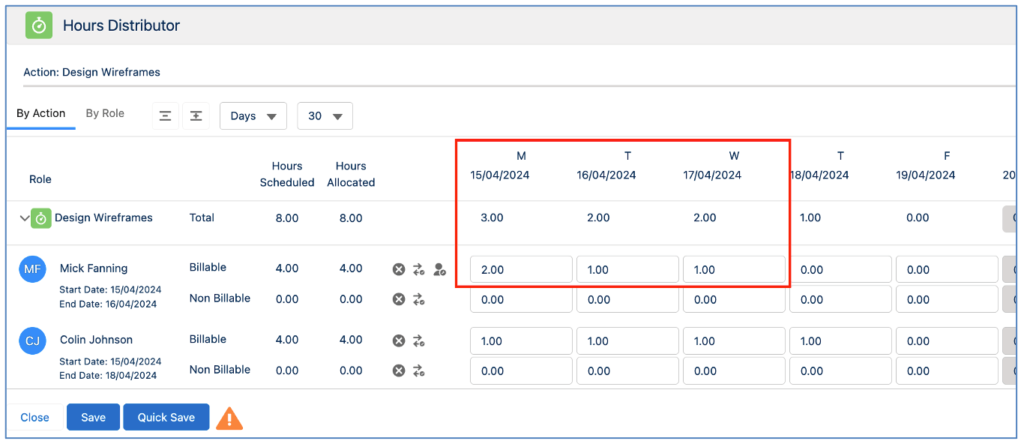
As a Role Allocation has been created for the Contributor after the existing End Date of the Contributor record, the Contributor End Date field is updated to reflect the new End Date.
This section includes details of any component changes within the package. This includes changes to existing fields as well as any new fields, validation rules, buttons / actions, Apex Classes, Components, etc. that have been added to the solution as part of this release.
IMPORTANT: We recommend you thoroughly review all of these components. To take advantage of the enhancements within this release, you may need to:
If you are not using the Permission Sets included with Mission Control, we recommend you check the Field Level Security for all of these fields and accessibility to the various Components to ensure all appropriate Profiles/Permission Sets have the required access.
Role
| Field | Field Type | Comments | New/Existing |
| Restrict Role Utilisation to My Role | Checkbox | Set this field to TRUE if you want this Role to only be able to view their own utilisation data on the Role Utilisation Report | New |
Project
| Field | Field Type | Comments | New/Existing |
| Do Not Generate Role Alloc/Actuals | Checkbox | Set this field to TRUE if you do not want Role Allocations or Role Actuals to be created for Actions / Time Logs related to this Project | New |
| Billing Type | Picklist | New Value to be added:
Retainer to T&M |
Existing |
Billing Event
| Field | Field Type | Comments | New/Existing |
| Retainer | Checkbox | Set this field to TRUE if this Billing Event is a Retainer Invoice for a Project that is using the ‘Retainer to T&M’ Billing Type | New |
Components
The following Components have been included or updated in this Release.
| Component Type | Component Name | Description |
| Apex Class | MobileTimeLoggerController | Supports the use of the Log Time Component |
Validation Rules
The following Validation Rules have been included or updated in this Release. It is recommended you review each Validation Rule and determine whether you wish for the rule(s) to be active or inactive.
| Object | Rule | Description | Active |
| Billing Event | Project Not Retainer to TM | Ensures the Retainer field can only be set to TRUE for Projects where the Billing Type is set to ‘Retainer to T&M’ | TRUE |
| Project | Field Req Retainer to TM | Ensures various supporting fields are populated correctly if Billing Type is set to ‘Retainer to T&M’ | TRUE |
Mission Control will be made available based on the following release schedule.
3rd May 2024 – Available for manual upgrade from the AppExchange
18th May 2024 – Automatic upgrade to all Sandbox Orgs
1st June 2024 – Automatic upgrade to all Production Orgs
To manually upgrade to the new version of Mission Control in your organisation, please follow the steps below:
We have pre-recorded the ‘What’s New’ webinar to provide further information on how to get the best out of the new features. To access this webinar, please view the ‘Release Notes’ section of the Mission Control Support Centre – www.aprika.com/mc-support
Some of the new features included in this release of Mission Control have come from ideas submitted from existing clients. If you have an idea for enhancing Mission Control, you can submit it via email to [email protected].
If you have any questions regarding this release notification, please do not hesitate to contact us at [email protected].
