Release Notes, Version - 1.69
Mission Control Version 1.69 Release Notification
30 August 2024
A new version of Mission Control (version 1.69) will be released on the AppExchange on Friday 30th August 2024. This notification has been issued to existing Mission Control users. It contains an overview of the new features available with this release, along with instructions on how to upgrade to the new version.
What’s New?
This release includes a number of new features, along with some enhancements to existing functionality, including:
- Project Time Logs PDF
- Time Log Rejections
- Expense Rejections
- Daily Digest Enhancements
- Project Overview Filters
- Holiday Exclusions
- Scheduler Enhancements
- Meeting Manager Enhancements
- Meeting Notes Enhancements
- Project Launch Wizard Enhancements
- Warning Icon Fields
- Time Log – Rate Source Fields
- Billing Event PDF Enhancements
- And a few minor enhancements
- Expense Mileage Rate Field
- Log Time Component Field Set
- Working Days (Contributors & Checklist Items)
- Gantt Chart Phase Collapse/Expand
- Error Log
- Project Validation Rules
- Time Log Validation Rules
- Track Pad Height Attribute
- Source Milestone Field & Validation Rule
- Revenue Recognition Polling Setting
Let’s get stuck into the detail…
Project Time Logs PDF
The ‘Time Logs PDF’ can be generated from the Time Logs Tab on the Project Overview. This provides you with the ability to generate a PDF containing the Time Logs related to the Project, which can be downloaded and shared, for example, with your customer, to provide insight into the time spent on the project.
To generate the PDF, navigate to the Time Logs Tab on the Project Overview and click the ‘Generate PDF’ button, located on the right-hand side above the Time Log Summary table.
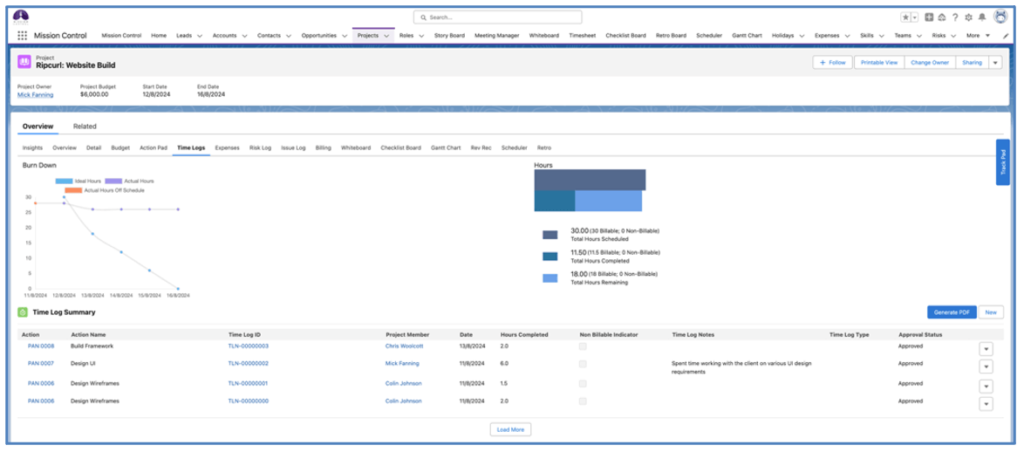
When you click the button, a modal will appear allowing you to specify a date range.
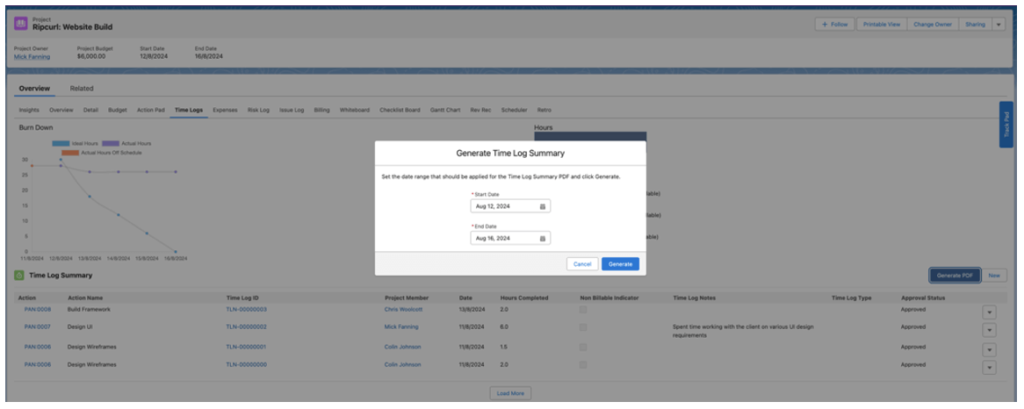
By default, these field values are set based on the following rules:
Start Date: Set to the Project Start Date or the Date of the earliest Time Log, whichever is earlier
End Date: Set to the Project End Date or the Date of the latest Time Log, whichever is later
You are able to run the report using these default dates, or select the required date range you want to apply. Time Logs will be included in the report if the ‘Date’ is greater or equal to the specified Start Date and less or equal to the specified End Date.
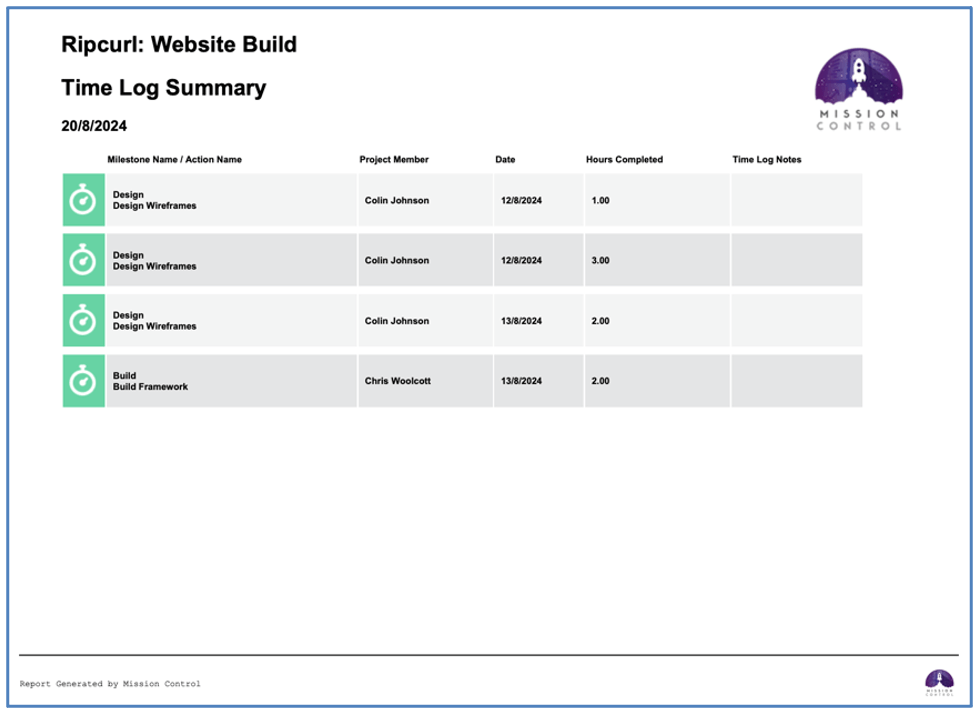
When you download the PDF, the default format for the File Name will be:
YYMMDD – Project Name – Time Log Summary.pdf
For example, if you generate the PDF on the 14th August 2024 for the Rip Curl: Website Build Project, the file name will be:
240814 – Rip Curl Website Build – Time Log Summary.pdf
Sort Order
The Sort Order used within the PDF is:
- Milestone Sort Order ASC
- Milestone Start Date ASC
- Milestone End Date ASC
- Milestone Name ASC
- Action End Date ASC
- Gantt Sort Order ASC
- Action Name ASC
- Time Log Date ASC
Custom Fields
The Milestone Name / Action Name column will always appear as the first column within the table. The other columns included by default are:
- Project Member
- Date
- Hours Completed
- Time Log Notes
You can add additional fields into the table by using the ‘Time Log Summary PDF’ Field Set on the Time Log Object. You can include a total of 10 columns into the table, therefore, the first 9 fields included within the Field Set will be included in the PDF.
Branding
The logo located in the top right will display the file set as the ‘Gantt Chart Logo’ on the Control Pad within Mission Control. If there is no logo specified within this setting, the Mission Control logo will display by default.
The footer can be turned off by setting the ‘Report Generated by Mission Control Footer’ Setting to TRUE within the ‘Project Status Report Settings tile on the Control Pad of the Mission Control Console.
Time Log Rejections
The Rejections Tab of the Timesheet provides access to any Time Logs you have submitted, that have subsequently been rejected.
If any of your Time Logs have been rejected, you will see the Rejections Tab on the Timesheet, as shown below.

When you click on the Rejections Tab, you will see the Time Logs that you previously submitted that are currently rejected, along with any rejection comments.

Within the Rejections Tab, you are able to edit the individual Time Logs to make the necessary adjustments. To do this, click the pencil icon to edit the record.

Once you’ve made the necessary updates, you can click the tick icon to save the changes. Once all of your changes have been made, you can click the submit icon, as shown below.
![]()
This icon can be clicked to resubmit individual Time Logs, or you can click the master icon in the top-right to resubmit all of the rejected Time Logs.

The Daily Digest also contains a section showing you any Time Logs you currently have that have an Approval Status of Rejected.
A List View on the Time Log Object called ‘My Rejected Time Logs’ enables you to view a list of the Time Logs you have submitted that have been rejected. This will dynamically display Time Logs for the individual User based on the Time Logs being associated to their Role record.

This List View provides the ability to inline edit the Time Logs to enable Users to make the required changes and manually adjust the applicable approval status field(s) back to Submitted.
Expense Rejections
A List View on the Expense Object called My Rejected Expenses’ enables you to view a list of the Expenses you have submitted that have been rejected. This will dynamically display Expenses for the individual User based on the Expense being associated to their Role record.

This List View provides the ability to inline edit the Expense records to enable Users to make the required changes and manually adjust the applicable approval status field(s) back to Submitted.

The Daily Digest also contains a section showing you any Expenses you currently have that have an Approval Status of Rejected.
Daily Digest Enhancements
A number of enhancements have been made to the Daily Digest Email Template. These enhancements include:
- Ability to include Checklist Items
- Ability to include Risks
- Ability to include Issues
- Ability to display the Role’s hours as Action Owner / Contributor
- Ability to view a summary of Rejected Time Logs / Expenses / Holidays
The Daily Digest provides detailed insight into what’s going on in Mission Control from the individual Role’s perspective. It includes the following sections:
- Timesheet Summary
- Today’s Assignments
- New Assignments
- Upcoming Deadlines
- Outstanding Assignments
- Approvals Summary
- Rejections Summary
Timesheet Summary

The Timesheet Summary section provides insight into the hours you’ve logged for This Week and Last Week.
Today’s Assignments
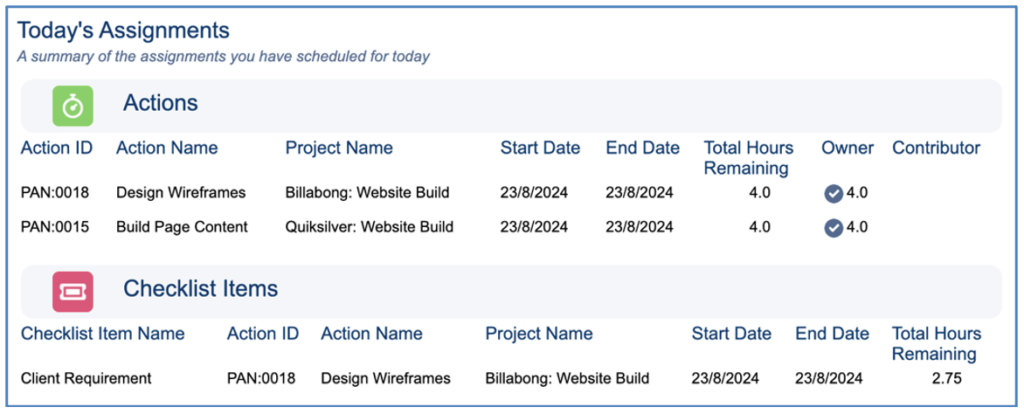
This section includes a list of Actions and Checklist Items. The records will be included if they meet the following criteria:
Actions
- Role is the Action Owner or a Contributor
- Start Date is less or equal to Today
- End Date is greater or equal to Today
- Status does not equal On Hold, Complete or Cancelled
Checklist Items
- Role is the Item Owner
- Start Date is less or equal to Today
- End Date is greater or equal to Today
- Status does not equal On Hold, Complete or Cancelled
New Assignments
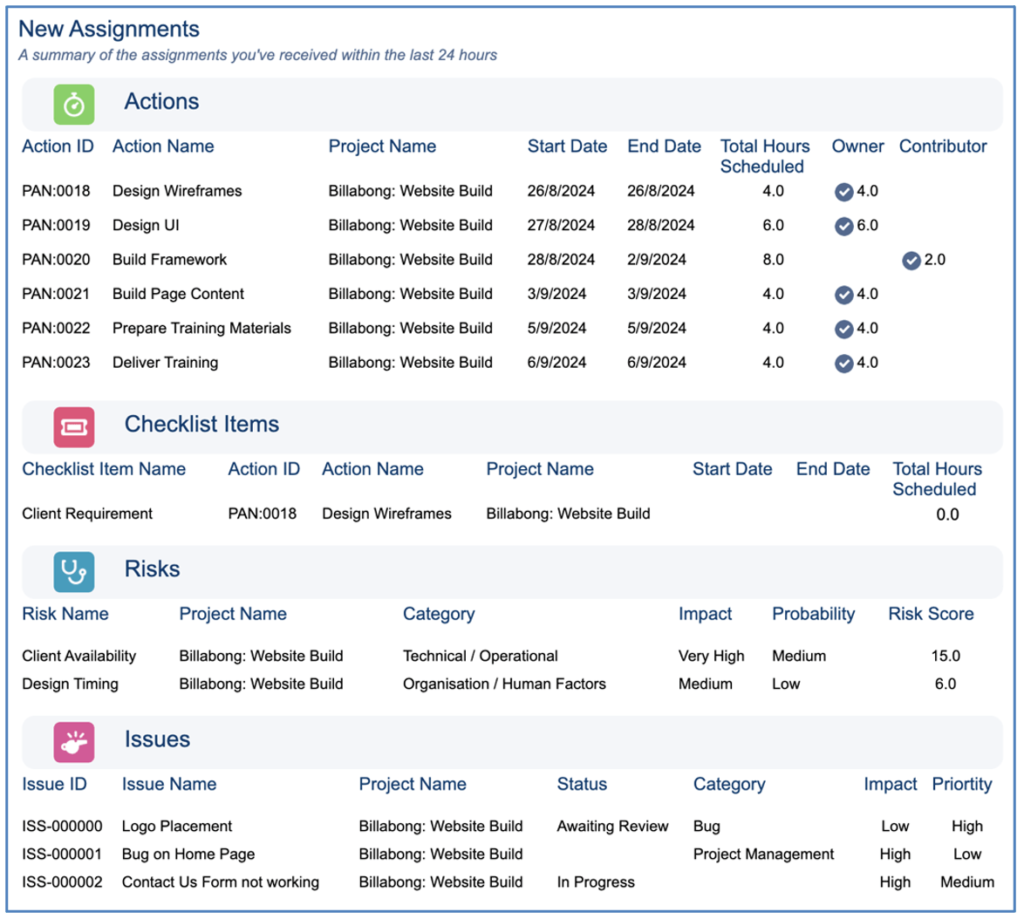
The New Assignments section includes lists of Actions, Checklist Items, Risks and Issues that have been assigned to the Role in the last 24 hours.
Upcoming Deadlines
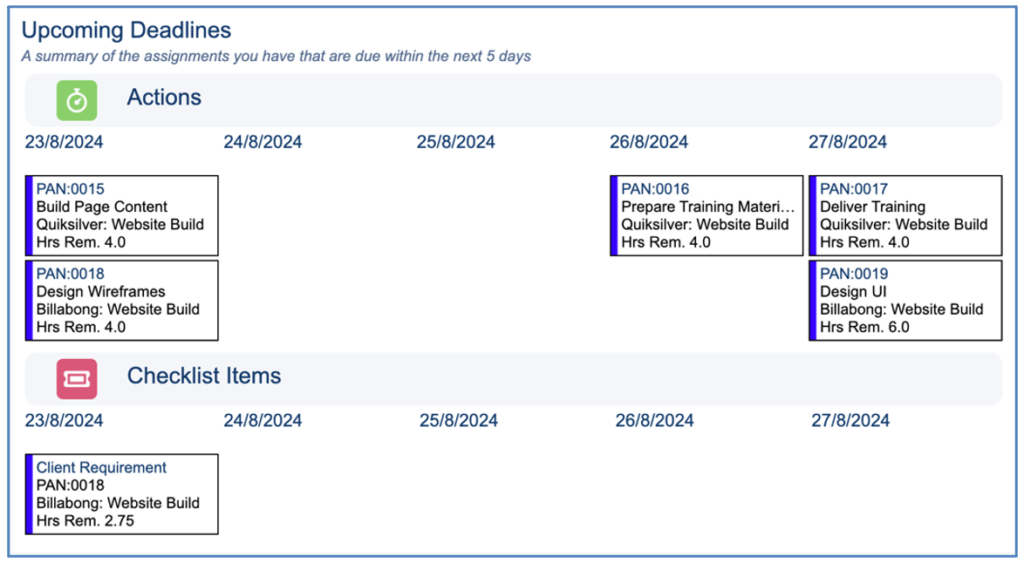
This section includes lists of Actions and Checklist Items that have an End Date in the next 5 days.
Outstanding Assignments
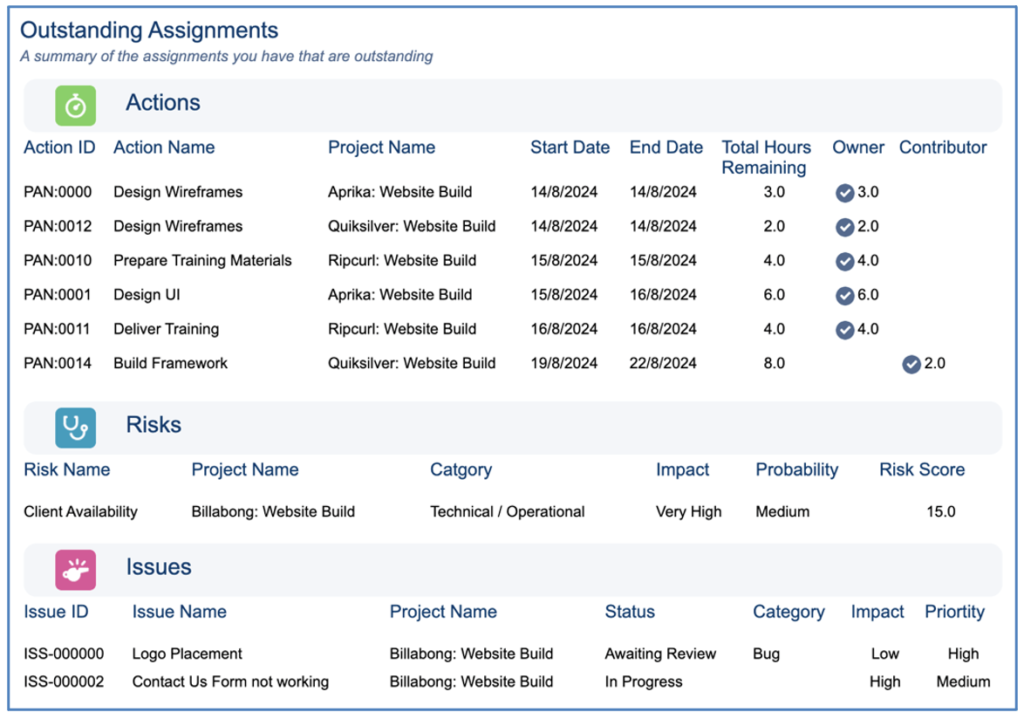
This section includes lists of Actions, Checklist Items, Risks and Issues that are outstanding. The records will be included if they meet the following criteria:
Actions
- Role is the Action Owner or Contributor
- End Date is less than Today
- Status is Planned or In Progress
Checklist Items
- Role is the Item Owner
- End Date is less than Today
- Status is Planned or In Progress
Risks
- Status does not equal Closed
- Date Identified is less than Today
Issues
- Status does not equal Closed
- Date Identified is less than Today
Approvals Summary

The Approvals Summary section provides a record count of Time Logs, Expenses and Holidays that are currently awaiting your approval.
Rejections Summary

The Rejections Summary section provides a record count of Time Logs, Expenses and Holidays you have submitted that have been rejected.
Each section of the digest will only appear if there are records to display. For example, if you have not been assigned any new records within the last 24 hours, the ‘New Assignments’ section will not be visible.
In addition, you can further customise the content of the email by selecting to exclude certain content. This is controlled via settings within the Daily Digest Tile on the Control Pad of the Mission Control Console.

Each setting within the ‘Digest Settings’ allows you to exclude that content from the email template.
Project Overview Filters
Filters can be applied to the Work Breakdown Structure (WBS) table on the Overview Tab of the Project Overview. This enables you to remove records that you may not wish to currently view. For example, you may wish to filter the records to only show you those where you are the owner, or remove any that have already been completed.
To access the Filters Modal, you will need to click the filter icon located on the right-hand side of the Overview WBS table, as shown below.

You can apply Filters at each of the following layers:
- Phases
- Milestones
- Actions
- Checklist Items
Filters applied at the Action layer can comprise of Filters on the Action, Checklist Item and Contributor Objects. For example, you may want to filter Actions based on you being the Action Owner, or a Contributor, or an Item Owner of a related Checklist Item.
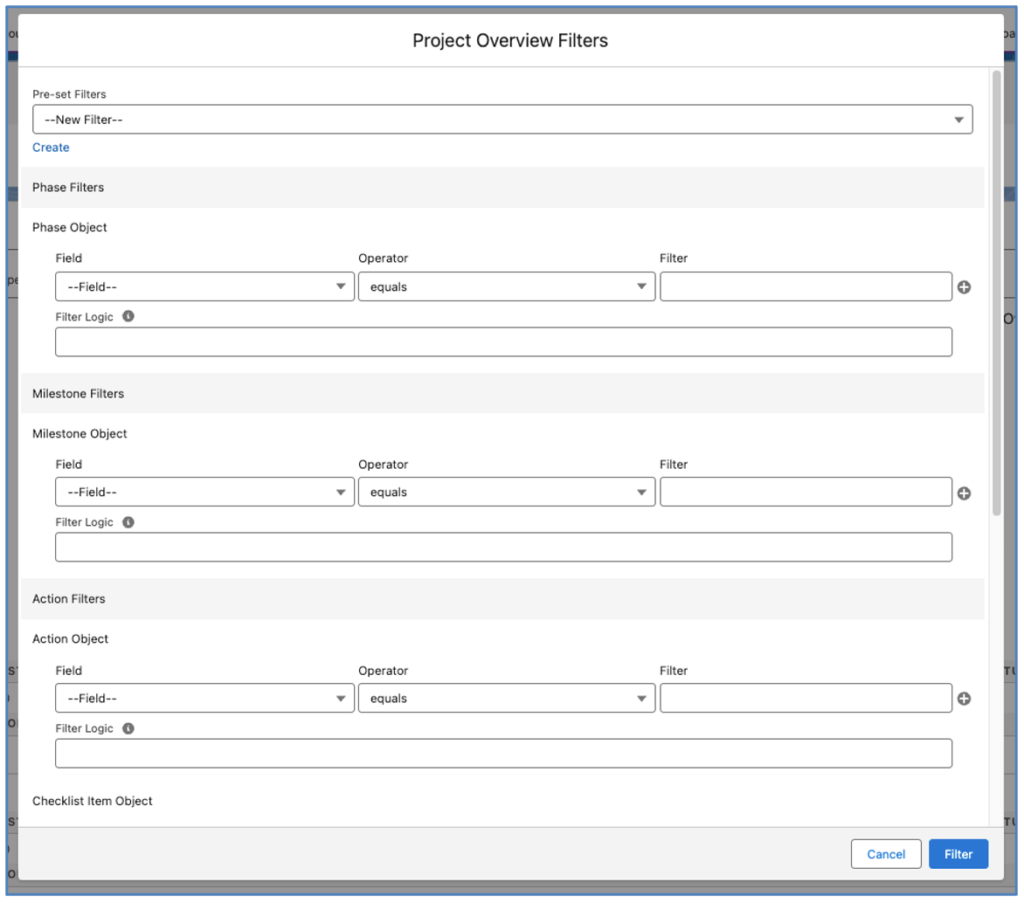
You are able to adjust the Filter Logic for each layer. Filters can be saved using the Pre-set Filter feature and shared with other Users.
Holiday Exclusions
A new Custom Object has been included called Holiday Exclusions, which allows you to exclude individual Roles from being allocated to a Holiday that is assigned to a Team via a Holiday Assignment.
Previously, when a Holiday was assigned to a Team, all Roles included in that Team would be allocated to that Holiday. However, individual Roles may choose not to take the day off due to work commitments and instead choose to take a day off as ‘Time Off In Lieu’ (TOIL) at a later date. In addition, a Team may comprise of employees who are entitled to Holidays as well as contractors that are not entitled to Holidays.
The Holiday Exclusion enables you to specify that individual Roles that are part of a Team should not be allocated to a Holiday that has been associated to the Team via a Holiday Assignment.
You can choose to exclude someone manually for a specific Holiday record. Alternatively, you can specify on their Team Assignment record that they should be excluded from Holidays assigned to the Team.
Excluding manually for a specific Holiday
You may find you need to exclude an individual Role that is part of a Team from a specific Holiday. For example, Seth is part of the ‘US Team’ and is entitled to the Holidays that get assigned to this Team. The Labor Day public holiday is coming up next week, so a Holiday is created and a Holiday Assignment is created for the US Team. This will allocate the Holiday to all of the Roles associated to the US Team.
However, Seth has chosen not to take the day off due to work commitments and instead aims to take a TOIL day next month instead. To exclude Seth from this Holiday, a Holiday Exclusion record must be created, as shown below.
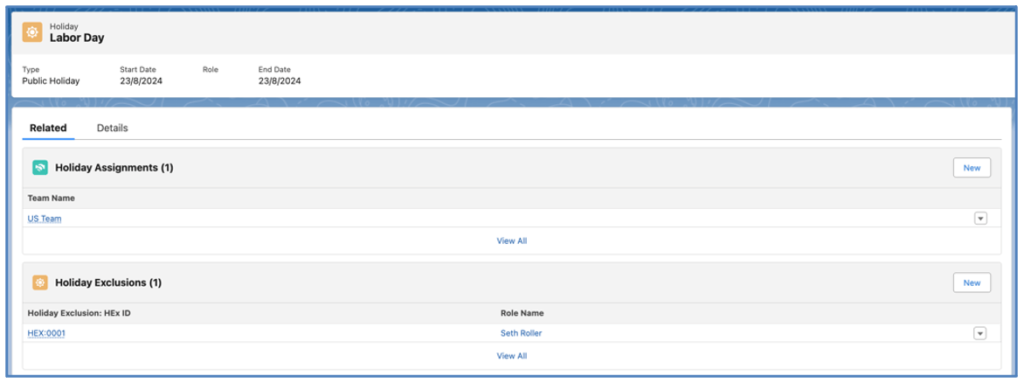
Once the Holiday Exclusion record has been created, Seth will not be included in the Holiday and will continue to be available to work that day.
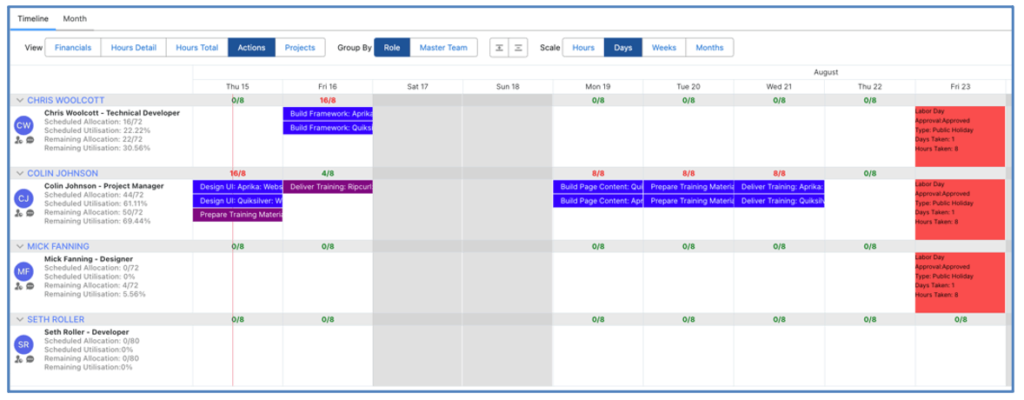
The above shows Seth as still available on the day of the Public Holiday even though other Roles that are members of the US Team are unavailable due to the Holiday.
Excluding automatically for all Holidays assigned to the Team
You may find you need to have a Role included in a Team, but they are not eligible for any of the Holidays that get assigned to the Team. For example, let’s say we have a ‘US Team’ and this includes Colin, Chris, Seth and Mick. However, Mick is a Contractor and is not eligible for Public Holidays.
To avoid having to manually create a Holiday Exclusion record for Mick every time a Holiday is assigned to the US Team, you can specify on Mick’s Team Assignment record, that he should be excluded from team holidays.

The above image shows that the ‘Exclude from Team Holidays’ field has been set to TRUE for the ‘US Team’ Team Assignment for Mick.
This ensures that a Holiday Exclusion record is automatically created for Mick whenever a Holiday Assignment is created for the ‘US Team’.
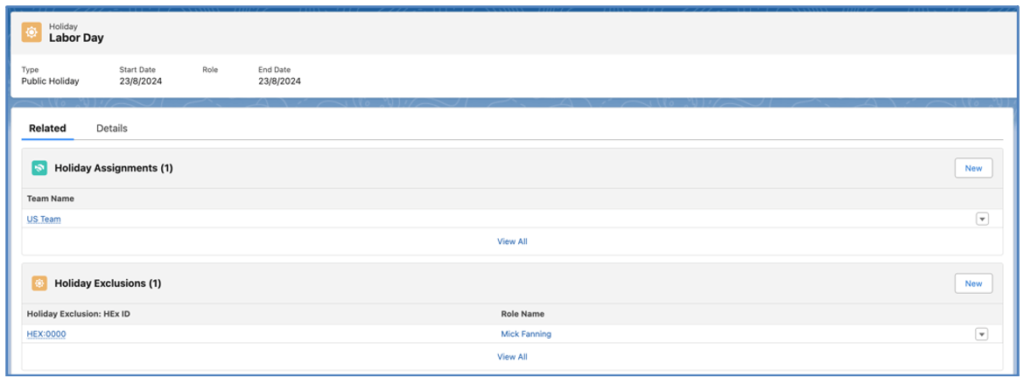
This means Mick will not be allocated to the Public Holiday and will remain available for work.
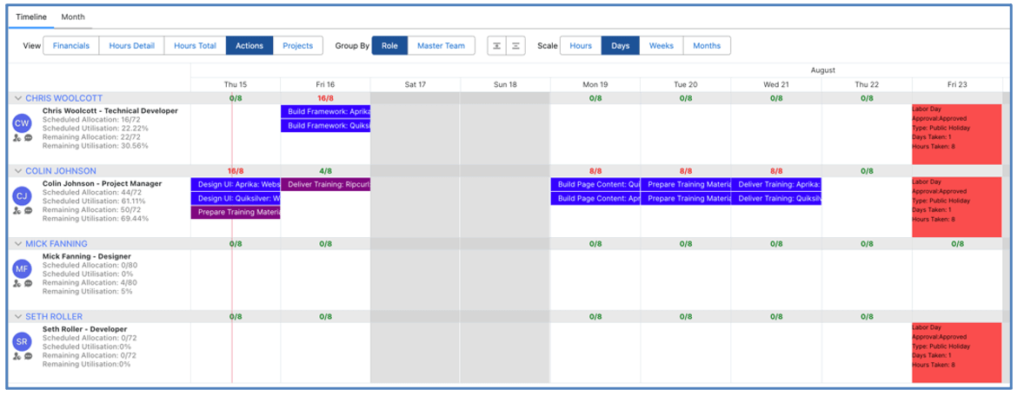
The above shows Mick as still available on the day of the Public Holiday even though other Roles that are members of the US Team are unavailable due to the Holiday.
Scheduler Enhancements
A number of enhancements have been made to the Scheduler. Details of each enhancement is included below.
Quick Create Action or Holiday
You are able to create a new Action or a new Holiday record directly from the Scheduler. Drag your mouse across the day(s) and when you release your mouse, the following modal will load.
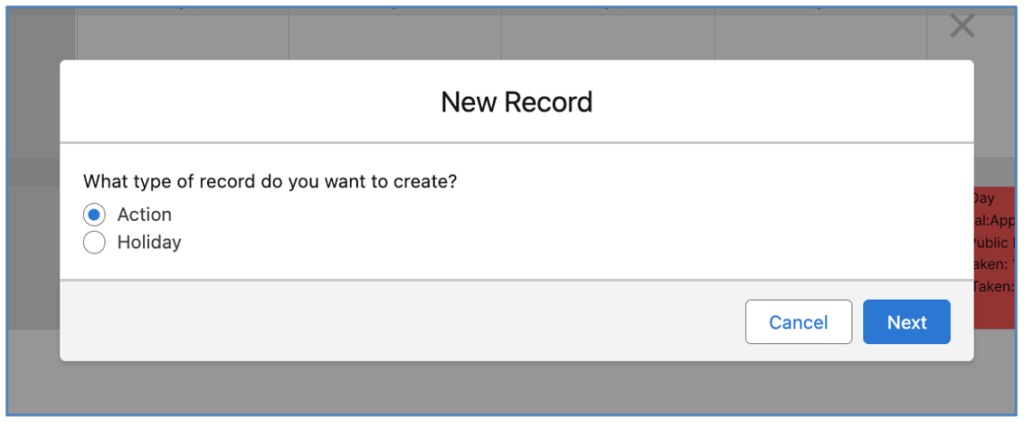
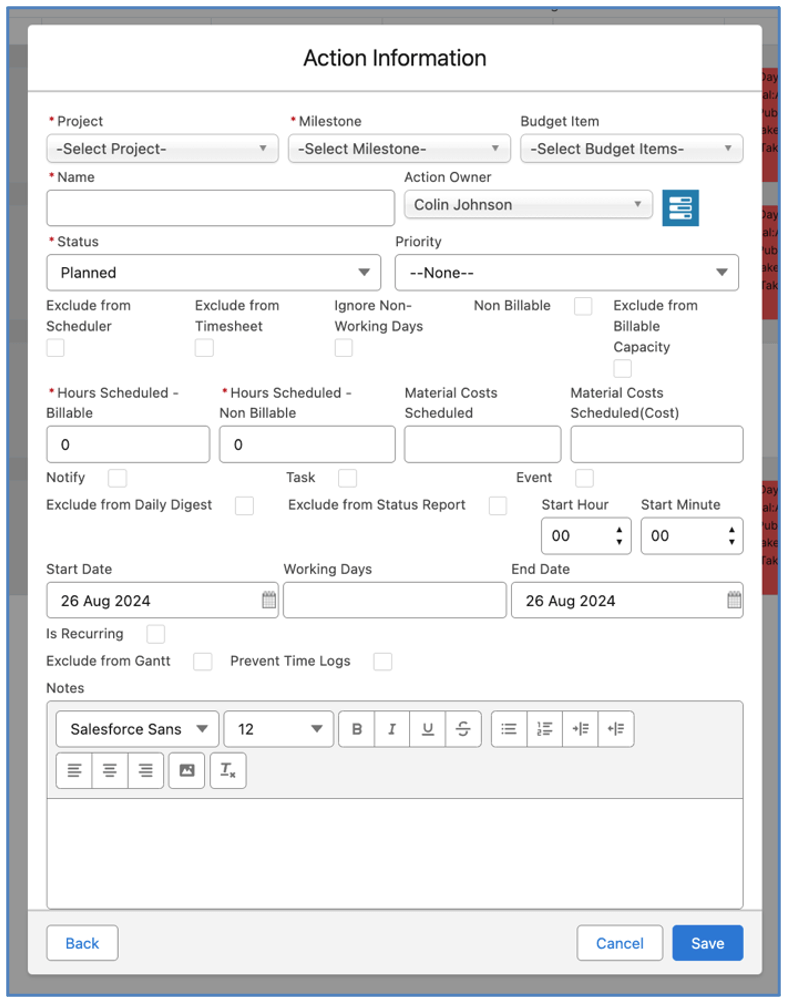
To create an Action, select the applicable option and click the Next button. The following screen will appear, enabling you to create the Action.
To create a Holiday, select the applicable option and click the Next button. The following screen will appear, enabling you to create the Holiday.
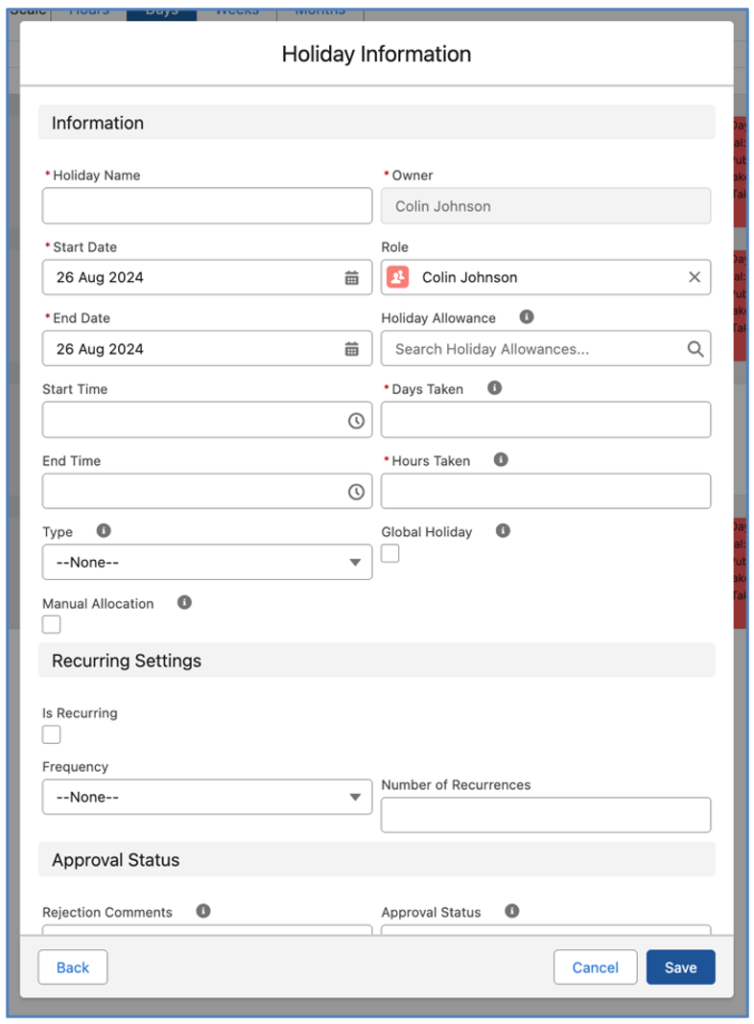
The new records will automatically appear on the Scheduler.
Holiday Information Setting
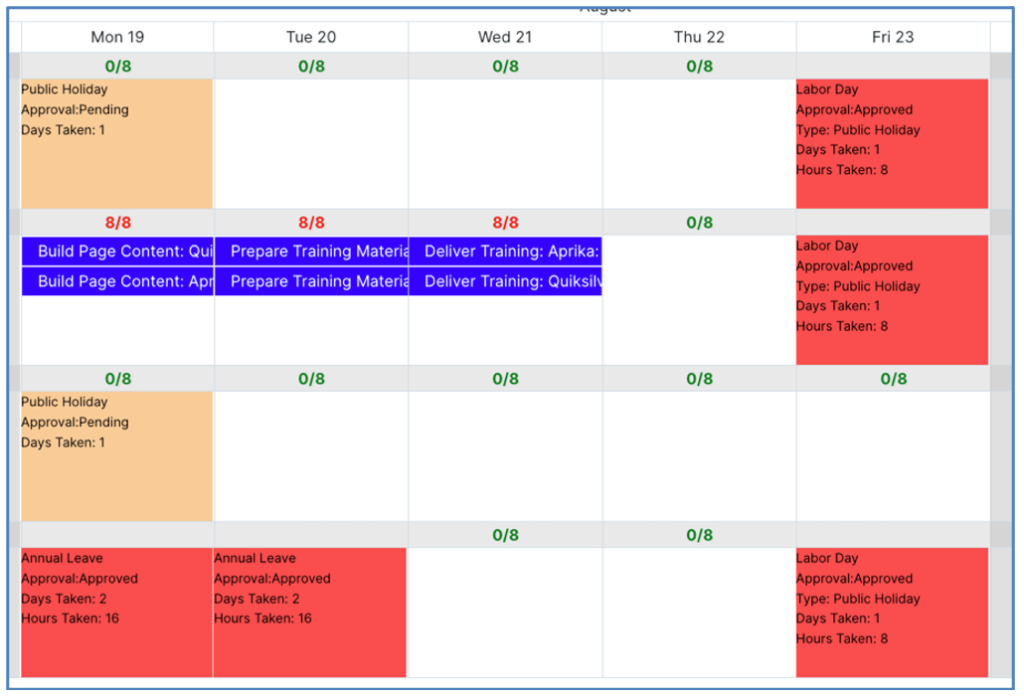
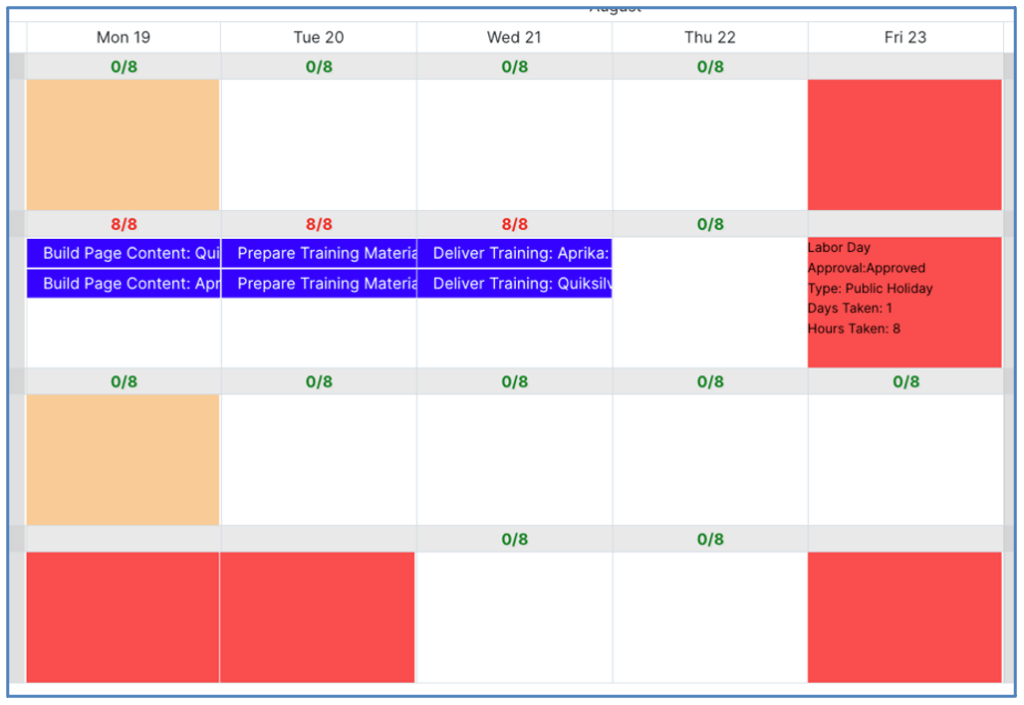
By default, the Name of the Holiday will be visible on the Scheduler, along with the Approval Status, Type, Days Taken and Hours Taken.
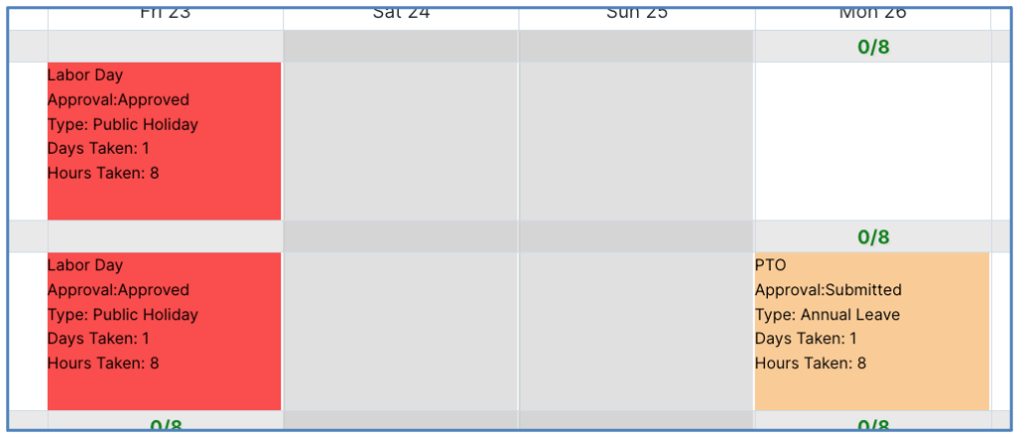
For Customers that may not wish to display the detail of Holidays on the Scheduler, there are settings available within the Scheduler Settings Tile on the Control Pad of the Mission Control Console that provide options on what information is displayed for Holiday records on the Scheduler.
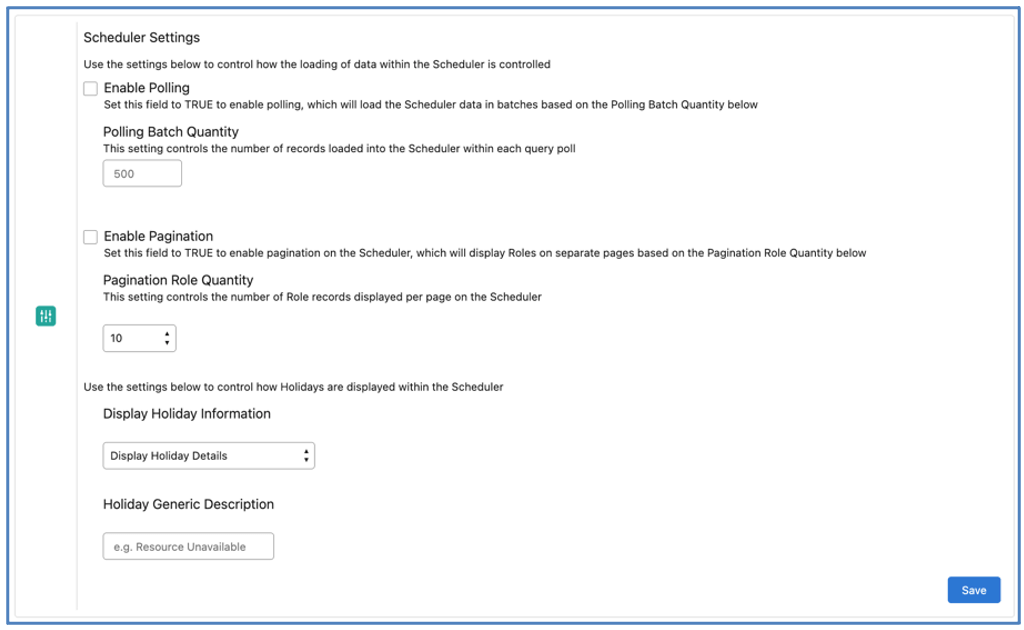
Display Holiday Information
This setting allows you to control what information is displayed. The options are:
- Display Holiday Details
- Display Holiday Generic Description
- Display No Information
Each of these settings will change the information that is displayed on the Scheduler for a Holiday, as shown below.
Note: These settings do not restrict visibility of Holiday records related to the Role record of the User viewing the Scheduler. They will continue to be able to the default ‘Display Holiday Details’ for their Holiday records.
Display Holiday Details
This is the default setting, which shows the Holiday Name, Approval Status, Type, Days Taken and Hours Taken.
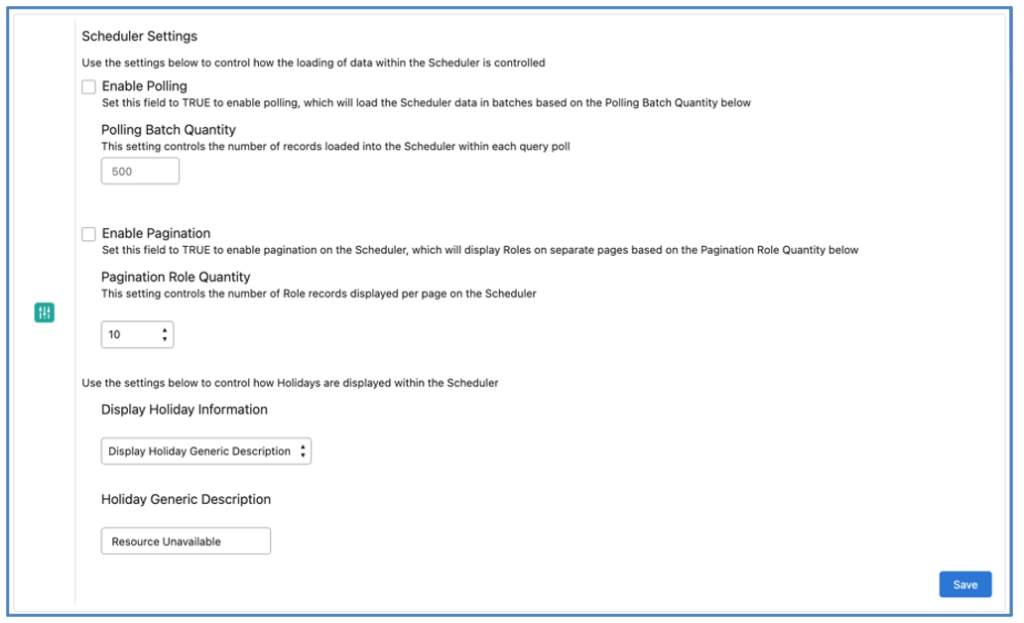
Display Holiday Generic Description
This setting enables you to display a generic statement explaining the Role is unavailable. Note, to select this option, you need to enter a value in the ‘Holiday Generic Description’ setting, as shown below.
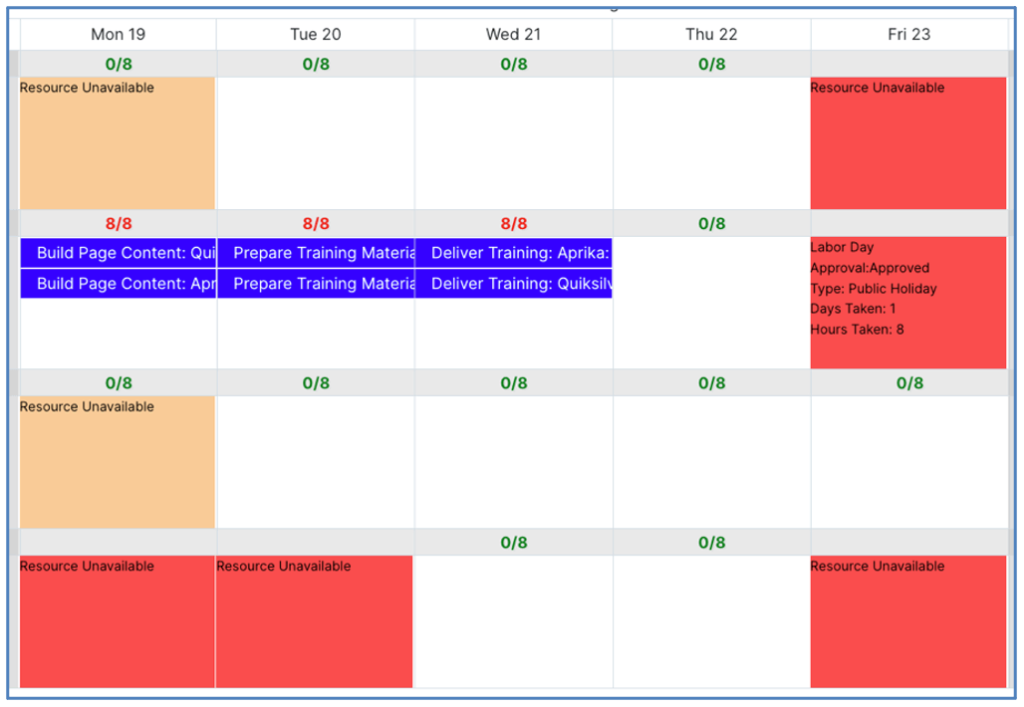
With these settings in place, the Holidays will only display the generic description, as shown below.
Display No Information
This setting removes all information and simply shows the Role as being unavailable, as shown below.
Reschedule Contributor’s Assignments
Previously, you were able to reassign a Contributor’s assignment to another Role but you were unable to reschedule the assignment. You are now able to reschedule the assignment, providing it remains within the date range of the parent Action.
You can reschedule a Contributor’s assignment of an Action on the Scheduler by dragging the bar on the Scheduler that represents the Role’s contribution. In the example below, Chris is the Action Owner of the ‘Build Framework’ Action and it has been assigned to him from Monday 19th to Thursday 22nd. Colin is a Contributor with a 2 day contribution for Tuesday 20th and Wednesday 22nd.

If Colin’s contribution needs to be rescheduled, you can drag the bar and reschedule to the new dates, providing they remain within the date range of the parent Action. In the example below, Colin’s contribution has been rescheduled to Wednesday 21st and Thursday 22nd.

If you attempt to reschedule the Contributor’s assignment outside of the Action’s date range, you will receive the following notification located in the top-right corner of the scheduler.

The assignment will revert back to the original dates.
Tab & Modal Access
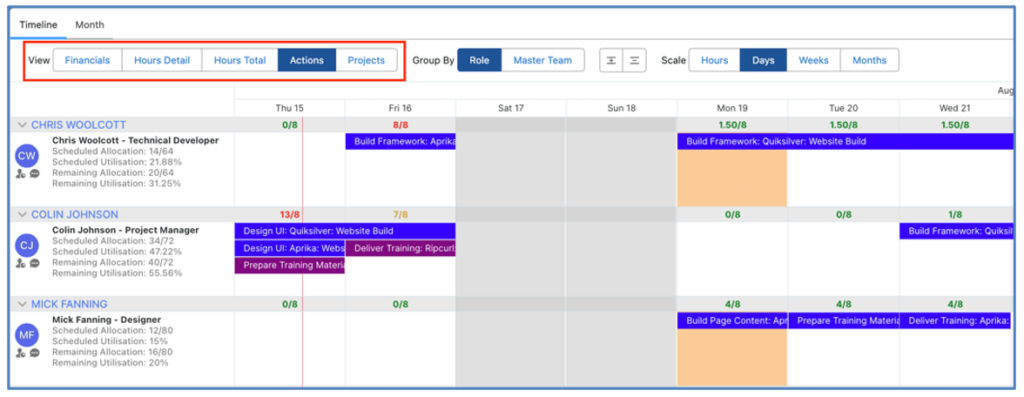
You can control which Tabs each User has access to on the Scheduler through a collection of fields on their individual Role records. There are Checkbox Fields on the Role record that control whether the person is able to see the following sections of the Scheduler:
Main Tabs
- Timeline
- Month

View Buttons
- Financials
- Hours Detail
- Hours Total
- Actions
- Projects
Action Modal Tabs
- Action
- Checklist Items
- Chatter

The fields within the ‘Scheduler Settings’ section of the Role record allow you to control which of the above Tabs/Buttons are available to the individual person.

You are also able to set the ‘Default Tab’ within the Action Summary Modal. For example, if the User would prefer the Chatter Tab to load by default, this can be controlled through this field.

These fields can also be updated in bulk via the above ‘Role Permissions – Scheduler’ List View for all Roles.
Meeting Manager Enhancements
A number of enhancements have been made to the Meeting Manager. Details of each enhancement are included below.
Related to Projects
Meeting Manager records can be related to a Project. When creating a Meeting Manager, you can choose to populate the ‘Project’ field, as shown below.
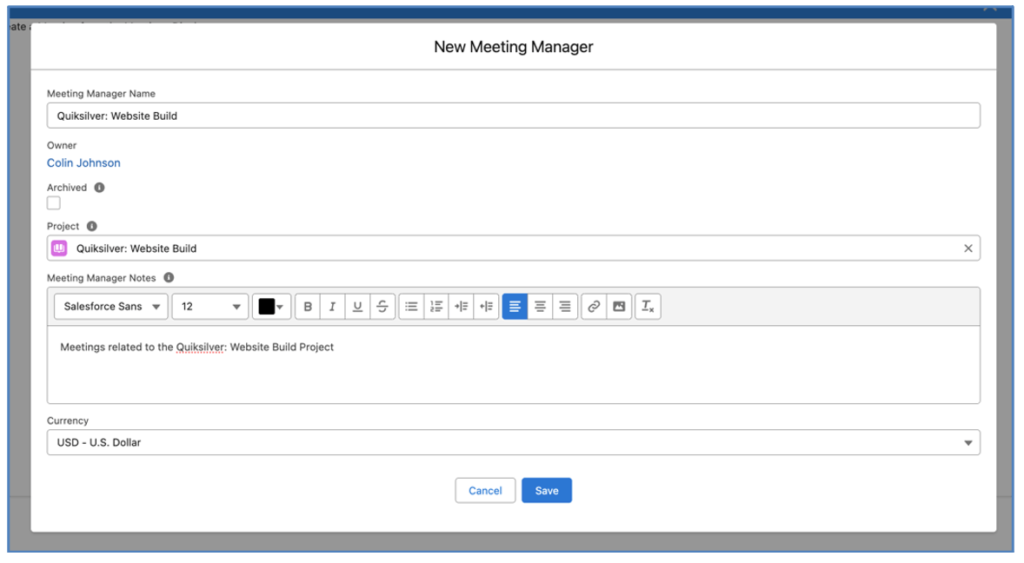
This means you will be able to see the Meeting Manager records in the Related Lists sections.
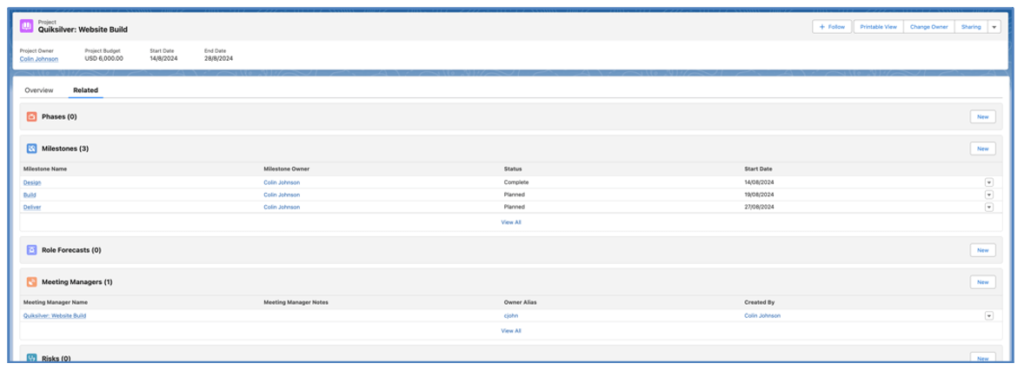
You are also able to add the Meeting Manager component to the Project Lightning Page, as shown below.
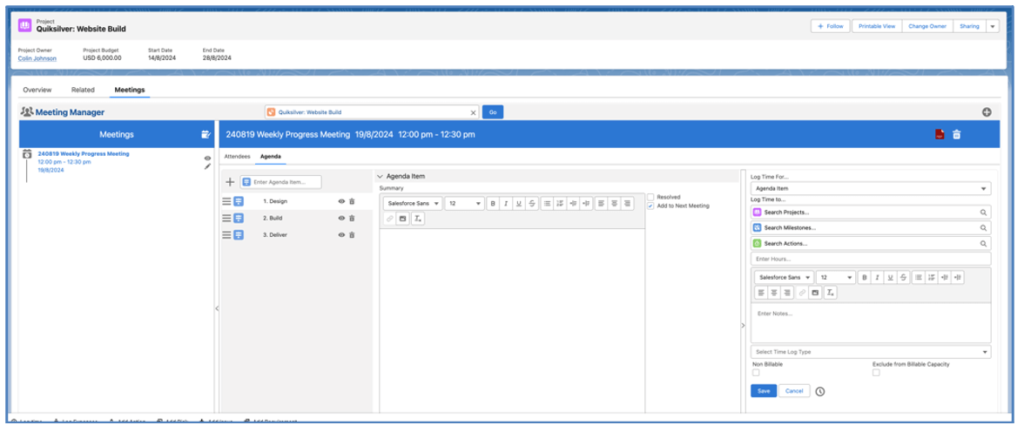
When using the Meeting Manager in context of a Project, it will only display Meeting Managers that are related to the Project. If only one Meeting Manager relates to the Project, it will be loaded by default.
Collapsible Sections
When using the Meeting Manager, the list of Meetings on the left-hand side and the Time Logger on the right-hand side can be collapsed.
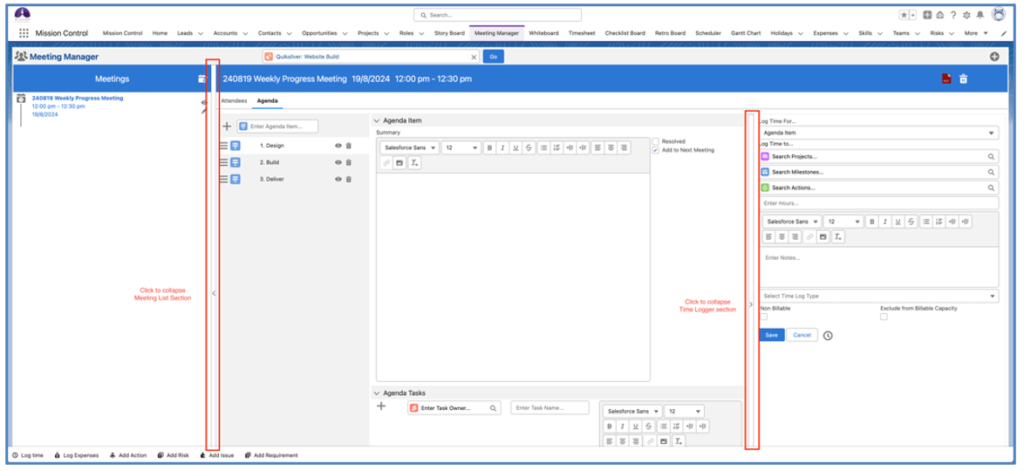
When the sections are collapsed, the Agenda section occupies the full screen. You are able to expand the Meeting List and Time Logger sections by clicking on the expandable sections.
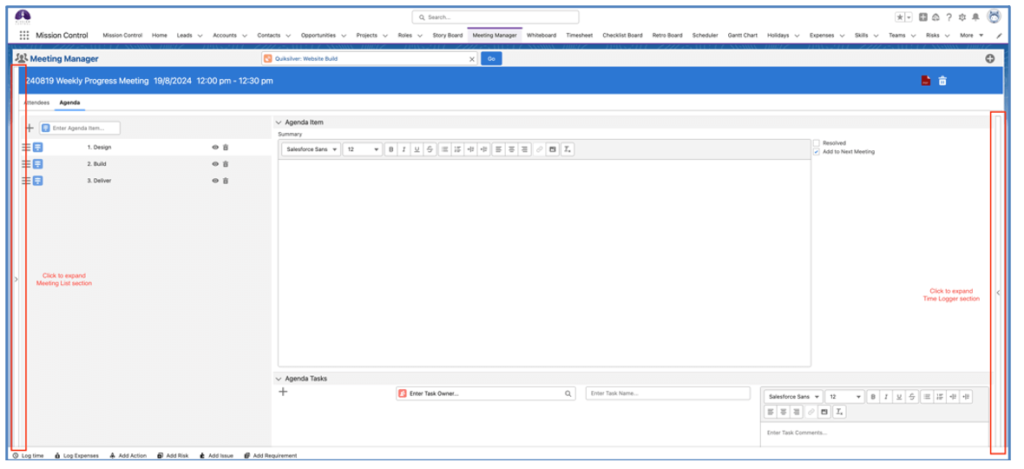
The collapsed/expanded state of these sections will be persistently remembered between visits to the page.
Quick Create Agenda Tasks
When using the quick create feature to add new Agenda Tasks, you are able to enter the Task Owner, Task Name and Task Comments.
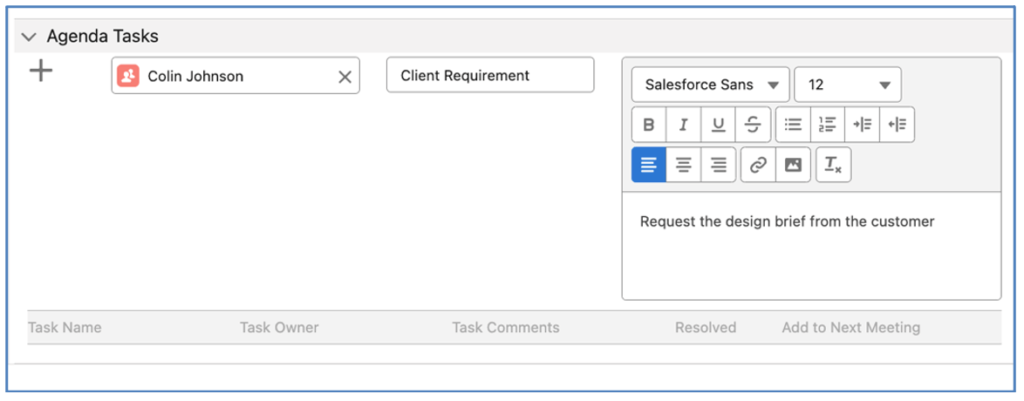
Click the + icon to create the new Agenda Task, and it will appear in the Task List, as shown below.
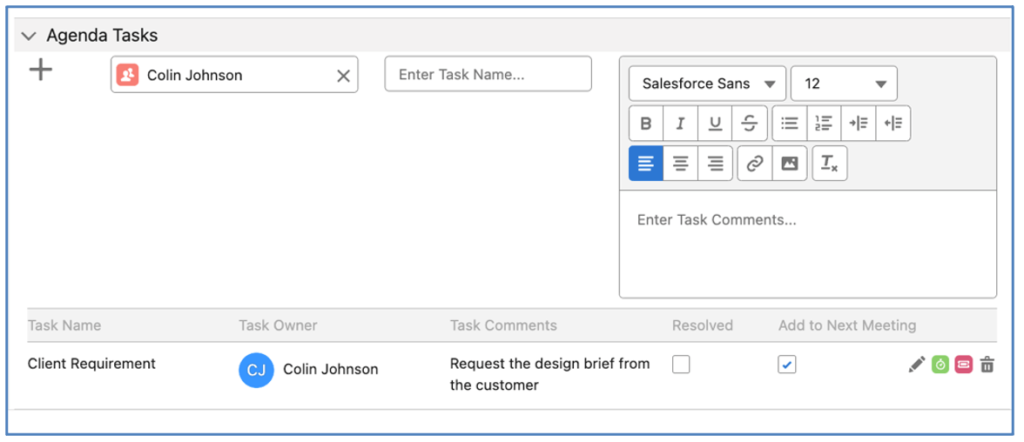
The Task Owner field will remain populated in the Quick Create section, should you require to create another Agenda Task for the same Role.
Promote Agenda Tasks to Checklist Items
You are able to ‘promote’ an Agenda Task to a Checklist Item. This may be required when an Agenda Task has been reviewed and determined to need work on a specific Project to be carried out.
To promote an Agenda Task to a Checklist Item, you can click on the red Checklist Item icon, located to the right of the green Action icon and Edit icon for the Agenda Task on the Meeting Manager.
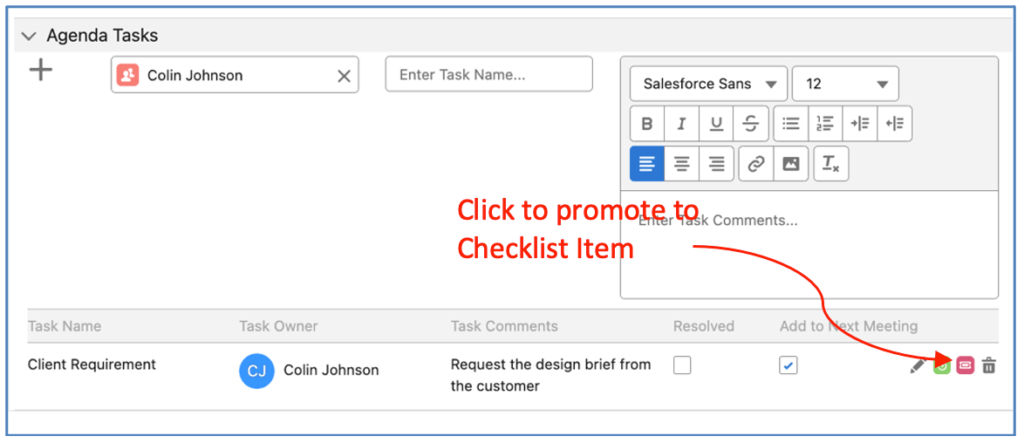
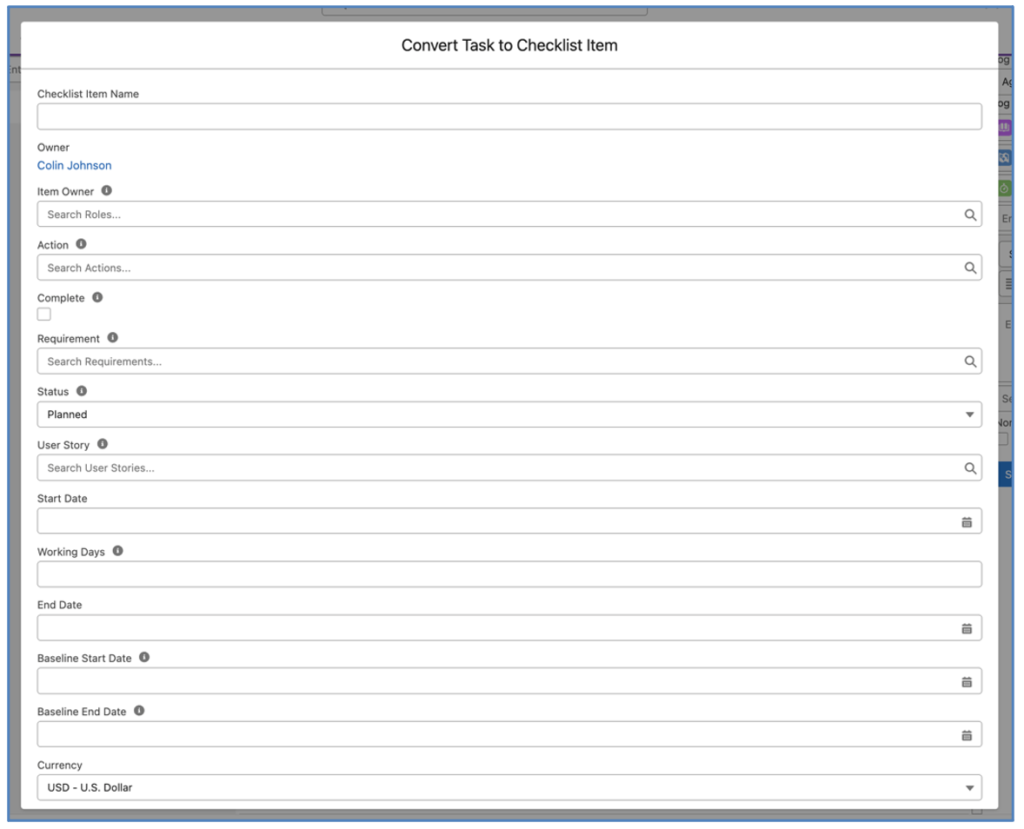
When you click the icon, it will open up the Checklist Item Modal allowing you to create a new Checklist Item. From here, you will be able to select which Action the Checklist Item will relate to.
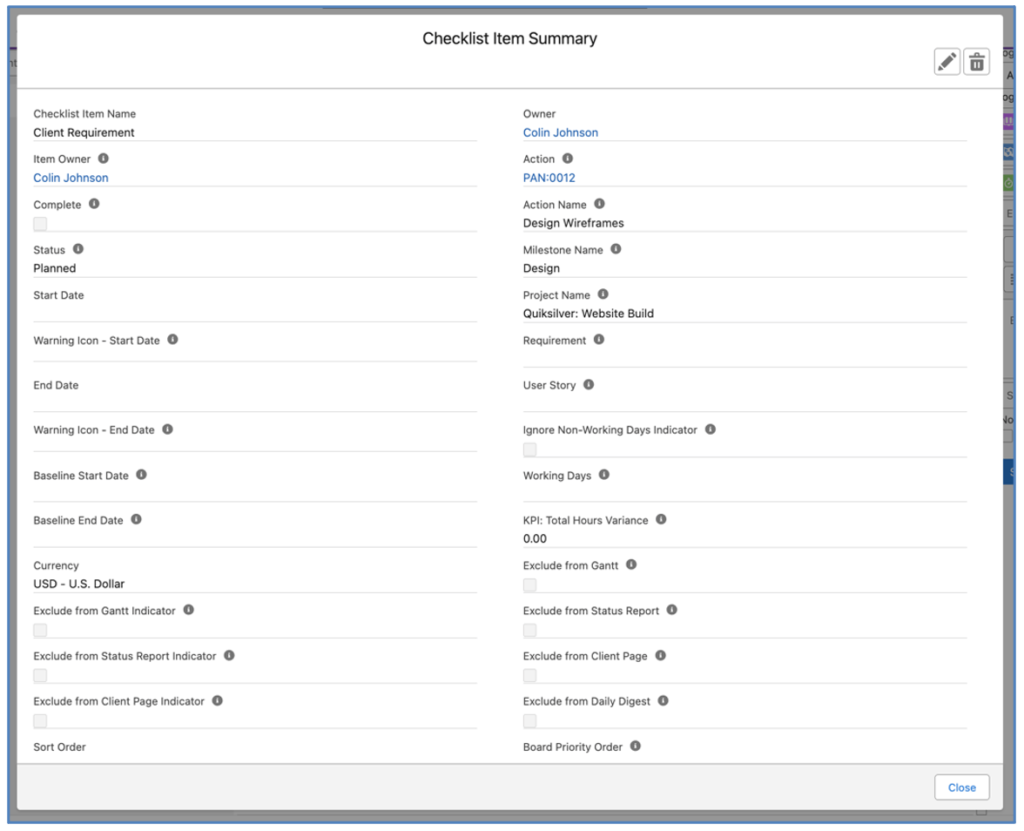
Once an Agenda Task has been promoted to a Checklist Item, if you click the red Checklist Item icon, it will open the Checklist Item Summary modal, as shown below.
Quick Create Agenda Items
Within the Agenda Builder section of the Meeting Builder, instead of creating Agenda Items manually, you are able to click the ‘Create from Milestones’ button.

When this button is clicked, Agenda Items will be added to the Agenda Builder for each Milestone included on the Project that the Meeting Manager relates to.
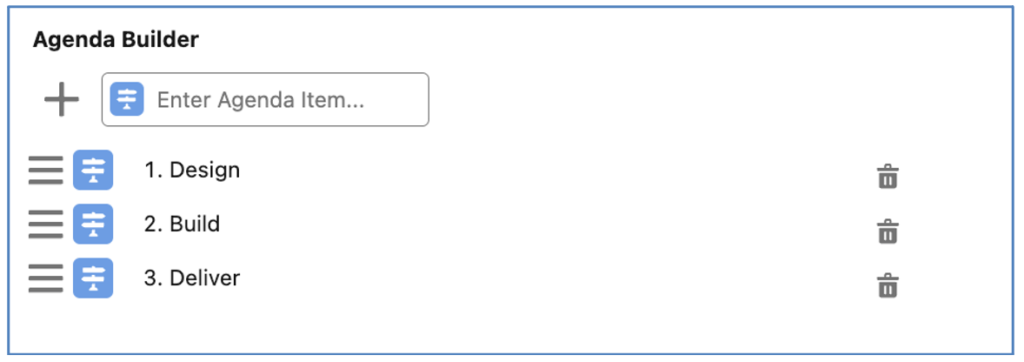
Note: This button will only appear if the Meeting Manager is related to a Project. Once clicked, the button will no longer be displayed.
Add Team Members as Attendees
Within the Attendees section of the Meeting Builder, instead of adding individual Attendees manually, you are able to click the ‘Add Team(s)’ button.

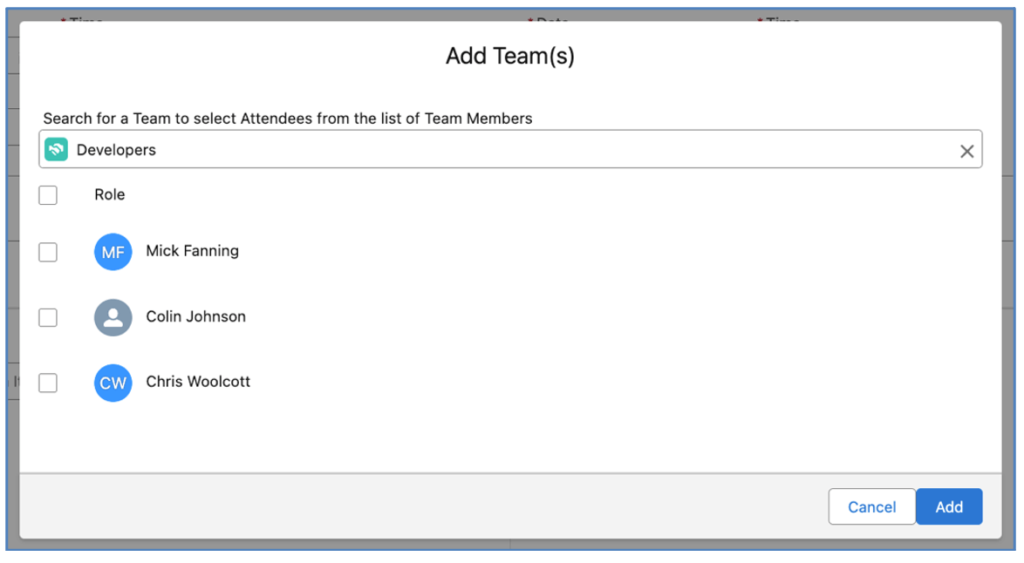
This will open ‘Add Team(s)’ Modal where you are able to search and select a Team that you would like to add Attendees from.
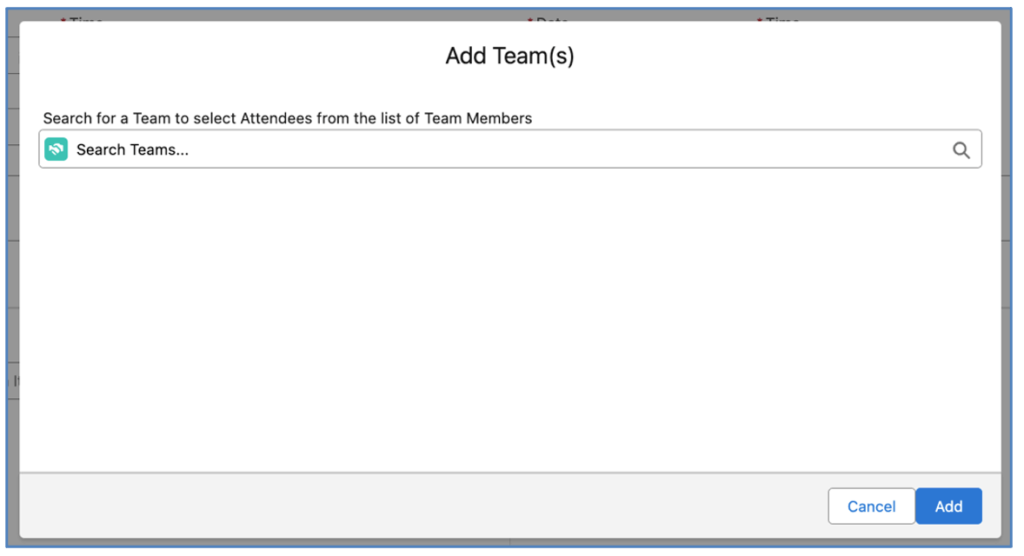
Once you have selected the required Team, you are able to select all or some of the Roles displayed and click the Add button.
This will add each of the Selected Roles as Attendees.
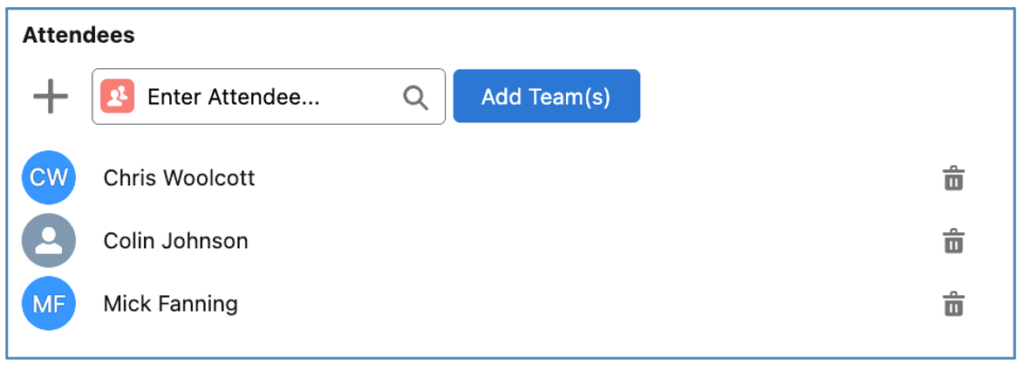
To add Roles from another Team, click the ‘Add Team(s)’ button again to repeat the process.
Add Project Stakeholders as Attendees
If your Project has related Project Stakeholders, you are able to add them as Attendees. Within the Attendees section of the Meeting Builder, you are able to click the ‘Add Stakeholder(s)’ button.

This will open ‘Add Stakeholder(s)’ Modal where you are able to the Stakeholders that you would like to add as Attendees.
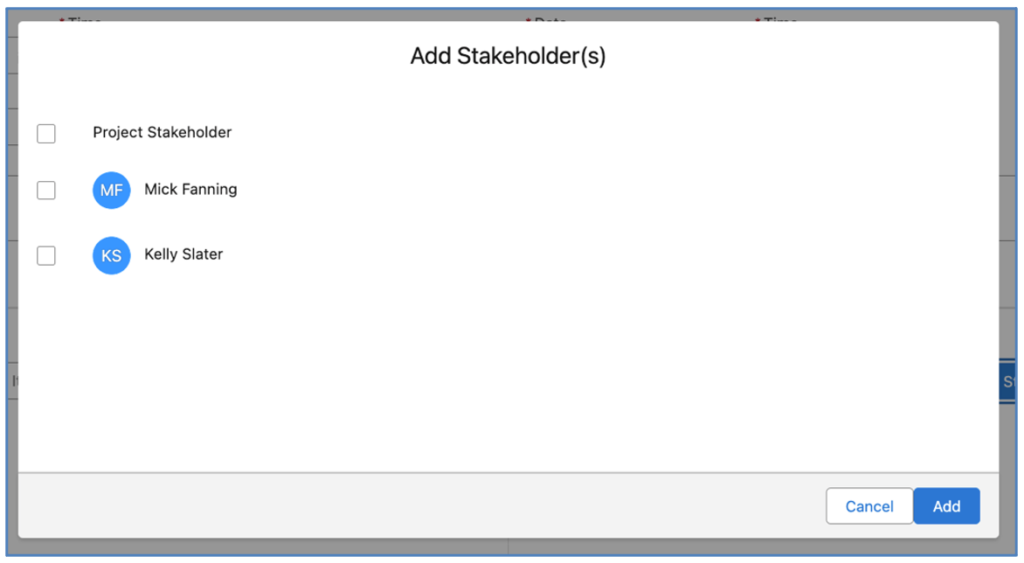
You are able to select all or some of the Project Stakeholders displayed and click the Add button. This will add each of the Selected Roles as Attendees.

Archive Meeting Manager Records
You are able to archive a Meeting Manager record. This will remove the Meeting Manager from the Search Field on the Meeting Manager, which allows you to switch from one Meeting Manager to another.

However, archived Meeting Manager records will still appear in the results of the Meeting Manager tile on the Management Pad of the Mission Control Console. This will enable Users to still access the Meeting Manager for archived records.
Cascading Deletion of Records
There is logic that will carry out the cascading deletion of related records when a parent record is deleted amongst the Meeting Manager Objects, including:
- Meeting Manager
- Meeting
- Agenda Item
- Agenda Task
- Attendee
If the Meeting Manager record is deleted, the cascading deletion logic will also delete the following:
- Related Meeting records
- Related Attendees
- Related Agenda Items
- Related Agenda Tasks
If the Meeting record is deleted, the cascading deletion logic will also delete the following:
- Related Attendees
- Related Agenda Items
- Related Agenda Tasks
If the Agenda Item is deleted, the cascading deletion logic will also delete the following:
- Related Agenda Tasks
Meeting Notes Enhancements
A number of enhancements have been made to the Meeting Notes PDF. Details of each enhancement are included below.
Meeting Notes Header Settings
There are settings within the Meeting Manager Settings Tile on the Control Pad of the Mission Control Console that enable you to customize the Header Settings, including:
- Meeting Notes Title
- Header Alignment
By default, the Meeting Notes Header section will appear as shown below.
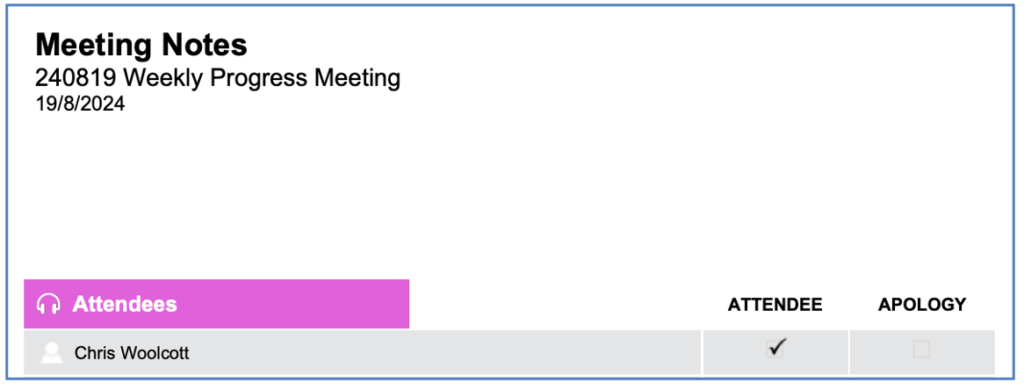
Meeting Notes Title
By default, the Title will appear as ‘Meeting Notes’. If you wish to override this, you can specify a value in the ‘Meeting Notes Title Override’ field on the Meeting Manager Settings Tile, as shown below.

When this setting is populated, the Header section will appear as shown below.
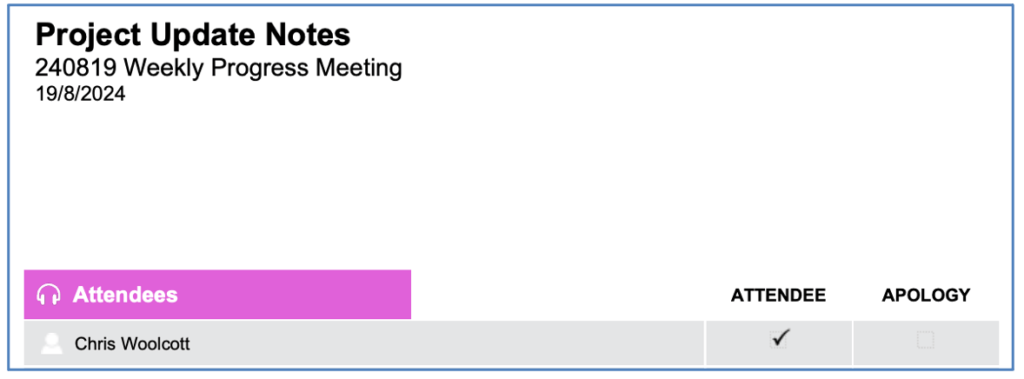
To reset to the default value, remove the value in the override field and Save the settings.
Header Alignment
By default, the Title section will be left-aligned, as shown in the image below.
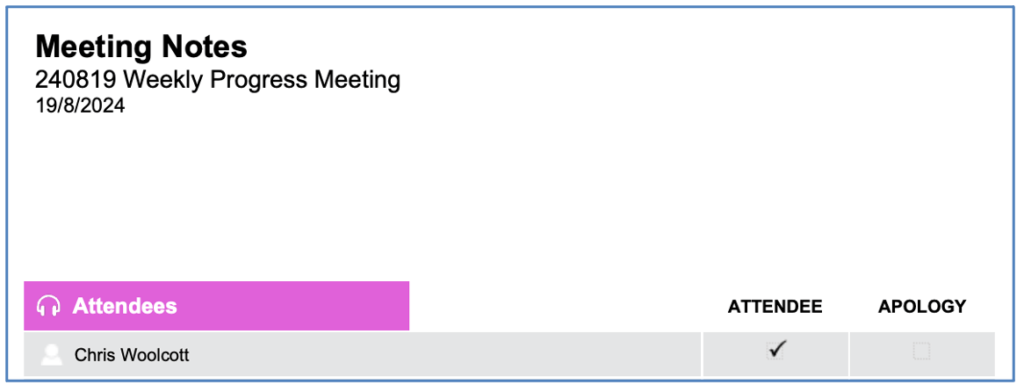
If you wish to adjust this, you can specify a value in the ‘Header Alignment’ field on the Meeting Manager Settings Tile, as shown below.

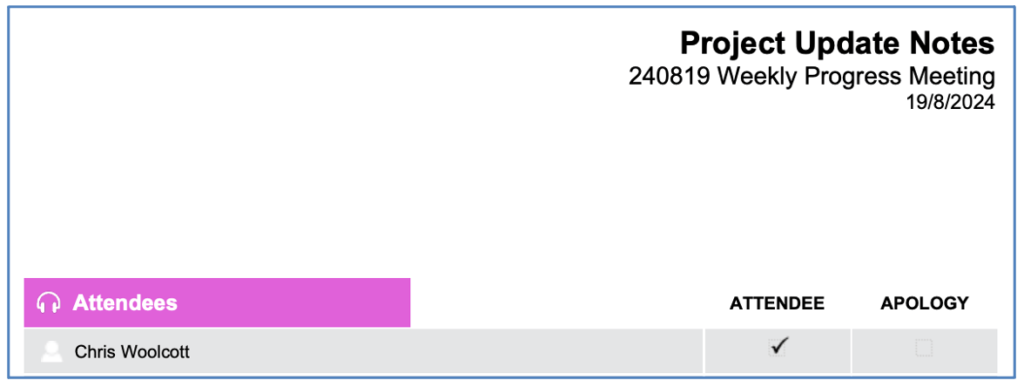
The options are:
- Left
- Center
- Right
Below is an example of the Header section being aligned to the Center.
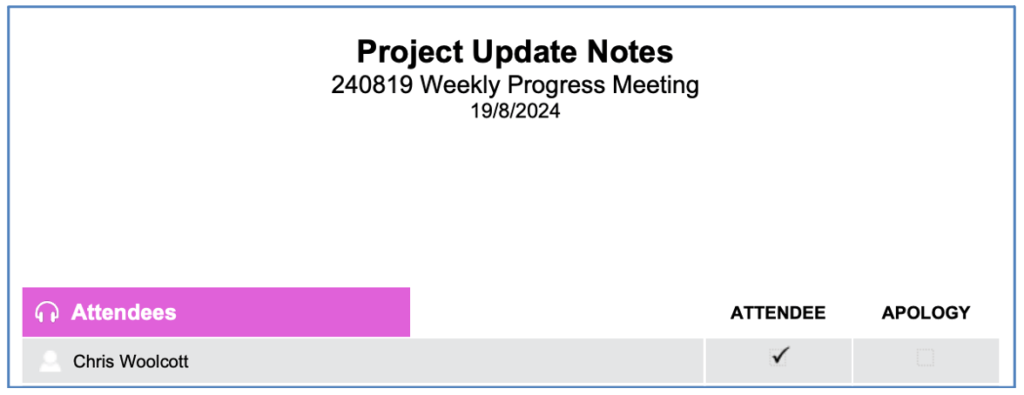
Below is an example of the Header section being aligned to the Right.
Display Attendees
By default, the Attendees Table is displayed on the Meeting Notes PDF, as shown below.
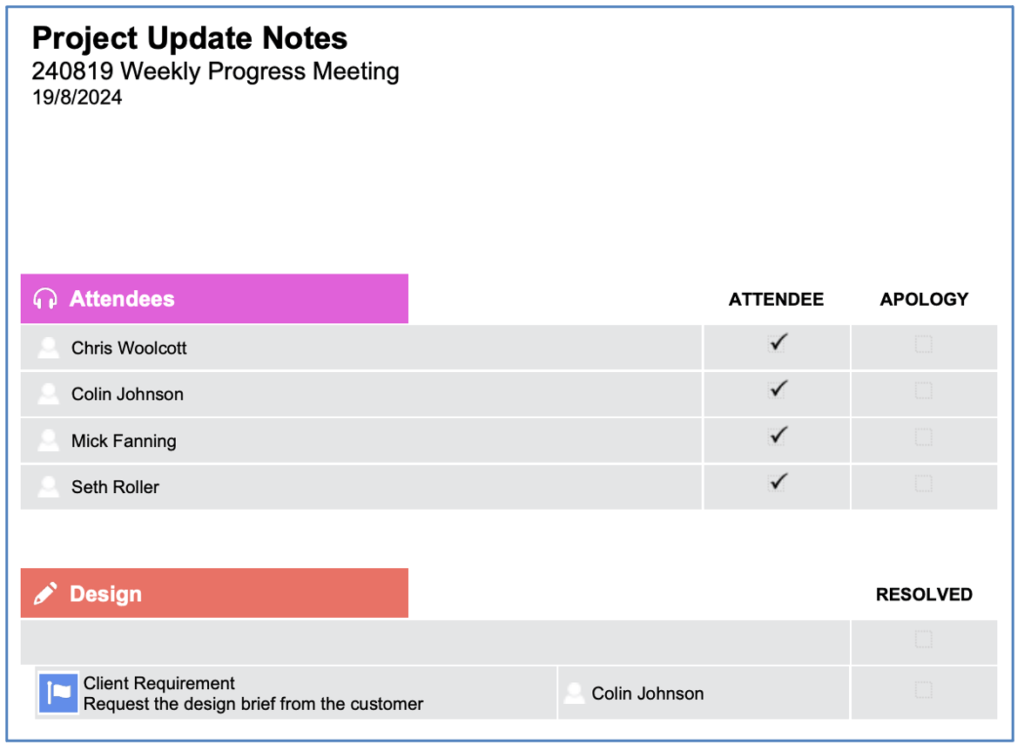
You are able to hide the Attendee table on a per Project basis, by setting the ‘Hide Meeting Notes Attendees List’ field to TRUE.
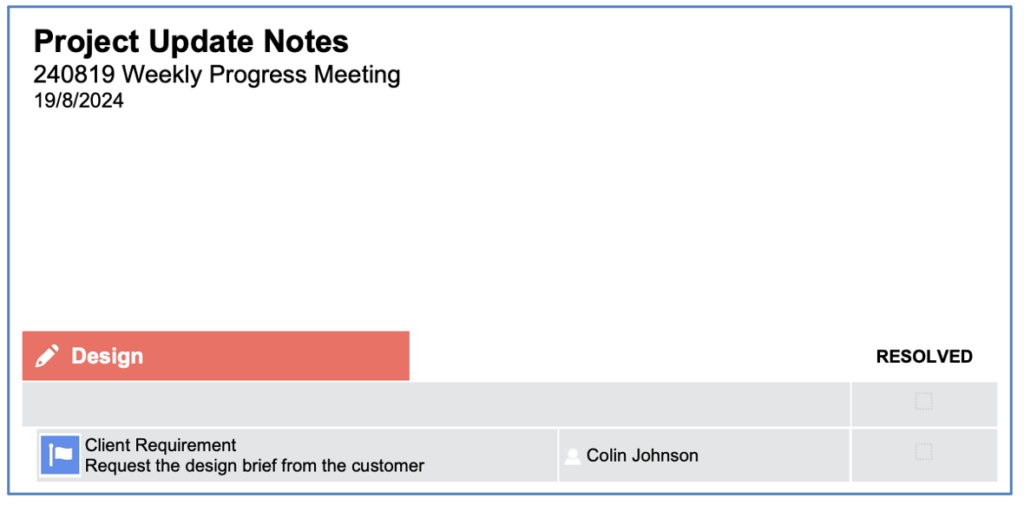
Note: This feature is only applicable to Meeting Notes PDF files that are generated from Meeting Managers that are related to a Project.
Display Agenda Task Comments
By default, the Task Comments field of the Agenda Tasks are displayed underneath the Task Name on the Meeting Notes PDF, as shown below.

You are able to hide the Task Comments field on a per Project basis, by setting the ‘Hide Meeting Notes Agenda Task Comments’ field to TRUE.

Note: This feature is only applicable to Meeting Notes PDF files that are generated from Meeting Managers that are related to a Project.
Project Launch Wizard Enhancements
The Project Launch Wizard provides the ability to quickly create a Project and related Milestones. It is accessible from the Launch Pad of the Mission Control Console.
By default, it provides the ability to populate the following fields:

You are able to add additional fields relating to the Project record and/or the Milestone record(s) via Field Sets on the respective Objects. The Field Set names are:
- Project Launcher Project Fields
- Project Launcher Milestone Fields
Fields added to the Project Field Set will be added below the Opportunity field. Fields added to the Milestone Field Set will be added to the right of the Budget field.
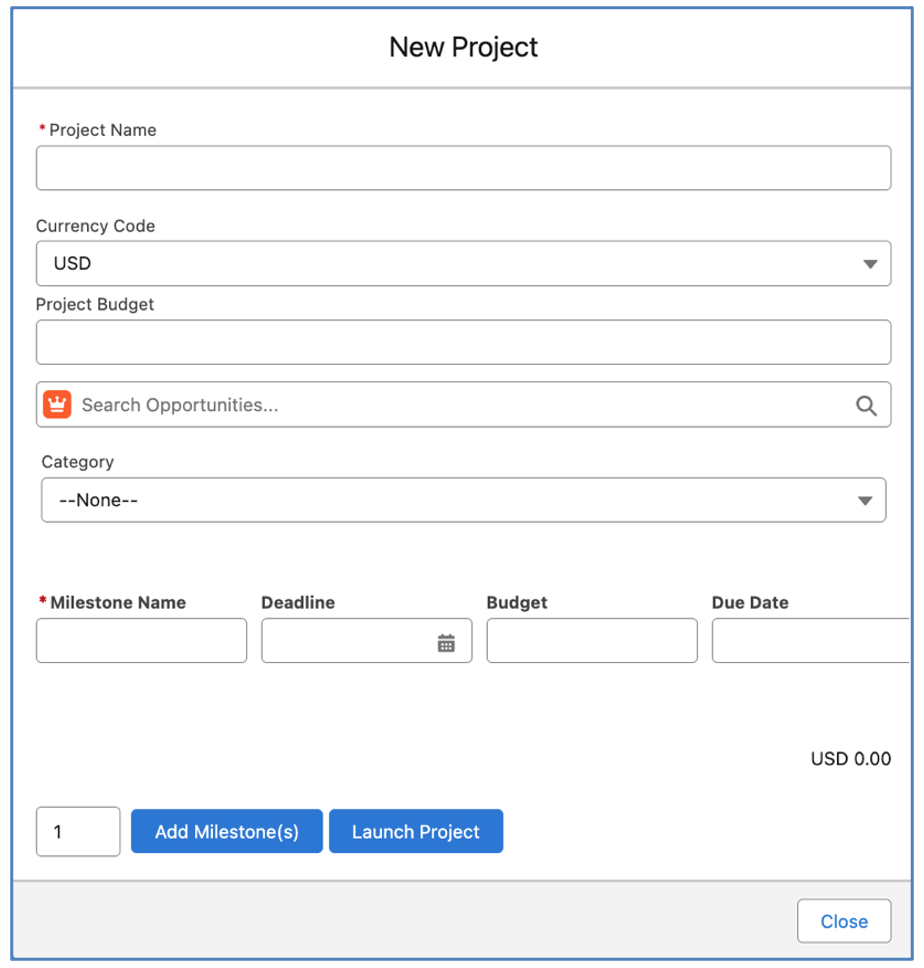
In addition to adding fields to the Field Sets, if a Customer adds a Custom Field to either the Project or Milestone Object and sets the ‘Required’ field to TRUE, these fields will automatically be included on the Project Launch Wizard.
In addition, if a Customer has Multi Currency enabled in their Salesforce Org, the Currency field on the Project will automatically appear below the Project Name field.
Warning Icon Fields
Key feature pages, such as the Project Overview, Whiteboard, etc. display red or yellow warning icons if a Milestone or Action is overdue or about to become overdue. These images are now also available directly on the records as formula fields that can be displayed on the Page Layout, Related Lists, List Views and Reports.
The Warning Icon Formula Fields are available on the following Objects within Mission Control:
- Project
- Phase
- Milestone
- Action
- Checklist Item
Red Warning Icon ![]()
The Red Warning Icon is displayed for the Start Date or the End Date based on the following criteria:
- Start Date: If Status = Planned and Start Date is less than today
- End Date: If Status = Planned or In Progress and End Date is less than today
Yellow Warning Icon ![]()
The Yellow Warning Icon is displayed for the Start Date or the End Date based on the following criteria:
- Start Date: If Status = Planned or In Progress and Start Date is Today+1 or Today+2
- End Date: If Status = Planned or In Progress and End Date is Today+1 or Today+2
These Warning Icon fields are available to be used on the Page Layout, Related Lists, List Views and Reports, as shown below.
Page Layout
![]()
Related List
![]()
List View
![]()
Reports
![]()
Time Log Rate Source Fields
The Time Log Object contains two fields that are populated with the details of the rates used to calculate the Billable and Cost values. These fields are:
- Billable Hourly Rate Source
- Cost Hourly Rate Source
Depending on the rates being used on the Project that the Time Log relates to, these fields will be populated with one of the following descriptions.
| Rate Source | Description | Example |
| Standard | Project Day Rate: {Project Name} | Project Day Rate: Rip Curl: Website Build |
| Standard Rate Adjustment | Standard Rate Adjustment: {Rate Adjustment ID} | Standard Rate Adjustment: RADJ:00002 |
| Role-based | Role Hourly Rate: {Role Name} | Role Hourly Rate: Colin Johnson |
| Role-based Rate Adjustment | Role-based Rate Adjustment: {Rate Adjustment ID} | Role-based Rate Adjustment: RADJ:00005 |
| Role-based Override Rate Adjustment | Role-based Override Rate Adjustment: {Rate Adjustment ID} | Role-based Override Rate Adjustment: RADJ:00009 |
| Skill-based | Skill Assignment Hourly Rate: {Role Name} | {Skill Name} | Skill Assignment Hourly Rate: Colin Johnson | Development |
| Skill-based Rate Adjustment | Skill-based Rate Adjustment: {Rate Adjustment ID} | Skill-based Rate Adjustment: RADJ:00010 |
| Skill-based Override Rate Adjustment | Skill-based Override Rate Adjustment: {Rate Adjustment ID} | Skill-based Rate Adjustment: RADJ:00012 |
| Rate Card Entry | Rate Card Entry: {Rate Card Name} | {Function} | Rate Card Entry: ACM 2024 Rate Card | Project Manager |
| Rate Card Rate Adjustment | Rate Card Adjustment: {Rate Adjustment ID} | Rate Card Adjustment: RADJ:00015 |
Billing Event PDF Enhancements
A number of enhancements have been made to the Billing Event PDF. Details of each enhancement is included below.
Time Log Appendix Custom Fields
You are able to control which fields are displayed in the Time Log Appendix that is visible on the Billing Event PDF.
By default, the following fields are included in the appendix:
- Milestone / Action
- Date
- Project Member
- Time Log Notes
- Hours Completed
- Hours Completed Value (Billable)
Below is an example of the default layout.

The first column (Milestone/Action) will always be displayed, however you are able to control which fields are displayed across the rest of the appendix. This is controlled by the ‘Billing Event Time Log Appendix’ Field Set on the Time Log Object.
The appendix table will show the Milestone/Action column and additional 7 columns. If more than 7 fields are added to the field set, the first 7 fields will be displayed.

Only the ‘Hours Completed’, ‘Hours Completed Value (Billable)’ and ‘Hours Completed Value (Cost)’ fields will display a summary at the bottom.
Expense Appendix Custom Fields
You are able to control which fields are displayed in the Expense Appendix that is visible on the Billing Event PDF.
By default, the following fields are included in the appendix:
- Expense ID
- Category
- Date
- Expense Notes
- Amount Claimed
Below is an example of the default layout.

You are able to control which fields are displayed within the appendix. This is controlled by the ‘Billing Event Expense Appendix’ Field Set on the Expense Object.
The appendix table will show a maximum of 8 columns. If more than 8 fields are added to the field set, the first 8 fields will be displayed.

Only the ‘Amount Claimed’, ‘ex-Tax Amount’ and ‘Tax Amount’ fields will display a summary at the bottom.
Contact Salutation
The Contact’s Salutation has been included in the PDF, so instead of previously displaying Mick Fanning, it would now display Mr Mick Fanning.
Minor Enhancements
A number of minor enhancements have been made to various features. Each enhancement is detailed below.
Expense Mileage Rate Field
The ‘Mileage Amount’ field on the Expense Object is a formula field that previously referenced the ‘Mileage Rate’ on the Role record for the person set in the ‘Incurred By’ field. Historically, if the ‘Mileage Rate’ on the Role was modified, the ‘Mileage Amount’ for all Expenses would adjust.
To accommodate periodic changes to the ‘Mileage Rate’ on the Role record, the ‘Mileage Rate’ on the Expense Object will store the value from the Role ‘Mileage Rate’ field at the time the Expense is created. This will be populated automatically when the following conditions are TRUE:
- Incurred By is not null
- Mileage Rate on the Role record for the Incurred By Role is not null
- Distance (Km/Miles) is not null
If the Expense ‘Mileage Rate’ field is empty, the ‘Mileage Amount’ formula field will reference the value from the Role ‘Mileage Rate’ field instead.
Log Time Component Field Set
The ‘Log Time Component Fields’ Field Set now supports the ability to add fields from the Case that it may relate to. This will enable Users to update fields on the parent Case at the time that a Time Log is being created. For example, a User maybe logging time via the Log Time Component that relates to a Case. If the Case Status needs to be updated, to avoid the User from having to navigate to the Case, the field can be added to the Field Set, allowing the User to update the Case Status field directly from the Log Time Component.
Working Days (Contributors & Checklist Items)
Working Days fields have been added to the Contributor and Checklist Item Objects to provide deeper insight into reporting and rescheduling. These fields are calculated in the same way the Action Working Days field is calculated.
Gantt Chart Phase Collapse / Expand
You are now able to manually collapse and expand Phases within the Gantt Chart in the same way you can with other layers, such as Milestones, Actions and Checklist Items.
The state of the Phase, whether it’s collapsed or expanded will be persistently remembered between visits to the Gantt Chart.
Error Log
A new Custom Object called ‘Log’ has been added. This will be used to capture any system log information, such as system information, error or warning notifications.
These Log records will primarily be generated when asynchronous operations do not process as expected – for example, if a custom Validation Rule has been added to an Object that prevents a record from being created or updated.
These Logs will be available for System Administrators and Aprika Customer Support to assist with identifying the cause of such unexpected outcomes.
Project Validation Rules
A new Validation Rule has been added to the Project Object. The ‘Project Status Report Required Fields’ Validation Rule ensures the appropriate fields are populated if the ‘Generate Weekly Status Report’ is set to TRUE. This Validation Rule is Active by default.
Time Log Validation Rules
Three new Validation Rules have been added to the Time Log Object.
The ‘Prevent New Time Logs Before This Month’ Validation Rule prevents Users from creating Time Logs for a Date less than This Month.
The ‘Prevent Core Field Edits If Invoiced’ Validation Rule prevents Users from editing core fields if the ‘Invoiced’ field is TRUE, unless they are a System Administrator.
The ‘Prevent Core Field Edits If Approved’ Validation Rule prevents Users from editing core fields if the ‘Approval Status’ field is set to Approved, unless they are a System Administrator.
The core fields checked in these two Validation Rules include:
- Action
- Date
- Project Member
- Hours Completed
- Non Billable
All of these Validation Rules are Inactive by default.
Track Pad Height Attribute
A Height Parameter has been added to the Track Pad Component. This will allow Customers to specify the desired height of the Track Pad when adding the Component to a Lightning Page.
Source Milestone Field & Validation Rule
When a Milestone is being created as part of any of the cloning or auto-generation functions, the ‘Source Milestone’ field will be populated to identify which Milestone this new Milestone was generated from. This field will be automatically populated when a Milestone is created using any of the following functions:
- Project Clone
- Milestone Clone
- Milestone Loader
- Auto-generation from Opportunity (all Generation Methods)
- Auto-generation from Project Requests
To prevent Users from manually adding Milestones to their Projects, rather than adding via the above functions, the ‘Prevent New Milestone If Source Empty’ Validation Rule can be activated. This will prevent Users other than System Administrators from adding a new Milestone to a Project if the ‘Source Milestone’ field is empty.
Revenue Recognition Polling Setting
A new setting has been added to facilitate larger data sets in the Revenue Recognition page.
The Revenue Recognition Tab on the PMO Dashboard and Project Overview loads data from multiple Projects. To control the performance of the Revenue Recognition page, there is a ‘Revenue Recognition Batch Size’ setting within the Project Automation Settings Tile on the Control Pad of the Mission Control Console.
This setting can be set to a specific number that will determine how many Projects are process per batch during the page loading process.

By default, it will be set to 10. The lower the number, the more data that can be loaded, albeit with longer load times. This makes it possible to view a larger number of Projects on the page at once.
New Component Overview
This section includes details of any component changes within the package. This includes changes to existing fields as well as any new fields, validation rules, buttons / actions, Apex Classes, Components, etc. that have been added to the solution as part of this release.
IMPORTANT: We recommend you thoroughly review all of these components. To take advantage of the enhancements within this release, you may need to:
- Add fields to your Page Layouts
- Add picklist values to Picklist Fields
- Activate Validation Rules
- Add buttons/actions to your Page Layouts
- Add Related Lists to your Page Layouts
If you are not using the Permission Sets included with Mission Control, we recommend you check the Field Level Security for all of these fields and accessibility to the various Components to ensure all appropriate Profiles/Permission Sets have the required access.
Meeting Manager
| Field | Field Type | Comments | New/Existing |
| Project | Lookup (Project) | Identifies the Project this Meeting Manager relates to | New |
| Archived | Checkbox | Set this field to TRUE to archive the Meeting Manager record, which will remove it from the Meeting Manager Lookup on the Console | New |
Agenda Task
| Field | Field Type | Comments | New/Existing |
| Checklist Item | Lookup (Checklist Item) | Identifies the Checklist Item this Agenda Task relates to | New |
Attendee
| Field | Field Type | Comments | New/Existing |
| Project Stakeholder | Lookup (Project Stakeholder) | Identifies the Project Stakeholder that this Attendee relates to | New |
Role
| Field | Field Type | Comments | New/Existing |
| View Scheduler Financials Tab | Checkbox | Identifies if the Role can view this Tab on the Scheduler | New |
| View Scheduler Hours Detail Tab | Checkbox | Identifies if the Role can view this Tab on the Scheduler | New |
| View Scheduler Hours Total Tab | Checkbox | Identifies if the Role can view this Tab on the Scheduler | New |
| View Scheduler Actions Tab | Checkbox | Identifies if the Role can view this Tab on the Scheduler | New |
| View Scheduler Projects Tab | Checkbox | Identifies if the Role can view this Tab on the Scheduler | New |
| View Scheduler Timeline Tab | Checkbox | Identifies if the Role can view this Tab on the Scheduler | New |
| View Scheduler Month Tab | Checkbox | Identifies if the Role can view this Tab on the Scheduler | New |
| Scheduler Action – Default Tab | Picklist | Identifies which Tab is loaded by default for this Role within the Action Modal on the Scheduler | New |
| View Scheduler Action – Action Tab | Checkbox | Identifies if the Role can view this Tab within the Action Modal on the Scheduler | New |
| View Scheduler Action – Checklist Tab | Checkbox | Identifies if the Role can view this Tab within the Action Modal on the Scheduler | New |
| View Scheduler Action – Chatter Tab | Checkbox | Identifies if the Role can view this Tab within the Action Modal on the Scheduler | New |
| Inactive Date | Date | Identifies the date the Active field was set to FALSE | New |
Log
| Field | Field Type | Comments | New/Existing |
| Name | Auto Number (Name) | Identifies the unique number for this record. Format: MCL-{000000} | New |
| Type | Picklist | Identifies the type of log notification this record is
Values: Info, Warning, Error |
New |
| Class | Text (255) | Identifies the Class this Log relates to | New |
| Method | Text (255) | Identifies the Method this Log relates to | New |
| Line Number | Number (18, 0) | Identifies the Line Number within the Class this Log relates to | New |
| Message Body | Long Text (32,768) | Message to explain the reason for the Log being created | New |
| User | Lookup (User) | Identifies the User that caused this Log to be created | New |
| Stack Trace | Long Text (32,768) | Stack Trace to assist debugging the cause of this Log | New |
Checklist Item
| Field | Field Type | Comments | New/Existing |
| Exclude from Daily Digest | Checkbox | Identifies if this Checklist Item should be excluded from the Daily Digest | New |
| Working Days | Number (18, 0) | Tracks the number of automatically calculated working days for this Checklist Item | New |
| Warning Icon – Start Date | Formula (Text) | Displays a Red Warning if Planned and <= Today or Yellow Warning if Planned and Today+1 or Today+2 | New |
| Warning Icon – End Date | Formula (Text) | Displays a Red Warning if Planned or In Progress and <= Today or Yellow Warning if Planned or In Progress and Today+1 or Today+2 | New |
Risk
| Field | Field Type | Comments | New/Existing |
| Exclude from Daily Digest | Checkbox | Identifies if this Risk should be excluded from the Daily Digest | New |
Issue
| Field | Field Type | Comments | New/Existing |
| Exclude from Daily Digest | Checkbox | Identifies if this Issue should be excluded from the Daily Digest | New |
Contributor
| Field | Field Type | Comments | New/Existing |
| Working Days | Number (18, 0) | Tracks the number of automatically calculated working days for this Contributor | New |
Holiday Exclusion
| Field | Field Type | Comments | New/Existing |
| HEx ID | Auto Number (Name) | Identifies the Unique ID of the Holiday Exclusion record | New |
| Holiday | Master-Detail (Holiday) | Links to the Holiday this Holiday Exclusion relates to | New |
| Role | Master-Detail (Role) | Links to the Role this Holiday Exclusion relates to | New |
Team Assignment
| Field | Field Type | Comments | New/Existing |
| Exclude from Team Holidays | Checkbox | Identifies if this Role should have a Holiday Exclusion record for a Holiday assigned to this Team | New |
Project
| Field | Field Type | Comments | New/Existing |
| Hide Meeting Notes Attendees List | Checkbox | Set this field to TRUE to hide the Attendee List from the Meeting Notes PDF | New |
| Hide Meeting Notes Agenda Task Comments | Checkbox | Set this field to TRUE to hide the Task Comments field from the Agenda Task section of the Meeting Notes PDF | New |
| Warning Icon – Start Date | Formula (Text) | Displays a Red Warning if Planned and <= Today or Yellow Warning if Planned and Today+1 or Today+2 | New |
| Warning Icon – End Date | Formula (Text) | Displays a Red Warning if Planned or In Progress and <= Today or Yellow Warning if Planned or In Progress and Today+1 or Today+2 | New |
Phase
| Field | Field Type | Comments | New/Existing |
| Warning Icon – Start Date | Formula (Text) | Displays a Red Warning if Planned and <= Today or Yellow Warning if Planned and Today+1 or Today+2 | New |
| Warning Icon – End Date | Formula (Text) | Displays a Red Warning if Planned or In Progress and <= Today or Yellow Warning if Planned or In Progress and Today+1 or Today+2 | New |
| Gantt Collapsed | Checkbox | When checked, indicates the Phase is collapsed on the Gantt | New |
Milestone
| Field | Field Type | Comments | New/Existing |
| Warning Icon – Start Date | Formula (Text) | Displays a Red Warning if Planned and <= Today or Yellow Warning if Planned and Today+1 or Today+2 | New |
| Warning Icon – End Date | Formula (Text) | Displays a Red Warning if Planned or In Progress and <= Today or Yellow Warning if Planned or In Progress and Today+1 or Today+2 | New |
| Source Milestone | Lookup (Milestone) | Identifies the Milestone that was used when creating this Milestone (e.g. via Clone or Auto-Generation) | New |
Action
| Field | Field Type | Comments | New/Existing |
| Warning Icon – Start Date | Formula (Text) | Displays a Red Warning if Planned and <= Today or Yellow Warning if Planned and Today+1 or Today+2 | New |
| Warning Icon – End Date | Formula (Text) | Displays a Red Warning if Planned or In Progress and <= Today or Yellow Warning if Planned or In Progress and Today+1 or Today+2 | New |
Expense
| Field | Field Type | Comments | New/Existing |
| Mileage Rate | Currency (14, 4) | Identifies the amount paid per Kilometre / Mile | New |
| Mileage Amount | Formula (Currency) | Identifies the amount being claimed for the distance
Modified from: If(Mark_Up_Required__c,Distance_Km_Miles__c * Incurred_By__r.Mileage_Rate__c + (( Distance_Km_Miles__c *Incurred_By__r.Mileage_Rate__c) * Project__r.Expenses_Mark_Up__c), Distance_Km_Miles__c * Incurred_By__r.Mileage_Rate__c)
Modified to: If(Mark_Up_Required__c,Distance_Km_Miles__c * IF(ISBLANK(Mileage_Rate__c), Incurred_By__r.Mileage_Rate__c, Mileage_Rate__c) + (( Distance_Km_Miles__c *IF(ISBLANK(Mileage_Rate__c), Incurred_By__r.Mileage_Rate__c, Mileage_Rate__c)) * Project__r.Expenses_Mark_Up__c), Distance_Km_Miles__c * IF(ISBLANK(Mileage_Rate__c), Incurred_By__r.Mileage_Rate__c, Mileage_Rate__c))
|
Existing |
Time Log
| Field | Field Type | Comments | New/Existing |
| Billable Hourly Rate Source | Text (255) | Identifies the source of the Billable Hourly Rate | New |
| Cost Hourly Rate Source | Text (255) | Identifies the source of the Cost Hourly Rate | New |
Components
The following Components have been included or updated in this Release.
| Component Type | Component Name | Description |
| Apex Class | TimeLogSummaryPDFController | Required to utilise the Project Time Logs PDF feature |
| Visualforce Page | TimeLogSummaryPDF | Required to utilise the Project Time Logs PDF feature |
Validation Rules
The following Validation Rules have been included or updated in this Release. It is recommended you review each Validation Rule and determine whether you wish for the rule(s) to be active or inactive.
| Object | Rule | Description | Active |
| Project | Project Status Report Required Fields | Ensures the required fields are populated if the Generate Weekly Project Status Report is set to TRUE | TRUE |
| Time Log | Prevent New Time Logs Before This Month | Prevent Users from creating Time Logs for a Date less than This Month | FALSE |
| Time Log | Prevent Core Field Edits If Invoiced | Prevent User from editing core fields if the Invoiced Field is TRUE, unless you are a System Administrator | FALSE |
| Time Log | Prevent Core Field Edits If Approved | Prevent Users from editing core fields if the Approval Status Field is Approved, unless you are a System Administrator | FALSE |
| Milestone | Prevent New Milestone If Source Empty | Prevents the creation of a new Milestone if the Source Milestone field is empty. Does not apply to System Administrators | FALSE |
How do I upgrade?
Mission Control will be made available based on the following release schedule.
30th August 2024 – Available for manual upgrade from the AppExchange
14th September 2024 – Automatic upgrade to all Sandbox Orgs
28th September 2024 – Automatic upgrade to all Production Orgs
To manually upgrade to the new version of Mission Control in your organisation, please follow the steps below:
- Click www.aprika.com/mc-app
- Click the ‘Get it Now’ button
- Enter your login details (if required)
- Click ‘Install in Production’
- Click ‘Confirm and Install’ (you may need to login again at this stage)
- Select which users you want to install for (‘Install for All Users’ is recommended)
- Click ‘Upgrade’
- Click Next (on step 1. Approve Package API Access)
- Select who you want to grant access to (on Step 2. Choose Security Level)
- Click Next
- Click Install
- Add new fields to page layouts as required.
What’s New Webinar
We have pre-recorded the ‘What’s New’ webinar to provide further information on how to get the best out of the new features. To access this webinar, please view the ‘Release Notes’ section of the Mission Control Support Centre – www.aprika.com/mc-support
Feedback
Some of the new features included in this release of Mission Control have come from ideas submitted from existing clients. If you have an idea for enhancing Mission Control, you can submit it via email to [email protected].
Questions?
If you have any questions regarding this release notification, please do not hesitate to contact us at [email protected].

