A new version of Mission Control (version 1.75) will be released on the AppExchange on Friday 2nd May 2025. This notification has been issued to existing Mission Control users. It contains an overview of the new features available with this release, along with instructions on how to upgrade to the new version.
This release includes a number of new features, along with some enhancements to existing functionality, including:
Let’s get stuck into the detail…
If you have a large pool of resources that could be assigned to your Projects, you may centralise the resource assignment process. This is where the Resource Request feature comes in. Instead of each Project Manager looking at available resources through features like the Resource Assignment Wizard or Scheduler, they would instead submit a Resource Request for each resource they need on their Project. These Resource Requests would then be reviewed by the centralised resource management team, who would identify and assign the most appropriate resource to work on the Project.
The Resource Request feature is a component available within the Resource Planner in Mission Control. It provides Resource Managers with the ability to view all Resource Requests, search for Resources (Roles) that match the requirements, review and compare the potential Resources, and assign the selected Resource to the Project.

The Resource Request Manager is accessed via one of the Tabs on the Resource Planner. You can control who has access to the Resource Request Tab by setting the ‘View RP Resource Request Tab’ field on the individual User’s Role record.

If this field is set to TRUE, the User will be able to access the Tab from the Resource Planner.

If this field is set to FALSE, the User will not be able to access the Tab from the Resource Planner.

Note: If you want the Resource Request Tab to load by default when you visit the Resource Planner, you can set ‘Resource Planner Default Tab’ to be Resource Request on your Role record.
Project Managers can submit Resource Requests for the Resource Manager to review / assign. This can be done by clicking the ‘New’ button from the Resource Request related list on the Related Tab of the Project Page.

When creating a new Resource Request record, the User will need to provide the following information:
The remaining fields should be left empty, as these will be populated by the Resource Manager:
Any Resource Request where ‘Resource Assigned’ is empty and ‘Declined’ is FALSE will appear on the Resource Request Tab for the Resource Manager to process.
When looking at the Resource Request Tab, the ‘Resource Requests’ section on the left-hand-side displays a list of all Resource Request records that need to be reviewed. These will be grouped by Project Name and sorted alphabetically. Within each Project, the Resource Requests are sorted alphabetically based on ‘Function’.

There are a variety of icons that provide you with the ability to carry out key functions. Each icon’s function is explained below.
| Icon | Function |
| Opens a Modal enabling you to add a new Resource Request
|
|
| Opens a Modal enabling you to edit the individual Resource Request record. For example, if you wish to decline the request | |
| Populates key field information from the individual Resource Request record into the ‘Request Information’ and ‘Search Criteria’ sections | |
| Opens a Chatter Modal, enabling you to collaborate on the Resource Request or the Project Chatter Feed | |
| Enables the deletion of an individual Resource Request record
|
When you click on the eye icon of an individual Resource Request record, key field information will be populated into the ‘Request Information’ and ‘Search Criteria’ sections of the Resource Request page, as shown below.
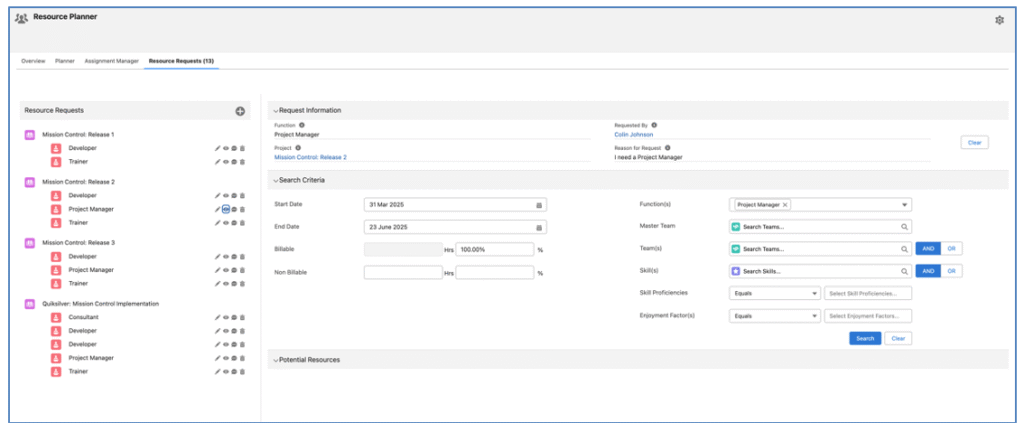
You can further refine your search criteria, including search parameters such as Master Team, Teams, Skills, Skill Proficiencies and Enjoyment Factors.

Note: any Search Criteria you enter will be stored on the Resource Request when you click the ‘Search’ button and will be pre-populated the next time you click the eye icon for the Resource Request record.
When you have specified all of the required Search Criteria, you can click ‘Search’, which will return any matching Roles in the ‘Potential Resources’ section. If you wish to clear the Search Criteria, click the ‘Clear’ button. This will remove any search parameters you’ve entered, excluding those populated based on the fields from the Resource Request record.
The ‘Potential Resources’ section of the Resource Request Tab provides individual resource profile cards for each Role that has been returned as a potentially suitable resource for the request.

The search results displayed will not include any Roles already assigned to the Project.
The profile cards provide insights into key attributes of the Role’s ability to match the requirements of the Resource Request.

Charge Level
The ‘Charge Level’ image will display 3 money bag icons, indicating how expense the Role is, based on the value of the ‘Charge Level’ field on their Role record. The images display based on the following logic:
| Charge Level | Charge Level Image |
| Low | |
| Medium | |
| High |
This helps determine how affordable / expensive the Role is without displaying their specific Billable / Cost rates.
Capacity Overview
The Capacity Overview provides insight into the Role’s availability during the period being requested. The Progress Bar provides a visual indication of how much of their capacity is already allocated elsewhere. Below that, their Capacity, Allocation and Availability figures are displayed.
The ‘Allocation’ figure is determined based on the ‘Existing Allocation Source’ setting within the Resource Request Settings section of the Settings on the Resource Planner.

The options are:
If this Setting is empty, the ‘Both (Actions Win)’ option will be applied.
Team Overview
The Team Overview section provides insight into which Teams the Role is a member of that you are searching for within the Search Criteria for the Resource Request. The green tick indicates the Role is a member of the Team, the red cross indicates the Role is not a member of the Team.
Skill Overview
The Skill Overview section provides insight into which Skills the Role is assigned to that you are searching for within the Search Criteria for the Resource Request. The green tick indicates the Role is assigned to the Skill, the red cross indicates the Role is not assigned to the Skill. If they are assigned to the Skill, the Skill Proficiency and Enjoyment Factor will also be displayed.
The number of Roles displayed within the Potential Resources section will vary based on the Search Criteria. You can scroll horizontally to view all of the Roles returned as potential matches. However, you can also use the ‘Role Search’ and ‘Compare’ features to further filter the results.
Role Search
You can use the ‘Role Search’ box to filter the profile cards based on the Role ‘Name’. This is located within the ‘Potential Resources’ Header.

For example, if I enter ‘Chr’ into the Search and hit Enter, the results will be filtered down to only show Chris Woolcott and Christopher Allen.

To return to the full list of Potential Resources, simply clear the text entered in the Role Search field.
Compare Resources
You can use the ‘Compare’ feature to filter the Profile Cards to allow you to perform a side by side comparison. For example, if my search results return 20 Roles, I may want to compare Roles 1, 8 and 17. Instead of scrolling horizontally see how well each Role matches the Resource Request, I can tick the Checkbox within each Role’s Profile Card and click the ‘Compare’ link located in the ‘Potential Resources’ Header.

When you click the ‘Compare’ link, it will only display Profile Cards where the Checkbox is TRUE. This allows you to conduct a side-by-side comparison of the Potential Resources.
To return to the full list of Potential Resources, click the ‘View All’ link located in the ‘Potential Resources’ Header.
Once you have identified the Role that will fulfil the Resource Request, you can click the ‘Select’ button on their Profile Card to open the ‘Resource Assignment’ Modal.

Within the Resource Assignment Modal, you’re able to create Role Forecast records and/or transfer ownership.
Create Role Forecasts
The ‘Role Forecast’ section of the Modal enables you to create Role Forecast records for the Role being assigned to the Project to fulfil the Resource Request.
When creating Role Forecast records, you can choose how many records are created, from the following options:
Note: Where multiple Role Forecast records are being created, a pro-rated Role Forecast may be created at the beginning and/or end of the period. For example, if I’ve selected ‘1 per week and my Start Date is the 5th March and the End Date is the 19th March with Billable Hours set to 30, there will be 3 Role Forecast records created as follows.
Role Forecast 1
Start Date: 5 March
End Date: 9 March
Hours Billable: 8.16
Hours breakdown:
| 3 March | 4 March | 5 March | 6 March | 7 March | 8 March | 9 March |
| 2.70 | 2.73 | 2.73 |
Role Forecast 2
Start Date: 10 March
End Date: 16 March
Hours Billable: 13.65
| 10 March | 11 March | 12 March | 13 March | 14 March | 15 March | 16 March |
| 2.73 | 2.73 | 2.73 | 2.73 | 2.73 |
Role Forecast 3
Start Date: 17 March
End Date: 19 March
Hours Billable: 8.19
| 17 March | 18 March | 19 March | 20 March | 21 March | 22 March | 23 March |
| 2.73 | 2.73 | 2.73 |
This example is based on Saturday and Sunday being configured as Non Working Days.
If you do not wish to create Role Forecasts (for example, you may just want to transfer ownership), you can set the following fields to null/empty:
With all of these fields null, no Role Forecast records will be generated.
Ownership Reassignment
The ‘Ownership Reassignment’ section of the Modal enables you to transfer ownership from a Role that is currently assigned to the Project.
Select a Role in the Lookup field, identifying the Role you want to transfer ownership from. This Lookup field will display all Roles that are assigned to the Project at any of the following levels:
This will transfer ownership to the new Role.
The Role Assignment Manager feature is a component available within the Resource Planner in Mission Control. It provides Resource Managers with the ability to view all Role Allocations assigned to Roles across a selection of Projects, for a period of time.
The Role Assignment Manager is a key tool for managing resource assignment across Projects. It assists Resource Managers in being able to carry out a number of processes, including:

The Role Assignment Manager is accessed via one of the Tabs on the Resource Planner. You can control who has access to the Assignment Manager Tab by setting the ‘View RP Assignment Manager Tab’ field on the individual User’s Role record.

If this field is set to TRUE, the User will be able to access the Tab from the Resource Planner.

If this field is set to FALSE, the User will not be able to access the Tab from the Resource Planner.

Note: If you want the Assignment Manager Tab to load by default when you visit the Resource Planner, you can set ‘Resource Planner Default Tab’ to be Assignment Manager on your Role record.
When loading the Assignment Manager Tab, the ‘Settings & Filters’ section will be displayed. This enables you to specify the Settings related to the date range and display format applied to the Assignment Manager. The Filters section enables you to select which Roles and Projects you wish to view.
Settings
The Settings section enables you to specify the date range to apply to the reporting period being viewed, along with the format of how the Roles will be grouped.

Filters
The Filters section enables you to apply filters to the Roles and Projects being viewed within the Assignment Manager.

Roles can be filtered by Master Team or Team. If the Master Team toggle is being used, you can select multiple Teams – however, the AND/OR toggle will be restricted to OR. If the Team toggle is being used, you can select multiple Teams, and specify whether the Roles should be members of all Teams (e.g. Set Toggle to AND) or can be a member of any of the teams (e.g. Set Toggle to OR).
Projects can be selected in one of two ways – List or Filter. The List option displays all Projects in a list view, excluding any that have Template = TRUE or Archive = TRUE.

Alternatively, the Filter option provides the ability to specify a set of filter parameters based on Project Fields.

Filters can also be saved and used as pre-set filters, which can be persistently applied when using the Assignment Manager.
Once your Filters have been specified, click the ‘Filter’ button to load the results into the Assignment Manager section.
The Assignment Manager section of the Component displays a row for each Role and a selection of columns for each Project.

For each Role, a minimum of 2 rows of data will be visible, as shown below.

The top row displays Role Forecast information, the bottom row displays Action information. This provides Resource Managers the ability to carry out a ‘double resource’ process.
Double-resourcing is where a Role has been allocated to a Project through Role Forecast records, and then assigned hours across Actions & Checklist Items. For example, Kelly Slater is a Project Manager working on the Rip Curl: Mission Control Implementation Project. He requires a Developer on the Project, and submits a Resource Request for 100 hours. The Resource Manager determines that Mick Fanning is the most suitable Role for this and creates a Role Forecast record for Mick against the Project. Kelly then assigns Mick to a variety of Actions on the Project plan. The sum of the hours assigned to Mick across these Actions currently totals 48. When the Resource Manager is viewing this information on the Assignment Manager, they can see Mick is allocated to the Project for 100 hours (Role Forecast) but has only been assigned 48 hours (Actions). This ‘double resourcing’ insight enables the Resource Manager to identify that Mick may be available to transfer the other 52 hours to another Project, or can reach out to Kelly to ensure Mick is still in fact required for the full 100 hours.
The ‘Double Resourcing’ on the Assignment Manager Tab is calculated during page load. However, if you wish to have the Action hours visible on the individual Role Forecast records, which will allow you to report on the information, there is a Setting that can be enabled on the Control Pad.
When the ‘Enable Double Resourcing’ Setting within the Role Allocation Automation Settings Tile on the Control Pad within Mission Control is set to TRUE, the following fields will be updated on the Role Forecast record:
These fields can be added to Related List Views and Custom Reports to allow for ‘double resourcing’ analysis.
Where Role Forecasts relate to a specific Skill, the Role will have additional rows displayed. As shown below, Charles Lewis has been allocated to the Project for a total of 50 hours.

This is made up from the following Role Forecast records:
For each Role, there are a number of ‘Summary’ columns, which provide key information relating to all of the Project specific columns. These Summary columns include:
For each Project, the following columns will be displayed:
Creating Role Forecast Records
To create a Role Forecast record from the Assignment Manager, you need to enter a value in the Hours or Percentage field (either Billable or Non Billable) and double-click within the cell. This will open up the ‘Role Forecast Information’ Modal.

Within this Modal, you can complete the remaining fields to create the Role Forecast record, including:
Once you have completed the required information, click Save to return to the main Component.
You will need to click the main ‘Save’ button to commit all new records.

Note: The yellow warning icon will display if there are unsaved changes.
Editing Role Forecast Records
The Assignment Manager enables you to edit existing Role Forecast records. To do so, you can simply adjust the figure in the required cell to modify the number/percentage. If you need to modify other fields, such as Skill, Start Date, End Date, Billable Hourly Rate, Cost Hourly Rate, etc., you can double-click into the cell and it will open the ‘Role Forecast Information’ Modal, as shown below.

If the cell value reflects multiple Role Forecast records, when you double-click into the cell, the ‘Select Role Forecast’ Modal will display. This enables you to select the specific Role Forecast record you wish to modify. By selecting the individual record, the ‘Role Forecast Information’ Modal will open.

You will need to click the main ‘Save’ button to commit all changes made to existing records.

Note: The yellow warning icon will display if there are unsaved changes.
Deleting Role Forecast Records
The Assignment Manager enables you to delete Role Forecast records you no longer require. To delete a Role Forecast record, double-click into the cell containing the record. This will open up the ‘Role Forecast Information’ Modal. From here, you will be able to click the ‘Delete’ button.

If the cell value reflects multiple Role Forecast records, when you double-click into the cell, the ‘Select Role Forecast’ Modal will display. This enables you to select the specific Role Forecast record you wish to delete. By selecting the individual record, the ‘Role Forecast Information’ Modal will open.

You will need to click the main ‘Save’ button to commit all required record deletions.

Note: The yellow warning icon will display if there are unsaved changes.
The Assignment Manager will display a maximum of 25 Roles and 25 Projects in one view. The Component supports pagination, so if you have more Roles / Projects, they will be displayed across multiple pages and the page navigation in the top-left corner of the Assignment Manager section will enable you to navigate between pages.

Within the Component ‘Settings’, you can adjust the number of records displayed per page. The image below illustrates each page will have a maximum of 15 Roles and 15 Projects.

Each of these Settings can be set to values of 5, 10, 15, 20 and 25.
You can leverage the Role ‘Quick Search’ text box located within the ‘Assignment Manager’ section header, as shown below.

By entering a text string within this search field and hitting enter, the Role(s) displayed will be filtered based on the Role ‘Name’ including the search string.

For example, in the image above, the User has entered ‘je’ in the search field and the results have been filtered to show the Roles for Jennifer Jones and Jessica Lee. To remove the quick search filter, simply clear out the string from the text box.
Within the Resource Planner ‘Settings’ Modal, there are a number of Settings that can be used to configure the Assignment Manager section of the Assignment Manager Component. This Settings Modal is located in the top-right corner of the Resource Planner.
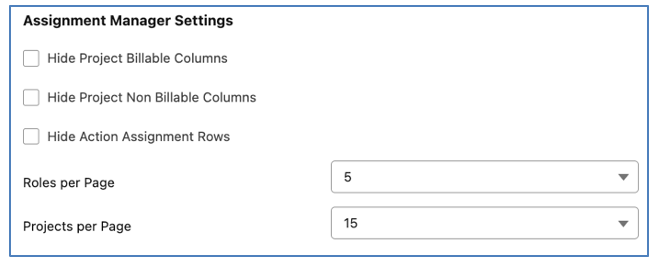
The image above shows the Settings that apply to the Assignment Manager. Below is an explanation of each Setting.
Hide Project Billable Columns
If this Setting is TRUE, the Billable Hours, Billable % and Billable Total Columns will be hidden for each Project.
Hide Project Non Billable Columns
If this Setting is TRUE, the Non Billable Hours, Non Billable % and Non Billable Total Columns will be hidden for each Project.
Hide Action Assignment Rows
If this Setting is TRUE, the Action Assignments row will be hidden for each Role.
Roles per Page
This Setting controls how many Roles are displayed per page.
Projects per Page
This Setting controls how many Projects are displayed per page.
By default, the ‘Role Forecast Information’ Modal will display the following fields from the Role Forecast Object:
You can adjust the fields that are available within the ‘Role Forecast Information’ Modal via a Field Set on the Role Forecast Object. This Field Set is called ‘Assignment Manager Custom Fields’.
A number of enhancements have been made to the Gantt Chart. Details of each enhancement are included below.
Constraint Scheduling is a feature within Mission Control that can be enabled / disabled to accommodate your project scheduling scenarios. By default, Constraint Scheduling is disabled.
To enable Constraint Scheduling, you will need to set the ‘Enable Constraint Scheduling’ setting to TRUE. This setting can be found within the ‘Gantt Chart Settings’ Tile on the Control Pad of the Mission Control Console.

Constraint Scheduling provides greater flexibility when scheduling elements of your Project work breakdown structure that are part of a predecessor / successor dependency relationship. Once enabled, you will need to set the ‘Constraints’ Setting to TRUE in the Gantt Chart Settings – either for each individual User or centrally from the Control Pad if you are using the Gantt Chart Settings Override feature.

With Constraint Scheduling disabled, all dependency relationships automatically set the child to be scheduled immediately after the parent. This can be adjusted through the use of Lead and Lag. However, whenever the parent is rescheduled, the child will automatically be rescheduled by the same period of time.
With Constraint Scheduling enabled, Users have greater flexibility around scheduling parents, without adjusting when the child is scheduled, whilst also maintaining the dependency relationship. Constraint Scheduling allows the child’s scheduled dates to be influenced by the parent, but within the rules of the constraint placed on the child. The following Constraint Types are supported:
Let’s look at a scenario where Constraint Scheduling could be used within a Project. Mick Fanning is the Project Manager on the ‘Aprika: Website Build’ Project. Within that Project, there are 2 Actions – ‘Prepare Training Materials’ and ‘Deliver Training’. The ‘Deliver Training’ Action cannot be delivered before the ‘Prepare Training Materials’ Action is completed. Therefore, Mick creates a dependency between the 2 Actions, as outlined below.

However, the client has advised Mick that they will not be able to attend the training until after a specific date. This is where Mick can apply Constraint Scheduling. He wants to retain the dependency between the 2 Actions, however, he also needs to ensure the ‘Deliver Training’ Action does not get scheduled earlier than the specified date. When creating the dependency, Mick applies the ‘Start No Earlier Than’ Constraint Type and specifies the Constraint Date to the date provided by the client, as outlined below.

Mick’s team has progressed well on the Project and they are able to start the ‘Prepare Training Materials’ Action sooner than anticipated. They adjust the schedule for that Action. Without Constraint Scheduling, the child Action would also have been scheduled. However, due to the Constraint Scheduling rule, the ‘Deliver Training’ schedule will not be scheduled before the Constraint Date, as outlined below.

When Constraint Scheduling is enabled, the Constraint Type will be set to ‘As Soon As Possible’ by default. If the User sets the Constraint Type to any other value, a Constraint Date will be required. Whilst the Constraint Type and Constraint Date fields on the Gantt Chart will be visible for all levels (e.g. Portfolio, Program, Project, etc.), these fields will be read-only for the following levels and the Constraint Type will always be ‘As Soon As Possible’:
Users will be able to set the Constraint Type and Constraint Date for the following levels:
With Constraint Scheduling enabled, the Constraint will be applied regardless of whether the record is edited from the Gantt Chart or another page, such as the Create Actions page, or the Whiteboard.
If Constraint Scheduling was previously enabled and is subsequently disabled, the original Lead/Lag dependency logic will be resumed. For example, if you had Actions for ‘Prepare Training Materials’ and ‘Deliver Training’ and ‘Prepare Training Materials’ is set to start on Monday and ‘Deliver Training’ is set to not start before Thursday, there would be no lag, so in essence, ‘unofficial lag’. When the Constraint Scheduling feature is disabled, any modification to the Project would revert back to the original logic, so the dependency would end up snapping ‘Deliver Training’ to start immediately after ‘Prepare Training Materials’.
Note: When Constraint Scheduling is enabled, the ‘Lightning Bolt’ button on the Gantt Chart will be hidden as manual adjustment of scheduling will be prevented. The button will be visible, and continue to support the ability to turn on/off strict scheduling, if Constraint Scheduling is disabled.
The Gantt Chart library has been updated. Whilst this results in no major changes to functionality, there are changes to the UI. Details of the differences are included below.
Gantt Timeline
The bars within the Timeline view of the Gantt Chart now have a more rounded design.

Dependency Links
Previously, the Dependency link between 2 WBS layers would be Orange if not part of the Critical Path and Red if they are part of the Critical Path.

With the library update, relationships that are not part of the Critical Path are now Gray and relationships that are part of the Critical Path remain Red.

No setup is required for the Gantt Library update for existing customers.
The Checklist Item Object has a ‘Completion %’ field that enables you to track the progress being made towards the completion of work.
By default, this field will be calculated automatically when you log time against the Checklist Item. If you feel you are tracking accurately on the delivery in relation to the scheduled effort, then you can leave this field to be maintained automatically.
For example, if you have a Checklist Item with an ‘Hours Scheduled – Billable’ value of 8 hours, and you create a Time Log for 4 hours, if you feel you will complete the work in the remaining 4 hours, you can leave this field to be calculated automatically. In this situation, the Completion % field will be set to 50% (e.g. 4 hours completed / 8 hours scheduled).
However, if you feel you are progressing quicker or slower than the scheduled effort indicates, you can manually override the Completion % field. When logging time, you can enter a value in the Completion % field, and that will be used to calculate the following ‘Projected Hours’ formula fields:
When logging time, the Time Log will relate to an Action and you can optionally choose to relate it to a Checklist Item that relates to the Action. When the Checklist Item field is populated, the ‘Checklist Item Completion %’ field will appear.
![]()
Note: If you manually override the Completion % value, you will need to maintain it manually from that point onwards. The ‘Completion % Overridden’ Checkbox field on the Checklist Item will be set to TRUE. On pages such as the Timesheet, Track Pad Time Logger, etc., for Checklist Items where the Completion % is being maintained automatically, the value will be displayed in a Grey, whereas fields being manually maintained will be displayed in Black.
Out of the box, all Mission Control Custom Objects have Organization-wide Sharing Rules configured to be ‘Public Read/Write’. Like any other Standard Object or Custom Object in Salesforce, the Sharing Settings for Mission Control Custom Objects can be configured to be more restricted – such as setting them to Private and opening up access via Sharing Rules for Public Groups.
Given the number of Custom Objects that contribute to one individual ‘Project’, you could potentially need to create many different Sharing Rules to ensure everyone involved with the Project has access to all records relating to the Project, including:
Based on the relationship between the individual Custom Object and the Project Object, Sharing Rules will not be required. Objects that are related to the Project via a ‘Master-Detail’ relationship do not require Sharing Rules, as they inherit their Sharing Rules directly from the Project Object. Objects that are related to the Project via a ‘Lookup’ relationship do require Sharing Rules.
The Objects below do not require Sharing Rules as they are related to the Project via a Master-Detail relationship:
The Objects below do require Sharing Rules as they are related to the Project via a Lookup relationship:
If you have configured your Organization-wide Sharing Rules to restrict access, you can take advantage of a cascading sharing rule feature that can be activated on the Control Pad of the Mission Control Console.
The Setting is located within the ‘Project Automation Settings’ Tile of the Control Pad. The Setting is called ‘Enable Project Sharing Management’. Setting this to TRUE will ensure Sharing Records are automatically created on all required Custom Objects if the User has been assigned responsibility of a part of the Project.
For example, Mick Fanning currently does not have access to any records relating to the ‘Rip Curl: Mission Control Implementation’ Project. If we assign Mick as the Action Owner of an Action on the Project, we want to ensure Mick has access to the full Project Plan. Therefore, Sharing Records will be created for Mick on records in the following Custom Objects:
If a Role, that is linked to an active User, is assigned responsibility to a Project by being populated in any of the following fields, Sharing Records as outlined above will be created.
You can control whether the User is provided with ‘Read’ or ‘Edit’ access via these Sharing Records. This is controlled through the ‘Default Sharing Access’ field on the Role record. If a Sharing Record is required and this field is empty, a ‘Read’ Sharing Record would be created.
A number of enhancements have been made to the Reassignment Wizard. Each enhancement is detailed below.
When reassigning ownership on a Project that has Rate Adjustments, you have the option to have the Rate Adjustments copied for the incoming Owner based on the Rate Adjustments for the outgoing Owner.
For example, if Kelly Slater is currently assigned as an Action Owner on a Project, and there are Rate Adjustment records related to the Project for Kelly, then when we reassign ownership to Mick Fanning, we can have Kelly’s Rate Adjustment records copied so they can be applied to Mick.

In the image above, there is a Checkbox in the ‘Copy Rate Adjustments’ column for Kelly Slater, indicating there are Rate Adjustments. As we are transferring ownership of Actions on this Project from Kelly to Mick, we will set the field to TRUE so we can create the same Rate Adjustment records for Mick.
The Reassignment Wizard now supports the ability to transfer the Phase Owner. Therefore, you are now able to transfer ownership at all of the following levels of a Project Plan:
When reassigning ownership from one Role to another, they may be an Owner at multiple levels of the Project Plan. For example, in the image below, Kelly is an Action Owner, Checklist Item Owner and Contributor.

If we want to transfer ownership from Kelly Slater to Mick Fanning, we need to populate the Action Owner, Checklist Item Owner and Contributor lookup fields with Mick’s Role. However, rather than having to do that manually in all fields, you can populate one field and click the ‘copy’ button located to the right-hand-side of the fields.

This will auto-populate the same value in all other fields displayed for the row.
A number of minor enhancements have been made to various features. Each enhancement is detailed below.
Two new fields have been added to the ‘Sprint Team’ section of the Sprint Board. The Sprint Board shows ‘Available Capacity’ for each Role that is part of the Sprint Team. If you wish to only allocated a part of that capacity to this particular Sprint, you can enter a value into either ‘Sprint Capacity Hours’ or ‘Sprint Capacity Percent’.

You can only enter a value into one or the other of the hours or percent fields – when one field contains a value, the other field will be disabled. If either of these fields contain a value, the ‘Sprint Capacity’ will be calculated based on those field values, as outlined below:
Sprint Capacity Hours: Sprint Capacity will be based on this value
Sprint Capacity Percent: Sprint Capacity will be based on ‘Sprint Capacity Percent’ x ‘Available Capacity’
If neither field contains a value, ‘Sprint Capacity’ will equal ‘Available Capacity’.
A new Validation Rule has been added to the Holiday Object.
The ‘Prevent High Days Taken’ Validation Rule on the Holiday Object ensures the ‘Days Taken’ field value is not greater than the number of days between the ‘Start Date’ and ‘End Date’ of the Holiday.
The ‘Fixed Price Hours Scheduled’ Validation Rule on the Time Log has been deprecated and replaced with Apex Trigger Logic that is controlled via a Setting on the Control Pad of the Mission Control Console.
The Validation Rule prevented additional hours from being logged against an Action on a Project with a Billing Type of ‘Fixed Price’, if the result of those hours being logged would cause the Hours Completed to be greater than the Hours Scheduled. To provider greater scalability for inserting multiple Time Logs against the same Action at the same time, this logic has been moved to an Apex Trigger.
On the Control Pad of the Mission Control Console, within the ‘Project Automation Settings’ Tile, there are two Settings that control whether you prevent the Hours Completed field being greater than the Hours Scheduled field for Projects with a Billing Type of ‘Fixed Price’ or ‘Fixed Price + Expenses’.
The Settings are:
Disable Fixed Price Billable Hours Enforcement
If this Setting is FALSE, you will not be able to log time that would cause the Action’s ‘Hours Completed – Billable’ field to be greater than the ‘Hours Scheduled – Billable’ field. If this Setting is TRUE, you will not be restricted from logging more time than has been scheduled.
Disable Fixed Price Non Billable Hours Enforcement
If this Setting is FALSE, you will not be able to log time that would cause the Action’s ‘Hours Completed – Non Billable’ field to be greater than the ‘Hours Scheduled – Non Billable’ field. If this Setting is TRUE, you will not be restricted from logging more time than has been scheduled.
Note: The default status of these Settings is FALSE.
The Billable Capacity data on the Role Utilisation Report is now controlled by two separate Settings. Previously, the ‘Display Billable Performance Information’ Setting controlled the visibility of the following rows:
To provide Customers with greater flexibility, these rows are now controlled by two separate Settings, as outlined below.
Display Billable Capacity Information
Display Billable Performance Information
An Install Script will execute upon upgrade ensuring the ‘Display Billable Capacity Information’ Setting is set to the same value as the ‘Display Billable Performance Information’ Setting.
This section includes details of any component changes within the package. This includes changes to existing fields as well as any new fields, validation rules, buttons / actions, Apex Classes, Components, etc. that have been added to the solution as part of this release.
IMPORTANT: We recommend you thoroughly review all of these components. To take advantage of the enhancements within this release, you may need to:
If you are not using the Permission Sets included with Mission Control, we recommend you check the Field Level Security for all of these fields and accessibility to the various Components to ensure all appropriate Profiles/Permission Sets have the required access.
| Field | Field Type | Comments | New/Existing |
| Constraint Type | Picklist | Identifies the type of Constraint that is applied to this Action with regards to scheduling the Start Date and End Date | New |
| Constraint Date | Date | Identifies the Date that will be applied to the Constraint Type | New |
| Projected Value (Billable) | Formula (Currency 16, 2) | The Formula has been modified to:
IF(OR(ISPICKVAL(amc__Milestone__r.amc__Project__r.amc__Billing_Type__c, “Fixed Price”),ISPICKVAL(.amc__Milestone__r.amc__Project__r.amc__Billing_Type__c, “Fixed Price + Expenses”)), amc__Hours_Scheduled_Cost__c, IF(OR(ISBLANK(amc__Completion_Percent__c),amc__Completion_Percent__c =0), amc__Hours_Remaining_Cost__c, amc__Hours_Completed_Cost__c / amc__Completion_Percent__c)) |
Existing |
| Field | Field Type | Comments | New/Existing |
| Constraint Type | Picklist | Identifies the type of Constraint that is applied to this Checklist Item with regards to scheduling the Start Date and End Date | New |
| Constraint Date | Date | Identifies the Date that will be applied to the Constraint Type | New |
| Completion % | Percent (18, 0) | Identifies the completion percentage of progress made. This field is updated automatically, but can be overridden manually if required | New |
| Completion % Overridden | Checkbox | Identifies whether a User has manually overridden the Completion % value. If this field is TRUE, the Completion % will stop being updated automatically when Time Logs are entered | New |
| Projected Hours Remaining – Billable | Formula (Number 16, 2) | Identifies the projected number of billable hours remaining on this Checklist Item | New |
| Projected Hours Remaining – Non Billable | Formula (Number 16, 2) | Identifies the projected number of non billable hours remaining on this Checklist Item | New |
| Total Projected Hours Remaining | Formula (Number 16, 2) | Identifies the projected number of hours remaining on this Checklist Item | New |
| Projected Total Hours – Billable | Formula (Number 16, 2) | Identifies the total projected billable hours for this Checklist Item. ‘Hours Completed – Billable’ + ‘Projected Hours Remaining – Billable’ | New |
| Projected Total Hours – Non Billable | Formula (Number 16, 2) | Identifies the total projected non billable hours for this Checklist Item. ‘Hours Completed – Non Billable’ + ‘Projected Hours Remaining – Non Billable’ | New |
| Projected Total Hours | Formula (Number 16, 2) | Identifies the total projected hours for this Checklist Item. ‘Total Hours Completed’ + ‘Total Projected Hours Remaining’ | New |
| Field | Field Type | Comments | New/Existing |
| Resource Planner Default Tab | Picklist | Identifies which Tab on the Resource Planner is displayed by default | New |
| View RP Overview Tab | Checkbox | Identifies whether the User linked to this Role has the ability to view this Tab on the Resource Planner | New |
| View RP Planner Tab | Checkbox | Identifies whether the User linked to this Role has the ability to view this Tab on the Resource Planner | New |
| View RP Assignment Manager Tab | Checkbox | Identifies whether the User linked to this Role has the ability to view this Tab on the Resource Planner | New |
| View RP Resource Request Tab | Checkbox | Identifies whether the User linked to this Role has the ability to view this Tab on the Resource Planner | New |
| Charge Level | Picklist | Identifies how affordable / expensive this Role is. Controls the image displayed in the Charge Level Image field | New |
| Charge Level Image | Formula (Text) | Displays a Money Bag rating to indicate the Charge level for this Role. Images range from 1 to 3 Money Bags | New |
| Default Sharing Access | Picklist | Identifies what level of access the User related to this Role should be given when using the ‘Enable Project Sharing Management’ feature | New |
| Field | Field Type | Comments | New/Existing |
| Name | Auto Number | Identifies the unique number for this record | New |
| Requested By | Lookup (Role) | Identifies the Role record for the person requesting the resource | New |
| Project | Lookup (Project) | Identifies the Project record the resource request relates to | New |
| Function | Picklist | Identifies the Function the Role should have to fulfil this Resource Request | New |
| Reason for Request | Rich Text (32,000) | Provide an explanation of what the person will be doing on the Project, including a brief overview of their involvement, along with any Team or Skill attributes they need | New |
| Start Date | Date | Identifies the Start Date the resource will be required by | New |
| Working Days | Number (18, 0) | Identifies the number of Working Days expected for this Resource Request | New |
| End Date | Date | Identifies the End Date the resource will be required until | New |
| Billable Hours | Number (16, 2) | Identifies the number of Billable Hours required | New |
| Billable Percentage | Percent (16, 2) | Identifies the percentage of Billable Hours required | New |
| Non Billable Hours | Number (16, 2) | Identifies the number of Non Billable Hours required | New |
| Non Billable Percentage | Percent (16, 2) | Identifies the percentage of Non Billable Hours required | New |
| Resource Assigned | Lookup (Role) | Identifies the Roel assigned to fulfil this Resource Request | New |
| Declined | Checkbox | Set to TRUE if the Resource Request has been declined | New |
| Reason Declined | Rich Text (32,000) | Identifies the reason why the Resource Request has been declined | New |
| Search Filters | Long Text (32,000) | Stores the Search Criteria filter parameters entered when searching for potential resources | New |
| Field | Field Type | Comments | New/Existing |
| Assigned Action Hours – Billable | Number (16, 2) | Identifies the sum of Billable Hours from Role Allocations relating to Actions on the Project this Role Forecast relates to during the same date range | New |
| Assigned Action Hours – Non Billable | Number (16, 2) | Identifies the sum of Non Billable Hours from Role Allocations relating to Actions on the Project this Role Forecast relates to during the same date range | New |
| Total Assigned Action Hours | Formula (Number 16, 2) | Formula: ‘Assigned Action Hours – Billable’ + ‘Assigned Action Hours – Non Billable’ | New |
| Field | Field Type | Comments | New/Existing |
| Sprint Capacity Hours | Number (16, 2) | Identifies the number of hours assigned to this Sprint from the Role’s Sprint Capacity | New |
| Sprint Capacity Percent | Percent (16, 2) | Identifies the percentage of the hours assigned to this Sprint from the Role’s Sprint Capacity | New |
| Field | Field Type | Comments | New/Existing |
| Gantt Collapsed | Checkbox | When checked, indicates the Program is collapsed on the Gantt | New |
| Field | Field Type | Comments | New/Existing |
| Gantt Collapsed | Checkbox | When checked, indicates the Portfolio is collapsed on the Gantt | New |
Components
The following Components have been included or updated in this Release.
| Component Type | Component Name | Description |
| Apex Class | RoleAssignmentManager | Required to use the Assignment Manager Tab of the Resource Planner |
The following Validation Rules have been included or updated in this Release. It is recommended you review each Validation Rule and determine whether you wish for the rule(s) to be active or inactive.
| Object | Rule | Description | Active |
| Action | Action Ensure Constraint Date Populated | Ensure the Constraint Date is populated if Constraint Type requires a date | TRUE |
| Checklist Item | Checklist Item Ensure Constraint Date Populated | Ensure the Constraint Date is populated if Constraint Type requires a date | TRUE |
| Resource Request | Prevent Billable Hours and Percentage | Prevent Users from entering values in the Billable Hours field and the Billable Percentage field | TRUE |
| Resource Request | Prevent Non Billable Hours and Percentage | Prevent Users from entering values in the Non Billable Hours field and Non Billable Percentage field | TRUE |
| Resource Request | End Date Validation | Ensures the End Date is not set before the Start Date | TRUE |
| Holiday | Prevent High Days Taken | Prevent the Days Taken field from being a greater value than End Date – Start Date | TRUE |
As part of the upgrade process, an Install Script will execute to set default values for the following Fields / Settings.
Role Fields
Role Utilisation Report Setting
Mission Control will be made available based on the following release schedule.
2nd May 2025 – Available for manual upgrade from the AppExchange
17th May 2025 – Automatic upgrade to all Sandbox Orgs
31st May 2025 – Automatic upgrade to all Production Orgs
To manually upgrade to the new version of Mission Control in your organisation, please follow the steps below:
We have pre-recorded the ‘What’s New’ webinar to provide further information on how to get the best out of the new features. To access this webinar, please view the ‘Release Notes’ section of the Mission Control Support Centre – www.aprika.com/mc-support
Some of the new features included in this release of Mission Control have come from ideas submitted from existing clients. If you have an idea for enhancing Mission Control, you can submit it via email to [email protected].
If you have any questions regarding this release notification, please do not hesitate to contact us at [email protected].
