A new version of Mission Control (version 1.78) will be released on the AppExchange on Friday 29th August 2025. This notification has been issued to existing Mission Control users. It contains an overview of the new features available with this release, along with instructions on how to upgrade to the new version.
This release includes a number of new features, along with some enhancements to existing functionality, including:
Let’s get stuck into the detail…
The Epic Board is a Tab on the Project Overview that enables Users to manage Epics, User Stories & Actions for Agile Projects. The Requirement Object is used as an Epic. An Epic allows you to group Actions together, even if they are allocated to separate Milestones on a Project.
For example, you may be running a Project, where you have captured a number of different scenarios from your customer, across various departments. These Actions will be delivered across a number of Sprint-based Milestones. However, you want to be able to retain insight as to which department each of the Actions relates to.
In the table below, we have captured the various use cases for each department within the customer’s business.
| Sales | Marketing | Customer Success | Finance |
| · Track key stages of Opportunity Pipeline
· Track Lead Status · Receive Leads from Website |
· Track Lead Source
· Send Mass Emails to Leads |
· Receive support requests from customers via email
· Track escalation rules |
· Have insight into Sales Pipeline |
As the Project is planned out, these individual use cases will become Actions on your Project, which get assigned to individual Sprint Milestones. In the table below, we see how these Actions have been assigned to various Milestones.
| Sprint 1 | Sprint 2 | Sprint 3 |
| · Track Lead Status
· Receive Leads from Website · Track Lead Source
|
· Track key stages of Opportunity Pipeline
· Send Mass Emails to Leads · Have insight into Sales Pipeline |
· Receive support requests from customers via email
· Track escalation rules |
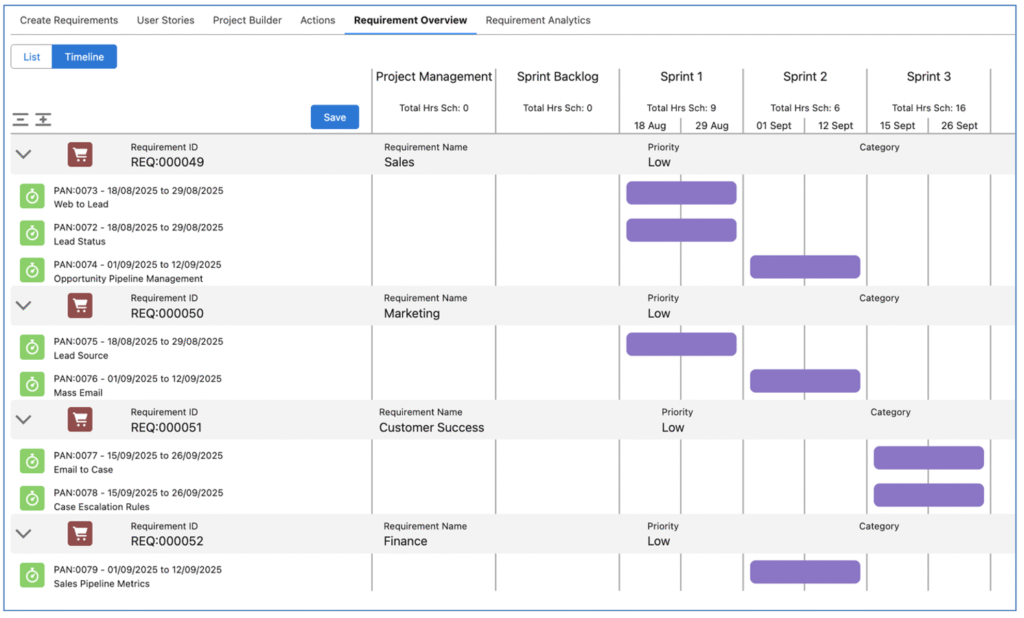
By just looking at the Milestones and Actions, you lose the visibility of which ‘Epic’ the Actions relate to. With the Epic Board, you are able to view the Actions in context of both Epic (Requirement) and Sprint (Milestone). The table below illustrates the view of the Actions in context of both Epic and Sprint.
| Epic (Requirement) | Sprint (Milestone) | ||
| Sprint 1 | Sprint 2 | Sprint 3 | |
| Sales | · Track Lead Status
· Receive Leads from Website |
· Track key stages of Opportunity Pipeline | |
| Marketing | · Track Lead Source | · Send Mass Emails to Leads | |
| Customer Success | · Receive support requests from customers via email
· Track escalation rules |
||
| Finance | · Have insight into Sales Pipeline | ||
Leveraging the Epic Board functionality, you will be able to maintain this view across both Epics and Sprints, as show in the Timeline view below.
On a larger Project, you may choose to initially create User Stories, which you then convert to Actions once they are finalised and approved by the customer. However, User Stories are not mandatory. You can choose to create Actions, directly related to the Epic. The Epic Board provides the flexibility for you to choose either option.
The Epic Board comprises of various Sub Tabs, including:
You can control whether a User has access to the Epic Board and each individual Sub Tab based on various fields on their Role record.
To provide access to the Epic Board, a User’s Role record will need to have the ‘View Epic Board Tab’ field set to TRUE. You can also control which Sub Tab is loaded by default by setting the ‘Epic Board Default Tab’ field. You can also control visibility of each of the Sub Tabs through the following fields on the Role record:
The ‘Create Requirements’ Tab enables you to create the Epics for your Project. Note, we are using Epics and Requirements interchangeably here. The Epic will be a record that is inserted in the ‘Requirement’ Object.
Requirements can relate to a Project. However, due to the Master-Detail relationship, they must also relate to a Program. Therefore, to use the Epic Board, your Project will need to relate to a Program. This will allow you to relate your Requirements to a Program.
If your Project does not relate to a Program, you will see the following screen when you click on the Create Requirements Tab.
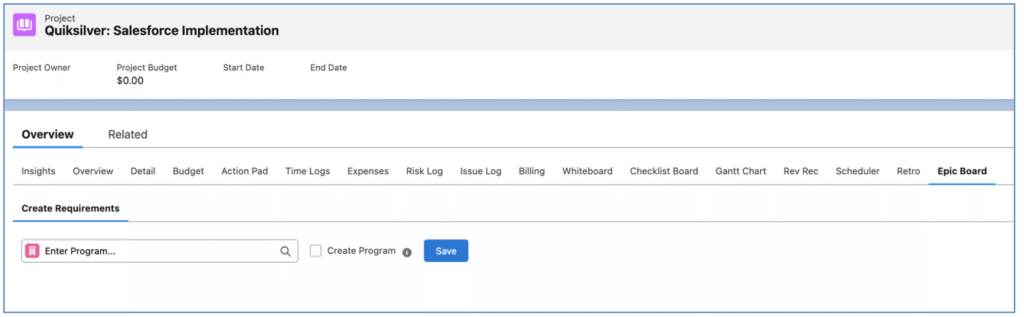
From here, you can relate the Project to a Program if one already exists by entering the Program name in the Program lookup field. Alternatively, if a Program has not already been created, you can tick the ‘Create Program’ field to generate a Program with the same Name as the Project.
When you click save, you will then be presented with the ‘Create Requirements’ page, as shown below.
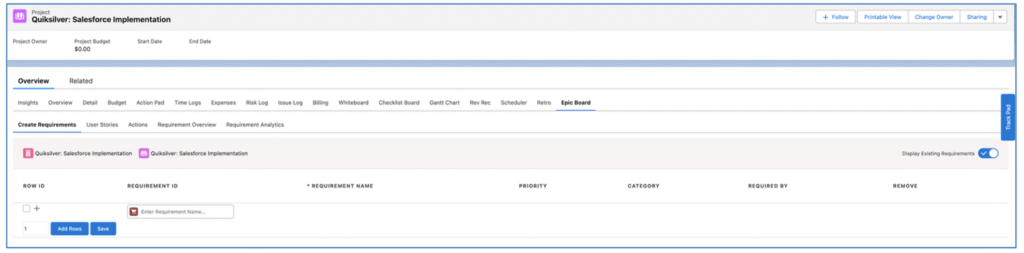
You will now be able to create the Epics for your Project. You can do this by using the quick create feature at the top of the page, or by clicking the ‘Add Rows’ button to add extra rows to your page.
The image below shows the 4 Epics we require on the Quiksilver: Salesforce Implementation Project, in line with the example from above.
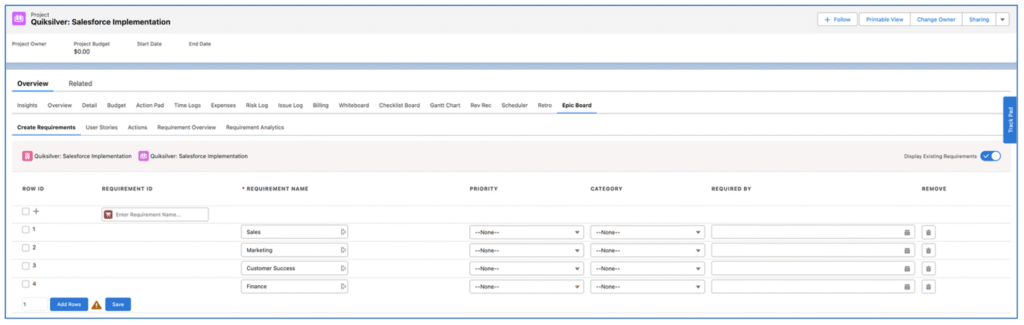
Once you have created the Epics, you can click Save.
The User Story Tab enables you to create User Stories, which can be directly related to an individual Epic. You may choose to create User Stories initially, so they can be refined, scoped and agreed with the client before converting them to Actions.
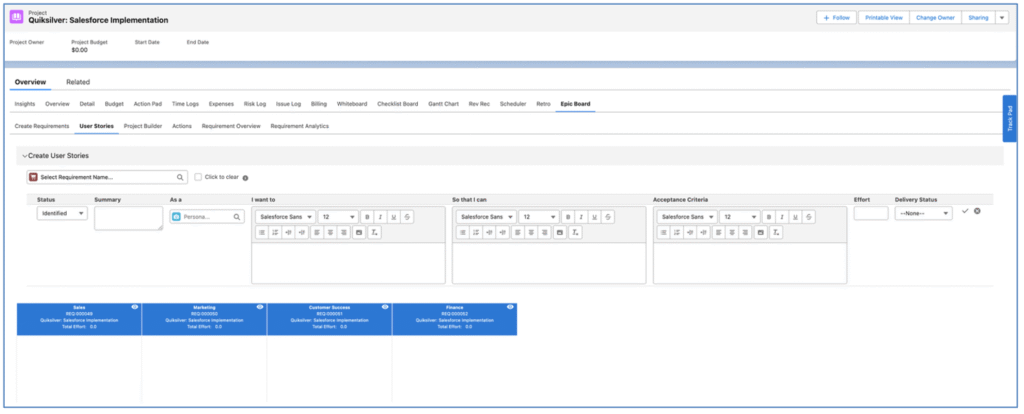
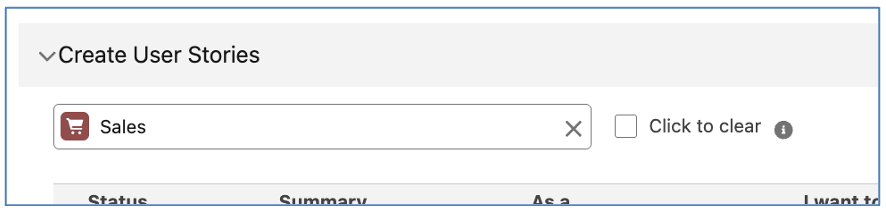
To create User Stories, you will need to first select the Requirement (Epic) they will relate to. If you intend to create multiple User Stories related to the same Requirement, you can choose to leave the ‘Click to clear’ FALSE and the Requirement will remain populated. If you set this field to TRUE, you will need to populate the Requirement field each time you create a new User Story.
Once the Requirement field is populated, you can enter the required information for the individual User Story.

To create the User Story and have it appear on the Story Board, click the tick icon. This will add the User Story card to the board and clear the new User Story fields ready for you to create another User Story if required.

You will be able to continue creating User Stories, relating them to the appropriate Requirement.
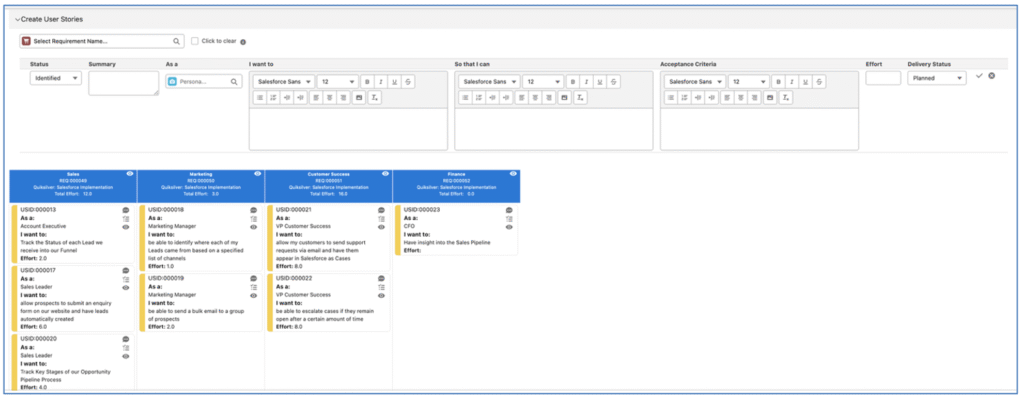
Once you have created all of your User Stories, you can use the Project Builder Tab to convert them to Actions and allocate them to the appropriate Sprints/Milestones.
The Project Builder Tab provides access to the Project Builder component, which enables Users to convert User Stories into Actions. Whilst the standalone Project Builder provides various conversion methods, being used in context of the Epic Board, it is restricted to the ‘User Stories to Actions’ conversion method.

Users are able to drag and drop User Stories into Milestones on the Project Builder. The Actions will then be available on the Project’s work breakdown structure to be assigned to the appropriate resources and scheduled for delivery.
The Actions Tab provides access to the ‘Create Actions’ component, enabling Users to view existing Actions and create new Actions.
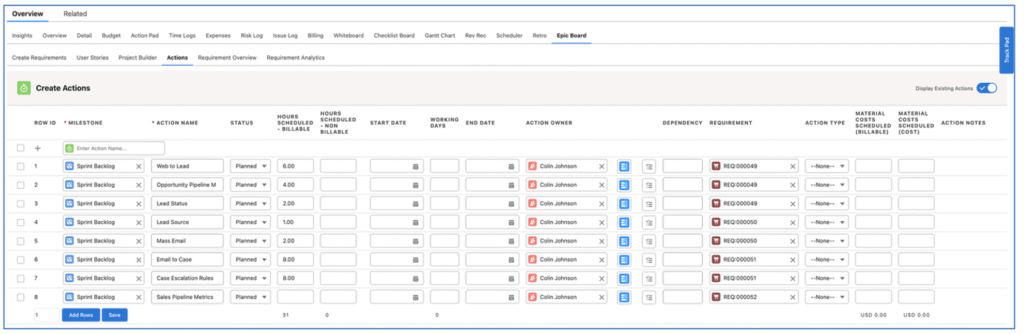
The functionality of the Actions Tab on the Epic Board is the same as the standalone Create Actions component.
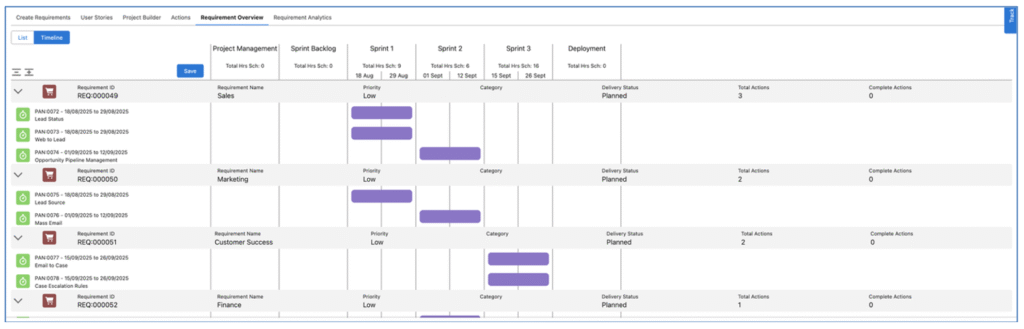
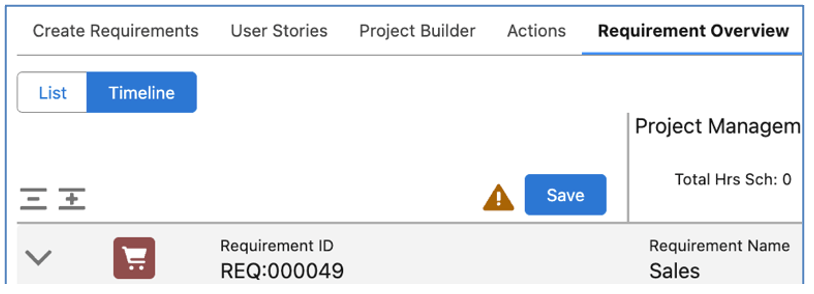
The Requirement Overview Tab provides the detailed insight of the Actions, in context of both the Epic (Requirement) and the Sprint (Milestone) they relate to. The Tab provides access to two features:
These views will only show Actions that are related to Requirements, not all Actions. For example, if you have a ‘Project Admin’ Milestone where you are tracking various PM Actions, such as weekly progress meetings, etc., they are unlikely to be related to a Requirement. Therefore, they will not be visible from this Tab, but they will remain visible on other key feature tabs such as the Overview, Whiteboard, Action Pad and Gantt Chart.
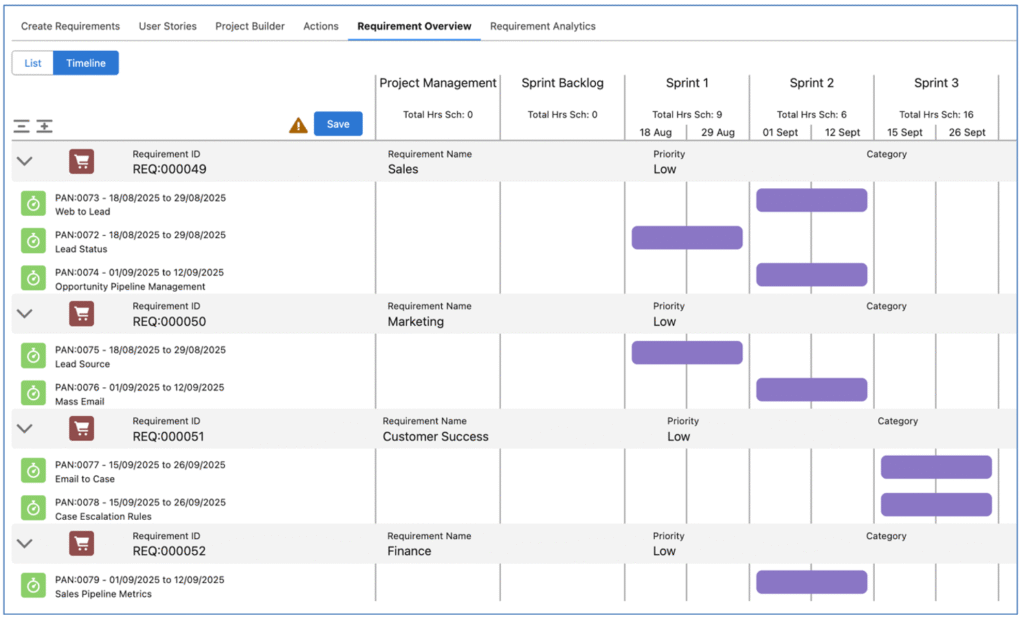
The Requirement List view provides a nested view of the Actions, grouped by the Requirement they are related to.
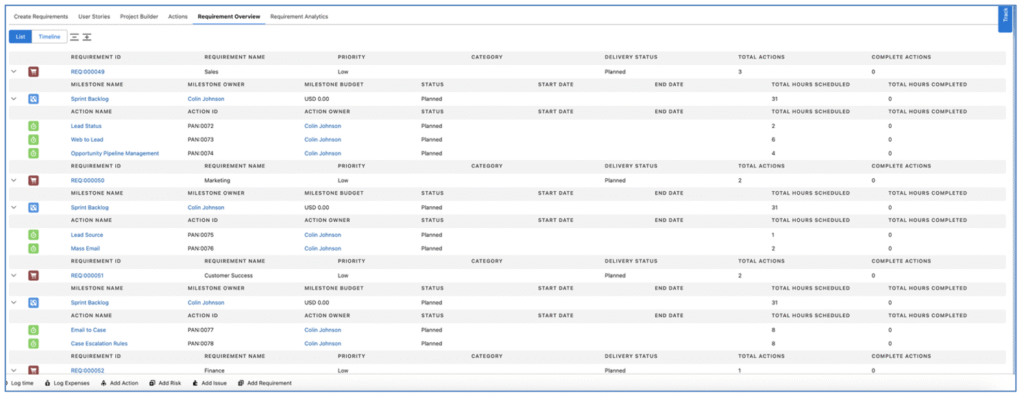
Each Requirement and Action will only appear in the List once. However, the Milestone can appear multiple times if Actions within different Requirements are related to the same Milestone.
For example, in the example above, the Actions related to the ‘Sales’ Requirement and the Actions related to the ‘Marketing’ Requirement are allocated to the ‘Sprint Backlog’ Milestone. Therefore, the ‘Sprint Backlog’ Milestones appears under both the ‘Sales’ and ‘Marketing’ Requirements.
The Requirement List is a read-only visualisation of the data. If you wish to edit any of the underlying records, you can click the hyperlinks to navigate to the individual records.
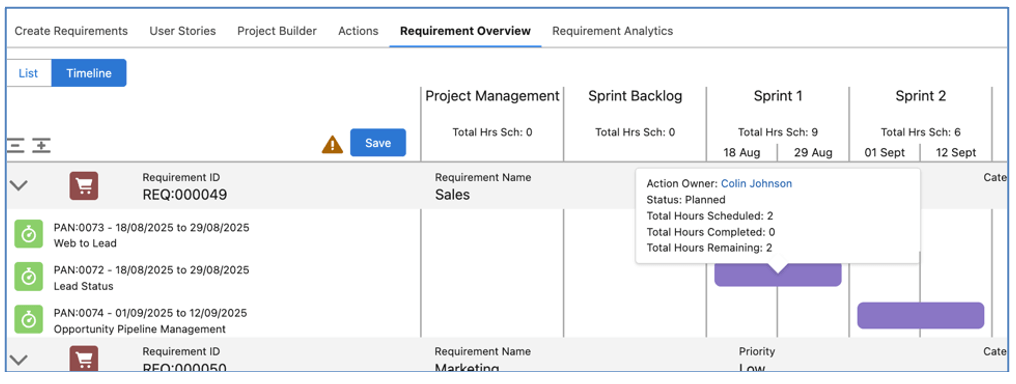
The Requirement Timeline view provides a gantt-style view of the Actions, grouping and visualising their relationship to both the Epic (Requirement) and Sprint (Milestone).
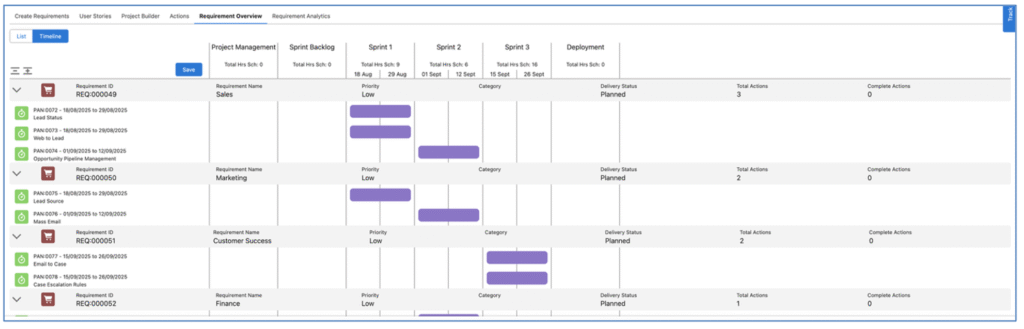
Vertically, the Actions are grouped by the Requirement they relate to. Horizontally, the Actions are grouped by the Milestone they relate to.
Milestones will only be visible on the Timeline view if they contain no Actions or Actions that relate to a Requirement.
To view additional information relating to any individual Action, you are able to click onto the timeline bar of the Action to display a Hover modal, as shown below.
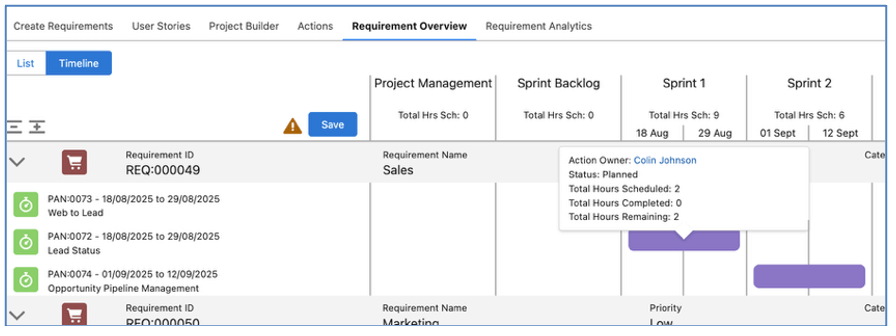
By default, the fields included in this hover include the Action Owner, Status, Total Hours Scheduled, Total Hours Completed and Total Hours Remaining. The content of the hover modal is controlled by a Field Set. Please refer to the ‘Epic Board Configuration Settings’ section for more information.
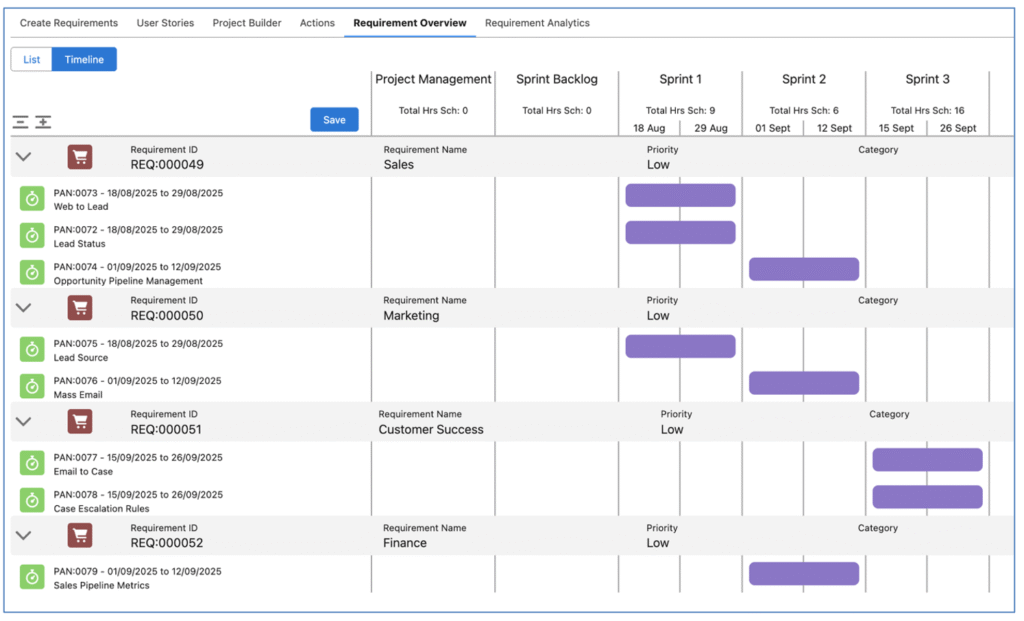
When you make changes to any of the Actions on the Requirements Timeline view, you will need to confirm you wish to save the changes by clicking the ‘Save’ button.
A warning icon will appear next to the Save button to notify you there are unsaved changes that could be lost if you navigate away from the page.
You are able to adjust the order in which Actions are displayed within their respective Requirement by dragging and dropping the Action up or down within the list of Actions.

In the example above, I would like the ‘Web to Lead’ Action to appear at the top of the list. Therefore, I drag it up above the ‘Lead Status’ Action. This adjusts the ‘Requirement Priority Order’ field on the Action record.
The unsaved changes warning icon will appear, reminding me to click the Save button to commit the change.
You are able to reparent an Action from one Requirement to another by dragging and dropping the Action between Requirements.
In the example above, the ‘Opportunity Pipeline Management’ Action is currently related to the ‘Sales’ Requirement. However, we need to relate it to the ‘Finance’ Requirement instead. Therefore, we are able to drag and drop this into the list of Actions for the ‘Finance’ Requirement, as shown below.

The unsaved changes warning icon will appear, reminding me to click the Save button to commit the change.
You are able to reparent an Action from one Milestone to another by dragging and dropping the Action between Milestone.
In the example above, the ‘Web to Lead’ Action is currently related to the ‘Sprint 1’ Milestone. However, we need to reschedule this into the ‘Sprint 2’ Milestone instead. Therefore, we are able to drag and drop this into the column for the ‘Sprint 2’ Milestone, as shown below.
The unsaved changes warning icon will appear, reminding me to click the Save button to commit the change.
Note: When an Action is rescheduled to a new Milestone, if the Action Owner is unavailable during that timeframe, a notification will be displayed advising of their availability restrictions.
You are able to edit the details of an Action by double-clicking on the Timeline bar for the Action. This will open up the ‘Edit Action’ Modal, as shown below.

By default, the fields included in this Modal include the Start Date, End Date and Working Days. The content of the modal is controlled by a Field Set. Please refer to the ‘Epic Board Configuration Settings’ section for more information.
The Requirement Analytics Tab provides access to various charts providing insight into the performance of the Epics, including:

Below is an overview of the information each chart provides.
Burn Down
The Burn Down Chart illustrates the ‘ideal’ and ‘actual’ delivery of hours throughout the Sprints.
Velocity: Completed Actions
This gauge shows the total number of Actions assigned to the Sprints and how many of those Actions were Completed.
Hours by Time Log Type
This donut chart provides insight into the number of hours logged to the Sprints, categorised by Time Log Type.
Velocity: Total Hours
This bar chart provides insight into the velocity of total hours, illustrating the number of hours scheduled and the number of hours completed during the Sprints.
Velocity: Hours by Function
This bar chart provides insight into the velocity of hours by Function, illustrating the number of hours scheduled and the number of hours completed during the Sprints, grouped by the Role ‘Function’ field.
Velocity: Hours by Role
This bar chart provides insight into the velocity of hours by Role (person), illustrating the number of hours scheduled and the number of hours completed during the Sprints, grouped by Role.
There are a number of Field Sets that enable you to customise the fields displayed on specific sections across the Epic Board. A list of all applicable Field Sets is included below.
Requirements
Create Requirements Fields – controls the fields displayed on the ‘Create Requirements’ Tab
Requirement Overview Requirement Fields – controls the fields displayed on the List and Timeline views on the ‘Requirement Overview’ Tab
Milestone
Requirement Overview Milestone Fields – controls the fields displayed on the List and Timeline views on the ‘Requirement Overview’ Tab
Action
Requirement Overview Action Fields – controls the fields displayed on the List and Timeline views on the ‘Requirement Overview’ Tab
Requirement Overview Action Hover – controls the fields displayed on the Hover Modal on the Timeline view of the ‘Requirements Overview’ Tab
Requirement Overview Action Modal – controls the fields displayed on the ‘Edit Action’ Modal on the Timeline view of the ‘Requirements Overview Tab
Checklist Item
Requirement Overview Checklist Fields – controls the fields displayed on the List and Timeline views on the ‘Requirement Overview’ Tab
The ‘Create Checklist Items’ page enables you to create multiple Checklist Items for one Project. You are also able to edit existing Checklist Items if you need to make changes in bulk.
The page is accessible from the Project, Milestone & Action Page Layouts. You access it by clicking the ‘Create Checklist Items’ button, as highlighted below.

When you initially load the Create Checklist Items page, you’ll have one draft record ready to complete, as illustrated below.

You can add multiple draft rows by entering the number of rows you wish to add and click the ‘Add Row(s)’ button.
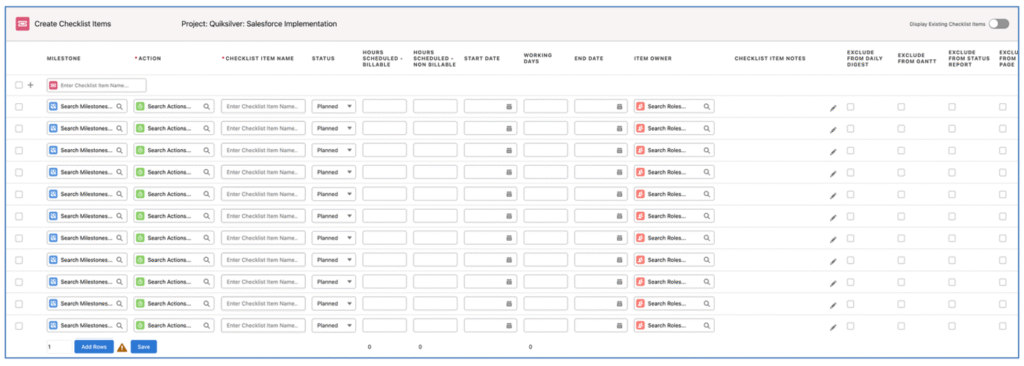
Alternatively, you can use the ‘Quick Add’ feature at the top of the page, which will add the new Checklist Item to the bottom of the list.

Once you have completed the required information for all of the Checklist Items, click the Save button at the bottom of the page.
In the top right corner of the page, you can toggle on/off the ability to view and edit Existing Checklist Items. If this is toggled on, all existing Checklist Items will be displayed to enable you to make changes as required.

Note: The maximum number of Checklist Items supported is 200. When editing existing records from the ‘Create Checklist Items’ page, if there are too many Checklist Items that causes this limit to be exceeded, you can access it from the Milestone or individual Action record.
You are able to apply edits to multiple lines on the Create Checklist Items page at the same time. Click the checkbox at the top of the page, or selecting the checkbox for the individual rows you wish to edit, as shown below.
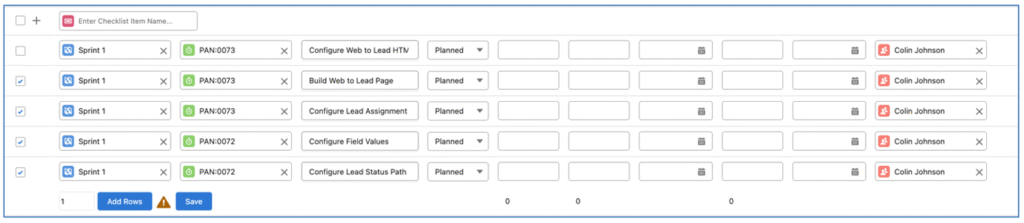
Applying an edit to one of the selected rows will apply the same change to all of the selected rows. For example, in the image below, the User has selected rows 2, 3, 4 and 5.

The User adjusted the Item Owner of row 2, and the same change is automatically applied to rows 3, 4 and 5.
The copy icon located to the right of the Item Owner field on the Create Checklist Items page enables you to copy the Item Owner from the row above to the selected row.

For example, in the image below, row 1 has Bethany Hamilton as the Item Owner. If Bethany is also required to be the Item Owner of the Checklist Item on row 2, the User can click the icon to copy the value from row 1, rather than having to use the lookup functionality.

Note: clicking this icon will not work in conjunction with the multi-line edit functionality. However, manually populating one Item Owner field would automatically populate the same value in the Item Owner of other rows selected.
To provide customers with the ability to choose which fields are displayed on the page, there is a Field Set on the Checklist Item Object called ‘Create Checklist Item Fields’. All existing fields on the Checklist Item Object are available for selection, excluding the following:
These fields are excluded from the Field Set as they will always appear on the Create Checklist Items page by default.
The following fields are pre-selected within the Field Set and will be accessible from the Create Checklist Items page.
If you wish to add Custom Fields or remove any of the above pre-selected fields, you can do so by editing the fields included in the Field Set.
A number of enhancements have been made to the Billing Generator. Details of each enhancement are included below.
The ‘T&M Wizard’ Tab on the Billing Event Generator enables you to create a Billing Event invoice based on the Time Logs & Expenses that are not yet invoiced. Whilst the periodic feature within Mission Control will generate the Billing Event automatically for you, customers may choose to use the T&M Wizard. This method provides you with the ability to review and select which Time Logs and Expenses should be included in the invoice.
To generate a Billing Event in this manner, you will need to access the Billing Event Generator by clicking the ‘Generate’ button the Billing Tab of the Project Overview.

The T&M Wizard Tab will be visible if the following criteria on the Project is met:
There are four steps to generating a Billing Event using the T&M Wizard:
The first step is to create the Billing Event record. As shown in the image below, the ‘Draft Billing Event’ section enables you to populate the fields required for the Billing Event. Note: The Due Date will automatically be set to Invoice Date + Payment Terms (if the Payment Terms field on the Project contains a value).

Once you have completed the fields, click ‘Next’ to proceed to the next step.
The second step is to review and select which Time Logs should be included in the Billing Event. As shown in the image below, there are 3 fields to help identify which Time Logs you want to include:

The Date Source determines which Date field on the Time Log will be used to identify the Time Logs you want to review:
The Date Range determines the period of time you want to use to identify the Time Logs you want to review:
When you select ‘Specify Date Range’, the Start Date and End Date fields will be displayed, as shown below.

The Billing Event Item Grouping determines how many Billing Event Item records will be created, based on the Time Logs being included:
Once you have specified the required settings, click the ‘Review Time Logs’ button to generate the list of Time Logs matching the criteria.

You are able to review and select the Time Logs you wish to include in the Billing Event by clicking the Checkbox against the applicable Time Logs.
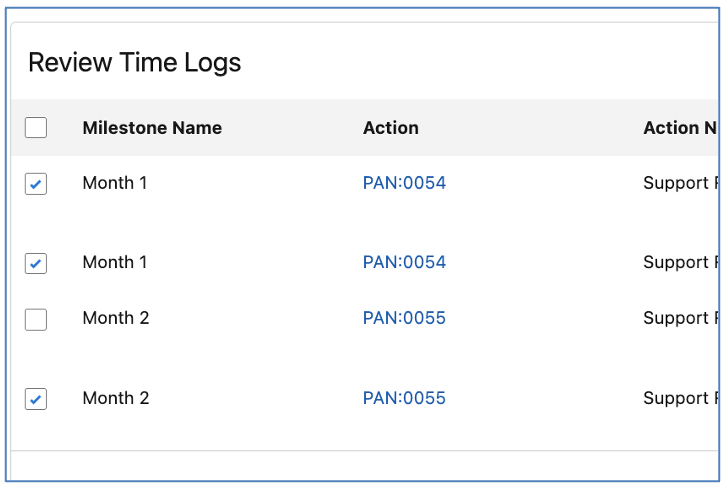
Note: If the ‘Include Non Billable Expenses’ field on the Project is FALSE, Time Logs will only be included where the ‘Non Billable Indicator’ field is FALSE. If the ‘Include Non Billable Expenses’ field on the Project is TRUE, Time Logs will be included where the ‘Non Billable Indicator’ field is TRUE or FALSE.
Once you have selected the required Time Logs, click ‘Next’ to proceed to the next step.
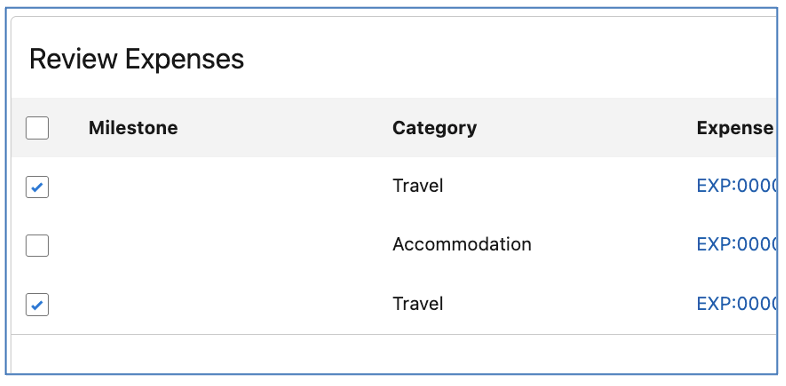
The third step is to review and select which Expenses should be included in the Billing Event. As shown in the image below, there are 3 fields to help identify which Expenses you want to include:

The Date Source determines which Date field on the Expense will be used to identify the Expenses you want to review:
The Date Range determines the period of time you want to use to identify the Expenses you want to review:
When you select ‘Specify Date Range’, the Start Date and End Date fields will be displayed, as shown below.

The Billing Event Item Grouping determines how many Billing Event Item records will be created, based on the Expenses being included:
Once you have specified the required settings, click the ‘Review Expenses’ button to generate the list of Expenses matching the criteria.

You are able to review and select the Expenses you wish to include in the Billing Event by clicking the Checkbox against the applicable Expenses.
Once you have selected the required Expenses, click ‘Next’ to proceed to the next step.
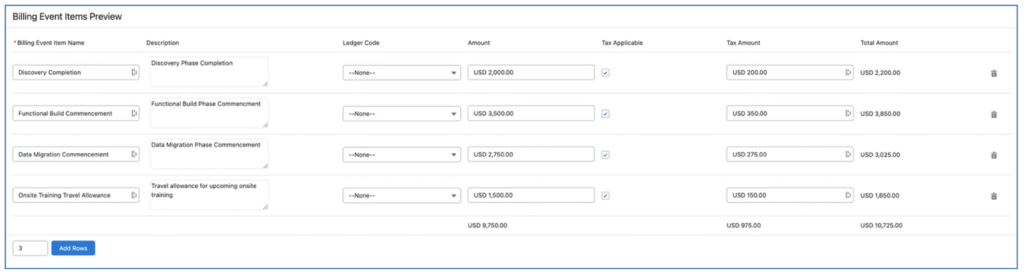
The fourth step is to review the Billing Event and Billing Event Items. In the image below, you can see the Billing Event information you entered in Step 1 and beneath that in the ‘Billing Event Items Preview’ section, you can see the Billing Event Items that have been compiled based on your Time Log & Expense settings and selections.

You can add values to fields such as Description, Ledger Code, etc. prior to clicking Save. Once you have reviewed everything, if you wish to create the Billing Event and related Billing Event Items, click Save.
There are a number of Field Sets that enable you to customise the fields displayed on specific sections across the T&M Wizard Tab of the Billing Event Generator. A list of all applicable Field Sets is included below.
Billing Event
Billing Event T&M Wizard Generator – controls the fields displayed on the ‘Draft Billing Event’ Tab and ‘Review & Save’ Tab
Billing Event Item
Billing Event T&M Wizard Generator – controls the fields displayed on the ‘Review & Save’ Tab
Time Log
Billing Event T&M Wizard Generator – controls the fields displayed on the ‘Add Time Logs’ Tab
Expense
Billing Event T&M Wizard Generator – controls the fields displayed on the ‘Add Expenses’ Tab
The ‘Manual’ Tab on the Billing Event Generator enables you to create a Billing Event and Billing Event Items within a single interface.
To generate a Billing Event in this manner, you will need to access the Billing Event Generator by clicking the ‘Generate’ button the Billing Tab of the Project Overview.

The Manual Tab will be visible if the following criteria on the Project is met:
From the Manual Tab on the Billing Generator, you are able to create the Billing Event and multiple Billing Event Items.

First, enter the details for the Billing Event, such as Billing Event Name, Type, Status, etc. Note: The Due Date will automatically be set to Invoice Date + Payment Terms (if the Payment Terms field on the Project contains a value).

Second, you will need to enter at least one Billing Event Item within the ‘Billing Event Items Preview’ section.

Additional rows can be added by clicking the ‘Add Rows’ button, enabling you to include multiple Billing Event Items.
Once you have reviewed everything, if you wish to create the Billing Event and related Billing Event Items, click Save.
There are a number of Field Sets that enable you to customise the fields displayed on specific sections across the Manual Tab of the Billing Event Generator. A list of all applicable Field Sets is included below.
Billing Event
Billing Event Manual Generator – controls the fields displayed on the Manual Tab
Billing Event Item
Billing Event Manual Generator – controls the fields displayed on the Manual Tab
The Resource Request feature has been updated to also support being used in context of an Opportunity.
Resource Requests can be created by clicking the ‘New’ button from the Resource Request related list on the Opportunity Page.

When reviewing Resource Requests on the Resource Planner, the left-hand-side section displays a list of all Resource Requests that need to be reviewed. You can identify whether the Resource Request relates to an Opportunity or a Project based on the icon displayed.

In the image above, the ‘Aprika: Webite Build’ Resource Requests relate to a Project. The ‘Billabong: Salesforce Implementation’ Resource Requests relate to an Opportunity. Where a Resource Request relates to both an Opportunity and a Project, the Project icon will be displayed.
When assigning a Role to a Resource Request that is related to an Opportunity, you will be able to create Role Forecast records. However, the ‘Ownership Reassignment’ section will not be displayed, as this is only applicable to a Project.
When auto-generating a Project from an Opportunity, Resource Requests related to the Opportunity will be updated to also relate to the Project.
A number of enhancements have been made to the Project Status Report feature. Details of each enhancement are included below.
You can control which sections of the Project Summary page are included in the PDF. Below is an illustration of the default view for the Project Summary.

If you do not wish to include the Project Summary page in the Project Status Report PDF, you can set the ‘Exclude PSR Summary Page’ field to TRUE on the Project.
Alternatively, you can control which of these sections are displayed, on a per Project basis. This is controlled through a number of fields available on the Project record, as outlined below. Each Checkbox field controls whether the section of the report is displayed in the PDF.
| Field | Section Controlled |
| Exclude PSR Project Completion Summary | Excludes the ‘Project Completion’ section in the left-hand column of the Project Summary |
| Exclude PSR Milestone Summary | Excludes the ‘Milestone Summary’ section in the left-hand column of the Project Summary |
| Exclude PSR Tasks Completed Summary | Excludes the ‘Tasks Completed’ section in the middle column of the Project Summary |
| Exclude PSR Additional Information | Excludes the ‘Additional Information’ section in the middle column of the Project Summary, which conditionally displays if Custom Fields are added to the ‘Project: Status Report Fields’ Field Set |
| Exclude PSR Project Status Summary | Excludes the ‘Project Status’ tile in the right-hand column of the Project Summary |
| Exclude PSR Start Date Summary | Excludes the ‘Start Date’ tile in the right-hand column of the Project Summary |
| Exclude PSR End Date Summary | Excludes the ‘End Date’ tile in the right-hand column of the Project Summary |
| Exclude PSR Hours Summary | Excludes the ‘Hours Last Week’ tile in the right-hand column of the Project Summary |
| Exclude PSR Issues Summary | Excludes the ‘Issues’ tile in the right-hand column of the Project Summary |
| Exclude PSR Risks Summary | Excludes the ‘Risks’ tile in the right-hand column of the Project Summary |
| Exclude PSR Change Request Summary | Excludes the ‘Change Request’ tile in the right-hand column of the Project Summary |
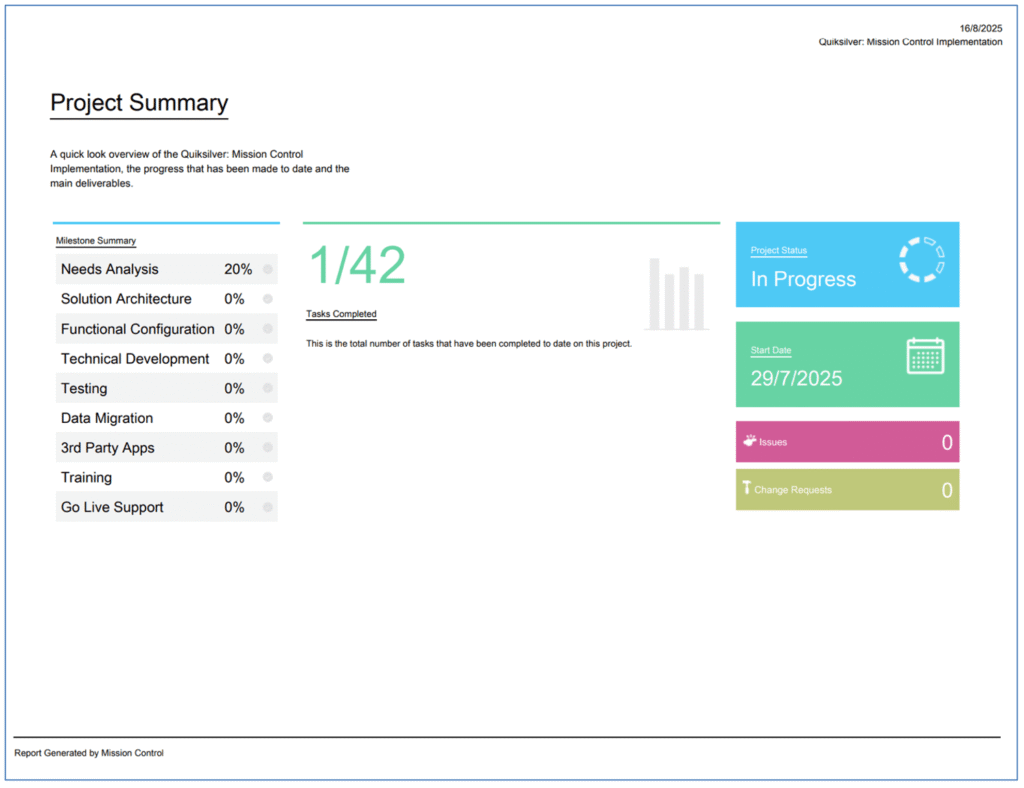
In the example above, the User has chosen to exclude the ‘Project Completion’, ‘End Date’, ‘Hours’ and ‘Risk’ sections of the Project Summary.
You are able to provide your Project Stakeholders with a summary update, without including the ‘Project Detail’ pages of the Project Status Report.
To exclude the ‘Project Detail’ section of the PDF, you need to ensure the ‘Exclude PSR Detail Page’ is set to TRUE.
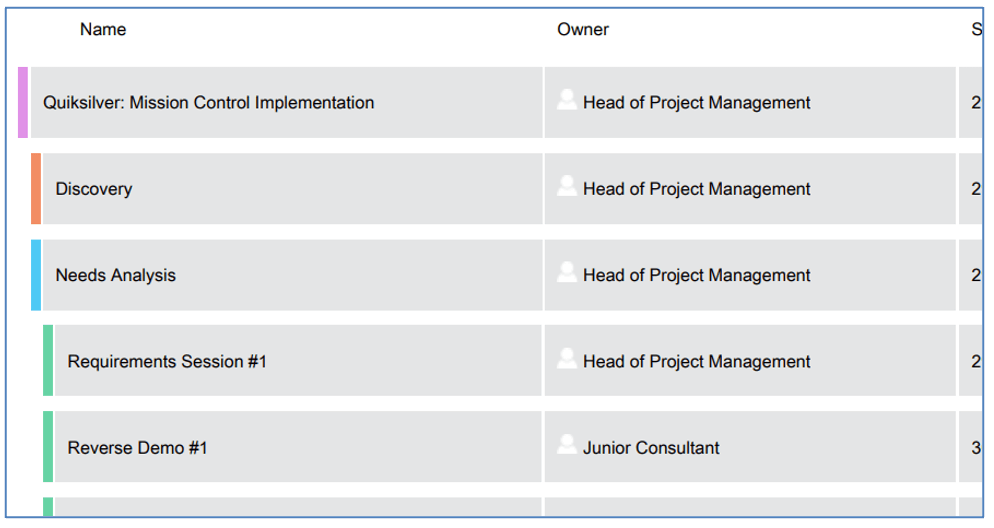
The ‘Project Detail’ page includes the name of the person responsible for each item on the Project Plan, as shown below.

In some instances, you may wish to anonymize this information to prevent individual project resources being contacted directly by Project Stakeholders. This can be achieved by using the ‘PSR Anonymize Owner’ field on the Project record. You can select from the following options:
Blank
When set to Blank, the Owner field will not display a value, as shown below.

Role Title
When set to Role Title, the Owner field will display the value of the ‘Job Title’ field from the Role record for each Owner, as show below.
Role Function
When set to Role Function, the Owner field will display the value of the ‘Function’ field from the Role record for each Owner, as shown below.

If this field is empty, the Owner’s name will be displayed.
The Expense Appendix can be optionally included in the Status Report by setting the ‘Weekly Status Report – Inc Expenses’ field to TRUE on the Project record. This Appendix includes all Expenses where the ‘Exclude from Weekly Status Report’ field on the Expense record is set to FALSE.
Below is an example of the Expense Appendix.

To add Custom Fields to the Expense Appendix within the Project Status Report, Customers can add fields to the ‘Expense Status Report Fields’ Field Set on the Expense Object. Note: A maximum of 8 fields will be displayed on the Appendix.
Exclude Expenses
If you wish to exclude particular Expense records from the Project Status Report, you will need to set the ‘Exclude from Weekly Status Report’ field on the Expense Object to TRUE.
A number of enhancements have been made to the Address sections of the Billing Event PDF. Details of each enhancement are included below.
By default, the address displayed on the Billing Event PDF is sourced from the ‘Billing Address’ fields on the Account record. Customers can specify an alternative address source if required.
The ‘Invoice Address Source’ field on the Billing Event can be used to specify which address should be displayed. The options include:
If this field is left blank, the Billing Address of the ‘Account’ specified on the Billing Event will be used. If the ‘Account’ field on the Billing Event is empty, the Billing Address of the ‘Account’ specified on the Project will be used.
To specify alternative fields to be used for the address, there are three sets of ‘Address Source’ settings in the ‘Billing Event Settings’ Tile on the Control Pad of the Mission Control Console.
Within these fields, you can enter the API Label of the fields to be used as the address source for each scenario.

In the image above, we have specified which fields are to be used as the address source.
By default, the format of addresses displayed on the Billing Event PDF are as follows:
| Format | Example |
| Street City State Postal Code Country |
1 Collins Street Melbourne VIC 3000 Australia |
Customers can use the ‘Company Address Format’ and ‘Customer Address Format’ settings to customize the address format. These settings can be found in the ‘Billing Event Settings’ Tile on the Control Pad of the Mission Control Console.

Below is an illustration of customized address format and how they would display.
| Format | Example |
| Street, City, State, Postal Code, Country |
1 Collins Street, Melbourne, VIC, 3000, Australia |
| Street, City, State, Postal Code, Country |
1 Collins Street, Melbourne, VIC, 3000, Australia |
A number of minor enhancements have been made to various features. Each enhancement is detailed below.
A new field has been added to the Phase Object called ‘Total Milestone Budget’. This field will roll up the value of the ‘Milestone Budget’ field of all related Milestones.

This will enable Users to compare the ‘Phase Budget’ and the ‘Total Milestone Budget’ on individual Phase records.
A new Setting has been added to the ‘Project Automation Settings’ Tile on the Control Pad of the Mission Control Console.
When a Time Log is created and relates to a Checklist Item, if the Status of that Checklist Item is ‘Planned’, it will automatically be updated to ‘In Progress.
This provides the same logic on the Checklist Item that updates the Action Status to In Progress when a Time Log is created against the Action.
![]()
Customers are able to disable this feature if it is not required. To disable this feature, set the ‘Disable Time Log Updates Checklist Item Status’ setting to TRUE.
A Validation Rule has been added to the ‘Sprint Team’ Object. This Validation Rule prevents Users from entering values in both the ‘Sprint Capacity Hours’ and ‘Sprint Capacity Percent’ fields. This Validation Rule is Active by default.
To enable Customers to enter a specified Mark Up value for Expenses, a new Custom Field has been added to the Expense Object. This field can be used instead of applying the ‘Mark Up %’.

If the ‘Custom Mark Up Amount’ contains a value and ‘Mark Up Required’ Checkbox is TRUE, the ‘Amount’ field will be based on the ‘Cost Amount’ + ‘Custom Mark Up Amount’ instead of ‘Cost Amount’ + (‘Cost Amount’ * ‘Mark Up %’).
This section includes details of any component changes within the package. This includes changes to existing fields as well as any new fields, validation rules, buttons / actions, Apex Classes, Components, etc. that have been added to the solution as part of this release.
IMPORTANT: We recommend you thoroughly review all of these components. To take advantage of the enhancements within this release, you may need to:
If you are not using the Permission Sets included with Mission Control, we recommend you check the Field Level Security for all of these fields and accessibility to the various Components to ensure all appropriate Profiles/Permission Sets have the required access.
| Field | Field Type | Comments | New/Existing |
| Total Actions | Number (18, 0) | Roll Up Summary: Counts all Actions relating to this Requirement where the Action Status != Cancelled | New |
| Complete Actions | Number (18, 0) | Roll Up Summary: Counts all Actions relating to this Requirement where the Action Status = Complete | New |
| Total Hours Scheduled | Number (16, 2) | Roll Up Summary: Sum of Total Hours Scheduled on all Actions relating to this Requirement where the Action Status != Cancelled | New |
| Total Hours Completed | Number (16, 2) | Roll Up Summary: Sum of Total Hours Completed on all Actions relating to this Requirement where the Action Status != Cancelled | New |
| Total Hours Remaining | Number (16, 2) | Roll Up Summary: Sum of Total Hours Remaining on all Actions relating to this Requirement where the Action Status != Cancelled | New |
| Field | Field Type | Comments | New/Existing |
| Requirement Priority Order | Number (18, 0) | Identifies the positional order of the Action on the Epic Board | New |
| Field | Field Type | Comments | New/Existing |
| Project Overview Default Tab | Picklist | Add ‘Epic Board’ as a new value | Existing |
| View Epic Board Tab | Checkbox | Identifies whether the User linked to this Role has the ability to view the Project Overview Epic Board Tab | New |
| Epic Board Default Tab | Picklist | Identifies which Tab on the Epic Board is displayed by default | New |
| View Create Requirements Tab | Checkbox | Identifies whether the User linked to this Role has the ability to view the Epic Board Create Requirements Tab | New |
| View User Stories Tab | Checkbox | Identifies whether the User linked to this Role has the ability to view the Epic Board User Stories Tab | New |
| View Project Builder Tab | Checkbox | Identifies whether the User linked to this Role has the ability to view the Epic Board Project Builder Tab | New |
| View Actions Tab | Checkbox | Identifies whether the User linked to this Role has the ability to view the Epic Board Actions Tab | New |
| View Requirements Overview Tab | Checkbox | Identifies whether the User linked to this Role has the ability to view the Epic Board Requirements Overview Tab | New |
| View Requirements Analytics Tab | Checkbox | Identifies whether the User linked to this Role has the ability to view the Epic Board Requirements Analytics Tab | New |
| Field | Field Type | Comments | New/Existing |
| Exclude PSR Project Completion Summary | Checkbox | Identifies if this section of the Project Status Summary Page is excluded from the PDF | New |
| Exclude PSR Milestone Summary | Checkbox | Identifies if this section of the Project Status Summary Page is excluded from the PDF | New |
| Exclude PSR Task Completed Summary | Checkbox | Identifies if this section of the Project Status Summary Page is excluded from the PDF | New |
| Exclude PSR Additional Information | Checkbox | Identifies if this section of the Project Status Summary Page is excluded from the PDF | New |
| Exclude PSR Project Status Summary | Checkbox | Identifies if this section of the Project Status Summary Page is excluded from the PDF | New |
| Exclude PSR Start Date Summary | Checkbox | Identifies if this section of the Project Status Summary Page is excluded from the PDF | New |
| Exclude PSR End Date Summary | Checkbox | Identifies if this section of the Project Status Summary Page is excluded from the PDF | New |
| Exclude PSR Hours Summary | Checkbox | Identifies if this section of the Project Status Summary Page is excluded from the PDF | New |
| Exclude PSR Issues Summary | Checkbox | Identifies if this section of the Project Status Summary Page is excluded from the PDF | New |
| Exclude PSR Risks Summary | Checkbox | Identifies if this section of the Project Status Summary Page is excluded from the PDF | New |
| Exclude PSR Change Request Summary | Checkbox | Identifies if this section of the Project Status Summary Page is excluded from the PDF | New |
| Exclude PSR Summary Page | Checkbox | Identifies if this section of the Project Status Summary Page is excluded from the PDF | New |
| Exclude PSR Detail Page | Checkbox | Identifies if the Detail Page of the Project Status Report is excluded from the PDF | New |
| PSR Anonymize Owner | Picklist | Select a value in this field to replace the Owner name on the Detail page of the Project Status Report PDF | New |
| Weekly Status Report – Inc Expenses | Checkbox | Include the Expense records within the Weekly Status Report | New |
| Field | Field Type | Comments | New/Existing |
| Exclude from Weekly Status Report | Checkbox | Identifies if this Expense should be excluded from the Project Status Report | New |
| Custom Mark Up Amount | Currency (16, 2) | This Amount can be used to override the Project Mark Up % | New |
| Field | Field Type | Comments | New/Existing |
| Invoice Address Source | Picklist | Identifies the parent record that should be used to reference the Customer Address on the Billing Event PDF | New |
| Field | Field Type | Comments | New/Existing |
| Total Milestone Budget | Currency (16, 2) | Identifies the sum of the Milestone Budget field from all related Milestones | New |
| Field | Field Type | Comments | New/Existing |
| Opportunity | Lookup (Opportunity) | Identifies the Opportunity record the Resource Request relates to | New |
The following Components have been included or updated in this Release.
| Component Type | Component Name | Description |
| Apex Class | BillingEventWizard | Supports the T&M Wizard and Manual Tabs of the Billing Event Generator |
| Apex Class | CreateChecklistItemController | Supports the Create Checklist Items Page |
| Apex Class | Epic Board | Supports the Epic Board on the Project Overview |
| Apex Class | LogDeletionBatch | Deletes historic Log records |
| Visualforce Page | createChecklistItems | Create Checklist Items page on the Project |
| Visualforce Page | createChecklistItemsAction | Create Checklist Items page on the Action |
| Visualforce Page | createChecklistItemsMilestone | Create Checklist Items page on the Milestone |
The following Validation Rules have been included or updated in this Release. It is recommended you review each Validation Rule and determine whether you wish for the rule(s) to be active or inactive.
| Object | Rule | Description | Active |
| Sprint Team | Hours or Percent | Prevents both the Sprint Capacity Hours and Sprint Capacity Percent fields containing a value | TRUE |
| Resource Request | Ensure Project Or Opportunity Populated | Ensures the Resource Request relates to a Project or an Opportunity | TRUE |
| Expense | Only Amount or Percent Can Be Entered | Prevents both the Custom Mark Up Amount and Custom Mark Up being populated | TRUE |
As part of the upgrade process, an Install Script will execute to set default values for the following Fields / Settings.
Role Fields
Requirement Fields
Mission Control will be made available based on the following release schedule.
29th August 2025 – Available for manual upgrade from the AppExchange
14th September 2025 – Automatic upgrade to all Sandbox Orgs
28th September 2025 – Automatic upgrade to all Production Orgs
To manually upgrade to the new version of Mission Control in your organisation, please follow the steps below:
We have pre-recorded the ‘What’s New’ webinar to provide further information on how to get the best out of the new features. To access this webinar, please view the ‘Release Notes’ section of the Mission Control Support Centre – www.aprika.com/mc-support
Some of the new features included in this release of Mission Control have come from ideas submitted from existing clients. If you have an idea for enhancing Mission Control, you can submit it via email to [email protected].
If you have any questions regarding this release notification, please do not hesitate to contact us at [email protected].
