Salesforce Project Management Software by Aprika
Mission Control Version 1.63 Release Notification
13 January 2023
A new version of Mission Control (version 1.63) will be released on the AppExchange on Friday 13th January 2023. This notification has been issued to existing Mission Control users. It contains
an overview of the new features available with this release, along with instructions on how to upgrade to the new version.
This release includes a number of new features, along with some enhancements to existing functionality, including:
Let’s get stuck into the detail…
A new method for calculating the Billing or Cost rates on Projects is included within this release. To use this method, you will need to ensure you add ‘Rate Card’ as a new picklist value in the following fields on the Project Object:
The ‘Rate Card’ method provides a way of applying specific rates to all Projects associated with a particular customer. To use the Rate Card values on a Project, you will need to set the Billing Rate and/or Cost Rate to ‘Rate Card’. In addition, you will need to select the Rate Card that you want to use. Only Rate Cards that relate to the Account specified on the Project can be selected.
A Rate Card is a container for a group of ‘Rate Card Entry’ records that contain Billing and/or Cost Rates for a particular Function. The Rate Card is related to an Account record, enabling you to create a set of rates for one Account that vary from the rates used for a different Account.
In order to create Rate Cards and Rate Card Entries, you must ensure the ‘Function’ field on each Role record has been populated. This Function field is used on the individual Rate Card Entries to identify the rates that should be used, based on the Function field value of the Role completing the work on the Project.
The Function field contains the following values by default, but you are able to add / remove by modifying the values in the ‘Function’ Picklist Value Set. By modifying these values, the Function field on both the Role and the Rate Card Entry will be updated. The default values include:
By using the Function, rather than the name of the person, you do not need to maintain Rate Card Entries for each individual Role that will be working on the Project. For example, if Mick Fanning and Kelly Slater both have a Function of ‘Project Manager’, you will only need to create a Rate Card Entry for Project Manager and that will be applied to both of these Roles if they are working on the Project.
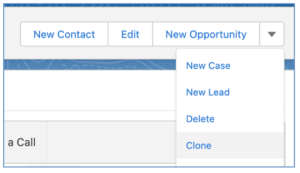
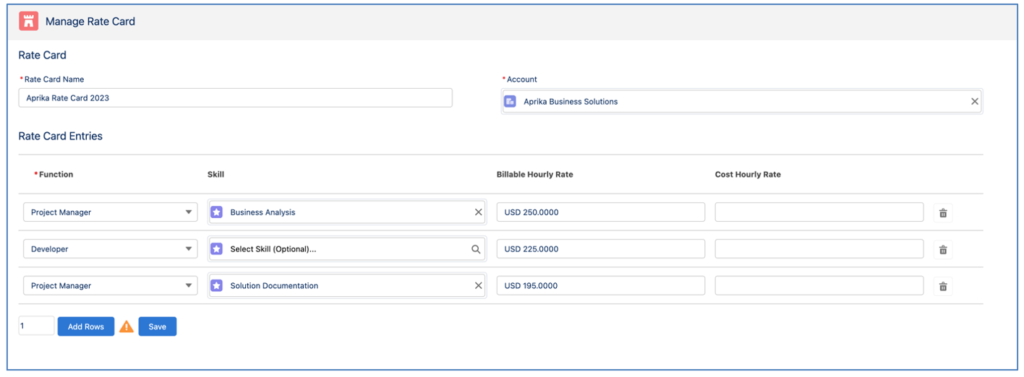
To create a Rate Card, you need to click on the ‘New’ button on the Rate Card Object Tab or from the Related List on the Account Page. This will open up the ‘Manage Rate Card’ page, which enables you to create the Rate Card and related Rate Card Entry records.

You will need to enter the Rate Card Name and ensure the Account field is populated with the name of the customer that this Rate Card will be used for.
Within the Rate Card Entries section, you can create Rate Card Entry records for each Function as required. You can optionally choose to associate a Skill to the Rate Card Entry. For example, you may charge different rates if your Project Managers are performing different activities on the Project, such as Business Analysis and Solution Documentation. For this scenario, you would need 2 Rate Card Entries for the Project Manager Function, one with the Skill of Business Analysis and the other with the skill of Solution Documentation.

You can clone an existing Rate Card and related Rate Card Entries by using the ‘Clone’ button the Rate Card record.
This deep clone process enables you to provide a new Rate Card Name, change the Account it will relate to and save all related Rate Card Entry records.
If required, you are also able to delete any unwanted Rate Card Entries as well as creating additional Rate Card Entries.
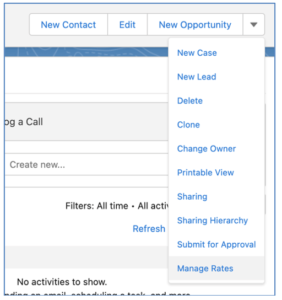
You can use the ‘Manage Rates’ feature with Rate Cards if you need to have different rates applied for different time periods. You can access the Manage Rates page from the Rate Card record.
From the Manage Rates page, you are able to create Rate Adjustments relating to individual Rate Card Entry records.
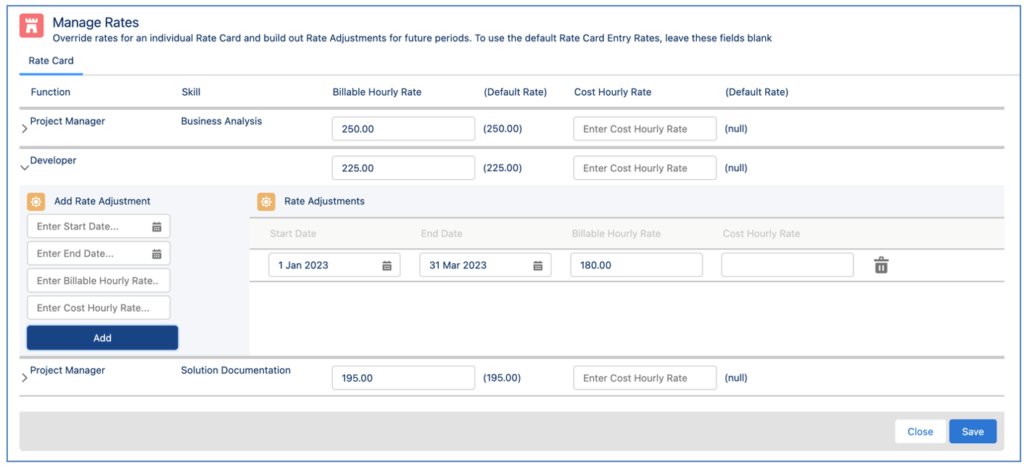
In the example above, we are providing a discounted rate for the Developer Function during Jan, Feb and Mar.
When using the Rate Card method for either the Billing Rate or the Cost Rate, the financials relating to hours will be calculated based on the following priority:
Action ‘Skill’ field is populated:
Action ‘Skill’ field is not populated:
The rate obtained from the prioritized list above will be used in the calculations relating to hours.
To enable customers to group Milestones of a Project together, you can choose to create ‘Phase’ records under your Project record. Unlike Milestones and Actions, which are mandatory requirements for a Project Plan, the Phase record is optional.
Some of your Projects may not be large enough to warrant having Phases, therefore you do not need to create them for every Project.
For larger Projects, you may wish to group your Milestones into layers beneath the Project. For example, we may have the following Milestones on a Project:
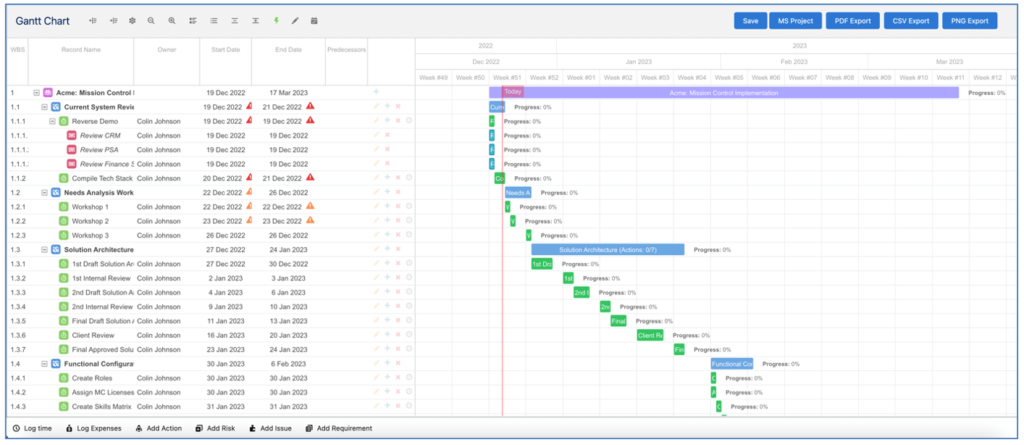
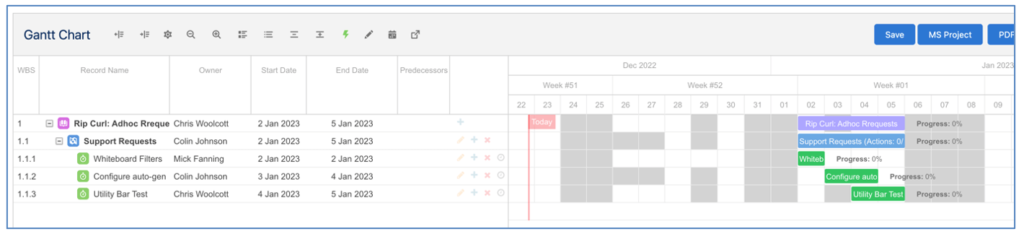
Below is an example of how these Milestones, and related Actions are shown on the Gantt Chart.
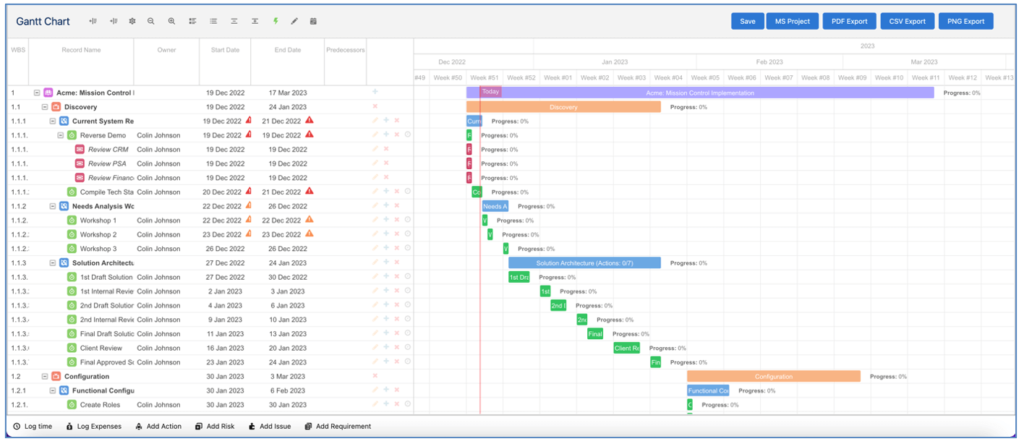
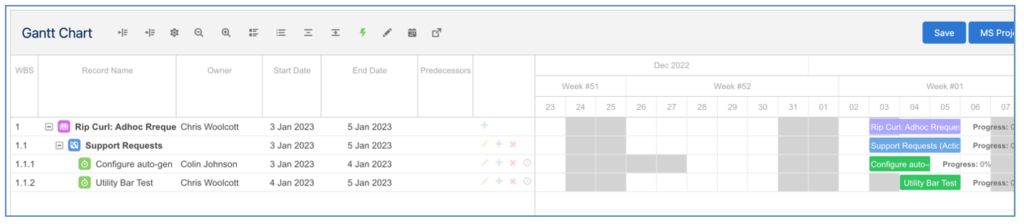
We may choose to group these Milestones into the three separate Phases, as detailed below:
Once the Milestones have been related to a Phase, the Phases will be displayed on the Gantt Chart as shown below.
To create a Phase, click the New button on the Phase Related List on the Project record you want the Phase to relate to. Enter the applicable fields and click Save.
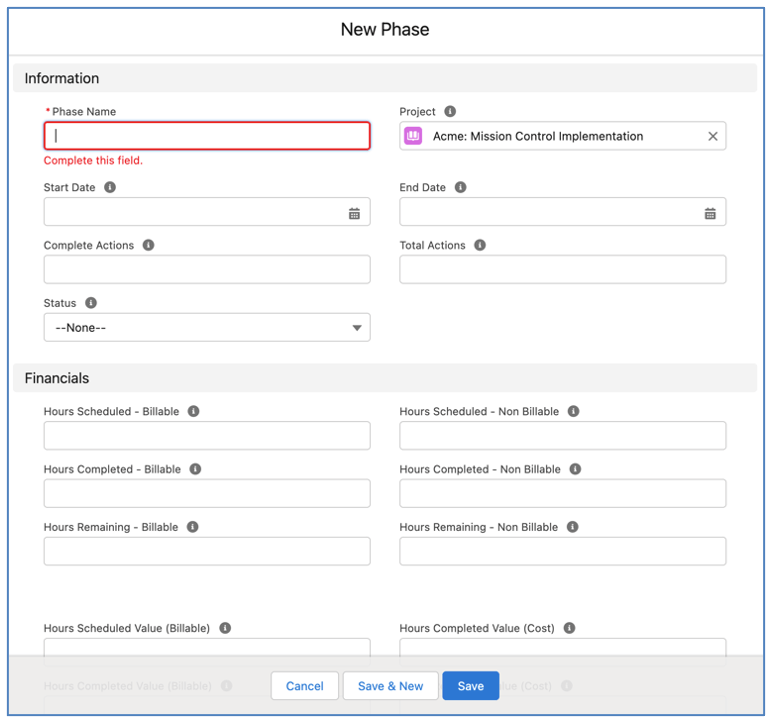
The only standard Fields that need to be populated manually are the Phase Name and the Project. All other fields will be updated automatically once the Phase has related Milestones.
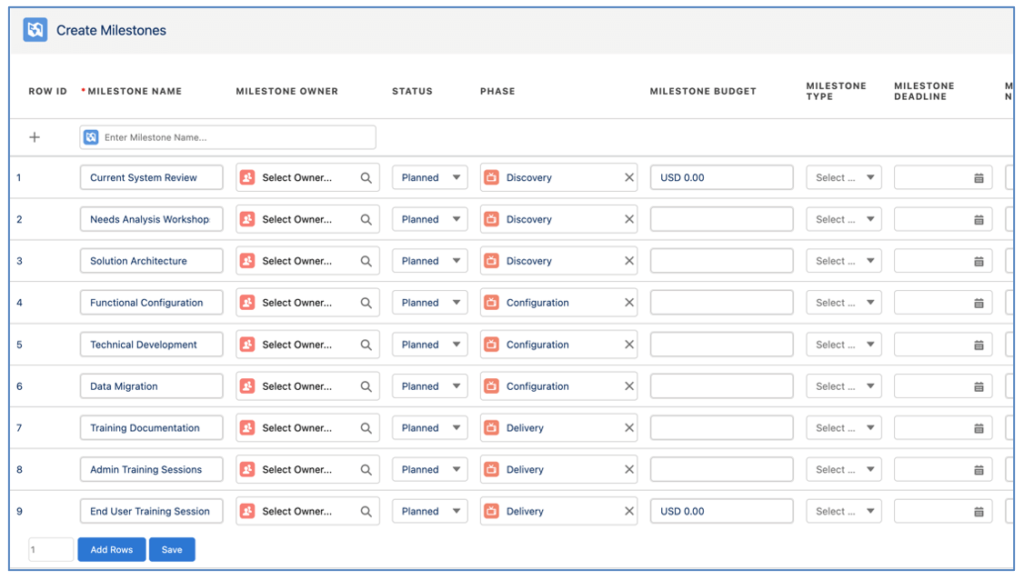
To relate a Milestone to a Phase, you need to populate the Phase field on the Milestone record. This can be done by editing the Milestones individually, entering the appropriate Phase and clicking Save.
Alternatively, you can add the Phase field to the ‘Create Milestones Fields’ Field Set. This will enable you to populate the Phase field for all Milestones.
The following items are not supported with the Phase Object:
The ‘Disable adjusting End Date if Start Date changed’ Custom Setting enables you to control the behaviour of the Working Days and End Date fields on an Action when the Start Date is modified.

If the Setting is FALSE, when the Start Date is adjusted and the Working Days field is not null, the End Date will be adjusted to be equal to Start Date + Working Days.
If the Setting is TRUE, when the Start Date is adjusted and Working Days field is not null, the Working Days field will be adjusted to equal End Date – Start Date.
This Setting is located within the Project Automation Settings Tile on the Control Pad of the Mission Control Console.
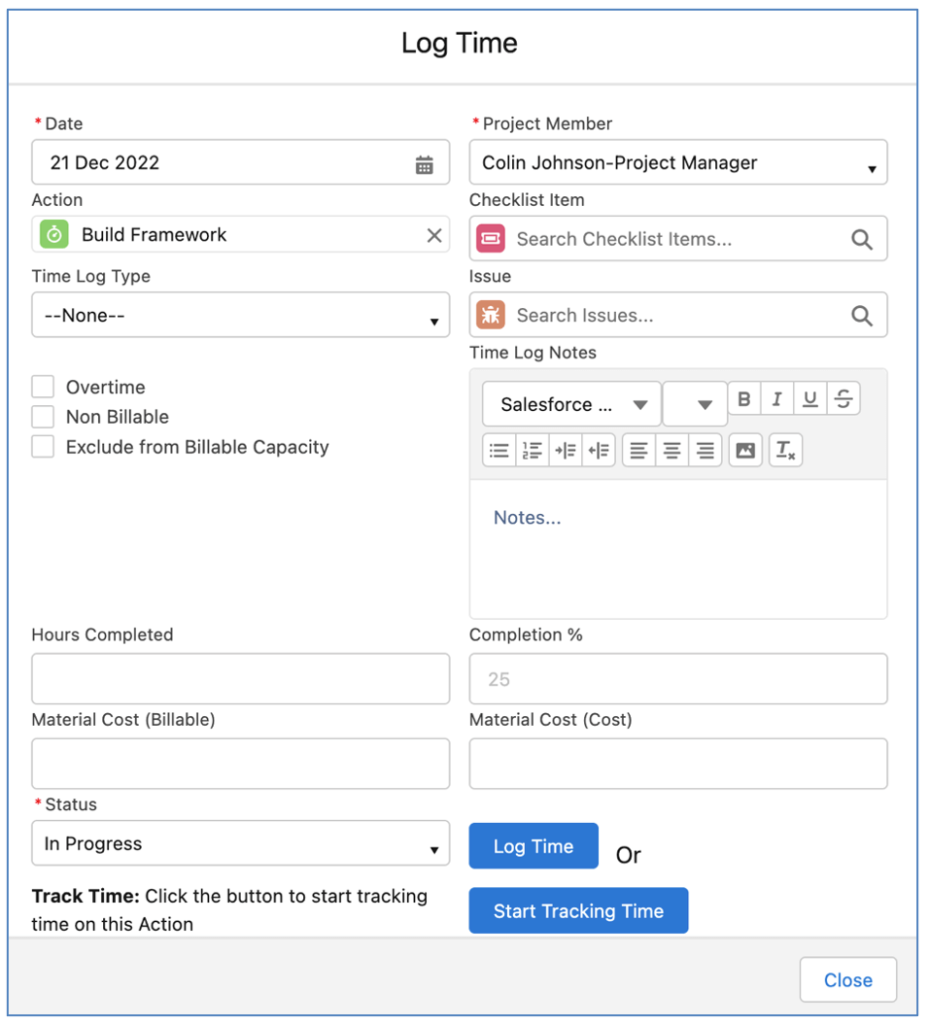
By default, the Log Time Component layout appears as shown below.
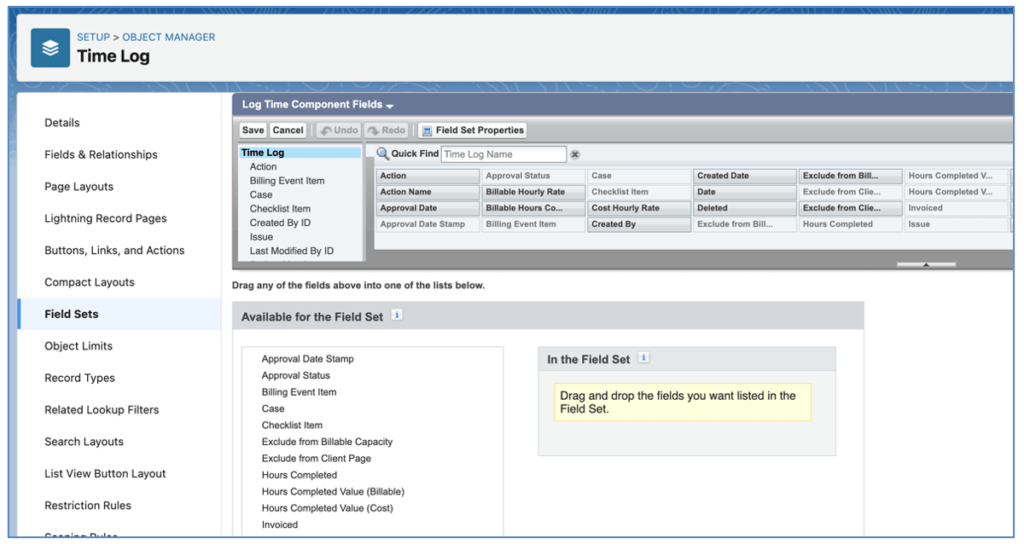
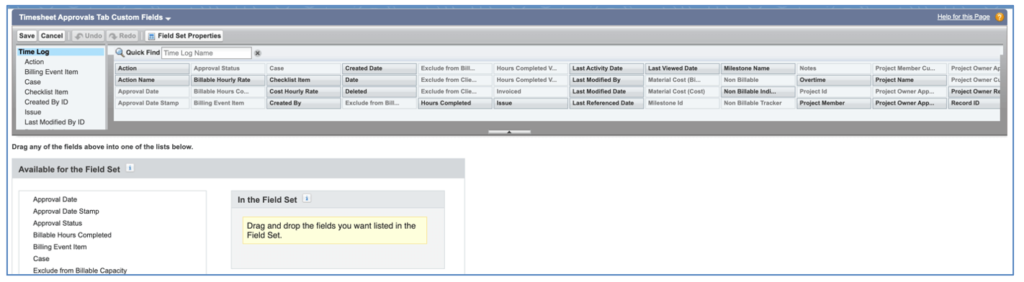
You are able to customize this layout by adding fields to the ‘Log Time Component Fields’ Field Set on the Time Log Object.
If the ‘In the Field Set’ section of this Field Set is empty, then the default layout will be applied.
The following fields will always be included on the Component:
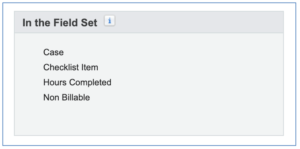
Once you add Fields to the Field Set, only standard fields listed above and those added to the Field Set will be available on the Log Time Component. For example, in the image below, we have added 4 fields to the Field Set.
When using the Log Time Component in this scenario, the standard Fields and the Fields from the Field Set will be accessible on the Component.

To reset to the default collection of Fields, you will need to remove all Fields from the ‘In the Field Set’ section of the Field Set.
A number of enhancements have been made to the Gantt Chart, each of which is detailed below.
The Standalone Gantt Chart filters can be saved and persistently set, including applying multiple filters. When you create a Filter on the Standalone Gantt Chart, you’re able to save as a Preset Filter using the feature at the top of the Filters Modal, as shown below.
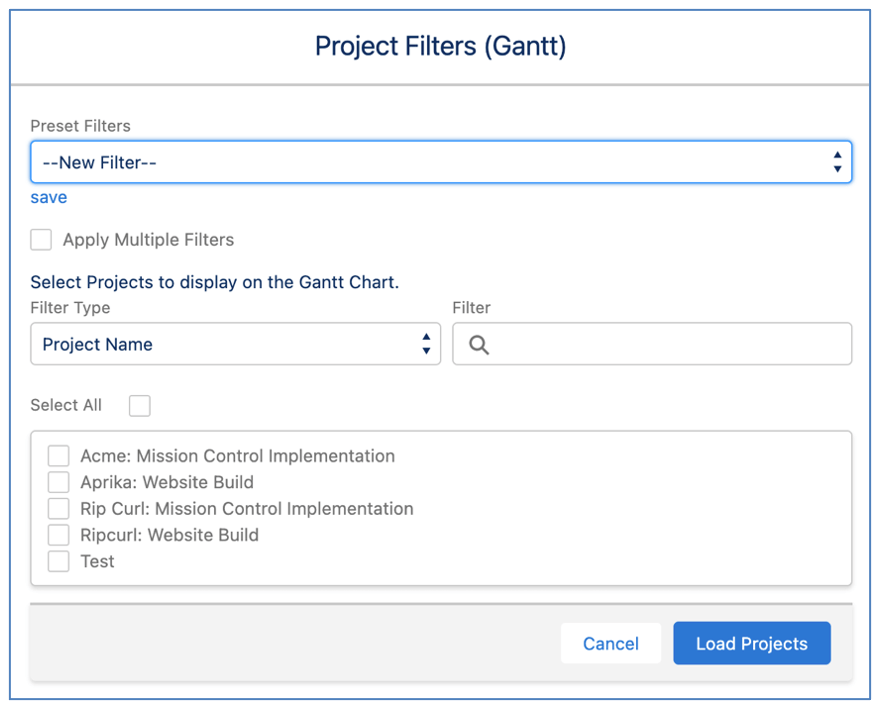
Preset Filters will be persistently applied when you reload the Gantt Chart, enabling you to have the Projects you want to view automatically load each time you visit the page.
Previously only Holiday records where ‘Global Holiday’ marked TRUE were displayed on the Gantt Chart.
The Gantt Chart will now display all Holiday records on the Gantt Chart, including:
All non working days, including Holidays, Role Availability and Business Hour Settings will all be shaded Grey to indicate a non working day.
When an Action is reassigned to a different Action Owner within the Gantt Chart it will automatically reschedule to take into account that Role’s non working days.
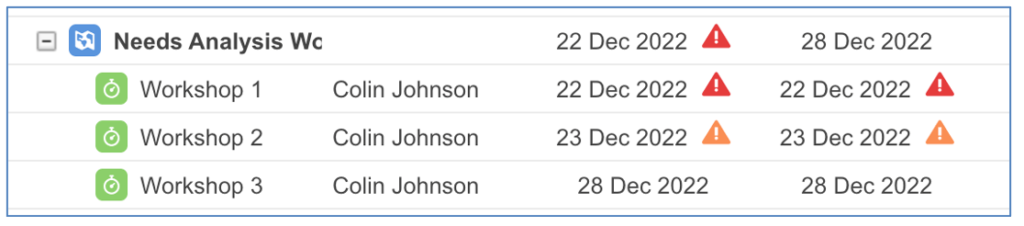
For example, the ‘Utility Bar Test’ Action in the Gantt Chart below is currently assigned to Colin for Tuesday and Wednesday.

When it is reassigned to Chris, it automatically reschedules to Wednesday and Thursday as he is on PTO on Tuesday.
The same logic occurs when you reassign an Action outside of the Gantt Chart.
Each layer of the Gantt Chart (e.g. Project, Phase, Milestone, Action, Checklist Item) has a Hover Tip that will appear when you hover over the record within the Gantt Chart, as shown below.
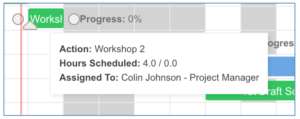
Each layer has preset default values. If a Customer wishes to include additional information in the Hover Tip, they can do so by adding fields to the applicable Field Set from the list below.
Any Fields added to the Field Set will appear beneath the default values.
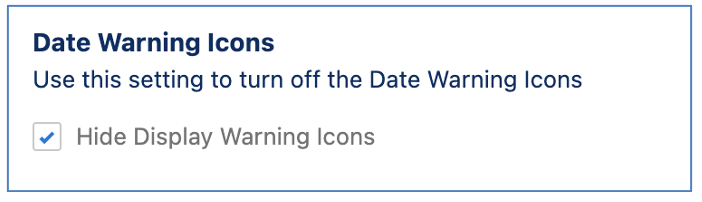
The Red / Amber warning icons for the Start Date and End Date are displayed on the Gantt Chart, as shown below.
These icons can be turned off within the individual User settings on the Gantt Chart or via the Gantt Chart Override settings on the Control Pad of the Mission Control Console.
You can change the Action Owner using the inline edit feature within the Data Table of the Gantt Chart. To change the Action Owner, double-click into the Owner cell that you wish to change.

Start typing the name of the person you want to assign as the Action Owner. You will see their full name appear in the search box – click on the name and it will populate in the cell.
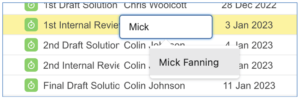
Click away from the cell and ensure you click the Save button at the top of the Gantt Chart to commit the change.
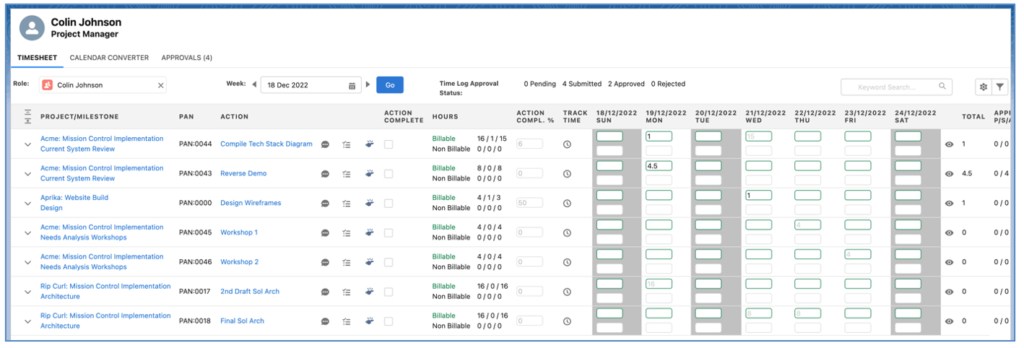
A number of enhancements have been made to the Timesheet, each of which is detailed below.
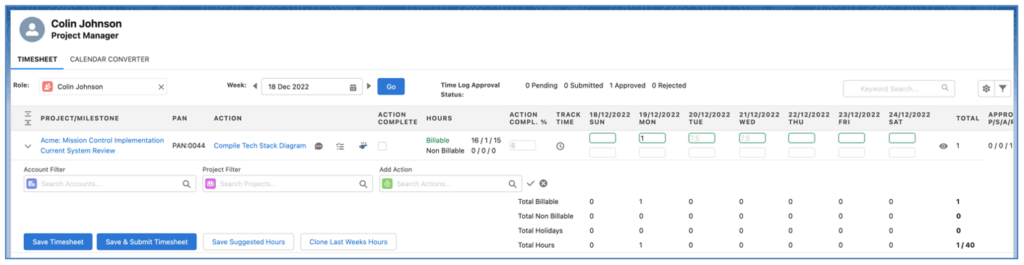
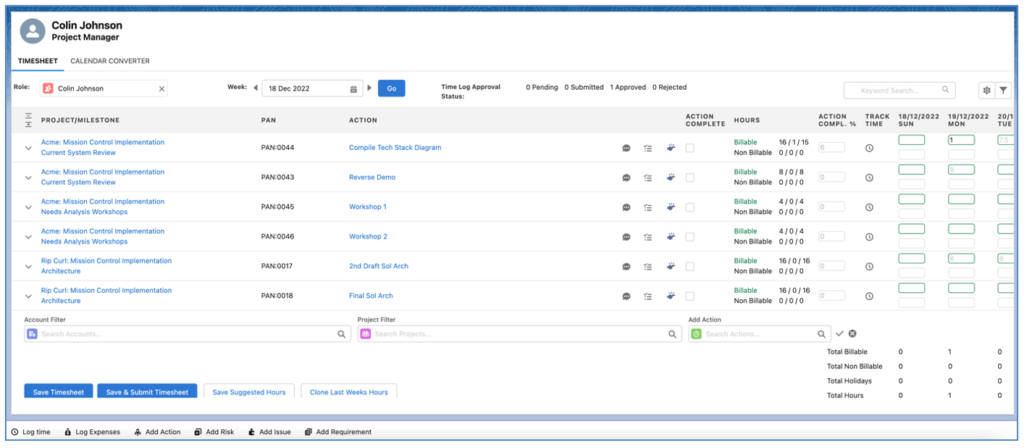
You are able to collapse / expand rows on your Timesheet. This can be done on each row, or you can click the +/- buttons to collapse all / expand all.
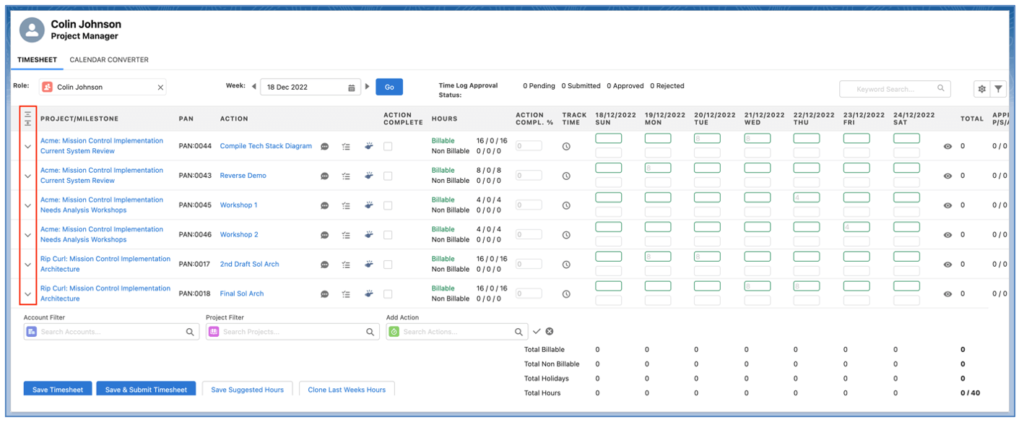
When you collapse / expand any individual row, all rows relating to the same Project will also be collapsed / expanded.
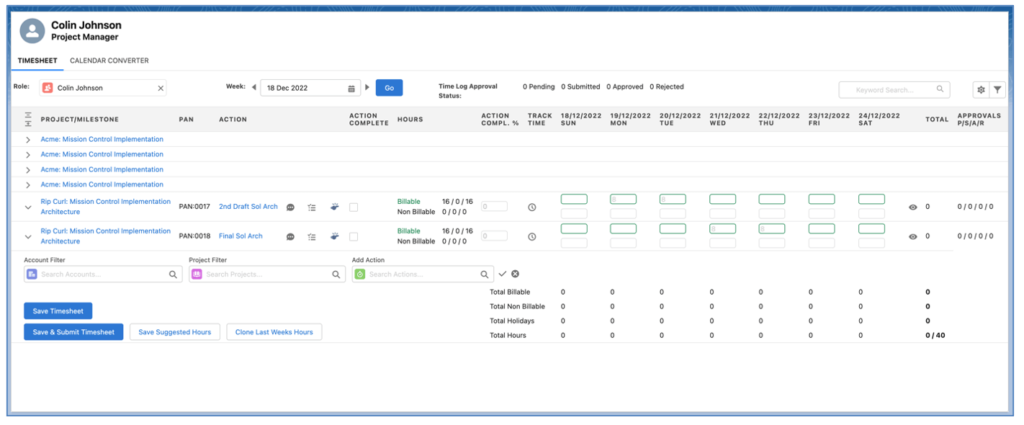
Collapsed rows will still reflect in the summary numbers at the bottom of the Timesheet.
For customers that do not use the Approvals feature, there is a Setting within the Timesheet Settings that enables you to hide the Approval Status information at the top of the Timesheet and to the right of each individual row.
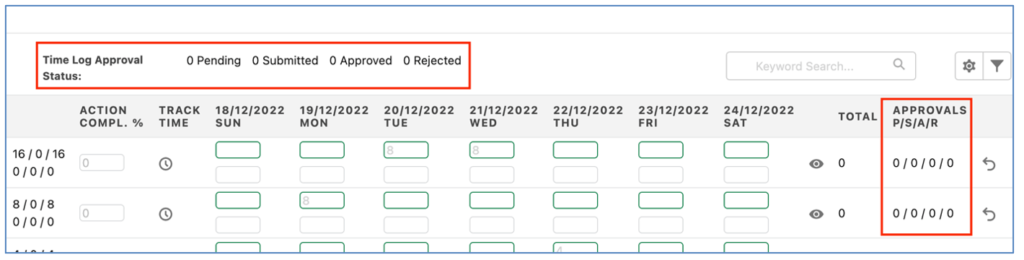
To remove these sections from the Timesheet, you need to set the ‘Hide Approval Status Information’ Setting to TRUE.
This Setting can also be controlled centrally from the Timesheet Settings on the Control Pad of the Mission Control Console.
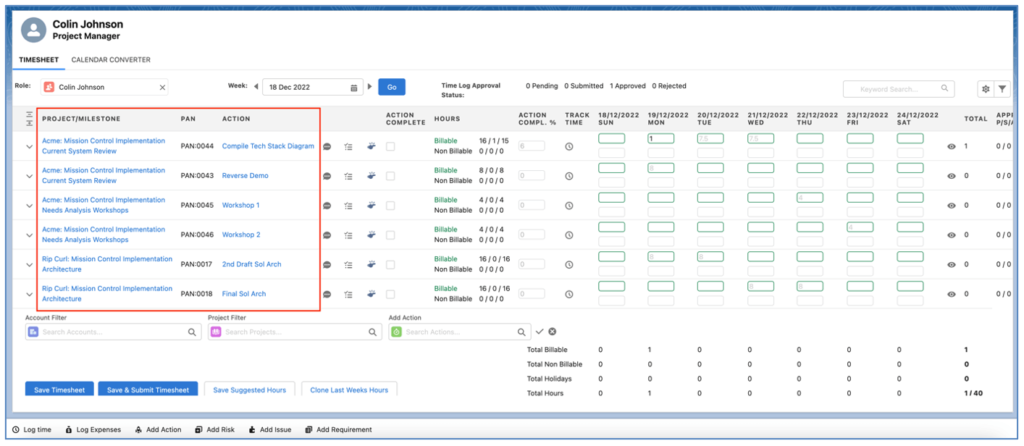
For Customers that want to start each week with a blank Timesheet, there is a Setting called ‘Hide Actions with no Time Logs This Week’ that enables you to hide Actions if you have not yet logged time against that Action this week.
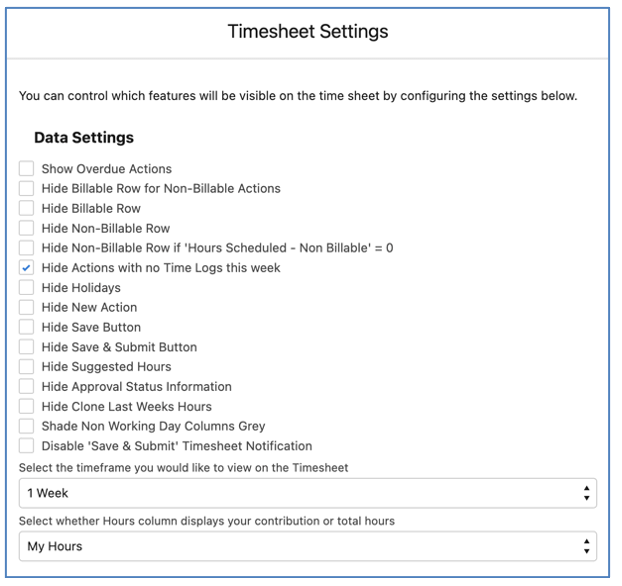
If this Setting is TRUE, and you have not yet logged any time against any Actions, your Timesheet will appear empty, as shown below.
Once you’ve logged time again an Action during this week, that Action will be loaded, as shown below.
If this Setting is FALSE, all Actions will load in the default manner.
This Setting can also be controlled centrally from the Timesheet Settings on the Control Pad of the Mission Control Console.
By default, the rows within the Timesheet are sorted based on the following criteria:
For Customers that wish to sort the Timesheet in a different way, the ‘Timesheet Sort Order Settings’ within the Timesheet Settings enable you to specify up to 3 sort order options.
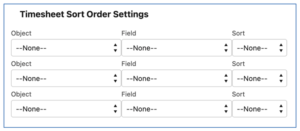
You can specify the Object, Field and Sort Order (e.g. ASC or DESC).
This Setting can also be controlled centrally from the Timesheet Settings on the Control Pad of the Mission Control Console.
There are ‘Column Width Settings’ within the Timesheet Settings that enable you to adjust the width of the following columns on the Timesheet:
By default, the width of these columns will be as shown below:
By entering values in the Column Width Settings, you are able to specify your desired column widths, as shown below:
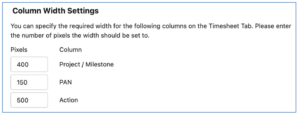
The width of these columns will then be set based on these Setting values, as shown below.
To reset the column widths back to the default values, you will need to remove the values in these Column Width Settings.
This Setting can also be controlled centrally from the Timesheet Settings on the Control Pad of the Mission Control Console.
You can apply Filters to your Timesheet to ensure you’re only viewing the Actions that are most important to you. Simply click on the Filter icon to open up the Filters modal and apply the filters as required.
![]()
The Filters can be applied as required, alternatively, you can save any Filter selection, and that will be persistently applied each time you visit the Timesheet.
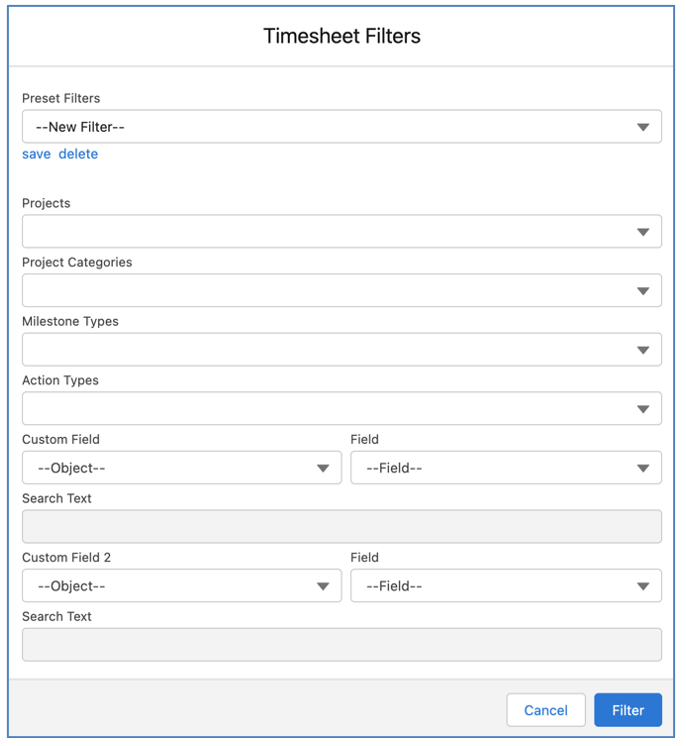
Preset Filters are created and accessed by individual Users and cannot be shared with other Users.
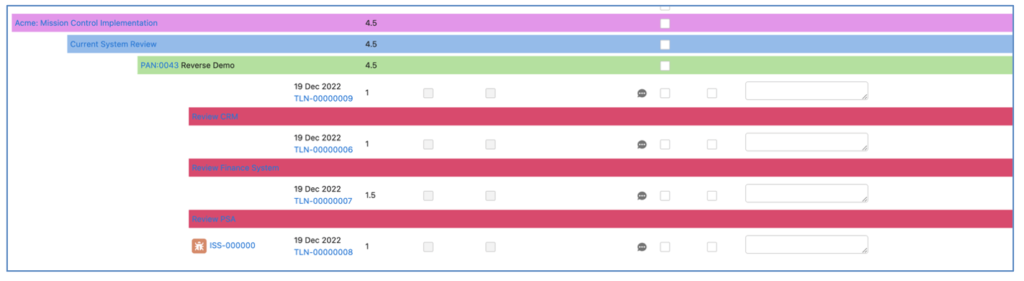
The Approvals Tab groups Time Logs by Action. If the Time Log also relates to a Checklist Item, a fourth layer will be displayed, grouping the Time Logs by Checklist Item.
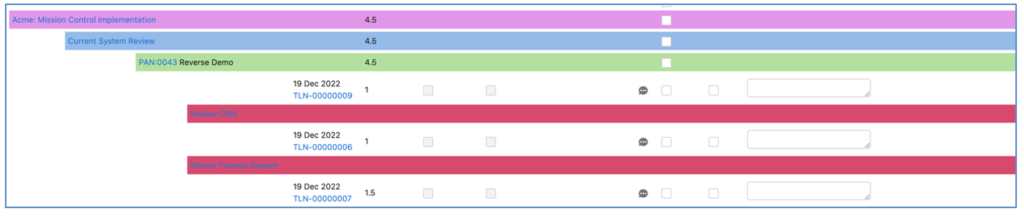
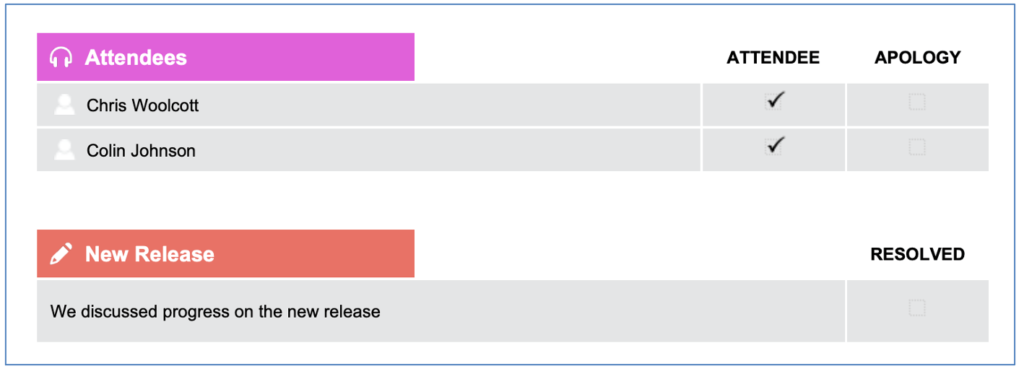
If the Time Log has also been related to an Issue, the Issue will be displayed, as shown below.
By default, the Approvals Tab on the Timesheet will display the following fields:
All of these standard Fields can be turned on/off via the Timesheet Settings.
For Customers that wish to include additional Fields on to the Approvals Tab, you will need to add Fields to the ‘Timesheet Approvals Tab Custom Fields’ Field Set.
Any Field added to this Field Set will be placed to the right of all standard Fields.
Within Mission Control you can set a Role’s availability directly on their Role record or by creating Role Availability records relating to their Role record.
Either method enables you to specify which days of the week they work, by entering the number of hours per day.
For any day of the week, where the value is 0 or null, that day is considered a ‘Non Working Day’ for that Role.
When creating Actions [and Checklist Items], these non working days will be ignored like all other non working days (e.g. Holidays and Business Hours Settings). For example, if Mick Fanning has Tuesday set to 0 on his Role record and an Action is created and scheduled to start Monday 2nd January for 3 working days, the End Date will be scheduled to Thursday 5th January, as Tuesday 3rd January is considered a non working day for Mick.
These non working days are also visualised on the following pages:
The example above shows that Tuesday is a non working day for Colin.
A number of enhancements have been made to the Meeting Manager, each of which is detailed below.
The Agenda Item and Agenda Task sections now have the ability to be collapsed / expanded. Their state (e.g. collapsed or expanded) will be persistently remembered. Therefore, if you don’t use the Summary field in the Agenda Item section, you are able to collapse and leave it collapsed, providing easier access to the Agenda Tasks.
The Save button has been removed from the Agenda Item section of the Meeting Manager. All fields within this section now force an auto-save once they have lost focus. For example, if you enter text into the Summary field and then click away from that field, the changes will be automatically saved.
Previously, the Meeting Manager enabled you to log time to different Actions for each individual Agenda Item.
You are now able to choose whether you want to log time for individual Agenda Items or for the entire Meeting.
At the top of the Log Time section of the Meeting Manager, there is a ‘Log Time For…’ Picklist field, which provides you with the option to select a value of Meeting or Agenda Item. This is a persistent setting and will be remembered each time you use the Meeting Manager.
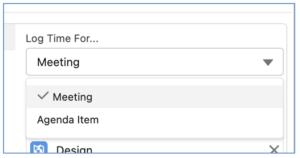
When set to Meeting, you will be able to log time for the entire duration of the meeting. For example, you may be having a meeting to review one individual Project and want to log time for the entire meeting to that Project. If you’re using the Start/Stop feature, you can start at the beginning of the meeting and stop at the end.
When set to Agenda Item, you are able to log time to separate Actions for each individual Agenda Item. For example, you may be having a meeting to review the progress of several different Projects. Therefore, you may need to allocate time spent reviewing each Project. If you’re using the Start/Stop feature, you will need to start and stop for each individual Agenda Item.
The Meeting Notes PDF includes sections for:
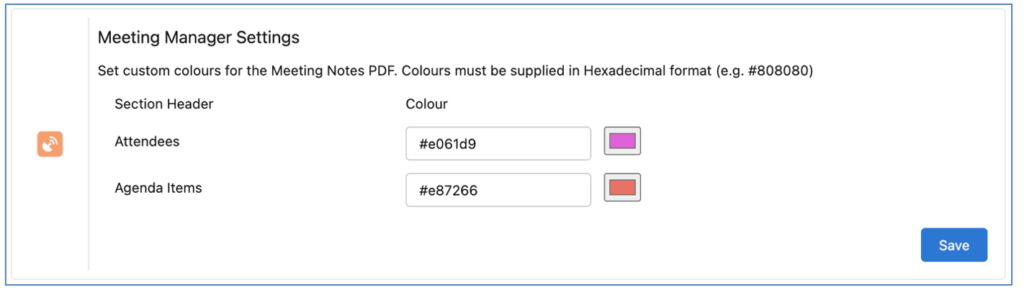
The Headers for these two sections are branded with the following colours by default.
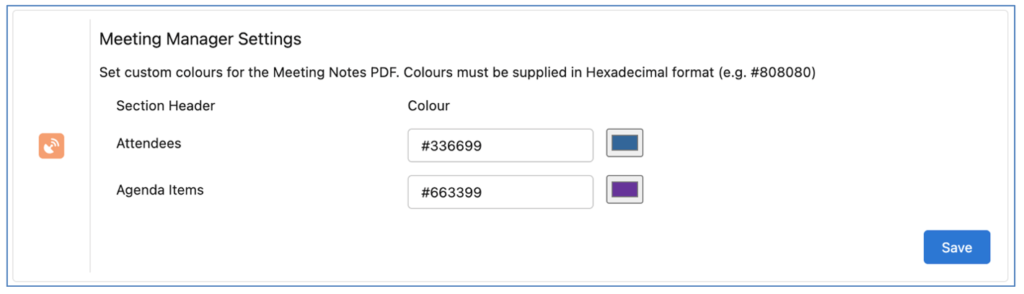
For Customers that want to apply different colours to the Header sections, there are Custom Settings on the Control Pad of the Mission Control Console.
You can enter Hexadecimal references to match your own branding colours, as shown below.
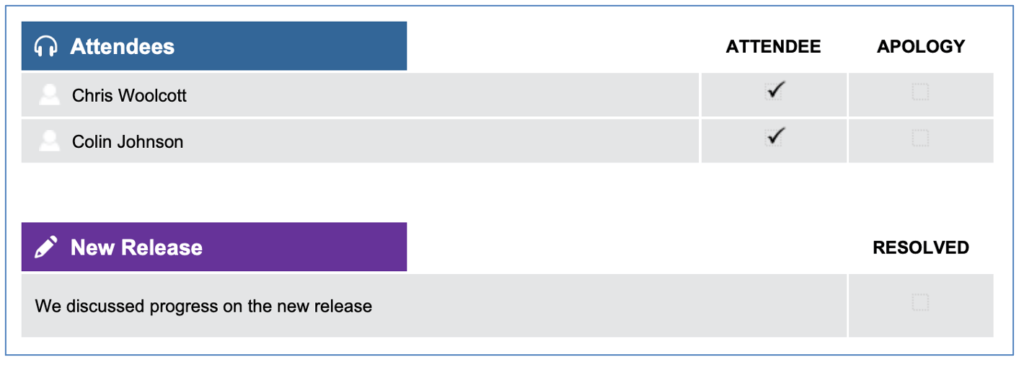
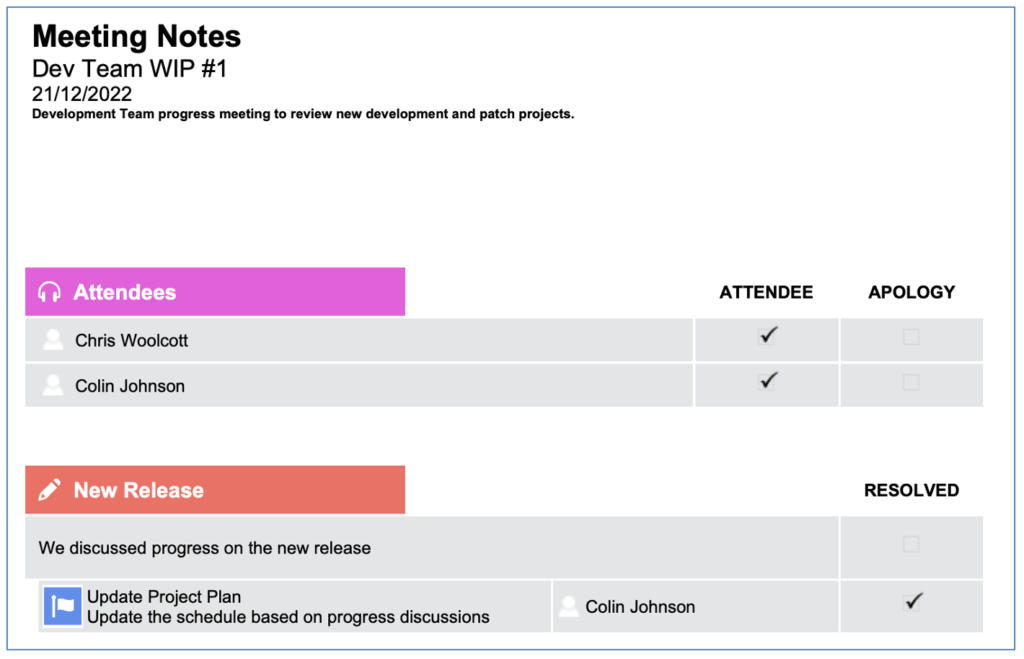
These colours will be reflected in the PDF as shown below.
To reset to the default values, clear your custom values from the Colour fields so they are empty and click Save.
The following updates have been made to the Meeting Notes PDF to accommodate various customer requests:
When creating Agenda Items, each Agenda Item will be assigned a sequential number to make it easier to refer to during meetings (e.g. Item 4).
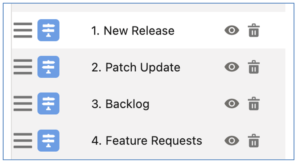
Previously to adjust the order of Agenda Items, you were required to click the up/down icons to the right of each Agenda Item several times.
You are now able to drag and drop individual Agenda Items to the desired location by clicking and holding the ‘hamburger’ icon to the right of the Agenda Item, as shown below.
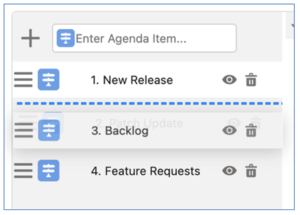
The sequential auto-numbering of each Agenda Item will automatically adjust each time you change the order of Agenda Items.
The relationship between the Meeting Manager, Meeting, Agenda Item and Agenda Task are all ‘Lookup’ relationships. Therefore, if a Customer wants to apply Sharing Rules to the ‘Meeting Manager’ feature, the rules would need to be applied to all of these Objects individually.
To simplify this sharing requirement, Mission Control will automatically apply all of the Sharing Records on the Meeting Manager record to the Meeting, Agenda Item and Agenda Task records.
You are therefore able to set the Org-wide default for all of these Objects to Private, and any rules that you apply the Meeting Manager will be replicated automatically on the other 3 Objects.
This sharing logic ensures those Users that have access to the parent Meeting Manager record, also have the same level of access to the individual related records.
The Create Actions page has had a number of enhancements applied to it to support customisation of which fields are displayed on the page.
By default, the following fields are available on the Create Actions page:
The ‘Create Actions Page Settings’ Tile on the Control Pad of the Mission Control Console enables you to specify up to 5 x Custom Fields to be included on the Create Actions page.
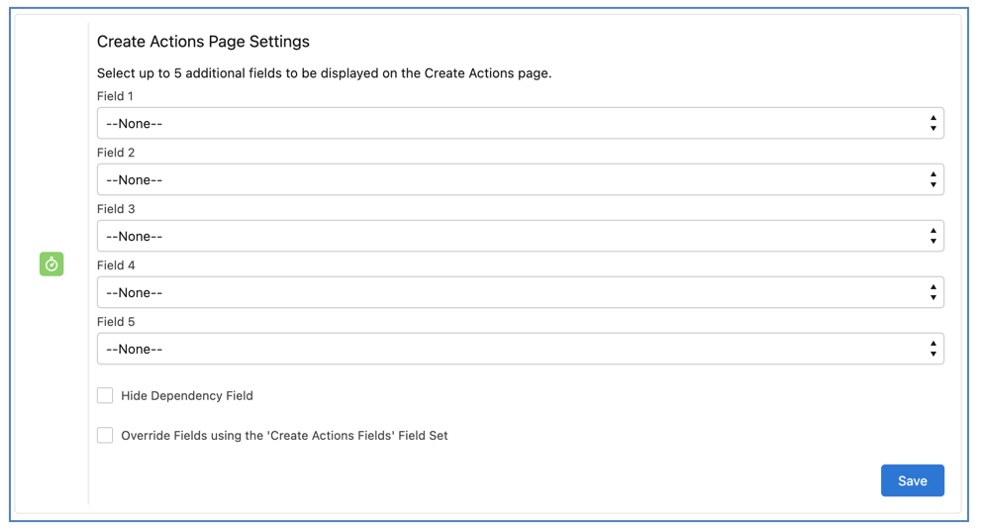
However, for Customers that want to add more Custom Fields and/or remove any of the default standard Fields, a Field Set is available on the Action Object called ‘Create Actions Fields’. When using this Field Set to control the page layout, you will need to add all of the required Fields to the Field Set.
Note, Milestone, Action Name and Action Owner are not available within the Field Set, as they will always be included on the page by default.
In addition to adding the Fields to the Field Set, you will need to set the ‘Override Fields using the ‘Create Actions Fields’ Field Set’ setting to TRUE within the ‘Create Actions Page Settings’ Tile on the Control Pad of the Mission Control Console.
The Dependency field visibility is not able to be controlled via the Field Set as it is not an actual field on the Object. As such, if you do not want this field to be included on the page layout, you will need to set the ‘Hide Dependency Field’ setting to TRUE within the ‘Create Actions Page Settings’ Tile on the Control Pad of the Mission Control Console.
A number of minor enhancements have been made to various features. Each enhancement is detailed below.
Customers have requested the ability to identify the hourly rates that are used for individual Time Logs to calculate the following fields:
These rates can come from a variety of sources, depending on the Billing Rate / Cost Rate, Rate Adjustments, etc. In addition, if the Time Log is Overtime, then the Overtime Ratio is also taken into account. It’s not therefore possible to simply divide the financial value by the ‘Hours Completed’ field.
Therefore, two new fields have been added to the Time Log Object as outlined below:
These fields will be automatically populated when the financial fields are calculated.
To enable Customers to add Custom Fields to the Project Clone page into the Milestone and Action sections of the page, two new Field Sets have been added:
By adding Fields to either of these Field Sets, these Fields will be included in the Milestone / Action sections of the Project Clone page.
To enable Customers to add Custom Fields to the Milestone Clone page into the Action section of the page, a new Field Set has been added:
By adding Fields to this Field Set, these Fields will be included in the Action section of the Milestone Clone page.
The following Validation Rules have been added to the Time Log Object.
Ensure_Role_Manager_Approves
Only the specified Role Manager can set the Role Manager Approval Status to Approved or Rejected
Ensure_Project_Owner_Approves
Only the specified Project Owner can set the Project Owner Approval Status to Approved or Rejected
The following Validation Rule has been added to the Rate Adjustment Object.
Ensure_Start_Date_Populated
You must set a Start Date when specifying an End Date
This section includes details of any changes to existing fields as well as any new fields that have been added to the solution as part of this release.
IMPORTANT: We recommend you add these fields to your Page Layouts. If you are not using the Permission Sets included with Mission Control, we recommend you check the Field Level Security for all of these fields to ensure all appropriate Profiles/Permission Sets have the required access.
Role
| Field | Field Type | Comments |
| Function | Picklist | Picklist values controlled via the ‘Function’ Global Picklist Value Set |
Project
| Field | Field Type | Comments |
| Rate Card | Lookup (Rate Card) | Identifies the Rate Card that will be used for the Project Financials |
| Billing Rate | Picklist | Existing Field – add the following value
Rate Card |
| Cost Rate | Picklist | Existing Field – add the following value
Rate Card |
Rate Adjustment
| Field | Field Type | Comments |
| Rate Card Entry | Lookup (Rate Card Entry) | Identifies the Rate Card Entry this Rate Adjustment relates to |
| Rate Type | Picklist | Existing Field – add the following value
Rate Card |
Rate Card
| Field | Field Type | Comments |
| Name | Text (80) | Identifies the Name of the Rate Card |
| Account | Lookup (Account) | Identifies the Account this Rate Card relates to |
Rate Card Entry
| Field | Field Type | Comments |
| RCE ID | Name (Auto-Number) | Identifies the unique number for this Rate Card Entry (Format: RCE:XXXXXX) |
| Rate Card | Lookup (Rate Card) | Identifies the Rate Card this Rate Card Entry relates to |
| Function | Picklist | Picklist values controlled via the ‘Function’ Global Picklist Value Set |
| Billable Hourly Rate | Currency (14, 4) | Identifies the Billable Hourly Rate for this Rate Card Entry |
| Cost Hourly Rate | Currency (14, 4) | Identifies the Cost Hourly Rate for this Rate Card Entry |
| Skill | Lookup (Skill) | Identifies the Skill this Rate Card Entry relates to |
Meeting
| Field | Field Type | Comments |
| Action | Lookup (Action) | Lookup to the Action that time will be logged against for this Meeting |
Phase
| Field | Field Type | Comments |
| Name | Text (80) | Identifies the name of the Phase |
| Project | Lookup (Project) | Identifies the Project this Phase relates to |
| Status | Picklist | Identifies the Status of the Phase |
| Start Date | Date | Identifies the earliest Start Date of Actions within Milestones relating to this Phase |
| End Date | Date | Identifies the latest End Date of Actions within Milestones relating to this Phase |
| Total Actions | Number (18, 0) | Counts all Actions relating to Milestones within this Phase |
| Complete Actions | Number (18, 0) | Counts all Actions relating to Milestones within this Phase where the Action Status = Complete |
| Hours Scheduled – Billable | Number (16, 2) | Identifies the number of Billable Hours Scheduled on all Actions relating to Milestones within this Phase |
| Hours Scheduled – Non Billable | Number (16, 2) | Identifies the number of Non Billable hours Scheduled on all Actions relating to Milestones within this phase |
| Total Hours Scheduled | Formula (Number 16, 2) | Formula: Sum of ‘Hours Scheduled – Billable’ + ‘Hours Scheduled – Non Billable’ |
| Hours Completed – Billable | Number (16, 2) | Identifies the number of Billable Hours Completed on all Actions relating to Milestones within this Phase |
| Hours Completed – Non Billable | Number (16, 2) | Identifies the number of Non Billable Hours Completed on all Actions relating to Milestones within this Phase |
| Total Hours Completed | Formula (Number 16, 2) | Formula: Sum of ‘Hours Completed – Billable’ + ‘Hours Completed – Non Billable’ |
| Hours Remaining – Billable | Number (16, 2) | Identifies the number of Billable Hours Remaining on all Actions relating to Milestones within this Phase |
| Hours Remaining – Non Billable | Number (16, 2) | Identifies the number of Non Billable Hours Remaining on all Actions relating to Milestones within this Phase |
| Total Hours Remaining | Formula (Number 16, 2) | Formula: Sum of ‘Hours Remaining – Billable’ + ‘Hours Remaining – Non Billable’ |
| Hours Scheduled Value (Billable) | Currency (16, 2) | Identifies the Scheduled Billable Value of all Actions relating to Milestones within this Phase |
| Hours Scheduled Value (Cost) | Currency (16, 2) | Identifies the Scheduled Cost Value of all Actions relating to Milestones within this Phase |
| Hours Completed Value (Billable) | Currency (16, 2) | Identifies the Completed Billable Value of all Actions relating to Milestones within this Phase |
| Hours Completed Value (Cost) | Currency (16, 2) | Identifies the Completed Cost Value of all Actions relating to Milestones within this Phase |
| Hours Remaining Value (Billable) | Currency (16, 2) | Identifies the Remaining Billable Value of all Actions relating to Milestones within this Phase |
| Hours Remaining Value (Cost) | Currency (16, 2) | Identifies the Remaining Cost Value of all Actions relating to Milestones within this Phase |
| Projected Hours Remaining – Billable | Number (16, 2) | Identifies the projected number of Billable Hours Remaining on all Actions relating to Milestones within this Phase |
| Projected Hours Remaining – Non Billable | Number (16, 2) | Identifies the projected number of Non Billable Hours Remaining on all Actions relating to Milestones within this Phase |
| Total Projected Hours Remaining | Number (16, 2) | Formula: Sum of ‘Projected Hours Remaining – Billable’ + ‘Projected Hours Remaining – Non Billable’ |
| Projected Total Hours – Billable | Number (16, 2) | Identifies the total projected number of Billable Hours on all Actions relating to Milestones within this Phase |
| Projected Total Hours – Non Billable | Number (16, 2) | Identifies the total projected number of Non Billable Hours on all Actions relating to Milestones within this Phase |
| Projected Total Hours | Number (16, 2) | Formula: Sum of ‘Projected Total Hours – Billable’ + ‘Projected Total Hours – Non Billable’ |
| Phase Completion Status | Formula (Percent 18, 0) | Formula: If Status = Complete, will display 100%. If Total Hours Scheduled or Total Hours Completed = 0 will be Completed Actions / Total Actions, otherwise Total Hours Completed / (Total Hours Completed + Total Projected Hours Remaining) |
Milestone
| Field | Field Type | Comments |
| Phase | Lookup (Phase) | Identifies the Phase this Milestone relates to |
Time Log
| Field | Field Type | Comments |
| Billable Hourly Rate | Currency (14 ,4) | Identifies the Billable Hourly Rate used to calculate the billing financials for this Time Log |
| Cost Hourly Rate | Currency (14, 4) | Identifies the Cost Hourly Rate used to calculate the cost financials for this Time Log |
How do I upgrade?
Mission Control will be made available based on the following release schedule.
13th January 2023 – Available for manual upgrade from the AppExchange
21st January 2023 – Automatic upgrade to all Sandbox Orgs
28th January 2023 – Automatic upgrade to all Production Orgs
To manually upgrade to the new version of Mission Control in your organisation, please follow the steps below:
What’s New Webinar
We have pre-recorded the ‘What’s New’ webinar to provide further information on how to get the best out of the new features. To access this webinar, please view the ‘Release Notes’ section of the Mission Control Support Centre – www.aprika.com/mc-support
Feedback
Some of the new features included in this release of Mission Control have come from ideas submitted from existing clients. If you have an idea for enhancing Mission Control, you can submit it via email to [email protected].
Questions?
If you have any questions regarding this release notification, please do not hesitate to contact us at [email protected].
